Videonics FIREWRITER REMOTE User manual

Instruction Manual

FireWriter Instruction Manual • MANL-0780-01 ©2001 Focus Enhancements
The Videonics logo and Videonics FireWriter logo are registered trademarks of Focus Enhance-
ments, Inc. Other products and brand names may be trademarks or registered trademarks of their
respective companies and are hereby acknowledged. Television screens are simulated. Subject
to change without notice. FireWriter is not to be used for the unauthorized copying of copyrighted
material.
Focus Enhancements Inc. • 1370 Dell Avenue • Campbell, CA 95008 USA • 408-866-8300
www.focusinfo.com
Instruction Manual

CONTROLS
1. POWER. Power key turns on the FireWriter unit.
DEMO. Demonstrates features. Press ACCENT + DEMO for English version; SHIFT + DEMO
for International version. You can also copy the demo into the editing area, to modify it or
study how its effects were accomplished.
2. MENU KEYS. Menus change color, font, style, etc., of lines or pages that contain marked text
or cursor. Use either MARK START, MARK END, TAB, or the bracket keys, ( [ ) and ( ] ), to
change sub-menus; arrow keys to highlight the desired choice; and NEW LINE/OK or PLAY
to implement changes. Press UNDO to cancel the menu and leave titles unchanged.
3. POSITION LIGHT. Used in conjunction with the POSN key (16). Indicates that page or line
positioning may be done (see POSN key).
4. CUT, COPY and PASTE. To cut, copy or paste text, mark the text using MARK START and
MARK END, move cursor to desired location, then press CUT, COPY or PASTE.
5. CAPS LOCK LIGHT. When the CAPS LOCK light is on, typing a letter key (A-Z) causes the
SHIFTed version to appear. Other keys (numbers, symbols, etc.) are unaffected. Press the CAPS
LOCK key to turn the CAPS LOCK light on and off.
6. MARK LIGHT. Indicates that the mark function has been enabled (i.e., MARK START or
MARK END has been pushed).
7. UNDO. If you accidentally delete something, press UNDO immediately.
8. DELETE. Erases marked text, if any. Otherwise, erases the character before the cursor.
9. MARK START and MARK END (10). Mark text to modify, delete, copy, or move it. Position
cursor before first character and press MARK START. Position after last character and press
MARK END. Notice cursor becomes wider to remind you something is marked. Use UNDO to
remove marks. SHIFT, used with a mark key, marks start or end of the page; COMMAND plus
a mark key marks start or end of all text in current project.
11. TAB. “Smart tab” positions cursor to match the tab stops located above the status line. Also
used to move between submenus.
12. SHIFT and CAPS LOCK. Hold SHIFT to type capital letters. CAPS LOCK capitalizes all
typing until pressed again. Note that some fonts have only capital letters. SHIFT is also used to
modify the function of other keys.
13. CMD (COMMAND). Modifies function of other keys.
14. Z (CLOCK). ACCENT + Z displays clock as text on a page.
15. ACCENT. Hold ACCENT while typing a letter key to type the special symbols (•,©,¢,etc.)
printed in blue. Use with power key to activate DEMO. Use with accent marks followed by a
letter to type accented international characters such as é, ü, å, etc.
16. POSN (POSITION). Press and release POSN, followed by up or down arrow keys, to position
text at the top, bottom, or center of the page. Press and release POSN, then left or right arrow,
to position text at right, left, or center page.
17. X (DATE). ACCENT + X displays date as text on a page.
18. SPACE BAR. Adds space to text. Pauses the page that is playing.
19. PAGE INDEX. Displays an index in which each page occupies one line, making it easy to look
through all pages and projects.
20. NEW PAGE. Starts a new page of text.
21. PLAY. After you create titles using the Editing Screen, press PLAY key to play the titles for
display or recording. CMD (Command) + PLAY always plays from first page in project. If no
text is marked, PLAY displays the current page. If text is marked, PLAY loops through marked
pages. Once playing begins: Press PLAY again to go to next page; use SHIFT and PLAY to
play backwards; press arrow keys to manually step forward or backwards. NEW LINE/OK
ends play and returns to Editing Screen.
22. ARROW KEYS. Use the four individual arrow keys to move the cursor on screen; to change
highlights in a menu; and, when playing text, to go forward and backward.
23. PAGE UP and PAGE DOWN. Used to re-position cursor a page at a time. PAGE UP places
cursor at the first line of the page, PAGE DOWN places cursor at the last line in the page.
24. NEW LINE/OK. Ends a line of text and starts a new one. Also accepts settings of menus,
returns to Editing Screen from Page Index and Play Screens.
25. LEFT and RIGHT BRACKET. Use the left and right bracket to change sub-menus. MARK
START, MARK END, and TAB will do the same.

Contents
Long Pages ............................................ 35
Creating a Page ..................................... 35
Page Symbols ........................................ 36
Navigating Pages and Projects ............. 36
Deleting a Page...................................... 37
Inserting a Page ..................................... 38
Moving and Copying Pages .................. 38
Chapter 8 • Projects...................... 40
About Projects ........................................ 40
Examples of How Projects are Used ..... 40
Viewing Projects ..................................... 41
Creating a Project .................................. 41
Naming a Project .................................... 41
Removing a Project or
Erasing its Contents............................. 41
Moving Between Projects ...................... 42
Copying or Moving Text
Between Projects ................................. 42
Chapter 9 •Changing Titles.......... 43
Undo ....................................................... 43
Simple Changes ..................................... 43
Marking Text for Major Changes ........... 43
Marking Whole Lines and Pages ........... 44
Deleting Marked Text ............................. 44
Replacing Marked Text .......................... 45
Moving and Copying Text ...................... 45
Memory.................................................. 46
Multiple Copies...................................... 47
Chapter 10 • Positioning Text
....................................................... 48
Positioning Horizontally:
Left, Right, Center................................ 48
Positioning Vertically:
Up, Down, Center ................................ 48
Additional Positioning Hints ................... 49
Chapter 11 • How to Use Menus . 50
Concept .................................................. 50
Sub-menus ............................................. 50
Highlights and Choices .......................... 50
Using the Menus .................................... 51
Chapter 12 •
How Characteristics Affect Text . 52
How Characteristics Affect
Lines and Pages .................................. 52
Choosing Characteristics....................... 53
Chapter 1 • Introduction................. 1
In a Hurry? ................................................ 1
Helpful Hints ............................................. 1
What is a Character Generator? .............. 2
What is FireWriter? ................................... 2
Typical Applications ................................. 3
Equipment ................................................ 3
Chapter 2 • QuickStart ................... 4
Chapter 3 • Connections .............. 14
Connections: Overall Concept ............... 14
What You’ll Need .................................... 15
Types of Cables Used
with FireWriter. ..................................... 15
IN and OUT Markings ............................ 16
Connecting Power .................................. 17
Turning Power On and Off: Video
Pass-Through and Data Protection ..... 17
Connecting Outputs and Monitors......... 18
Connecting a Video Source ................... 19
Troubleshooting Hints ............................ 20
Chapter 4 •
Connecting Equipment ................ 23
Videonics Equipment Arrangements ..... 23
Single-Source Editing Setup .................. 24
Multiple Source Editing
with a Video Mixer ............................... 25
GPI Control ............................................. 25
Chapter 5 • Using the Demo ........ 27
Using the Demo...................................... 27
International Demo ................................. 27
Locked Demo ......................................... 27
Using the Demo as a Guided Tour ........ 27
Using the Demo to Create Titles ............ 28
Chapter 6 • Typing Titles ............. 29
The Editing Screen and Cursor ............. 29
Moving Around the Screen .................... 29
Shortcuts for Moving the Cursor ............ 30
Typing Titles ........................................... 30
Columns (Tabs) ...................................... 31
Typing Special and
Accented Characters .......................... 32
Chapter 7 • Pages ......................... 35
About Pages ........................................... 35
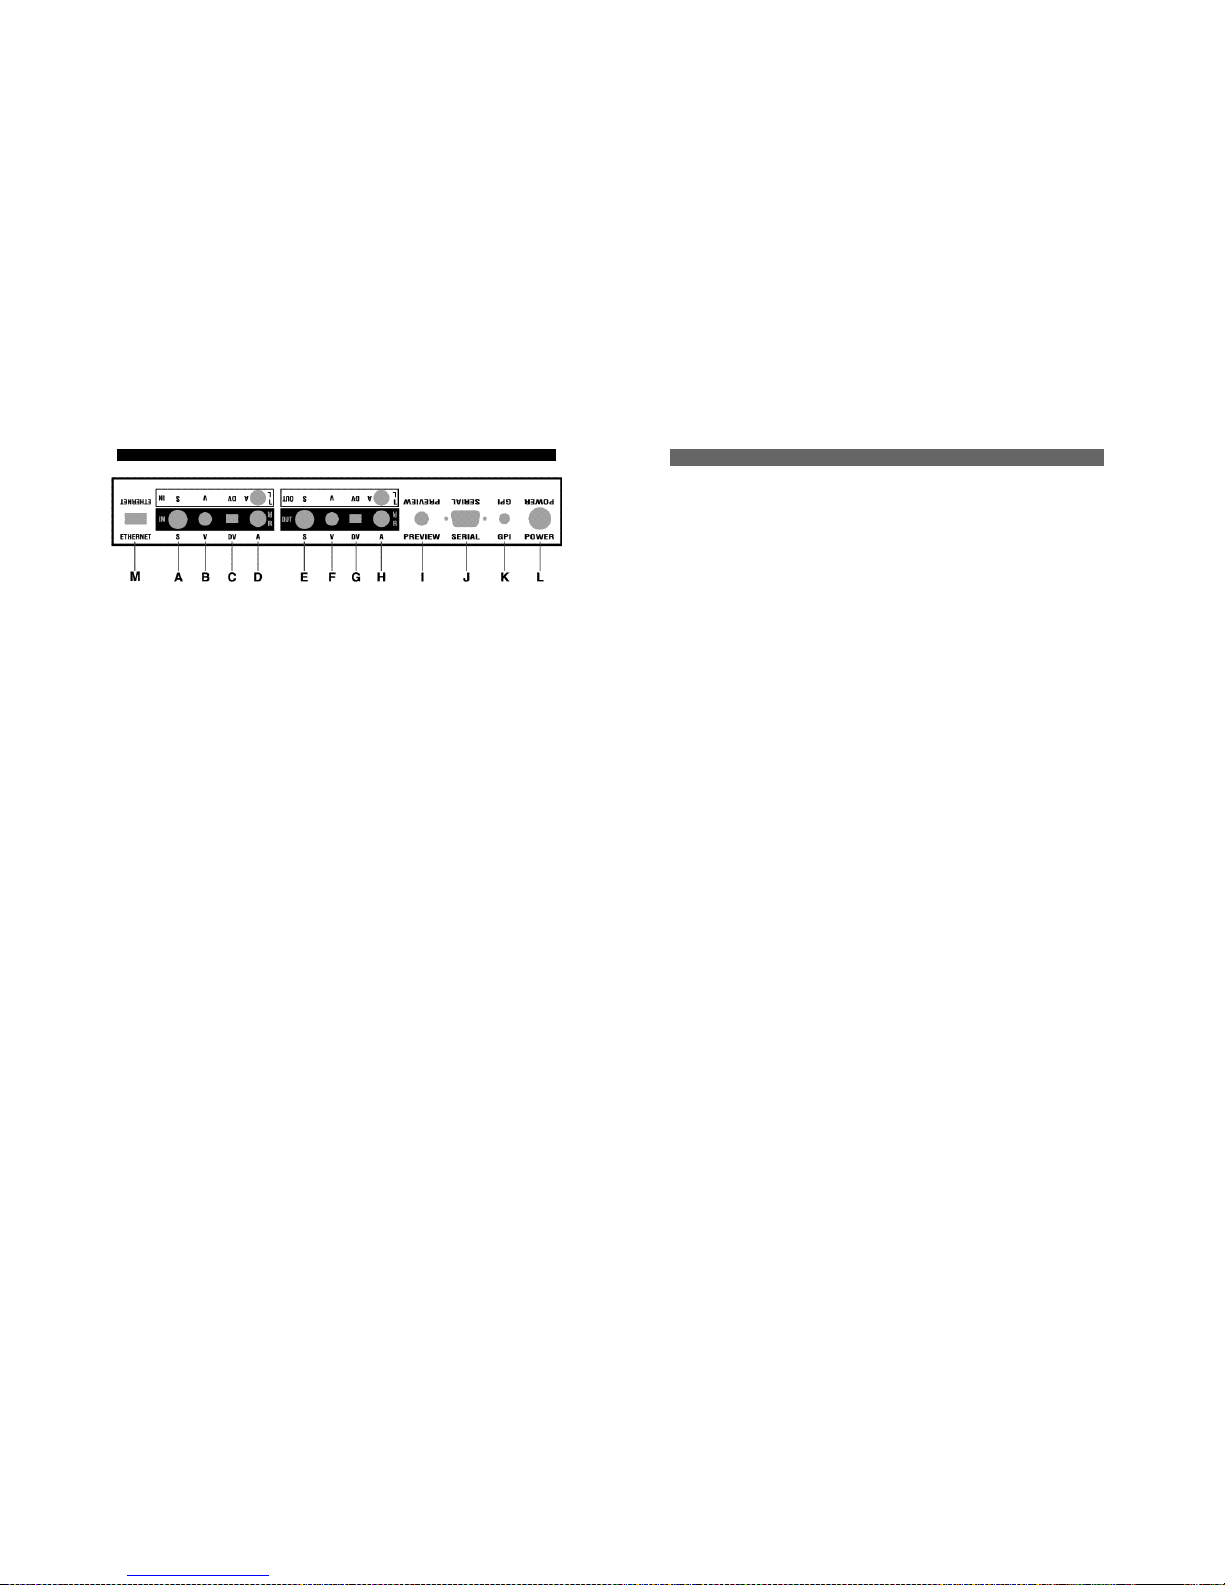
REAR PANEL
A. S-video VIDEO IN. Connect a S-video 4 pin mini-DIN cable from source.
B. Composite VIDEO IN. Connect a RCA type cable from source.
C. DV VIDEO IN. Connect a 4 pin DV ( IEEE-1394) cable from source.
D. AUDIO IN . Audio connections are provided for convenience; the audio signals pass straight
through without modification.
E. S-video VIDEO OUT. Connect a S-video 4 pin mini-DIN to VTR.
F. Composite VIDEO OUT. Connect a RCA type cable to VTR.
G. DV VIDEO OUT. Connect a 4 pin DV (IEEE 1394) to VTR.
H. AUDIO OUT. Audio output connections.
I. PREVIEW OUT. Optional. When used in live title setup, permits you to modify titles and
typing is not seen on main output. Important: Leave unconnected when not in use.
J. SERIAL. 9-pin D-type connector for optional serial control.
K. CONTROL (GPI). Allows remote trigger of titles using switch or controller with GPI (“Gen-
eral Purpose Interface”) output. Warning: Always turn power off before connecting or discon-
necting GPI jack.
L. POWER. Connect FireWriter power supply. Important: Do not use power supplies designed
for any other equipment.
M. ETHERNET. Connect to the Internet, LAN, or to a client computer.
Note:
Upside-down legends make it easy to make connections without turning unit around.

Contents
Chapter 13 •
Fonts, Sizes, and Styles .............. 54
Font and Size.......................................... 54
Hints on Using Fonts and Sizes ............. 54
Font Style ................................................ 54
Outlines and Shadows........................... 55
Hints on Using Styles ............................. 55
Chapter 14 • Colors ...................... 56
About the Color Palette.......................... 56
Choosing a Color ................................... 56
Creating a Color .................................... 56
Using the User Colors ............................ 57
Hints on Using Colors ............................ 57
Chapter 15 • Background Patterns
59
Pattern Menus ........................................ 58
One Pattern per Page ............................ 58
Hints on Using Patterns ......................... 59
Bugs...................................................... 59
Hints on Using Bugs............................... 59
Chapter 16 • Borders .................... 60
Border Style Menu .................................. 60
Placing a Box Around Text.................... 60
Complex Borders ................................... 60
Removing borders .................................. 61
Chapter 17 •
Effects, Scrolls, and Crawls ........ 62
Effects Menus ......................................... 62
Transition Effects: Cuts, Fades, Slides, and
Wipes ................................................... 62
Choosing a Transition Effect .................. 63
Setting the Transition Speed .................. 63
Displaying the Page ............................... 63
Setting Duration...................................... 63
Infinite Duration ...................................... 64
Scroll and Crawl ..................................... 64
Scroll and Crawl Notes .......................... 65
Hints on Using Effects............................ 65
Chapter 18 •
Clock and Date Features.............. 66
Setting the Clock and Date Formats ...... 66
Setting the Clock and Date .................... 66
Displaying a Project at a Pre-Determined
Date and Time ..................................... 66
Repeating Triggers ................................ 67
Internal Timed Trigger Notes ................. 67
Displaying the Real Time Clock
and Date .............................................. 68
Real Time Clock and Date Notes........... 68
Placing Time or Date in Your Text ......... 69
Chapter 19 •
Superimposing Titles ................... 71
Superimposing Titles on Video .............. 71
Superimposing Titles on Video
with a Transparent Pattern .................. 71
Making Titles Come and Go .................. 72
Chapter 20 • Playing Pages ......... 73
Projects ................................................... 73
Important Concepts ............................... 73
Playing All Pages ................................... 74
Playing Some Pages .............................. 74
Pause ...................................................... 74
Search (Cue and Review) ...................... 74
Manual Play (Slide Projector Mode) ...... 74
Continuous Play (Video Billboard) ......... 75
Leaving Play to Edit Again ..................... 76
Chapter 21 • Editing and Presenta-
tions..............................77
Applications............................................ 77
Video Editing .......................................... 77
How Titles are Added............................ 77
GPI Trigger............................................ 78
Presentations .......................................... 79
Instructions for Making a Trigger........... 81
Chapter 22 • Preview .................... 81
About Preview ........................................ 82
Forcing Preview Mode ........................... 81
Chapter 23• Computer Connec-
tions................................................83
Ethernet .................................................. 83
Connecting to a Network........................ 83
Connecting to a PC (serial port)............. 84
Transferring Files.................................... 84
System Directories..................................85
Updating System Software..................... 85
System Information................................. 87
Contents
Fonts...............................................88
Selecting a Font and Size ...................... 88
Fonts 1-26.............................................. 89
Appendix A •
Advanced Techniques, Shortcuts,
and Command Keys ..................... 90
Capacity ................................................. 90
Erasing Memory and Resetting Unit ...... 91
Moving the Cursor .................................. 91
Projects ................................................... 92
Moving In the Color Menu ...................... 92
Using the Demo...................................... 92
Play Modes ............................................. 93
System Information................................. 93
Appendix B • Graphic Files ......... 94
Appendix C • Glossary ................. 96

VIDEONICS FIREWRITER PAGE 1
Chapter 1 • Introduction
Congratulations on your purchase of the Videonics
FireWriter character generator, by Focus Enhancements.
FireWriter is a character generator that meets the demand of
the video producer. FireWriter not only has the traditional
analog video (composite and Y/C), input and output but
also includes IEEE-1394 DV input and output for full com-
patibility with digital sources and recording equipment.
Your new FireWriter also includes features like Ethernet
and Serial I/O to make the connection to the Internet, your
LAN and computers possible. With FireWriter, you can add
brilliant titles, graphics, and effects to your video produc-
tion, making the FireWriter one of your most creative video
tools.
In a Hurry?
If you want to get started quickly, reference the Quick Start
section, Chapter 2.
Helpful Hints
FireWriter is a sophisticated video production tool. Some of
the words and concepts used in this manual may be new to
you. As needed, please refer to the Glossary (Appendix C).
For More Information...
Focus Enhancements produces the highest quality products
possible while also making them easy-to-use. If you have
any difficulties with your equipment, our Technical Support
staff is available to assist you. The following table contains
information for contacting Technical Support:
Telephone: 408 370-9963 8 am- 5 pm PST
http://www.focusinfo.com/support

PAGE 2 VIDEONICS FIREWRITER VIDEONICS FIREWRITER PAGE 3
• Choose from a wide variety of fonts and sizes.
• Choose different attributes. You can change letter spac-
ing, make the letter boldC and add outlines, Shadows, and
colors to each character independent of each other.
• Use a real-time clock to superimpose a running clock
onto all backgrounds, including live video.
• Have a project start playing automatically at a specified
date and time.
Typical Applications
FireWriter can be used in live or taped settings. You can add
titles as you copy or edit tapes. The original tape remains
untouched – titles are added to the edited copy. FireWriter
works with VCRs and camcorders of all videotape formats
as long as the equipment used has DV, composite, or S-video
outputs. You can superimpose titles, bugs and logos on live
video, colored or gradient backgrounds, or JPEG back-
grounds, using fades and wipes to transition between plain
video and video with titles.
Equipment
Your FireWriter Package includes:
• FW-1 Unit
• Keyboard
• Power supply
• This manual
• Product registration card.
You may need to purchase cables to connect audio and
video equipment to your FireWriter . Your dealer can help
you identify the cables you need
What is a Character Generator?
A Character Generator (also called a title generator, titler, or
CG) creates letters and numbers (characters) on a video signal
that can be displayed on a television or monitor, or be recorded by a
VCR.
What is the FireWriter?
FireWriter CG is a character generator with many capabili-
ties. With FireWriter you have the ability to:
• Overlay text, bugs, and logos over live video .
• Import and export JPEG graphics using a computer and
various software Applications.
• Execute a wide variety of transitions (such as dissolves
and wipes) that you can use to artfully switch from one
project page to another.
• Operate the FireWriter CG as a stand-alone device, or
you can integrate it with a computer platform.
• Connect FireWriter CG to a Macintosh, Windows, UNIX,
Amiga, and other computer platforms. The connection can
be made through a serial (RS-232) connection or an Ethernet
Network to transfer files.
• FireWriter CG uses the concept of Projects and Pages to
help manage your work. A project is any collection of work –
such as title credits for a video production, or text overlays
for a specific Video. Every project consists of one or more
pages. Pages normally consist of one or more lines of Text,
bugs or logos, and backgrounds that can be either imported
JPEG pictures or full color.
• Copy and move text, to revise titles without retyping.
• Position text anywhere on the page, including automatic
centering.

PAGE 4 VIDEONICS FIREWRITER VIDEONICS FIREWRITER PAGE 5
Chapter 2 • QuickStart
Whether you’re a video expert looking for just the basic
steps or a beginner who wants instant gratification, this
chapter will have you titling in minutes! This chapter de-
scribes just the basics. Many features and applications are
skipped or mentioned only briefly. For more information, or
if you encounter problems, refer to the table of contents or
the index to locate a more complete discussion elsewhere in
the manual.
Connections
Connect the power supply (C) to a working wall outlet and
connect the other end to FireWriter’s POWER jack.
Connect FireWriter’s OUT jacks to the VIDEO and AUDIO
IN jacks of a VCR (B). Connect a television or monitor to the
VCR in the normal fashion, so you can see the VCR’s output.
Leave the PREVIEW OUT jack unconnected unless you are
using a PREVIEW monitor (Chapter 22). Turn the television
and VCR on.
Connect a camcorder, VCR or other source (A) to
FireWriter’s video and audio IN jacks if you plan to super-
Typical FireWriter Connections
impose titles over video. Turn on the video source and start
the tape rolling.
Note: The illustration shows the use of composite (RCA-
style) jacks for the video connections. You can use S-video
(Y/C) jacks or DV instead.
The audio connections are for convenience only — the audio
signals are not affected by the unit, only passed.
Keyboard Connect the keyboard to the jack on FireWriter’s
front panel.
Power On/Off
The Keyboard's Power key turns the power on and off. The
green LED located on the units front panel will light when
the unit it on, and flash when connected to a network via
Ethernet.
Demo
To start the demo, press
ACCENT while you press
DEMO (POWER). The
demo is a built-in project
that demonstrates a wide
range of the TM-3000
features and effects. To run
the international version of
the demo, press SHIFT + DEMO. If no demo appears, check
the connections. Press any key to stop the demo.
Instant Titles
Creating basic titles is simple. Start with the Editing Screen.
The screen may not look exactly like this but it should have
at least the blinking cursor (1). Press POWER once or twice if
the cursor is not displayed. The cursor indicates where
characters you type will appear. Page symbols (2, described
later) separate pages of titles. Type some titles. They appear
at the cursor location. Press the PLAY key on

PAGE 6 VIDEONICS FIREWRITER VIDEONICS FIREWRITER PAGE 7
how it will be displayed; and which effect will be used to end
its display.
Projects
You can create separate projects (Chapter 8). Each project has
its own pages which are protected from alteration while you
are working on another project. This way several people can
use the same unit, or one person can work on several distinct
jobs. The PAGE INDEX key is used to access projects. It
displays all the pages in all the projects. By moving the
cursor up and down through the Page Index
screen, you can begin work on any page, in any
project. Press NEW LINE/OK to return to the
Editing Screen.
Entering Text
To create a title, simply type some letters and they will
appear at the cursor’s location.
• To type a capital letter, hold
SHIFT as you type. Press CAPS
LOCK to type all capital letters (key-
board LED will light). Press it again
to type in normal upper and lower
case (keyboard LED will go out).
• To type special characters (such as the ones printed in
blue on the keys), press ACCENT and a letter at the same
time. For instance, press ACCENT and Q to produce “¢.”
• To type an accented letter, simultaneously press
ACCENT and the key with the desired accent mark, then
press the letter to be accented. For example, press ACCENT
and 3 together; then release them and press the A key. You
will see the letter “à.”
Lines
Press NEW LINE/OK to end a line of text and begin a new
line.
the keyboard when you are finished. The Editing Screen
disappears and the finished titles fill the screen. Congratula-
tions — you have created your first titles! Press NEW LINE/
OK to return to the Editing Screen.
The Editing Screen and the Play Screen
You have just seen how the screen changes appearance,
depending on whether you are creating titles or displaying
them. The Editing Screen (the one with the cursor) is used to
create or change titles.
The Play Screen shows just the titles, with no cursor
or other items. It is the screen you use to display
and record the completed titles.
Pages
Titles are divided into pages. A page is a full screen of titles.
You create a new page by pressing the NEW PAGE key. In
this example, we typed “Sherlock Holmes,” then pressed
NEW PAGE, then typed “221B Baker Street.” We then used
the up arrow to move the cursor back to the first page and
pressed PLAY.
Page Symbols
A row of page symbols divides one page from the next. These
are described in detail in Chapter 7. Briefly: The first two
symbols and their numbers identify which page this is and
to which project (described in Chapter 8) it belongs. The next
symbols tell which effect will be used to introduce the page;

PAGE 8 VIDEONICS FIREWRITER VIDEONICS FIREWRITER PAGE 9
Moving the Cursor
If you want to add text somewhere other than where the
cursor is, use the arrow keys to move the cursor. Press PAGE
UP or PAGE DOWN to move a page at a time or you can
hold SHIFT as you press the UP or DOWN arrow keys.
SHIFT with the LEFT or RIGHT arrow key moves the cursor
to the start or end of the line.
Note: You cannot move the cursor past the end of the last
line of text. If you want to type beyond the last characters on
the screen, position the cursor at the end of the line and
press NEW LINE/OK to create blank lines.
Editing Text
To insert text, use the arrow keys to move the cursor to the
desired location and type. To delete text, position the cursor
after the characters you want to remove and press DELETE.
The character before the cursor is removed. To delete large
blocks of text at once, mark the text and press delete.
To replace text, delete the existing text, then type the new
text.
Oops!
If you accidentally delete something, immediately press
UNDO. It restores the text that was deleted by the last press
of the DELETE key.
Using Menus to Change Colors, Fonts, etc.
You can change characteristics (such as fonts, colors and font
styles) using the menu keys at the top of the keyboard.
Changes are made between MARK START and MARK END
brackets (Use undo to clear the brackets). For instance, press
the LETTER COLOR key (in the top row). A menu of colors
appears. This menu has two sub-menus — one at the top of
the screen (1) and one at the bottom (4). Each sub-menu
contains choices you can use to change your titles. Use the
left or right bracket ( [, ] ) to choose which sub-menu is
active. In this example, the bottom sub-menu is active (Tab,
MARK START and MARK END also work). If you wanted
to use the top sub-menu instead, you would press any of the
previously mentioned keys. One item in the active menu is
highlighted. In this example, a color choice is highlighted by
the triangular pointers (3). Use the arrow keys to move the
highlight to a different color. The sample patch (2) shows the

PAGE 10 VIDEONICS FIREWRITER VIDEONICS FIREWRITER PAGE 11
selected color. Press NEW
LINE/OK or PLAY to choose
the color you have high-
lighted. NEW LINE/OK
returns you to the editing
screen; PLAY will play the
resulting page. All the charac-
ters in the line that were
bracketed will change to the
selected color.
More Changes
Use menus to:
• Change the font style, size, letter color, letter outline
color, as well as background color and pattern.
• Add borders to character(s), line(s), or page(s) and
change their type, and color.
• Have effects start and end a page of titles.
• Display current time and/or date.
• Make text scroll and crawl.
• Add JPEG and gradients as backgrounds.

PAGE 12 VIDEONICS FIREWRITER VIDEONICS FIREWRITER PAGE 13
Use the DOWN arrow key to highlight the VIDEO symbol.
Press NEW LINE/OK.
• Confirm that your video source is running (start the
VCR or camcorder).
• Press PLAY.
The OUTPUT monitor will show your page of titles super-
imposed over the source video.
Making Titles Come and Go
In a production, you may want superimposed titles to ap-
pear for a while, then disappear. To do this, place blank
pages with video backgrounds between pages of titles.
Create a page of superimposed titles. At the end of the page,
press NEW PAGE but don’t type anything on this page. Set
its background to VIDEO, if it isn’t already. Press NEW
PAGE again and type the next titles. When you play these
pages, the first titles appear, then transition to the blank
page. Since this page is empty and the background is plain
video, the result is that the titles simply go away.
Positioning Text on the Line
You can change the position of the text on any line. A line
can be centered or positioned against the left or right edge of
the screen.
Position the cursor on the line. Press and release the POSN
(Position) key, the position light will go on. Then press the
LEFT or RIGHT arrow, the position light will go off. The line
position changes immediately to show the new choice: left,
center, or right justification.
Positioning Text on the Page
The page symbol shows how text is positioned vertically on
the page. It can be positioned at the top, center, or bottom of
the page. To change the position, press and release the POSN
(Position) key, then press the UP or DOWN arrow on the
keypad. You will see the text in its new position when you
press PLAY.
Each menu works much in the same way: If there are sub-
menus, use TAB or MARK START to switch between sub-
menus. Then use the arrow keys to highlight your choice
and press PLAY or NEW LINE/OK to implement it.
Hints
• Background, Pattern, and Effect menus affect the
entire page that contains the cursor. The other menus affect
only the contents of the line that contains the cursor. If
groups of text, lines or pages are marked using MARK
START and MARK END, the changes will affect the text
lines/pages that are marked.
• Mix characteristics on a character by character basis
on a single line or multiple lines.
• When you are editing text using the Editing Screen,
several pages may be on the screen at once (with page sym-
bols between them). Note that the backgrounds and borders
of all the pages appear in the pattern and color of the page
that contains the cursor. As you move the cursor from one
page to another, the patterns and colors used in the entire
screen will change.
• Each page can use one type of gradient pattern .
• When you type something new, it will have the same
characteristics as the preceding letter. If you want to type in
a different style, use the menu key to make a new choice and
continue typing.
• Each page can use one type of background pattern.
Superimposing Titles on Video
To change the background to VIDEO (rather than a solid
color or pattern). Follow these steps:
• Position the cursor on the page that contains the titles
you wish to superimpose.
• Press the BACKGROUND PATTERN menu key.
• Use MARK START to highlight the top sub-menu.

PAGE 14 VIDEONICS FIREWRITER VIDEONICS FIREWRITER PAGE 15
• Use a PREVIEW monitor to change titles out of the
audience’s view.
• Add borders, lines, and boxes to your video pages.
• Mark large blocks of text so you can move or copy
them without typing.
• Use effects (such as wipes) between pages and set
durations so pages are displayed for a pre-defined
time.
• Combine scroll and crawl to move titles on and off the
screen in many different ways.
• Play pages in many ways, such as manually, back
wards, automatically repeating, etc.
• Choose colors and define your own colors.
• Create transparent background patterns and colors.
• Add “real-time” time/date display features to your
video pages.
• Play projects automatically at a specified date and
time.
• Use graphic backgrounds and bugs
Transitions, Durations, Scroll, and Crawl
You can determine how long each page will be displayed (its
duration) and what transition effects (fade, wipe, etc.) will be
used to introduce (begin) and remove (end) the page. You
can also display the current time and/or date or make titles
scroll or crawl on or off the page.
Position the cursor anywhere on a page and use the EF-
FECTS IN menu to change the page’s duration, scrolling,
speed, and the effect that will introduce the page. Use the
Effects Out menu to choose the effect that will be used to
remove the page.
Duration is set using the bottom sub-menu of the Effects In
menu. Highlight the digits next to the clock symbol (on the
left-hand side of the menu), and type in the desired time. To
set infinite duration, select the Infinity symbol that is to the
right of the duration time.
Playing the Pages
When the pages are complete, move the cursor to the start of
the first page and press PLAY. Shortcut: To play all the pages
in the project, press CMD (Command) + PLAY. Each page will
be played, in sequence, using the selected durations and
effects. To play just some of the pages, play manually, or use
other specialized play options.
Learning More
A convenient way to become a FireWriter expert is to load
the demo into the Editing Screen for study. To do this, press
CMD (Command) + ACCENT + COPY at the same time
(CMD (Command) + SHIFT + COPY for the international
demo) and the unit will create a new project that contains
the demo text. This allows you to see how the demo was
created.
More...
This manual contains additional information that explains
how to:
• Create “projects.”
• Move between pages or projects.
• Use the Page Index.

PAGE 16 VIDEONICS FIREWRITER VIDEONICS FIREWRITER PAGE 17
This chapter describes how to connect the inputs, outputs,
and monitors.
What You’ll Need
A Video source (optional). Any standard video source
with composite (RCA-style) , S-video (Y/C) or DV (IEEE -
1394) outputs can be used, including VCRs, camcorders,
cameras, video disc players, video production equipment
(such as a mixer, processor, or another titler), and computers
with television outputs.
B OUTPUT monitor. The monitor will be connected to
a recording VCR in most cases. Required connections de-
pend on the VCR. You can use any arrangement that will
allow you to view tapes played on the VCR.
C Record VCR. In a live setup, in which the results will
be displayed without being recorded, the VCR is optional,
but most setups will include the VCR.
• Preview monitor (optional). If used, this monitor
must have a composite (RCA-style) video input.
• Video Cables. You will need one video cable to
connect FireWriter’s output to the Record VCR and one to
connect the Record VCR to the OUTPUT monitor. You may
also need a cable for the input, if a video source is used, and
for the PREVIEW monitor, if used. The next section de-
scribes the types of cables.
Types of Cables Used with FireWriter
•You can use S-video (Y/C), composite (RCA-style) or
DV (IEEE-1394) jacks for the input and output. DV cables
deliver the best performance, particularly if your sources
and record decks are DV-capable. The internally processing
of Firewriter is digital, so by using the DV format, the signal
can remain digital.
Chapter 3 • Connections
Connections Overall Concept
This diagram shows a typical video production setup.
FireWriter is connected between a video source (A), which
plays the picture to which you will add titles, and a recorder
(B), which will record the results. Some common variations:
1The diagram shows a camcorder (A) as the video
source. Other sources, such as a VCR or camera, can be
substituted.
2The output can be connected directly to a monitor (B),
instead of going through a VCR, if you plan to display titles
without recording them.
3FireWriter can operate without a source, generating
titles on its own backgrounds and outputting them to a
monitor or recording VCR.

PAGE 18 VIDEONICS FIREWRITER VIDEONICS FIREWRITER PAGE 19
Connecting Power
Connect the power supply to the POWER input and plug it
into a working power outlet. Be sure to use the power sup-
ply that came with the unit. Others, including the ones
supplied with other Focus products, may damage the unit
and void the warranty.
Once the power supply is connected, turn on the power by
pressing the power key located in the top left-hand side of
the keyboard. The power light on the front panel will go on.
Turning Power On and Off Video Pass-Through and Data
Protection
To turn the unit on or off, press the POWER key (upper left
hand corner of the keyboard). The front panel light indicates
that the power is connected, and it will blink if your unit is
connected to a network.
When the unit has been connected to the power supply for a
while, it will be warm to the touch. The power supply will
also be warm. This is normal.
To assure reliable storage of titles, always press Command
and S or the POWER key on the keyboard before unplug-
ging the power supply. This will ensure that all titles remain
intact, including all settings and formatting. Titles are re-
tained by the built-in lithium battery when you turn the
power off. Even when the unit is unplugged, all titles remain
intact, including all settings and formatting. When you turn
the unit off, FireWriter reorganizes its memory to optimize
storage.
•Record VCR to OUTPUT monitor. If you are using a
Record VCR, the OUTPUT monitor can be connected to the
VCR using an RF (antenna/cable type) cable, composite
(RCA-style) cable, or S-video (Y/C) cable, depending on
what types of jacks are available on the VCR and monitor. If
you have a choice, Firewire is generally better than S-video
composite.
•Preview. If you are using a PREVIEW monitor, it
must be connected via a composite (RCA-style) cable.
•BNC. If you plan to use equipment with BNC jacks,
you will also need RCA-BNC adapters.
•Audio. The audio jacks on FireWriter are simple pass-
through connectors, provided to make connections between
two video devices convenient. AUDIO IN is routed directly
to AUDIO OUT, unmodified by the unit. If you are using
the DV (4-pin) cables then audio and video are passed
through the same cable.
IN and OUT Markings
Hint: Always connect the OUT jack of one device to the IN
jack of the next. Never connect two OUTs together.
.

PAGE 20 VIDEONICS FIREWRITER VIDEONICS FIREWRITER PAGE 21
• Most VCRs have an input selector switch that goes
between LINE (or AUX, EXT, A/V, or S) and TUNER.
• Some use a button on the remote control or an on-
screen menu to choose an external line source. Others re-
quire that you choose a special channel (like 99 or A1).
• Still others switch automatically when you plug the
cable into the VIDEO IN jack.
• Turn FireWriter, the VCR(s), and the television or
monitor on and press ACCENT + DEMO. You should see a
series of titles with various transitions between them. Press
any key to stop the demo.
• Connect the CONTROL (GPI), Ethernet, and RS-232
Serial connectors (optional).
The CONTROL (GPI) input allows the unit to be triggered
(played) by edit controllers with a GPI (General Purpose
Interface). The Ethernet and RS-232 serial connectors allows
the unit to be connected to a computer which can then be
used to transfer projects, fonts, and graphics between
FireWriter and the computer.
• Connect the PREVIEW monitor (optional).
Connect FireWriter’s PREVIEW OUT to the VIDEO IN jack
of the PREVIEW monitor using a composite (RCA-style)
cable. Test the PREVIEW connection (if used). Turn the
PREVIEW monitor on. To test, activate the DEMO by press-
ing ACCENT and DEMO simultaneously. You should see a
series of titles. Press any key to stop the demo.
Connecting a Video Source
Video sources include camcorders, VCRs, laser disc players,
cameras, video production equipment (such as a mixer or
another cg), satellite tuners, broadcast tuners/receivers,
video-equipped computers, etc. They may have DV (4-pin or
6-pin) jacks, S-video (Y/C), or composite (RCA-style) output
Connecting Outputs and Monitors
Connect the OUTPUT monitor to FireWriter’s video OUT
jack. Connect FireWriter’s DV OUT to the DV VIDEO IN of
the Record VCR. Then connect to a television or monitor
Recording the Output
Connect FireWriter’s video OUT to the VIDEO IN of the
Record VCR. Then connect a television or monitor to the
Record VCR, as described in the manual that came with the
VCR. You can use either Firewire, S-video (Y/C) cables or
composite (RCA-style) cables to connect FireWriter to the
VCR. You can use S-video, composite, or RF (cable/antenna)
cables to connect the VCR and the television/monitor.
In either case, connect FireWriter’s audio OUT jacks (marked
L and R) to the Record VCR’s AUDIO IN.
Viewing the Output
Connect FireWriter’s video OUT to the VIDEO IN of a moni-
tor. You can use Firewire, S-video (Y/C) or composite (RCA-
style) cables for this connection. Connect FireWriter’s audio
OUT (marked L and R) to the monitor’s AUDIO IN or to an
external amplifier and speakers.
• Set the OUTPUT monitor’s input switch.
Important: If the television/monitor you are using
has an input selection switch, set it so it is displaying the
correct input. For instance, if you have connected to the
monitor’s VIDEO 1 input jack, you would choose VIDEO 1
as your input. Refer to the manual that came with your
monitor for details.
• Set the Record VCR input.
Important: Set the VCR’s controls so that it will
record whatever comes into its VIDEO IN jack, rather than
recording a broadcast channel. Different VCRs use different
methods to do this. Your VCR’s manual should explain how,
probably in a section that discusses copying tapes from a
camcorder. Here are some common examples:

PAGE 22 VIDEONICS FIREWRITER VIDEONICS FIREWRITER PAGE 23
jacks. RF sources (cable TV, antenna, “channel ”, or other
modulated sources) must be converted to DV (4-pin), S-
video or RCA style format video using the appropriate
conversion equipment.
• Connect the video source’s VIDEO OUT jack to the
video IN jack on FireWriter. Connect the source’s AUDIO
OUT jacks to FireWriter’s AUDIO IN jacks.
Input Connection Examples
Avoid mixing input and output types — if DV or S-video
jacks are not available on both the input and output, use
composite for both. If you do not see the picture you expect,
review the following hints:
1. Confirm that the POWER light is on.
2. Double-check the connections, especially the one from
FireWriter’s VIDEO OUT to your monitor or VCR’s VIDEO
IN. Most problems are caused by a cabling mistake.
3. Be sure the television is set to monitor the video input you
are using rather than, say, channel 7 (see “Set the OUTPUT
monitor’s input switch”); and that the VCR is set to record
its video input This is the second most common cause of
problems.
4. Check the obvious. Is the green POWER ON led lit? Are
all connections correct, with OUTs going to INs?
5. If you see titles when you press PLAY but you never see
the screen with the cursor, confirm that there is nothing —
not even an unconnected cable — plugged into the PRE-
VIEW OUT jack.
6. Try swapping cables — if the problem changes when you
completely exchange two cables, you may have a bad cable.
7. If you are using S-video connectors, try temporarily using
the RCA connectors instead.
8. If you are using DV connectors, try using S-video connec-
tors instead.
9. Jumpy or off-color recordings are often caused by poor
quality originals or by the use of commercially recorded
videos as source material. Many recordings carry copy-
protection signals designed to prevent copying. FireWriter is
not designed to remove copy-protection signals.

PAGE 24 VIDEONICS FIREWRITER VIDEONICS FIREWRITER PAGE 25
Chapter 4 •
Connecting Editing Equipment
FireWriter is compatible with a wide range of editing equipment,
such as edit controllers, video processors, and video mixers. It can be
connected in a variety of ways, depending on what you plan to do
and what equipment you have.
A character generator is a common part of a video editing or
message board setup. This chapter describes how to connect
your video equipment to FireWriter. For information on
how to edit using FireWriter, see Chapter 21, “Editing,
Presentations, and Other Applications.”
There is no single, “correct” way to connect equipment in an
editing studio. The setup varies, depending on what you
want to accomplish. The most important concept is that
editing equipment is connected in a chain, with the output of
one device feeding the input of the next.
The order in which the pieces of equipment are connected
matters since each piece will act on the video generated by
devices that are earlier in the chain. For instance, if you
wanted to add titles to video that has had special effects
added, you would use the setup labeled 1 in the illustration,
connecting the CG (B) after the special effects unit (A). If you
wanted to add effects to the titles and the video, you would
reverse the order, as in setup 2.
Videonics Equipment Arrangements
Here are some recommended setups using Videonics equip-
ment.

PAGE 26 VIDEONICS FIREWRITER VIDEONICS FIREWRITER PAGE 27
Multiple Source Editing with a Video Mixer
Advanced editing combines video from more than one
source. A video mixer is used to combine the video sources
to use fades, wipes, and other effects to transition between
sources. As with a single source, you can connect a CG
before or after the mixer. Generally, the most flexible ar-
rangement is to connect FireWriter between the mixer and
the recorder . This arrangement has an important advantage:
Titles can be superimposed over the mixed signal. For in-
stance, you could have a wipe from source B to source C and
have titles superimposed over the entire transition, rather
than just having the titles atop either B or C.
You may use the CG as a separate input (1). The advantage
of this arrangement is that the mixer’s effects can be used on
the titles. Of course, you can use multiple FireWriters, con-
necting one CG to the input and one to the output!
GPI Control
FireWriter supports GPI control. The GPI input jack located
on the rear panel of FireWriter supports a stereo mail 3.5
mm mini-plug and three wires connecting each terminal of
one plug to the corresponding terminal of the other. Wire
the “tip” and “base” (not the middle “ring”) to the two wires
of your GPI trigger source. You can also wire a push-button
switch to the GPI input to remotely trigger titles.
In the first setup, the camcorder is connected through a
digital mixer (A) and FireWriter (B) to the recorder. In the
second setup, the camcorder is connected through
FireWriter (B) and a mixer (A) to the recorder. In the third
setup (page 25) a digital mixer (B) and FireWriter (C) are
connected directly to a monitor simulating a message board
setup.
Single-Source Editing Setup A single-source editing
setup uses a camcorder or VCR (player) to play scenes from
an original tape. The desired scenes are recorded on a blank
tape, leaving the unwanted scenes behind. An edit controller
may be used to control the player and trigger the recorder
for accurate edits.
FireWriter can add titles as the scenes are recorded on the
new tape. To do this, the CG is connected between the player
and the recorder.
When an edit controller is used, FireWriter may be used
between the edit controller and the player, or between the
edit controller and the recorder. Either arrangement is likely
to work unless the edit controller relies on information that
is coded in the invisible portions of the video signal (vertical
interval time code, or VITC). If that is the case, the titler may
interfere with the time code when titles replace the incoming
video. If there are no instructions, connect FireWriter be-
tween the edit controller and the recorder. If you experience
problems with this setup, connect FireWriter between the
player and the edit controller instead.

PAGE 28 VIDEONICS FIREWRITER VIDEONICS FIREWRITER PAGE 29
Chapter 5 • Using the Demo
The built-in demo is a convenient way to learn what the unit can do.
Using the Demo
To display FireWriter’s built-in demo, simultaneously press
the ACCENT key and the DEMO key. The OUTPUT monitor
will display a series of titles that describe the unit’s features
and applications and demonstrates the kind of effects you
can generate. Press any key to end the demo.
Running the demo does not erase any titles you have en-
tered.
International Demo
Press SHIFT + DEMO to display a demo that minimizes the
use of English language text. This demo is designed for
international use.
Locked Demo
Normally, pressing any key will end the demo. If you want
to prevent passers-by from accidentally ending the demo,
hold CMD (Command) as you start the demo (CMD + AC-
CENT + DEMO for the English language demo; CMD +
SHIFT + DEMO for the international version). This will start
a locked demo. Only the CMD + ACCENT + DEMO or CMD
+ SHIFT + DEMO key combination will stop it.
Using the Demo as a Guided Tour
The demo makes extensive use of FireWriter’s features and
includes several clever tricks for making interesting titles.
You can study the demo in detail by copying it into the
Editing Screen. To do this, press CMD + ACCENT + COPY.
This creates a new project which contains the English-lan-
guage demo. (You can copy the international demo by press-
ing CMD + SHIFT + COPY.) To move between the demo
project and other existing projects, press CMD + PAGE UP
or PAGE DOWN.
Other manuals for FIREWRITER REMOTE
2
Table of contents
Other Videonics Media Converter manuals