VideoSys AEON-CC User manual

1
The information contained in this document is the property of VideoSys Broadcast Ltd. This document and the
information contained herein is provided for evaluation purposes only and is subject to change without notice.
VideoSys Broadcast Ltd assumes no responsibility for errors that might appear in this document and gives no
representations or warranties as to the accuracy of the information contained herein, including but not limited to
the suitability and performances of the product or its intended application.
©Copyright VideoSys Broadcast Limited 2018. All Rights Reserved (Version 4).
Configuration Guide -
Using the AEON-CC or RXSM-E
with ARRI ALEXA in Multicam Mode
Revision 4 –05.11.20
VideoSys Broadcast Ltd
Unit 1-2 Forest Barn Farm
Turners Hill Road
Turners Hill
West Sussex
RH10 4QH
UK

2
The information contained in this document is the property of VideoSys Broadcast Ltd. This document and the
information contained herein is provided for evaluation purposes only and is subject to change without notice.
VideoSys Broadcast Ltd assumes no responsibility for errors that might appear in this document and gives no
representations or warranties as to the accuracy of the information contained herein, including but not limited to
the suitability and performances of the product or its intended application.
©Copyright VideoSys Broadcast Limited 2018. All Rights Reserved (Version 4).
Contents
Requirements................................................................................................................................................................. 3
Hardware........................................................................................................................................................................ 3
Licence Options.............................................................................................................................................................. 3
Introduction.................................................................................................................................................................... 3
Configuration.................................................................................................................................................................. 4
Camera Control Path...................................................................................................................................................... 4
ARRI AMIRA Set Up Menus............................................................................................................................................ 4
Static IP Address............................................................................................................................................................. 5
RXSM-E Menu Path ..................................................................................................................................................... 6,7
Troubleshooting............................................................................................................................................................. 8

3
The information contained in this document is the property of VideoSys Broadcast Ltd. This document and the
information contained herein is provided for evaluation purposes only and is subject to change without notice.
VideoSys Broadcast Ltd assumes no responsibility for errors that might appear in this document and gives no
representations or warranties as to the accuracy of the information contained herein, including but not limited to
the suitability and performances of the product or its intended application.
©Copyright VideoSys Broadcast Limited 2018. All Rights Reserved (Version 4).
Introduction
The VideoSys camera control solution consists of several distinct components; an ‘RCP’ (Remote Control Panel),
this is made by a camera manufacturer such as Sony and is connected to the ‘IDU’ Indoor Unit. Up to four RCPs
can be connected to a single IDU. The ‘ODU’ Outdoor Unit is basically the data transmitter, it connects to the
IDU and takes the narrow band control data produced by the IDU and transmits it to the data receiver ‘RX’ over
a UHF radio link. From this point on the terms IDU, ODU, RCP and RX will be used.
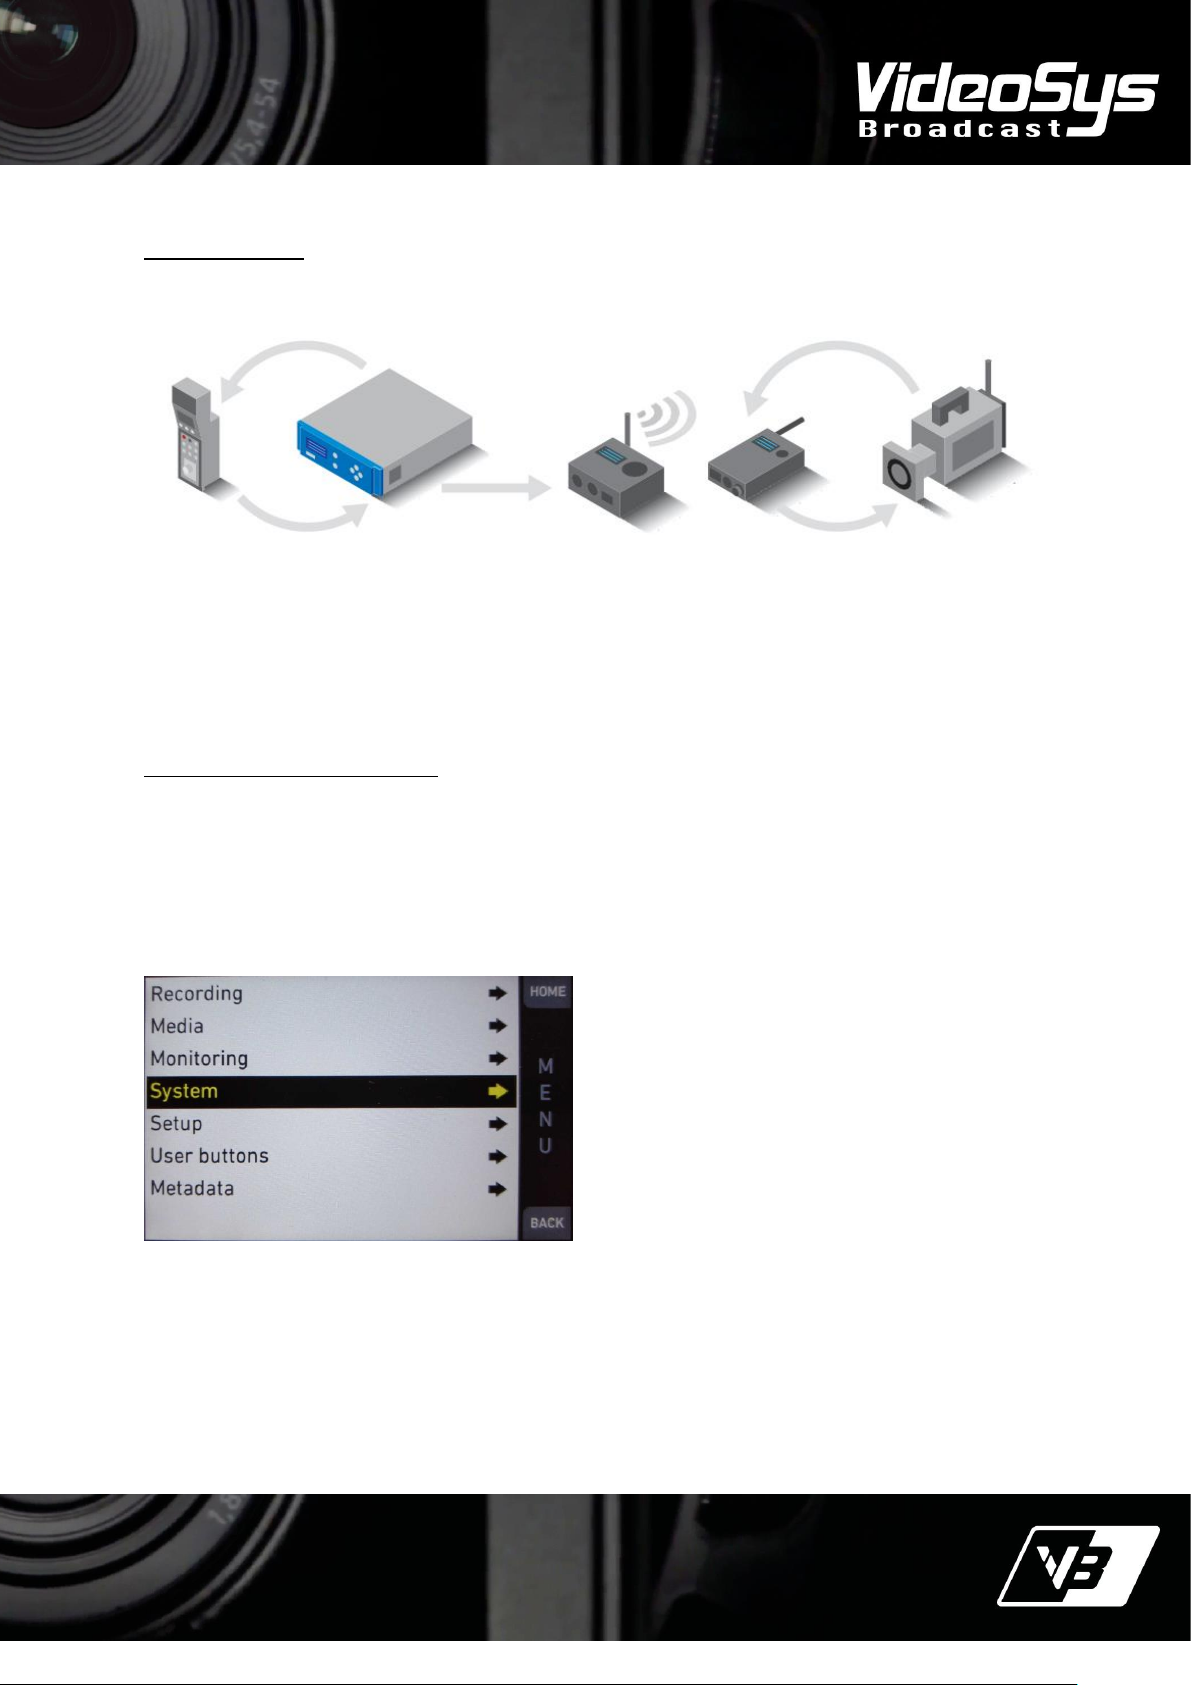
For simplicity we will focus on a Uni-directional setup and note the connection process for the camera control
receiver, be that an AEON-CC or RXSM-E to the ARRI camera is the same.
Examples of configuration in this manual will use an ARRI AMIRA may not be completely relevant to different
equipment. For specifics on setting up equipment not provided by VideoSys Broadcast, please refer to manuals
supplied by the manufacturer of that product.
Requirements
Hardware
You will require a minimum of the following:
•1 x AEON-CC or RXSM-E
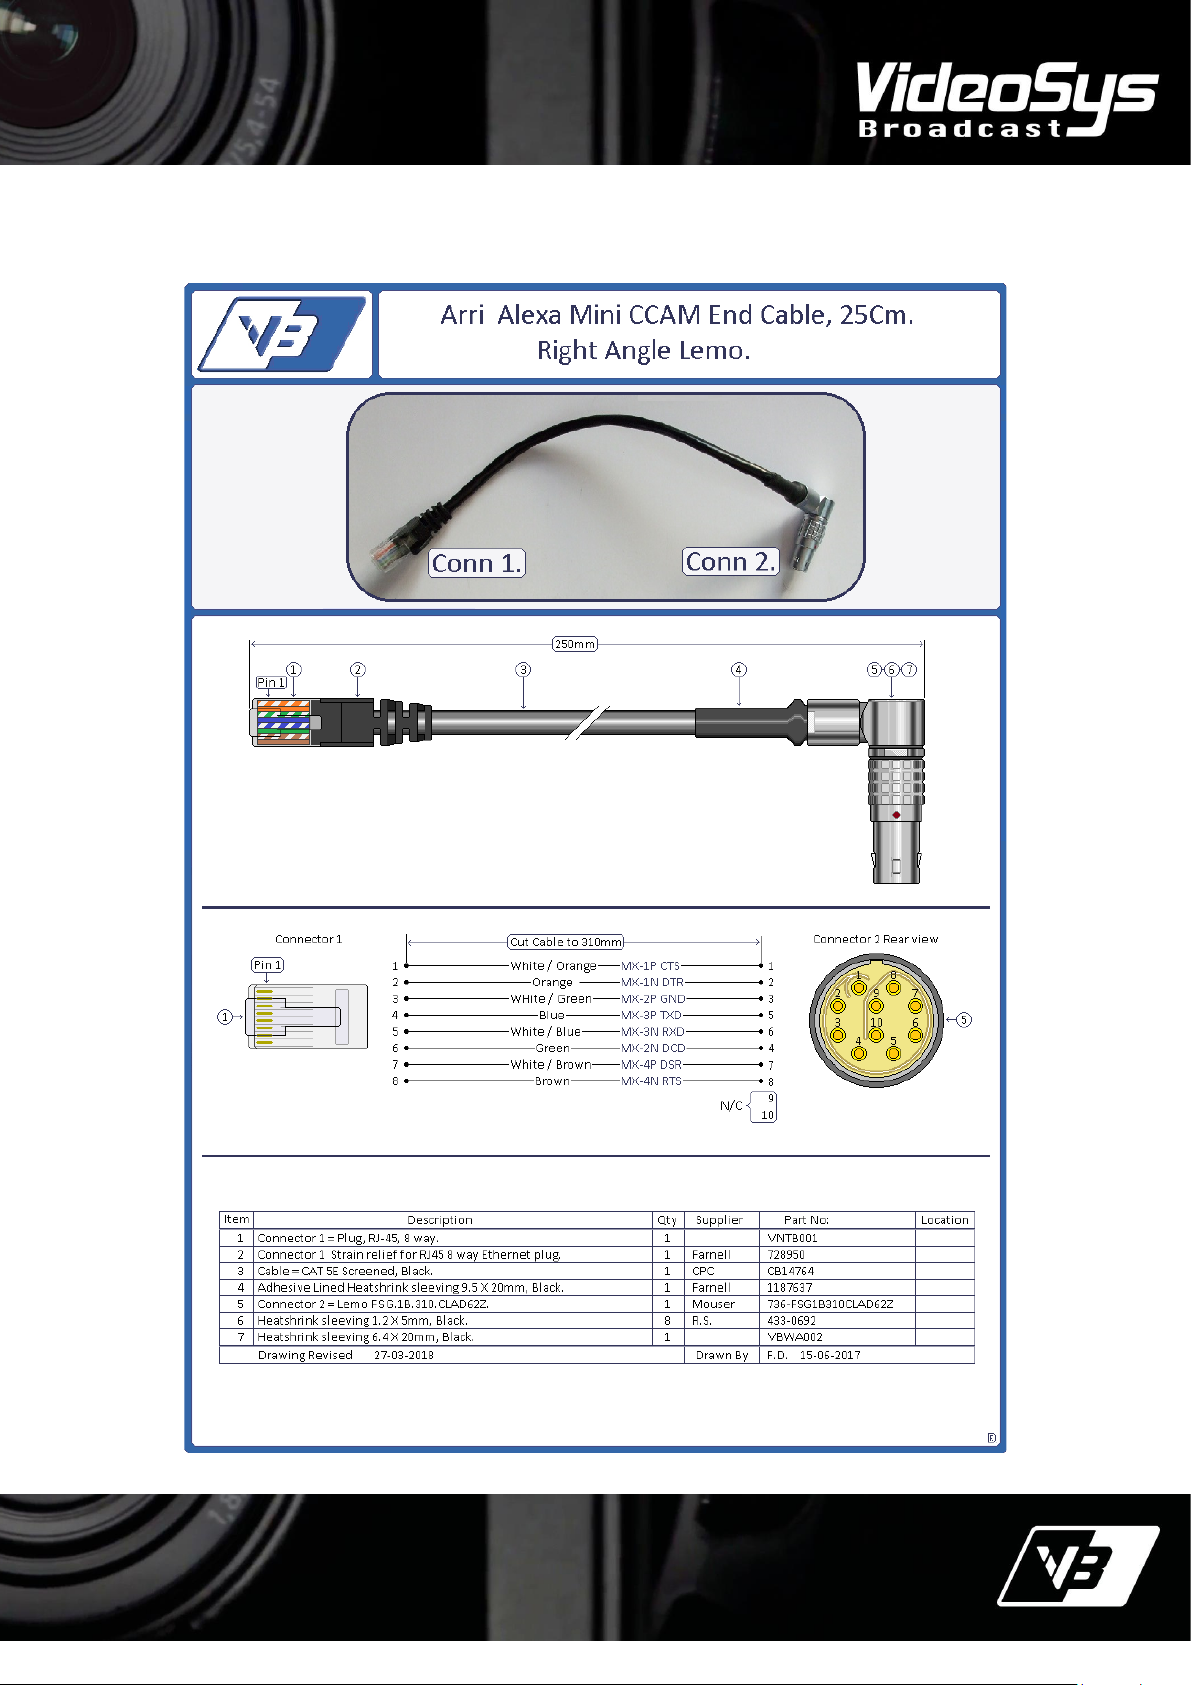
•1 x Multicam cable, depending on the Arri camera this could be an RJ45 to LEMO cable or a Standard
RJ45 ethernet cable.
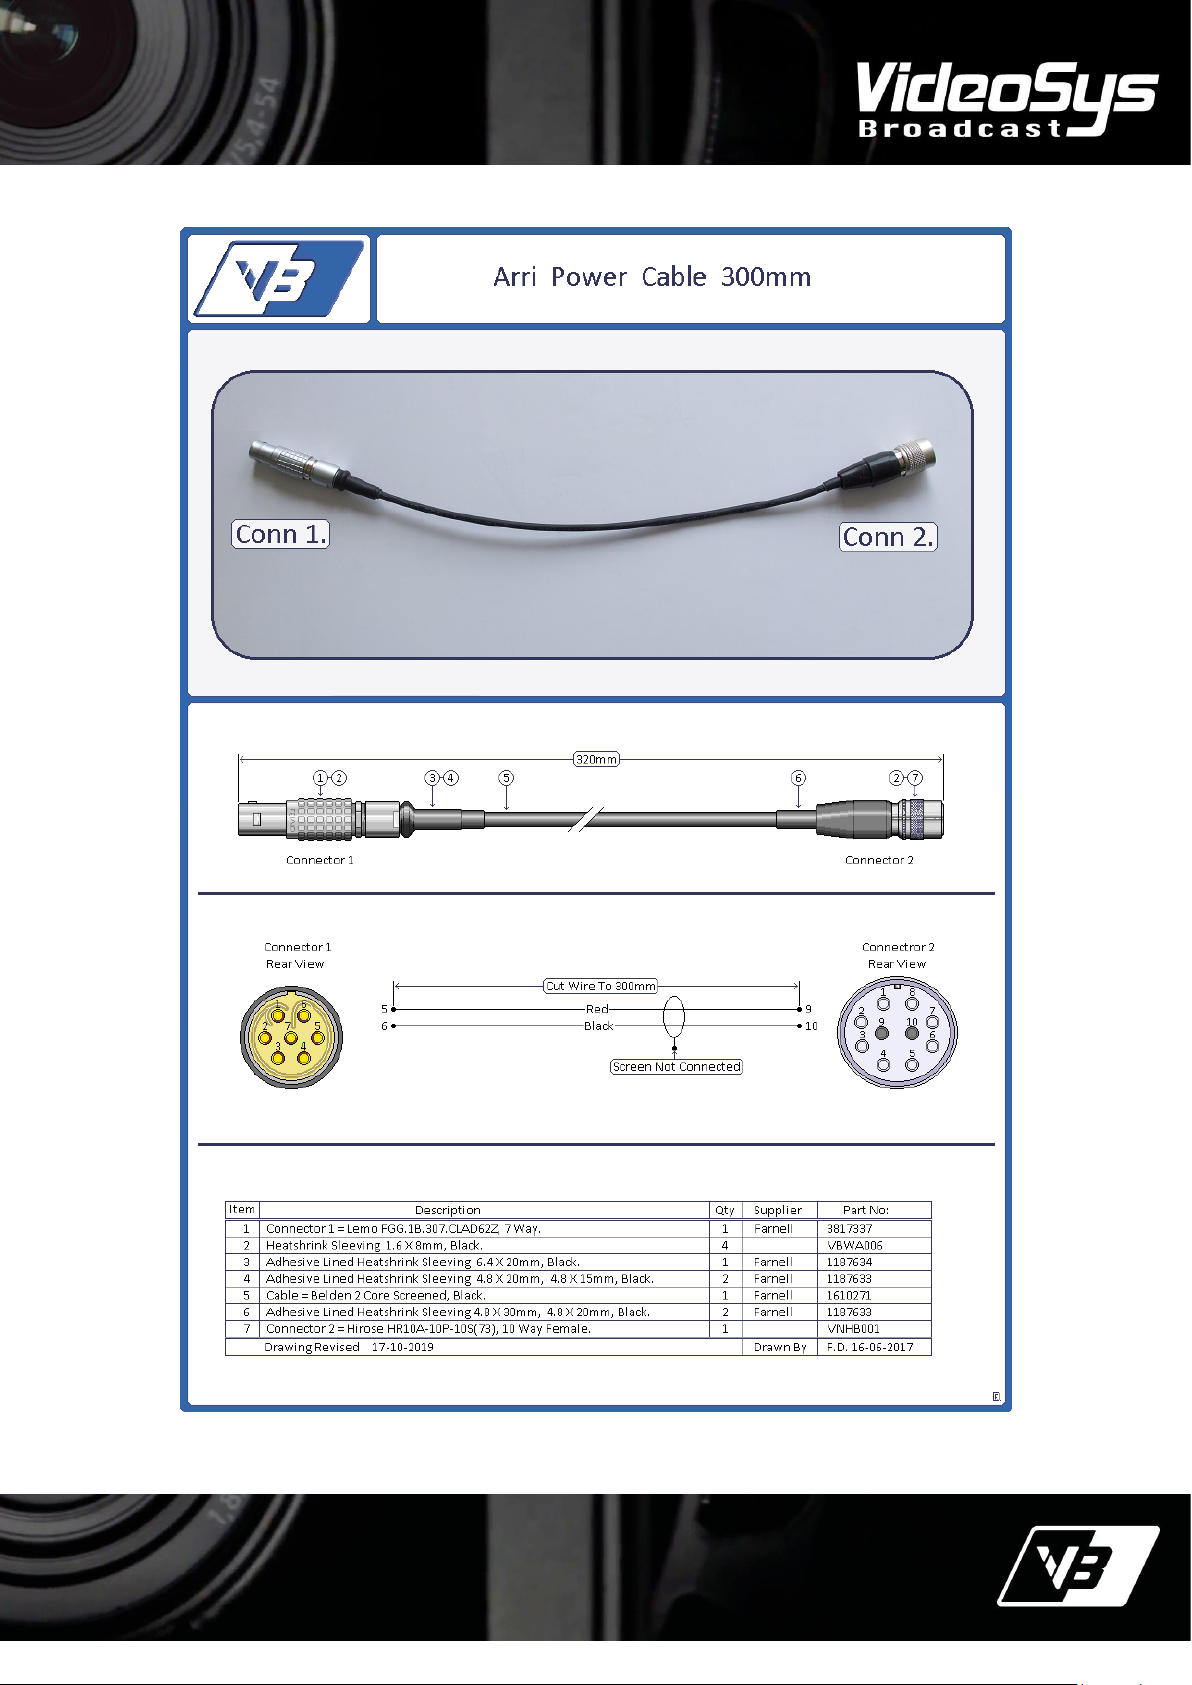
•If using the RXSM-E you will need a power cable for the RXSM-E (See your local distributer).
NOTE Diagrams for the required cables are at the end of this document
Licence Options
Ensure that the AEON-CC or RXSM-E are licensed for use with ARRI cameras.

4
The information contained in this document is the property of VideoSys Broadcast Ltd. This document and the
information contained herein is provided for evaluation purposes only and is subject to change without notice.
VideoSys Broadcast Ltd assumes no responsibility for errors that might appear in this document and gives no
representations or warranties as to the accuracy of the information contained herein, including but not limited to
the suitability and performances of the product or its intended application.
©Copyright VideoSys Broadcast Limited 2018. All Rights Reserved (Version 4).
Configuration
Camera Control Path:
The diagram above shows the data flow from the RCP to the camera. There is a local loop between the RCP and
the IDU. The IDU always maintains a connection to the RCP regardless. The narrowband data generated by the
IDU is then sent to the ODU via RS485, RS232 or IP connection. This data is transmitted by UHF radio to the RX
at the camera. Again, there is a local loop communication between the camera and the data RX. The data RX
receives the UHF radio data and converts it into Arri protocol to control the camera.
ARRI AMIRA set up menus
There are user set up files available on the Arri camera, see the operation guide for more information. But, note
is it possible to have a file preconfigured for the Multicam mode. Multicam mode is used in multiple camera set
ups to allow the user to control the cameras picture parameters ‘live’. This is very useful when the cameras are
being used in a live to air show, but also to help reduce the post girding process.
Turn Multicam on
From the main menu select System

5
The information contained in this document is the property of VideoSys Broadcast Ltd. This document and the
information contained herein is provided for evaluation purposes only and is subject to change without notice.
VideoSys Broadcast Ltd assumes no responsibility for errors that might appear in this document and gives no
representations or warranties as to the accuracy of the information contained herein, including but not limited to
the suitability and performances of the product or its intended application.
©Copyright VideoSys Broadcast Limited 2018. All Rights Reserved (Version 4).
Main Menu > System
Then Select Multicam sub menu
System > Multicam
Then check the tick box. Multicam mode is now enabled.
Static IP Address:
When connecting devices using ethernet, each device must have its own unique IP address. On many network
systems such as an office computer network, there is a server which identifies components on the network and
automatically issues them with a unique IP address. This system however requires the user to enter IP
addresses manually. The user must ensure all of the connected components have a unique address. This type
of network connection is often referred to as Static IP. It is always best to pre-plan your network addresses
especially if you are in a multicamera environment to ensure you do not duplicate IP addresses. Devices that
need to communicate locally with each other, such as the AEON CC and the camera, need to be on the same IP
range. A common IP range might be 192.168.1.xxx. Where xxx is changed between 001 and 254 to create a
unique address for each device, for example the AEON CC or RXSM-E might have IP address 192.168.1.10 and
the Arri camera might be 192.168.1.101

6
The information contained in this document is the property of VideoSys Broadcast Ltd. This document and the
information contained herein is provided for evaluation purposes only and is subject to change without notice.
VideoSys Broadcast Ltd assumes no responsibility for errors that might appear in this document and gives no
representations or warranties as to the accuracy of the information contained herein, including but not limited to
the suitability and performances of the product or its intended application.
©Copyright VideoSys Broadcast Limited 2018. All Rights Reserved (Version 4).
To enter a static IP address on the camera, please go back to the main menu:
MENU > SYSTEM > NETWORK / WIFI > LAN static IP.
To navigate the menus on the RXSM-E or AEON CC menu, Use the black navigation button, Left/Right/Up/Down
and press for enter
To set the IP address on the RXSM-E or AEON CC:
Now on the Arri camera you need to go to the SSCP menu and set the SSCP device IP to be the IP address of the
AEON-CC or RXSM-E Turn Multicam on and the ARRI should connect to the AEON-CC, this is indicated by the
plug icon on the AEON-CC or RXSM-E status screen.

7
The information contained in this document is the property of VideoSys Broadcast Ltd. This document and the
information contained herein is provided for evaluation purposes only and is subject to change without notice.
VideoSys Broadcast Ltd assumes no responsibility for errors that might appear in this document and gives no
representations or warranties as to the accuracy of the information contained herein, including but not limited to
the suitability and performances of the product or its intended application.
©Copyright VideoSys Broadcast Limited 2018. All Rights Reserved (Version 4).
Troubleshooting
Issue:
Can’t turn Multicam on in the ARRI camera
It is likely that you will be met with the above screen, informing you that the Look File currently selected does
not permit this setting. Select a look file that does.
Solution:
From the home screen press the button under “LOOK”
Scroll and select a Look File that permits Multicam

8
The information contained in this document is the property of VideoSys Broadcast Ltd. This document and the
information contained herein is provided for evaluation purposes only and is subject to change without notice.
VideoSys Broadcast Ltd assumes no responsibility for errors that might appear in this document and gives no
representations or warranties as to the accuracy of the information contained herein, including but not limited to
the suitability and performances of the product or its intended application.
©Copyright VideoSys Broadcast Limited 2018. All Rights Reserved (Version 4).
Cables

9
The information contained in this document is the property of VideoSys Broadcast Ltd. This document and the
information contained herein is provided for evaluation purposes only and is subject to change without notice.
VideoSys Broadcast Ltd assumes no responsibility for errors that might appear in this document and gives no
representations or warranties as to the accuracy of the information contained herein, including but not limited to
the suitability and performances of the product or its intended application.
©Copyright VideoSys Broadcast Limited 2018. All Rights Reserved (Version 4).

10
The information contained in this document is the property of VideoSys Broadcast Ltd. This document and the
information contained herein is provided for evaluation purposes only and is subject to change without notice.
VideoSys Broadcast Ltd assumes no responsibility for errors that might appear in this document and gives no
representations or warranties as to the accuracy of the information contained herein, including but not limited to
the suitability and performances of the product or its intended application.
©Copyright VideoSys Broadcast Limited 2018. All Rights Reserved (Version 4).
This manual suits for next models
1
Table of contents
Popular Transmitter manuals by other brands

API
API APD 4008 Series quick start guide

Roto
Roto ZEL STG HS 1 II manual

Dometic
Dometic Waeco PerfectView VT100DIG Installation and operating manual

Rose electronics
Rose electronics UltraVista VWL-S122DV Installation and operation manual

Fisher-Price
Fisher-Price R4814 manual

INTERTECHNO
INTERTECHNO ITM-200 operating instructions