Viessmann AQUAHOME 20-N User manual

Installation and operations VIESMANN
manual
for the device User
Water softening station
AQUAHOME 20-N / 30-N •
1 / 2012 Please retain this manual!

Important notice:
The price of this device includes free of charge
commissioning of the device to be performed by an
authorised service provider.
Transportation cost of a service technician is not
included in the offer of free of charge
commissioning of the device.
2

Table of contents
Basic data................................................................................................................................................................................... 4
Section I...................................................................................................................................................................................... 1
1. Hydraulic assembly............................................................................................................................................................ 1
A. Safety information............................................................................................................................................... 1
B. Unpacking of water softener................................................................................................................................ 1
C. Checking hydraulic fittings at installation site....................................................................................................... 1
D. Selecting installation site for the device............................................................................................................... 1
E. Materials............................................................................................................................................................. 1
F. Regeneration washings discharge connection..................................................................................................... 1
2. Programming the control panels........................................................................................................................................ 1
A. Programming the control panel of Aquahome 20-N water softener...................................................................... 1
B. Programming the control panel of Aquahome 30-N water softener........................................................................... 1
C. Filling the brine tank with salt.............................................................................................................................. 1
D. Setting the desired water hardness number of the by - pass valve...................................................................... 0
Section II..................................................................................................................................................................................... 0
1. Control panel functions ...................................................................................................................................................... 0
A. Manual activation of regeneration process................................................................................................................... 0
B. Additional functions featured by Aquahome 20-N......................................................................................................... 1
C. Additional functions featured by Aquahome 30-N......................................................................................................... 2
D. Basic diagnostics data.................................................................................................................................................. 2
E. Protective filtration (cleansing)...................................................................................................................................... 1
F. Power outage............................................................................................................................................................... 1
G. Error codes.................................................................................................................................................................. 1
Section III.................................................................................................................................................................................... 0
1. Service (maintenance) activities......................................................................................................................................... 0
A. Refilling salt in brine tank .................................................................................................................................... 0
B. Salt bridges (concrements) ................................................................................................................................. 0
C. Control of hardness of water treated by the water softener........................................................................................... 1
D. Control of water pressure in the installation....................................................................................................................... 0
E. Mechanical filter operation .................................................................................................................................. 0
F. Control of current hour clock indications.............................................................................................................. 0
2. Automatic disinfection of the medium featured by Aquahome 30-N.................................................................................... 0
3. Operational recommendations ........................................................................................................................................... 1
4. Operation logbook.............................................................................................................................................................. 1
5. Troubleshooting table......................................................................................................................................................... 1
Section IV ................................................................................................................................................................................... 1
1. Technical specifications and dimensions............................................................................................................................ 1
Section V .................................................................................................................................................................................... 2
1. Control activities prior to contacting a service provider....................................................................................................... 2
2. Warranty card .................................................................................................................................................................... 1
3. Device commissioning protocol (original copy) - for the User ............................................................................................. 1
4. Device commissioning protocol (copy no. 1) - for the party performing commissioning of the device.................................. 3
5. Device commissioning protocol (copy no. 2) - for the Supplier or Manufacturer.................................................................. 4
Section VI ................................................................................................................................................................................... 5
1. Components drawings ....................................................................................................................................................... 5
Impact of washings from water softener regeneration to municipal sewage systems and home sewage treatment
plants......................................................................................................................................................................................... 9
Conditions of Technical Inspection of operation of pressure devices, fitted at ion exchange water softener of
AQUAHOME type. ................................................................................................................................................................... 10

Tip!
Before installing the device, please read carefully
this instruction and comply with all safety rules
relating to commissioning and operation of the
device. In case of any questions please inquire
with the service team of your supplier or with the
manufacturer of the device.
Basic data
Prior to connecting, commissioning and operation of the device, please fill in the following information:
MODEL NO.*
SERIAL NO.*
*Information on model number and serial number can be found on the label, accessible after lifting of
the brine tank cover.
Commissioning date
-
Water hardness
dH (German water
hardness scale)
Water pressure
bar
4

Section I
1. Hydraulic assembly
A. Safety information
Before installing and
commissioning of the water
softener,, please read carefully
this instruction Compliance with
the guidelines provided in the
instruction will ensure safe and full
use of the device you acquired.
Failure to comply with this
instruction may result in material
and health damage.
Water softener removes from
water calcium and magnesium
cations responsible for water
hardness and it can also remove
divalent (bivalent) iron compounds
dissolved in water at the
acceptable concentration up to 0.7
mg Fe per litre. The device is not
capable of removing iron in any
other form (such as organic form)
neither is it capable of improving
the taste and smell of water.
Ambient temperature, suitable
for water softener operation,
must not be lower than 4oC and
higher than 40o C.
Maximum temperature of
water, that can be softened by
the device, must not be higher
than 49 o C.
The device can be supplied
together with a mechanical filter
(optional), which should be
installed on the water pipe
supplying water to the softener, in
accordance with the schematic
diagram shown in figure 1.
Operating voltage of the device is
24 V. Please use the transformer
that is supplied together with the
device.
In case of damage of the power
cable the transformer must be
immediately disconnected. Prior to
reconnecting the transformer,
damaged power cable must be
replaced or repaired.
Prior to removing the outer valve
cover, power supply of the device
must be unconditionally
disconnected.
Water softener must not be used
for softening of water with
abnormal physical and chemical
as well as bacteriological
parameters.
B. Unpacking of water softener
The first step is to remove all
components of the device from the
cardboard box, remove protection
styrofoam and adhesive tapes. The
device should be checked for possible
damages occurring during transportation.
In case of any damage the device
supplier must be notified immediately.
The device must be removed from the
packaging with outmost care. The device
is delivered as assembled, ready for use
unit and therefore is rather heavy. When
moved the device should be supported
“at the bottom” and must not be dragged
across the floor. Do not turn the device
upside down, drop the device or put it on
edgy or sharp surfaces.
5

C. Checking hydraulic fittings at installation site
Tap water pressure
In order for the water softener to
function properly the pressure in the
water supply network must not be
lower than 1.4 bar and higher than 8.0
bars. If water pressure is below the
former, pressure raising pressure tank
must be used; if water pressure
exceeds the maximum value,
pressure regulator (pressure reducing
valve) must be installed.
Important notice!
If during daytime water pressure is
high it is very likely that during night
time it will exceed the maximum value
of 8.0 bars. In such case pressure
regulator (pressure reducing valve) is
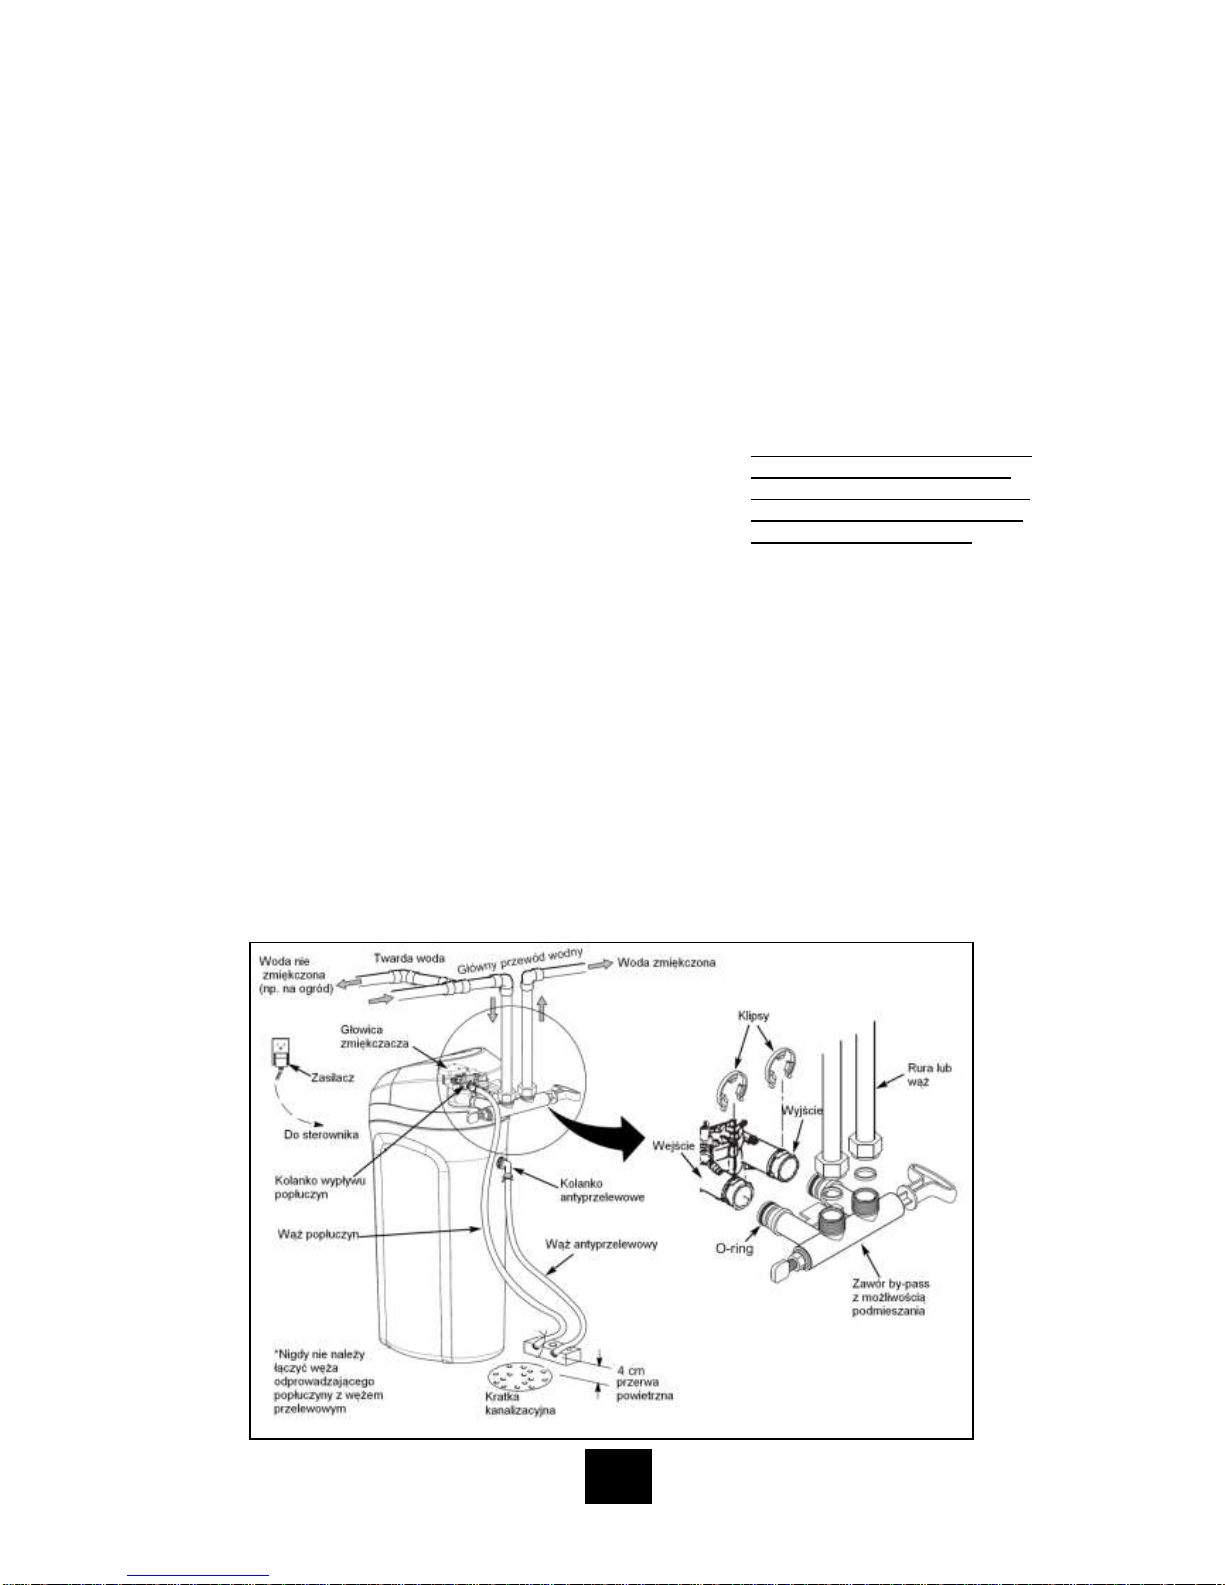
recommended. It is recommended to
fit pressure gauges on the installation,
in accordance with the schematic
diagram (figure 1), in order to control
operating water pressure in the
installation.
Water flow rate
In order for the water softener to
function properly the minimum water
flow rate at the water inlet should be
11.0 litres per minute.
D. Selecting installation site for the device
The water softener should be
located as close as possible to
hydrophore (in case of supplying
water from private well [intake]) or
water meter measuring the whole
water in the household (in case of
supplying the household with tap
water). The device should be
located in the immediate vicinity of
the outlet drain (floor drain, stub
pipe, laundry tub).
Installing the device upstream
from water heater (or boiler
unit), make sure that the
temperature of water at the
connection point does not exceed
490C. It is recommended that a
back - pressure valve is fitted
between the water softener and the
water heater (or boiler unit) in order
to prevent hot water backflow to the
water softener. Too hot water may
cause damage of control valve
elements as well as the ion-
exchange resin.
Make sure that the valve for water
used outside of the house (such as
water used for garden watering) is
installed upstream from the water
softener. Softening water that will be
used outside of the house is not cost
effective (unless necessary).
Installation site of the water softener
must be prevented from being
exposed to freezing. If frozen, the
water softener will be damaged.
Any damage resulting from freezing
is not covered by the warranty.
The water softener is powered with
24 V. Direct plug - in transformer
and power cable are provided along
with the device. Earthed power
socket for the water softener should
be located within the immediate
vicinity of the device and should be
protected against rain and subzero
temperatures. The water must be
always connected to the power
supply source; the power socket
must not be fitted with a controller
that could be incidentally switched
off.
E. Materials Before commencing installation of the device, it is
important to check relevant connection of inflow
and outflow of water to the water softener. Water
“inflow” connection is located on the right side of
6

the device and water “outflow” connection on its
left side, when facing the device (figure 2).
Descriptions in English: - (above vertical hose in figure 1) -> raw water; garden watering water, shut-off valve; shut –off
valve, pressure gauge; preliminary filter (option); pressure gauge; shut –off valve; pressure gauge; shut –off valve; check
valve; softened water ->
(below vertical hose in figure 1) sampling valve; washings drain (discharge); device control valve; sampling valve; device
casing
Hydraulic connection of the water softener should be
implemented in accordance with a specimen
connection diagram shown by figure 1. The water
softener is fitted with a by - pass valve with fitting
elements as well as a washings discharge hose. The
water softener may also be fitted with a mechanical
filter (as an option). Hydraulic installation
accessories such as valves, pressure gauges, water
sampling valve etc. are not, as standard, supplied
with the device and should be provided by the
person implementing the installation.
Figure
1
7

F. Regeneration washings discharge connection
1. Regeneration washings
discharge connection.
Use the hose supplied together
with the device to connect the
installation of washings discharge
from the water softener. Place one
end of the hose on the washings
discharge stub pipe, located at the
rear part of the control head, and
place the other end of the hose in
the outlet drain (floor drain, stub
pipe, laundry tub; figure 2). Make
sure to provide for at least 4 cm
air gap between the end of the
hose and the outlet drain. This
gap is needed to prevent backflow
of sewer water into the water
softener.
Install the hose in a manner
preventing its movement during
intense flow of washings. The
hose must not be bent, twisted or
punctured.
The hose must be located below
the outflow stub pipe from the
control valve.
2. Installation of flow elbow pipe of
the brine tank.
place the rubber connecting piece
in the hole of brine tank (from the
bottom) in such way that part of
the connecting piece is located
inside and part outside of the
brine tank (figure 2).
insert thick end of the elbow pipe
to the connection piece from the
outer side of the brine tank
discharge hose - connection point
diameter 3/8”, outer thread (not
supplied with the device) - can be
connected in the way identical to
the one referred in point 1.
Important notice:
- overflow hose of the brine tank
serves only as additional
safety feature in case when
filling of the brine tank with
water is not ended in
accordance to the program.
- no part on the overflow hose
can be placed above the
outflow level.
- the overflow hose of the brine
tank must not be connected to
the outflow stub pipe of the
control valve (see point 1
above).
Figure
2
8

Descriptions in English: hard water (for example used for watering the garden); hard water; main water pipe; softened water;
softening head; (left of softener housing) electric power supply, connection to control panel, washings elbow, washings
discharge hose *never connect together the washings discharge hose and overflow hose, (right of softener housing) overflow
elbow, overflow hose, 4 dm gap, drain hole, clips, inlet, outlet, O’ring, pipe or hose, by-pass valve with premixing feature
2. Programming the control panels
Important notice!
It is recommended that the water softener is
commissioned by an authorised service
provider.
Commissioning of the device is included in its
price.
A. Programming the control panel of Aquahome 20-N water softener
Descriptions in English: display screen, LED indicating low salt level, “up” button, “down“ button, regeneration button
(tonight –press; immediately (hold for 3 seconds), set/menu button
Upon plugging the transformer
into a power socket the display
screen will show a model code of
a given model of the device (u20)
for a few seconds as well as the
software version (such as J3.5 or
similar).
Then the display screen will show
the SET TIME caption as well as
flashing 12:00.
When the display screen shows --
--, press ▲or ▼buttons until
caption u20 appears on the
display screen. Disconnect and
then reconnect the power supply
to the water softener to confirm
correctness of the code entered. If
the code appearing on the display
screen is different than expected,
please contact the service team of
your supplier.
Audio signaller (BIP): the signaller
will activate each time the button
is pressed. Single audio signal
indicates one change on the
display screen. Series of audio
signals indicates wrong button
being pushed and the need to
push another button.
Figure
3
9

Setting Time
In order to set time, press ▲button to move
ahead or ▼button to set time back.
If a twelve-hour clock is set, the “ante
meridiem” (“AM”) caption will appear on
the display screen for the after midnight
part of the clock - hours between 000 and
1159 and the "post meridiem” (“PM”) caption
for the after midday part of the clock - hour
between 1200 and 2359.
With each pressing of one of the ▲or
▼buttons the time will increase or decrease
with one minute increments. If any of the
buttons remains pressed the time will change
at a faster rate.
Programming water hardness
Single press of the SET button (in Set Time
mode) will move programming to the SET
HARDNESS mode (Water hardness); the
value flashing on the display screen should be
25 (default value).
Now code the hardness of used water in
grains per American gallon - gpg (water
hardness expressed in, for example, odH - in
accordance with the German scale, should be
multiplied by 1.036). Water hardness can be
expressed in different units. Below is the table
showing water hardness units most commonly
used in the country:
Hardness unit
mg CaCO3/l
of French
degree of water
hardness
odH German
degree of water
hardness
gpg
1 mg CaCO3/l
1
0,1
0.056
0.058
1 French degree of
water hardness (of)
10
1
0.56
0.58
1German degree of
water hardness (on)
17.8
1.78
1
1.036
1 gpg
17.2
1.72
0.96
1
In case when the results of the
physical and chemical analysis
are not available, water hardness
information should be obtained
from local water supply company
or from relevant regional office of
the State Sanitary Inspectorate or
it should be self determined with
the use of a test which can be
obtained from the vendor. Please
enter the results obtained on page
4 of this manual as well as on a
separate label, which should be
placed under the brine tank cover
with the use of adhesive tape.
If raw water contains iron in
concentration exceeding 0.2 mg/l
please use adjusted water
hardness instead of water
hardness. The adjusted water
hardness is calculated with the
following formula:
Adjusted water hardness [of] = water hardness [of] + 4.8
iron content in Fe mg/l
Enter the water hardness number
or adjusted water hardness
number (expressed in gpg) to the
water softener software as
operational water hardness. In
order to enter the water hardness
number press ▲or ▼button until
the relevant number appears on
the display screen. Pressing the
▼button will reduce the displayed
9
10

water hardness number by 1.
Pressing the ▲button will
increase the displayed water
hardness number to the maximum
water hardness number for given
device. Between water hardness
numbers of 1 and 25, each
pressing of ▲or ▼buttons will
respectively increase or reduce
water hardness number by
increments of one unit. Between
water hardness numbers of 25
and the maximum water hardness
number, the increments are 5
units. If the button remains
pressed, the number will change
twice within one second.
Setting regeneration hour
Single press of the SET button (in
Set Water Hardness mode) will
move programming to the SET
RECHATHE TIME mode; the
value flashing on the display
screen should be 02:00 (2 a.m.)
as default value.
If this setting is confirmed (by
pressing the “SET” button), the
water softener will activate the
regeneration process at 2 a.m.
Due to water consumption
reduced to minimum at night, 2:00
a.m. is the optimum regeneration
hour.
In order to change the
regeneration hour settings, press
the ▲or ▼buttons to set new
regeneration process start time. If
a twelve-hour clock is set, please
take note that the “ante meridiem”
(“AM”) part of the clock indicates
hours between 0000 and 1159 and
the "post meridiem” (“PM”) part of
the clock indicates hour between
1200 and 2359. Pressing the “SET”
button will confirm the changes
introduced.
With each pressing of one of
the ▲or ▼buttons the time will
increase or decrease with one unit
increments. If the button remains
pressed, the time will change by
two units within one second.
Setting salt level
Single press of the SET button (in Set Regeneration
Hour mode) will move programming to the SET
SALT LEVEL mode. Control panel features the
system of salt level control in the brine tank. In order
to set the system of salt level control in the brine
tank proceed as follows:
Open the brine tank cover for visual inspection
of the actual salt level.
The salt level indicator, on the brinewell inside
the brine tank features the range between 0
and 8. Take note of the actual salt level.
Press ▲or ▼ button to set the actual salt level. In
the example provided, the salt level is 4. LED
indicating low level of salt will light up when the salt
level is 2 or below. Prevent the salt level in the brine
tak to drop below that level.
Important notice!
Brine -
well
Label
(sticker)
Salt
level
11

Make sure to set the actual salt level each time the
brine tank is refilled with salt.
In order to cancel the salt level control feature,
press ▲or ▼ button until the display screen shows
OFF. Pressing the “SET” button will confirm the
changes introduced.
The description of the remaining functions
available at the control panel is provided in
section II.
B. Programming the control panel of Aquahome 30-N water softener
Descriptions in English: display screen, current salt level button, brine tank illumination button
“up” button, menu selection button; “down“ button, regeneration button (tonight – press;
immediately (hold for 3 seconds), set/menu button
Upon plugging the transformer
into a power socket the display
screen will show a model code of
a given model of the device (u30)
for a few seconds as well as the
test number (such as J30 or
similar).
Then the display screen will show
the PRESET TIME caption as well
as flashing 12:00.
When the display screen shows --
--, press ▲or ▼buttons until
caption u30 appears on the
display screen.
Then press the “SET” button, the
display screen will show
PRESENT TIME caption as well
as flashing 12:00.
Audio signaller (BIP): the signaller
will activate each time the button
is pressed. Single audio signal
indicates one change on the
display screen. Series of audio
signals indicates wrong button
being pushed and the need to
push another button.
Setting Time
Figure
4
12

In order to set time, press ▲button to move
ahead or ▼button to set time back.
If a twelve-hour clock is set, the “ante
meridiem” (“AM”) caption will appear on
the display screen for the after midnight
part of the clock - hours between 000 and
1159 and the "post meridiem” (“PM”) caption
for the after midday part of the clock - hour
between 1200 and 2359.
With each pressing of one of the ▲or ▼
buttons the time will increase or decrease with
one minute increments. If any of the buttons
remains pressed the time will change at a
faster rate.
Programming water hardness
Single press of the SET button (in Set Time
mode) will move programming to the SET
HARDNESS mode (Water hardness); the
value flashing on the display screen should be
25 (default value).
Now code the hardness of used water in
grains per American gallon - gpg (water
hardness expressed in, for example, odH - in
accordance with the German scale, should be
multiplied by 1.036). Water hardness can be
expressed in different units. Below is the table
showing water hardness units most commonly
used in the country:
Hardness unit
mg CaCO3/l
of French
degree of water
hardness
odH German
degree of water
hardness
gpg
1 mg CaCO3/l
1
0,1
0.056
0.058
1 French degree of
water hardness (of)
10
1
0.56
0.58
1German degree of
water hardness (on)
17.8
1.78
1
1.036
1 gpg
17.2
1.72
0.96
1
In case when the results of the
physical and chemical analysis
are not available, water hardness
information should be obtained
from local water supply company
or from relevant regional office of
the State Sanitary Inspectorate or
it should be self determined with
the use of a test which can be
obtained from the vendor. Please
enter the results obtained on page
4 of this manual as well as on a
separate label, which should be
placed under the brine tank cover
with the use of adhesive tape.
If raw water contains iron in
concentration exceeding 0.2 mg/l
please use adjusted water
hardness instead of water
hardness. The adjusted water
hardness is calculated with the
following formula:
Adjusted water hardness [of] = water hardness [of] + 4.8
iron content in Fe mg/l
Enter the water hardness number
or adjusted water hardness
number (expressed in gpg) to the
water softener software as
operational water hardness. In
order to enter the water hardness
number press ▲or ▼button until
the relevant number appears on
the display screen. Pressing the
▼button will reduce the displayed
water hardness number by 1.
Pressing the ▲button will
13

increase the displayed water
hardness number to the maximum
water hardness number for given
device. Between water hardness
numbers of 1 and 25, each
pressing of ▲or ▼buttons will
respectively increase or reduce
water hardness number by
increments of one unit. Between
water hardness numbers of 25
and the maximum water hardness
number, the increments are 5
units. If the button remains
pressed, the number will change
twice within one second.
Setting regeneration hour
Single press of the SET button (in
Set Water Hardness mode) will
move programming to the SET
RECHARGE TIME mode; the
value flashing on the display
screen should be 02:00 (2 a.m.)
as default value.
If this setting is confirmed (by
pressing
the “SET”
button),
the water
softener
will
activate the regeneration process
at 2 a.m. Due to water
consumption reduced to minimum
at night, 2:00 a.m. is the optimum
regeneration hour.
In order to change the
regeneration hour settings, press
the ▲or ▼buttons to set new
regeneration process start time. If
a twelve-hour clock is set, please
take note that the “ante meridiem”
(“AM”) part of the clock indicates
hours between 0000 and 1159 and
the "post meridiem” (“PM”) part of
the clock indicates hour between
1200 and 2359. Pressing the “SET”
button will confirm the changes
introduced.
With each pressing of one of
the ▲or ▼buttons the time will
increase or decrease with one unit
increments. If the button remains
pressed, the time will change by
two units within one second.
Pressing the “SET” button will
confirm the changes introduced
and will move the control panel to
the home screen.
Salt level control system
Control panel features the system of salt level
control in the brine tank. In order to set the
system of salt level control in the brine tank
proceed as follows:
Open the brine tank cover for visual
inspection of the actual salt level.
The salt level indicator, on the brinewell
inside the brine tank features the range
between 0 and 8. Take note of the actual salt
level.
Press the “SET SALT LEVEL” button as
many times as it is necessary for the salt
level indicator to match the actual salt level
noted. In the example provided, the salt level
is 4. LED indicating low level of salt will light
up when the salt level is 2 or below. Prevent
Salt
level
Label
(sticker)
Brine -
well
Salt
level
14

the salt level in the brine tak to drop below
that level.
Important notice!
Make sure to set the actual salt level each
time the brine tank is refilled with salt.
In order to cancel the salt level control
feature, press “SET SALT LEVEL” button as
many times as it is necessary for the display
screen to show OFF.
The description of the remaining functions
available at the control panel is provided in
section II.
C. Filling the brine tank with salt
Regeneration of the ion exchange resin
is implemented with the use of brine or
in other words - aqueous salt solution.
The process utilises special
regenerative salt in tablets. The brine
tank is filled with salt tablets for which
the brine tank cover must be lifted. For
wet (humid) premises it is
recommended to only half fill the brine
tank and refill the brine tank more often.
The above recommendation results
from the possibility of so called salt
bridges (concrements) being formed in
humid environment (figure 7). For
premises with standard humidity the
brine tank can be filled in full that is up
to the level of the brine valve well
height. During normal operation of the
device the control valve allows certain
volume of water into the brine tank in
order to generate aqueous salt solution
that is later used for regeneration of the
medium.
Due to specific requirements for quality
of the regeneration agent only
regeneration salt approved by the water
softener manufacturer should be used
(regeneration salt in tablets complying
with the requirements of the PN 973
norm). Use of edible salt is not
recommended.
Prior to filling the brine tank with salt
make sure that the cover of brine valve
cover is tightly closed. No salt tablet
should be allowed to this part of the
device.
The brine tank capacity is provided in
section IV - “Dimensions and technical
specifications”.
Upon filling the brine tank with salt, the
regeneration process should be
activated manually. Activities which
must be performed for manual
activation of the regeneration process
are described in section II. Once the
regeneration process in complete the
device is ready for use.
15

D. Setting the desired water hardness number of the by - pass valve
Any standard by - pass valve, fitted on the
water softener, features water hardness
adjusting knob (blend adjusting knob; figure
5). The blend adjusting knob is used to
adjust the hardness of softened water. For
households it is recommended to use water
with hardness in the range between 3 and 6
degrees (according to the German water
hardness scale). Prior to any setting, loosen
the hex nut of the water hardness adjusting
knob (turning it counter - clockwise) in order
to unlock it and to set it in motion.
In order to increase the water hardness
number in the softened water, turn the water
hardness adjusting knob counter -
clockwise, while holding the by - pass valve
handle. From fully closed position of the
water hardness adjusting knob the water
hardness number can be increased with the
maximum of six full turns. Exceeding the
maximum of 6 counter - clock turns of the
water hardness adjusting knob may result in
the screw’s internal o'rings being pulled out
of their seat and water leak from the bypass
valve. If water hardness exceeds the desired
water hardness, turn the water hardness
adjusting knob clockwise, while holding the
by - pass valve handle. Once the desired
hardness is set, the water hardness
adjusting knob may be locked in place by
tightening the hex nut (turning it clockwise)
until stop. Make sure that each time the by -
pass valve is set in the by-pass position (i.e.
with piston handle fully pushed in), the water
hardness adjusting knob must be fully
closed (turn it clockwise until stop).
Descriptions in English: (Serv position, normal operation of the softener) handle extended, softened water outlet, hard water inlet,
redirection of part of hard water, controlled by water hardness adjusting knob, softener valve outlet, softener valve inlet, water
hardness adjusting knob - in order to increase the water hardness number in the softened water, turn counter –clockwise; in order
to reduce the water hardness number in the softened water, turn clockwise
(by-pass position) handle retracted, softened water outlet, hard water inlet, hex nut –turn clockwise to lock water hardness
adjusting knob, turn counter - clockwise in order to unlock water hardness adjusting knob
Section II
1. Control panel functions
A. Manual activation of regeneration process
During operation of the water softener
situations may occur when manually
activated, additional regeneration process is
Figure
5
16

necessary. Such additional regeneration
process is required when:
actual water usage exceeds planned
water usage (for example due to guests’ visit
in the household). Such situation poses a
threat that the ion exchange capacity of the
resin will be used before the device activates
the regeneration process automatically,
the brine tank is short of salt (the brine
tank was not refilled with salt) - the brine
tank must be immediately topped up with
salt
it is the first operation of the device
(commissioning of the device).
Immediate regeneration
Press the RECHARGE button (see
figure no. 3 and 4) and hold it until the
display screen shows flashing caption
reading RECHARGE NOW or
RECHARGE. The first phase of the
regeneration process will begin - filling
the brine tank with water. Subsequent
phases will be activated automatically.
Upon completion of the regeneration
process water softening capacity of
the device will be restored.
Regenerate tonight
Press the RECHARGE button (see
figure no. 3 and 4). The RECHARGE
TONIGHT caption will begin flashing.
The regeneration process will begin
on the preset hour (2.00 AM as
default). In order to cancel the
regeneration instruction press the
RECHARGE button again (but do not
hold it). The RECHARGE TONIGHT
caption will disappear from the display
screen.
Important notice!
If the “Clean Feature” is set ON, the
normal regeneration process is
preceded by a cleaning backwash
and rinse (in case of Aquahome 30-N
the words “CLEAN” and “Bkwsh” or
“Rinse” will flash on the display
screen, along with the minutes of the
clean cycle remaining).
Important notice!
During the course of the regeneration
process the device will not generate
softened water.
B. Additional functions featured by Aquahome 20-N
SALT EFFICIENCY (Lower
salt consumption mode),
CLEAN
FEATURE
(cleaning
function),
CLEAN FEATURE MINUTES
(Duration of cleaning),
MAXIMUM DAYS BETWEEN
REGENERATIONS
(Maximum time period between
regenerations in days
during water uptake idle
17

period),
97% FEATURE (Automatic
activation of the regeneration
process after the ion exchange
capacity of the resin has been used
in 97%),
12/24 HOUR CLOCK (12
or 24 - time display
mode),
BACKWASH & FAST RINSE
TIMES (Duration of
backwash and
fast rinse),
SECOND OUTPUT CONTROL
(Additional output of the
control panel)
To set any of the functions listed
above, press the “SET” button and
hold it, until the display screen shows
“000”.
Press again the “SET” button, but do
not hold it–the display screen will
show the SALT EFFICIENCY mode
(the display screen will show the SET
caption and the letter E). In order to
activate or deactivate the above
function, press ▲or ▼button, until
the display screen shows ON or OFF.
Salt efficiency (reduced salt
consumption) mode
When the salt efficiency (reduced salt
consumption) mode is ON, the device
will run the regeneration process more
often, consuming less salt and water
for the process. The use of salt
efficiency mode will depend on the
quality of water used in the
household.
Setting of this function can only be
implemented by the service team of
the supplier or manufacturer.
Press again the “SET” button (but do
not hold it) –the display screen will
show SET CLEAN caption.
Cleaning
This must be activated (ON). If the
clean function
is set ON, the
normal
regeneration
process is
preceded by a backwash cleaning
and fast rinse, enabling removal of
sediments, such as mechanical
sediments from the filtering mesh,
which is located in the main
distributor. If the display screen shows
(OFF), then use the ▲or ▼ button to
change it to (ON).
Press again the “SET” button (but do
not hold it) –the display screen will
show SET TIME CLEAN caption.
Duration of cleaning
The display screen will show a
flashing number, such as 5, which
indicates that duration of backwash
cleaning and fast rinse will be 5
minutes. It is recommended to set the
cleaning time to one minute as a
standard. In the case when the input
water contains increased amounts of
impurities such as sand, sludge,
slurry, etc., the duration of cleaning
may be extended to a maximum of 15
minutes. In order to change the value
on the display screen, press the ▲
button to reduce cleaning duration
time or the ▼button to reduce it.
Press again the “SET” button (but do
not hold it) –the display screen will
show SET RECHARGE caption.
Maximum period between
regenerations in days during water
uptake idle period
Automatic regeneration during water
uptake idle period helps maintaining
microbiological cleanliness of the
medium (during water uptake idle
period the medium may become
inhabited by microorganisms and
bacteria). With factory settings the
(AUTO) function will be inactive which
means that the device will not
regenerate during the water uptake
idle period. Press the ▲or ▼button
until the desired number appears on
the display screen. Available range of
settings is between 1 and 15 days
(DAY).
Press again the “SET” button (but do
not hold it) –the display screen will
show alternately flashing SET as well
as 97 and OFF captions.
Automatic activation of
regeneration process when the ion
exchange capacity of the resin has
been used in 97%
18

With factory settings (97 and OFF)
this function is not active. When
activated by pressing the ▲or ▼
buttons (the display screen will show
alternately flashing 97 and OFF
captions) the device will activate
regeneration process each time when
the ion exchange capacity of the resin
has been used in 97%, regardless of
the time of day.
Setting of this function can only be
implemented by the service team of
the supplier or manufacturer.
Press again (but do not hold) the
“SET” button, until the display screen
shows 12-hour or 24-hour clock
mode.
Setting clock mode (12-hour clock
or 24-hour clock)
Press the ▲or ▼button until the
display screen shows the desired
value, in order to 24-hour clock mode
to 12-hour clock mode and vice versa.
Backwash and fast rinse duration
time
Press again (but do not hold) the SET
button until the display screen shows
DURATION TIME caption.
press again (but do not hold) the SET
button until the display screen shows
the duration time of backwash SET
TIME bA and a number such as 5,
that will begin to flash. This means
that the backwash duration time is set
to 5 minutes. If the “SET” button is
pressed again the display screen will
show SET TIME Fr and a number,
such as 2 that will begin to flash, to
set the fast rinse duration time. This
means that the fast rinse duration
time is set to 2 minutes.
The change of duration time of the
regeneration cycles referred to
above can only be implemented by
the service team of the supplier or
manufacturer.
Then press again (but do not hold) the
SET button until the display screen
reads SET as well as Ctrl.
Additional output of the control
panel
Additional signal output to control
peripherals. Press the ▲or ▼ until
the display screen shows OFF
caption.
Press again (but do not hold) the
“SET” button, until the display screen
shows current time (hour).
Setting of the functions referred to
above can only be implemented by
the service team of the supplier or
manufacturer.
C. Additional functions featured by Aquahome 30-N
SALT EFFICIENCY (Lower
salt consumption mode),
CLEAN FEATURE (cleaning
function),
CLEAN FEATURE MINUTES
(Duration of cleaning),
MAXIMUM DAYS BETWEEN
REGENERATIONS
(Maximum time period between
regenerations in days
during water uptake idle
period),
97% FEATURE (Automatic
activation of the regeneration
process after the ion exchange
capacity of the resin has been
used in 97%),
12/24 HOUR CLOCK (12-hour
or 24-hour time display
mode),
BACKWASH & FAST RINSE
TIMES (Duration of
backwash and
fast rinse),
Salt tank illumination
Water flow through
the device
Time remaining for completion
of regeneration and indicators
of valve position
To set any of the functions listed
above, press the “SET” button and
hold it, until the display screen shows
“000”.
Then press again the “SET” button,
but do not hold it–the display screen
will show the SALT EFFICIENCY
mode (the display screen will show
letter E). In order to activate or
deactivate the above function, press
▲or ▼button, until the display
screen shows ON or OFF.
19

Salt efficiency (reduced salt
consumption) mode
When the salt efficiency (reduced salt
consumption) mode is ON, the
device will run the regeneration
process more often, consuming less
salt and water for the process. The
use of salt efficiency mode will
depend on the quality of water used
in the household.
Setting of this function can only
be implemented by the service
team of the supplier or
manufacturer.
Press again the “SET” button (but do
not hold it) –the display screen will
show CLEAN caption.
Cleaning
This must be activated (ON). If the
clean function is set ON, the normal
regeneration process is preceded by
a backwash cleaning and fast rinse,
enabling removal of sediments, such
as mechanical sediments from the
filtering mesh, which is located in the
main distributor. If the display screen
shows (OFF), then use the ▲or ▼
button to change it to (ON).
Press again the “SET” button (but do
not hold it) –the display screen will
show CLEAN TIME caption.
Duration of cleaning
The display screen will show a
flashing number, such as 6, which
indicates that duration of additional
backwash cleaning and fast rinse will
be 6 minutes. It is recommended to
set the cleaning time to one minute
as a standard. In the case when the
input water contains increased
amounts of impurities such as sand,
sludge, slurry, etc., the duration of
cleaning may be extended to a
maximum of 15 minutes. In order to
change the value on the display
screen, press the ▲button to reduce
cleaning
duration time or
the ▼button to
reduce it.
Press again the
“SET” button
(but do not hold
it) –the display
screen will show RECHARGE DAY
caption.
Maximum period between
regenerations in days during water
uptake idle period
Automatic regeneration during water
uptake idle period helps maintaining
microbiological cleanliness of the
medium (during water uptake idle
period the medium may become a
habitat for microorganisms and
bacteria). With factory settings the
(AUTO) function will be inactive
which means that the device will not
regenerate during the water uptake
idle period. Press the ▲or ▼button
until the desired number appears on
the display screen. Available range of
settings is between 1 and 15 days
(DAY).
Press again the “SET” button (but do
not hold it) –the display screen will
show alternately flashing
RECHARGE as well as 97 and OFF
captions.
Automatic activation of
regeneration process when the ion
exchange capacity of the resin has
been used in 97%
With factory settings (97 and OFF)
this function is not active. When
activated by pressing the ▲or ▼
buttons (the display screen will show
alternately flashing 97 and OFF
captions) the device will activate
regeneration process each time
when the ion exchange capacity of
the resin has been used in 97%,
regardless of the time of day.
Setting of this function can only
be implemented by the service
team of the supplier or
manufacturer.
Press again (but do not hold) the
“SET” button, until the display screen
shows 12-hour or 24-hour clock
mode.
Setting clock mode (12-hour clock
or 24-hour clock)
Press the ▲or ▼button until the
display screen shows the desired
value, in order to 24-hour clock mode
20
This manual suits for next models
1
Table of contents
Other Viessmann Water Dispenser manuals