Viewpro Mako Shark F412 User manual
1
Mako Shark F412
USE R MAN UAL
ViewproUAV Tech. Ltd
Rm 503, East Building, Coastal Times APT, Nanshan Dist, Shenzhen, China
Tel: +86-755-86052486 Website: www.viewprouav.com

1
Content
1. Product Profile ---------------------------------------------------------------- 2
2. Disclaimer and Safety Caution Preparing the aircraft ----------------3
3. Preparing the aircraft -------------------------------------------------- ------4
3.1 Packing list --------------------------------------------------------------------------------4
3.2 Definition of flight control interface ------------------------------------------5
3.3 Wiring diagram ----------------------------------------------------------------6
3.4 Installation ---------------------------------------------------------------------7
4. Remote control instruction -------------------------------------------------9
5. Flight control tuning ----------------------------------------------------------10
6. Pre-flight inspection ----------------------------------------------------------10
6.1 Calibrate Compass ----------------------------------------------------------------------11
6.2 Airspeedometer calibration ---------------------------------------------------12
7. Routing Planning --------------------------------------------------------------13
8. Battery Charger ----------------------------------------------------------------14
9. Aircraft Specification ---------------------------------------------------------15

2
1. Product Profile
Mako Shark F412 is electric VTOL Fixed wing UAV with the features of long
endurance, high reliability, high climb rates, long control range and convenient
maintenance, it’s easy to deal with the flight in high drop terrain. It equips with 4pcs
6S 30000mAh battery for 4 hours flight endurance to achieve functions like program
control, 3D coordinate airline autonomous flight, target tracking, emergency return
and fixed point circling.
Adopt detachable modular design, F412 is widely used in outfield rapid deployment
with excellent user experience by quick assembly within 2 minutes. The avionics
subsystems implement the functions of UAV posture calculation, flight control, track
control, flight management etc., it also supplies electricity for all airborne
equipment.
With maximum 10kg payload, it plays an important role in environment monitoring,
power/oil pipeline inspection, railway patrol, surveying and mapping, border patrol,
forest fire-fighting etc.

3
2. Disclaimer and Safety Caution
2.1 Disclaimer
1) Thank you very much for choosing this product. If you want to know more about this
product beyond the user manual, please visit our website or contact with our sales.
2) To use this product before , please read this statement carefully. Once used, this statement
will be deemed to have been fully accepted and accepted internally. Please strictly comply with the
user manual to install and operate this product. Viewpro will not be liable for any damage or
damage caused by improper installation and use of the product.
2.2 Safety Caution
1) When this product works, the high-speed rotation of the propeller will bring different
degrees of damage and damage to people and articles. Therefore, when you use this product,
please do not use it in places with many people or complicated environment.
2) Please abide by local laws and regulations when using any products of our company.
3) Before use, please read the operation manual carefully and watch the video of the aircraft
operation process. Our company will not be liable for any loss caused by violation of the relevant
operation process.
4) Do not modify the parameters of the remote control. When it is used, the remote control
must be turned on before the aircraft is powered on. When power is cut off, the remote control
must be turned off before the aircraft is powered off.
5) Do not overcharge or put the battery long time with full or low capacity. The two
connectors should be connected to the charger at the same time to charge the battery. The red light
is always on during charging, and the green light is on after charging;The storage voltage of a single
battery is controlled at about 3.85V, the total voltage of a 3S battery is controlled at about 11.55V,
the total voltage of a 4S battery is controlled at about 15.4V, and the total voltage of a 6S battery is
controlled at about 23.1V.
6) Before the flight mission, please confirm the battery voltage;
7) Keep away from unsafe factors, such as obstacles, people, children, buildings, high-voltage
lines, trees, etc.
8) Do not get close to or touch the rotating motor or propeller to avoid being cut by the
rotating propeller.
9) Be sure to fly under the safe take-off weight in case of danger.
10) Before flight, please check whether the propeller and arm are properly installed and
firmly.
11) When using the ground station to operate the UAV, the captain and pilot should have
relevant operating qualifications.
12) The operator must have relevant experience in aircraft operation.Novices must be trained
in simulators to operate the training machine after they have mastered the simulated aircraft.

4
3. Preparing the Aircraft
3.1 Packing list
1
Carrying case *1
2
Aircraft Fuselage *1
3
Left VTOL arm *1
4
Right VTOL arm *1
5
Left tail wing *1
6
Right tail wing *1
7
Left wing *1
8
Right wing *1
9
Tail fuselage *1
10
Payload compartment *1
11
Tail propeller *1
12
VTOL propeller(2cw,2ccw) *4
13
Airspeed metal nose *1
14
Remote Control *1
15
6S 30000mah Batteries *4
16
Battery Charger *1
17
Accessory Kits *1
5
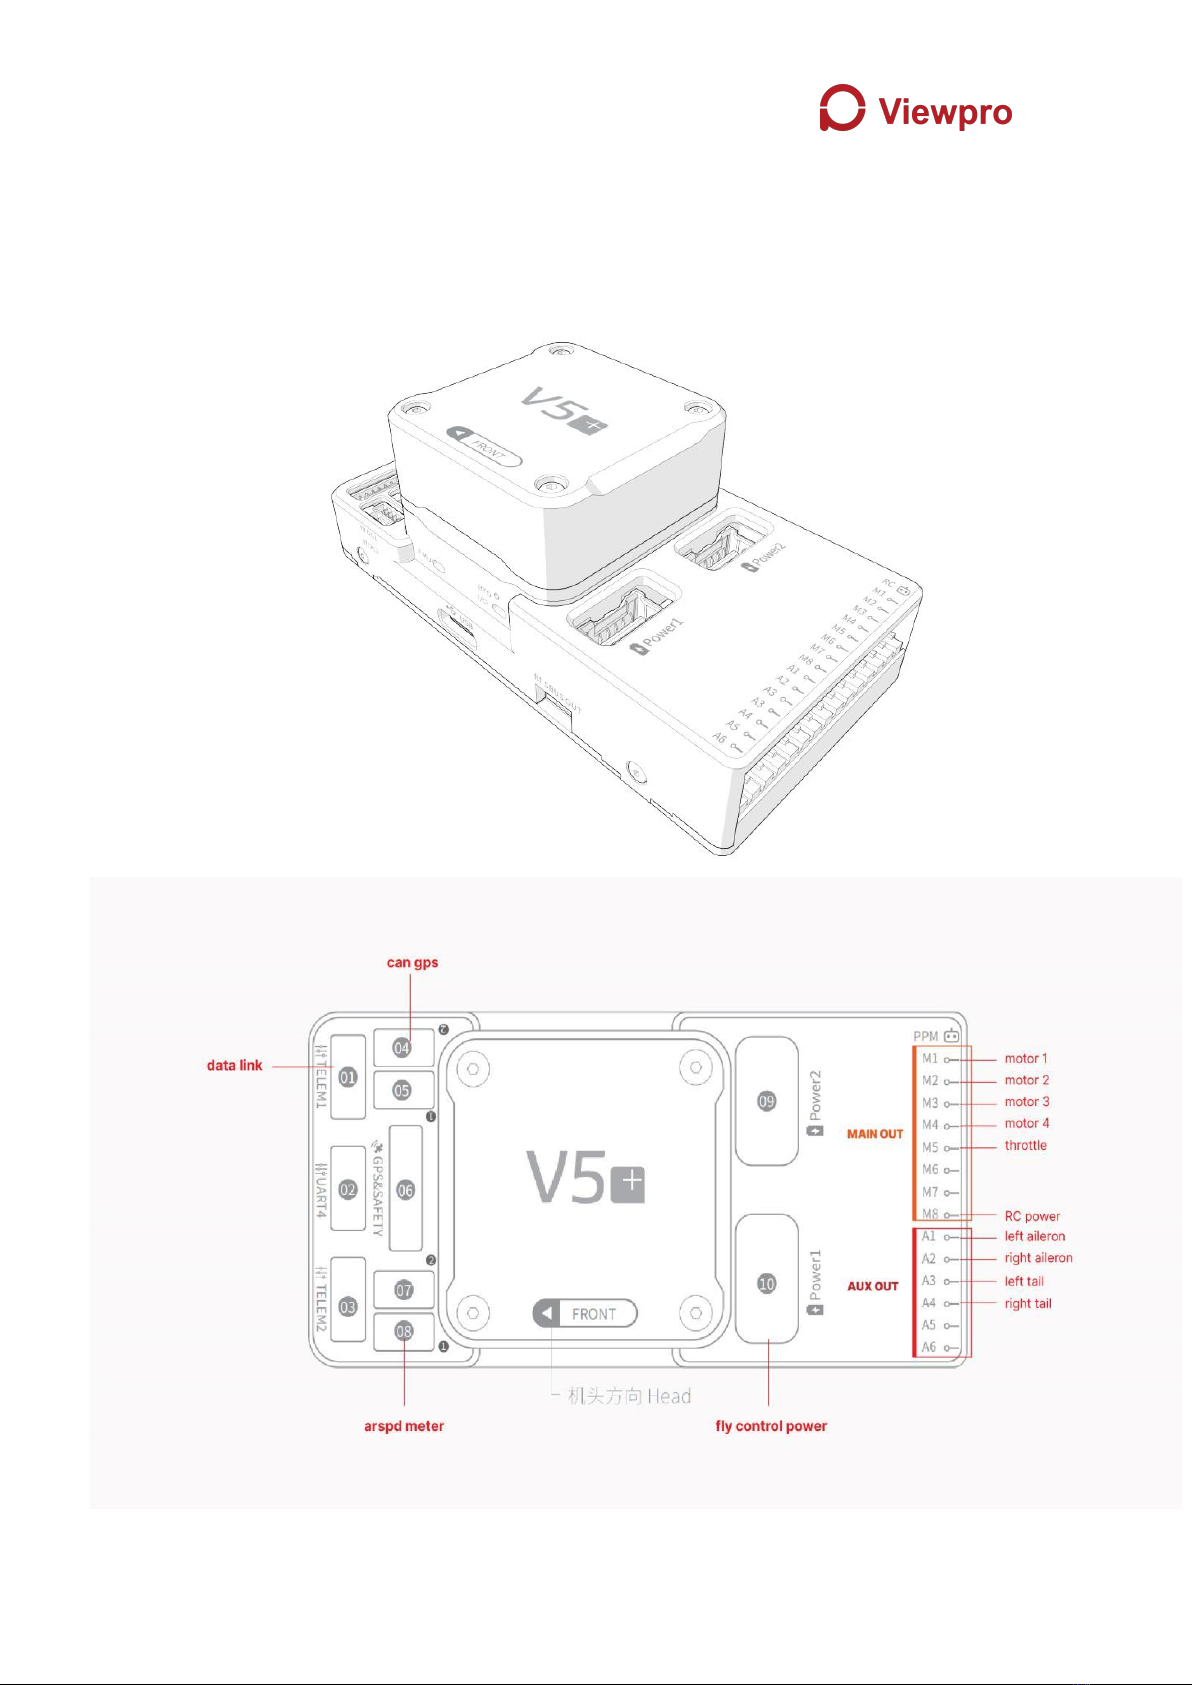
3.2 Definition of flight control interface
Mako Shark F412 adopt V5+ Autopilot which is in accordance with PX4 standard, Please
follow below definition of the flight control interface, Viewpro already write in the tested
parameter for flight. Please don’t change it randomly.

6
3.3 Wiring diagram
The wiring diagram shows the physical connection/layout of electrical system for Mako
Shark F412.

7
3.4 Installation
The Aircraft is with quick release connector design which is not required tool during the
whole process of aircraft assembly.
1) Battery Installation
Put the battery stickers on the bottom of the battery and battery compartment respectively,
then fix the four batteries with cable ties and put them into the battery compartment.

8
2) Propeller installation
Rotations:
CW = Clockwise
CCW = Counter Clockwise
①Rotor propeller installation
If it is not removed frequently, an appropriate amount of screw glue can be used to
prevent the screws from loosening. No screw glue is added. You need to check the propeller
screws every time you take off. Please ensure rotations of propeller are right!
②Tail motor propeller installation
The side with words of the propeller is close to the motor. Install propeller gasket and
tighten nuts with a wrench.

9
3) Aircraft center of gravity balance
The center of gravity of the Mako shark F412 is at the position of the carbon rods of the
wings. Pull the wing out a little and lift the aircraft upwards to keep the center of gravity of
the aircraft balanced. If it is unbalanced, it can be adjusted by moving the battery back and
forth.
4. Remote control instruction
1) Setting of FT24 Remote control
The Remote Control is set two switch as default (SD: change fly mode, SA turn on/off flight
light). User can set more switch to achieve more functions according to your requirement.

10
2) Connection with Ground Control Station
①Connect one end of the USB cable to the microusb port of the remote control, and
the other end to the computer.
②Power on the aircraft remote control, open the missionplanner software, select the
corresponding com port in the upper right corner, and select the default baud rate (115200)
③Click connect to get aircraft data on the ground
5. Flight control tuning
Flight control tuning is very important for a good flight, because tuning involves a lot of flight
control parameters, such as TECS, PID, inner loop control, outer loop control, Angle, speed, etc. Each
aircraft has different adaptive parameters. Viewpro already finished the flight control tuning, please
use directly.
6. Pre-flight Inspection
The aircraft is well configured and debugged, can be used directly for flight missions. Due to
the difference in the earth's magnetic field environment, you may need to re-calibrate the magnetic
compass.
Note:
Under no circumstances should the electronic compass be near magnets or areas with strong
magnetic fields. Otherwise, the electronic compass will be damaged and the aircraft will be abnormal
or even out of control.
When is calibration required?
①After updating the firmware, before the first flight.
②When arriving at a new site far away from the original flight site (such as across states and
cities).

11
③The aircraft drifts or the hovering not stable.
Note:
①Do not carry magnetic devices (such as mobile phones, keys, etc) during calibration.
②Do not perform calibration in places with strong magnet, such as parking lots, building
areas with steel bars, etc.
③During the calibration process, please make sure the aircraft rotates horizontally or
vertically.
Keep away from magnetic materials and other electronic equipment during the
calibration process. Choose an open area without high-rise buildings and strong magnetic fields.
Before calibration, reconfirm the aircraft is placed on a flat surface and take away the electronic
devices.
1) Calibrate Compass
Calibrate the compass every time to a new place.
Setup→Mandatory hardware→compass→start
①Usually we only open external compass, if you use two compass you should set
external compass with the most prior.
②Click start then hold the aircraft and rotate it in six directions: horizontal, left, right, up,
down and back until the ground station shows that the calibration is successful.
③If it is inconvenient to hold the plane like this, this operation can be done before
assembling, hold the body and calibrate it

12
*Please correspond to the positions of the plane above, and then turn the plane. Each axis
requires one circle of the airplane. When the ground station progress bar reaches 100%. The
calibration is completed.
After the compass calibration is completed, place the aircraft horizontally and wait for the
flight control system to restart automatically.
Note:
If the ground station prompts that the calibration has not passed, you need to
re-calibrate. If the calibration fails several times, it is recommended to change the location and
re-calibrate.
This aircraft uses Mission planner for configuration. It is recommended to use Mission
Planner software for sensor calibration and configuration changes.
① In FBWA mode, the aircraft should look up and down, and observe the feedback of
the tail rudder surface of the aircraft. The tail rudder should swing down when looking up, and
the tail rudder should turn up when looking down.
② In Manual mode, the remote control controls the rudder to observe the change of the
plane's rudder surface.Left stroke, aileron left high and right low; Right stroke, aileron left low
and right high; Push rod tail rudder downward; Pull rod rudder up.
2) Airspeedometer calibration
When there is no wind, click actions on MP screen, then click Preflight_calibration. Cover
the pitot tube with your hand, blow into it, and observe the ground station to see if there
is a significant change in airspeed
3) Positioning State. confirm whether the GPS is 3D locked, the accuracy hdop is less
than 1;
4) In the quick interface, check whether the battery voltage, airspeed, altitude and
flight mode are normal;
5) Ensure that no error is reported on HUD interface;
6) Flight control adjustment. This is a setup for advanced users. If you are familiar with
PIXHAWK flight control, you can adjust some parameters according to your flight needs.
13
Note: The flight control parameters are already set by Viewpro, without special needs,
please don’t change the parameters.
7) Check the aircraft center gravity is no problem again.
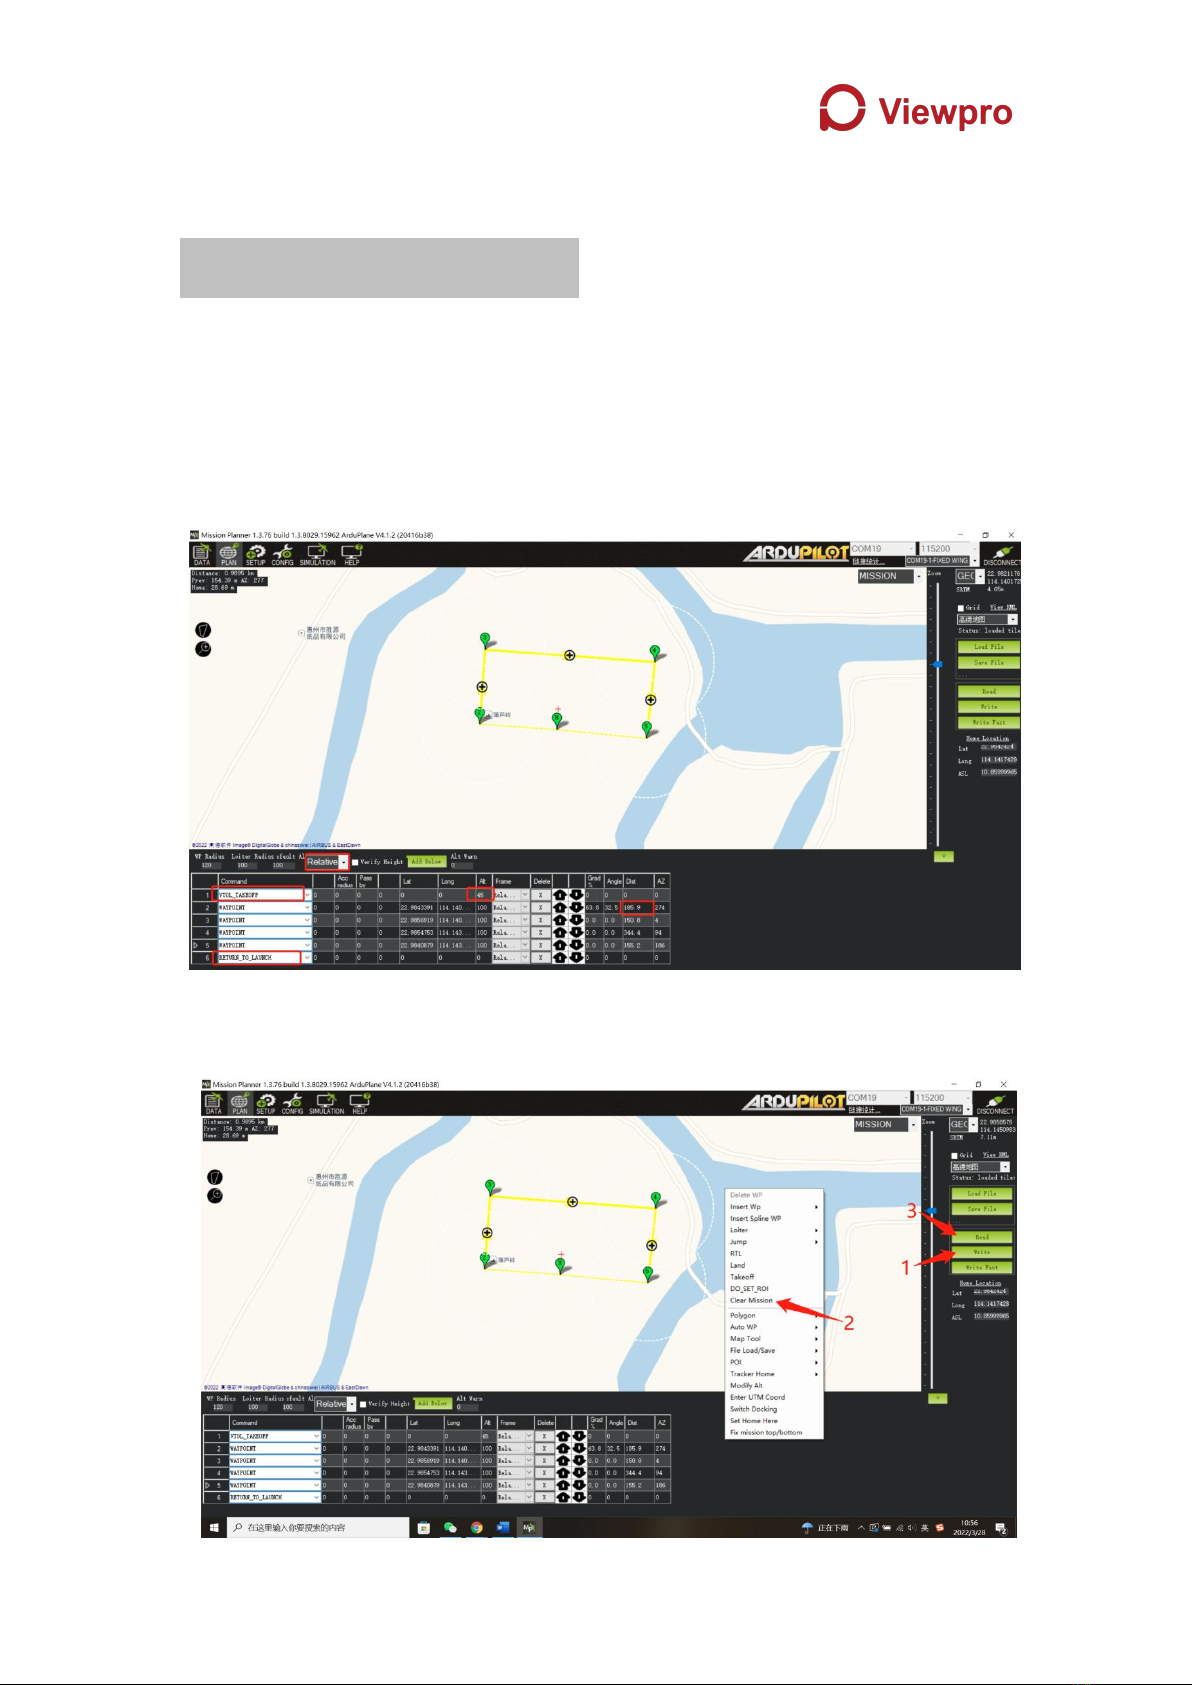
7. Routing Planning
1) In PLAN interface ,create your flight plan,Choose relative height.
2) The first point must be set VTOL_TAKEOFF,The altitude should be set according to the
surrounding environment
3) The distance from the first point to the second point should be between 150 and 200
meter
4) The last point we usually set return_to_launch,Because we set q_rtl_mode=1 in flight
control parameter
5) When the route is drawn,Click Write
6) Right mouse click,click clear mission
7) Then click Read

14
8) Then return to first interface,click arm then auto,you can start flying
8. Battery Charger
Under storage mode,the battery can be charged/discharged the cell voltage to 3.8V,When
the battery voltage is higher than 3.8V per cell the charger will discharge the battery;on the
opposite, When the voltage is lower than 3.8V per cell the charger will charge the battery.

15
9. Aircraft Specification
Model No.
Mako Shark F412
Type
VTOL Fixed Wing
Color
White as defualt (Support customization)
Wingspan
4128mm
Length
1926mm
Belly to Ground
225mm
Battery Cabin
30.5×19.7×16cm
Material
Carbon fiber + glass fiber +PVC
Airframe Weight
15kg(contains the power)
MTOW
36kg
Max Payload
10kg
Suggested Load
5kg
Flight Time
136min with 5kg payload, 102 min with 10kg payload
Max Cruising Speed
110km/h
Stall Speed
54km/h (15m/s)
Max Flight Altitude
4500m
Max Wind Resistance
15m/s (fixed wing), 8m/s (VTOL)
Battery
(Recommended)
4 * 6S 30000mAH Li-po
Working Temperature
-20℃~45℃
IP Grade
IP45
Package Chargable Size
158×66×76cm
ViewproUAV Tech. Ltd
Website: www.viewprouav.com
Support: info@viewprotech.com
Tell: +86 755 8605 2486
Addr.: Rm 2303, 23th Fl, East Block B, Coast Times APT, Shennan Blvd, Nanshan Dist, Shenzhen, China
Table of contents
Other Viewpro Drone manuals


