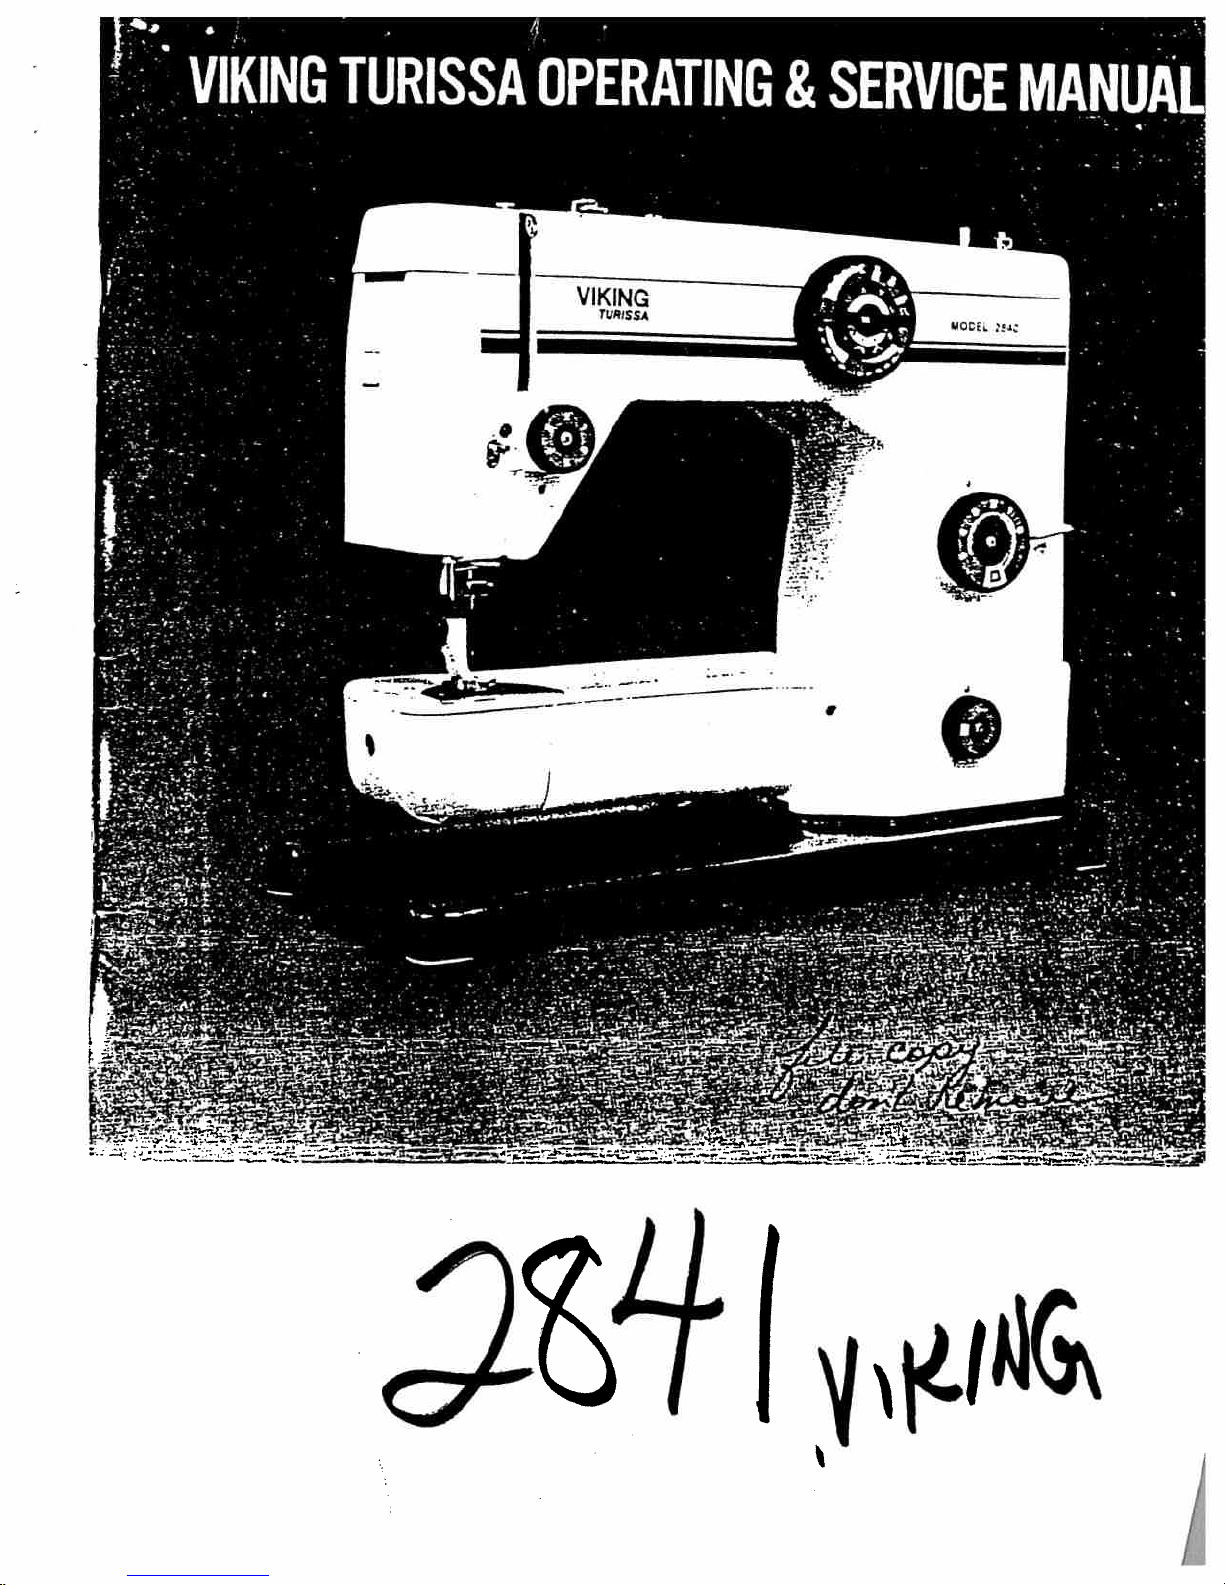
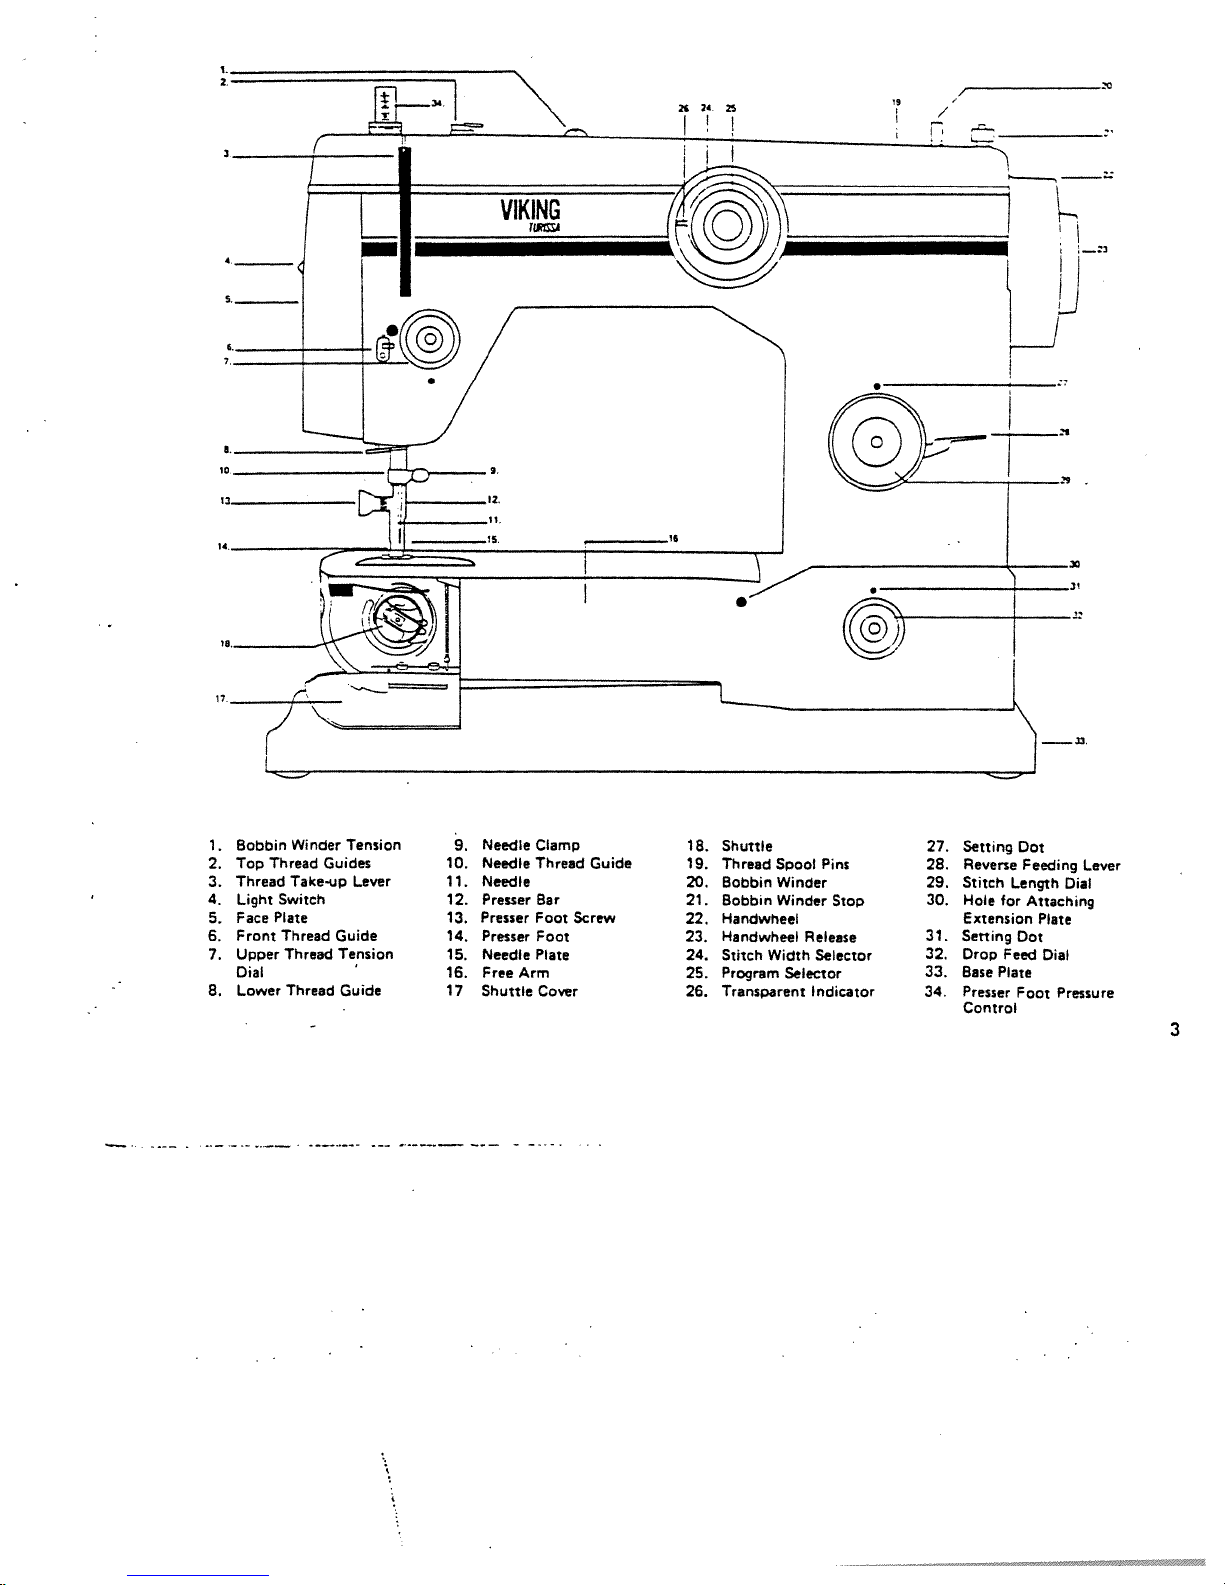
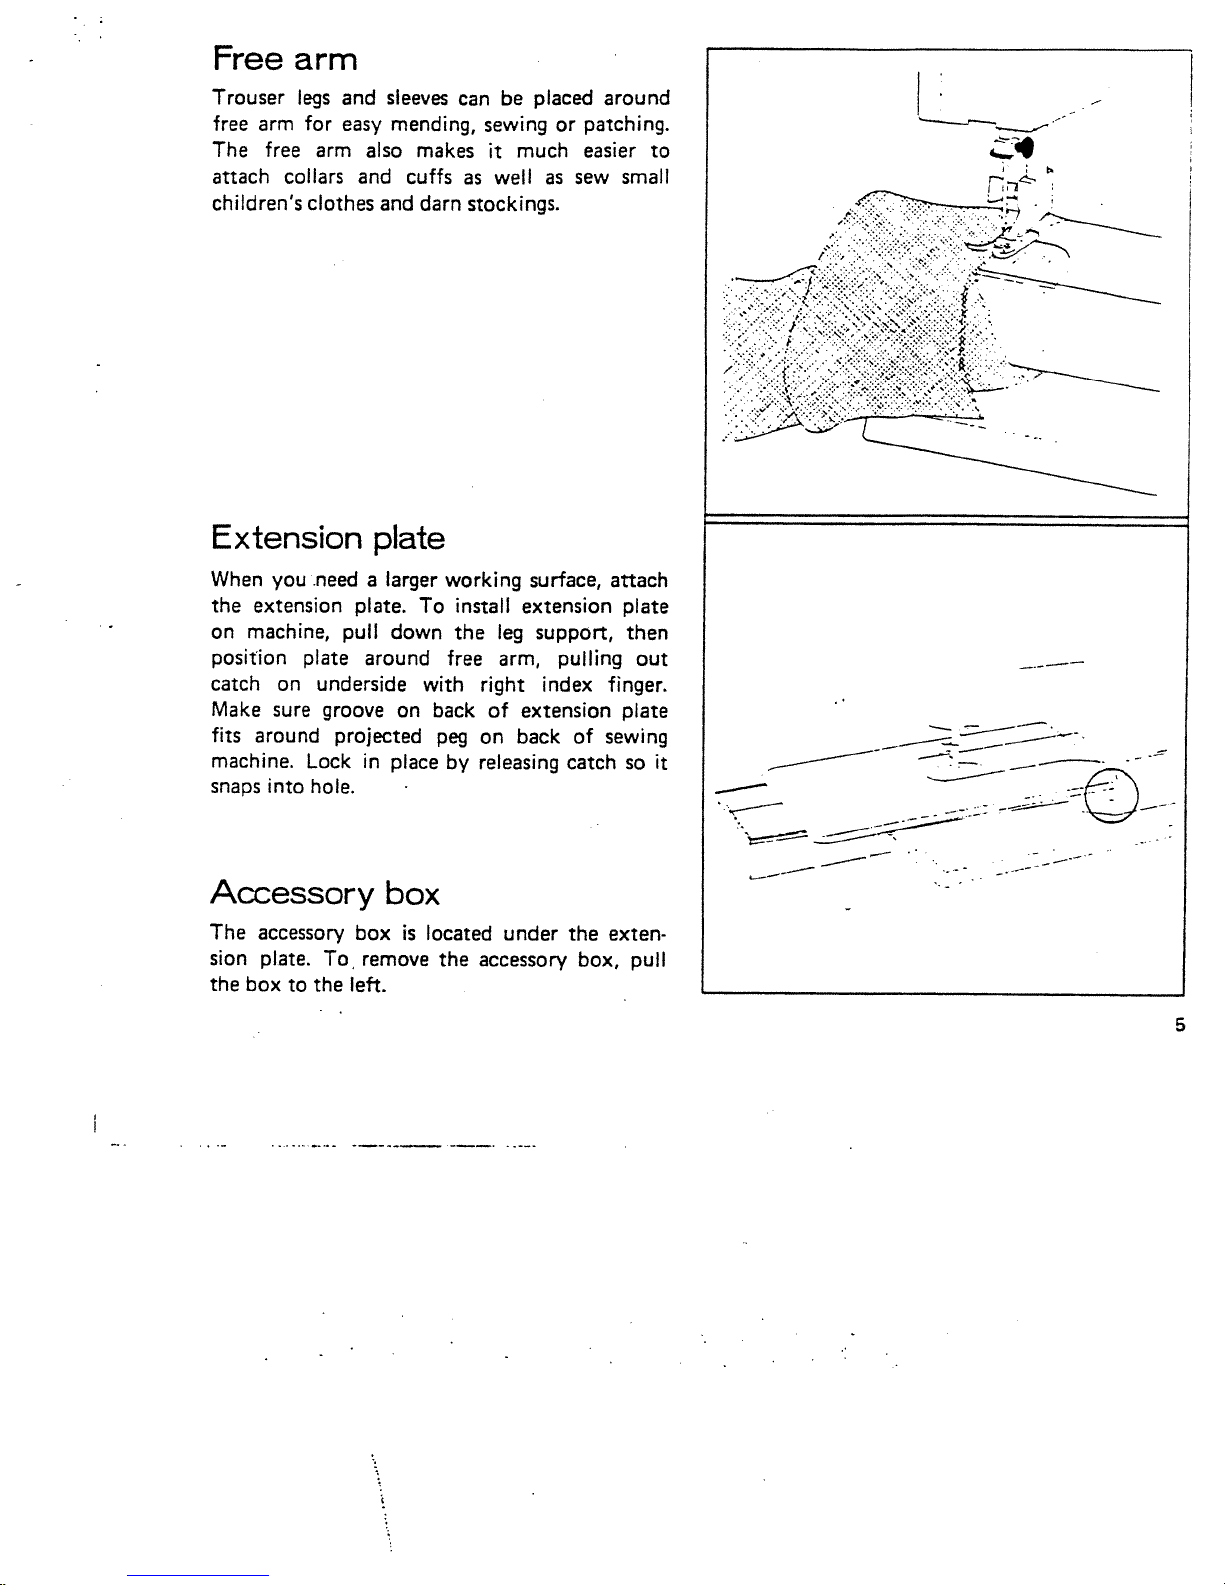
Viking Turissa Instruction and safety manual


I
We
have
published
the
Operation
and
Service
Manual
to
aid
you
in
the
operation
and
minor
service
repairs
of
your
new VIKING
TURISSA
SEW
ING
MACHINE.
If.
you
carefully
read
this
manual,
you
will
be
able
to
make
use
of
all
the
sewing
possibilities
that
are
available
to
you.
We
hope
you
will
enjoy
your
VIKING
TURISSA
and
have
many
pleasant
sewing
hours.
VIKING
SEWING
MACHINE
CO.,
INC.
I
I
ieM,y
(Ci•

Table of
contents
OPERATING
MANUAL
Accessory
box
5
Selecting
the
stitch
14
Blindstitching
20
Sewing
on
buttons
29
Bridging
Stitch
24
Shell
stitch
25
Bringing
up
the
lower
thread
9
Straight stitching
15
Buttonhole
Knife 28
Tension
of lower
thread
.
10
Buttonholes
26
Tension
of
upper
thread
.
10
Changing
the
needle
6
Thread
cutter
10
Changing
the
presser
foot
‘ankle”
12
Threading
the
lower
thread
S
Changing
the
srsapon
presser
foot
12
Threading
the
upper
thread
9
Connection
to electric
outlet
4
Three
step
zigzag
22
Correct
and
incorrect thread tension
1 1
Twin needles
Darning
36
Winding
the
bobbin
7
Etastic
straight
stitch
.
19
Zigzag
stitching
16
Extension
plate
5
Zipper
presser
foot
30
Free
arm
5
Free
.hand monograms
and
embroidery
37
Insertion
of
bobbin
case
Lighting
4
Lowering
the
feed
dog
13
Meiding
and
patching
34
:::::
:
::
:::
::::::
SERVICE
MANUAL
..39
Needle
position
15
Belt
tension
Qverlock
stitch
23
Bobbinwincler
adjustments
46
Pattern
stitching
16
Bobbinwinder
wheel
replacement
47
Patterns
and
utility
stitches
17
Change needle
39
Presser
foot
pressure
control
4
Cleaning
40
Regular
presser
foot
13
Light
bulb
45
Removing
the
bobbin
case
7
Lubrication
I
Reverse
cycle
patterns
and
utility
stitches
18
Maintenance
hints
49
Ric
rac
stitch
18
Needle
plate
replacement
45
Roller
presser
foot
30
Sewing
hook
clogged
48
2

1.
Bobbrn
Winder
Tension
2.
Top Thread
Guides
3.
Thread
Take-up
Lever
4.
Light
Switch
5.
Face
Plate
6.
Front
Thread Guide
7.
Upper Thread
Tension
Dial
8.
Lower
Thread
Guide
9,
Needle
Clamp
10.
Needle
Thread
Guide
11.
Needle
12.
Presser
Bar
13.
Presser
Foot
Screw
14.
Presser
Foot
15.
Needle
Plate
16.
Free
Arm
17
Shuttle
Cover
18.
Shuttie
19.
Thread
Spool
Pins
20.
Bobbin
Winder
21.
Bobbin Winder
Stop
22. Handwheel
23.
Handwheel
Release
24.
Stitch
Width
Selector
25,
Program
Selector
26.
Transparent
Indicator
27.
Setting
Dot
28.
Reverse
Feeding
Lever
29.
Stitch
Length
Dial
30.
I-tote
for
Attaching
Extension
Plate
31.
Setting
Dot
32.
Drop
Feed
Dial
33.
Base
Plate
34.
Presser
Foot
Pressure
Control

Connection
to
electric
outlet
A.
Plug
cord
into
foot
control.
I
c
B.
Attach
plug
to
machine.
C.
Plug
cord
into
wall
outlet.
A
Lighting
To
turn
light
on
or
off,
press
button
located
on
______
face
plate.
The
light
bulb
is
located
inside
the
face
plate. To
remove
the
bulb,
unscrew
the
bulb
through
the
opening
at
the
bottom
of
the
face
plate.
Presser
foot
pressure
control
The pressure
control
for
the
presser
bar
is
lo
cated
on
top
of
the
machine
on
the
left
side.
To
change
the
pressure
on
the
presser
foot,
press
down
on
the
outer
ring.
The
inner section
will
move
up.
You
now
have
no
pressure
on
the
j
—
presser
foot.
As
you
push
down
on
the
inner
section
you
will
increase
the
pressure.
Loose
pressure
on
the
presser
foot
is
used
mostly
for
sewing
on
certain
types
of
stretch
fabric
such
as
sweater
fabric.
Tight
pressure
on
the
presser
foot
is
used
for
sewing
girdle
fabrics.
‘I
ii
1’
4

Free
arm
Trouser
legs
and
sleeves
can
be
placed
around
free
arm
for
easy
mending,
sewing
or
patching.
The
free arm
also
makes
it
much
easier
to
attach
collars
and
cuffs
as
well
as
sew small
children’s
clothes
and
darn stockings.
Extension
plate
When
you
need
a
larger
working surface,
attach
the
extension plate.
To install
extension plate
on
machine,
pull
down
the
leg
support,
then
position
plate
around
free
arm,
pulling
out
catch
on
underside
with
right
index
finger.
Make
sure
groove
on back
of extension plate
fits
around
projected
peg
on
back
of
sewing
machine.
Lock
in
place
by
releasing
catch
so
it
snaps
into
hole.
Accessory
box
—
The
accessory
box
is
located
under
the
exten
sion
plate.
To, remove
the
accessory box,
pull
the
box
to
the
left.
5

Needle
and
thread
Your
sewing
machine
uses
a
type
705
or
type
130
needle.
This
number
refers
to
the
length
and
configuration
of
the
needle.
It
is
best
to
purchase
your
needles from
your
dealer.
How
ever,
if
this
is
not
possible
due to
some
emer
gency
condition
in
your
locality
you
can
get
by
temporarily
with
what
is
commonly
called
a
15x1
needle
which
is
carried
in
stock
by
almost
all
sewing
machine stores
or
wherever
they
sell
sewing
machine
needles.
The
above-mentioned
needles
come
in
various
widths.
And
the
larger
the
width
number
the
larger
the
eye
of
the
needle.
With
regard
to
the
size
of
the
needle
it
may
be
generally
said
that
numbers
80/12
or
90/14
can
be
used
for
most
fabrics.
For
a
finer
thread
or
for
sheer
or
tightly
woven
fabrics
a
finer
needle
can
be
used.
For
a
very
heavy
or
stiff
fabric
a
heavy
needle
can
be
used;
the
higher
the
needle
number
the
heavier
the
needle.
The
sizes
of
thread
and
needle
to
be used
are
shown
in
the
chart.
Changing
the
needle
Loosen
the
needle clamp
screw
and
remove
the
needle.
When
you
insert
the
new
needle,
turn
the
flat
side
away
from
you
and
push
the
needle
up
into
the
needle
socket
as
far
as
the
stop.
Tighten
the
screw
so
that
the
needle
is
held
firmly.
Synthetic
Thread
No.
Cotton
Sewing
Thread
No.
60
50--60
40--50
40
30
30
Machine
Embroidery
Thread
No.
50
30—50
30--50
Needle
Width
No.
70/10
80/12
90/14
100/16
110/18
120120
-
Synthetic
threads
are
not
generally
numbered.
Use
a
fine needle
for
fine
thread
and
a
heavier
needle
for
heavier
thread.
6

Removing
the
bobbin
case
Lift
or
remove
extension
plate.
Bring
needle
to
highest
position
by
turning
haridwheel
to
wards
you.
Open
shuttle
cover.
Grasp
bobbin
case
latch with
thumb
arid
index
finger
and
pull
out
bobbin
case.
Winding
the
bobbin
With
one hand
hold
handwheel
stationary
and
use
other
hand
to
turn
handwheel
release
(A)
(turning
towards
you)
to
disengage
sewing
mech
anism.
Place
empty
bobbin
on
bobbin
winder.
Rotate
bobbin
on
winder
pressing
down gently,
until the
notch
on
bobbin winder
engages
bobbin.
Push
bobbin
towards
handwheel
and
it
will
snap
in
position
next
to
bobbin
winder
stop.
Place spool
of
thread
on
spool
pin.
Guide
thread through
rear
upper
thread
guide,
around
bobbin
winder
tension
and
wind
thread
around
the
bobbin
a
few times.
Hold
the
end
of
thread
while
pressing
foot
control.
Release
end
of
thread
as
soon
as
winding process
is
underway.
Bobbin
winder
stop
will
allow
bobbin
to
fill
completely.
Now,
•move
bobbin
away
from
handwheel;
remove
bobbin
from
bobbin
winder
and
tighten
handwheel
release
(by
turning
away
from
you).
If
you
do
not
wish
to
completely
fill
your
bobbin
with
thread,
you may
stop
any
time
during
the
winding
process
by
moving
bobbin
winder
spindle
to
the
left.
7

Threading
the
lower
thread
When
bobbin
is
wound,
hold
it
beside
the
bobbin
case
with
thread
running
in
direction
of
arrow
in
photo.
Slide
thread
into the
slot
on
edge
of
bobbin
case
as
shown.
Pull
thread
under tension
spring.
Check
to
b
sure bobbin
rotates
in
direction
of
arrow when
thread
is
pulled.
The
hook
on
top
of
the
bobbin
case
is
used
to
increase
the
bottom
tehsion
when making
buttonholes
or
when
doing
embroidery
work.
Before you
insert
the
bobbin
case,
hook
the
thread
on
the
hook
on
the
bobbin
case.
Insertion
of
bobbin
case
Grasp
bobbin
case
latch
with
thumb
and
index
finger
and
place
on
shuttle
spindle,
with
bobbin
case
opening
on
top
or
nearest
the
needle.
Press
bobbin
case
to
make
sure
:it
is
locked
in
place.
Release
the
latch.
II
8

Threading
the
upper
thread
Raise
presser
bar.
Turn
handwheel
until
needle
is
in
highest
position.
Place
spool
of
thread
on
a
spool
pin
(A).
With
circular
motion,
guide
thread
through
upper
thread
guides,
rear
and
front
(B
&
C).
Bring
thread
down
and
around
tension
dial
(D).
Now
hold
spool
steady
and
pull
end
of
thread
upward
and
over
to
the
right
to
lock
thread
into
the
thread
tension
spring.
Insert
thread
through
either
eye
of
take-up
lever
(E).
Place
thread through
front
thread
guide
(F).
Guide
thread behind
and
through
lower
thread
guide
(G).
Slip
thread
around
left
hook
of
needle
thread
guide
(H).
Thread
the
needle from
the
front
to
the
back.
Bringing
up
the
lower
thread
Hold
the threaded upper
thread
and
turn the
handwheel
toward
you
until
the
needle
goes
down
and
then
up
again. When
the
needle
is
in
its
highest
position,
pull
the
upper thread
and
you
will
get
a
loop
of
lower
thread
which
is
easy
to catch.
-
You
should
not
pull
the
upper thread
too
hard
as
this
may
bend
the
needle.
Pull
the
threads
(upper
and
lower)
about
6”
(15
cm)
toward
the
rear.
If
thread
ends
are
too
short,
the
thread
may
slip
out
of
the
eye
of
the
needle
when
you
begin
to
sew.
9

—
?
/
ç</
/•>-.
10
Thread
cutter
On
the
back
of
the
presser
bar
you
will
find
a
notch,
the
thread
cutter,
which
makes
it
easy
for
you
to cut
off
the
threads.
Tension
of
upper
thread
The
dial
which
regulates
the
tension
of
the
upper
thread
is
graduated
from
0
to
5.
Your
machine
has
been
tested
with
the
thread
which
accompanies
it.
It
may
be
necessary
to
adjust
the
thread
tension
somewhat
if
you
use
thread
of
another
thickness.
For
example,
a
heavier-than-ordinary
sewing
thread
usually
requires
a
higher
upper thread
tension.
To
increase
the
upper
thread tension,
turn
the
dial
to
a
higher
number.
Tension
of
lower
thread
In
most
special
sewing
cases
it
is
sufficient
to
change
only
the
upper
thread tension.
Rarely
do
you
need
to
adjust
the
lower
thread
tension.
If
it
is
necessary
to
adjust
the
tension
of
the
lower
thread,
use
the
small
screwdriver
from
the
accessory
box.
Fit
it
in
the
larger
screw on
the
thread tension
spring and
turn
it
not
more
than
1/10th
of
a
turn
to
the
left
if
the
thread
tension
is
too
tight; to
the
right
if
it
is
too
loose.

Correct
and
incorrect
thread
tension
In
order
to
easily
understand
the
importance
of
correct thread
tension,
you
can
try
different
thread tensions
by
sewing
two
thicknesses
of
fabric.
Begin
by
using
an
excessively
loose
tension,
i.e.
you
turn
the
upper
thread
tension
dial
to
the
left
as
far
as
it
will
go.
Look
at
the
fabric
and
you
will
find
the
lower
thread
lies
straight
and
the
upper
thread
is
drawn down
into
the
lower
side
of
the
fabric.
If
you
turn
the
dial
to
the
right,
the
opposite
occurs.
The
upper
thread
lies
straight
and
the
lower
thread
comes
up
in
loops
on
the
top
of
the
fabric.
The
thread tension
is
correct
when
the
threads
interlock
in
the
middle of
the
layers
of
fabric
(approximately
at
3
on
the
dial).
Before
starting
to
sew,
check
the
tension
by
sewing
on
two
thicknesses
of
the
same
fabric
you
intend
to
work with.
Before
you
begin
to
use
the
zigzag
stitch,
check
that
the thread
tension
is
the
same
as
when
you
did
straight
stitching.
Use
a
scrap
of
fabric
to
see
how
the
zigzag
stitches
look
if
you
set
them
first
on
the
loosest
(upper
picture),
then
on
the
higher
thread
tension
(middle
picture).
Then
finally
the
correct
thread
tension
will
look
about
like
that
in
the
lower
picture.
It
is
important
that
you
use
the
same
weight
thread
on
the bobbin
as
on
the
spool.
Corrct
Wrong
Wrong
,-,.--
‘<NN’—
Correct
\/\/\/\/\/\i\
11

Changing
the
snap-on
presser
foot
The presser
feet
which
accompany
the
machine
have
the
form of
loose soles
which
are
held
in
place
on
the
presser
foot
“ankle”
by
a
spring.
To
change
the
presser
foot,
turn
the
handwheel
toward
you
until
the
needle
is
in
the
highest
position.
Remove
the
presser
foot
by
drawing
it
toward
you
while
pressing
slightly
down
ward.
Slide
the
new
presser
foot
over
the
front
edge
of
the
ankle
bracket
as
shown
in
the
illustration.
There
is a
spring
on
the
lower
end
of
the
ankle
bracket.
Slide
on
the
presser
foot
so
that
the
round
transverse
pin
on
the
presser
foot
fits
into
the
space
between
the
bracket
and
the
spring.
Then
press
lightly
backward
and
down
ward
and
the
presser
foot
will
snap
into
the
correct
position.
Changing
the
presser
foot
‘nkle”
Certain
presser
feet
cannot
be
constructed
as
loose
soles
and
then
the
ankle
bracket
must
also be
changed.
Make
sure
that
the
needle
is
in
its
highest
position. Then
loosen
the
re
taining
screw
with
your
left
hand
and
remove
the
presser
foot
ankle
with
your
right
hand.
12

Regular
presser
foot
Upper
side
L-e-
sce
The
presser
foot
(383) which
is
fitted
on
the
machine
at
delivery,
is
used
for
normal
straight
stitching,
zigzag
stitching
and
other:
utility
stitches.
As
you
can
see,
it
has
different
notches
which can
be used
as
guides
when
sewing.
If
you
wish
to
have
a
seam
allowance
about
“
(6
mm),
let
the
material
run
even
with
the
outer
edge
of
the
presser
foot
(applies
to
straight
stitching
with
the
needle
in
the
center
position).
By
moving
one
step
inwards
you
will
have
a
seam
allowance
of
about
5/32”
(4
mm).
The
innermost notch
gives
a
seam
allowance
of
about
5/64”
(2
mm).
Needle
plate
Exact
seam
allowances
may
be
obtained
by
using
guides
on
the
needle
plate
which
are
measured
from
needle
in
CENTER
position.
Lowering
the
feed dog
You
lower
the
feed
dog
by
turning
the
Drop
Feed
Dial
to “crosshatch”
symbol.
To
raise
the
feed
dog
turn
the
Drop
Feed
Dial
to
the
symbol
for
a
regular
seam.
Lower
the
feed
dog
when
you
sew
on
buttons,
form closing
bars
(bar-tacks)
and
carry
out
certain
darning
work,
embroidery,
etc.
2
47
13

14
Selecting
the
stitch
As
you face
the
machine
you
wifl
see
two
round
controls.
The one
towards the
top
of
the
machine
is
the
Stitch
Program
Selector.
The
outer
scale
is
for
selecting
the
needle
position,
the
zigzag
width
and
for
making
buttonholes.
The middle
scale
is
used
for
selecting
various
patterns.
The
inner
scale
is
used
for
selecting
various
reverse
cycle
stitches.
The
red
window
indicates
which
function
the
machine
is
going
to
perform.
The
middle
and
inside
scales
are
changed
by
moving
the
handle.
The
outside
scale
is
moved
by
turning
the
outside
scale.
Remember
to
always
turn
the
dial
clockwise.
The
other
control
on
the
right
of
the
machine
is
the
Stitch
Length
Dial,
the
reverse
cycle
control
and
the
control
for
sewing
in
reverse.

Straight
stitching
To
make
a
regular
straight
stitch
with
the
needle
in
the
center
position,
turn
the
outer
scale
on
the
Program
Selector
so
that
the
middle
o
is
in
the
red
window.
Turn
the
pattern
select
or
so
that the
symbol
on
the
handle
is
aligned
with
the
red
window.
Turn
the
Stitch
Length
Dial
to
2.
If
you
wish
a
longer
stitch,
move
the
control
toward
5.
If
you
want
a
smaller
stitch
turn
toward
0.
To
sew
in
reverse,
press
down
the
lever
located
on
the
right
of
the
Stitch
Length
Dial.
When
released,
the
machine
will
resume
normal
forward
sewing.
Needle
position
There
are
three
needle
positions:
left,
center
and
right.
On
the
outer
scale
of
the
Program
Selector
you
will
see
a
scale
from
0
-
5
in
three
different
places.
The
scale
with
the
letter
E
on
top
puts
the
machine
in
left
hand
needle
posi
tion
(line
on
left).
The
middle
scale
puts
the
needle
in
center
position.
The
third
scale
puts
the
needle
in
right
hand
position
(line on
right).
15

Zigzag
stitching
Put
needle
in
center
position.
Align
the
symbol
on
the
handle
with
the
red
window.
Move
the
outer
scale
and
select
the
width required
from
o
to
5.
The
higher
the
number,
the
wider
the
zigzag.
Select
the
length
of
stitch
desired
on
the
Stitch
Length
Dial.
Zigzag
stitches
are
mostly
used
for
overcasting
edges.
Make
sure
that
the
needle
sews
over
the
edge
of
the
fabric.
A
narrow
zigzag
stitch
is
also
used
for
sewing
tricot.
You also use
the
zigzag
stitch
for
embroidery
work,
sewing on
buttons,
snaps,
etc.
Pattern
stitching
When
using
the
decorative
stitches,
change
to
the
pattern
foot.
The
pattern
presser
foot
gives
a
more
raised seam,
thanks
to the
space
behind
the
needle-hole
on
the
underside,
and
should
be used
for
all
close
pattern
stitching
and
for
close
zigzag
stitching.
You
will
find
the
pattern
presser
foot
in
the
accessory
box.
II
Upper
Side
Under
Side
/LJ
16

Patterns
and
utility
stitches
To
obtain
the
patterns
shown on
the
middle
scale
turn the
outer
ring
to
number
5,
center
needle
position.
Turn
the
handle
so
that
the
desired
symbol
on
the
middle
scale
is
lined
up
with
the
red
window. Set
the
Stitch
Length
Dial
for
buttonholes.
The
stitch
length
can
be
varied
by
turning the
Stitch
Length
Dial.
For
decorative
stitches
we
suggest
that
you
loosen
the
top
thread
tension
slightly
so
that
the
knots
form
on
the
bottom
of
the
fabric.
We
also
suggest
that
you
put
the
bottom
thread
through
the
hook
on
the
bobbin
case.
1o
:
I
I
.
I
I
III%
II
I
,
I
I
j
‘‘blib
II’
%
•
Is
I
I
—
..
—1
‘.
ø
I
•
,
I(•••
I
•
,
I
1%
1:1
1
I
I
S%
I%
I
.
%%
I
•
%
17
II

Reverse
cycle
patterns
and
8
utility
stitches
The
symbols
for
reverse
cycle
stitches
are
on
the
inner
scale
of
the
Program
Selector.
Turn
the
outer
scale
so
that
number
5
in
the
center
position
is
in
the
red
window.
Turn
the
handle
so
that
the
desired symbol
on
the
inner
scale
is
lined
up
with
the
red
window.
To
lock
the
machine
in
reverse
cycle,
hold
down
the
reverse
control
and
move
the
Stitch
Length
Dial
towards the
left
so
that
the
reverse
cycle
sewing
symbol
lines
up
with
the
dot
on
the
machine.
Be
sure
that
when you
finish
using
the
reverse
cycle
stitch
that
you
unlock
the
reverse
mechanism
by
presssing
down
the
reverse
lever,
and
turn
the
Stitch
Length
Dial
clockwise
to
0.
Release
the
reverse
lever
and
set
the
stitch
length
at
the
desired
point.
Ric
rac
stitch
Setting
for
pattern
No.
1
in
illustration.
Turn
the
outer
scale
on
the
Program
Selector
to
5,
center
needle
position.
Align
the
symbol
on
the
handle
with
the
red
window.
Set
the
Stitch
Length
Dial
for
reverse
cycle.
>%i
>I
>%
F

Elastic
straight
stitch
II
Turn
the
outer
scale on
the
Program
Selector
to
0,
center
needle
position.
Align
the
symbol
on
the handle
with
the
red
window.
Set
the
Stitch
Length
Dial
for
reverse cycle.
Press
down
on
the
reverse
lever
and
turn
the
Stitch
Length
Dial
to
the
left.
The
elastic
straight stitch
is
a
triple
lock
straight
stitch
combining
stretchability
and
strength.
The
stretchability
makes
it
useful
for
sewing
on
knits
and
other
stretch
fabrics.
It
is
also
used
for
sewing
crotch
seams,
sewing
bias
seams
and
for
sleeve
insertion. The
elastic
straight
stitch
can
also
be
used
for
decorative purposes.
19
.
Ill
Ill
Ill
III
Ill
Ill
Ill
Ill
III
Other manuals for Turissa
1
This manual suits for next models
2
Table of contents
Other Viking Sewing Machine manuals

Viking
Viking Turissa Service manual

Viking
Viking Designer I User manual

Viking
Viking Huskystar 207 User manual

Viking
Viking Designer Topaz User manual

Viking
Viking Huskylock S15 User manual

Viking
Viking H|Class 500E User manual

Viking
Viking Huskystar 215 User manual

Viking
Viking Interlude 445 User manual

Viking
Viking 3260 User manual

Viking
Viking Designer Ruby User manual