Vimar ELVOX 46916.005 User manual

Manuale per il collegamento e l’uso
Installation and operation manual
46916.005
Tastiera
Keyboard

2
Può accadere che il manuale non sia tecnicamente accurato o che contenga errori ortograci minori. I contenuti di
questo manuale relativi alla descrizione del prodotto e del programma sono soggetti ad aggiornamenti in qualsiasi
momento e senza preavviso.
Attenzione
Il display LCD è fragile, non sottoporlo a urti e non esporlo a lungo a luce intensa.
La manopola di azionamento è delicata. Se si restituisce il prodotto al servizio di assistenza, accertarsi che sia
confezionato nell'imballo originale.
Utilizzare la tastiera di controllo in ambienti conformi ai valori di temperatura e umidità specicati.
Per la connessione attenersi alle indicazioni descritte in questo manuale.
INDICE
Pagina
1 Presentazione del prodotto ................................................................................................................................1
1.1 Contenuto della confezione .......................................................................................................................1
1.2 Funzioni principali ......................................................................................................................................1
1.3 Speciche ..................................................................................................................................................1
2 Installazione .......................................................................................................................................................2
2.1 Dimensioni .................................................................................................................................................2
2.2 Collegamento esterno ...............................................................................................................................3
3 Uso .......................................................................................................................................................4
3.1 Rilevamento automatico tastiera ...............................................................................................................4
3.2 Uso del joystick ..........................................................................................................................................4
3.3 Uso dei tasti ...............................................................................................................................................5
3.4 Impostazione dei menu sul display LCD ...................................................................................................5
3.4.1 Modo di impostazione dei menu.....................................................................................................5
3.4.2 Indice dei menu ..............................................................................................................................5
3.5 Impostazione dei menu .............................................................................................................................6
3.6 Comandi rapidi da tastiera .........................................................................................................................6
Appendice I - Analisi e soluzione di problemi comuni...............................................................................................7
Avviso sui diritti d'autore ...........................................................................................................................................7
IT

1
VIMAR group
1 Presentazione del prodotto
1.1 Contenuto della confezione
Tastiera 1 pz
Alimentatore 1 pz
Terminale di linea a 4 pin 1 pz
Manuale per l'utente 1 pz
1.2 Funzioni principali
- L'intervallo di indirizzi della telecamera PTZ o dome può essere impostato sui valori da 0 a 255. È possibile collegare
no a 128 dispositivi in parallelo.
- Tutte le porte di comunicazione in ingresso e in uscita sono dotate di protezione antifulmine e hanno un elevato
grado di resistenza ai disturbi. La distanza di trasmissione standard è di 1,2 km al massimo.
- Controllo di tutte le funzioni della telecamera PTZ o dome.
- Impostazione ed esecuzione di tutti i preset della telecamera PTZ o dome. È possibile impostare 255 preset in totale.
- Esecuzione della scansione della telecamera PTZ o dome a velocità ssa o variabile.
- Controllo manuale o automatico della telecamera PTZ o dome. Per modicare le impostazioni predenite di fabbrica
di telecamere particolari, modicare il menu della telecamera.
- Controllo manuale di zoom, messa a fuoco e apertura del diaframma della telecamera.
- Controllo di più telecamere PTZ o dome contemporaneamente.
- Protocolli selezionabili integrati.
- OSD multilingue integrato.
- Funzione sonora dei tasti disattivabile.
Prodotto Tastiera
Alimentazione 12 Vcc ±10% / 50 Hz 500 mA
Temperatura di esercizio -20°C +55°C
Umidità di esercizio ≤90% Senza condensa
Comunicazione RS-485
Interfaccia Terminali di linea a 4 pin
Velocità di trasferimento in baud 1200bps, 2400bps, 4800bps, 9600bps, 19200bps
Protocollo di comunicazione PELCO-D, PELCO-P, SAMSUNG, YAAN, SAE
Comunicazione tra telecamera e tastiera Punto - multipunto half duplex
Joystick Joystick vettoriale a velocità variabile
Display LCD
Distanza di comunicazione 1,2 km
Numero di telecamere controllabili 128
Menu OSD Inglese
Dimensioni 220x130x90 (mm)
1.3 Speciche
IT

2
2 Installazione
Dopo aver estratto la tastiera dalla confezione conservare tutti i materiali dell'imballo originale, che dovranno essere
utilizzati per reinviare il prodotto al produttore o al rivenditore nella confezione originale nel caso di problemi. Il mancato
utilizzo dell'imballo originale può causare danni durante il trasporto e comportare costi aggiuntivi.
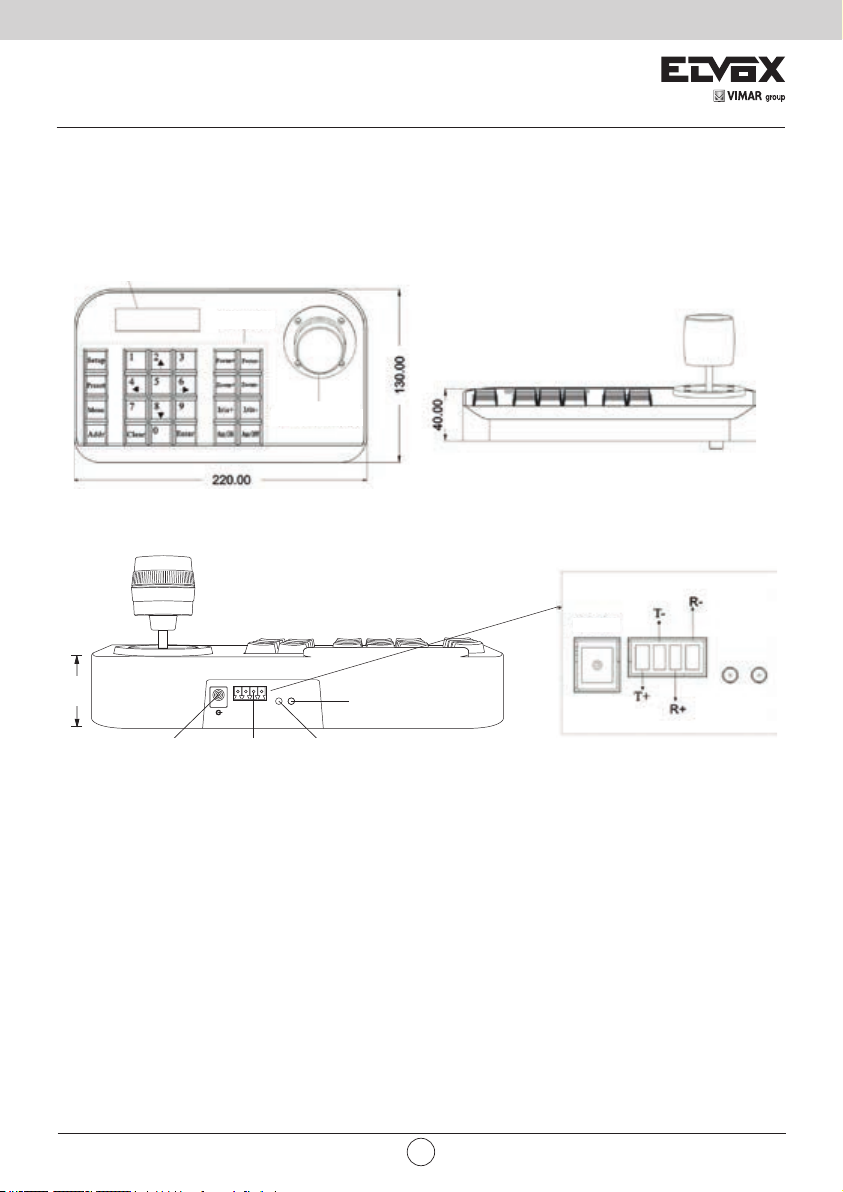
2.1 Dimensioni
12 Vdc
Lato anteriore della tastiera
Lato posteriore della tastiera
Interfaccia di alimentazione: collegare a una sorgente di alimentazione con tensione stabile a 12 Vcc
Interfaccia di comunicazione: collegare alla spina RS485 della telecamera dome o PTZ. T+ si collega a RS485+ e T- a
RS485-. R+ e R- sono riservati.
Spia di alimentazione: indica lo stato di alimentazione. Se è accesa signica che l'alimentazione è collegata
correttamente.
Spia COMM: quando è accesa indica che la tastiera è collegata alla telecamera dome o PTZ.
DC12V
T+T-R+R- T/R PW
- +
40.00
Display LCD
Area tasti
Joistick Vector
Porta
COMM Spia COMM
Spia di
alimentazione
Ingresso alimentazione
a 12 Vdc
IT

3
VIMAR group
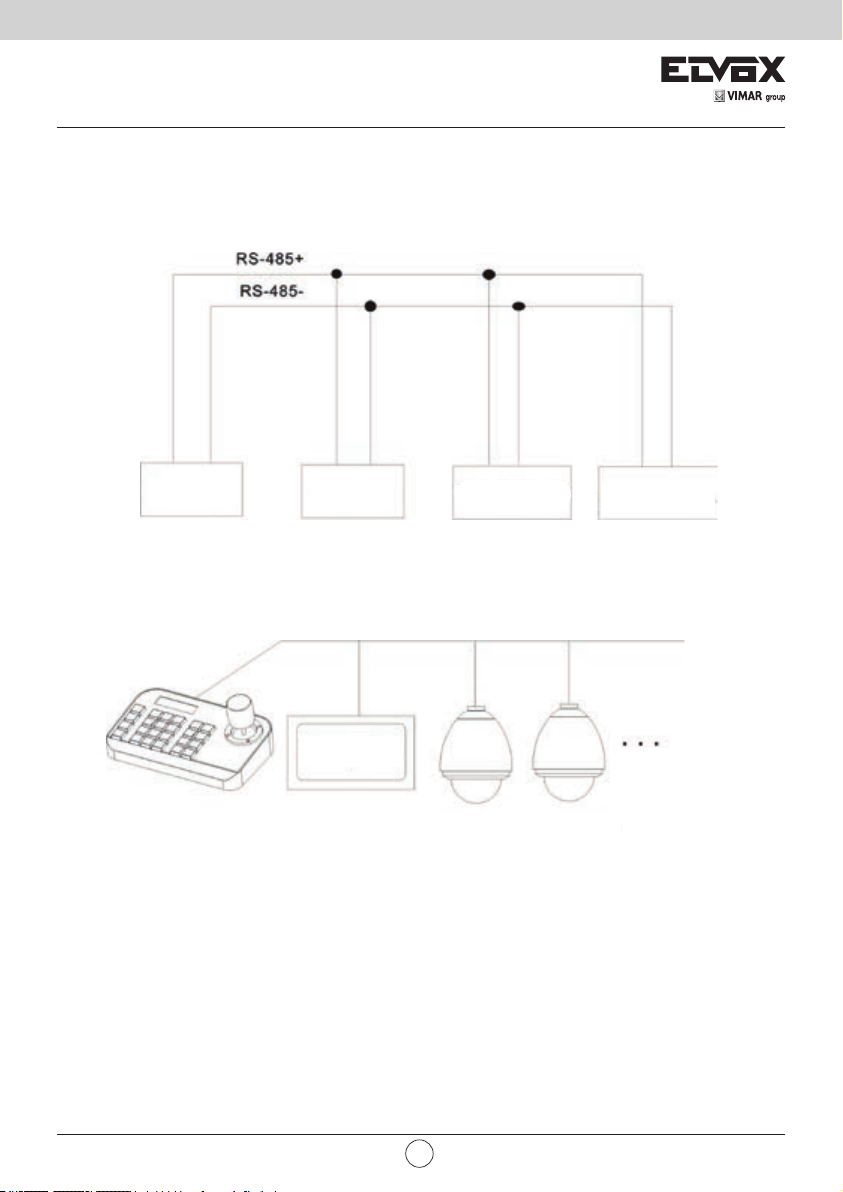
2.2 Collegamento esterno
Leggere attentamente il manuale prima di eseguire qualsiasi collegamento. Un collegamento errato potrebbe
danneggiare il dispositivo in modo permanente. Quando si collega il dispositivo, assicurarsi che l'alimentazione di
tutti i dispositivi sia spenta. Il cavo di comunicazione tra i dispositivi deve essere un doppino ritorto schermato. Una
volta congurati i cablaggi, evitare il più possibile linee ad alta tensione o altre linee che creano interferenza. Non
eseguire collegamenti incrociati della tastiera quando vengono collegati altri dispositivi di comunicazione. Rispettare la
corrispondenza negativo con negativo e positivo con positivo. Come indicato di seguito:
Avviso: prima di usare la tastiera per controllare la telecamera dome, assicurarsi che l'indirizzo, il protocollo e la
velocità di trasferimenti in baud sulla tastiera corrispondano a quelli della telecamera dome o PTZ. In caso contrario
non sarà possibile controllare la telecamera dome o PTZ.
PTZ Telecamera dome Altri dispositivi
Tastiera
Computer
Dome 1 Dome 2
Tastiera
Il metodo di controllo di più telecamere dome è descritto di seguito:
IT

4
3 Funzionamento
3.1 Rilevamento automatico tastiera
PELCO-D2400000
SYSTEM STARTUP
<<<<<<
Fig 3.1.1 Fig 3.1.2
Dopo l'accensione la tastiera esegue automaticamente queste azioni:
A. Rilevamento automatico: sulla prima riga del display LCD è visualizzato “SYSTEM STARTUP” (Avvio sistema).
Sulla seconda riga sono visualizzati segni “<” in numero sempre maggiore accompagnati da un unico impulso
sonoro, no a riempire il display, come indicato nella Fig 3.1.1.
Se l'audio della tastiera è attivato, i segni “<” aumentano in successione emettendo contemporaneamente impulsi
sonori in successione, vedere Fig 3.1.1.
B. Al termine del rilevamento automatico: riceve automaticamente i parametri correnti e cancella il contenuto della
seconda riga del display LCD.
Sulla prima riga del display LCD viene visualizzato “PELCO-D 2400 000” a indicare, nell'ordine, protocollo di comu-
nicazione, velocità di trasferimento in baud e indirizzo, vedi Fig 3.1.2.
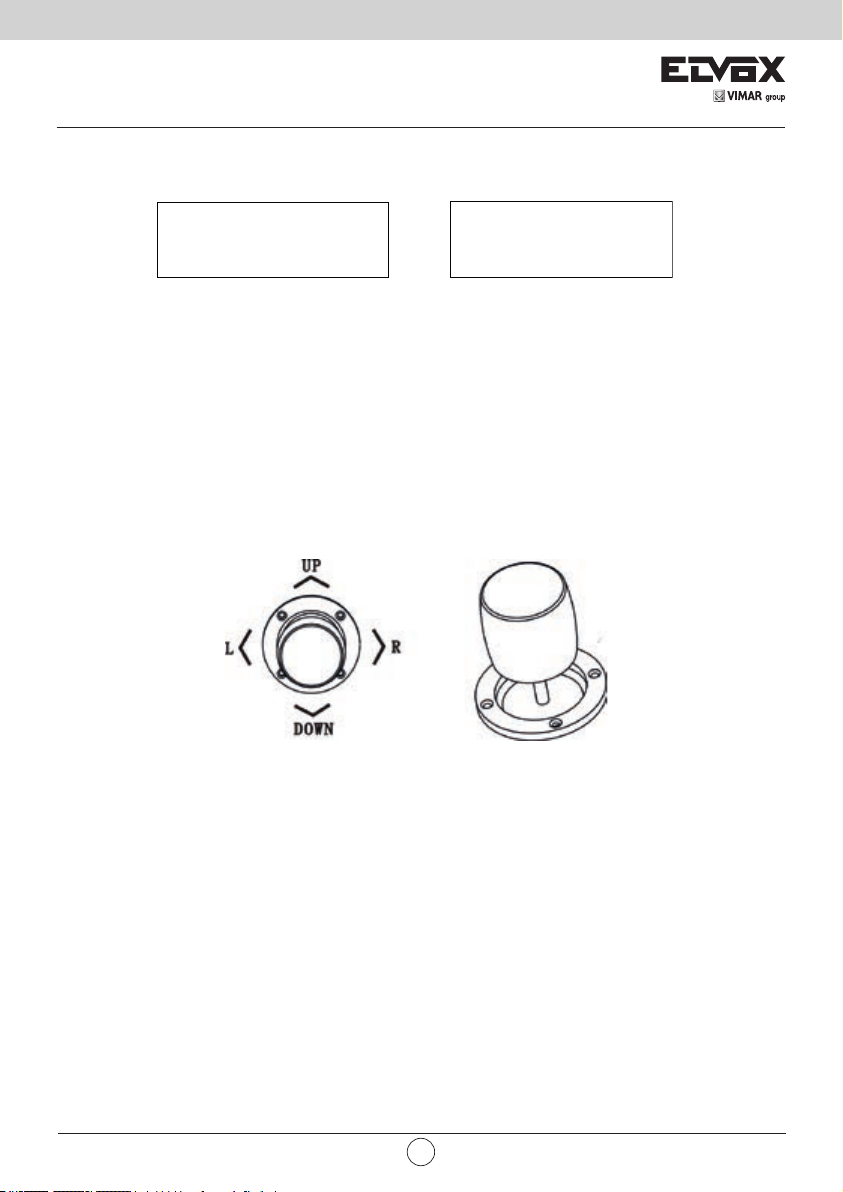
3.2 Uso del joystick
Il joystick consente di controllare la rotazione, la direzione di brandeggio orizzontale e verticale e la velocità della tele-
camera PTZ o dome. Cambiare l'angolo di inclinazione del joystick per regolare la velocità in modo uniforme. Di seguito
è fornita una schematizzazione del joystick Vector:
Il joystick Vector comprende le tre funzioni principali seguenti:
(1) Controllo della rotazione della telecamera dome: spostare il joystick nella direzione desiderata per muovere la te-
lecamera nella direzione corrispondente. Sul display LCD è visualizzato "PTZ <<<<<". Agendo sull’inclinazione del
joystick è possibile regolare la velocità di rotazione della telecamera. All'aumentare della velocità della telecamera,
sul display LCD aumenta il numero di segni "<" visualizzati. Al diminuire della velocità della telecamera, sul display
LCD diminuisce il numero di segni "<" visualizzati.
(2) Regolazione zoom (funzione speciale della tastiera 3D): ruotare la manopola del joystick per regolare la lunghezza
focale dell'obiettivo. Ruotare la manopola in senso orario per eseguire lo zoom avanti in modo che l'immagine
appaia più vicina e più grande, ruotare la manopola in senso antiorario per eseguire lo zoom indietro in modo che
l'immagine appaia più lontana e più piccola.
Durante la rotazione della manopola del joystick, sul display LCD viene visualizzato "PTZ<<<<<". Il numero di "<"
indica la velocità dello zoom. Maggiore è il numero di "<", maggiore è la velocità. Minore è il numero di "<", minore
è la velocità.
(3) Impostazione dei menu dell'oggetto controllato: per impostare il menu, spostare il joystick verso l'alto per selezio-
nare l'opzione di menu precedente e verso il basso per selezionare l'opzione di menu successiva. Spostare il
joystick a sinistra o a destra per cambiare i parametri del menu selezionato, come descritto nell'uso del menu LCD.
IT

5
VIMAR group
3.3 Uso dei tasti
(Focus+): messa a fuoco manuale su un oggetto distante. Gli oggetti distanti diventano più nitidi e quelli vicini più
sfocati.
(Focus-): messa a fuoco manuale su un oggetto vicino. Gli oggetti vicini diventano più nitidi e quelli lontani più sfocati.
(Zoom+): zoom avanti per ingrandire un oggetto.
(Zoom-): zoom indietro per aumentare il campo visivo. Gli oggetti appaiono più piccoli.
(Iris+) : aumento graduale dell'apertura del diaframma. L'immagine diventa più luminosa.
(Iris-): riduzione graduale dell'apertura del diaframma. L'immagine diventa più scura.
(Setup): tasto di impostazione, [Setup]+numero+[Enter] per impostare il preset della telecamera o impostare un coman-
do rapido da tastiera (vedere 3.5).
(Preset): tasto di esecuzione, [Preset]+numero+[Enter] per eseguire il preset.
(Menu): tasto menu per accedere al menu.
(Addr): tasto indirizzo, [Addr]+numero+[Enter] per scegliere l'indirizzo di comunicazione.
(0)~(9): tasti numerici [0], [1], [2], [3], [4], [5], [6], [7], [8], [9].
(Clear): tasto di eliminazione, [Clear]+numero+[Enter] per eliminare il preset.
(Enter): tasto di conferma, per confermare l'operazione in corso.
(Aux ON): funziona ausiliaria ON.
(Aux OFF): funzione ausiliaria OFF.
3.4 Impostazione dei menu sul display LCD
Accedere al menu sul display LCD: premere il tasto (Menu) per accedere al menu, come illustrato in Fig 3.4.1.
LCDMENU
PROTOCOL PELCO-D
Fig 3.4.1
Uscire dal menu sul display LCD: selezionare un tasto qualsiasi ad eccezione di (Menu) per uscire dal menu e acce-
dere all'operazione corrispondente.
Ad esempio, premere (Focus+) per uscire dal menu e accedere alle impostazioni di messa a fuoco. Vedere Fig 3.4.2.
Fig 3.4.2
PROTOCOL PELCO-D
LANGUAGE ENGLISH
SOUND OFF
ADDRESS 000
BAUDRATE2400
PELCO-D 2400 000
FOCUS+
3.4.1 Modo di impostazione dei menu
I menu si possono impostare in due modi:
(1) Con il joystick: Spostare il joystick in alto o in basso per scorrere i menu.
Spostare il joystick a sinistra e a destra + [Enter] per impostare i parametri del menu.
(2) Con i tasti: Premere [2], [8] per scorrere i menu.
Premere [4], [6]+ [Enter] per impostare i parametri del menu.
Avviso: quando si passa alla pagina dell'indirizzo, i tasti [2], [8] non scorrono la pagina del menu ma hanno solo funzio-
ne numerica. [4], [6] non impostano i parametri del menu ma hanno solo funzione numerica.
IT

6
3.4.2 Indice dei menu
PROTOCOL PELCO-D
LANGUAGE ENGLISH
SOUND OFF
ADDRESS 000
BAUDRATE2400
PELCO-D 2400 000
FOCUS+
Nella seconda riga del display LCD sono visualizzati i menu sopra indicati. Viene visualizzato un solo menu alla volta.
La modalità di visualizzazione è la seguente (ad es. indirizzo di comunicazione):
LCDMENU
ADDRESS 000
Range di impostazione dei menu:
- PROTOCOL (Protocollo): PELCO-P/ PELCO-D / SAMSUNG / YAAN / SAE
- LANGUAGE (Lingua): ENGLISH (Inglese)
- SOUND (Audio): ON/OFF
- ADDRESS (Indirizzo): 000 ~ 255
- BAUD RATE (Velocità di trasferimento in baud): 1200/2400/4800/9600/19200 BPS
3.5 Impostazione dei menu
Quando si utilizza il joystick contemporaneamente ai tasti, il joystick ha la priorità.
Se si ruota il joystick in qualsiasi direzione è possibile uscire dalla pagina di impostazione visualizzata (ad eccezione
della pagina dei menu).
Quando si impostano i parametri di un menu, premere [Enter] per rendere effettiva l'impostazione. Il tasto [Enter] me-
morizza solo gli ultimi parametri modicati del menu.
Ad esempio, se si modica il protocollo, l'indirizzo e la velocità di trasferimento in baud in quest'ordine e poi si preme
[Enter], verrà cambiata solo la velocità di trasferimento in baud.
Quando la seconda riga del display LCD è vuota, vedere Fig 3.5.1, i tasti numerici [2], [8], [4], [6] possono essere utiliz-
zati per spostarsi in alto, in basso, a sinistra e a destra per comandare il movimento della telecamera PTZ o dome nelle
direzioni corrispondenti, come con il joystick. Tuttavia la velocità di rotazione è ssata al massimo e non è possibile
regolarla, come mostrato nella Fig 3.5.2 (nell'esempio, il tasto [2]).
PELCO-D2400000
PT->UP
PELCO-D 2400 000
Fig 3.5.1 Fig 3.5.2
Dopo aver eseguito l'accesso al menu, il joystick non può più controllare la telecamera PTZ o dome. Può essere uti-
lizzato solo per scorrere i menu in alto e in basso o per selezionare i parametri del menu a sinistra o a destra. I tasti
[0], [1], [3], [5], [7], [9] non hanno alcuna funzione. I tasti [2], [8], [4], [6] sono utilizzati come tasti di direzione su, giù,
sinistra e destra. In questo caso non sono utilizzati come tasti numerici. La loro unica funzione è quella di scorrimento
dei menu ma non di rotazione della telecamera PTZ o dome verso l'alto, verso il basso, a sinistra o a destra. Solo dopo
essere usciti dal menu e se non vi è nulla nella seconda riga dell'LCD è possibile usare tali tasti per la rotazione della
telecamera nelle suddette direzioni.
IT

7
VIMAR group
Quando si imposta l'indirizzo [ADDRESS], la funzione numerica dei tasti [0], [1], [3], [5], [7], [9] viene ripristinata. Viene
inoltre ripristinata la funzione numerica dei tasti [2], [8], [4], [6], che non fungono più da tasti freccia su, giù, sinistra e
destra.
Quando si preme [Enter] al termine dell'impostazione dell'indirizzo, si accede all'impostazione della velocità di tra-
sferimento in baud [BAUD RATE 2400]. Quando si torna all'indirizzo [ADDRESS], l'interfaccia del menu visualizza
[ADDRESS 000]. Il valore correntemente impostato non è visualizzato. Quando si esce dal menu, sulla prima riga del
display LCD viene visualizzato l'indirizzo di comunicazione attuale. Spostare il joystick verso l'alto o verso il basso per
uscire dall'impostazione dell'indirizzo. L'intervallo di indirizzi disponibili è 000 - 255. Non è possibile impostare numeri
superiori a 255
3.6 Comandi rapidi da tastiera
Combinazione di tasti: [Setup]+numero+[Enter]
Numero Funzione
700 Disattiva suono
701 Attiva suono
812 Imposta la velocità di trasferimento in baud a 1200bps
824 Imposta la velocità di trasferimento in baud a 2400bps
848 Imposta la velocità di trasferimento in baud a 4800bps
896 Imposta la velocità di trasferimento in baud a 9600bps
819 Imposta la velocità di trasferimento in baud a 19200bps
Appendice I - Analisi e soluzione di problemi comuni
Problema Causa possibile Soluzione
Dopo aver acceso
l'apparecchio non
compare nulla sul display
LCD
Non arriva corrente
Controllare il connettore del cavo di
alimentazione e collegarlo correttamente
Assicurarsi che l'alimentazione sia a 12 Vcc
Non si riesce a
comandare la telecamera
dome collegata
Il protocollo è errato
Controllare il protocollo della tastiera
Assicurarsi che sia lo stesso della telecamera
dome o PTZ
L'impostazione
della velocità di
trasferimento in baud
è errata
Controllare il valore della velocità di
trasferimento in baud della tastiera
Assicurarsi che sia lo stesso della telecamera
dome o PTZ
Indirizzo sbagliato
Controllare l'indirizzo della tastiera Assicurarsi
che sia lo stesso della telecamera dome o
PTZ
Avviso: le soluzioni ai problemi comuni sopra descritti hanno solo valore di riferimento. In caso di problemi particolari,
rivolgersi al concessionario per richiedere assistenza tecnica.
Avviso sui diritti d'autore
Il produttore è il solo proprietario dei diritti di autore. È vietato riprodurre o copiare i contenuti di questo documento in
qualsiasi forma o con qualsiasi mezzo, senza il suo consenso.
L'azienda persegue una politica di sviluppo continuo. Di conseguenza, si riserva il diritto di modicare o migliorare
senza alcun preavviso i prodotti descritti in questo manuale.
I contenuti del manuale vengono offerti "così come sono". Salvo leggi speciche applicabili, l'azienda non rilascia alcun
tipo di garanzia palese o tacita sull'accuratezza, l'afdabilità e i contenuti di questo manuale. L'azienda si riserva il diritto
di modicare o alterare il manuale in qualsiasi momento e senza preavviso.
IT

8
This manual might be not accurate technically or contains some minor typo errors. The contents about production
description and program in this manual might be updated at any time without notice.
Cautions:
The LCD is fragile, no crush or long-exposed under strong light.
Operation knob is fragile. Please make sure product is packed with original packing material when you send it back
for reparation.
The keyboard controller should work in specied range of temperature and humidity.
Please follow the connecting method dened in this manual.
INDEX Page
1 Product Introduction ...........................................................................................................................................9
1.1 Package Contents .....................................................................................................................................9
1.2 Main Functions ..........................................................................................................................................9
1.3 Specication ..............................................................................................................................................9
2 Installation .....................................................................................................................................................10
2.1 Dimension ................................................................................................................................................10
2.2 External Connection ................................................................................................................................11
3 Operation .....................................................................................................................................................12
3.1 Keyboard Self-detection ..........................................................................................................................12
3.2 Joystick Operation ...................................................................................................................................12
3.3 Key Operation ..........................................................................................................................................13
3.4 Menu Operation on LCD ..........................................................................................................................13
3.4.1 Menu Operation Mode..................................................................................................................13
3.4.2 Index of Menu...............................................................................................................................14
3.5 Menu Operation .......................................................................................................................................14
3.6 Keyboard Short Commands ....................................................................................................................15
Appendix I Analysis and Solution of Common Problem .........................................................................................15
Copyright Statement ...............................................................................................................................................15
EN

9
VIMAR group
1 Product Introduction
1.1 Package Contents
Keyboard 1 pc
Power supply 1 pc
4 Pin Line Pressing Terminals 1 pc
User manual 1 pc
1.2 Main Functions
- The address range of PTZ or dome camera can be set from 0~255. At most, 128 devices can be connected in
parallel.
- All input and output communication ports are lightning protection design and the anti-jamming ability is strong. The
standard transmission distance is up to 1.2km.
- Control all the functions of PTZ or dome camera, such as on / off of back light compensation.
- Set and run the preset point of PTZ or dome camera. 255 preset points are settable in all.
- Run PTZ or dome camera scan at a xed speed or variable speed.
- Control PTZ or dome camera manually or automatically. Change factory default setting of special camera by
adjusting camera menu.
- Control zoom, focus and aperture of camera manually.
- Control multiple PTZ or dome cameras at the same time.
- Built-in protocals are selectable.
- Built-in multiple languages OSD.
- Key sound on/off function.
Product Vector Keyboard
Power Supply 12 Vdc ±10% / 50 Hz 500 mA
Operating Temperature -20°C +55°C
Operating Humidity ≤90% Non Condensing
Communication RS-485
Interface 4PIN Line Pressing Terminals
Baud Rate 1200bps, 2400bps, 4800bps, 9600bps, 19200bps
Communication Protocal PELCO-D, PELCO-P, SAMSUNG, YAAN, SAE
Communication between Camera and Keyboard One point to multi-points Half-duplex
Joystick Vector variable speed joystick
Display LCD
Communication Distance 1.2 km
Control Camera Quantity 128
OSD Menu English
Dimension 220x130x90 (mm)
1.3 Specication
EN
10
2 Installation
After open keyboard package, please keep the original packaging materials, so that when there is a problem, keyboard
with original packaging materials can be sent back to the agent or the manufacturer for reparation. Non-original
packaging material may lead to an unexpected transit damage, which may cause additional costs.
2.1 Dimension
Frontside of Keyboard
Backside of Keyboard
Power Supply Interface: Connect to external stable voltage 12 Vdc input through this interface.
Communication interface: Connect to RS485 of dome or PTZ camera. T+ is connected to RS485+ and T- to RS485-.
R+ and R- are reserved.
Power indicator: It shows the present power status. Light on means power connected well.
COMM indicator: When keyboard connect to dome camera or PTZ, this light is on.
12 Vdc
DC12V
T+T-R+R- T/R PW
- +
40.00
LCD Display
Key area
Vector Joistick
COMM Port COMM Indicator
Power Indicator
Power port 12 Vdc
EN
11
VIMAR group
The control system of controlling multiple dome cameras is as below:
2.2 External Connection
Please read the user manual carefully before any connection. Any wrong connection may cause the device damaged
permanently. When you connect the device, please make sure the power of all devices are off. Communication cable
used between the devices connection must be twisted-pair cable with shielding. When cable is set up, high voltage line
or other interfering line should be avoided as much as possible. Keyboard cannot be cross-connected when connecting
with other communication devices. Anode must be to anode, cathode to cathode. As shown below:
Notice: Before using the keyboard to control dome camera, please make sure the address, protocol, baud rate
of the keyboard is set the same to the dome or PTZ camera. Otherwise, the dome or PTZ camera can’t be controlled.
PTZ Dome camera Other devices
Keyboard
Computer
Dome 1 Dome 2
Keyboard
EN
12
3 Operation
3.1 Keyboard Self-detection
PELCO-D2400000
SYSTEM STARTUP
<<<<<<
Fig 3.1.1 Fig 3.1.2
After power on, the keyboard take the following actions automatically:
A. Self-detecting: The rst line of LCD display shows “SYSTEM STARTUP”.
The second line shows “<” and “<” increases successively till it lls the screen with one sound “di” as Fig 3.1.1.
If keyboard sound is turned on, “<” increases successively with sound “di,di…” as Fig 3.1.1.
B. After self-detection nishes: Get the current parameters automatically and clear the contents of the second line on
the LCD display.
The rst line of LCD display shows “PELCO-D 2400 000”. They are communication protocal, baud rate, address
respectively as Fig 3.1.2.
3.2 Joystick Operation
Using joystick can control PTZ or dome camera’s rotation, pan-tilt direction and speed. Changing the tilt angle of joy-
stick can adjust speed even. Vector joystick outline is as below:
Vector Joystick has three main functions as following:
(1) Control dome camera rotation: Rocking the joystick in any direction, camera moves in appropriate direction. At the
same time, the LCD displays "PTZ <<<<<". Controlling rocker of rotary speed of inclination can control the speed
of the camera. More "<" displays on LCD screen, joystick tilts more, and the speed of camera is faster. Less "<"
displays on LCD screen, joystick tilts less, and the speed of camera is slower.
(2) Zoom Adjust (special function of 3D keyboard): Rotate the joystick grip to adjust focal length of the lens. Clockwise
rotation of Joystick grip, zoom in and the image gets closer and larger; Counterclockwise rotation of joystick grip,
zoom out and image gets farther and smaller.
When rotating the joystick, the LCD will display "PTZ<<<<<". The number of "<" stands for the speed of zoom.
More "<", zoom speed is faster. Less "<", zoom speed is slower.
(3). The menu setting of controlled object: When setting menu, joystick up is to select previous menu option and joystick
down is to select the next menu option. Joystick left or right can change parameters of the selected menu (as
described in the LCD menu operation).
EN

13
VIMAR group
3.3 Key Operation
(Focus+): Manual focus on far object. The far objects come clear and the near objects come blurring.
(Focus-): Manual focus on near object. The near objects come clear and the far objects come blurring.
(Zoom+): Zoom in to enlarge object.
(Zoom-): Zoom out the lens to larger view eld. The object becomes smaller.
(Iris+) : Increase aperture gradually. The picture becomes brighter.
(Iris-): Downsize aperture. The picture becomes darker.
(Setup): Set key, [Setup]+number+[Enter] to set the preset point of the camera or set the short commands of the key-
board (See 3.5).
(Preset): Run key, [Preset]+number+[Enter] to run the preset point.
(Menu): Menu key, to enter Menu.
(Addr): Address key, [Addr]+number+[Enter] to choose the communication address.
(0)~(9): Number keys [0], [1], [2], [3], [4], [5], [6], [7], [8], [9].
(Clear): Delete key, [Clear]+number+[Enter] to delete the preset point.
(Enter): Conrm key, to conrm the present operation.
(Aux ON): Aux ON.
(Aux OFF): Aux OFF.
3.4 Menu Operation on LCD
Enter the menu on LCD: Press (Menu) key to enter menu as Fig 3.4.1.
LCDMENU
PROTOCOL PELCO-D
Fig 3.4.1
Exit menu on LCD: Select random function keys except (Menu) key to exit menu and enter corresponding opera-
tion.
For example, press (Focus+) to exit menu and enter focus setting. As Fig 3.4.2.
Fig 3.4.2
PROTOCOL PELCO-D
LANGUAGE ENGLISH
SOUND OFF
ADDRESS 000
BAUDRATE2400
PELCO-D 2400 000
FOCUS+
3.4.1 Menu Operation Mode
There are two modes of menu operation:
(1) Joystick operation: Joystick up and down to ip the menu.
Joystick left and right + [Enter] to set the parameters of the menu.
(2) Key operation: Press [2], [8] to ip the menu.
Press [4], [6]+ [Enter] to set the parameters of the menu.
Notice: When ipping to address page, [2], [8] can’t ip the menu page, and just function as number keys. [4], [6] can’t
set parameters of menu, and just function as number keys.
EN

14
3.4.2 Index of Menu
PROTOCOL PELCO-D
LANGUAGE ENGLISH
SOUND OFF
ADDRESS 000
BAUDRATE2400
PELCO-D 2400 000
FOCUS+
The above menus are displayed in the second line on LCD. Only one menu is displayed at one time. The display mode
is as below (e.g communication address):
LCDMENU
ADDRESS 000
Menu Setting Range:
- PROTOCOL: PELCO-P/ PELCO-D / SAMSUNG / YAAN / SAE
- LANGUAGE: ENGLISH
- SOUND: ON/OFF
- ADDRESS: 000 ~ 255
- BAUD RATE: 1200/2400/4800/9600/19200 BPS
3.5 Menu Operation
When joystick and keys are operated at the same time, joystick operation is preferred.
Rotating the joystick to any direction can exit the present setting page (except on menu page).
When setting parameters in menu, pressing [Enter] can make the setting effective. The key [Enter] just store the latest
changed parameters of menu.
For example, if you change protocal, address and baud rate in order, then press [Enter]. Only baud rate is changed
successfully.
When there is nothing in the second line on LCD as Fig 3.5.1, number keys [2], [8], [4], [6] can be used as up, down, left
and right keys to control PTZ or dome camera left and right rotation as the function of joystick. But the rotation speed
is the fastest and no grades to select, shown as 3.5.2 (e.g key [2]).
PELCO-D2400000
PT->UP
PELCO-D 2400 000
Fig 3.5.1 Fig 3.5.2
After entering menu, joystick has no function to control PTZ or dome camera. It can only be used as up or down to ip
the menu page and left or right to change the parameters of menu. Number keys [0], [1], [3], [5], [7], [9] are invalid. [2],
[8], [4], [6] are used as up, down, left and right keys. They are not used as number keys at this time. Their functions
are just to ip the menu page but not to control PTZ or dome camera’s up, down, left or right rotation. Only after exiting
menu and when there is nothing in the second line on LCD, they can control dome camera’s up, down, left and right
rotation.
EN

15
VIMAR group
When setting [ADDRESS], number keys [0], [1], [3], [5], [7], [9] restore the number keys’ function. [2], [8], [4], [6] restore
the number keys’ function and don’t have up, down, left and right functions.
When pressing [Enter] after address setting on menu nishes, it will enter baud rate setting [BAUD RATE 2400]. When
go back to [ADDRESS] again, the menu interface displays [ADDRESS 000]. The present set value can’t be seen. When
exit menu, the rst line on LCD displays the present communication address. Joystick up or down can exit address set-
ting. Address range is 000-255. The number above 255 can’t be set
3.6KeyboardShortCommands
Combination key: [Setup]+number+[Enter]
Number Function
700 Turn off sound
701 Turn on sound
812 Set baud rate to 1200bps
824 Set baud rate to 2400bps
848 Set baud rate to 4800bps
896 Set baud rate to 9600bps
819 Set baud rate to 19200bps
Appendix I Analysis and Solution of Common Problem
Issue Possible Reason Solution
Nothing on LCD after
item is turned on No power
Check power cable connection and
connect it well
Make sure power is DC12V
Can’t control the target
dome camera
Protocal is wrong
Check protocal of keyboard. Make
sure it is the same to the dome or
PTZ camera.
Baud rate is wrong
Check baud rate of keyboard. Make
sure it is the same to the dome or
PTZ camera.
Address is wrong
Check address of keyboard. Make
sure it is the same to the dome or
PTZ camera.
Notice: The above solutions of common issues are just for your reference. If there are some special issues, please
contact your dealer to get technical support.
CopyrightStatement
This copyright merely belongs to the manufacturer. Without permission, please don’t plagiarize or copy the contents of
this book in any form or by any means.
The company follows the policy of continuous development. Therefore, the company reserves the right to modify or
improve the products described in this manual without notice.
The content of manual is offered according to the "current state". Unless applicable law specied, otherwise the com-
pany does not make any kind of clear or tacit assurance about the accuracy, reliability and contents of this manual. The
company reserves the right to revise or recoup this manual at any time without notice.
EN

16

17
VIMAR group

Viale Vicenza, 14
36063 Marostica VI - Italy
www.vimar.com
49401177A0 00 1703
Table of contents
Languages:
Other Vimar Keyboard manuals


