Vimar by-me Eikon 20516 User manual
Viale Vicenza, 14
36063 Marostica VI - Italy
www.vimar.com
49400467B0 02 1804
Eikon
20516
Arké
19516
Idea
16956
Plana
14516
Ricevitore per telecomando a infrarossi - 2 moduli.
Il dispositivo riceve i comandi dal telecomando 01849 e dispone di 4 canali in
ricezione. Consente di realizzare le funzioni di interruttore ON/OFF, comando per
tapparelle, comando per regolatore, comando inversione di stato (passo-passo),
attivazione scenari.
CARATTERISTICHE.
• Tensione nominale di alimentazione: BUS 29 V
• Assorbimento: 10 mA
• Input: telecomando 01849 (IR protocollo RC5)
• Canali in ricezione: 4
• Morsetti: bus TP
• Funzioni realizzabili:
- interruttore ON/OFF
- comando per tapparelle
- comando per regolatore
- inversione di stato (passo-passo)
- pulsante
- attivazione scenari.
CONFIGURAZIONE.
PER LE OPERAZIONI DI INSTALLAZIONE E CONFIGURAZIONE, VEDERE IL
MANUALE ISTRUZIONI DEL SISTEMA By-me ALLEGATO ALLA CENTRALE
DI CONTROLLO.
• Blocchi funzionali: 4, ogni blocco funzionale può appartenere al massimo a 4
gruppi.
• Selezione del blocco funzionale (configurazione): durante la creazione dei gruppi,
quando la centrale richiede di premere il pulsante dei dispositivi:
• Funzionamento tipo 1: pulsante passo-passo o semplice (premuto ON, rila-
sciato OFF):
- premere il pulsante di configurazione;
- il led si accende e lampeggia;
- selezionare il blocco funzionale da configurare attraverso un pulsante da 1 a 4 del
telecomando (indifferentemente tasti di destra o di sinistra del telecomando);
- il led lampeggia;
- premere il pulsante del telecomando che si desidera associare al blocco funzio-
nale;
- il led lampeggia lentamente; al termine dell’operazione il led si spegne.
• Funzionamento tipo 2: pulsante ON/OFF, controllo regolatore o comando
tapparelle:
- premere il pulsante di configurazione;
- il led si accende e lampeggia;
- selezionare il blocco funzionale da configurare attraverso un pulsante da 1 a 4
del telecomando (indifferentemente tasti di destra o di sinistra del telecomando);
- il led lampeggia;
- premere il pulsante del telecomando che si desidera associare al blocco funzio-
nale;
- il led lampeggia lentamente;
- premere entro 3 s il tasto a lato di quello precedentemente premuto (che è il
tasto a lato di quello associato al blocco funzionale);
- il led si accende; al termine dell’operazione il led si spegne.
Note.
• Nella configurazione “Funzionamento tipo pulsante passo-passo o semplice”
è possibile passare da funzionamento “pulsante passo-passo” a “pulsante
semplice” attraverso la modifica dei parametri.
• Nella configurazione “Funzionamento tipo pulsante ON/OFF, controllo regola-
tore o comando tapparelle” è possibile passare da funzionamento “pulsante
ON/OFF” a “pulsante controllo regolatore” e a “pulsante comando tapparelle”
attraverso la modifica dei parametri.
PARAMETRI.
• Per ogni blocco funzionale è possibile impostare la modalità di funzionamento:
- Funzionamento tipo 1:
- pulsante ON/OFF (passo-passo);
- Funzionamento tipo 2:
- pulsante semplice (ON alla pressione, OFF al rilascio);
- pulsante ON/OFF;
- pulsante controllo regolatore;
- pulsante tapparelle;
- comando scenario;
• Parametri led:
- led sempre spento;
- led normalmente spento (tranne che in ricezione IR);
- led normalmente acceso per individuazione al buio (tranne che in ricezione IR).
• Parametri di default: pulsante ON/OFF con led sempre acceso.
REGOLE DI INSTALLAZIONE.
L’installazione deve essere effettuata da personale qualificato con l’osservanza
delle disposizioni regolanti l’installazione del materiale elettrico in vigore nel paese
dove i prodotti sono installati.
CONFORMITÀ NORMATIVA.
Direttiva EMC
Norma EN 50428.
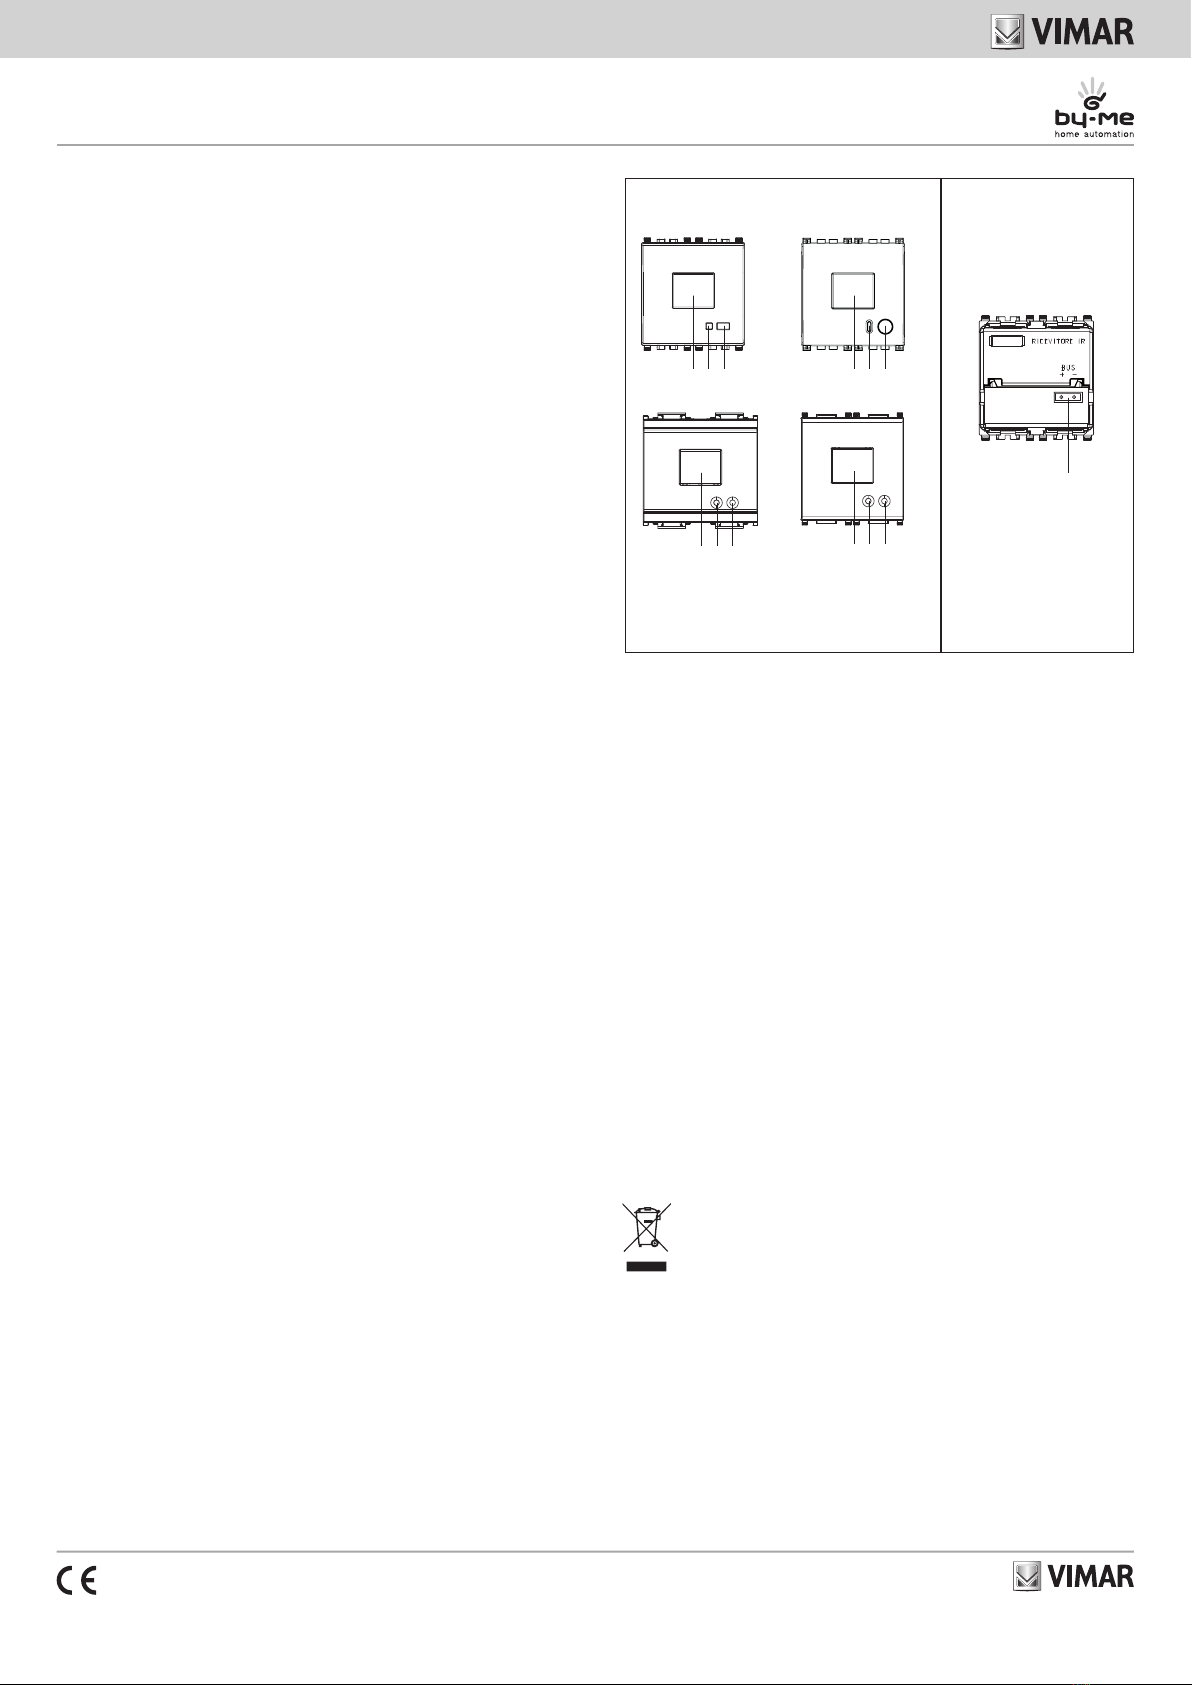
Legenda:
A: ricevitore IR
B: led
C: pulsante di configurazione.
A B C
VISTA FRONTALE.
Idea Plana
Eikon
VISTA POSTERIORE.
Morsetti
bus TP
Arké
A B C
A B C A B C
RAEE - Informazione agli utilizzatori
Il simbolo del cassonetto barrato riportato sull’apparecchiatura o sulla sua confezione
indica che il prodotto alla fine della propria vita utile deve essere raccolto separatamente
dagli altri rifiuti. L’utente dovrà, pertanto, conferire l’apparecchiatura giunta a fine vita agli
idonei centri comunali di raccolta differenziata dei rifiuti elettrotecnici ed elettronici. In al-
ternativa alla gestione autonoma, è possibile consegnare gratuitamente l’apparecchiatura
che si desidera smaltire al distributore, al momento dell’acquisto di una nuova apparec-
chiatura di tipo equivalente. Presso i distributori di prodotti elettronici con superficie di
vendita di almeno 400 m2è inoltre possibile consegnare gratuitamente, senza obbligo
di acquisto, i prodotti elettronici da smaltire con dimensioni inferiori a 25 cm. L’adeguata
raccolta differenziata per l’avvio successivo dell’apparecchiatura dismessa al riciclaggio,
al trattamento e allo smaltimento ambientalmente compatibile contribuisce ad evitare
possibili effetti negativi sull’ambiente e sulla salute e favorisce il reimpiego e/o riciclo dei
materiali di cui è composta l’apparecchiatura.
Viale Vicenza, 14
36063 Marostica VI - Italy
www.vimar.com
49400467B0 02 1804
Eikon
20516
Arké
19516
Idea
16956
Plana
14516
Infrared remote control receiver - 2 modules.
This device receives commands from the remote control 01849 and has 4 chan-
nels in reception. It can be used for the functions of an On/Off switch, roll-up blind
control, dimmer control, state reversal control (step-by-step), scenario activation.
CHARACTERISTICS.
• Rated supply voltage: BUS 29 V
• Input: 10 mA
• Input: remote control 01849 (IR protocol RC5)
• Reception channels: 4
• Terminals: TP BUS
• Possible functions:
- ON/OFF switch
- roller shutter control
- dimmer control
- state reversal (step-by-step)
- button
- scenario activation.
CONFIGURATION.
FOR THE OPERATIONS OF INSTALLATION AND CONFIGURATION, SEE
THE By-me SYSTEM INSTRUCTIONS MANUAL ATTACHED TO THE
CONTROL UNIT.
• Functional blocks: 4, each functional block can belong to at most 4 groups.
• Selecting the functional block (configuration): during group creation, when the
control unit requires pressing the device button:
• Operation type 1: step-by-step or simple button (pressed ON, released OFF):
- press the configuration button;
- the LED light illuminates and blinks;
- select the functional block to configure with a button from 1 to 4 on the remote
control (right or left-hand buttons of the remote control indistinctly);
- the LED blinks;
- press the button of the remote control you want to associate with the functional
block;
- the LED blinks slowly; at the end of the operation the LED will go out.
• Operation type 2: ON/OFF button, dimmer control or roller shutter control
- press the configuration button;
- the LED light illuminates and blinks;
- select the functional block to configure with a button from 1 to 4 on the remote
control (right or left-hand buttons of the remote control indistinctly);
- the LED blinks;
- press the button of the remote control you want to associate with the functional
block;
- the LED blinks slowly;
- within 3 s press the button next to the one pressed before (which is the button
next to the one associated with the functional block);
- the LED comes on; at the end of the operation the LED will go out.
Notes.
• In “step-by-step or simple button operation” configuration it is possible to
pass from “step-by-step button” to “simple button” operation by changing the
parameters.
• In “ON/OFF button, dimmer control or roller shutter operation” configuration it is
possible to pass from “ON/OFF button” to “dimmer control button” and “roller
shutter control button” by changing the parameters.
PARAMETERS.
• For each functional block it is possible to set the operating mode:
- Operation type 1:
- ON/OFF button (step-by-step);
- Operation type 2:
- simple button (ON when pressed, OFF when released);
- ON/OFF button;
- dimmer control button;
- roller shutter button;
- scenario control;
• LED parameters:
- LED always off;
- LED normally off (except when on IR reception);
- LED normally on for location in the dark (except when on IR reception).
• Default parameters: ON/OFF button with LED always on.
INSTALLATION RULES.
Installation should be carried out by qualified personnel in compliance with the current
regulations regarding the installation of electrical equipment in the country where the
products are installed.
CONFORMITY.
EMC directive
Standard EN 50428.
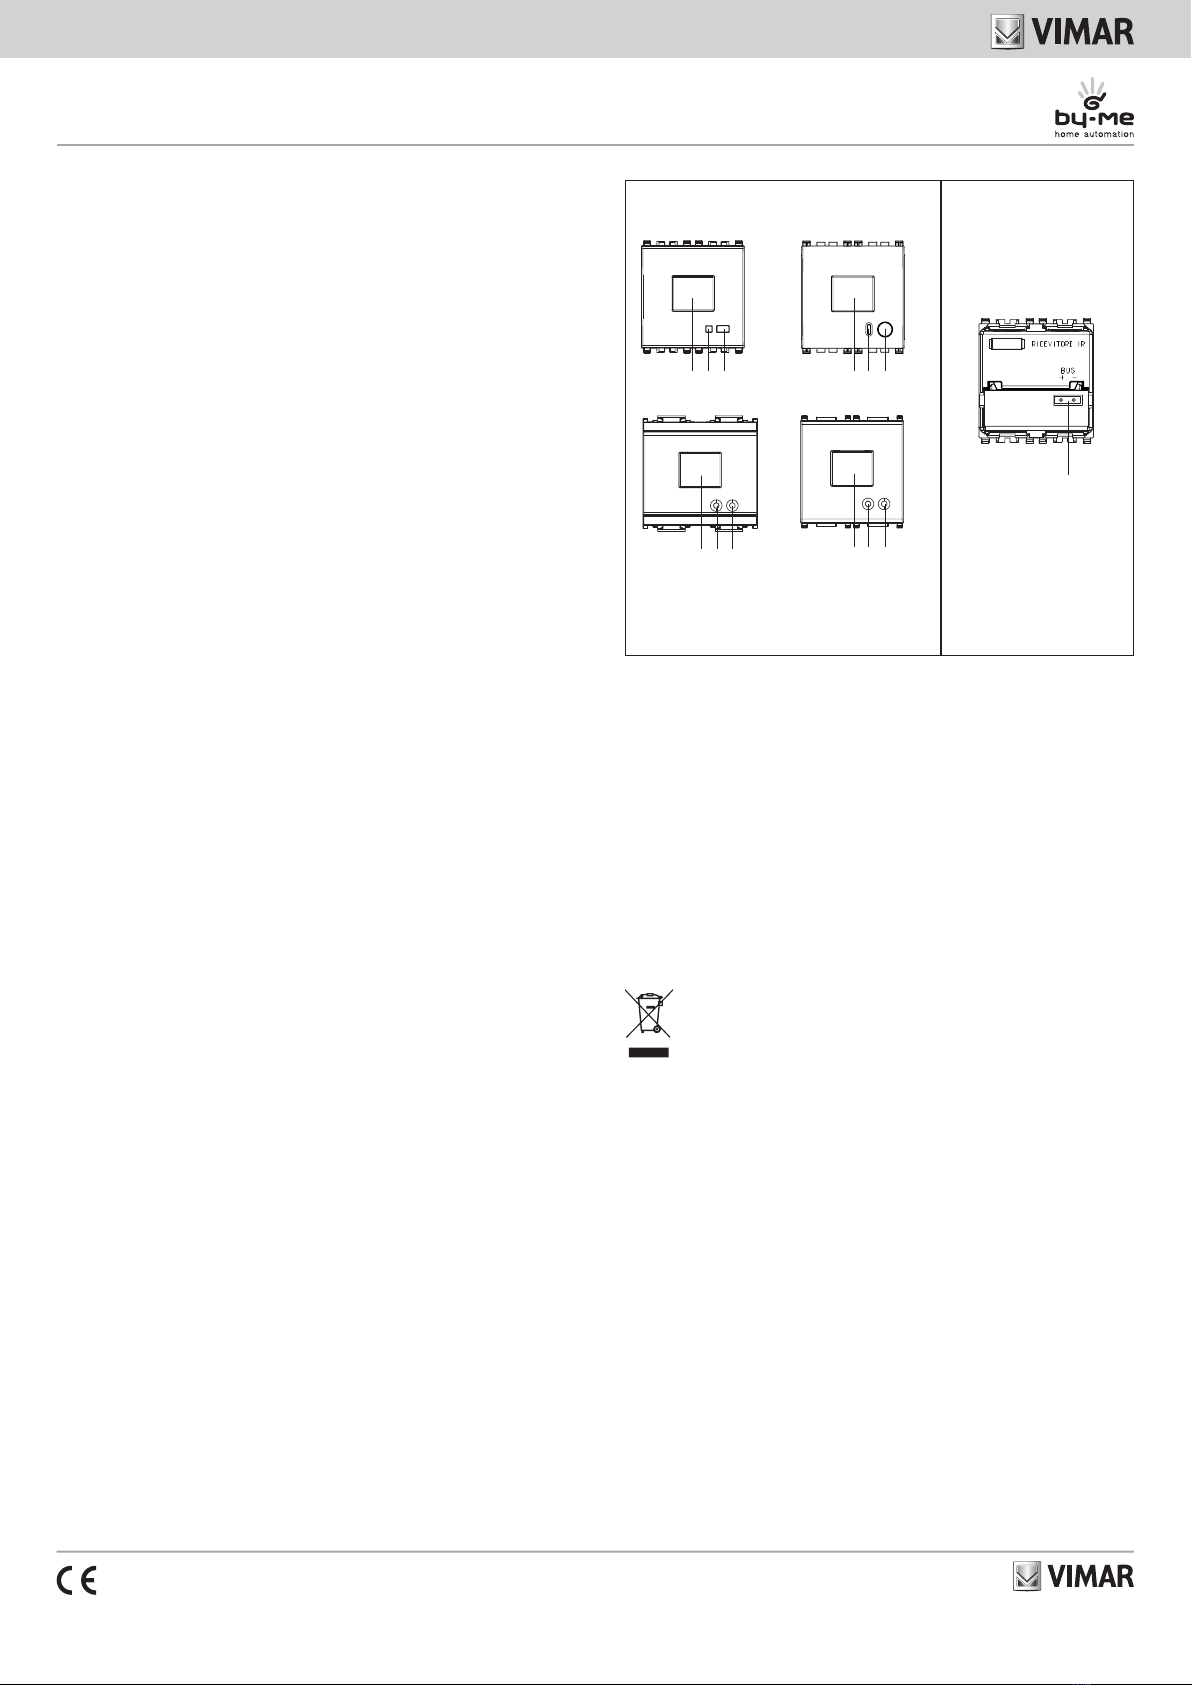
FRONT VIEW.
Caption:
A: IR receiver
B: led
C: configuration button.
BACK VIEW.
terminals
TP bus
A B C
Idea Plana
Eikon Arké
A B C
A B C A B C
WEEE - Information for users
If the crossed-out bin symbol appears on the equipment or packaging, this means the
product must not be included with other general waste at the end of its working life. The
user must take the worn product to a sorted waste center, or return it to the retailer when
purchasing a new one. Products for disposal can be consigned free of charge (without
any new purchase obligation) to retailers with a sales area of at least 400 m2, if they
measure less than 25 cm. An efficient sorted waste collection for the environmentally
friendly disposal of the used device, or its subsequent recycling, helps avoid the potential
negative effects on the environment and people’s health, and encourages the re-use
and/or recycling of the construction materials.

Viale Vicenza, 14
36063 Marostica VI - Italy
www.vimar.com
49400467B0 02 1804
Eikon
20516
Arké
19516
Idea
16956
Plana
14516
Récepteur pour télécommande à infrarouges - 2 modules.
Le dispositif reçoit les commandes de la télécommande 01849 et dispose de 4
canaux en réception. Permet de réaliser les fonctions d’interrupteur ON/OFF, com-
mande pour stores, commande pour variateurs, commande inversion d’état (pas
à pas), activation scénarios.
CARACTÉRISTIQUES.
• Tension nominale d’alimentation : BUS 29 V
• Absorption : 10 mA
• Input : télécommande 01849 (IR protocole RC5)
• Canaux en réception : 4
• Bornes : bus TP
• Fonctions réalisables :
- interrupteur ON/OFF
- commande pour stores
- commande pour variateur
- inversion d’état (pas à pas)
- bouton
- activation scénarios.
CONFIGURATION.
POUR LES OPÉRATIONS D’INSTALLATION ET DE CONFIGURATION,
VOIR LE MANUEL D’INSTRUCTIONS DU SYSTÈME By-me ANNEXÉ À LA
CENTRALE DE CONTRÔLE.
• Blocs fonctionnels : 4, chaque bloc peut appartenir au maximum à 4 groupes.
• Sélection du bloc fonctionnel (configuration) : pendant la création des groupes,
lorsque la centrale demande d’appuyer sur le bouton des dispositifs :
• Fonctionnement type 1 : bouton pas à pas ou simple (appuyé ON, relâché
OFF) :
- appuyer sur le bouton de configuration ;
- la led s’illumine et clignote ;
- sélectionner le bloc fonctionnel à configurer au moyen d’un bouton de 1 à 4
de la télécommande (indifféremment touches de droite ou de gauche de la
télécommande) ;
- la led clignote ;
- appuyer sur le bouton de la télécommande que l’on désire associer au bloc
fonctionnel ;
- la led clignote lentement ; à la fin de l’opération, la led s’éteint.
• Fonctionnement type 2 : bouton ON/OFF, contrôle variateur ou commande
stores :
- appuyer sur le bouton de configuration ;
- la led s’illumine et clignote;
- sélectionner le bloc fonctionnel à configurer au moyen d’un bouton de 1 à 4
de la télécommande (indifféremment touches de droite ou de gauche de la
télécommande) ;
- la led clignote ;
- appuyer sur le bouton de la télécommande que l’on désire associer au bloc
fonctionnel ;
- la led clignote lentement ;
- appuyer dans les 3 s sur la touche à côté de celle précédemment appuyée (qui
est la touche à côté de celle associée au bloc fonctionnel) ;
- la led s’allume ; à la fin de l’opération, la led s’éteint.
Remarques.
• Dans la configuration “Fonctionnement type bouton pas à pas ou simple”, il est
possible de passer du fonctionnement “bouton pas à pas” à “bouton simple”
au moyen de la modification des paramètres.
• Dans la configuration “Fonctionnement type bouton ON/OFF, contrôle variateur
ou commande stores”, il est possible de passer du fonctionnement “bouton
ON/OFF” à “bouton contrôle variateur” et à “bouton commande stores” au
moyen de la modification des paramètres.
PARAMÈTRES.
• Pour chaque bloc fonctionnel, il est possible d’introduire le mode de fonctionne-
ment :
- Fonctionnement type 1:
- bouton ON/OFF (pas à pas) ;
- Fonctionnement type 2 :
- bouton simple (ON à la pression, OFF au relâchement) ;
- bouton ON/OFF ;
- bouton contrôle variateur ;
- bouton stores ;
- commande scénario ;
• Paramètres led :
- led toujours éteinte ;
- led normalement éteinte (sauf en réception IR) ;
- led normalement allumée pour individualisation dans le noir (sauf en réception IR).
• Paramètres par défaut : bouton ON/OFF avec led toujours allumée.
RÈGLES D’INSTALLATION.
L’installation doit être confiée à des personnel qualifiés et exécutée conformément
aux dispositions qui régissent l’installation du matériel électrique en vigueur dans le
pays concerné.
CONFORMITÉ AUX NORMES.
Directive EMC
Norme EN 50428.
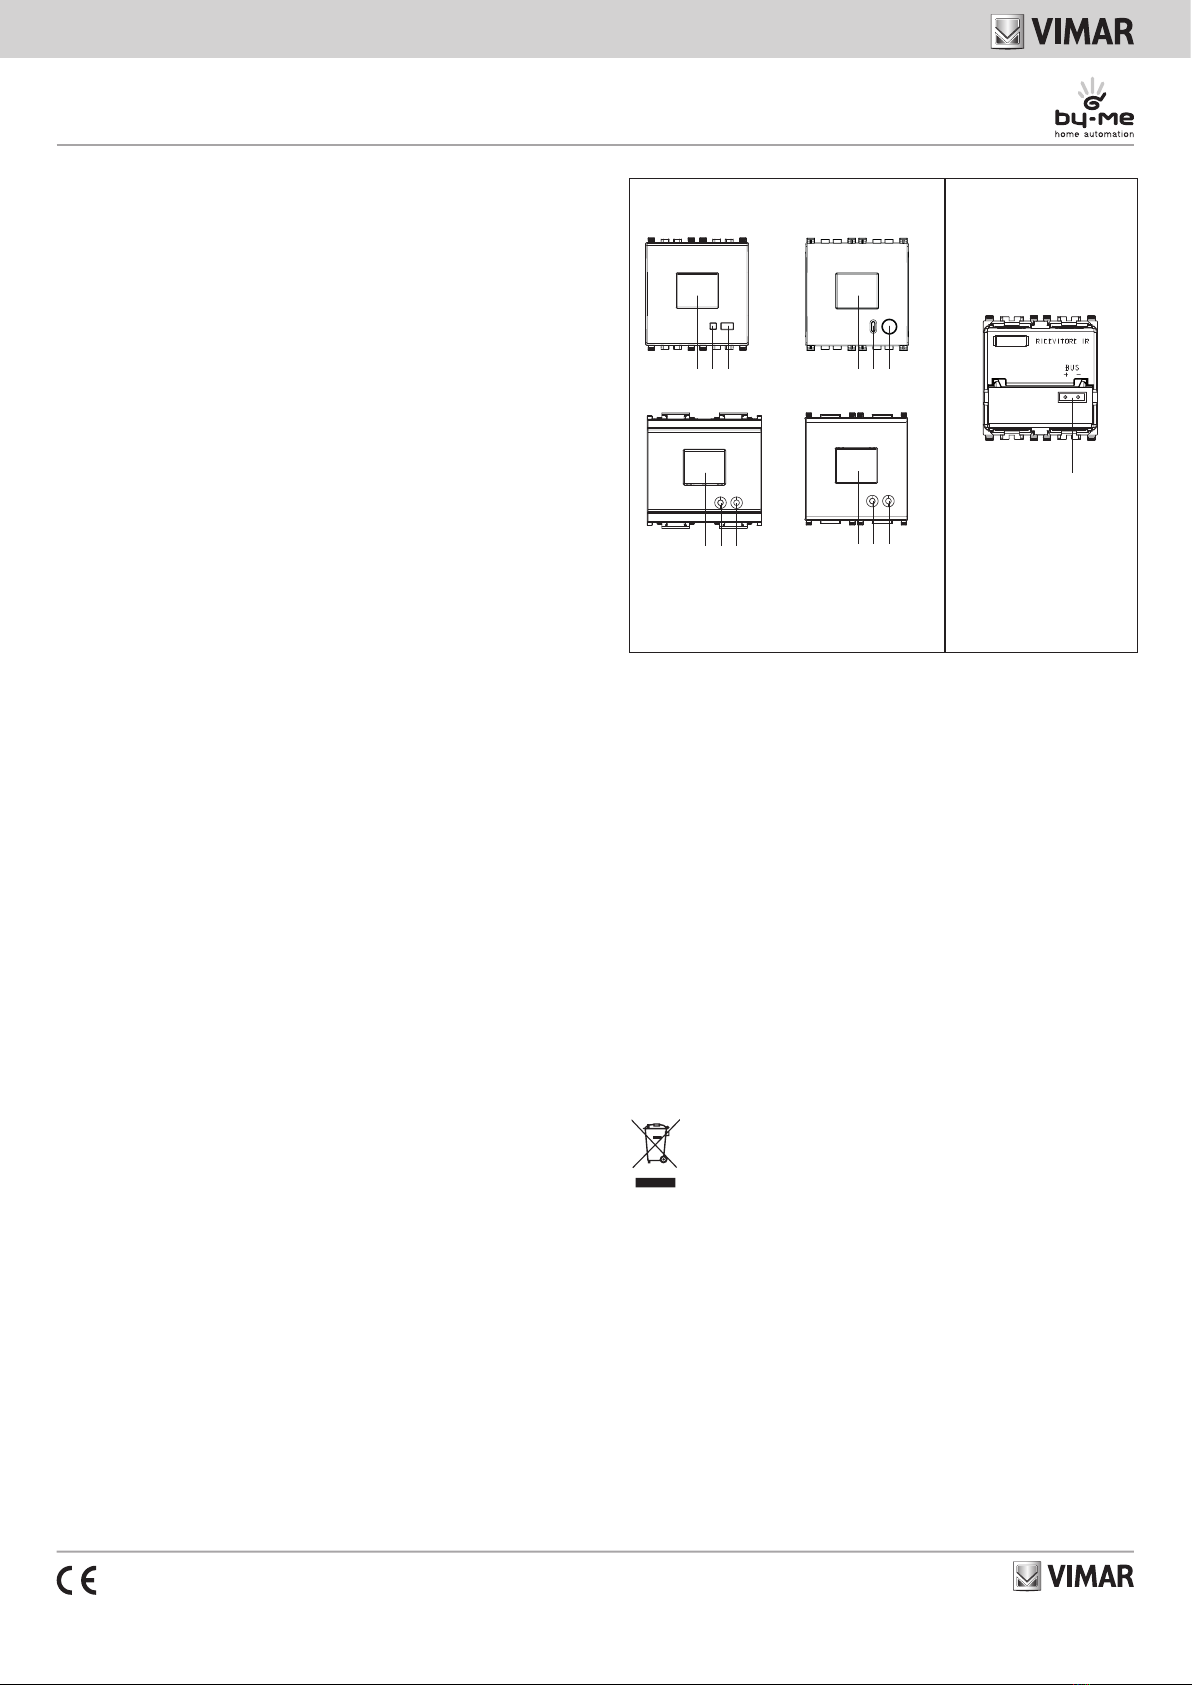
VUE FRONTALE.
Légende:
A: récepteur IR
B: led
C: bouton de configuration.
VUE ARRIÈRE.
bornes
bus TP
A B C
Idea Plana
Eikon Arké
A B C
A B C A B C
DEEE - Informations pour les utilisateurs
Le symbole du caisson barré, là où il est reporté sur l’appareil ou l’emballage, indique
que le produit en fin de vie doit être collecté séparément des autres déchets. Au terme
de la durée de vie du produit, l’utilisateur devra se charger de le remettre à un centre
de collecte séparée ou bien au revendeur lors de l’achat d’un nouveau produit. Il est
possible de remettre gratuitement, sans obligation d’achat, les produits à éliminer de
dimensions inférieures à 25 cm aux revendeurs dont la surface de vente est d’au moins
400 m2. La collecte séparée appropriée pour l’envoi successif de l’appareil en fin de vie
au recyclage, au traitement et à l’élimination dans le respect de l’environnement contri-
bue à éviter les effets négatifs sur l’environnement et sur la santé et favorise le réemploi
et/ou le recyclage des matériaux dont l’appareil est composé.

Viale Vicenza, 14
36063 Marostica VI - Italy
www.vimar.com
49400467B0 02 1804
Eikon
20516
Arké
19516
Idea
16956
Plana
14516
Receptor para mando a distancia de infrarrojos - 2 módulos.
El dispositivo recibe los mandos desde el mando a distancia 01849 y dispone de 4
canales de recepción. Permite realizar las funciones de interruptor ON/OFF, mando
para persianas, mando para regulador, mando de inversión de estado (paso-paso),
activación de escenarios.
CARACTERÍSTICAS.
• Tensión nominal de alimentación: BUS 29 V
• Absorción: 10 mA
• Input: mando a distancia 01849 (IR protocolo RC5)
• Canales en recepción: 4
• Bornes: bus TP
• Funciones que se pueden realizar:
- interruptor ON/OFF
- mando para persianas
- mando para regulador
- inversión del estado (paso-paso)
- pulsador
- activación de escenarios.
CONFIGURACIÓN.
PARA LAS OPERACIONES DE INSTALACIÓN Y CONFIGURACIÓN,
CONSULTAR EL MANUAL DE INSTRUCCIONES DEL SISTEMA By-me
SUMINISTRADO CON LA CENTRALITA DE CONTROL.
• Bloques funcionales: 4, cada bloque funcional puede pertenecer a cuatro grupos
como máximo.
• Selección del bloque funcional (configuración): durante la creación de grupos,
cuando la centralita solicita que se accione el pulsador de los dispositivosi:
• Funcionamiento de tipo 1: pulsador paso-paso o simple (pulsado ON, soltado
OFF):
- accionar el pulsador de configuración;
- el led enciende la luz y parpadea;
- seleccionar el bloque funcional que se debe configurar mediante un pulsador
de 1 a 4 del mando a distancia (indistintamente teclas de la derecha o de la
izquierda del mando a distancia);
- el led parpadea;
- accionar el pulsador del mando a distancia que se desea asociar al bloque
funcional;
- el led parpadea lentamente; al término de la operación, el led se apaga.
• Funcionamiento de tipo 2: pulsador ON/OFF, control del regulador o mando
de las persianas:
- accionar el pulsador de configuración;
- el led enciende la luz y parpadea;
- seleccionar el bloque funcional que se debe configurar mediante un pulsador
de 1 a 4 del mando a distancia (indistintamente teclas de la derecha o de la
izquierda del mando a distancia);
- el led parpadea;
- accionar el pulsador del mando a distancia que se desea asociar al bloque
funcional;
- el led parpadea lentamente;
- en un plazo de 3 segundos, pulsar la tecla al lado de la pulsada precedente-
mente (que es la tecla al lado de la asociada al bloque funcional);
- el led se enciende; al término de la operación, el led se apaga.
Notas.
• En la configuración “Funcionamiento tipo pulsador paso-paso o simple” es
posible pasar del funcionamiento “pulsador paso-paso” a “pulsador simple”
modificando los parámetros.
• En la configuración “Funcionamiento tipo pulsador ON/OFF, control del regula-
dor o mando de las persianas” es posible pasar de funcionamiento “pulsador
ON/OFF” a “pulsador de control del regulador” y a “pulsador de mando de las
persianas” modificando los parámetros.
PARÁMETROS.
• Para cada bloque funcional es posible configurar la modalidad de funcionamiento:
- Funcionamiento de tipo 1:
- pulsador de ON/OFF (paso-paso );
- Funcionamiento de tipo 2:
- pulsador simple (ON cuando se acciona, OFF cuando se suelta);
- pulsador de ON/OFF;
- pulsador de control del regulador;
- pulsador de las persianas;
- mando para escenario
• Parámetros del led:
- led siempre apagado;
- led normalmente apagado (salvo para recepción IR);
- led normalmente encendido para la identificación en la oscuridad (salvo para
recepción IR).
• Parámetros preestablecidos: pulsador ON/OFF con led siempre encendido.
NORMAS DE INSTALACIÓN.
La instalación debe ser realizada por personal cualificado cumpliendo con las dispo-
siciones en vigor que regulan el montaje del material eléctrico en el país donde se
instalen los productos.
CONFORMIDAD NORMATIVA.
Directiva EMC
Norma EN 50428.
VISTA FRONTAL.
Leyenda:
A: receptor IR
B: led
C: pulsador de configuración.
VISTA TRASERA.
Bornes
bus TP
A B C
Idea Plana
Eikon Arké
A B C
A B C A B C
RAEE - Información para los usuarios
El símbolo del contenedor tachado, cuando se indica en el aparato o en el envase, indica
que el producto, al final de su vida útil, se debe recoger separado de los demás resi-
duos. Al final del uso, el usuario deberá encargarse de llevar el producto a un centro de
recogida selectiva adecuado o devolvérselo al vendedor con ocasión de la compra de
un nuevo producto. En las tiendas con una superficie de venta de al menos 400 m2, es
posible entregar gratuitamente, sin obligación de compra, los productos que se deben
eliminar con unas dimensiones inferiores a 25 cm. La recogida selectiva adecuada para
proceder posteriormente al reciclaje, al tratamiento y a la eliminación del aparato de ma-
nera compatible con el medio ambiente contribuye a evitar posibles efectos negativos en
el medio ambiente y en la salud y favorece la reutilización y/o el reciclaje de los materiales
de los que se compone el aparato.

Viale Vicenza, 14
36063 Marostica VI - Italy
www.vimar.com
49400467B0 02 1804
Eikon
20516
Arké
19516
Idea
16956
Plana
14516
IR-Empfänger für Fernbedienung - 2 Module.
Die Vorrichtung empfängt die Steuerbefehle von der Fernbedienung 01849 und
verfügt über vier Empfangskanäle. Ermöglicht folgende Funktionen: ON/OFF-
Schalter, Rollladenbetätigung, Dimmerregelung, Steuerbefehl für Zustandsumkehr
(Schrittbetrieb), Aktivierung von Szenarien.
EIGENSCHAFTEN.
• Nenn-Versorgungsspannung: BUS 29 V
• Stromaufnahme: 10 mA
• Input: Fernbedienung 01849 (IR Protokoll RC5)
• Empfangskanäle: 4
• Klemmen: BUS TP
• Mögliche Funktionen:
- ON/OFF-Schalter
- Rollladenbetätigung
- Dimmerregelung
- Zustandsänderung (Schrittbetrieb)
- Druckschalter
- Aktivierung von Szenarien.
KONFIGURATION.
BZGL. INSTALLATION UND KONFIGURATION WIRD AUF DIE DER
STEUEREINHEIT BEILIEGENDE BETRIEBSANLEITUNG DES By-me-
SYSTEMS VERWIESEN.
• Funktionsblöcke: 4, jeder Block kann maximal 4 Gruppen angehören.
• Anwahl des Funktionsblocks (Konfiguration): Während der Zusammenstellung
der Gruppen erscheint die Aufforderung der Steuereinheit, den Druckschalter der
Vorrichtungen zu betätigen:
• Funktionsweise Typ 1: Druckschalter für Schrittbetrieb oder einfach (gedrückt
ON, losgelassen OFF):
- Den Konfigurations-Druckschalter betätigen.
- Die zweifarbige LED Anzeige leuchtet und blinkt.
- Den zu konfigurierenden Funktionsblock mit einem der Druckschalter 1-
4 der Fernbedienung anwählen (beliebig die rechten oder linken
Fernbedienungstasten);
- Die LED blinkt.
- Den Druckschalter auf der Fernbedienung, dem der Funktionsblock zugeordnet
werden soll, drücken.
- Die LED blinkt langsam, am Ende des Vorgangs schaltet sie sich aus.
• Funktionsweise Typ 2: ON/OFF-Druckschalter, Dimmerregelung oder
Rollladenbetätigung:
- Den Konfigurations-Druckschalter betätigen.
- Die zweifarbige LED Anzeige leuchtet und blinkt.
- Den zu konfigurierenden Funktionsblock mit einem der Druckschalter 1-
4 der Fernbedienung anwählen (beliebig die rechten oder linken
Fernbedienungstasten).
- Die LED blinkt.
- Den Druckschalter auf der Fernbedienung, dem der Funktionsblock zugeordnet
werden soll, drücken.
- Die LED blinkt langsam.
- Die daneben liegende Taste (d.h. die Taste neben der, welcher der Funktionsblock
zugeordnet wird) innerhalb von 3 s drücken.
- Die LED leuchtet, nach Abschluss des Vorgangs schaltet sie sich aus.
Anmerkungen.
• In der Konfiguration “Funktionsweise des Typs Druckschalter für Schrittbetrieb
oder einfach” kann durch die Änderung der Parameter von “Druckschalter
Schrittbetrieb” auf “einfacher Druckschalter” umgeschaltet werden.
• InderKonfiguration“FunktionsweisedesTypsON/OFF-Schalter,Dimmerregelung
oder Rollladenbetätigung” kann durch die Änderung der Parameter von “ON/
OFF-Schalter” auf “Druckschalter Dimmerregelung” und auf “Druckschalter
Rollladenbetätigung” übergegangen werden.
PARAMETER.
• Für jeden Funktionsblock kann die Betriebsart eingestellt werden:
- Funktionsweise Typ 1:
- ON/OFF-Druckschalter (Schrittbetrieb).
- Funktionsweise Typ 2:
- einfacher Druckschalter (ON bei Betätigung, OFF beim Loslassen);
- ON/OFF-Druckschalter;
- Druckschalter Dimmerregelung;
- Rollladen-Druckschalter;
- Steuerung Szenarium.
• LED-Parameter
- LED immer aus;
- LED normalerweise aus (außer bei IR-Empfang);
- LED normalerweise an zur Lokalisierung bei Dunkelheit (außer bei IR-Empfang).
• Standardparameter: ON/OFF-Druckschalter und LED immer an.
INSTALLATIONSVORSCHRIFTEN.
Die Installation muss durch Fachpersonal gemäß den im Anwendungsland des
Geräts geltenden Vorschriften zur Installation elektrischen Materials erfolgen.
NORMKONFORMITÄT.
EMC-Richtlinie
Norm EN 50428.
RÜCKSEITE.
Klemmen
bus TP
A B C
Idea Plana
Eikon Arké
A B C
A B C A B C
VORDERANSICHT.
Legende:
A: IR-Empfänger
B: Led
C: Konfigurationstaster.
Elektro- und Elektronik-Altgeräte - Informationen für die Nutzer
Das Symbol der durchgestrichenen Mülltonne auf dem Gerät oder seiner Verpackung
weist darauf hin, dass das Produkt am Ende seiner Nutzungsdauer getrennt von den
anderen Abfällen zu entsorgen ist. Nach Ende der Nutzungsdauer obliegt es dem
Nutzer, das Produkt in einer geeigneten Sammelstelle für getrennte Müllentsorgung zu
deponieren oder es dem Händler bei Ankauf eines neuen Produkts zu übergeben. Bei
Händlern mit einer Verkaufsfläche von mindestens 400 m2können zu entsorgende Pro-
dukte mit Abmessungen unter 25 cm kostenlos und ohne Kaufzwang abgegeben wer-
den. Die angemessene Mülltrennung für das dem Recycling, der Behandlung und der
umweltverträglichen Entsorgung zugeführten Gerätes trägt dazu bei, mögliche negative
Auswirkungen auf die Umwelt und die Gesundheit zu vermeiden und begünstigt den
Wiedereinsatz und/oder das Recyceln der Materialien, aus denen das Gerat besteht.
Viale Vicenza, 14
36063 Marostica VI - Italy
www.vimar.com
49400467B0 02 1804
Eikon
20516
Arké
19516
Idea
16956
Plana
14516
Δέκτης για τηλεχειρισμό υπερύθρων - 2 θέσεις.
Ο μηχανισμός λαμβάνει τις εντολές απο το τηλεκοντρόλ 01849 και διαθέτει 4 κανάλια
λήψεως. Επιτρέπει τις λειτουργίες διακόπτου ON/OFF, εντολές για ρολλά, εντολές για
ρυθμιστές, εντολές εναλλαγής της κατάστασης (βήμα-βήμα), ενεργοποίηση σεναρίων.
ΧΑΡΑΚΤΗΡΙΣΤΙΚΑ
• Ονομαστική τάση τροφοδοσίας: BUS 29 V
• Απορρόφηση: 10 mA
• Είσοδος: τηλεκοντρόλ 01849 (IR πρωτόκολλο RC5)
• Κανάλια λήψεως: 4
• Επαφές: bus TP
• Πραγματοποιούμενες λειτουργίες:
- διακόπτης ON/OFF
- εντολή για ρολλά
- εντολή για ρυθμιστές
- εναλλαγή της κατάστασης (βήμα-βήμα)
- μπουτόν
- ενεργοποίηση σεναρίων
ΔΙΑΜΟΡΦΩΣΗ.
ΓΙΑ ΤΙΣ ΕΡΓΑΣΙΕΣ ΕΓΚΑΤΑΣΤΑΣΗΣ ΚΑΙ ΔΙΑΜΟΡΦΩΣΗΣ, ΒΛΕΠΕ ΤΟ ΦΥΛΛΑΔΙΟ
ΟΔΗΓΙΩΝ ΤΟΥ ΣΥΣΤΗΜΑΤΟΣ ΒΥ-ΜΕ ΠΟΥ ΣΥΝΟΔΕΥΕΙ ΤΗΝ ΚΕΝΤΡΙΚΗ
ΜΟΝΑΔΑ ΕΛΕΓΧΟΥ.
• λειτουργικά μπλόκ: 4, κάθε λειτουργικό μπλόκ μπορεί να συμμετέχει μέχρι σε 4
ομάδες
• Επιλογή του λειτουργικού μπλόκ (προγραμματισμός), όταν η κεντρική μονάδα ζητή-
σει την πίεση του μπουτόν των μηχανισμών:
• Λειτουργία τύπου 1: μπουτόν βήμα-βήμα (πατημένο ON, ελεύθερο OFF):
- πιέστε το μπουτόν διαμόρφωσης
- το δίχρωμο led το φως ανάβει και αναβοσβήνει
- επιλέξτε το λειτουργικό μπλόκ προς διαμόρφωση μέσω των μπουτόν απο 1 έως 4
του τηλεκοντρόλ (αδιάφορο εάν είναι πλήκτρα αριστερά ή δεξιά)
- το led αναβοσβήνει
- πιέστε το μπουτόν του τηλεκοντρόλ που επιθυμείτε να επισυνδέσετε στο λειτουρ-
γικό μπλόκ
- το led αναβοσβήνει αργά. Στο τέλος της εργασίας το led σβήνει.
• Λειτουργία τύπου 2: μπουτόν ON/OFF, έλεγχος ρυθμιστή ή λειτουργία ρολλών:
- πιέστε το μπουτόν διαμόρφωσης
- το δίχρωμο led το φως ανάβει και αναβοσβήνει
- επιλέξτε το λειτουργικό μπλόκ προς προγραμματισμό μέσω των μπουτόν απο 1
έως 4 του τηλεκοντρόλ (αδιάφορο εάν είναι πλήκτρα αριστερά ή δεξιά)
- το led αναβοσβήνει
- το μπουτόν του τηλεκοντρόλ που επιθυμείτε να επισυνδέσετε στο λειτουργικό
μπλόκ
- το led αναβοσβήνει αργά.
- πιέστε εντός 3 s το διπλανό πλήκτρο απο το επισυνδεδεμένο (οποιοδήποτε άλλο
πλήκτρο δεν γίνεται αποδεκτό)
- το led ανάβει. Στο τέλος της εργασίας το led σβήνει.
Σημειώσεις.
• Στον προγραμματισμό “Λειτουργία τύπου μπουτόν βήμα-βήμα ή απλό” είναι δυνα-
τόν να περάσετε απο την λειτουργία “μπουτόν βήμα-βήμα” σε “μπουτόν απλό”
μέσω της τροποποίησης των παραμέτρων.
• Στη διαμόρφωση “Λειτουργία τύπου μπουτόν ON/OFF, έλεγχο ρυθμιστών ή έλεγχο
ρολλών” είναι δυνατόν να περάσετε απο την λειτουργία “ μπουτόν ON/OFF ” σε
“μπουτόν για έλεγχο ρυθμιστών” και σε “μπουτόν για έλεγχο ρολλών” μέσω της
τροποποίησης των παραμέτρων.
ΠΑΡΑΜΕΤΡΟΙ.
• Για κάθε λειτουργικό μπλόκ είναι δυνατή η ρύθμιση του τρόπου λειτουγίας του:
- Λειτουργία τύπου 1:
- μπουτόν ON/OFF (βήμα - βήμα)
- Λειτουργία τύπου 2:
- μπουτόν απλό (ON στην πίεση, OFF ελεύθερο)
- μπουτόν ON/OFF;
- μπουτόν για έλεγχο ρυθμιστών;
- μπουτόν ρολλών
- έλεγχος σεναρίων
• Παράμετροι led:
- led πάντοτε σβηστό
- led κανονικά σβηστό (εκτός απο την λήψη IR)
- led κανονικά αναμμένο για επισήμανση στο σκότος (εκτός απο την λήψη IR).
• Σταθερές παράμετροι: μπουτόν ON/OFF με led πάντοτε αναμμένο.
ΚΑΝΟΝΕΣ ΕΓΚΑΤΑΣΤΑΣΗΣ.
Η εγκατάσταση πρέπει να πραγματοποιείται από εξειδικευμένο προσωπικό σύμφωνα
με τους κανονισμούς που διέπουν την εγκατάσταση του ηλεκτρολογικού εξοπλισμού και
ισχύουν στη χώρα όπου εγκαθίστανται τα προϊόντα.
ΣΥΜΜΟΡΦΩΣΗ ΠΡΟΔΙΑΓΡΑΦΩΝ.
Οδηγία EMC
Προδιαγραφές EN 50428.
ΕΜΠΡΟΣΘΙΑ ΟΨΗ.
Υπόμνημα:
A: δέκτης IR
B: led
C: μπουτόν προγραμματισμού.
ΟΠΊΣΘΙΑ ΌΨΗ.
A B C
Idea Plana
Eikon Arké
A B C
A B C A B C
επαφές
bus TP
ΑΗΗΕ - Ενημέρωση των χρηστών
Το σύμβολο διαγραμμένου κάδου απορριμμάτων, όπου υπάρχει επάνω στη συσκευή
ή στη συσκευασία της, υποδεικνύει ότι το προϊόν στο τέλος της διάρκειας ζωής
του πρέπει να συλλέγεται χωριστά από τα υπόλοιπα απορρίμματα. Στο τέλος της
χρήσης, ο χρήστης πρέπει να αναλάβει να παραδώσει το προϊόν σε ένα κατάλληλο
κέντρο διαφοροποιημένης συλλογής ή να το παραδώσει στον αντιπρόσωπο
κατά την αγορά ενός νέου προϊόντος. Σε καταστήματα πώλησης με επιφάνεια
πωλήσεων τουλάχιστον 400 m2 μπορεί να παραδοθεί δωρεάν, χωρίς καμία
υποχρέωση για αγορά άλλων προϊόντων, τα προϊόντα για διάθεση, με διαστάσεις
μικρότερες από 25 cm. Η επαρκής διαφοροποιημένη συλλογή, προκειμένου να
ξεκινήσει η επόμενη διαδικασία ανακύκλωσης, επεξεργασίας και περιβαλλοντικά
συμβατής διάθεσης της συσκευής, συμβάλλει στην αποφυγή αρνητικών
επιπτώσεων για το περιβάλλον και την υγεία και προωθεί την επαναχρησιμοποίηση
ή/και ανακύκλωση των υλικών από τα οποία αποτελείται η συσκευή.
This manual suits for next models
10
Table of contents
Languages:
Other Vimar Receiver manuals

Vimar
Vimar Clima 01923 User guide

Vimar
Vimar Elvox ECRU.1 User guide

Vimar
Vimar Eikon 20172 User manual

Vimar
Vimar Elvox 46861.R01 User manual

Vimar
Vimar Clima Series manual

Vimar
Vimar Eikon 20173 User manual

Vimar
Vimar Eikon 20175 User manual

Vimar
Vimar Elvox ECRU.W User guide

Vimar
Vimar Elvox ECR2.RX User manual
Popular Receiver manuals by other brands

moore o matic
moore o matic MDR, MDR2, MDRNR, MDRM, MDRM2 installation instructions

BWI Eagle
BWI Eagle AIR-EAGLE SR 38-5000-AC Product information bulletin

TELECO AUTOMATION
TELECO AUTOMATION TVPRS868A01 quick start guide

Omega
Omega MWTC SERIES user guide

Carlson
Carlson NR3 user manual

Onkyo
Onkyo DR-S2.0 instruction manual


