manuals.online logo
Brands
  1. Home
  2. •
  3. Brands
  4. •
  5. Vimar
  6. •
  7. Security Camera
  8. •
  9. Vimar ELVOX 46CAM.136B User manual

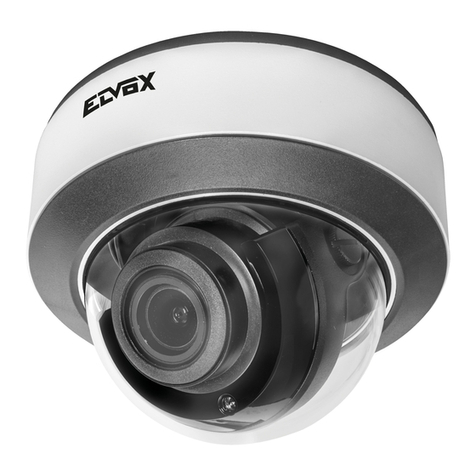
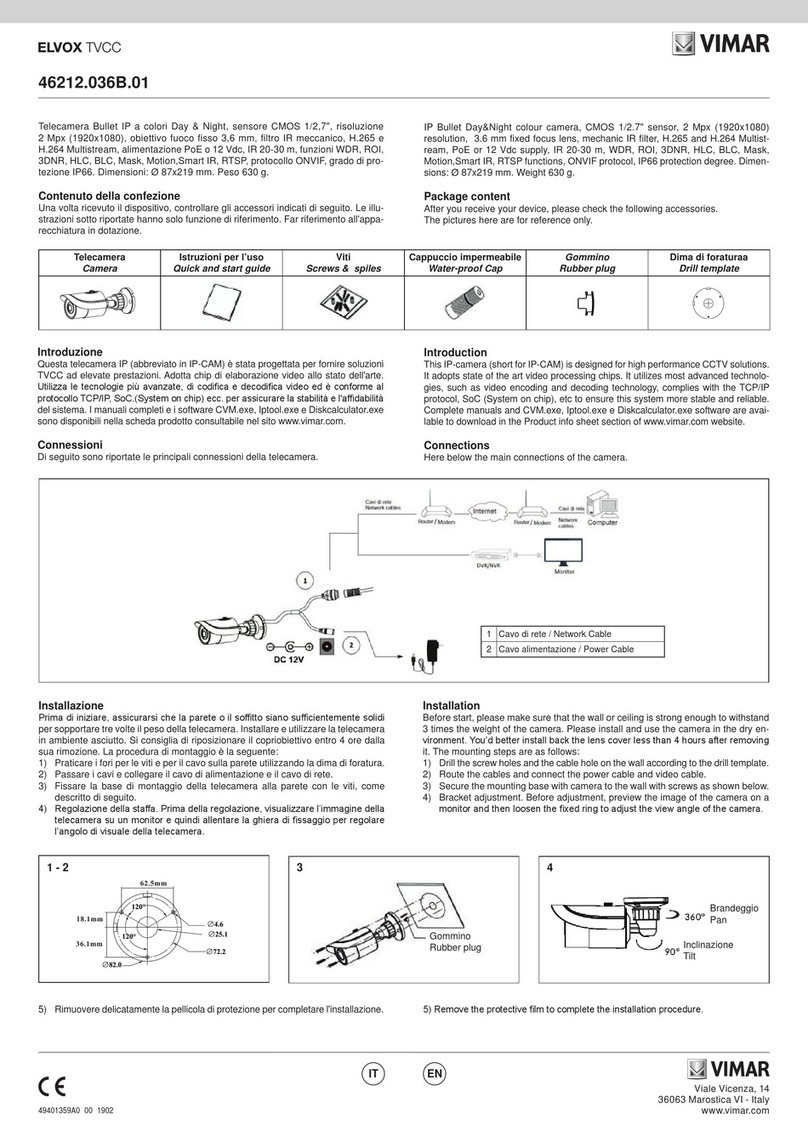
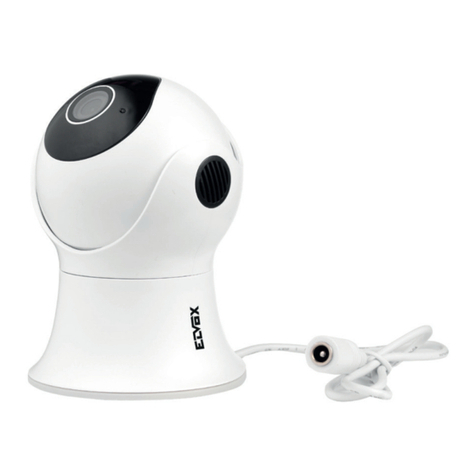
Vimar ELVOX 46CAM.136B User manual

Viale Vicenza, 14
36063 Marostica VI - Italy
www.vimar.com
49401223A0 01 1906
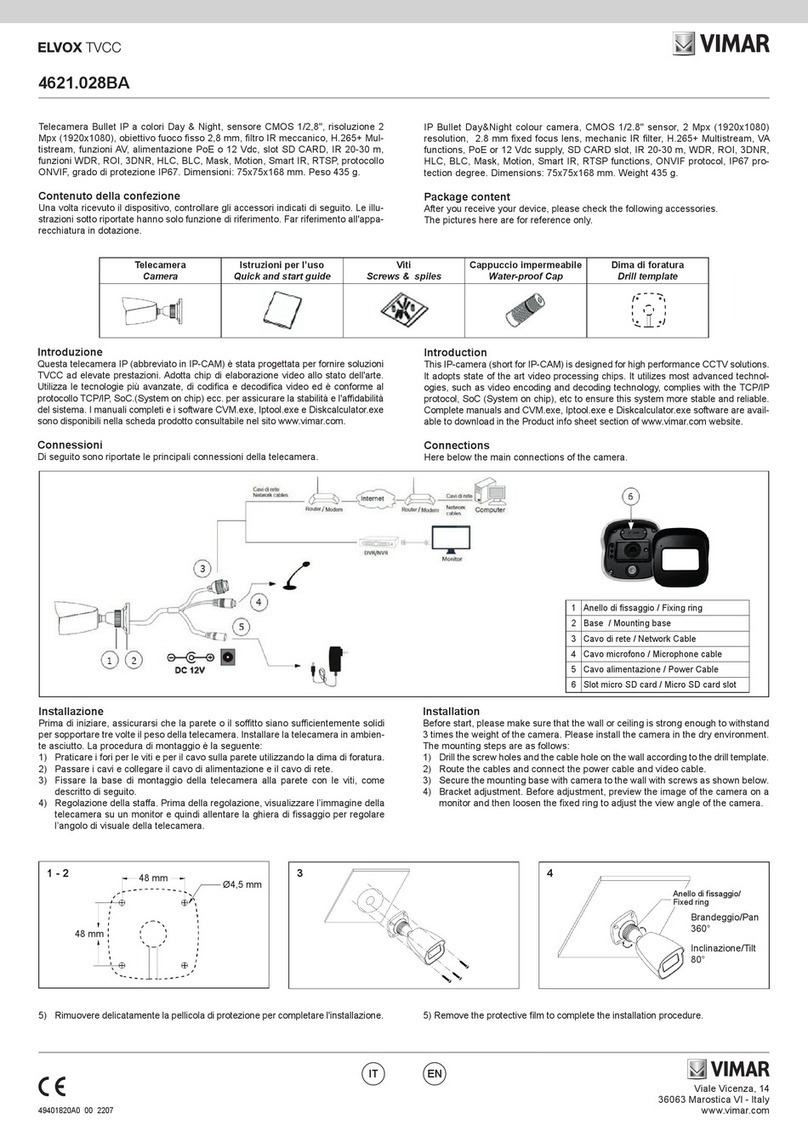
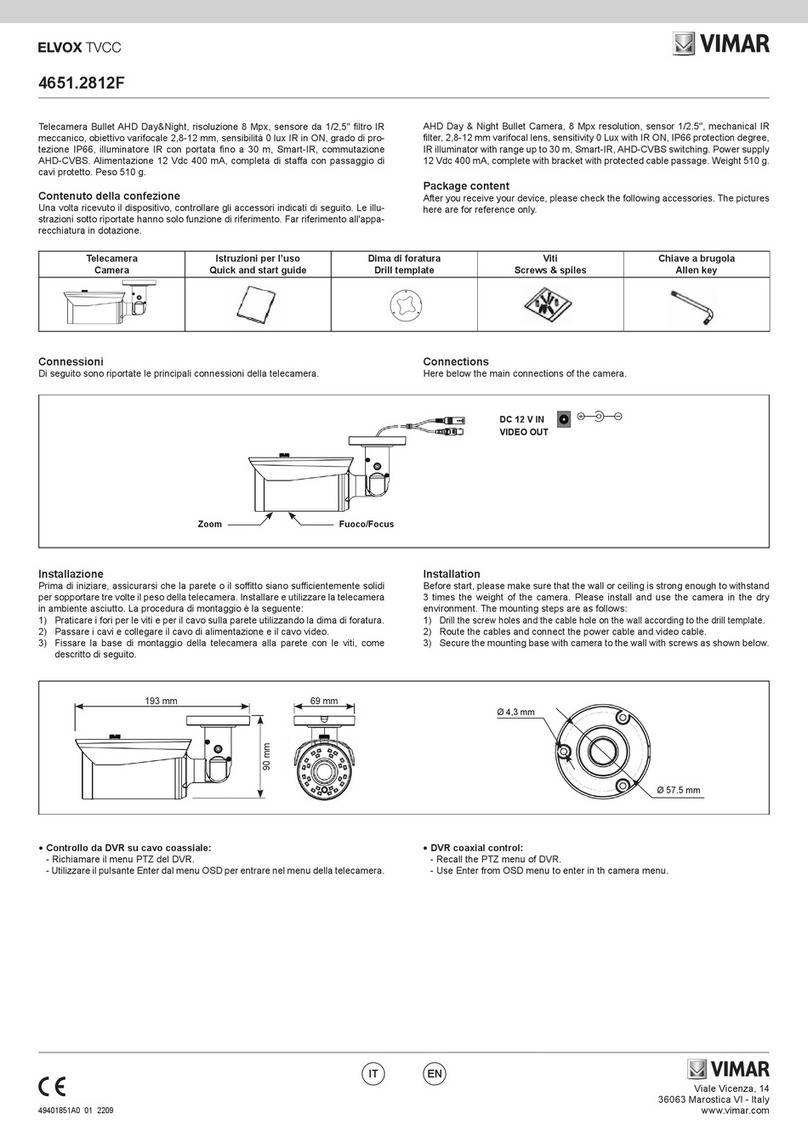
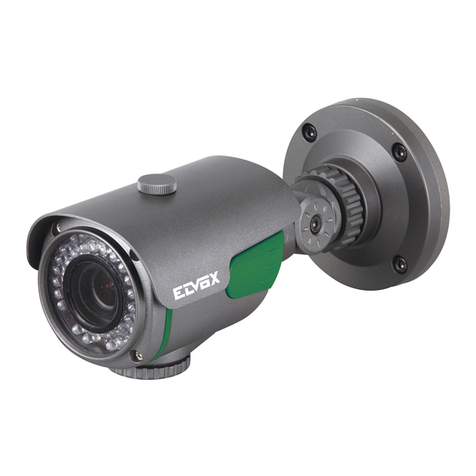
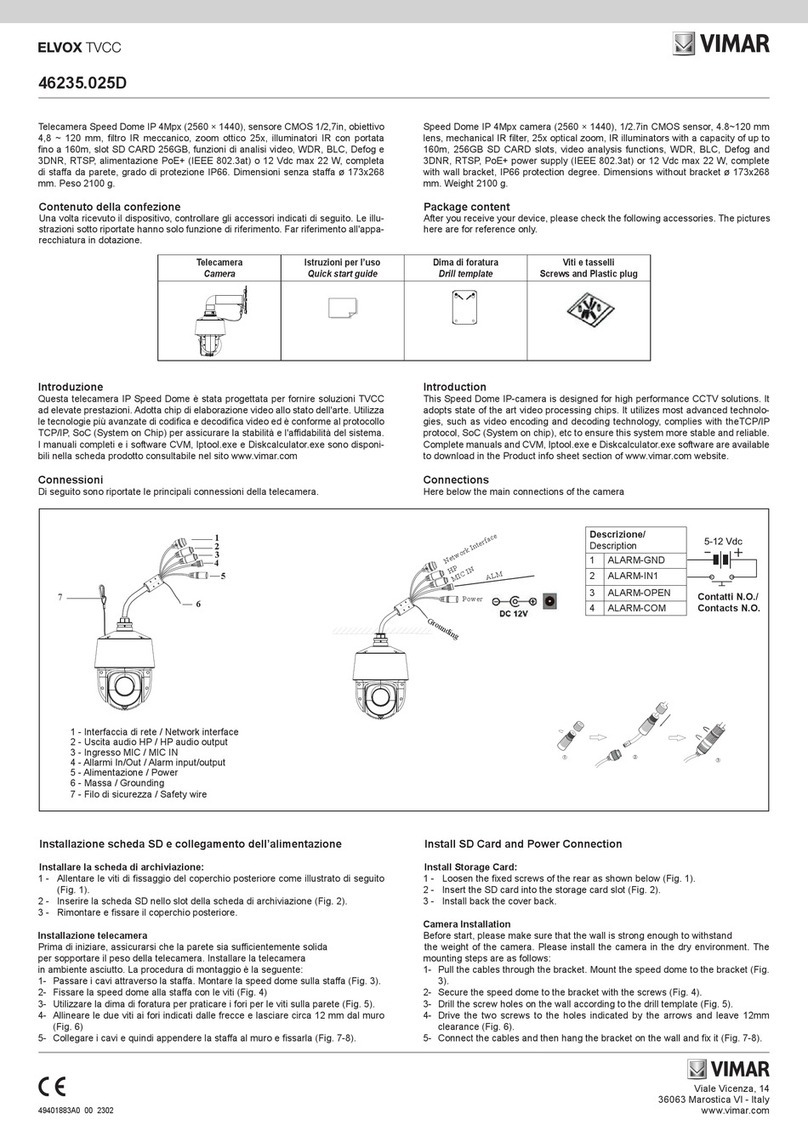
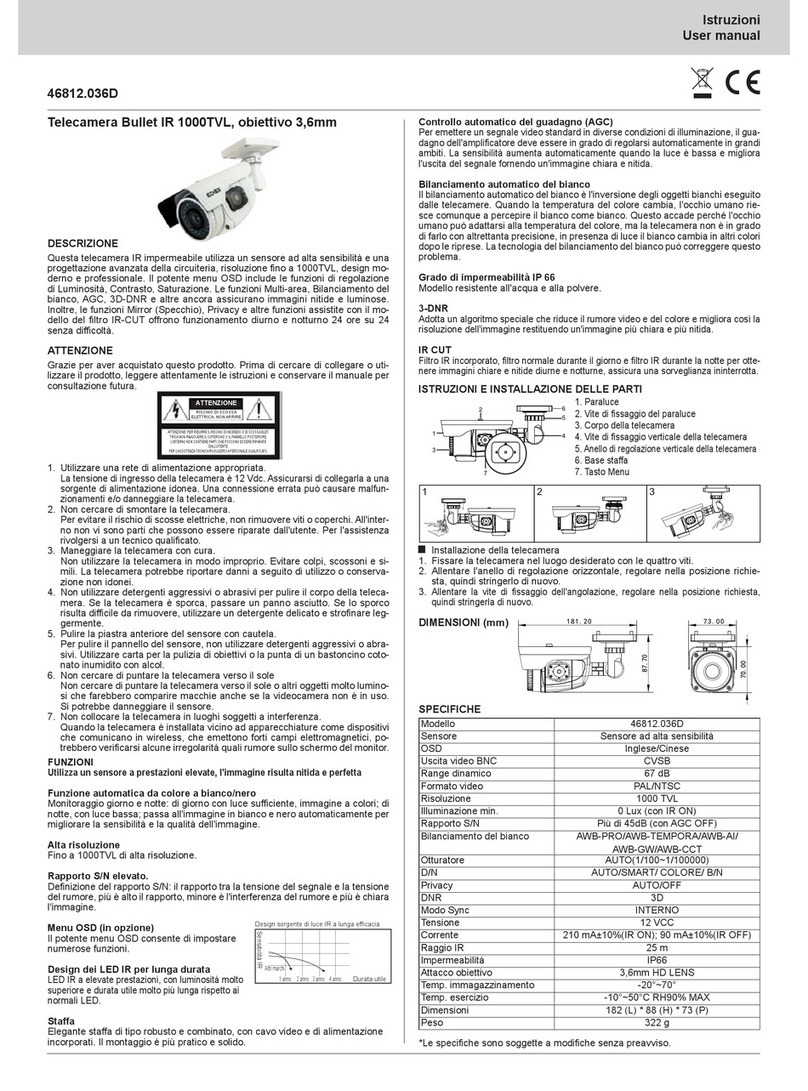
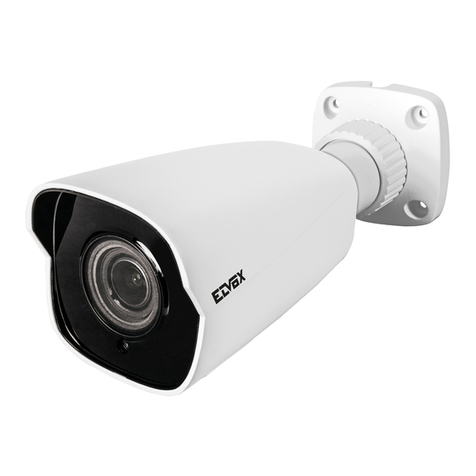
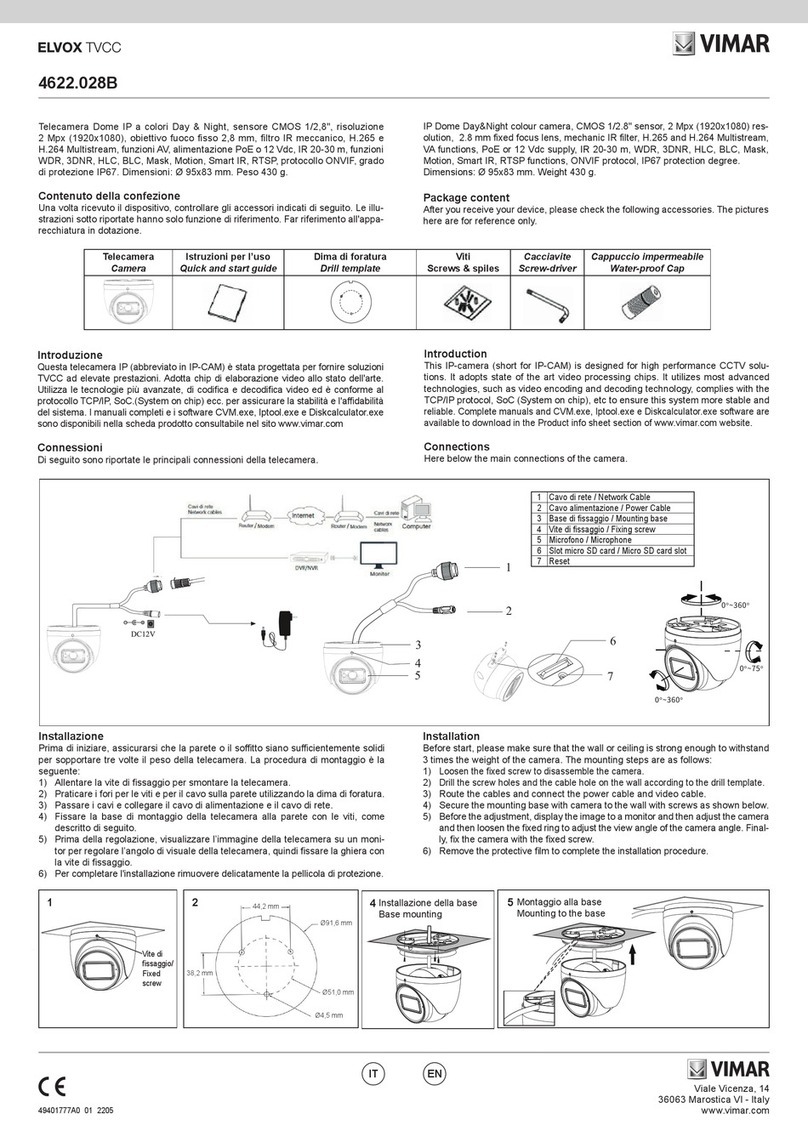
46CAM.136B
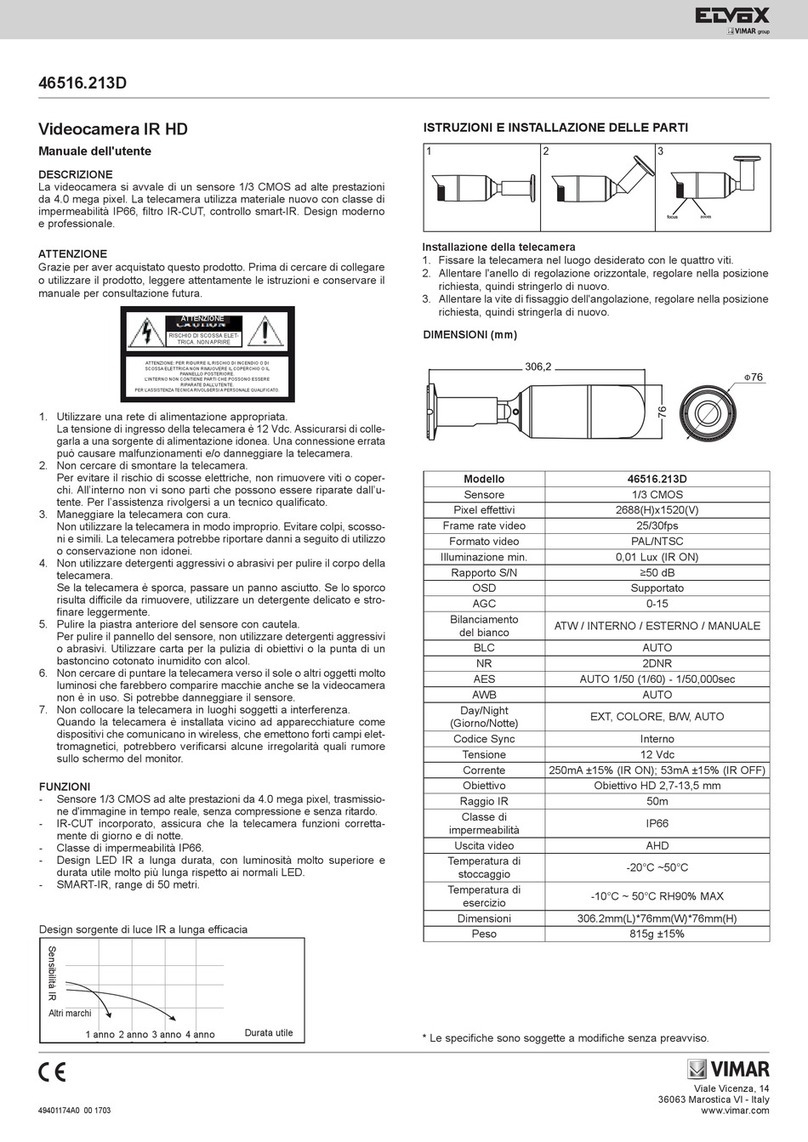
La telecamera IR impermeabile adotta un sensore AHD ad elevate prestazioni
da 2 megapixel 1080P a 25/30fps. La telecamera utilizza un nuovo materiale con
classe di impermeabilità IP66, filtro IR-CUT, controllo Smart-IR. Design moderno
e professionale.
Attenzione
Grazie per aver acquistato questo prodotto. Prima di cercare di collegare o uti-
lizzare il prodotto, leggere attentamente le istruzioni e conservare il manuale per
consultazione futura.
1 - Utilizzare una rete di alimentazione appropriata.
La tensione di ingresso della telecamera è 12 Vdc. Assicurarsi di collegarla a
una sorgente di alimentazione idonea. Una connessione errata può causare
malfunzionamenti e/o danneggiare la telecamera.
2 - Non cercare di smontare la telecamera.
Per evitare il rischio di scosse elettriche, non rimuovere viti o coperchi. All’interno
non vi sono parti che possono essere riparate dall’utente. Per l’assistenza rivol-
gersi a un tecnico qualicato.
3 - Maneggiare la telecamera con cura.
Non utilizzare la telecamera in modo improprio. Evitare colpi, scossoni e simili.
La telecamera potrebbe riportare danni a seguito di utilizzo o conservazione non
idonei.
4 - Non utilizzare detergenti aggressivi o abrasivi per pulire il corpo della telecamera.
Se la telecamera è sporca, passare un panno asciutto. Se lo sporco risulta
di󰀩cile da rimuovere, utilizzare un detergente delicato e stronare leggermente.
5 - Pulire la piastra anteriore del sensore con cautela.
Per pulire il pannello del sensore, non utilizzare detergenti aggressivi o abrasivi.
Utilizzare carta per la pulizia di obiettivi o la punta di un bastoncino cotonato
inumidito con alcol.
6 - Non cercare di puntare la telecamera verso il sole.
Non cercare di puntare la telecamera verso il sole o altri oggetti molto luminosi
che farebbero comparire macchie anche se la videocamera non è in uso.
Si potrebbe danneggiare il sensore.
7 - Non collocare la telecamera in luoghi soggetti a interferenza.
Quando la telecamera è installata vicino ad apparecchiature come dispositivi
che comunicano in wireless, che emettono forti campi elettromagnetici, potreb-
bero vericarsi alcune irregolarità quali rumore sullo schermo del monitor.
Funzioni
- Sensore CMOS a prestazioni elevate da 2 Megapixel con 25/30fps a 1080P.
- IR-CUT incorporato, assicura che la telecamera funzioni correttamente di giorno
e di notte.
- Classe di impermeabilità IP66.
- Design LED IR a lunga durata, con luminosità molto superiore e durata utile
molto più lunga rispetto ai normali LED.
- Smart-IR, range IR di 30 metri.
- Trasmissione immagine no a 300 metri.
ENIT
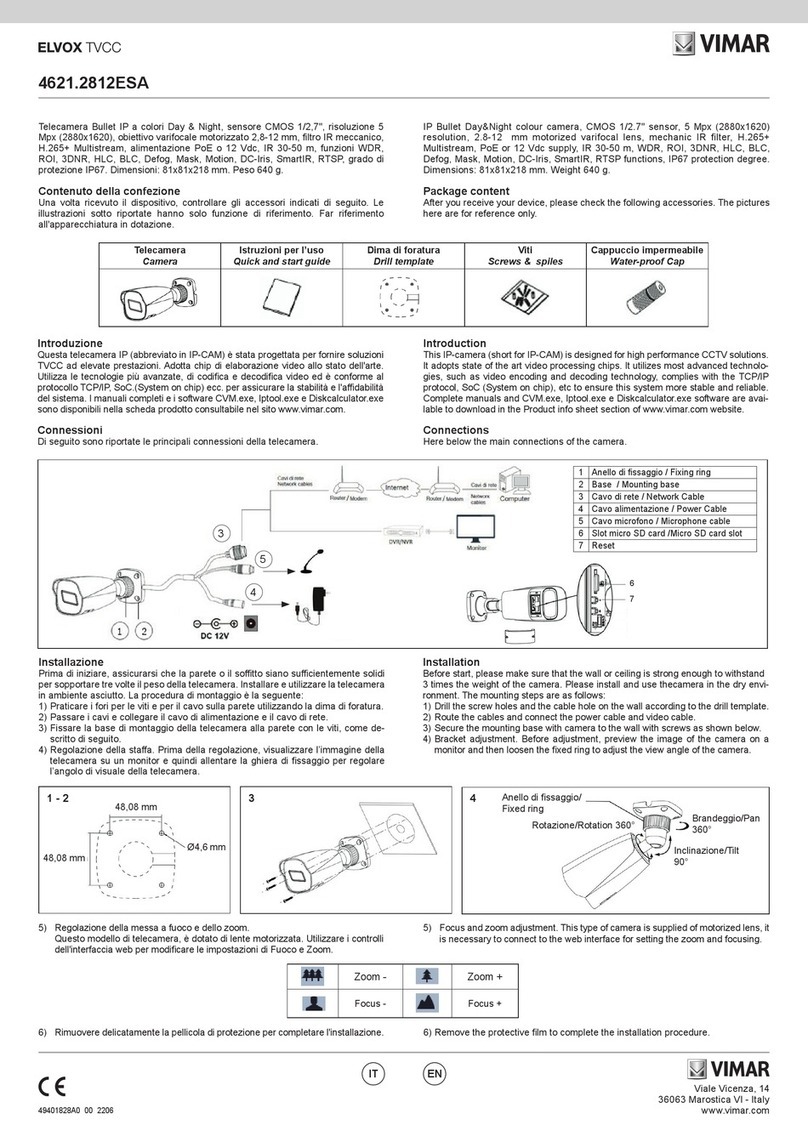
The waterproof IR camera adopt 2 megapixels 1080P@25/30fps high perfor-
mance AHD sensor. The camera adopt new material with IP66 waterproof stand-
ard, IR-CUT filter, Smart-IR control. Fashionable and professional design.
Attention
Thank you for your purchasing this product. Before attempting to connect or oper-
ate this product, please read these instructions carefully and save this manual for
future use.
1 - Use the Appropriate Power Supply
The input power for the camera is 12 Vdc. Be sure to connect it to the appro-
priate power. Wrong connection may cause malfunction and/or damage to the
video camera.
2 - Do not attempt to disassemble the camera.
To prevent electric shock, do not remove screws or covers. There are no user
serviceable parts inside. Ask a qualied service person for servicing.
3 - Handle the camera with care.
Do not abuse the camera. Avoid striking, shaking, etc. The camera could be
damaged by improper handling or storage.
4 - Do note use strong or abrasive detergents when cleaning the camera body.
Use a dry cloth to clean the camera when dirty. In case the dirt is hard to remove.
Use a mild detergent and wipe gently.
5 - Clean the sensor faceplate with care.
When cleaning the sensor panel, do not use strong or abrasive detergents.Use
a piece of lens tissue or cotton tipped applicator and ethanol.
6 - Do not attempt to aim the camera at the sun
Do not attempt to aim the camera at the sun or other extremely brightobjects that
causes mear to appear irrespective of whether the camera is operating or not.
This can damage the sensor.
7 - Do not put the camera in a place with interference.
When this camera is installed near the equipment like wireless communication
device which emits strong electromagnetic eld, some irregularity such as noise
on monitor screen may happen.
Features
- 2 Megapixel high performance CMOS sensor with 25/30fps@1080P.
- Built in IR-CUT, ensure the camera work properly both day and night.
- IP66 waterproof standard.
- Long-life IR LED design, whose brightness is several times higher and service
life longer than ordinary LED’s.
- Smart-IR, 30meters IR range.
- Image transmission up to 300 meters.
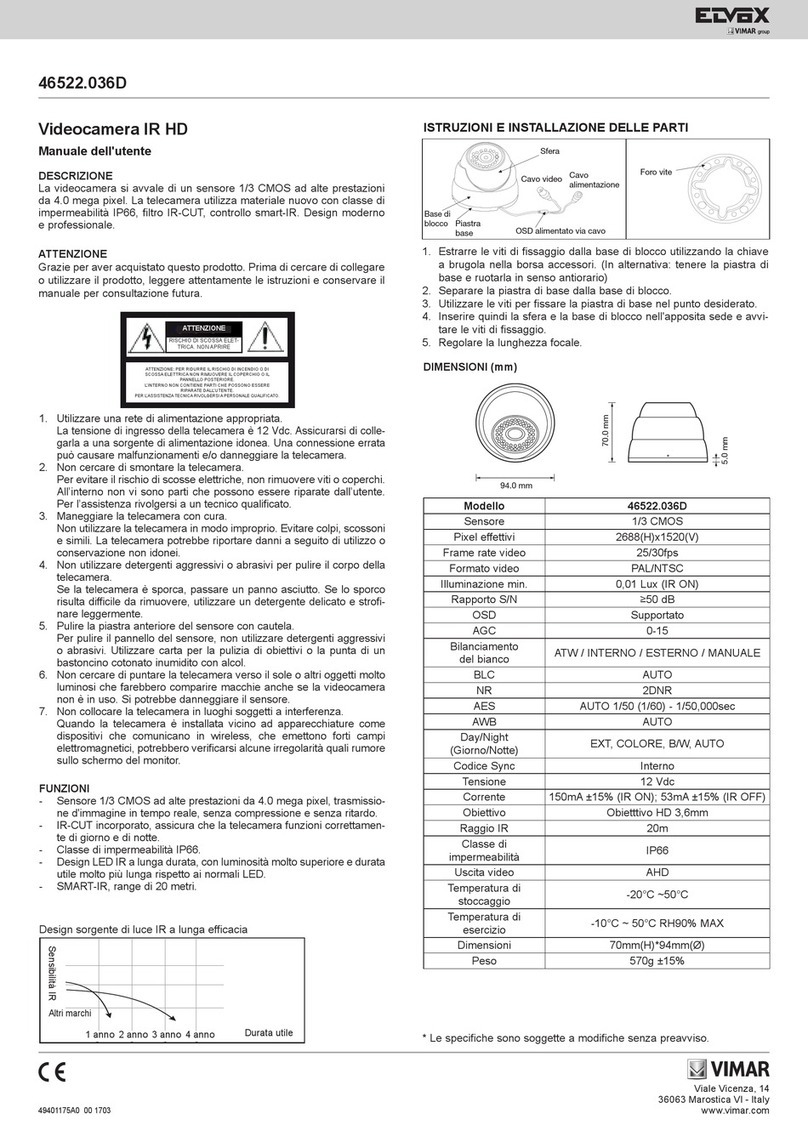
70.0mm
5.0mm
CAUTION
RISK OF ELECTRIC
SHOCK DO NOT OPEN
CAUTION: TO REDUCE THE RISK OF ELECTRIC
SHOCK, DO NOT REMOVE COVER (OR BACK).
NO USER-SERVICEABLE PA RTS INSIDE. REFER
SERVICING TO QUALIFIED SERVICE PERSONNEL
1yr 2yr 3yr 4yr
IR Sensitivity
Long-effective IR Light Source Design
Service Life
Other brands
70.0mm
5.0mm
CAUTION
RISK OF ELECTRIC
SHOCK DO NOT OPEN
CAUTION: TO REDUCE THE RISK OF ELECTRIC
SHOCK, DO NOT REMOVE COVER (OR BACK).
NO USER-SERVICEABLE PA RTS INSIDE. REFER
SERVICING TO QUALIFIED SERVICE PERSONNEL
1yr 2yr 3yr 4yr
Design sorgente di luce IR a lunga efficacia
Altri marchi
Durata utile
Sensibilità IR
1 anno 2 anno 3 anno 4 anno
Viale Vicenza, 14
36063 Marostica VI - Italy
www.vimar.com
49401223A0 01 1906
46CAM.136B
ENIT
L'immagine del prodotto è puramente indicativa, solo a scopo illustrativo.
1 - Fissare la telecamera nel luogo desiderato con le tre viti.
2 - Allentare l'anello di regolazione orizzontale, regolare nella posizione richiesta,
quindi stringerlo di nuovo.
3 - Allentare la vite di fissaggio dell'angolazione, regolare nella posizione richiesta,
quindi stringerla di nuovo.
Istruzioni e installazione delle parti
123
The image of the product is purely indicative, for illustrative purposes only.
1 - Fix the camera to the needed place with the four pieces of screws.
2 - Loosen the horizontal adjusting ring, adjust it to the needed place, then fix the
horizontal adjusting ring.
3 - Loosen the angle fixing screw, adjust it to the needed place, then fix the angle
fixing screw.
Parts instruction and installation
123
BNC (uscita video)
Alimentazione (12 Vdc)
BNC (video output)
Power (12 VDC)
Specifications
Model 46CAM.136B
Sensor 1080P Sensor
Effective Pixels 1920 (H) x 1080 (V)
Video Frame Rate 25/30fps@1080P
Max.transmission distance 300 m, with 46364.500
Video format PAL/NTSC
Mini-illumination 0 Lux (IR ON)
S/N Ration More than 50 dB (with AGC OFF)
OSD English/Chinese/ITA
AGC 0-15
White Balance ATW/AWB
Backlight BLC/OFF
NR 2DNR
Spec Fun D-WDR
Shutter Speed AUTO
Sync code Internal
Voltage 12 Vdc
Current 250 mA±15% (IR ON);
100 mA±10% (IR OFF)
DAY/NIGHT EXT/COLOR/B/W
Lens 3.6 mm HD Lens
IR range 30 m
Waterproof standard IP66
Video output CVBS/AHD
Storage temperature -20°C ~70°C
Operate Temperature -10°C~50°C RH90% MAX
Size 227mm (L) 67mm (D)
Weight 460 g
*Specications subject to change without notice.
AHD
CVBS
UP
Tenere premuto verso destra per
settare la telecamera in AHD, tenere
premuto verso sinistra per settare la
telecamera in CVBS.
Specifiche
Modello 46CAM.136B
Sensore Sensore 1080P
Pixel effettivi 1920 (H) x 1080 (V)
Frame rate video 25/30fps a 1080P
Distanza massima trasmissione 300 m, con 46364.500
Formato video PAL/NTSC
Illuminazione min. 0 Lux (con IR ON)
Rapporto S/N Più di 50 dB (con AGC OFF)
OSD Inglese/Cinese/ITA
AGC 0-15
Bilanciamento del bianco ATW/AWB
Controluce BLC/OFF
NR (Riduzione rumore) 2DNR (Riduzione rumore digitale)
Spec Fun (Funzioni speciali) D-WDR
Velocità otturatore AUTO
Codice Sync Interno
Tensione 12 Vdc
Corrente 250 mA ± 15% (IR ON);
100 mA ± 10% (IR OFF)
DAY/NIGHT (Giorno/Notte) EXT/COLORE/B/N
Obiettivo Obiettivo HD da 3,6 mm
Raggio IR 30 m
Classe di impermeabilità IP66
Uscita video CVBS/AHD
Temperatura di stoccaggio -20°C ~70°C
Temperatura di esercizio -10°C~50°C RH 90% MAX
Dimensioni 227mm (L) 67mm (D)
Peso 460 g
*Le speciche sono soggette a modiche senza preavviso.
AHD
CVBS
UP
Hold to the right to set the camera
in AHD, hold to the left to set the
camera in CVBS.
Viale Vicenza, 14
36063 Marostica VI - Italy
www.vimar.com
49401223A0 01 1906
46CAM.136B
ENIT
WDR OFF (ON)
LANGUAGE ENGLISH
4 - Impostazione video
Spostare il cursore su “Video Setting”, quindi premere il tasto menu nel sottomenu,
impostare i parametri seguenti nel modo desiderato.
MENU OSD
Set Up (Congurazione)
Premere il tasto nel menu principale “Set Up” in cui è possibile impostare i para-
metri seguenti.
1 - Esposizione
Spostare il cursore su “AE”, quindi premere il tasto menu nel sottomenu “Exposure”,
impostare i parametri seguenti nel modo desiderato.
2 - Bilanciamento del bianco
Spostare il cursore su “WB”, quindi premere il tasto menu nel sottomenu “WB” “MWB”,
impostare i parametri seguenti nel modo desiderato.
3 - Giorno/notte
Spostare il cursore su “Day&Night”, quindi premere il tasto menu nel sottomenu, impo-
stare i parametri seguenti nel modo desiderato.
WDR OFF (ON)
LANGUAGE ENGLISH
WDR OFF (ON)
LANGUAGE ENGLISH
WDR OFF (ON)
LANGUAGE ENGLISH
WDR OFF (ON)
LANGUAGE ENGLISH
WDR OFF (ON)
LANGUAGE ENGLISH
WDR OFF (ON)
LANGUAGE ENGLISH
OSD MENU
Set Up (Conguration)
Press the menu button into the main menu “Set Up”, can set the following para-
meters.
1 - Exposure
Move the cursor to “AE”, and press the menu button into the submenu “Exposure”,
set the following parameters as needed.
2 - WB
Move the cursor to “WB”, and press the menu button into the submenu “WB”
“MWB”, set the following parameters as needed.
4 - Video Setting
Move the cursor to “Video Setting”, and press the menu button into the submenu,
set the following parameters as needed.
3 - Day&Nigh
t
Move the cursor to “Day&Night”, and press the menu button into the submenu, set
the following parameters as needed.
Viale Vicenza, 14
36063 Marostica VI - Italy
www.vimar.com
49401223A0 01 1906
46CAM.136B
ENIT
Cautions
- Before operation, we strongly advise users to read this manual and keep it prop-
erly for using later.
- Please use the specied power supply to connect.
- Avoid from in correct operation, shock vibration, heavy pressing which can cause
damage to product.
- Do not use corrosive detergent to clean main body of the camera. If necessary,
please use soft dry cloth to wipe dirt; for hard contamination, use neutral deter-
gent. Any cleanser for high grade furniture is applicable.
- Avoid aiming the camera directly towards extremely bright objects, such as, sun,
as this may damage the image sensor.
- Please follow the instructions to install the camera. Do not reverse the camera,
or the reversing image will be received.
- Do not operate it incase temperature, humidity and power supply are beyond the
limited stipulations.
- Keep away from heat sources such as radiators, heat registers, stove., etc.
- This is product instructions not quality warranty. We may reserve the rights of
amending the typographical errors, inconsistencies with the latest version,
software upgrades and product improvements, interpretation and modication.
These changes will be published in the latest version without special notication.
- When this product is in use, the relevant contents of Microsoft, Apple and Google
will be involved in. The pictures and screenshots in this manual are only used
to explain the usage of our product. The ownerships of trademarks, logos and
other intellectual properties related to Microsoft, Apple and Google belong to the
above-mentioned companies.
Installation rules
Installation should be carried out by qualified staff in compliance with the current
regulations regarding the installation of electrical equipment in the country where
the products are installed.
Conformity to Standards
EMC Directive
Standards EN 55032, EN 55024
REACH (EU) Regulation no. 1907/2006 – Art.33. The product may contain traces
of lead.
WEEE - User information
If the crossed-out bin symbol appears on the equipment or packaging, this means
the product must not be included with other general waste at the end of its working
life. The user must take the worn product to a sorted waste center, or return it to
the retailer when purchasing a new one. Products for disposal can be consigned
free of charge (without any new purchase obligation) to retailers with a sales area of at least
400 m
2
, if they measure less than 25 cm. An efficient sorted waste collection for the envi-
ronmentally friendly disposal of the used device, or its subsequent recycling, helps avoid
the potential negative effects on the environment and people’s health, and encourages the
re-use and/or recycling of the construction materials.
Avvertenze
- Prima di utilizzare il prodotto si raccomanda vivamente di leggere il manuale e di
conservarlo in un luogo sicuro per consultazione futura.
- Utilizzare l'alimentazione specicata per il collegamento.
- Evitare di azionare il prodotto in modo improprio, sottoporlo a urti o vibrazioni, forti
pressioni che possono danneggiarlo.
- Non utilizzare detergenti corrosivi per pulire il corpo principale della telecamera. Se
necessario, utilizzare un panno morbido e asciutto per pulirla; in caso di sporco resi-
stente utilizzare un detergente neutro. È possibile utilizzare detergenti per mobili di
qualità.
- Non puntare la telecamera direttamente verso oggetti estremamente luminosi, ad
esempio il sole, in quanto si potrebbe danneggiare il sensore d'immagine.
- Seguire le istruzioni per installare la telecamera. Non rovesciare la telecamera, altri-
menti riceverà un'immagine rovesciata.
- Non azionarla se temperatura, umidità e alimentazione non corrispondono ai limiti o
valori specicati.
-
Tenere lontano da fonti di calore quali radiatori, bocchette dell'aria calda, stufe e simili.
- Il presente documento contiene le istruzioni per l'uso del prodotto. Non è la garanzia
di qualità. Ci riserviamo il diritto di correggere errori di stampa, incongruenze con la
versione più recente, aggiornamenti del software e miglioramenti, interpretazione e
modiche al prodotto. Tali cambiamenti saranno pubblicati nella versione più recente
senza previa notica.
- Quando il prodotto è in uso, sono applicabili i contenuti di Microsoft, Apple e Google.
Le immagini e le schermate di questo manuale hanno lo scopo di spiegare l'utilizzo
del prodotto. La proprietà dei marchi commerciali, dei logo e altre proprietà intellet-
tuali relative a Microsoft, Apple e Google appartengono alle suddette aziende.
Regole di installazione
L’installazione deve essere e󰀨ettuata da personale qualicato con l’osservanza
delle disposizioni regolanti l’installazione del materiale elettrico in vigore nel paese
dove i prodotti sono installati.
Conformità normativa
Direttiva EMC
Norme EN 55032, EN 55024
Regolamento REACh (UE) n. 1907/2006 – art.33. Il prodotto potrebbe contenere
tracce di piombo.
RAEE - Informazioni agli utilizzatori
Il simbolo del cassonetto barrato riportato sull’apparecchiatura o sulla sua confe-
zione indica che il prodotto alla fine della propria vita utile deve essere raccolto sepa-
ratamente dagli altri rifiuti. L’utente dovrà, pertanto, conferire l’apparecchiatura giunta
a fine vita agli idonei centri comunali di raccolta differenziata dei rifiuti elettrotecnici
ed elettronici. In alternativa alla gestione autonoma, è possibile consegnare gratuitamente l’ap-
parecchiatura che si desidera smaltire al distributore, al momento dell’acquisto di una nuova
apparecchiatura di tipo equivalente. Presso i distributori di prodotti elettronici con superficie
di vendita di almeno 400 m
2
è inoltre possibile consegnare gratuitamente, senza obbligo di
acquisto, i prodotti elettronici da smaltire con dimensioni inferiori a 25 cm. L’adeguata raccolta
differenziata per l’avvio successivo dell’apparecchiatura dismessa al riciclaggio, al trattamento
e allo smaltimento ambientalmente compatibile contribuisce ad evitare possibili effetti negativi
sull’ambiente e sulla salute e favorisce il reimpiego e/o riciclo dei materiali di cui è composta
l’apparecchiatura.
Other Vimar Security Camera manuals

Vimar ELVOX 4651.2812ES User manual

Vimar

Vimar ELVOX 4651.2812ES User manual

Vimar Elvox 46235.030D User manual

Vimar

Vimar Elvox 46235.030D User manual

Vimar ELVOX 4652.2812F User manual

Vimar

Vimar ELVOX 4652.2812F User manual

Vimar Elvox TVCC 46613.036 User manual

Vimar

Vimar Elvox TVCC 46613.036 User manual

Vimar Elvox 46238.036 User manual

Vimar

Vimar Elvox 46238.036 User manual

Vimar ELVOX 46216.312DM User manual

Vimar

Vimar ELVOX 46216.312DM User manual

Vimar ELVOX 46240.024B User manual

Vimar

Vimar ELVOX 46240.024B User manual

Vimar ELVOX 4621.036E User manual

Vimar

Vimar ELVOX 4621.036E User manual

Vimar ELVOX User manual

Vimar

Vimar ELVOX User manual

Vimar ELVOX 68TU Assembly instructions

Vimar

Vimar ELVOX 68TU Assembly instructions

Vimar ELVOX TVCC 4652.036E User manual

Vimar

Vimar ELVOX TVCC 4652.036E User manual

Vimar ELVOX 46617.550D User manual

Vimar

Vimar ELVOX 46617.550D User manual

Vimar ELVOX TVCC 46516.650B User manual

Vimar

Vimar ELVOX TVCC 46516.650B User manual

Vimar ELVOX 46226.312D.01 User manual

Vimar

Vimar ELVOX 46226.312D.01 User manual

Vimar ELVOX 46240.032A User manual

Vimar

Vimar ELVOX 46240.032A User manual

Vimar ELVOX TVCC 46216.212B.01 User manual

Vimar

Vimar ELVOX TVCC 46216.212B.01 User manual

Vimar ELVOX 46222.036F User manual

Vimar

Vimar ELVOX 46222.036F User manual

Vimar Elvox 46.822.036 User manual

Vimar

Vimar Elvox 46.822.036 User manual

Vimar ELVOX TVCC User manual

Vimar

Vimar ELVOX TVCC User manual

Vimar ELVOX TVCC 4622.2812DA User manual

Vimar

Vimar ELVOX TVCC 4622.2812DA User manual

Vimar ELVOX 4622.2812ESA User manual

Vimar

Vimar ELVOX 4622.2812ESA User manual

Vimar 46242.036C User manual

Vimar

Vimar 46242.036C User manual

Vimar ELVOX TVCC 46212.036B.01 User manual

Vimar

Vimar ELVOX TVCC 46212.036B.01 User manual

Vimar 5vl5 User manual

Vimar

Vimar 5vl5 User manual

Popular Security Camera manuals by other brands

Amcrest IP8M-2493EB user manual

Amcrest

Amcrest IP8M-2493EB user manual

HomeSeer HS-CAM-I manual

HomeSeer

HomeSeer HS-CAM-I manual

Sony 1/3" DSP COLOR CAMERA instruction manual

Sony

Sony 1/3" DSP COLOR CAMERA instruction manual

EverFocus ED550 Operation instructions

EverFocus

EverFocus ED550 Operation instructions

COP-USA CM259VAIR-EX Specifications

COP-USA

COP-USA CM259VAIR-EX Specifications

HIK VISION iDS-TCM403-B/0832 Configuration manual

HIK VISION

HIK VISION iDS-TCM403-B/0832 Configuration manual

Abus Eyseo TV7220 installation instructions

Abus

Abus Eyseo TV7220 installation instructions

Bosch EX40 installation instructions

Bosch

Bosch EX40 installation instructions

Interlogix TruVision TVD-7120VE-2 quick start guide

Interlogix

Interlogix TruVision TVD-7120VE-2 quick start guide

Nexxt NHC-O612 manual

Nexxt

Nexxt NHC-O612 manual

Moultrie PREMISE PRO instructions

Moultrie

Moultrie PREMISE PRO instructions

TRUELOOK TRU23019-12D3 installation manual

TRUELOOK

TRUELOOK TRU23019-12D3 installation manual

Vicon VC355-DSP Installation and operation manual

Vicon

Vicon VC355-DSP Installation and operation manual

Dahua DH-HAC-EB2401 user manual

Dahua

Dahua DH-HAC-EB2401 user manual

Vicon SN680D-WNIR quick guide

Vicon

Vicon SN680D-WNIR quick guide

ESP DomeVF Pro user manual

ESP

ESP DomeVF Pro user manual

ENS SIP46B5A/MZ-H user manual

ENS

ENS SIP46B5A/MZ-H user manual

First Alert A-520 user manual

First Alert

First Alert A-520 user manual

manuals.online logo
manuals.online logoBrands
  • About & Mission
  • Contact us
  • Privacy Policy
  • Terms and Conditions

Copyright 2025 Manuals.Online. All Rights Reserved.