manuals.online logo
Brands
  1. Home
  2. •
  3. Brands
  4. •
  5. Vintage view
  6. •
  7. Indoor Furnishing
  8. •
  9. Vintage view VP-WD User manual

Vintage view VP-WD User manual

Vino Pins (VP-WD & VP-X) Installaon Instrucons for Wood Surfaces
Wine Master Cellars, LLLP • 10645 E 47th Ave, Denver, CO 80239 • phone: 866.650.1500 • fax: 866.650.1501 • VintageView.com
Required tools: •Level •2 X 10mm (or adjustable)wrenches •Drill •5/32 inch (4mm) drill bit
Starter Kit Included Parts: •1 Vino Pins Neck •2 Machine/Lag Studs •1 Vino Pins Base •2 Nuts
Figure B
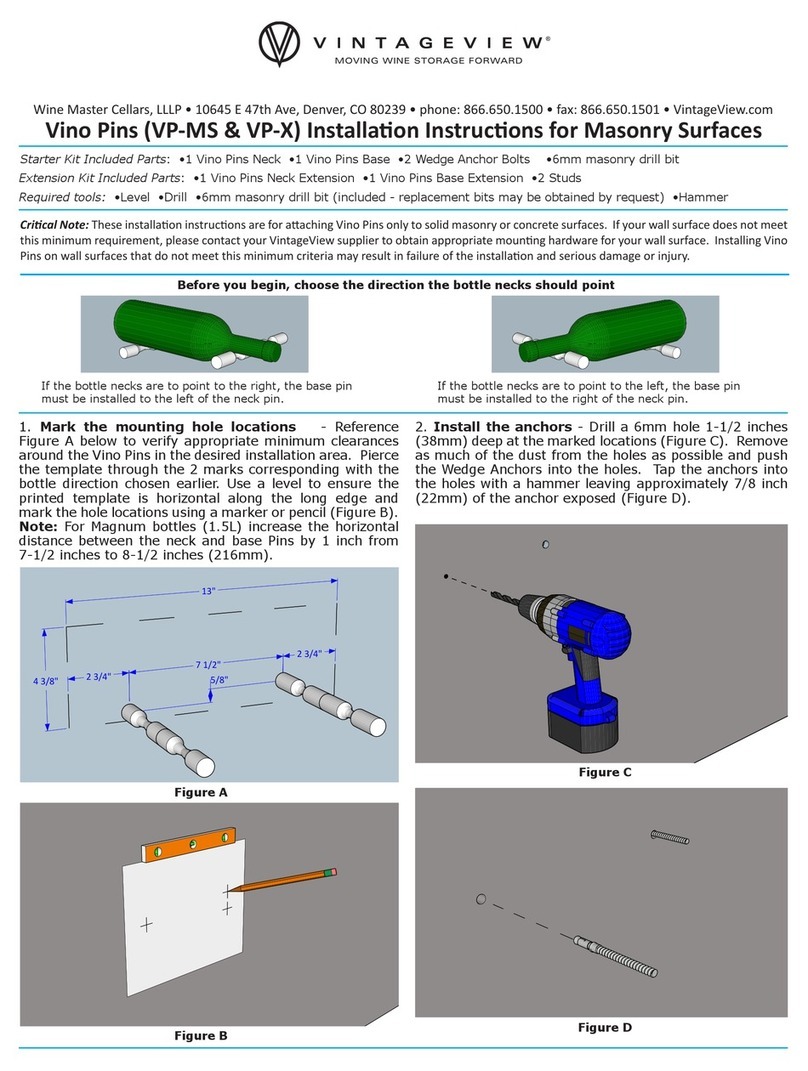
1. Mark the mounting hole locations - Reference
Figure A below to verify appropriate minimum clearances
around the Vino Pins in the desired installation area. Use
a level to ensure the printed template is horizontal along
the long edge and mark the hole locations by piercing
the template with an awl or a screw at the center of the
2 marks corresponding with the bottle direction chosen
earlier.
Note: For Magnum bottles (1.5L) increase the horizontal
distance between the neck and base Pins by 1 inch from
7-1/2 inches to 8-1/2 inches (216mm).
43/8"
13"
71/2"
5/8"
23/4"
23/4"
Figure A
2. Drill the pilot holes - Drill a 5/32 inch (4mm) pilot
hole for the Machine/Lag Studs at the marked locations
(Figure C).
Figure C
Extension Kit Included Parts: •1 Vino Pins Neck Extension •2 Studs •1 Vino Pins Base Extension
Before you begin, choose the direction the bottle necks should point
If the bottle necks are to point to the right, the base pin
must be installed to the left of the neck pin.
If the bottle necks are to point to the left, the base pin
must be installed to the right of the neck pin.
Crical Note: These installaon instrucons are for aaching Vino Pins only to solid wood or plywood surfaces with a minimum thickness of 1/2 inch
(12.7mm). If your wall surface does not meet this minimum requirement, please contact your VintageView supplier to obtain appropriate mounng
hardware for your wall surface. Installing Vino Pins on wall surfaces that do not meet this minimum criteria may result in failure of the installaon
and serious damage or injury.
Figure D
4. Assemble the Vino Pins and Install - If using the
optional Vino Pins Collars, slide one collar over each of
the studs protruding from the wall (Figure F). If using
Vino Pins extensions*, thread a stud into one end of the
base extension Pin and screw the starter base Pin onto
the remaining exposed end and rmly hand tighten (Figure
G). Connect any additional extensions in a similar fashion
and repeat this process for the neck pins. Thread the
assembled Vino Pins or the Vino Pins starter onto the studs
extending from the wall, ensuring that the base side is
secured to the lower stud and the neck pin attaches to the
higher stud and rmly hand tighten (Figure H).
3. Install the Lag Studs - Thread 2 nuts onto the ne
threaded end of one Machine/Lag Studs and using two
10mm wrenches, tighten the nuts against one another
(Figure D). With the nuts tightend against each other, use
one wrench on the outer nut and thread the lag end into
the pilot hole in the wall. Screw the bolt into the wall
until the coarse threads of the lag screw end are no longer
visible, leaving just the ner threads exposed (Figure E).
Again using 2 wrenches, loosen the nuts and remove them
to repeat the process for the second Machine/Lag Stud.
Figure G
Figure E
Figure H
Vino Pins with
Optional Collar
Vino Pins
without Collar
Vino Pins
Starter
Vino Pins
with one
Extension
Vino Pins with
2 Extensions
*Optional
Extensions
*Optional
Collars
Figure F
For product warranty information, please visit: VintageView.com/support/warranty
We’re here to help, call us at 866-650-1500 with any questions.
US Patents: 6,991,117 and 7,850,017 China Patent: ZL 2006 2 0173305.3
*IMPORTANT NOTICE: The Vino Pins are designed to accommodate a maximum of 3 bottles deep - 1 starter plus 2 extensions. Any
application outside of these parameters is not warranted by VintageView and may result in product and/or installation failure, property
damage and/or bodily injury.
Maintenance and Care - The Vino
Pins should be regularly checked for
tightness. Should any Vino Pin be
found to be loose, tighten by hand until
secure. If the face of the wall surface
shows signs of breakage, discontinue
use immediately until such time as
the wall may be adequately repaired.
Vino Pins may be cleaned with a damp
cloth and mild detergent - abrasive
cleaners, pads or steel wool should
NOT be used as they may scratch the
surface.
Base side
Neck poinng
to the RIGHT
Neck side
Neck poinng
to the LEFT
Neck side
Neck poinng
to the RIGHT
Base side
Neck poinng
to the LEFT
Important Note:
When prinng this template, select “None” from the Page Scaling opon list. This will ensure that the page
prints at the proper size. The length of the line below must measure 7-1/2 inches for proper spacing.

This manual suits for next models

1

Other Vintage view Indoor Furnishing manuals

Vintage view VR Series User manual

Vintage view

Vintage view VR Series User manual

Vintage view CC2-DOOR User manual

Vintage view

Vintage view CC2-DOOR User manual

Vintage view Case & Crate Series User manual

Vintage view

Vintage view Case & Crate Series User manual

Vintage view W Series User manual

Vintage view

Vintage view W Series User manual

Vintage view VP-X User manual

Vintage view

Vintage view VP-X User manual

Vintage view Vino Styx User manual

Vintage view

Vintage view Vino Styx User manual

Popular Indoor Furnishing manuals by other brands

J&K FA4821D Assembly instructions

J&K

J&K FA4821D Assembly instructions

Ticaa Marlies 310 Instructions for use

Ticaa

Ticaa Marlies 310 Instructions for use

EFG Solo quick start guide

EFG

EFG Solo quick start guide

Furniture To Go Scandi 4+2 Drawer Chest 1020201 Assembly instructions

Furniture To Go

Furniture To Go Scandi 4+2 Drawer Chest 1020201 Assembly instructions

milliard Changing Table manual

milliard

milliard Changing Table manual

Costway JV10536 user manual

Costway

Costway JV10536 user manual

SEI OC031400TX Assembly instructions

SEI

SEI OC031400TX Assembly instructions

Onespace Basics 50-LD02OK Assembly instructions

Onespace

Onespace Basics 50-LD02OK Assembly instructions

East West Furniture SION PARSON CHAIR SIP Assembly instructions

East West Furniture

East West Furniture SION PARSON CHAIR SIP Assembly instructions

aspenhome IML-378-GRY Assembly instructions

aspenhome

aspenhome IML-378-GRY Assembly instructions

Songmics LWS97 quick start guide

Songmics

Songmics LWS97 quick start guide

Belleze 014-HG-41002-HT manual

Belleze

Belleze 014-HG-41002-HT manual

OVE PRESTON 30 installation manual

OVE

OVE PRESTON 30 installation manual

Elements CVMG800VTPL Assembly instructions

Elements

Elements CVMG800VTPL Assembly instructions

Dorel AMERIWOOD 5527303PCOM manual

Dorel

Dorel AMERIWOOD 5527303PCOM manual

Home Decorators Collection NAPLES FWS80209 Assembly instructions

Home Decorators Collection

Home Decorators Collection NAPLES FWS80209 Assembly instructions

Wholesale Interiors BBT 5303 Assembly instructions

Wholesale Interiors

Wholesale Interiors BBT 5303 Assembly instructions

firplak VBAN05-0113-000-0437 Assembly instructions

firplak

firplak VBAN05-0113-000-0437 Assembly instructions

manuals.online logo
manuals.online logoBrands
  • About & Mission
  • Contact us
  • Privacy Policy
  • Terms and Conditions

Copyright 2025 Manuals.Online. All Rights Reserved.