manuals.online logo
Brands
  1. Home
  2. •
  3. Brands
  4. •
  5. Vintage view
  6. •
  7. Indoor Furnishing
  8. •
  9. Vintage view VP-X User manual

Vintage view VP-X User manual

Vino Pins (VP-MS & VP-X) Installaon Instrucons for Masonry Surfaces
Wine Master Cellars, LLLP • 10645 E 47th Ave, Denver, CO 80239 • phone: 866.650.1500 • fax: 866.650.1501 • VintageView.com
Required tools: •Level •Drill •6mm masonry drill bit (included - replacement bits may be obtained by request) •Hammer
Starter Kit Included Parts: •1 Vino Pins Neck •1 Vino Pins Base •2 Wedge Anchor Bolts •6mm masonry drill bit
Figure B
1. Mark the mounting hole locations - Reference
Figure A below to verify appropriate minimum clearances
around the Vino Pins in the desired installation area. Pierce
the template through the 2 marks corresponding with the
bottle direction chosen earlier. Use a level to ensure the
printed template is horizontal along the long edge and
mark the hole locations using a marker or pencil (Figure B).
Note: For Magnum bottles (1.5L) increase the horizontal
distance between the neck and base Pins by 1 inch from
7-1/2 inches to 8-1/2 inches (216mm).
43/8"
13"
71/2"
5/8"
23/4"
23/4"
Figure A
2. Install the anchors - Drill a 6mm hole 1-1/2 inches
(38mm) deep at the marked locations (Figure C). Remove
as much of the dust from the holes as possible and push
the Wedge Anchors into the holes. Tap the anchors into
the holes with a hammer leaving approximately 7/8 inch
(22mm) of the anchor exposed (Figure D).
Figure C
Extension Kit Included Parts: •1 Vino Pins Neck Extension •1 Vino Pins Base Extension •2 Studs
Before you begin, choose the direction the bottle necks should point
If the bottle necks are to point to the right, the base pin
must be installed to the left of the neck pin.
If the bottle necks are to point to the left, the base pin
must be installed to the right of the neck pin.
Crical Note: These installaon instrucons are for aaching Vino Pins only to solid masonry or concrete surfaces. If your wall surface does not meet
this minimum requirement, please contact your VintageView supplier to obtain appropriate mounng hardware for your wall surface. Installing Vino
Pins on wall surfaces that do not meet this minimum criteria may result in failure of the installaon and serious damage or injury.
Figure D
Figure G
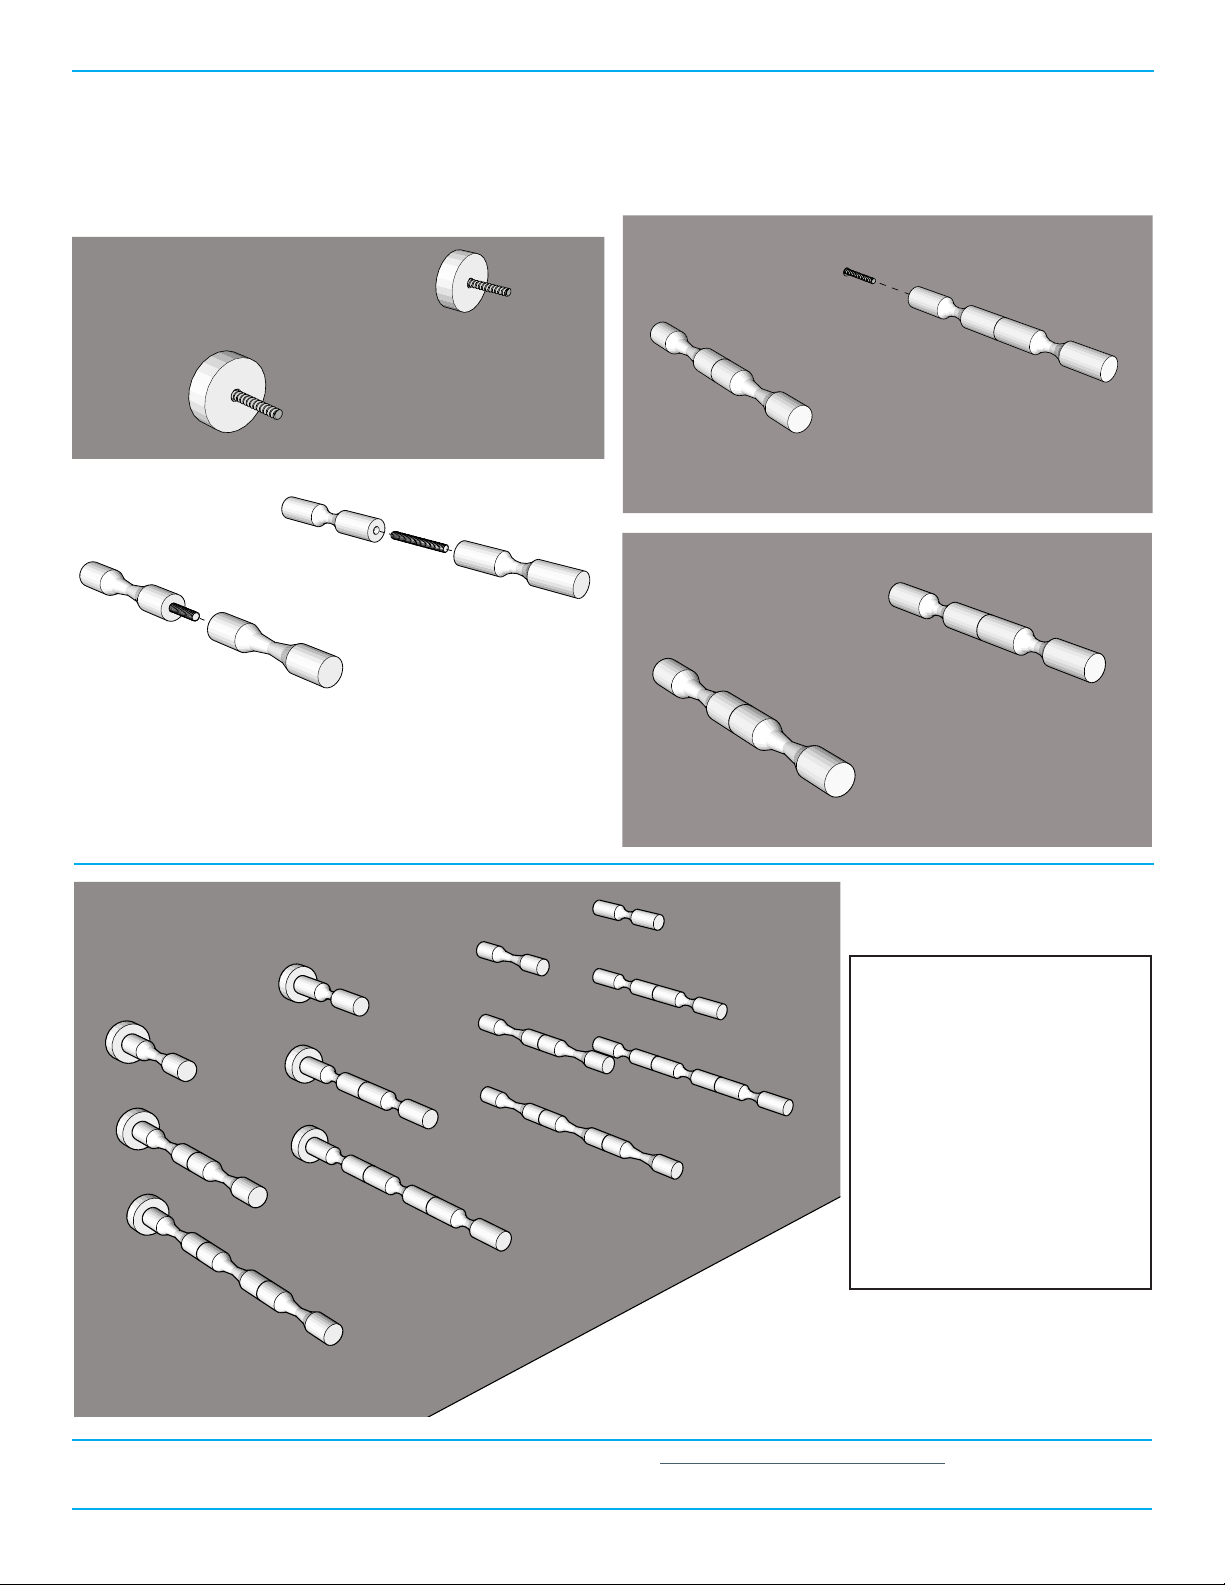
4. Assemble the Vino Pins - If using Vino Pins Collar,
place the collars over the bolts extending from the wall
(Figure E). If using extensions*, thread a stud into one end
of the base extension pin and screw the starter base Pin
onto the remaining exposed end and rmly hand tighten
(Figure F). Connect any additional extensions in a similar
fashion and repeat this process for the neck pins.
5. Install Pins - Locate the lower of the 2 anchors in
your wall and ensure that you have the base side Vino
Pin assembly (the side with the longer curve in it). Screw
the Vino Pin on clockwise and rmly hand-tighten in place
(Figure G). Repeat the process for the neck pin in the
higher anchor hole (Figure H).
Figure F
Figure E
Vino Pins with
Collar
Vino Pins
Starter
Vino Pins
with one
Extension
Vino Pins with
2 Extensions
*Optional
Extensions
*Optional
Collars
Figure H
Vino Pins
without Collar
For product warranty information, please visit: VintageView.com/support/warranty
We’re here to help, call us at 866-650-1500 with any questions.
US Patents: 6,991,117 and 7,850,017 China Patent: ZL 2006 2 0173305.3
*IMPORTANT NOTICE: The Vino Pins are designed to accommo-
date a maximum of 3 bottles deep - 1 starter plus 2 extensions.
Any application outside of these parameters is not warranted by
VintageView and may result in product and/or installation failure,
property damage and/or bodily injury.
Maintenance and Care - The
Vino Pins should be regularly
checked for tightness. Should
any Vino Pin be found to be
loose, tighten by hand until
secure. If the face of the
wall surface shows signs of
breakage, discontinue use
immediately until such time
as the wall may be adequately
repaired. Vino Pins may be
cleaned with a damp cloth
and mild detergent - abrasive
cleaners, pads or steel wool
should NOT be used as they
may scratch the surface.
Base side
Neck poinng
to the RIGHT
Neck side
Neck poinng
to the LEFT
Neck side
Neck poinng
to the RIGHT
Base side
Neck poinng
to the LEFT
Important Note:
When prinng this template, select “None” from the Page Scaling opon list. This will ensure that the page
prints at the proper size. The length of the line below must measure 7-1/2 inches for proper spacing.

This manual suits for next models

1

Other Vintage view Indoor Furnishing manuals

Vintage view Case & Crate Series User manual

Vintage view

Vintage view Case & Crate Series User manual

Vintage view W Series User manual

Vintage view

Vintage view W Series User manual

Vintage view CC2-DOOR User manual

Vintage view

Vintage view CC2-DOOR User manual

Vintage view VR Series User manual

Vintage view

Vintage view VR Series User manual

Vintage view VP-WD User manual

Vintage view

Vintage view VP-WD User manual

Vintage view Vino Styx User manual

Vintage view

Vintage view Vino Styx User manual

Popular Indoor Furnishing manuals by other brands

DHP 4045439W Instruction booklet

DHP

DHP 4045439W Instruction booklet

BOGFRAN DENIS DS1 Assembly instructions

BOGFRAN

BOGFRAN DENIS DS1 Assembly instructions

Extendo T8 Assembling instructions

Extendo

Extendo T8 Assembling instructions

American Signature VCF IA34-455 Assembly instructions

American Signature

American Signature VCF IA34-455 Assembly instructions

overstock TV1854 Assembly instructions

overstock

overstock TV1854 Assembly instructions

Amart Furniture ROSE BAY 64416 Assembly instruction

Amart Furniture

Amart Furniture ROSE BAY 64416 Assembly instruction

Hafele Bettlift Foldaway Bed Fittings 271.95.203 Installation instructio and drilling jig

Hafele

Hafele Bettlift Foldaway Bed Fittings 271.95.203 Installation instructio and drilling jig

NewAge Products Bold Series VersaShelf Install instructions

NewAge Products

NewAge Products Bold Series VersaShelf Install instructions

Furniture of America CM7515N Assembly instructions

Furniture of America

Furniture of America CM7515N Assembly instructions

Lifestyle Solutions QUEEN SIZE Assembly instructions

Lifestyle Solutions

Lifestyle Solutions QUEEN SIZE Assembly instructions

Eaton Optimedia Periodical Shelf instruction sheet

Eaton

Eaton Optimedia Periodical Shelf instruction sheet

Winners Only Colorado GCQ272R Assembly instructions

Winners Only

Winners Only Colorado GCQ272R Assembly instructions

Argos ORLEANS Assembly instructions

Argos

Argos ORLEANS Assembly instructions

Rev-A-Shelf Wood Classics 444 Series installation instructions

Rev-A-Shelf

Rev-A-Shelf Wood Classics 444 Series installation instructions

Balmani Fila Wall Unit installation guide

Balmani

Balmani Fila Wall Unit installation guide

Mocka Kuranda Assembly instructions

Mocka

Mocka Kuranda Assembly instructions

HJH office XT 600 Assembly instructions

HJH office

HJH office XT 600 Assembly instructions

Triarch 32340/2 owner's manual

Triarch

Triarch 32340/2 owner's manual

manuals.online logo
manuals.online logoBrands
  • About & Mission
  • Contact us
  • Privacy Policy
  • Terms and Conditions

Copyright 2025 Manuals.Online. All Rights Reserved.