Vishay Precision Group BLH 325 User manual

SYSTEM CALIBRATION TECHNOLOGY
BLH
MODEL 325
Weigh Systems Calibrator
Operator’s Manual
SYSTEM CALIBRATION TECHNOLOGY
BLH
MODEL 325
Weigh Systems Calibrator
Operator’s Manual
TM026
RevC
6/1/11
Doc 35120

NOTICE
BLH makes no representation or warranties of any kind whatsoever with respect to the
contentshereof and specifically disclaims any implied warranties ormerchantability or
fitness for any particular purpose. BLH shall not be held liablefor errors contained herein
or for incidental or consequential damages in connection with the furnishing,
performance, or use of this publication or its contents.
BLH reserves the right to revise this manual at any time and to make changes inthe
contents hereof without obligation to notify any person of such revision or changes.
Call (781) 298-2216 for BLH Field Service.

Table of Contents
SECTION 1. Introduction........................................................................................1-1
1.1 GENERAL.......................................................................................................1-1
1.2 SPECIFICATIONS..........................................................................................1-1
1.3 WARRANTY POLICY .....................................................................................1-1
1.4 FIELD ENGINEERING....................................................................................1-2
SECTION 2. Installation..........................................................................................2-1
2.1 GENERAL.......................................................................................................2-1
2.2 LOCATION......................................................................................................2-1
2.3
ELECTRICAL INSTALLATION........................................................................2-1
2.3.2 Remote Sense Lead Connections................................................................2-1
2.3.3 Signal Connections ......................................................................................2-2
SECTION 3. Operation...........................................................................................3-1
3.1
GENERAL
.....................................................................................................3-1
3.2 FRONT PANEL CONTROL.............................................................................3-1
3.2.1 Millivolt-Per-Volt Selection............................................................................3-1
3.2.2 Input/Output Resistance Selection...............................................................3-1
3.2.3 Vernier Adjustment.......................................................................................3-2
3.3 CALIBRATION................................................................................................3-2
3.3.1 Dead Weight Signal Calibration ...................................................................3-2
3.3.2 Establishing Zero .........................................................................................3-2
3.3.4 Calculate the Interpolated Span Value.........................................................3-3
3.3.5 Entering a Span Point ..................................................................................3-3
3.4 VERNIER OPERATION..................................................................................3-3

1-1
SECTION 1. Introduction
1.1 GENERAL
The Model 325 precision calibrator (Figure 1-1) is a
portable, lightweight simulator designed to supply high
accuracy millivolt-per-volt (mV/V) level signals for
testing and calibrating weigh system instrumentation.
Precise output references for 0, 0.5, 1, 1.5, 2, 2.5, 3,
and 3.5 mV/V are achieved by using a metal film
resistor network, discrete wire wound resistors, and a 2-
pole, 8-position rotary switch. The 350, 700, and 1000
ohm input and output impedance selections match
typical strain gage devices. Vernier operation provides precise checking of setpoint and
alarm functions. Four permanent binding posts, integral to the rugged palm-size case,
provide connection points for the indicator or transmitter.
The Model 325 unit substitutes for weigh system transducers. Lightweight construction,
compact size, and superb accuracy make the Model 325 Calibrator an excellent choice
for calibrating process weighing instruments and transmitters.
1.2 SPECIFICATIONS
Output Accuracy
0.02% of selected range
Accuracy Stability
(0.5 and lmV/V steps)
less than 0.01% in 24 hours
less than 0.02% in 1 year
(1.5 thru 3.5 mV/V steps)
less than-0.005% in 24 hours
less than 0.01% in 1 year
Zero Stability
less than 3 uV
Span TC
+ /- 15 ppm/degree C
Input Impedance (Excitation)
adjustable to + /- 0.05%
Output Impedance (Signal)
adjustable to + /- 0.08%
Output Ranges
8 steps: 0, 0.5, 1, 1.5, 2, 2.5, 3 and 3.5 mV/V
Vernier Range
106% (approx.) of selected step
25Vdc maximum
25Vdc maximum
Operating Temperature Range
32 to 120 F (0 to 50C)
Impedance Adjustment
350, 700, and 1000 ohms
Dimensions (inches)
6 x 32 x 1.8 (LVVH)
1.3 WARRANTY POLICY
BLH warrants the products covered hereby to be free from defects in material and
workmanship. BLH's liability under this guarantee shall be limited to repairing or
furnishing parts to replace, f.o.b. point of manufacture, any parts which, within three
(3) years from date of shipment of said product(s) from BLH's plant, fail because of
Figure 1-1. The Model 325
Calibrator

1-2
defective workmanship or material performed or furnished by BLH. As a condition
hereof, such defects must be brought to BLH's attention for verification when first
discovered, and the material or parts alleged to be defective shall be returned to BLH if
requested. BLH shall not be liable for transportation or installation charges, for expenses
of Buyer for repairs or replacements or for any damages from delay or loss of use for
other indirect or consequential damages of any kind. BLH may use improved designs of
the parts to be replaced. This guarantee shall not apply to any material which shall have
been repaired or altered outside of BLH's plant in any way, so as in BLH's judgment, to
affect its strength, performance, or reliability, or to any defect due in any part to misuse,
negligence, accident or any cause other than normal and reasonable use, nor shall it
apply beyond their normal span of life to any materials whose normal span of life is
shorter than the applicable period stated herein. In consideration of the forgoing
guarantees, all implied warranties are waived by the Buyer, BLH does not guarantee
quality of material or parts specified or furnished by Buyer, or by other parties
designated by buyer, if not manufactured by BLH. If any modifications or repairs are
made to this equipment without prior factory approval, the above warranty can become
null and void.
1.4 FIELD ENGINEERING
Authorized BLH Field Service Engineers are available around the world to install and/or
repair BLH products. The field service department at BLH is the most important tool
to assure the s best performance from your application. Field service phone numbers are
listed below.
Factory: (Main Number) (781) 298-2200
(800) 567-6098 in Canada

2-1
SECTION 2. Installation
2.1 GENERAL
The Baldwin Model 325 calibrator is a hand-held device and requires no mechanical
installation instructions. Figure 2-1 provides outline dimensions for reference and storage
considerations.
2.2 LOCATION
Units perform accurately in temperatures ranging from 32 to 120 degrees Fahrenheit. If
used in harsh or dirty environments, wipe clean before storing. When not in use, store in
a clean, dry, vibration free area that is exempt from unusual temperature fluctuations.
Figure 2-1. Model 325 Outline Dimensions
2.3
ELECTRICAL INSTALLATION
2.3.1 Excitation Lead Connections
Power for the 325 is supplied by the instrument (indicator, transmitter, etc.) being
tested. Simply connect the instrument excitation output to the 325 excitation input
binding posts as shown in Figure 2-2 (black and green leads).
2.3.2 Remote Sense Lead Connections
For maximum calibration accuracy on systems equipped with remotesenselines,connect
thoseleadsinparallelwiththeexcitationleads on the green and black binding posts.

2-2
2.3.3 Signal Connections
Simply connect the leads for the input of the indicator/transmitter totheredandwhite
bindingpostsasshowninFigure2-2.
Figure 2-2. Typical Electrical Connections
NOTE: The Model 325 polarity designations are designed to simulatecompressiontype
systems.Tosimulateatensionsystem,thesignal leads (white and red) may have to be
reversed.
NOTE: BLH load cell wiring color code conventions may differ from otherload cell
manufacturers.

3-1
SECTION 3. Operation
3.1 GENERAL
The Model 325 Calibrator is a multi-purpose tool designed to simulate ' scale/system
transducers when calibrating system instrumentation. After completing SECTION II
installation instructions, the 325 calibrator is ready for operation.
3.2 FRONT PANEL CONTROL
Front panel controls consist of an 8-position rotary switch (Figure 3-1) for selecting
mV/V simulation, a 3-position rotary switch for selecting input and output resistance, and
a 2-position bat-handle switch/potentiometer combination for vernier adjustments.
3.2.1 Millivolt-Per-Volt Selection
Use the 8-position rotary switch to select 0, 0.5, 1.0, 1.5, 2.0, 2.5, 3.0, and 3.5 mV/V
output ranges. Each range supplies a highly accurate, constant output.
3.2.2 Input/Output Resistance Selection
The 3-position resistance-ohms selection switch provides 3 resistance ranges to match
different transducer specifications. Traditional strain gage based transducers typically
specify 350 ohm impedance values. However, some beam style transducers mayuse700 or
1000ohmgages.Consultthetransducerspecification sheet or installation instructionsfor the
correct value and select accordingly.
Figure 3-1. Model 325 Front Panel Controls.

3-2
3.2.3 Vernier Adjustment
The Model 325 Calibrator offers a vernier adjustment for checking setpoint, peak/hold,
alarm, and overrange instrument functions (see paragraph 3.4). The bat-handle
switch must be in the 'IN' position for vernier function. As specified in paragraph 1.2, the
vernier
functions over 106% of the selected step range (slightly more than 0.5 mV/V).
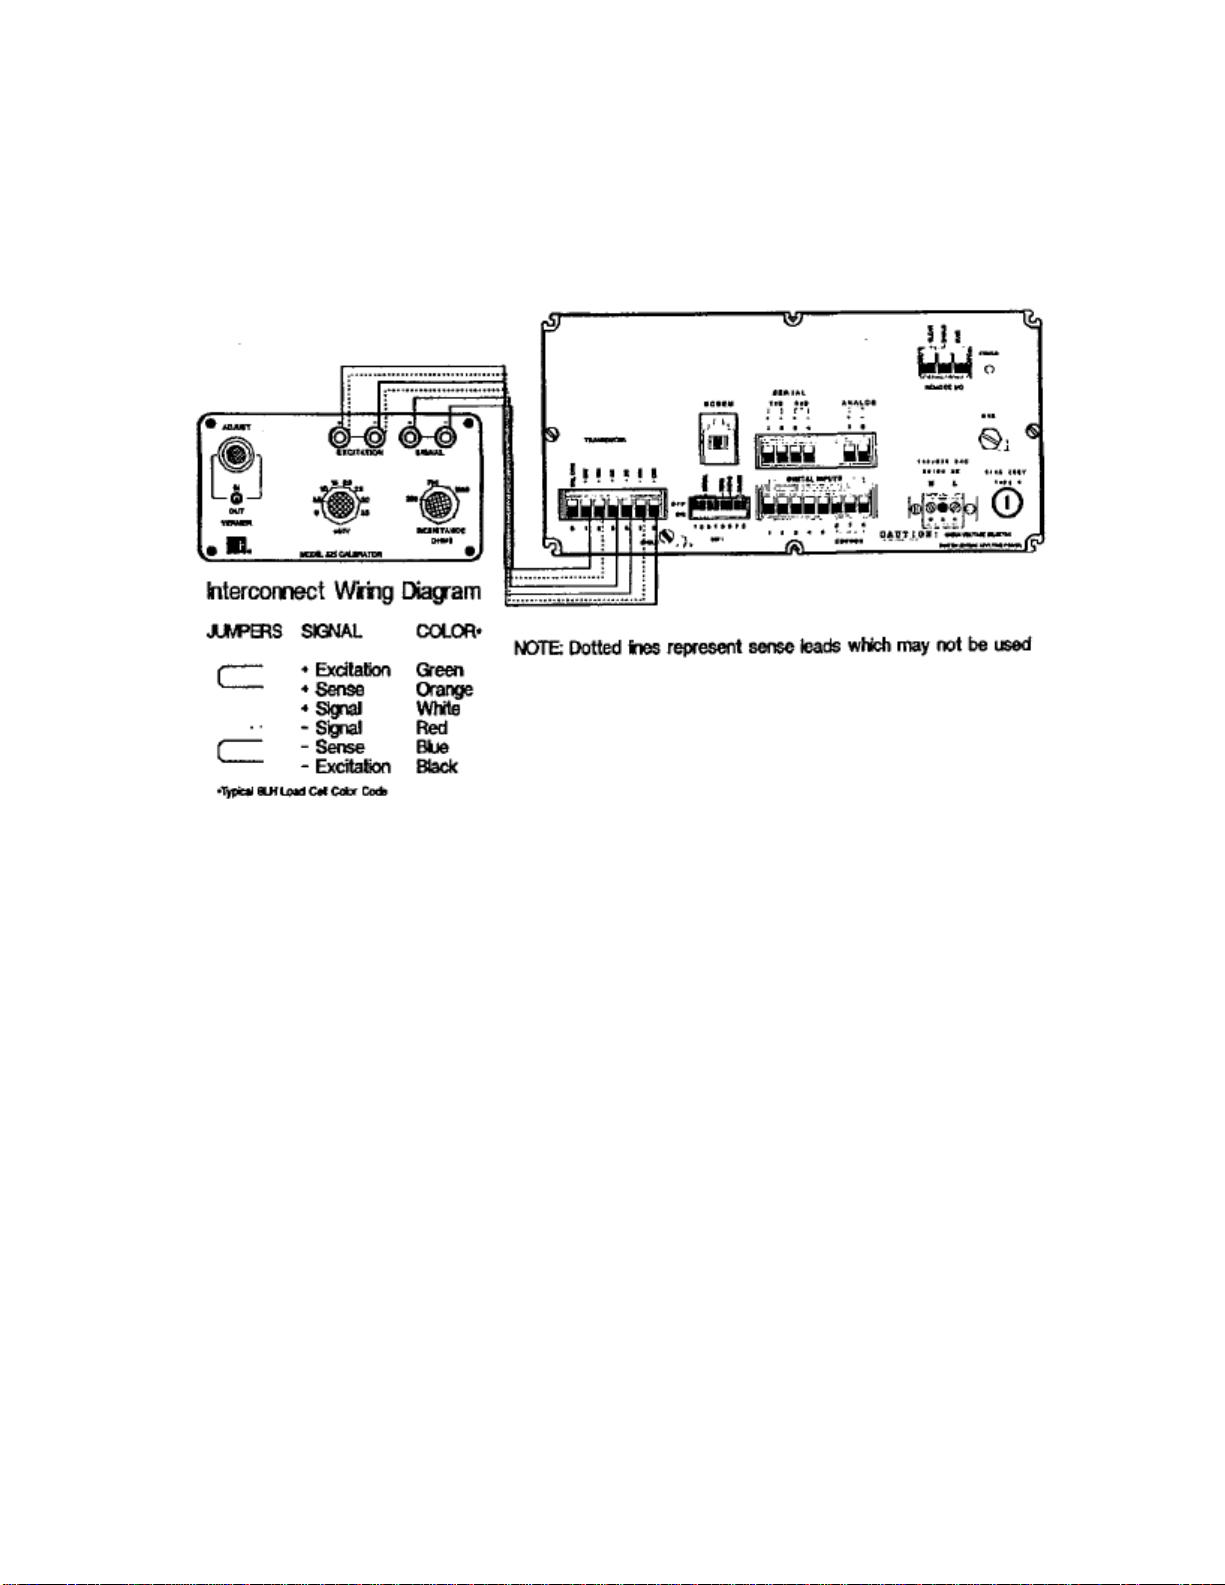
3.3 CALIBRATION
The typical procedure for calibrating a transducer indicating/transmitting instrument is to
apply known input mV/V levels and adjust the instrument to display the correct
equivalent value in engineering units such as lb, kg, etc.. For example, when 0
mV/V is selected the instrument display should read 0 pounds. If the indicator does not
read 0 pounds at 0 mV/V, adjust the instrument zero selector (consult instrument
operator's manual for instructions) until the readout is correct. If the system/platform
rated capacity is 10,000 pounds at 2 mV/V, setting the 325 simulator switch to 2 mV/V
should result in a 10,000 pound display. If the indicator does not read 10,000 pounds at
2 mV/V, adjust the instrument span selector (consult instrument operator's manual for
instructions) until the readout is correct.
If the system full scale rated output is 2 mV/V, midrange linearizing calibration
adjustments can be made by selecting 0.5, 1, and 1.5 mV/V steps and adjusting the
readout to display 25, 50, and 75% of capacity (re-check 0 and full scale displays
afterwards). Similarly, for a 3 mV/V system, linearizing adjustments can be made at 0.5,
1, 1.5, 2, and 2.5 mV/V.
3.3.1 Dead Weight Signal Calibration
With newer BLH indicators/transmitters it is not necessary to initially calibrate out the
load cell output corresponding to dead load, or empty vessel weight. This step will
normally be accomplished by simply re-acquiring a new calibrated zero value on the
system after the live load calibration is complete.
3.3.2 Establishing Zero
To establish zero, perform the following:
1. Select 0 mV/V on the 325 calibrator.
2. Adjust the indicator/transmitter to zero and/or output a value corresponding to
zero (i.e. set 4-20 mA output to 4 mA).3.3.3 Calculate the Live Load mV/V Signal
The next requirement is to determine the live load mV/V signal (portion of the load cell
output corresponding to actual product weight). Use the formula presented in Figure 3-2
to determine this value.

3-3
Figure 3-2. Live Weight Signal Calculation Formula
3.3.4 Calculate the Interpolated Span Value
Since the 325 has only 8 discrete settings, establishing a live load span point typically
requires an interpolation process to determine a new span point value corresponding to
one of the fixed mV/V values. Use the formula shown in Figure 3-3 to determine this
value. When interpolating always choose a Model 325 mV/V selection lower than the full
transducer output value.
Figure 3-3. Span Value Interpolation Formula
3.3.5 Entering a Span Point
To enter the span point, perform the following:
1. Select the desired 325 mV/V setting.
2. Acquire and adjust the span point in the indicator/transmitter (refer to the
indicator/transmitter instruction manual).
Calibration functions described in this chapter pertain to digital indicator/transmitters that
can acquire a dead weight zero in place. Analog indicators may require a different
procedure (consult operator's manual supplied with unit).
NOTE: Make sure the instrument is in gross mode with all automatic functions turned
OFF and the vernier adjustment 'OUT before attempting calibration.
NOTE: After the weighing system is re-connected to the instrument, simply perform
acquire zero before beginning operation.
3.4 VERNIER OPERATION
The Model 325 calibrator is equipped with a vernier adjustment for checking setpoint,
peak/hold, alarm, and overrange instrument functions. Since normal operation
advances in 0.5 mV/V increments, it is difficult to verify exact setpoint cutoff points
without the vernier. With vernier operation selected, the indicator can be incremented
count by count and precise status change points determined or confirmed. To
use the vernier function, perform the following:

3-4
1. Advance the 325 mV/V selection switch to the nearest value below anticipated
cutoff. If necessary, use the interpolation tables described in paragraphs 3.3.3
and 3.3.4 to determine the correct selection.
2. Change the vernier adjustment bat-handle switch to the 'IN' (on) position.
3. Observing the indicator display, rotate the potentiometer switch until the point of
coincidence is achieved.

3 Edgewater Drive
Norwood, MA 02062 USA
Phone (781) 298-2200
Fax (781) 762-3988
www.vishaypg.com
Table of contents