Vision X TREMOR XD User manual

P/No. TREM-85246XX
*X signies the color eg.
TREM-85246A = Amber
WARNING
Read carefully and understand all instructions before operating.
lIt is not recommended to use magnetically mounted warning devices on the outside
of a vehicle in motion. Usage is at the sole risk and respondibility of the user.
lRisk of electrical shock; do not use in an environment with gas, combustible or
explosive materials, or hot objects.
lDo not open, repair or modify.
lUse only under the recommended voltage and frequency requirements.
lDo not look directly at the light, as this will result in dazzling.
lMinimum distance from lighted objects 0.1m.
lThespecicationinthismanualisbasedonstandardlabtesting,different
environmentsmayinuencethedata.
lCalifornia Proposition 65 Warning: This product contains chemicals known to the
State of California to cause cancer, and birth defects or other reproductive harm.
For more information, please visit www.P65Warnings.ca.gov
FEATURES
lTough diecast aluminium housing and virtually unbreakable polycarbonate lens.
lMilitary standard vibration resistance.
lUpward facing LED for increased awareness from above.
lSelectable Day/Night mode.
lFlash synchronisation of multiple beacons.
lSAE and California Title 13 approved.
Instructions, Specication
and Warranty Details

2
WIRING
RED: To 10–33V DC(+) Fuse at 3A
BLACK: To chassis / ground (-)
YELLOW: Flash pattern change +VDC. Connect Yellow wires of
strobes together for synchronisation*
WHITE: Apply to +VDC for low/high power switching
*All units must be set to the same pattern
INSTALLATION
1
Prepare a suitable area on the vehicle’s surface by wiping it clean to prevent scratching.
2Drill a 10mm (3⁄8") hole into the surface for the wires to exit through for connection
to a power source. Alternatively, the wires can be directed through the side of
lamp’s base for connection to a power source.
3Place the mounting base in position on the vehicle’s surface. Using the plate as a
template,drillthreeholesfortmentandsecuretothesurfaceusingthesupplied
mounting bolts. A mounting pad is included and can be installed between the
surface and the mounting plate.
4Route the wires as planned in step 2. Connect the red (+) wire to 12/24VDC and
the black (-) wire to ground. Test.
Note: If mounting plate is not required, use the lamp’s base as the template when drilling holes for
tment to the vehicle.
Mounting Pad
Mounting Washer
Mounting Nut
Mounting Bolt
Mounting Surface
Mounting Bolt
Mounting Surface
Mounting Pad
1
2
3
41’
2’
3’
4
3 BOLT 3 BOLT (Bottom-up)
Drill holes 1 2 3 4 on mounting surface for wire exit and mounting bolts.
2. Secure beacon onto mounting surface with mounting bolts.
3. Note: Mounting holes 1 2 3 are different from 1’ 2’ 3’ .
Check and mark the correct location before drilling.
1.

3
WIRING DIAGRAM
SINGLE FLASH
QUAD FLASH
QUINT FLASH
ULTRA FLASH
ROTATING
ROTATING
ROTATING
STEADY ON
ROTATOR
ROTATOR
ROTATOR QUINT FLASH
#4
#5
#6
#7
#8
#1
#2
#3
SYNCHRONISED FLASHING
For Simultaneous or Alternating Flash:
1 Apply +VDC to RED and YELLOW wires simultaneously, then remove YELLOW
wiretoenterGroupingMode,unitswilldisplayshortashes:
•Singleash=Group1
•Doubleash=Group2
2To change Group, momentarily apply +VDC to YELLOW wire:
•BothunitsinthesameGroupwillashtogether.
•TwounitsinthedifferentGroupwillashalternately.
3Save and exit Grouping Mode by disconnecting all power.
Note: For ash pattern #1~#3,
Group 1 Units will ash in anti-clockwise rotator;
Group 2 Units will ash in clockwise rotator.
Power switch Red
Red
Black
Yellow – Flash pattern change
Yellow – Connect to yellow on other units for synchronisation
Gnd Black
Battery
Momentary switch
ON / OFF switch
Optional
White – Low/High power
mode change
FLASH PATTERNS
4
For more info visit
www.visionxusa.com
Distributed by:
Vision X Lighting
1601 Boundary Blvd.
Auburn WA, 98001 USA
Made in Taiwan
WARRANTY TERMS & CONDITIONS:
1. Warranty items will be replaced or repaired to working condition and returned without cosmetic alterations.
2. A proof of purchase is required to validate all warranty claims. The warranty period is valid starting from the
original date of purchase.
3. All products must have been purchased through a Vision X Authorized Dealer/Reseller to be eligible for
warranty.
4. Damage resulting from any improper installation, accident, abuse, neglect or normal wear are not covered
under warranty.
5. Any product used in mining applications is warranted for one year only.
6. Actions which void the warranty include:
a. Openingofthelightingxture
b. Cutting any connectors or cords
c. Broken Glass
d. Damage caused by physical abuse
e. Lightsoperatedinenvironmentsoutsidetheirstatedspecications*
7. All customer warranties should be handled through the Dealer/Reseller the product was originally purchased
from. The customer is responsible for delivery to the Vision X Returns in Auburn, Washington.
8. If a product is deemed not covered under warranty, customer will be responsible for the return shipping
charges.
9. Items not covered under warranty can be repaired at the customer’s expense for parts and labor, at the
discretion of Vision X Lighting, who will provide an estimated repair cost before proceeding with the repair.
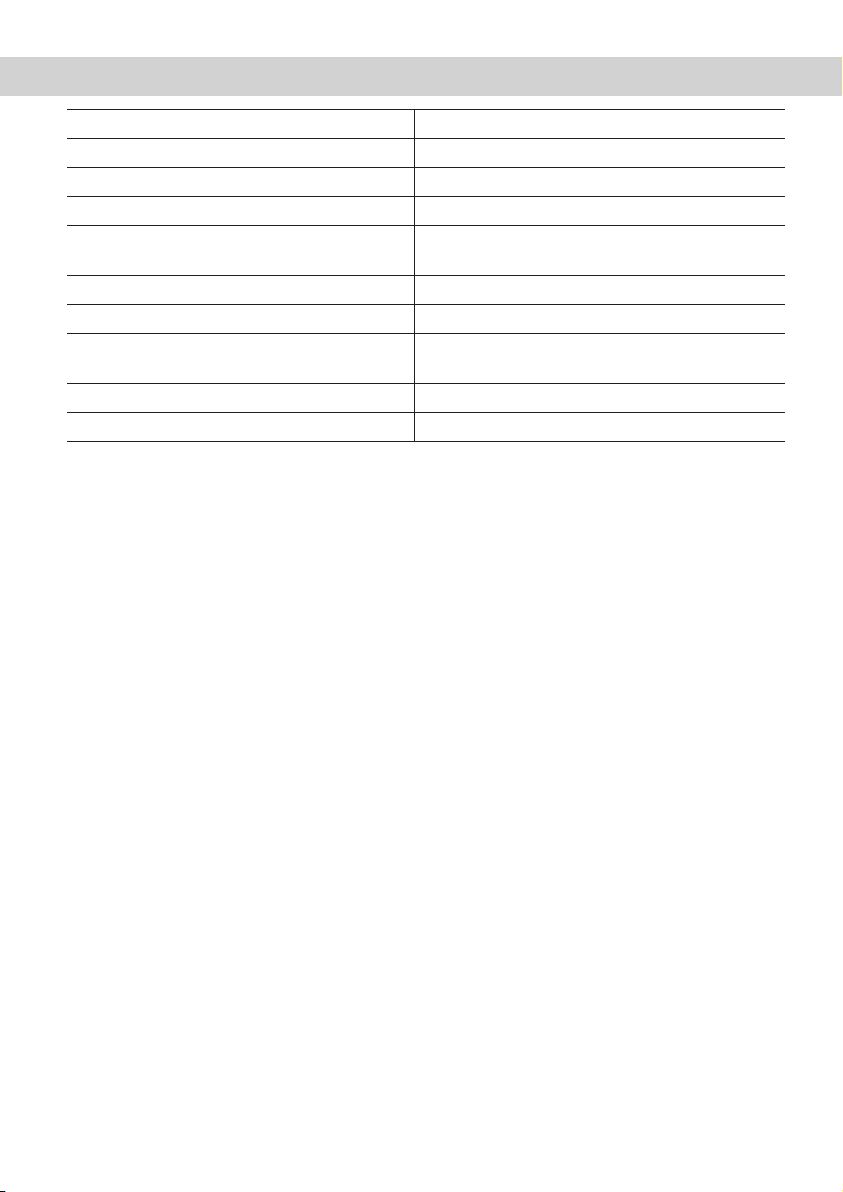
SPECIFICATIONS
LED 16 x 3W Width 167mm / 6.57"
Housing Material Aluminium Base Height 137mm / 5.39"
Lens Material Polycarbonate Depth 167mm / 6.57"
Mounting 3-Bolt Flange PCD 153mm / 6"
Voltage 12-24V DC Shock/Vibration ISO 16750-3,
MIL-STD-810G
Amperage 1.85A @ 12V Approvals CA T13
Wattage (W) 48W IP Rating IP-69k
Operating Temp. -22°F - 176°F
(-30°C - + 80°C)
ECE Ratings ECE R10
Weight 1kg / 2.2lbs EMC Approval CISPR25 Class 3
SAE Compliance J845 Class 1, W3-1
This manual suits for next models
1
Other Vision X Lighting Equipment manuals


