visionLINE V3 User manual

1
For outdoor use only
Improper installation, adjustment, alteration, service or
maintenance can cause property damage, injury or death. Read
the installation instructions thoroughly before installing this
equipment.
Warning: accessible parts may be very hot. Keep young children
a ay.
Do not move the appliance during use.
Any modication of the appliance may be dangerous.
Installer to leave instructions ith the consumer and consumer
to retain them for future reference.
Dispose of all polythene packing carefully and keep out of the
reach of children.
Pellet Fire Pizza Oven
!
WARNING
IMPORTANT: READ THE ASSEMBLY INSTRUCTIONS IN THIS BOOKLET BEFORE
REMOVING THE CONTENTS OF THIS CARTON
IMPORTANT SAFETY INSTRUCTIONS
This appliance must only be used in an above ground open-
air situation ith natural ventilation, ithout stagnant areas,
here products of combustion are rapidly dispersed by ind
and natural convection
�This oven is an outdoor appliance only. Under no
circumstances should it be use indoors.
�Do not store chemicals or ammable materials near this
appliance.
�Unsupervised children should not be near the oven hile
cooking or during arm up or cool do n.
�People ith ammable clothing such as nylon etc. should
keep ell a ay from the oven hen it is operating.
�Do not leave food unattended on the oven.
�Particular care must be taken hen removing the ash OR
used fuel. Hot ash can cause serious injury.
DO NOT OPERATE THIS APPLIANCE
BEFORE READING THE
INSTRUCTION BOOKLET
DO NOT PLACE ARTICLES ON OR
AGAINST THIS APPLIANCE
DO NOT STORE CHEMICALS OR
FLAMMABLE MATERIALS OR SPRAY
AEROSOLS NEAR THIS APPLIANCE
DO NOT OPERATE THIS APPLIANCE
INDOORS
DO NOT ENCLOSE THIS APPLIANCE
!
WARNING
2
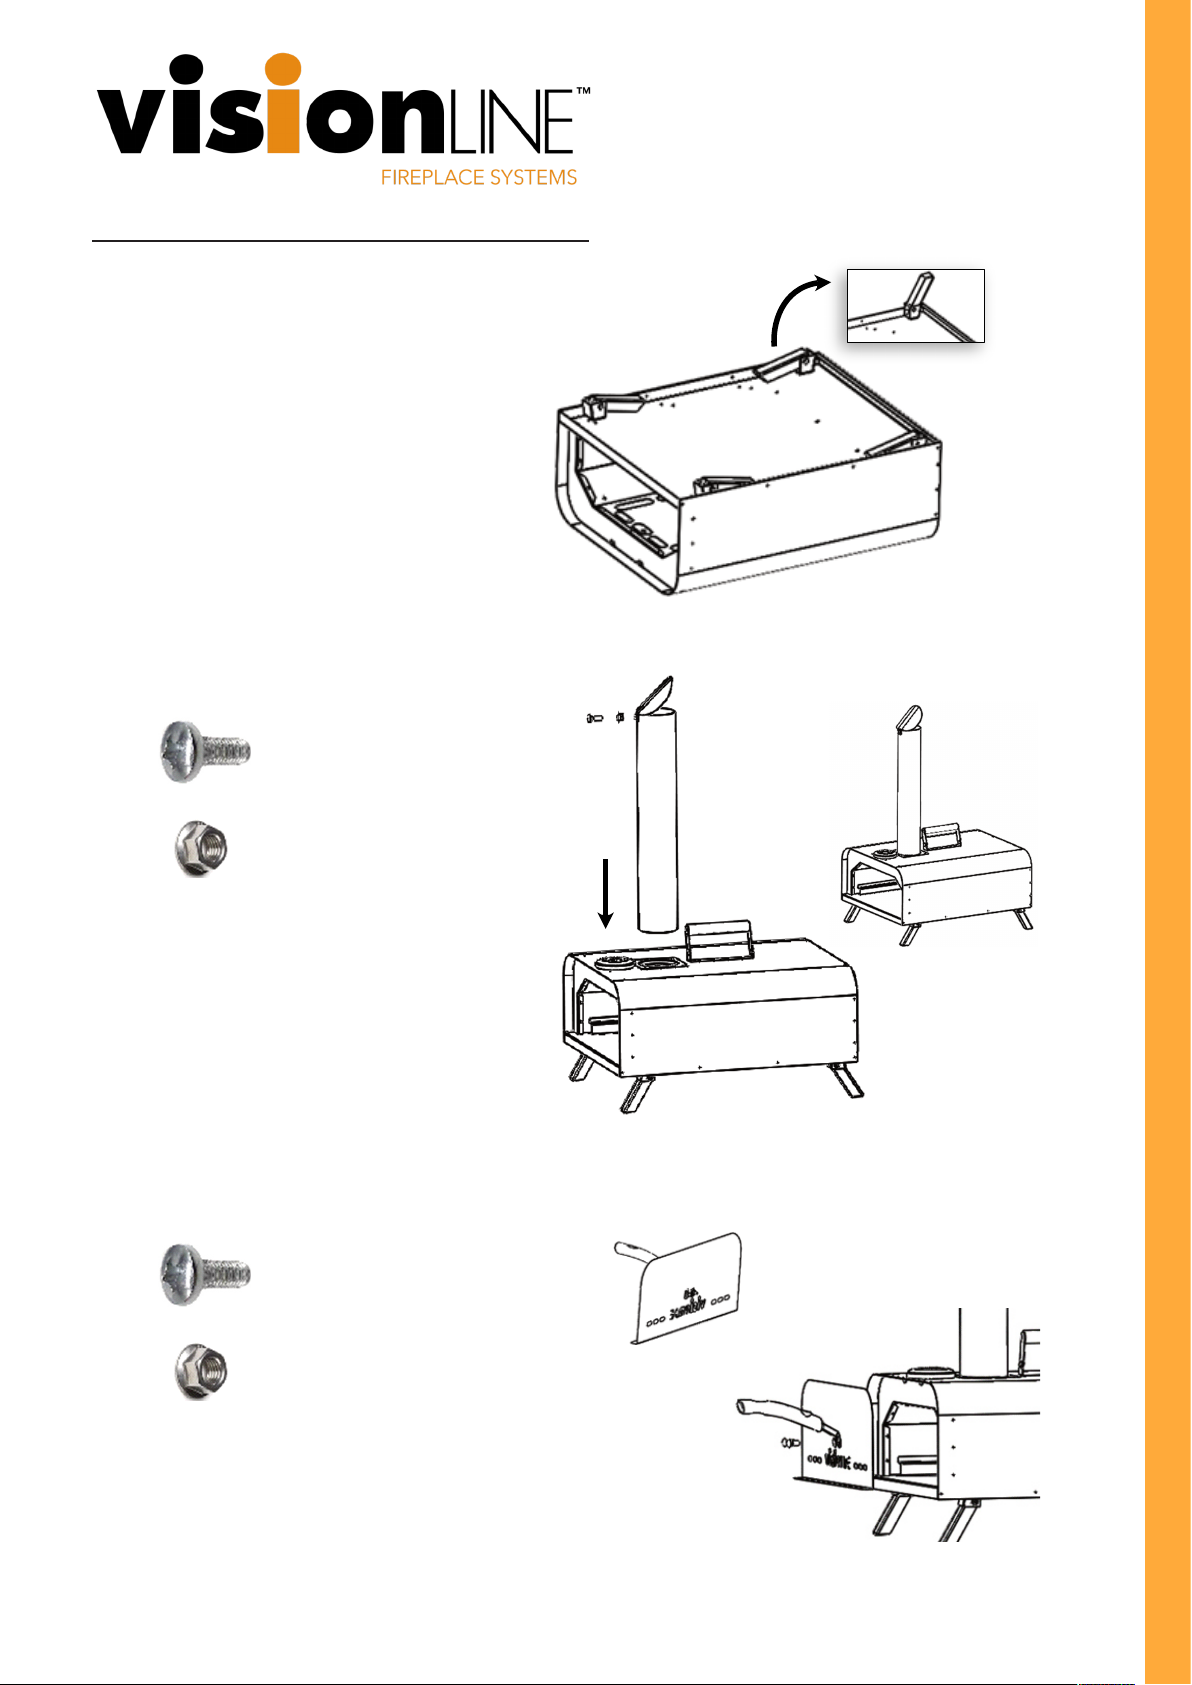
1. Unpack the unit and unfold the legs. Tightening
is possible if required using phillips head scre s
on inner part of leg.
Pellet Fire Pizza Oven Assembly Instructions
2. Secure ue pipe into spigot and attach smoke
diverter ith bolt and nut.
M5*10 - 1PCS
M5 - 1PCS
M4*12 - 2PCS
M4 - 2PCS
3. Secure handle to front door using 2 x bolt and 2 x
nut. Nut goes to inside of door.

3
4. Attach handle to pellet burn basket ith 2 x bolt and 2 x
nut. Nut goes to inside of basket.
M4*12 - 2PCS
M4 - 2PCS
WARNING:
For outside use only
Never leave pellet re unattended hen in operation
Ensure good clearance from the rear of the unit hen in operation
Never use oven on a day of Total Fire Ban
Package also conta ns:
1x Pizza Stone
(Part # VA-3-01-009)
1x Pizza paddle
(Part # VA-3-01-010)
1x Griddle plate, handle and
drip tray
OPTIONAL
Pellet scoop
(Part # VA-3-01-011)

4
COOKING
• Load ne pellets as required to maintain oven temperature - 1/2 a cup or 1 scoop at a time. Typically add a
scoop of pellets per 5-7 minutes.
• It is recommend check the pizza often as it can cook very quickly depending on oven temperature.
• Rotate regularly for even cooking ith the pizza peel.
• Regulating the temperature of the oven is relative to the quantity of fuel loaded. Recommended temp range
for cooking bet een 260oC and 340oC.
OPERATION INSTRUCTIONS
1. Once assembly has taken place per instructions, situate your VisionLINE pellet oven on a at level surface in a
ventilated area outside. (Note: non combustible surface recommended).
CAUTION: CLEARANCE TO COMBUSTIBLES REQUIRED TO REAR OF APPLIANCE
DO NOT POSITION WITHIN 500MM OF A COMBUSTIBLE WALL
2. Load 2 1/2 cups of pellets into burn basket. Leave top line of holes free to ensure correct combustion.
DO NOT OVERLOAD PELLETS. EXCESS FUEL WILL CAUSE OVERFIRE.
INTENDED FOR USE WITH HARDWOOD OR SOFTWOOD PELLETS
Use of other fuel other than specied may cause damage to your appliance
MODERATE TO HEAVY SMOKE IS COMMON WHEN USING WOOD PELLETS, ESPECIALLY DURING THE LIGHTING AND
RELOADING PROCESS. IT IS NORMAL FOR SMOKE STAINING ABOVE THE PELLET BASKET.
3. Place t o re lighters on top of the pellets and position basket half inside the unit. (natural non-chemical re
lighters recommended)
4. Use a match or gas lighter to light the re lighters and insert the burn basket into position. Ensure the front
door is closed during pre-heating
5. After approximately 15minutes, your pizza oven and stone should be hot and ready to cook.
It is normal during operation for the front door to ex slightly. Ensure hen closing the door, the top edge
clips into the retainer to secure it.
FIRE RISK FIRE RISK
!
WARNING
!
WARNING

5
CLEANING
Once nished cooking, remove left over solid fuel from the oven only after the re has gone out and it has cooled.
Al ays ensure oven is clean and free from oil or grease (internally and externally) to ensure longevity of the oven.
Al ays keep oven dry and under cover to protect from eather and moisture hen not in use.
Use normal cleaning methods appropriate for stainless steel.
Use a brush to remove carbon build-up from the roof and internal surfaces of the oven.
HOW TO CLEAN PIZZA STONE STAINS
1. Remove pieces of food rst by scraping them a ay ith a spatula or brush.
2. Make a paste that consists of equal parts ater and baking soda.
3. Scrub the paste on the stains.
4. Wipe ith a damp cloth.
5. Allo the stone to completely dry.
The Pizza stone is a porous material. Do not use soap or chemical
cleaners on it as it ill be absorbed and damage the stone permanently.
PRE-CAUTION
Al ays ensure hands are protected hen placing or removing food from the oven
Al ays ensure hands are protected hen adding pellets to burn basket
Al ays ensure oven is cool before touching or cleaning the internal areas
Do not use ammable liquids for igniting and re-igniting
Open ames and burning embers must never be left unattended
After use, make sure the oven is allo ed to cool before moving
IMPORTANT NOTES
Do not use this oven indoors.
Do not use this oven inside a tent, gazebo or ithin a conned space.
This oven ill become very hot during and for some time after use. Keep children a ay from the oven and do not
touch metal parts of the oven hen in use
Use suitable gloves for protection, especially hen loading the oven.
We recommend protecting your oven hen not in use ith a cover to protect it from eather exposure

6
Any claim under this arranty must be made ithin 12 months of the date of purchase of the product. To make a
claim under the arranty, please contact the store you purchased the pizza oven from or send an email to
Warranty covers manufacturer defects in materials, orkmanship and nish under normal use.
This arranty is provided in addition to other rights and remedies you may have under la : our goods come ith
guarantees hich cannot be excluded under the Australian Consumer La . You are entitled to replacement or
refund for a major failure and to have the goods repaired or replaced if the goods fail to be of acceptable quality
and the failure does not amount to a major failure.
The arranty excludes damage resulting from product misuse or product neglect. The arranty covers domestic
use only and does not apply to commercial applications.
WHAT IS NOT COVERED IN THE WARRANTY
Removal or re-installation costs. This arranty does not cover costs for transit, nor in home service.
Damages as a result of transport/shipping.
Damages due to lack of maintenance, abuse (over-re), neglect, misuse, accidental or improper installation of this
appliances.
Scratches, dents, corrosion or discoloration caused by heat, smoke or abrasive chemicals cleaners.
Corrosions or damage caused by exposure to elements such as insects, eather, hail or grease and fat res.
Damage to the pizza stone from being dropped or being poorly maintained.
Cleaning and ear and tear.
Commercial use of this product.
Unauthorized repairs or modication during arranty period.
WARRANTY
Thank you for purchasing one of our quality Visionline products.
YOUR PIZZA OVEN IS COVERED AGAINST DEFECTS FOR A PERIOD OF 12 MONTHS FOR PARTS AND LABOUR,
REPAIR OR REPLACEMENT.
THIS WARRANTY EXCLUDES SURFACE RUST AND DAMAGE CAUSE BY ABUSE OR NEGLECT.
CONDITIONS OF THE WARRANTY
The appliance must be operated and maintained in accordance ith the instructions supplied in the operating
manual.
Any repair does not extend the arranty period.
Any parts other than original Visionline parts ill void this arranty.
FOR WARRANTY CLAIMS
Visionline Fireplace Systems (Jetmaster Victoria P/L)
444 S an Street
Richmond
Victoria 3121
AUSTRALIA
1300 195 482
Any claims under this arranty must be made ithin 12 months of the date of purchase of the product.

7
Pizza Dough
300ml - luke arm ater
500gm - all purpose our (lauke our recommended)
10gm - yeast
10gm - maple syrup
10gm - salt
20ml - olive oil
Method
1. Pre-heat a bo l (to hold the dough once mixed) using arm ater and allo to sit hilst making dough.
2. Disolve yeast and sugar into the luke arm ater and let sit.
3. Sift our and salt together onto a clean prep bench and create a ‘bo l’ shape ith it to hold the yeast
solution.
4. Pour yeast solution into our and add olive oil.
5. Mix ell ith a fork starting from the inside until combined and knead until dough is smooth and has a
small amount of bounce.
6. Make dough into a ball shape.
7. Dry the pre-heated bo l from step one and lightly spray ith olive oil.
8. Place dough into the bo l, cover ith a damp tea to el or cling lm and allo to double in size. (Roughly
1 hour)
9. Once dough has doubled in volume, divide it into 4 and shape into balls.
10. Stretch each dough ball into your pizza shape and place on a oured pizza tray for immediate use.
If not being used straight a ay ( ithin 2 hours), it is best stored in the fridge/freezer to prevent the dough
over-curing and going sour.

8
PO Box 5051 Burnley, 3121
Phone: (03) 9429 5573
Email: info@visionlinere.com.au
Web: visionlinere.com.au
Table of contents


