Vispect V1 User manual
Vispect V1
Advanced Driving Assistant System
User Manual
Please read this manual carefully, and keep it properly!

/ 19
Catalogue
Notice ...................................................................................................... 3
1. Accessories Lists ................................................................................. 3
. Preparation Work ............................................................................... 4
3. Installation ......................................................................................... 4
3.1 Power-on ........................................................................................ 4
3.2 Buzzer Installation .......................................................................... 7
3.3 Connect Host with Mobile Phone ................................................... 8
3.4 Host Installation ........................................................................... 1
4. Calibration ........................................................................................ 13
4.1 Deviation, Depth and Height ...................................................... 13
4.1.1 Deviation .............................................................................. 13
4.1.2 Depth ................................................................................... 14
4.1.3 Height ................................................................................... 14
4.1.4 App Calibration Page ............................................................ 15
4.2 Host Angle Adjustment .............................................................. 15
5. Start Vehicle ..................................................................................... 16
6. Safety Information ........................................................................... 16
7. Warnings .......................................................................................... 16
3 / 19
Notice:
Our product is for driving assistance only.
Influenced by different kinds of limited factors like bright light, temperature
etc., this system cannot substitute for driver him/herself.
With the help of this system, drivers still need to pay attention to your safety
closely.
Accessories List
Please open the package and keep it safe for further use. If any damages of this
system happened, DON NOT try to use it. Please contact the local dealers.
Please check your accessories:
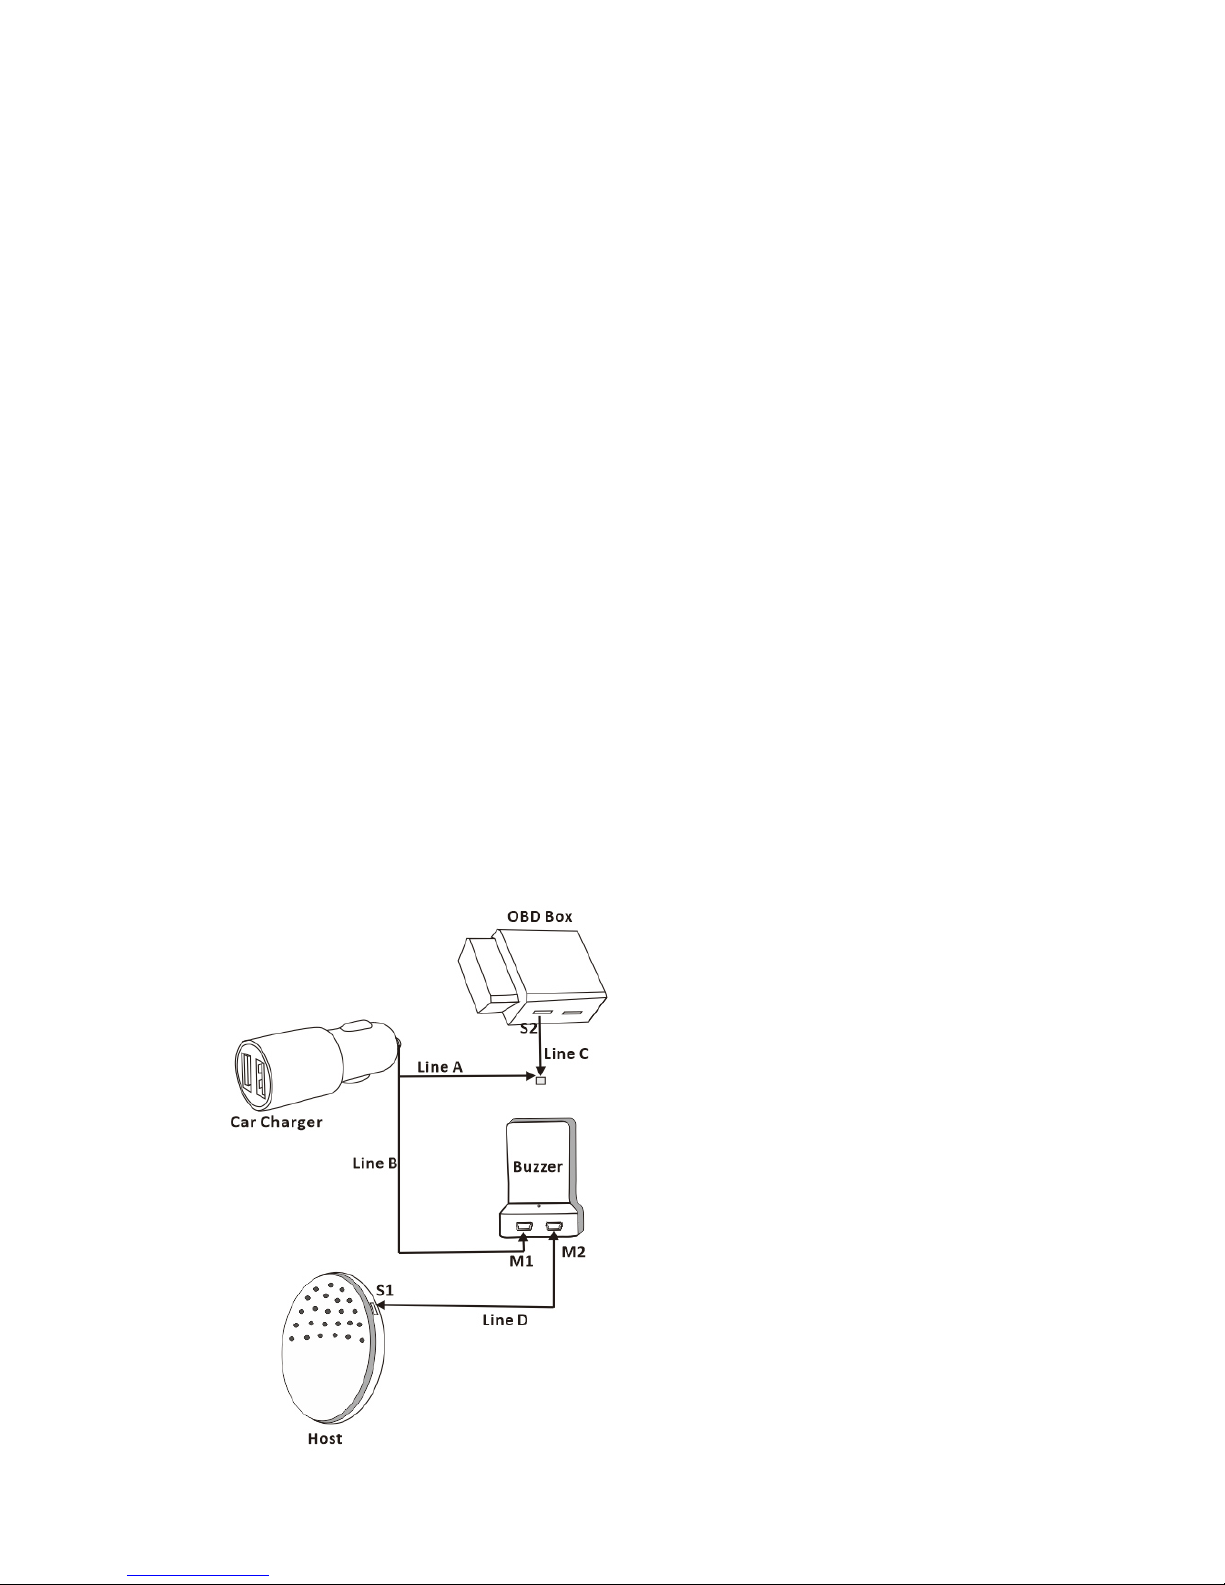
1. Car Charger Extension Line (Line A):standard mini USB connector, used for
connecting OBD Box
2. Car ChargerConnecting Line (Line B): standard mini USB connector, used for
connecting buzzer
3. OBD Connecting Line (Line C):used for connecting car charger
4. Buzzer Connecting Line (Line D): standard mini USB connector, used for
connectingthe host
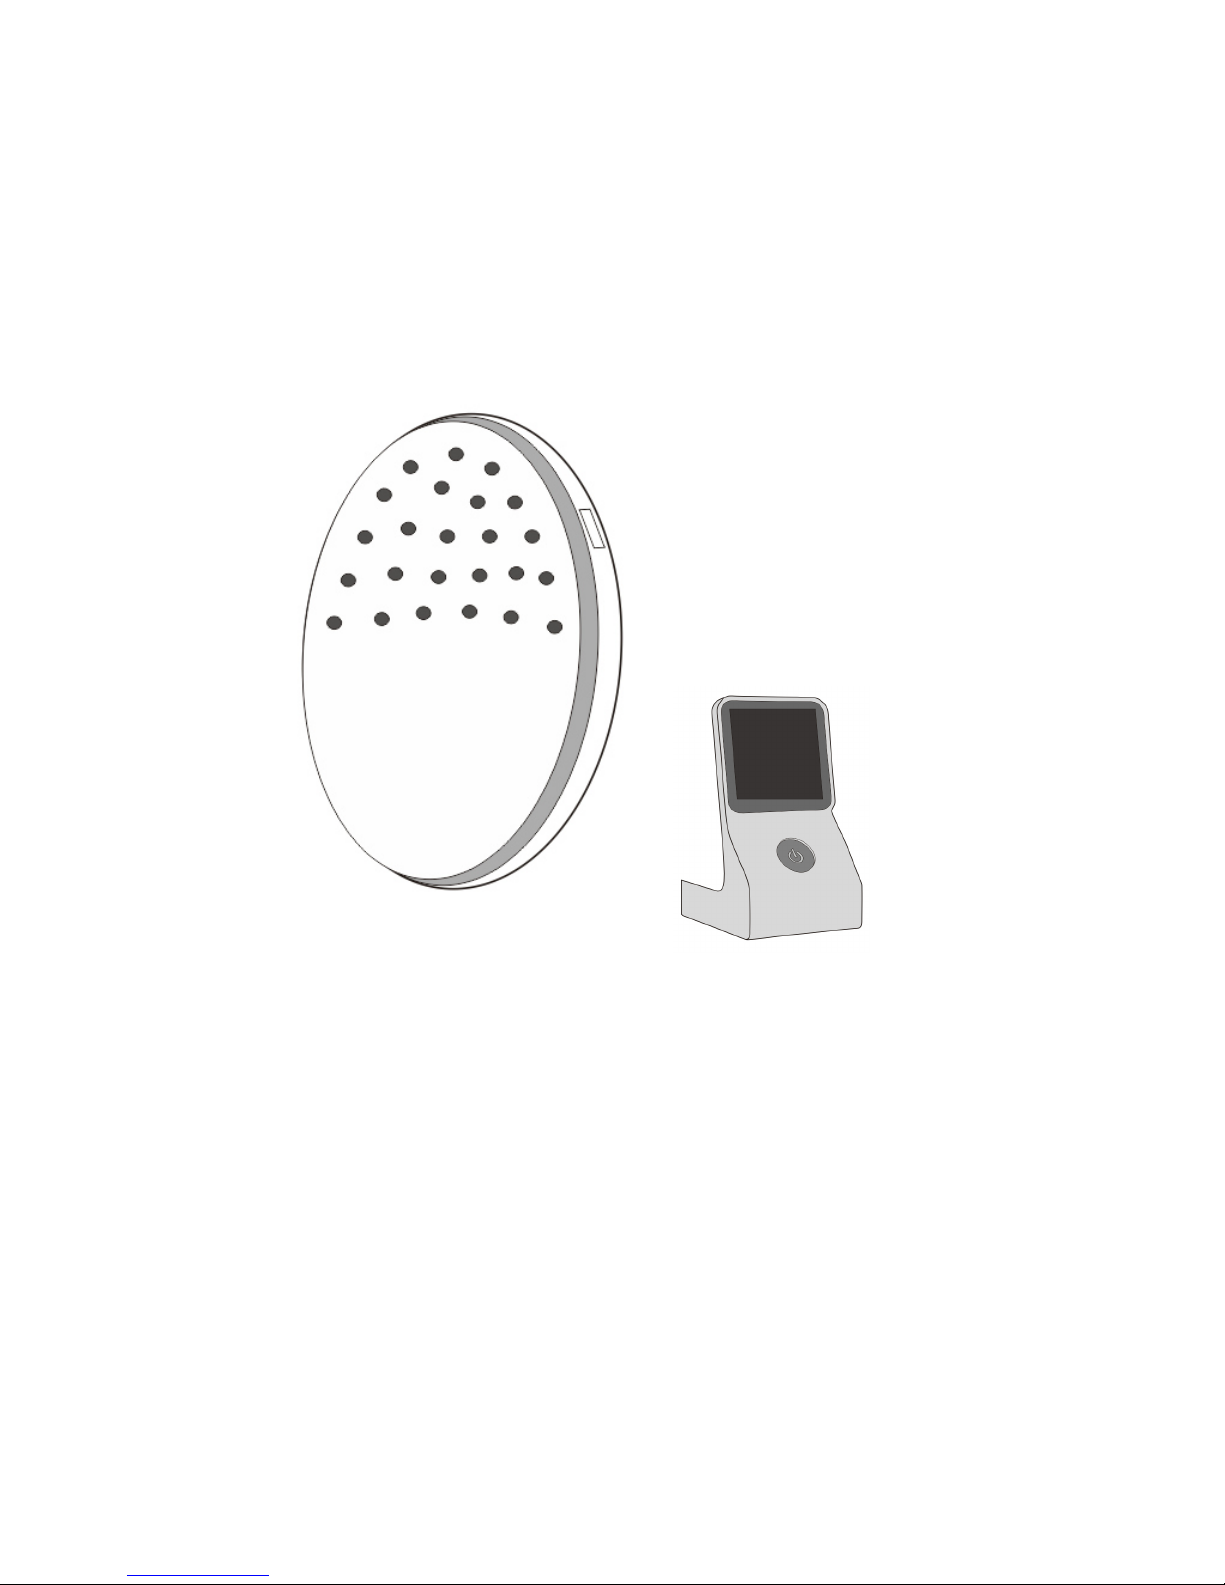
5. Host(including one camera, USB port S1)
6. Buzzer(including two USB ports: M1 and M2)
7. OBD Box (includingUSB port S2 )
8. Car Charger Connector
4 / 19
Preparation Work
① Download and register V1 APP:
1. Please first visitVispect website(www.vispect.net) and then choose Android or
IOS system to scan and download on your phone(IOS system needs to be
downloaded in Appstore).
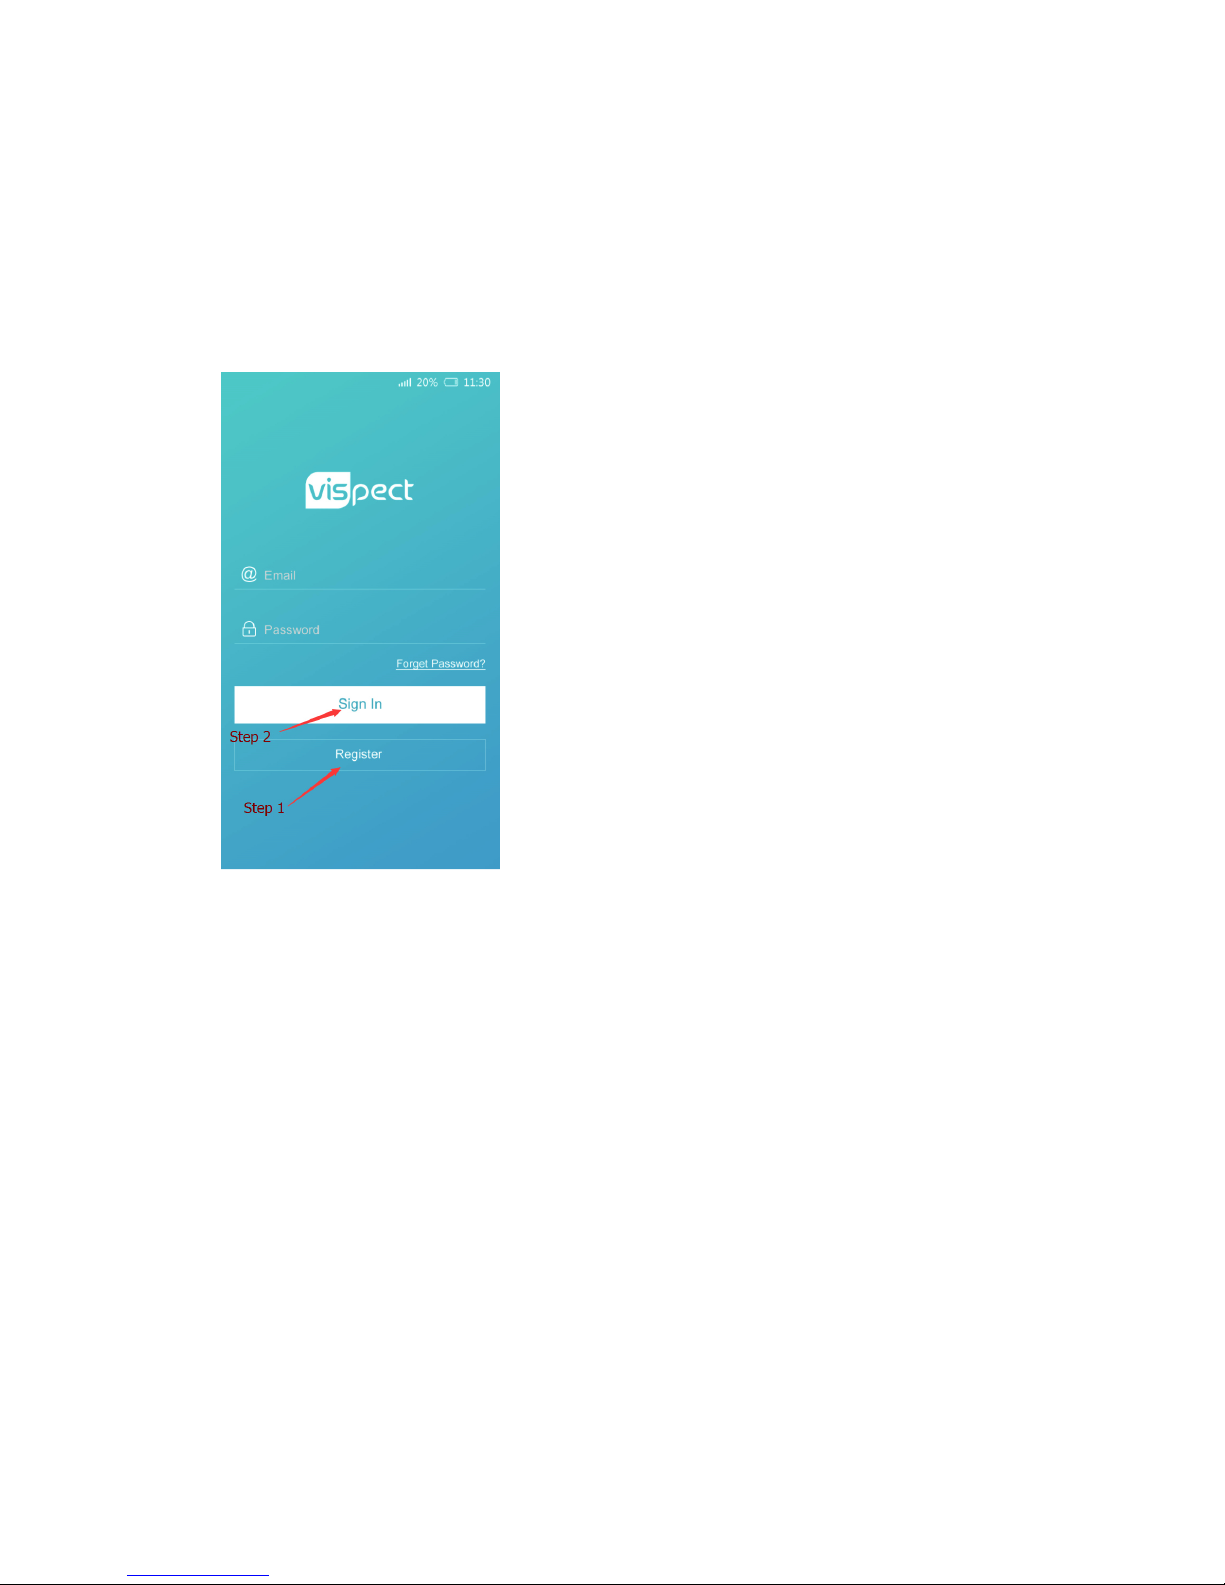
2. Open your app, click “Register”
-
”Sign In” to finish the whole register
procedures.
② Prepare a tape measure.
③ Drive your vehicleto a flat andsmoothroad surface

5 / 19
Installation
①Power-on
1. Plug OBD Box into the corresponding OBD positioninyour vehicle and then
connect Line Aand Line C.
(OBD box is a slot with a16-pin port forvehicle inspection; different vehicle has
different OBD position, and generally it is below the steering wheel).
Figure 1(OBD Slot)
Figure

6 / 19
Figure 3(
Possible OBD positions in different vehicles)
① Golden Delphi(Xiamen)-- Model 491QE
② Opel, Volkswagen(Shanghai), Audi
③ Hafei Auto, Golden Delphi (Xiamen)--Model JM495
④ Honda, Golden Delphi (Xiamen)
⑤ Volkswagen(Shanghai)
⑥ Opel,Volkswagen(Shanghai), Chevrolet
⑦ Changan Automobiles
⑧ Saab
⑨ Hyundai, Daewoo, KIA, Honda, Toyota, Nissan, Suzuki, Renault, Opel, BMW,
Mercedes, Mazda, Volkswagen, Audi, Shanghai GM, Chrysler, Peugeot, Hyundai,
Changan Suzuki, Changfeng Liebao, Dongfeng Motor, Fengxing, Dadi Auto,
SG(Dandong), Soueast Motor, Refine, Nanjing Fiat, Volkswagen(Shanghai),
Shanghai Chery, Citroen,ZX auto, Hafei Auto , Land Rover, etc.
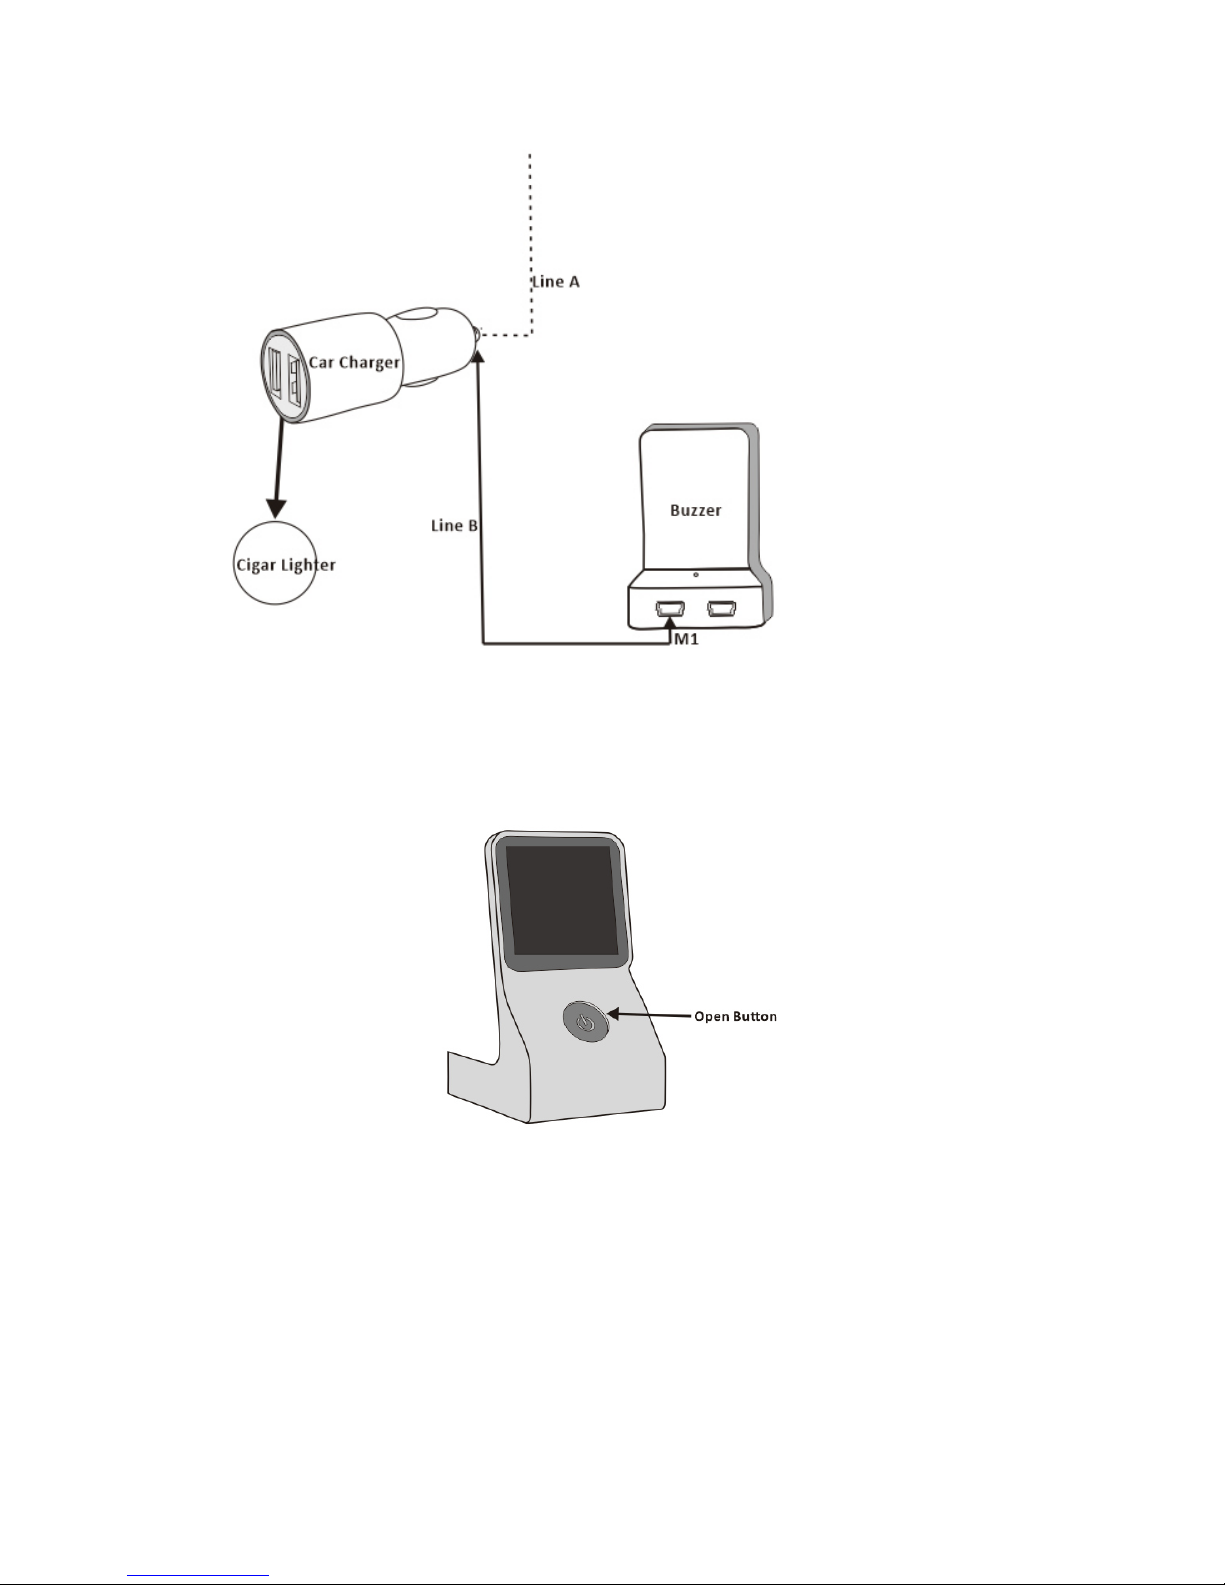
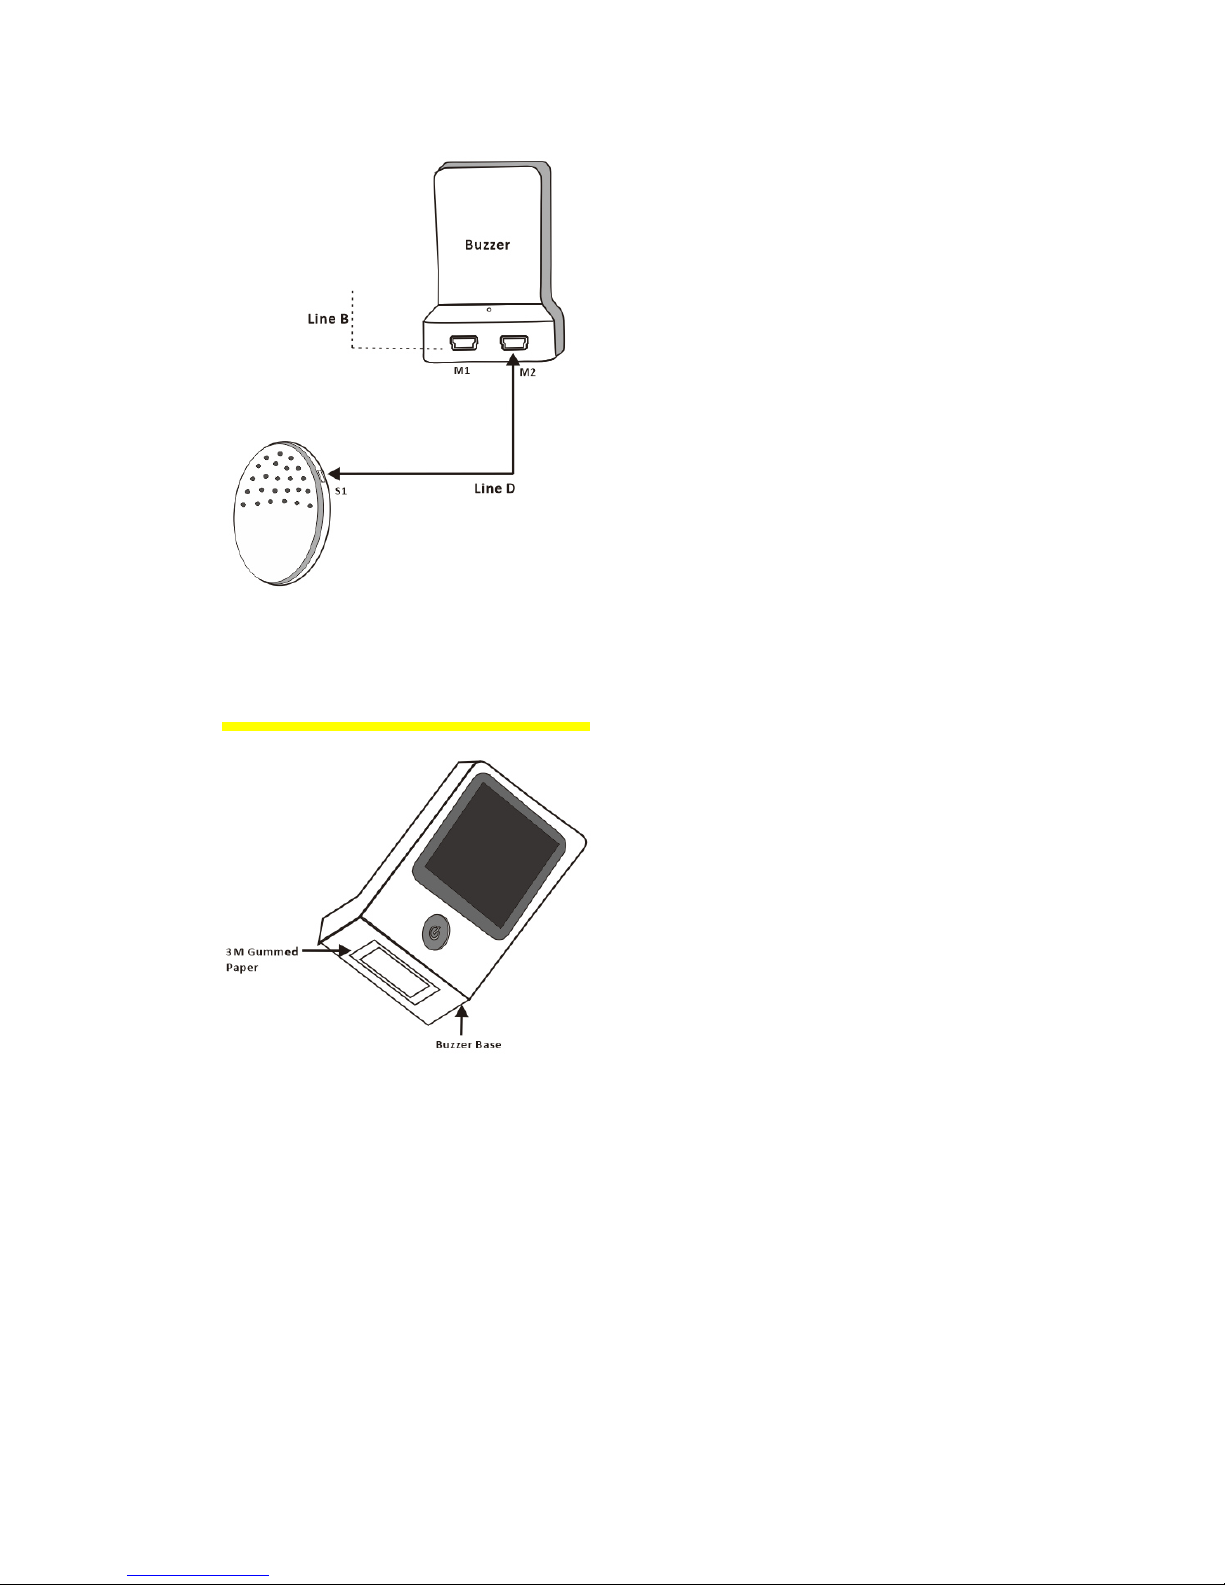
2. Plug one end of Line B into Port M1, the other end into car charger; then plug car
charger into vehicle’s cigar lighter for power supply.
7 / 19
3. Afterall the ports are stable, press the open button to start buzzer. And then
“Connect your device” will be showed on the screen.
4. Plug oneend of Line D plugs into Port M , the other end into Port S1;when the
indicator lights up, it means the host has electricity.
8 / 19
②Buzzer Installation
1. Remove the release paper of 3M gummed paper,and stick it ontothe bottom of
buzzer.
2. Remove the release paper on buzzer’s bottom, and fix buzzer on apositionbetter
for driver to observe (Usually take the place near A column, above the
dashboard).

9 / 19
③Connect Host with Mobile Phone
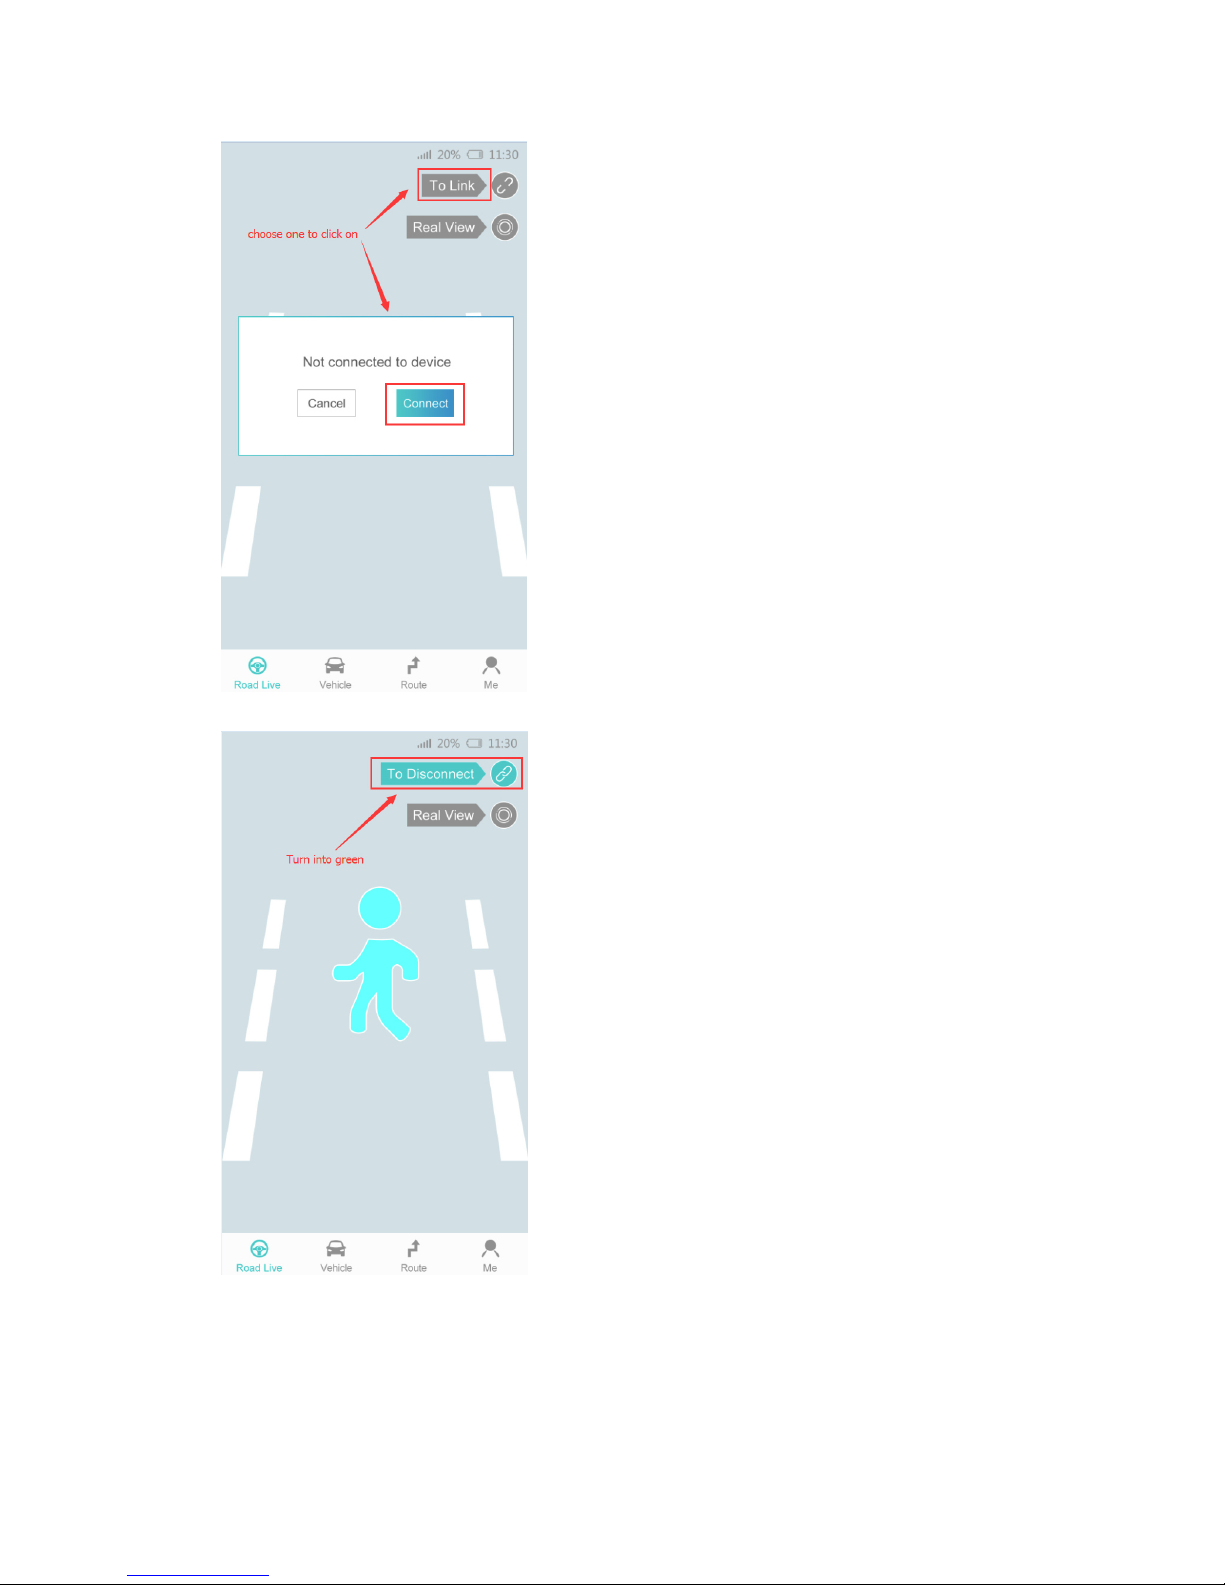
1. Open your app, sign in your registered account.
2. After signed in successfully, app will directly access to “Road Live” page.
3. Click on “Connect”/“To link” on top right corner, App will automatically connect
the host.
10 / 19
4. After connected the host successfully, “To-link”sign will turn into green.
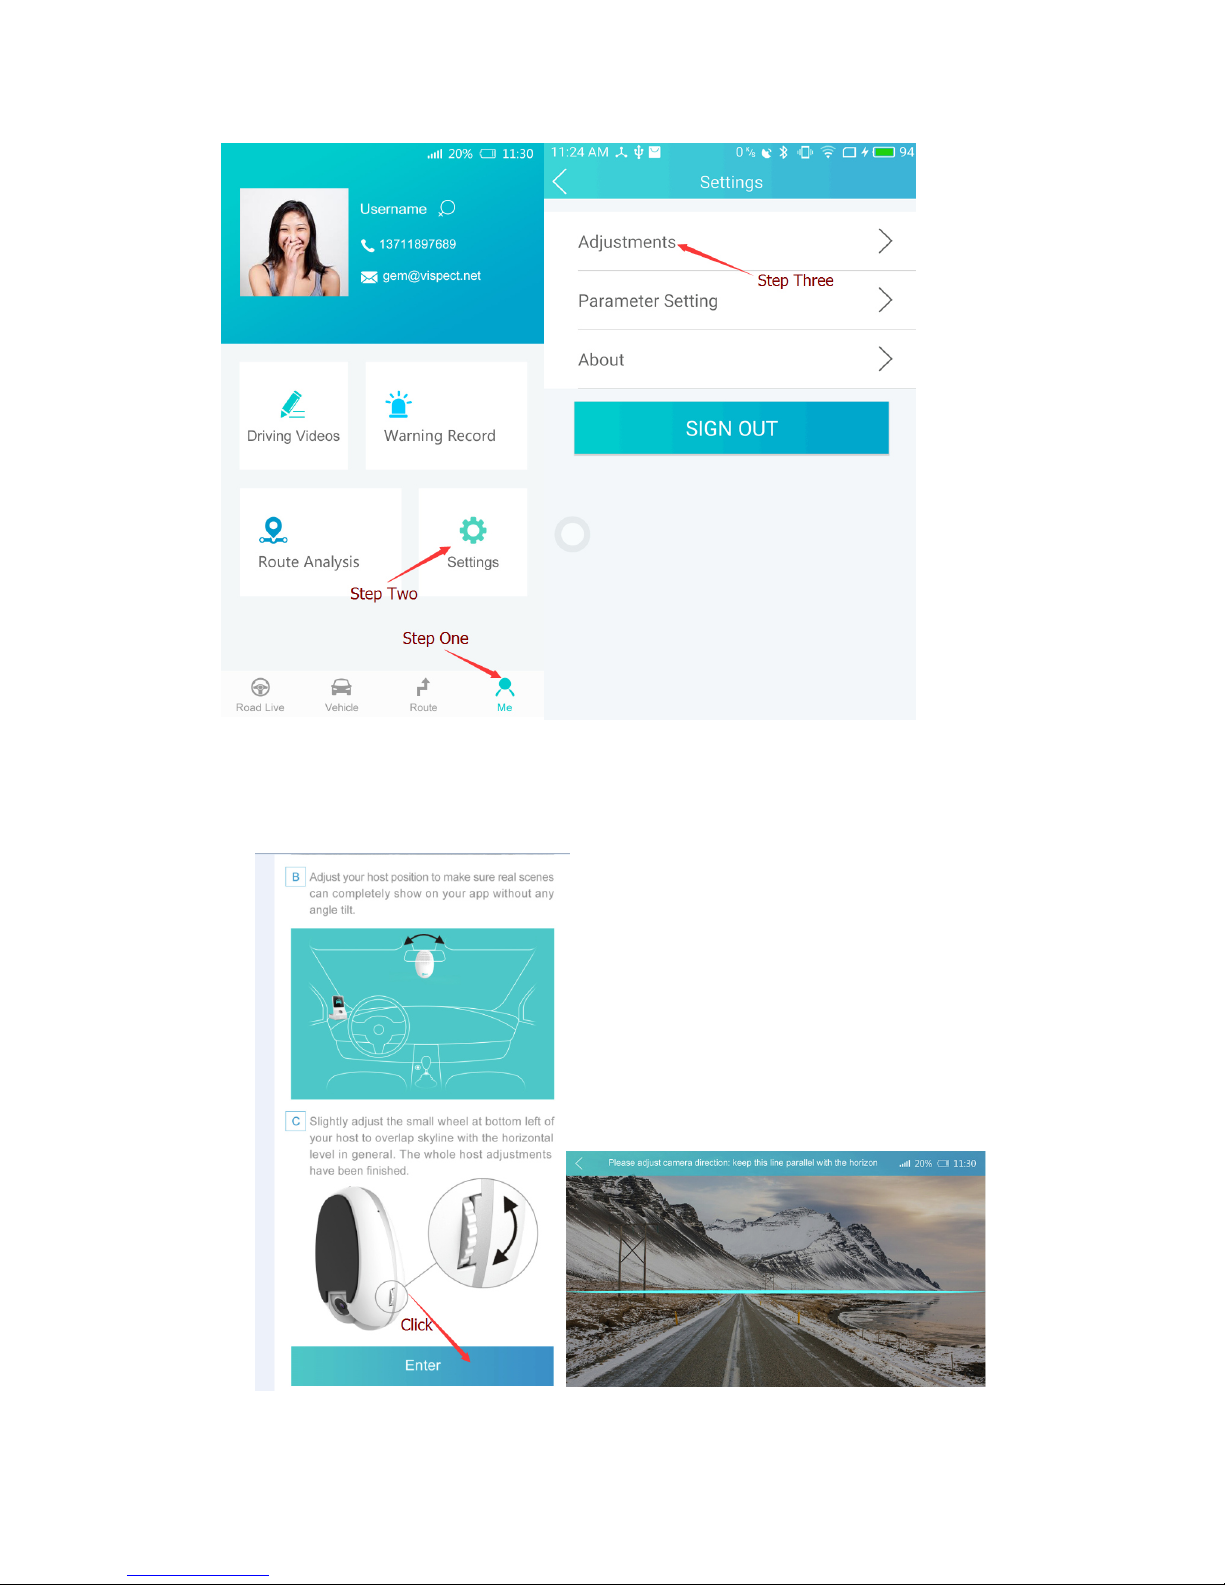
5. Click“Me”
-
“Settings”
-
“Adjustments” to adjust your camera angle.
11 / 19
6. First, click “Enter”, Real-view pictures and horizontal level will automatically show
on your app.
7.
1 / 19
④Host Installation
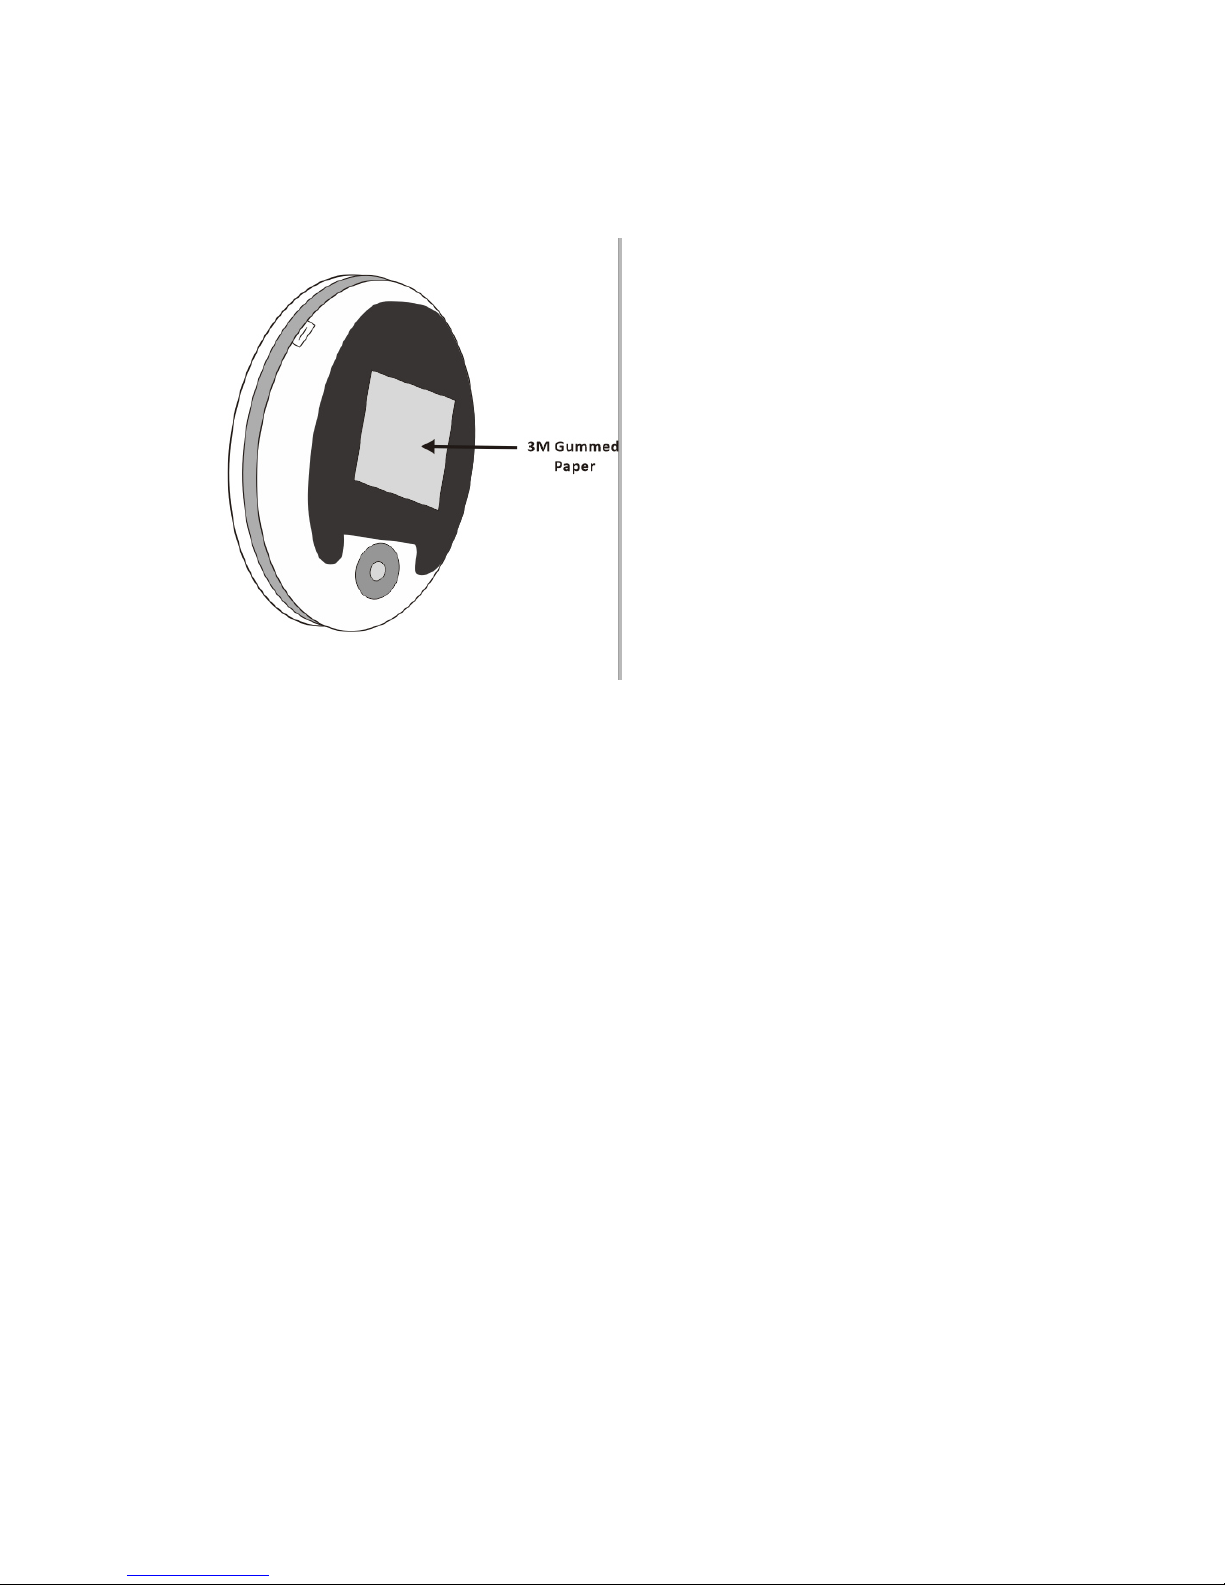
1. Remove the release paper, paste 3M gummed paper on the bottom of host.
2. Install host in the middle of rearview mirror and try to make its obverseside face
the back of mirror. Before installation, please slightly adjust your host’ angle to
make sure that the whole real-view pictures can show on app without any
obstructions.

13 / 19
3. Removethe release paper on host’s bottom and fix host on right position.

14 / 19
4. To prevent damages of line exposures as much as possible, please organizeand
hide all the lines into hollow parts at the top of vehicle (Please look at the dotted
lines parts).
15 / 19
Attention:
Beforepasting 3M gummed paper, please wipe clean and dry the pastingposition
with water or alcohol.
If temperature is too low, please use hot air gun to heat 3M gummed paper and
then paste it.
Calibration
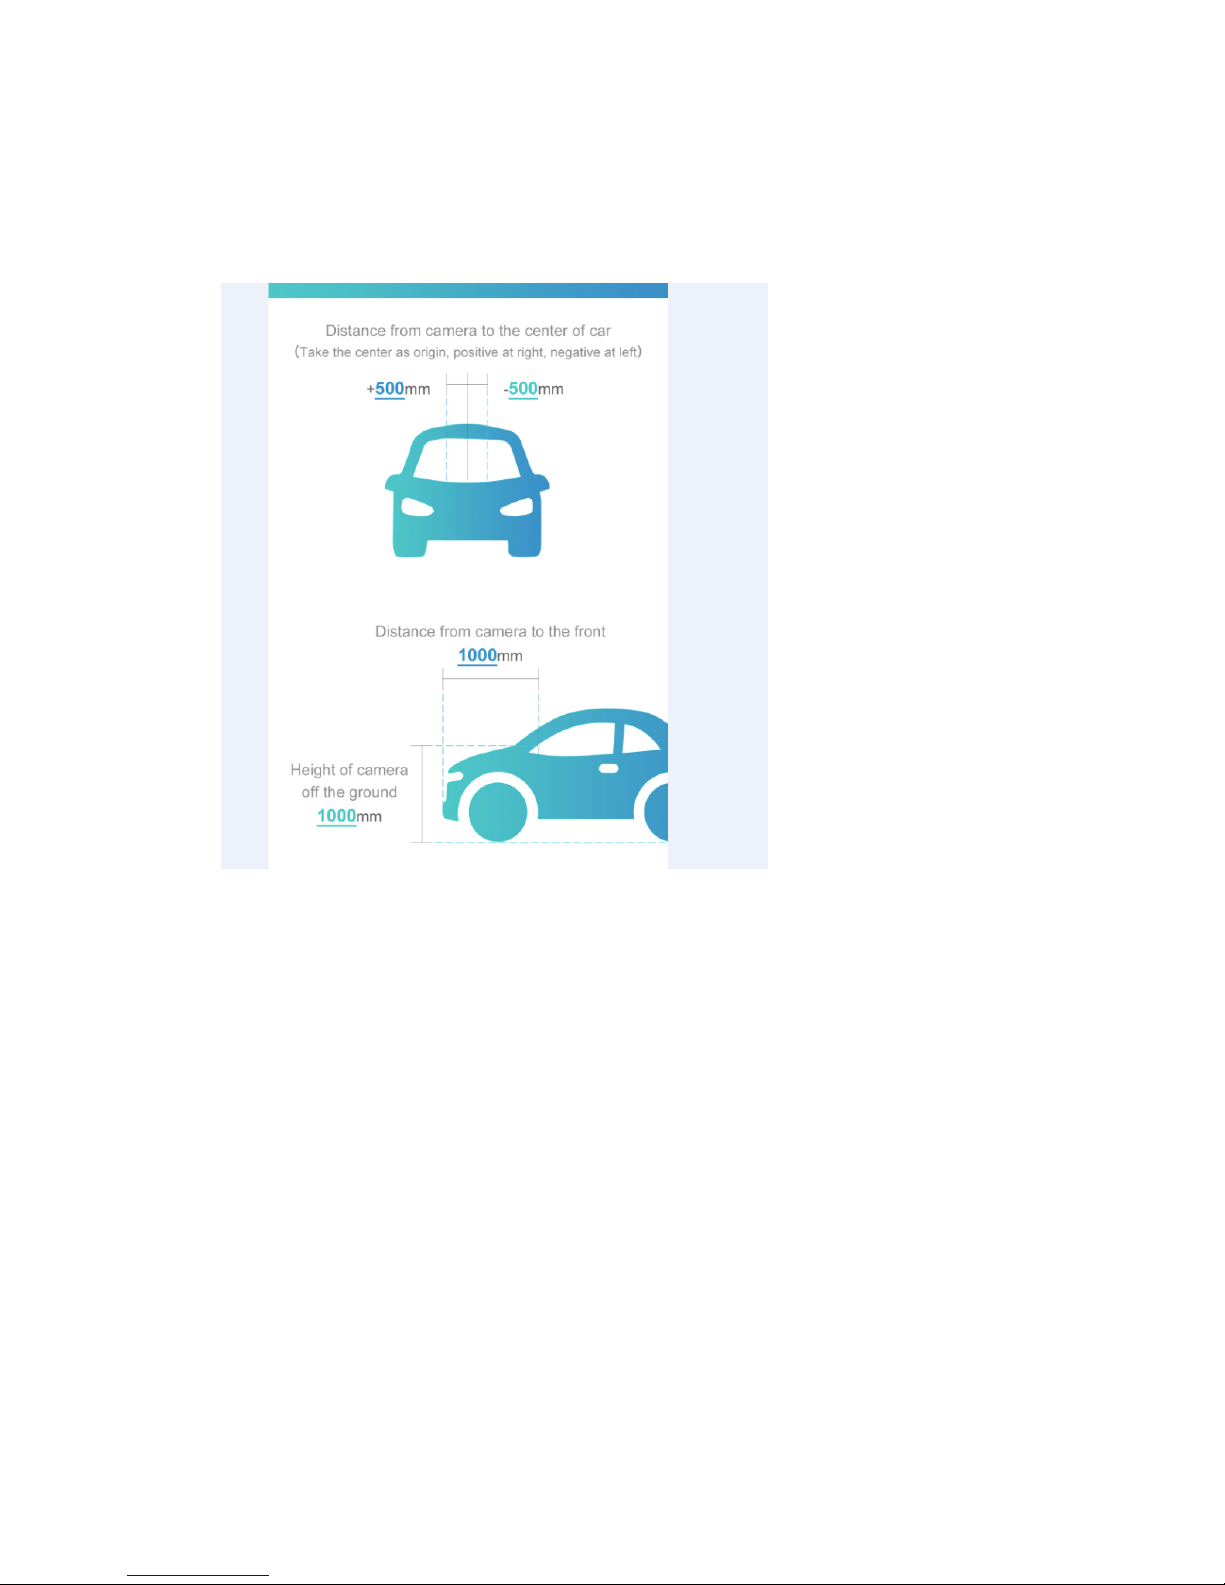
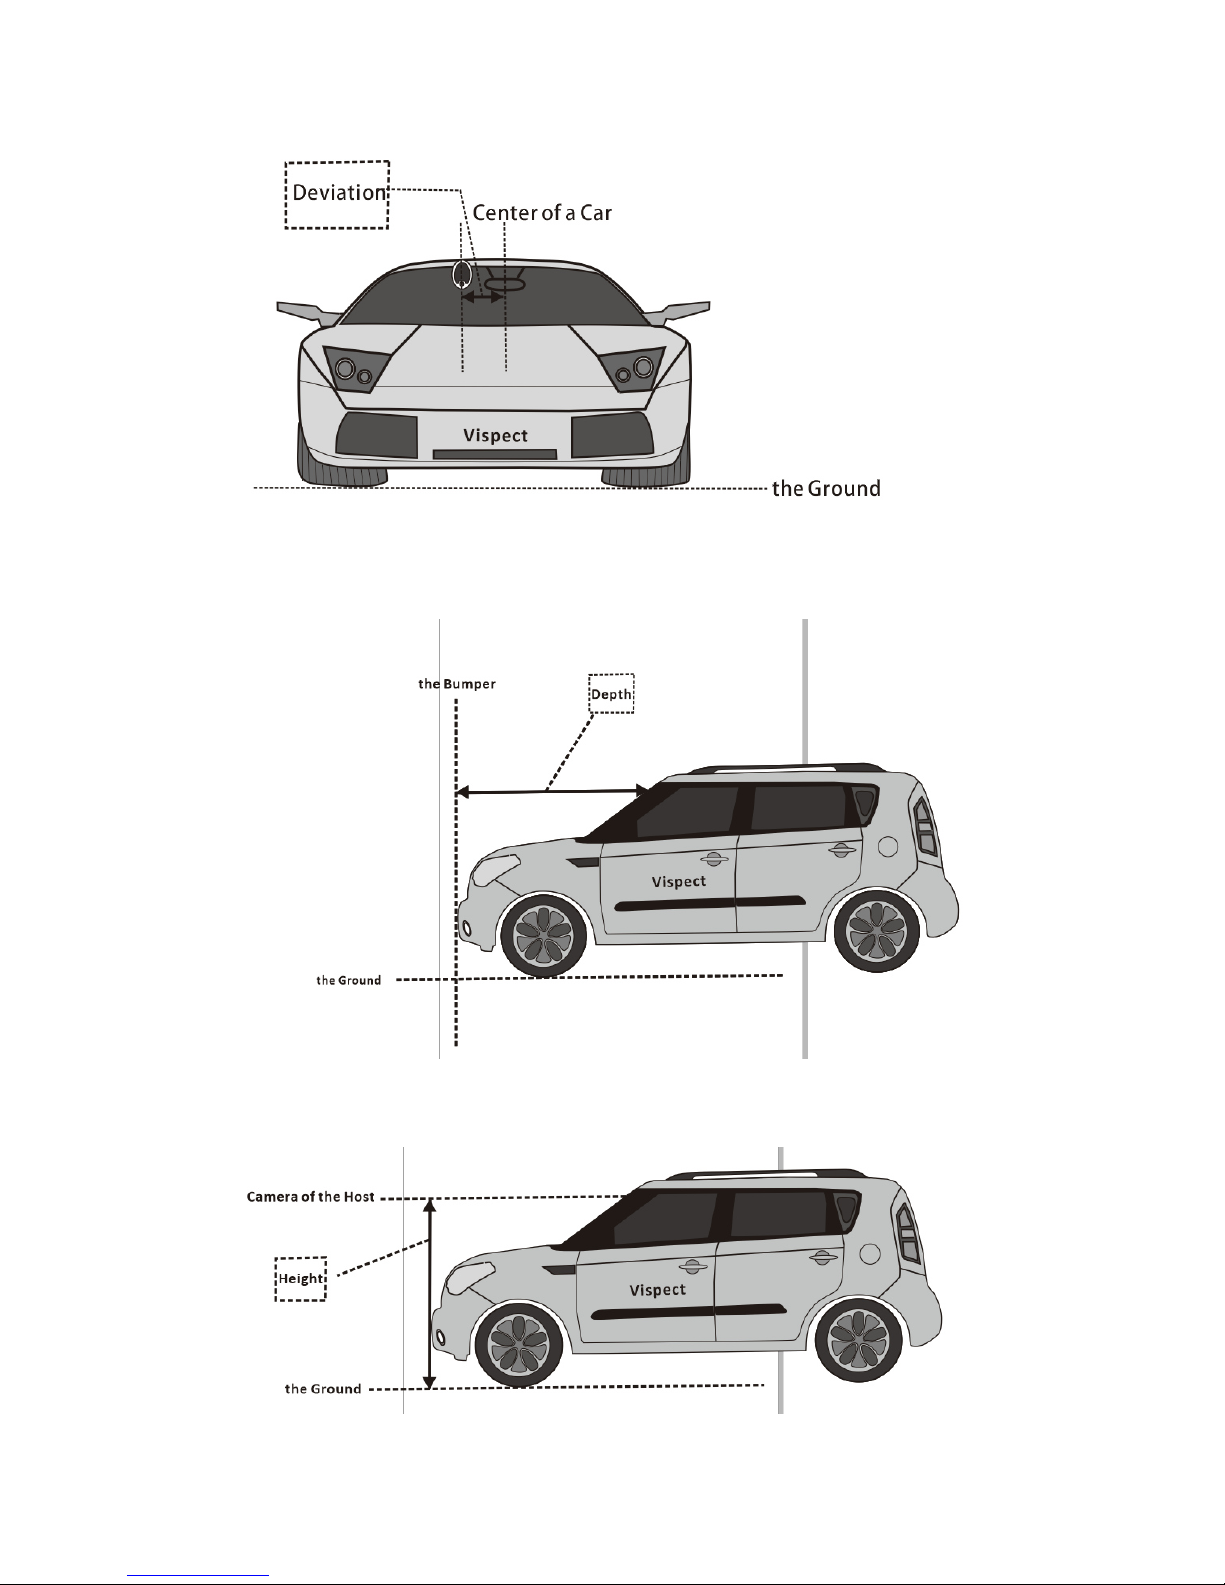
① Deviation, Depth and Height
1. Deviation:Use a tape measure to gauge the distance from host camera to car
center (seen from the front, take the car center as origin, positive at right,
negative at left), and then record the measuring results in calibration page.
16 / 19
2. Depth:Use a tape measure to gaugethe distance fromhost camera to the top of
vehicle bumper, and then record the measuring results in calibration page.
3. Height: Use a tape measure to gauge the distance from camera of host to the
ground, and then record the measuring results in calibration page.

17 / 19
4. APP Calibration Page
② HostAngle Adjustment
1. Open your app, click on “Me”
-
“Settings”
-
“Adjustments”
2. According to the horizontal level, please adjust your host camera to overlap
skyline with the horizontal level in general.

18 / 19
Start Vehicle
After finishing device installation and calibration, please start your vehicle and enjoy
your safe driving trip!
Safety Information
Before use, please calibrate your vehicle and device, or it will directly affect
recognition rate accuracy. Driving withinaccuratecalibrated device may result in
traffic accidents. If your device is reinstalled, please calibrate it again.
Before calibration, please stop your vehicle to a flat and horizontal road
surface.
To avoid fire or electric shock, do not let your device get damp or get rained.
Do not contact with any open flames.
To avoid being swallowed by children, please do not place any parts of device in
touch of children.
When in installation and configuration, please stop vehicle to a safe place, or it
may cause traffic accidents.
To avoid blocking driver’s perspective and causing traffic accidents, do not install
your device in a position of hampering driving.
Do not use poisonous, corrosive liquid to wipe your host camera, or it may cause
damages.
Pleaseinstall your device in a correct way according to the user manual, or it may
damage your vehicle and device.
If any problems found, please stop using it and contact the local dealer to handle
it.
Warnings
During the time of using your device, the followed factors may lead to the actual
effects different from installation.
The rain, snow, fog and other weather conditions.
The temperature nearthe host is very high or very low.
Vehicle dump or road slope.
The host is in darker or brighter environment.
The host moves quickly from darker to brighter environment, e.g. garage, tunnel
and so on.
Use other host without authorization.
Excess passengers or heavyitems may lead to the vehicle height changes.
After installed this device, replacementof suspension system may also lead to
the vehicle height changes.
Braking quickly may lead to the host height changes.
Vehicle cleaning or collisions may lead to the host position or angle changes.

19 / 19
All the above factors can affect device performance, and you need to admit that
these are not installation defects.

§ 15.19 Labelling requirements.
This device complies with part 15 of the FCC Rules. Operation is subject to the
following two conditions: (1) This device may not cause harmful interference, and (2)
this device must accept any interference received, including interference that may cause
undesired operation.
§ 15.21 Information to user.
Any Changes or modifications not expressly approved by the party responsible for
compliance could void the user's authority to operate the equipment.
§ 15.105 Information to the user.
Note: This equipment has been tested and found to comply with the limits for a Class B
digital device, pursuant to part 15 of the FCC Rules. These limits are designed to
provide reasonable protection against harmful interference in a residential installation.
This equipment generates uses and can radiate radio frequency energy and, if not
installed and used in accordance with the instructions, may cause harmful interference
to radio communications. However, there is no guarantee that interference will not
occur in a particular installation. If this equipment does cause harmful interference to
radio or television reception, which can be determined by turning the equipment off and
on, the user is encouraged to try to correct the interference by one or more of the
following measures:
-Reorient or relocate the receiving antenna.
-Increase the separation between the equipment and receiver.
-Connect the equipment into an outlet on a circuit different from that to which the
receiver is connected.
-Consult the dealer or an experienced radio/TV technician for help.
*RF warning for Mobile device:
This equipment complies with FCC radiation exposure limits set forth for an
uncontrolled environment. This equipment should be installed and operated with
minimum distance 20cm between the radiator & your body.
Table of contents
Popular Automobile Accessories manuals by other brands

Andersen
Andersen 3165 installation manual

Trinity Highway
Trinity Highway VORTEQ Premium Lighting Addendum

Metra Electronics
Metra Electronics 95-9616B installation instructions

MTD
MTD 143-660 Supplement sheet

Motorola
Motorola VC6000 Series Product reference guide

GMC
GMC 5581-00-100 installation instructions


ATD Tools
ATD Tools SPI-77300 user manual

Jacob Jensen
Jacob Jensen Electronic Parking Disc user guide

Berner
Berner BHFL Series operating manual

PE Racing
PE Racing Pedalbox Assembly Manual & Installation Instructions

Peiker Acustic
Peiker Acustic Bluetouch Music operating manual

Uebler
Uebler F42 Mounting and operating instructions