vitaaudio R1 User manual
User Guide
Guide de L’utilisateur
Bedienungsanleitung
Manuale Utente
Manual de Instrucciones
EN
FR
DE
IT
ES
2
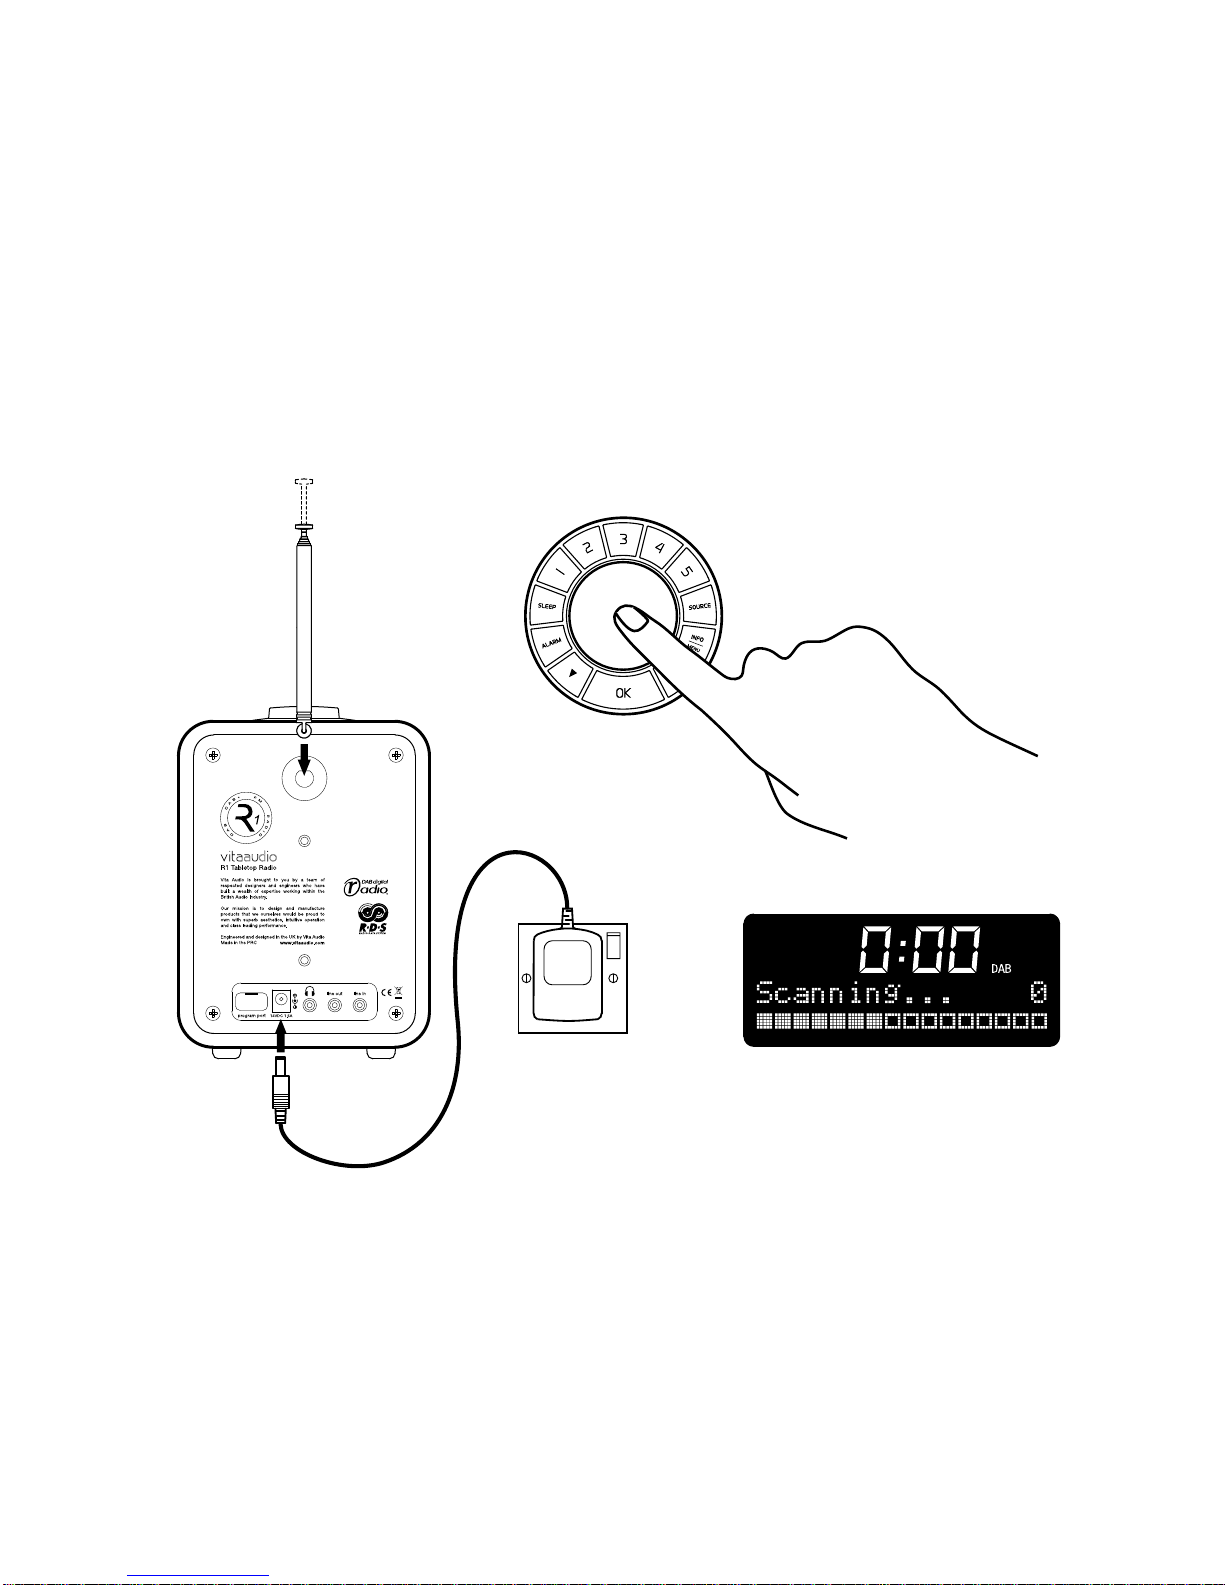
Quick Start
1Connect aerial
Ensure retaining
nut is secure and aerial
is fully extended.
2Connect power
supply
3Switch on
Press volume knob to switch on.
4Wait.....
Automatic tuning will search for DAB / DAB+
stations available in your area and will set
time and date.
Important: Please read this manual carefully before operating your R1 and retain for future reference.
3
EN
FR
DE
IT
ES
Basic controls “Press and hold” means you need to keep
the button pressed for at least 2 seconds.
Standby – press to switch on/off.
Volume – rotate left or right.
Snooze – press when the alarm sounds
to snooze for 5 minutes.
Cancel alarm – press and hold when the
alarm sounds.
Station presets
You can store 5 DAB and 5 FM preset
stations.
To select a preset station press a
numbered button.
To store the currently playing station
press and hold a numbered button.
Changing source
Press SOURCE to cycle through DAB,
FM and AUX; the selected source is
automatically loaded.
Sleep
Set the sleep timer to automatically switch
the R1 to standby.
Press SLEEP to choose between 15, 30,
45, 60, 90 minutes or off. Press OK to
confirm.
If sleep timer is active, pressing SLEEP
displays the remaining time. Clock icon
shows that the sleep timer is active.
Info
Press INFO/MENU to cycle through
station information e.g. text, date and
time, content type, etc.
Changing stations
DAB: press ▼▲ to scroll through station
list. Press OK to select station.
FM scan: press and hold ▼▲ to scan for
next available station.
FM manual tune: press ▼▲ to change
frequency.
Alarm
See page 6 for detailed information
on how to use the alarm.

4
65 7
3
4
2
9
8
113
12
11
10
17161514
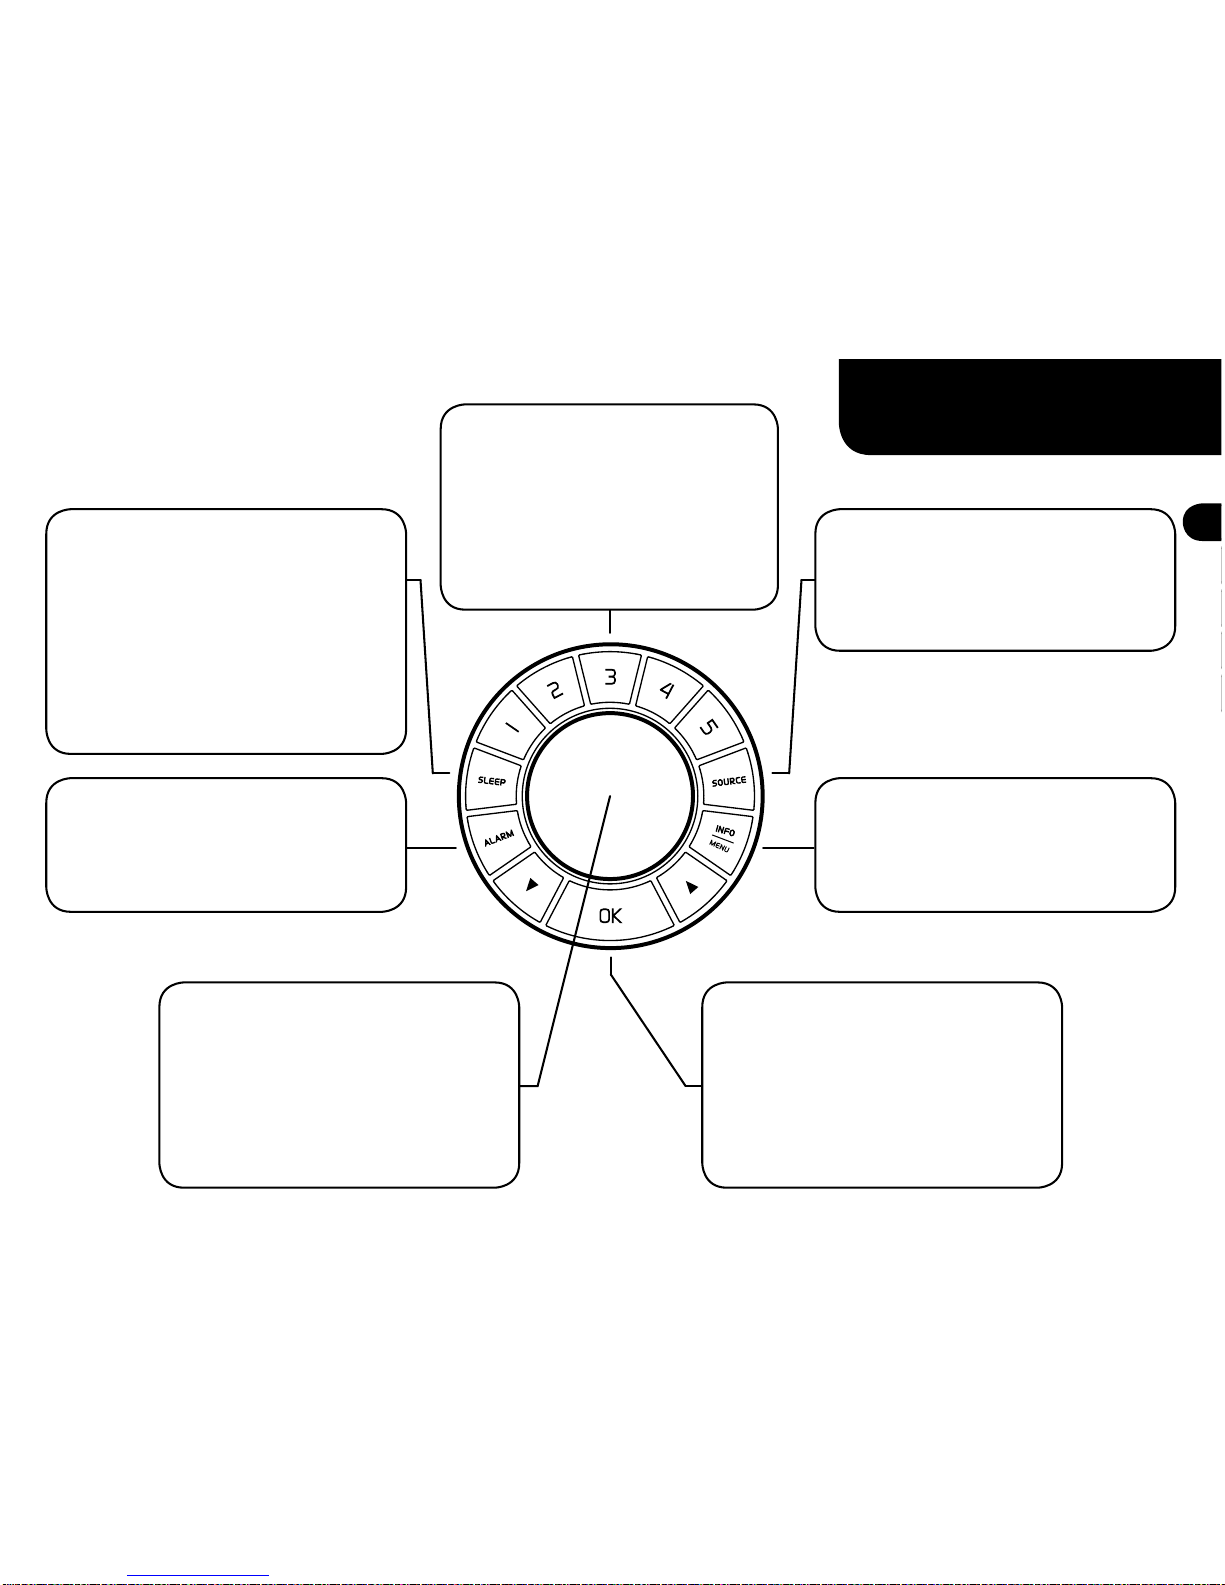
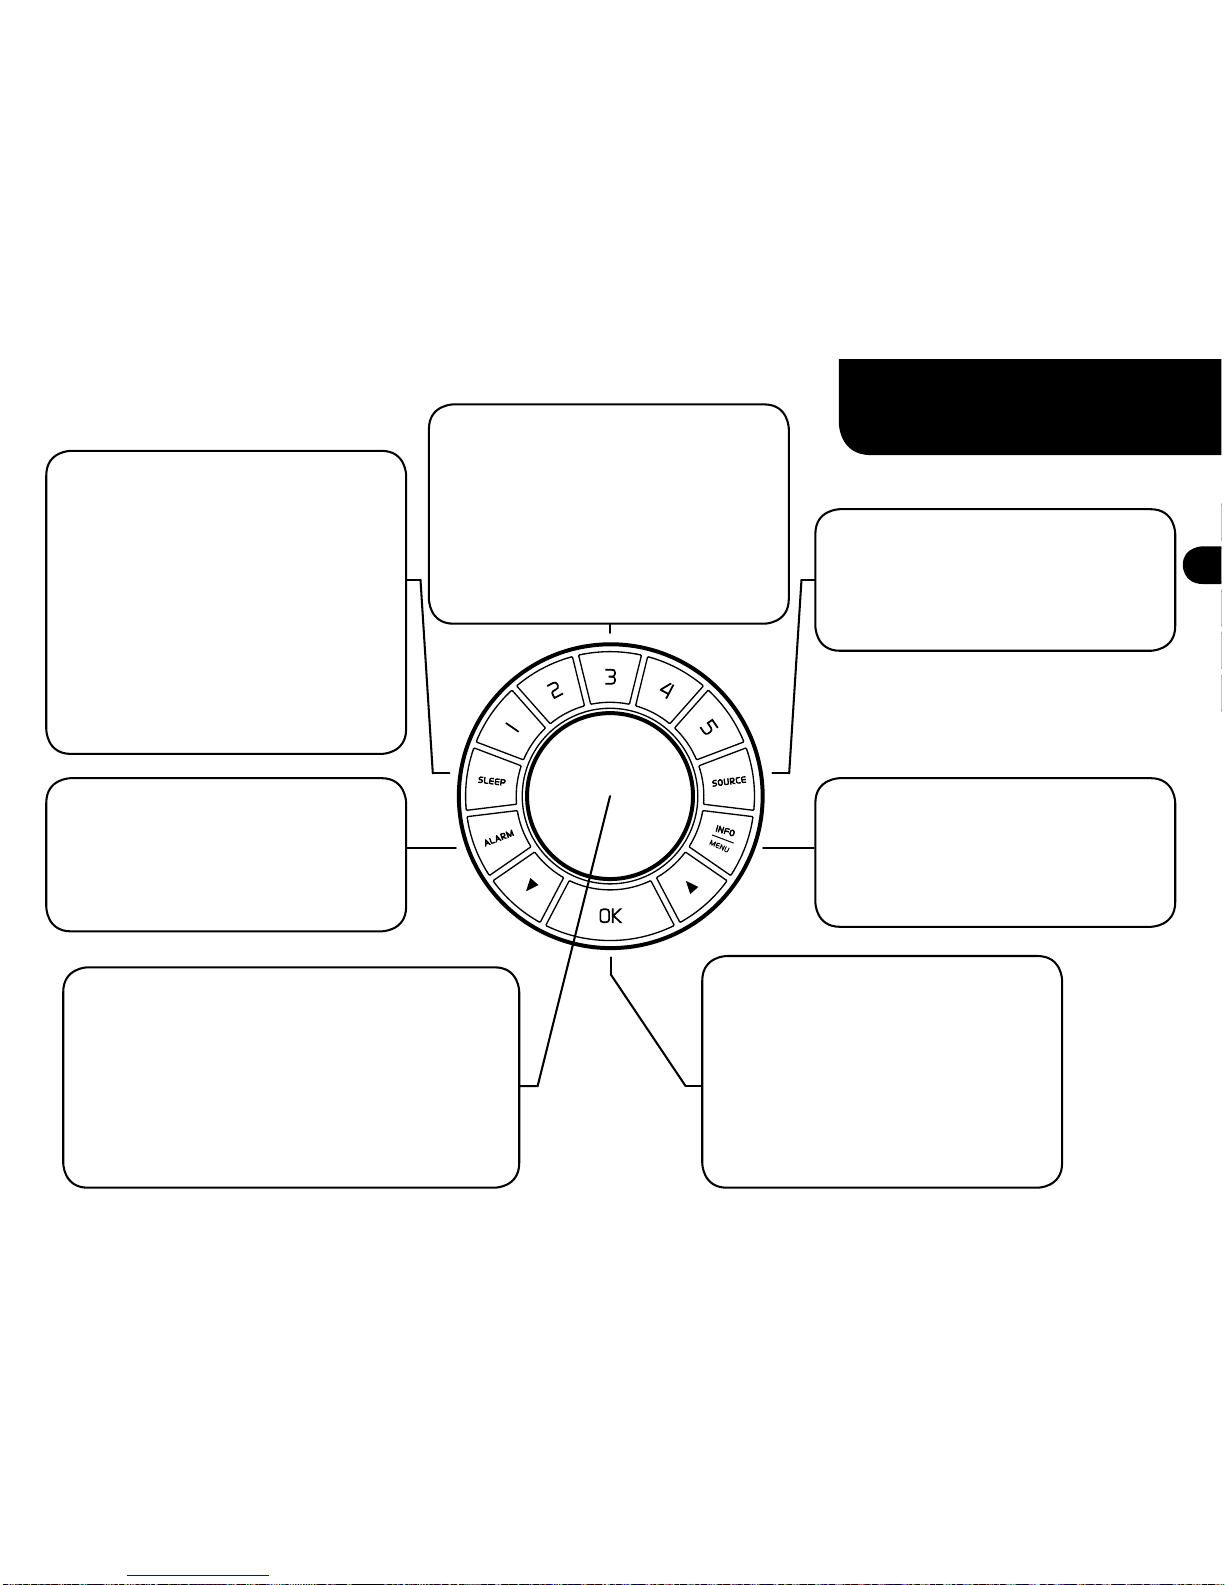
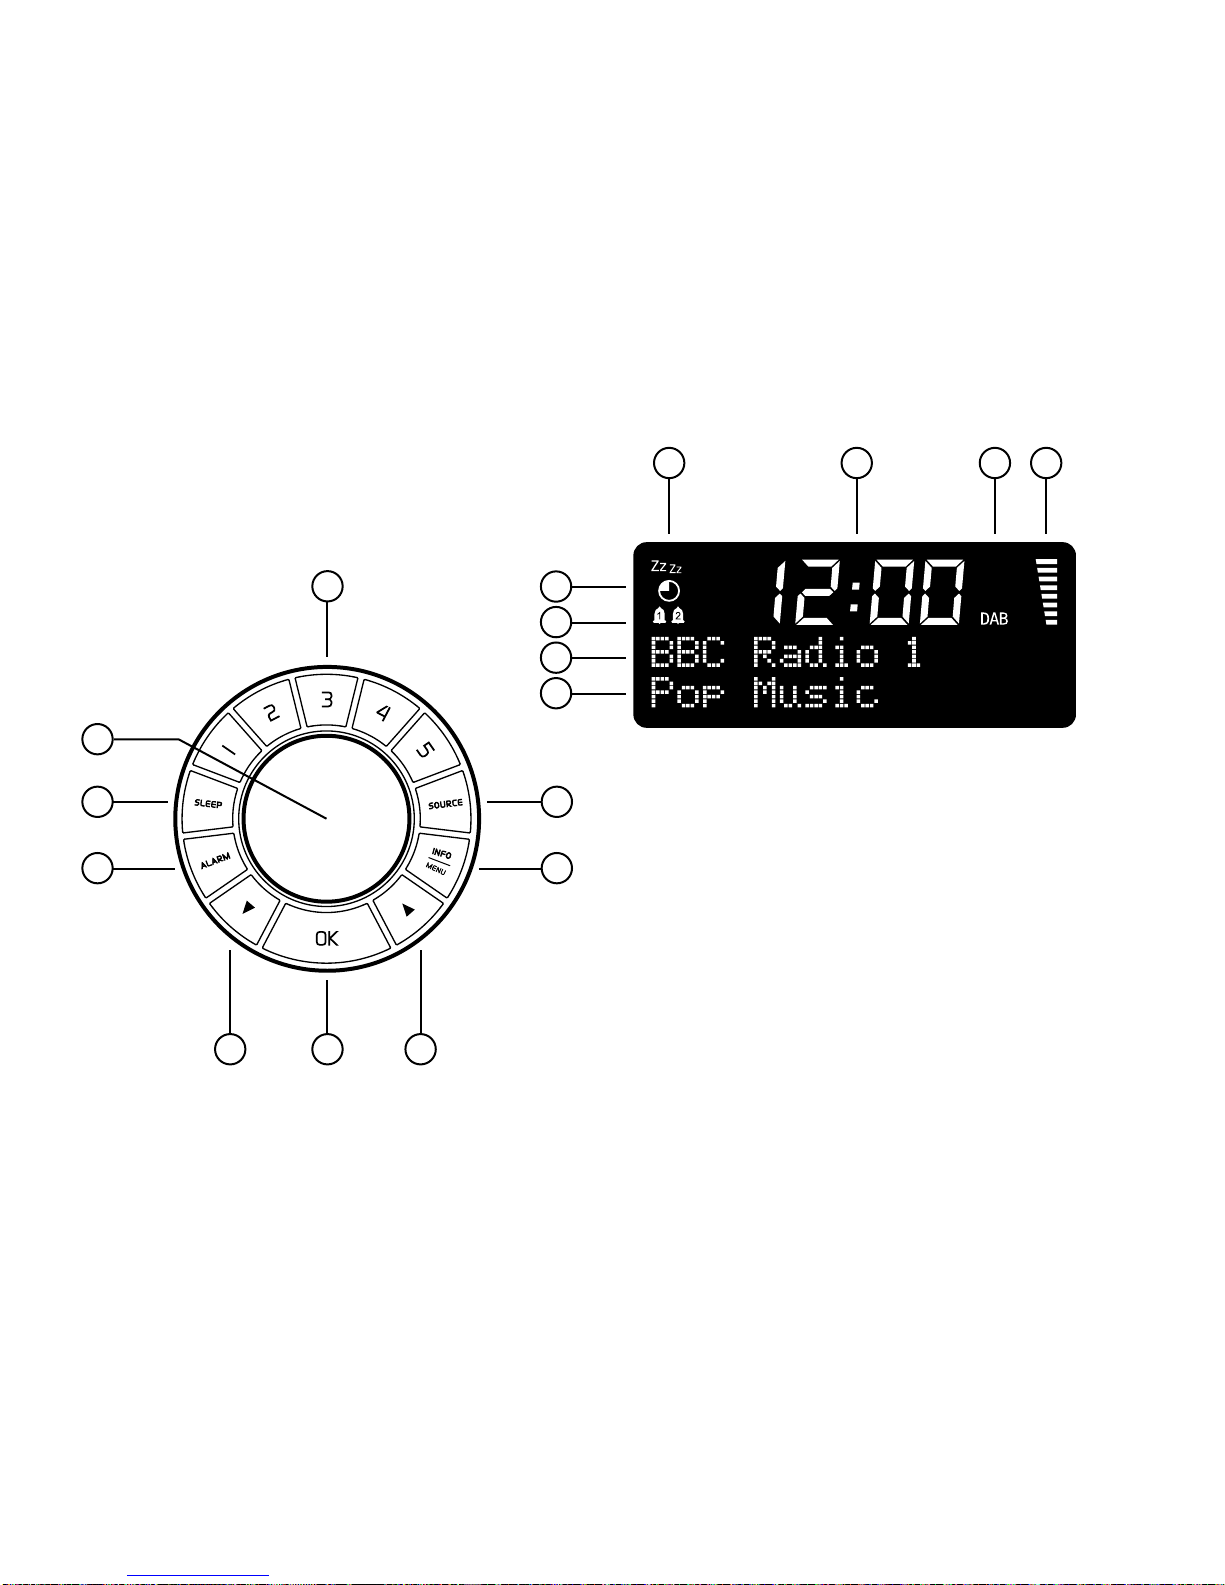
Getting to know your R1
1. Radio presets
Store 5 DAB and 5 FM stations
2. Standby / volume
Press for standby, turn for
volume
3. SLEEP
Set auto-off sleep timer
4. ALARM
Change alarm settings
5. ▼- Down button
6. OK - Confirm selection
7. ▲- Up button
8. INFO/MENU
Change programme information
or enter settings menu
9. SOURCE
Press to select DAB, FM or AUX
10. Programme information
Station type / info, etc
11. Station name
12. Alarm active
13. Sleep timer active
14. Snooze active
15. Large format clock display
16. Chosen source
17. Radio signal strength

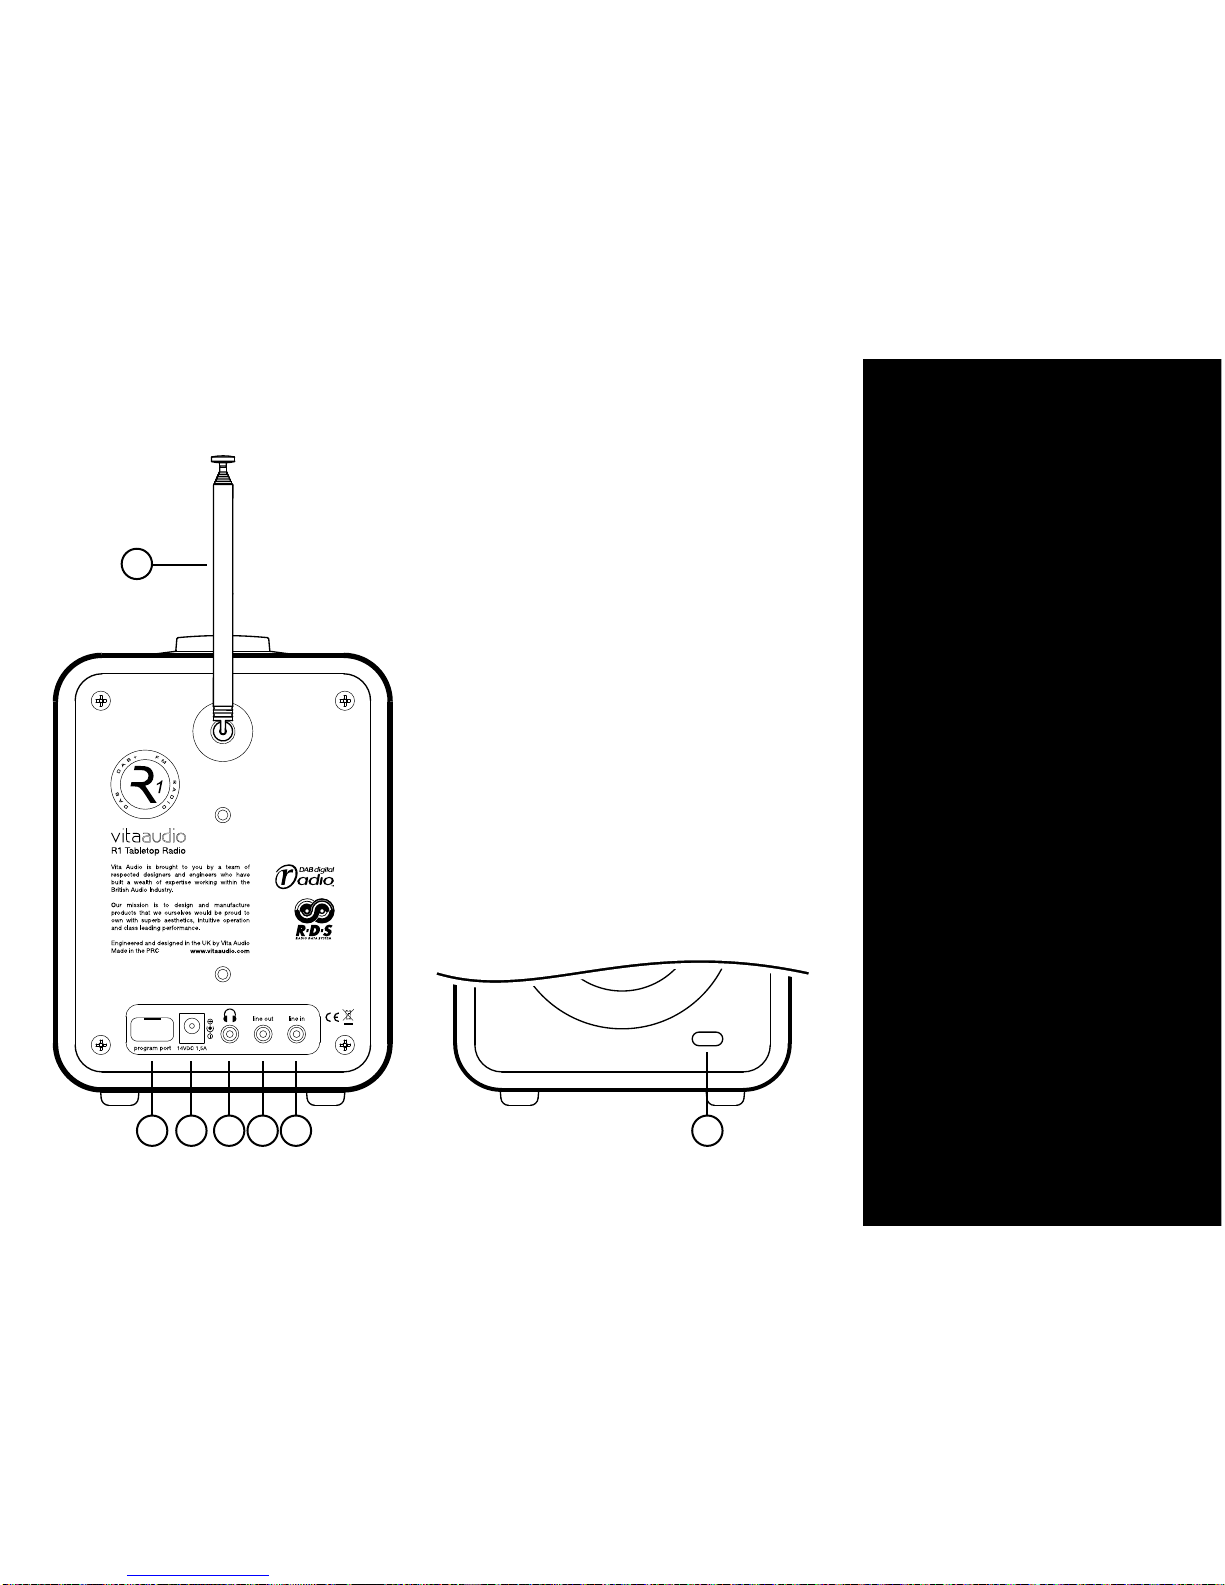
5
24
18. Aerial
Removable telescopic with F-Type connector
19. Program port
For factory and dealer use only
20. 14VDC 1.5A
Adapter connector
21. 3.5mm headphone socket
22. Line out - 3.5mm jack
Connect to amplifier or recording device
23. Line in - 3.5mm jack
Connect an external source e.g. MP3 player
24. Ambient light sensor
Automatically adjusts screen brightness to
suit ambient conditions.
IMPORTANT: To ensure correct function do
not cover the sensor.
Specifications
R1 Tabletop Radio
DAB / DAB+ / FM with RDS●3.5mm headphone output●Aux line input - 3.5mm stereo jack●Line output - 3.5mm stereo jack●3.5” loudspeaker in tuned●
bass reflex cabinet
9w nominal power output●Aerial: Removable telescopic●with F-Type connector
High contrast, backlit LCD●with auto dimming
Large format clock display●2 x 16 character area for●station names / info etc
Dimensions: 175x130x135mm●(6.9x5.1x5.3ins)
Weight: 1.5 kg (3.3 lbs)●
Power supply
Input power 90V to 240VAC●50-60Hz 0.5A
Output power 14VDC 1.5A●
19 20 21 22 23
18

6
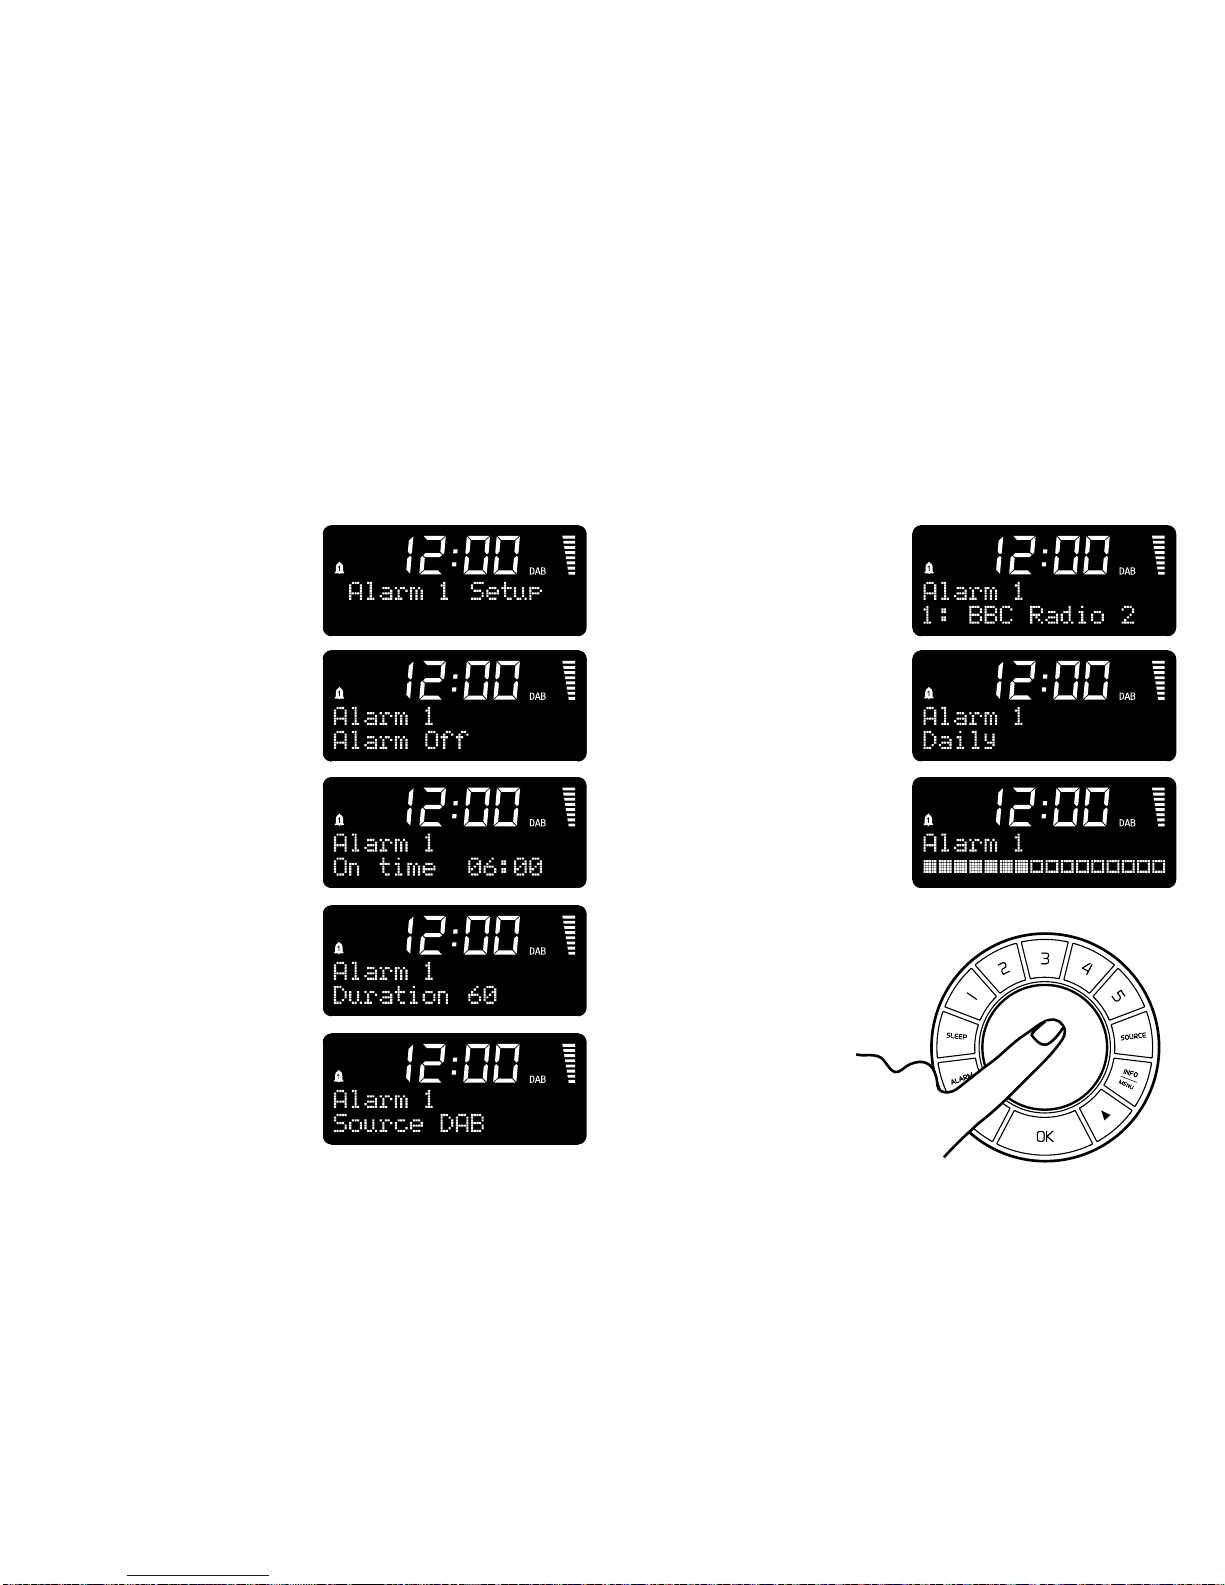
Alarm
The R1 has two separate alarm settings enabling you to, for example,
have one alarm for weekdays and one for weekends.
Setting the alarm
1. Press ALARM to choose
between ‘Alarm setup 1’ or
‘Alarm setup 2’. Press OK to
confirm.
2. Press ▼▲ to turn alarm
ON/OFF. Press OK to confirm.
3. Press ▼▲ to set hour. Press
OK to confirm. Press ▼▲ to set
minutes. Press OK to confirm.
4. Press ▼▲ to set alarm
duration to 15, 30, 45, 60 or 90
minutes. Press OK to confirm.
5. Press ▼▲ to cycle through
‘DAB’, ‘FM’ or ‘Buzzer’. Press
OK to confirm.
6. Press OK to wake to last
listened station or ▼▲ and then
OK to choose a preset station.
Note: This does not apply if
‘Buzzer’ is selected.
7. Press ▼▲ to set repeat pattern
to ‘Daily’, ‘Once’, ‘Weekends’ or
‘Weekdays’. Press OK to confirm.
8. Press ▼▲ to set alarm volume.
Press OK to confirm and save the
chosen alarm. Bell icons show
which alarms are active.
Snooze
When the alarm sounds, tap the
volume knob to snooze an alarm
for 5 minutes. Press again to add
another 5 minutes.
Cancel alarm
When the alarm sounds, press and
hold the volume knob.
7
EN
FR
DE
IT
ES
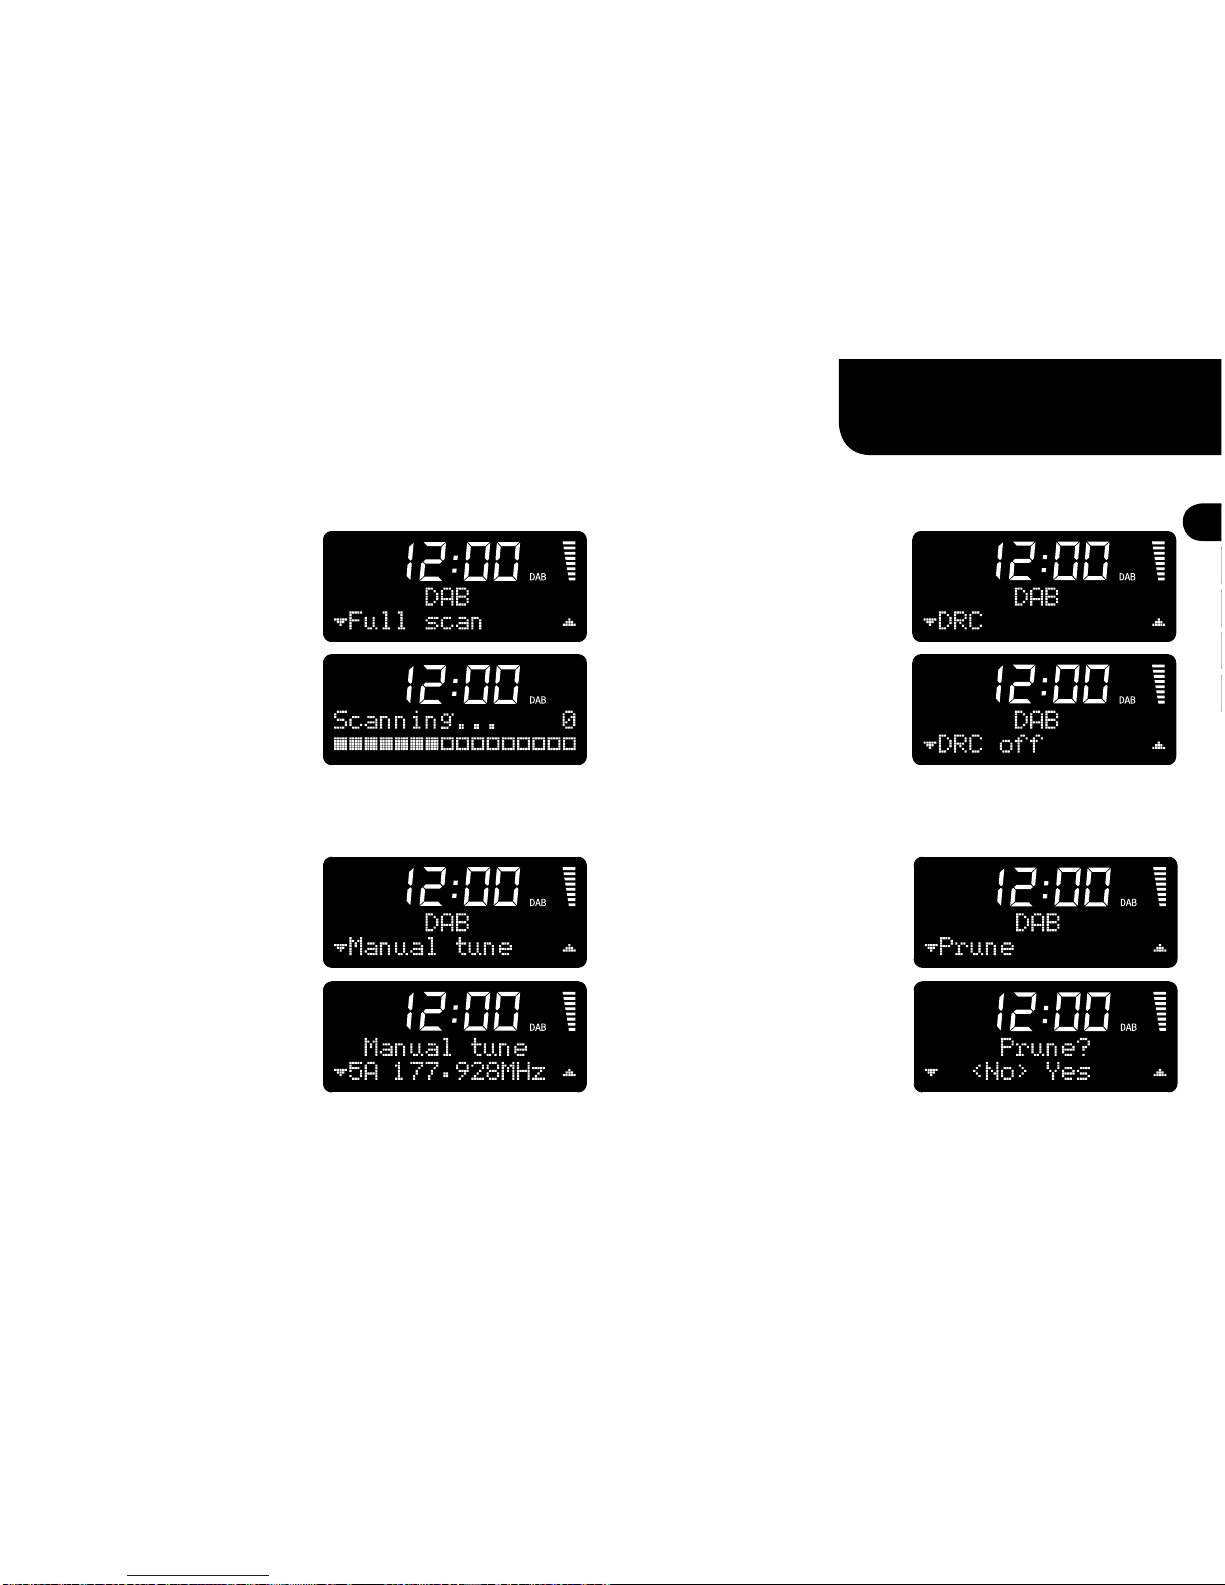
Advanced DAB settings
These settings are only available when source is set to DAB.
Full scan
Updates the list of available DAB
stations.
1. Press and hold INFO/MENU
until ‘Full scan’ appears. Press OK
to confirm.
2. The R1 will commence a scan
of all available DAB stations.
Manual tune
Manually change the frequency.
1. Press and hold INFO/MENU.
Press ▼▲ to select ‘Manual tune’.
Press OK to confirm.
2. Use ▼▲ to change the
frequency. Press OK to confirm.
DRC(Dynamic Range Control)
Some Talk and Classical music
stations transmit a DRC signal which
can make quiet passages easier to
hear in noisy environments. If DRC
is not transmitted, this function will
have no effect.
1. Press and hold INFO/MENU.
Press ▼▲ to select ‘DRC’.
Press OK to confirm.
2. Use ▼▲ to cycle through ‘DRC
high’, ‘DRC low’ and ‘DRC off’.
Press OK to confirm.
Prune
Removes unused or unavailable
stations from list.
1. Press and hold INFO/MENU.
Press ▼▲ to select ‘Prune’.
Press OK to confirm.
2. Use ▼▲ to select ‘Yes’ or ‘No’.
Press OK to confirm.
Did you know you can press INFO/MENU
at any time to return to previous step?
8
Advanced FM settings
These settings are only available when source is set to FM.
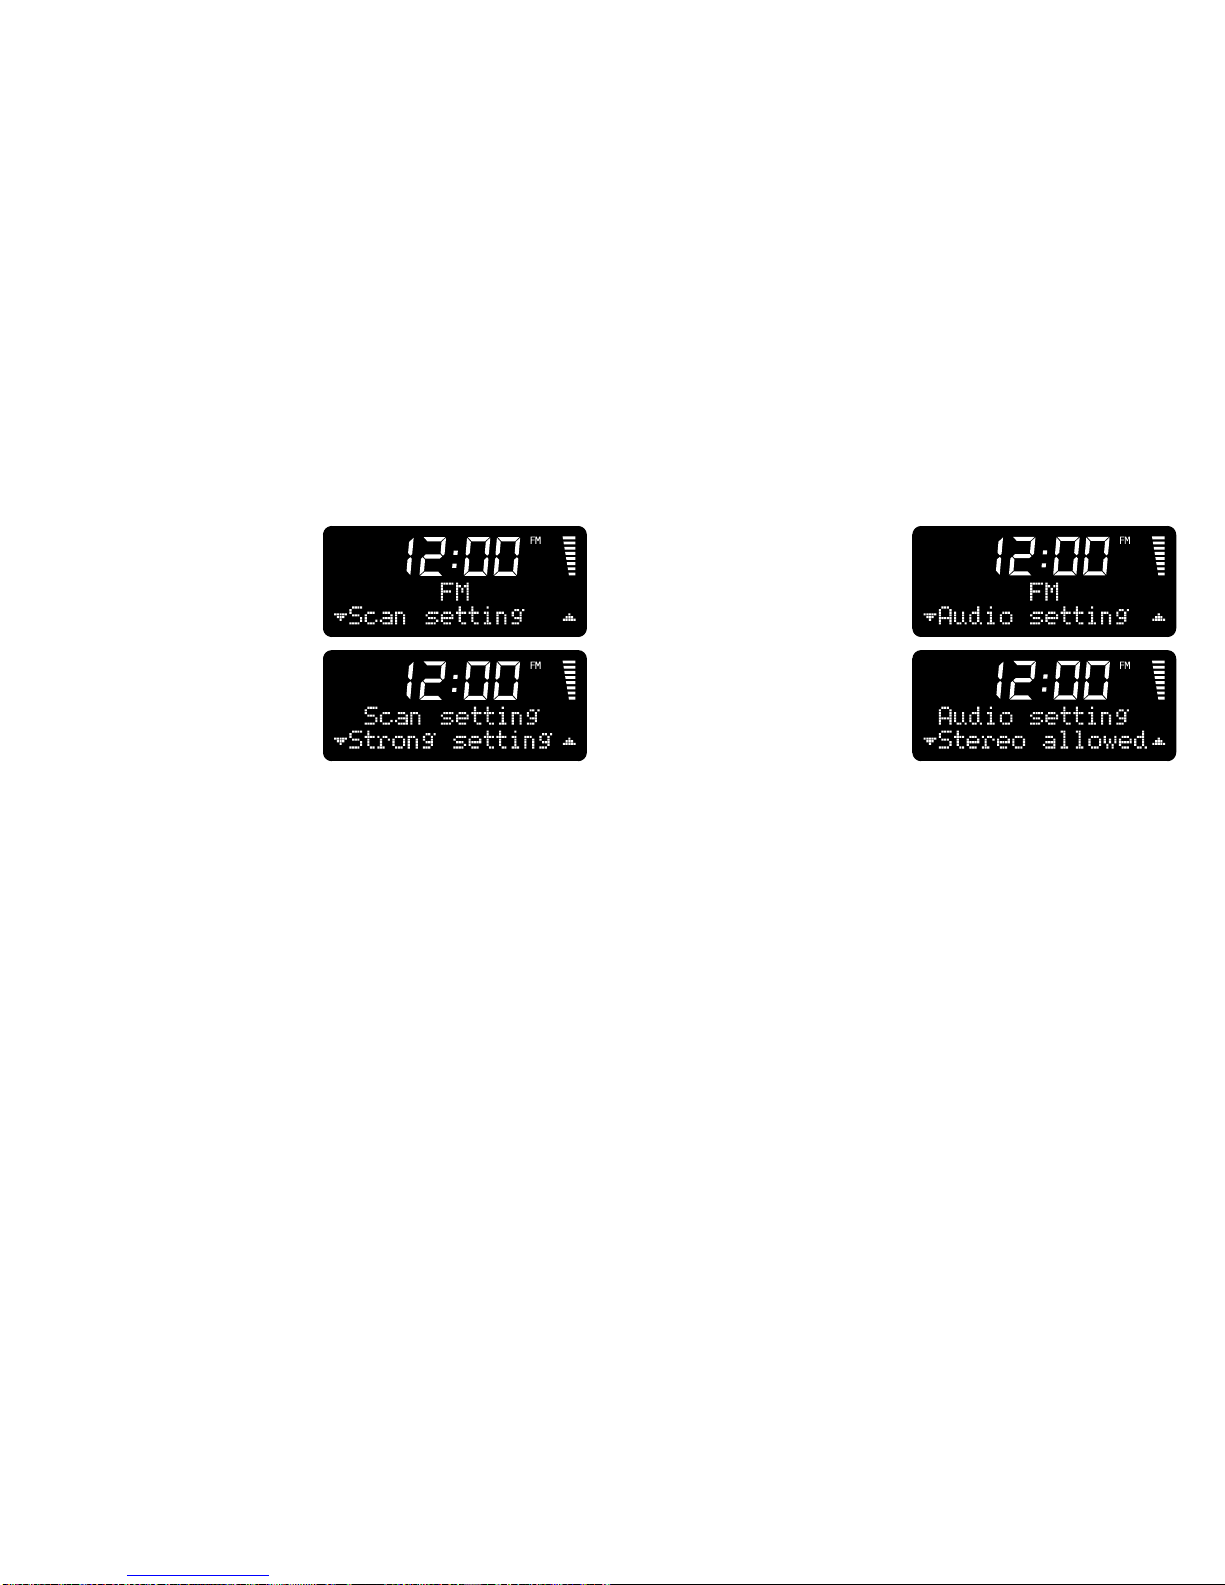
Scan setting
Change how the FM scan finds
stations.
1. Press and hold INFO/MENU
until ‘Scan setting’ appears.
Press OK to confirm.
2. Use ▼▲ to cycle between
‘Strong stations only’ and ‘All
stations’. Press OK to confirm.
Audio setting
Change between stereo or mono
settings. (Forced mono will help to
reduce background noise on weak
FM stations).
1. Press and hold INFO/MENU.
Press ▼▲ to select ‘Audio setting’.
Press OK to confirm.
2. Use ▼▲ to cycle between
‘Stereo allowed’ and ‘Forced mono’.
Press OK to confirm.
9
EN
FR
DE
IT
ES
System settings
To change system settings press and hold INFO/MENU.
Use ▼▲ to select ‘System’ and press OK to confirm.
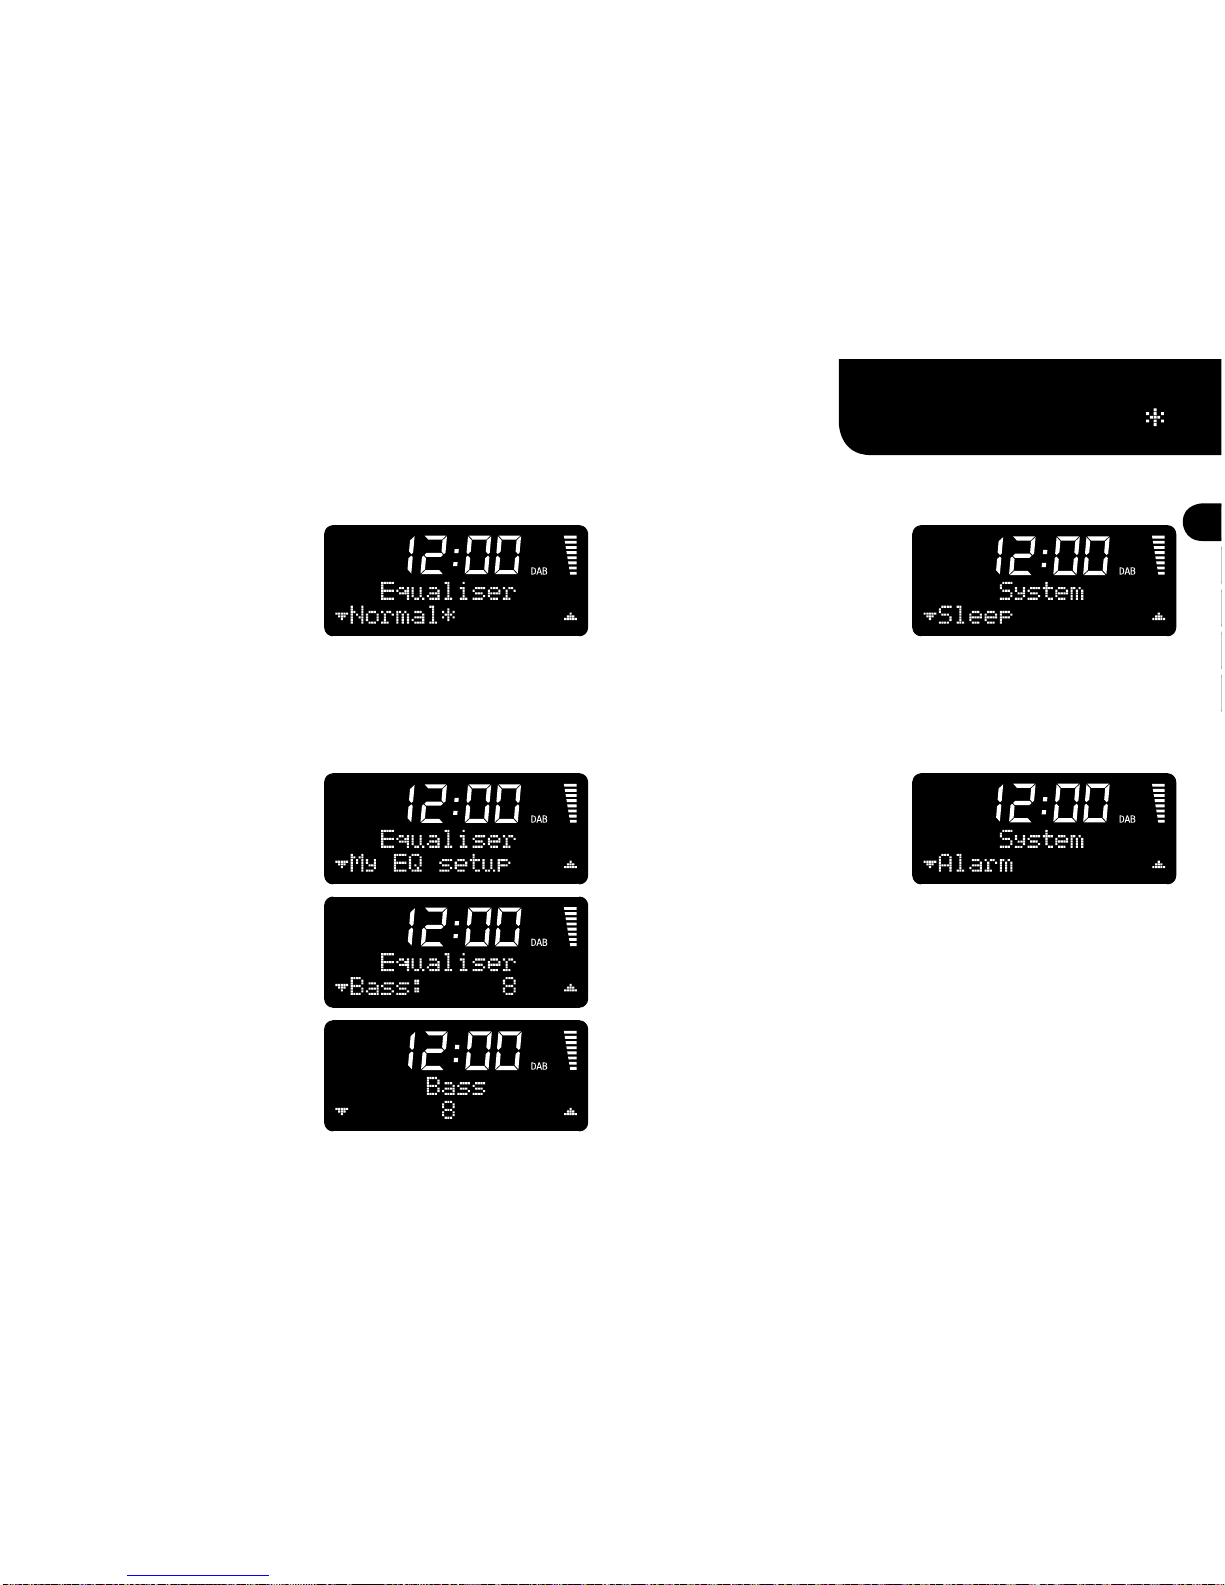
Equaliser
Selects or customises the tone
settings.
1. ‘Equaliser’ is the first option that
comes up in the system settings
menu. Press OK to confirm.
2. Use ▼▲ to cycle through
‘Normal’, ‘My EQ’ and ‘My EQ
setup’. Press OK to confirm.
Customise ‘My EQ’
1. In ‘Equaliser’ menu, use ▼▲ to
select ‘My EQ setup’. Press OK to
confirm.
2. Use ▼▲ to cycle through ‘Bass’,
‘Treble’ and ‘Loudness’ settings.
Press OK to confirm.
3. Use ▼▲ to change value. Press
OK to confirm.
Sleep
This function is also directly
available through the sleep button
as shown on page 3.
1. In ‘System’ menu, use ▼▲ to
select ‘Sleep’. Press OK to confirm.
2. Use ▼▲ to cycle 15, 30, 45, 60
and 90 minute sleep timer. Press OK
to confirm.
Alarm
See page 6 for detailed information
on how to set the alarm.
Did you know that when in a menu, the
current setting is highlighted by ?
10
System settings
To change system settings press and hold INFO/MENU.
Use ▼▲ to select ‘System’ and press OK to confirm.
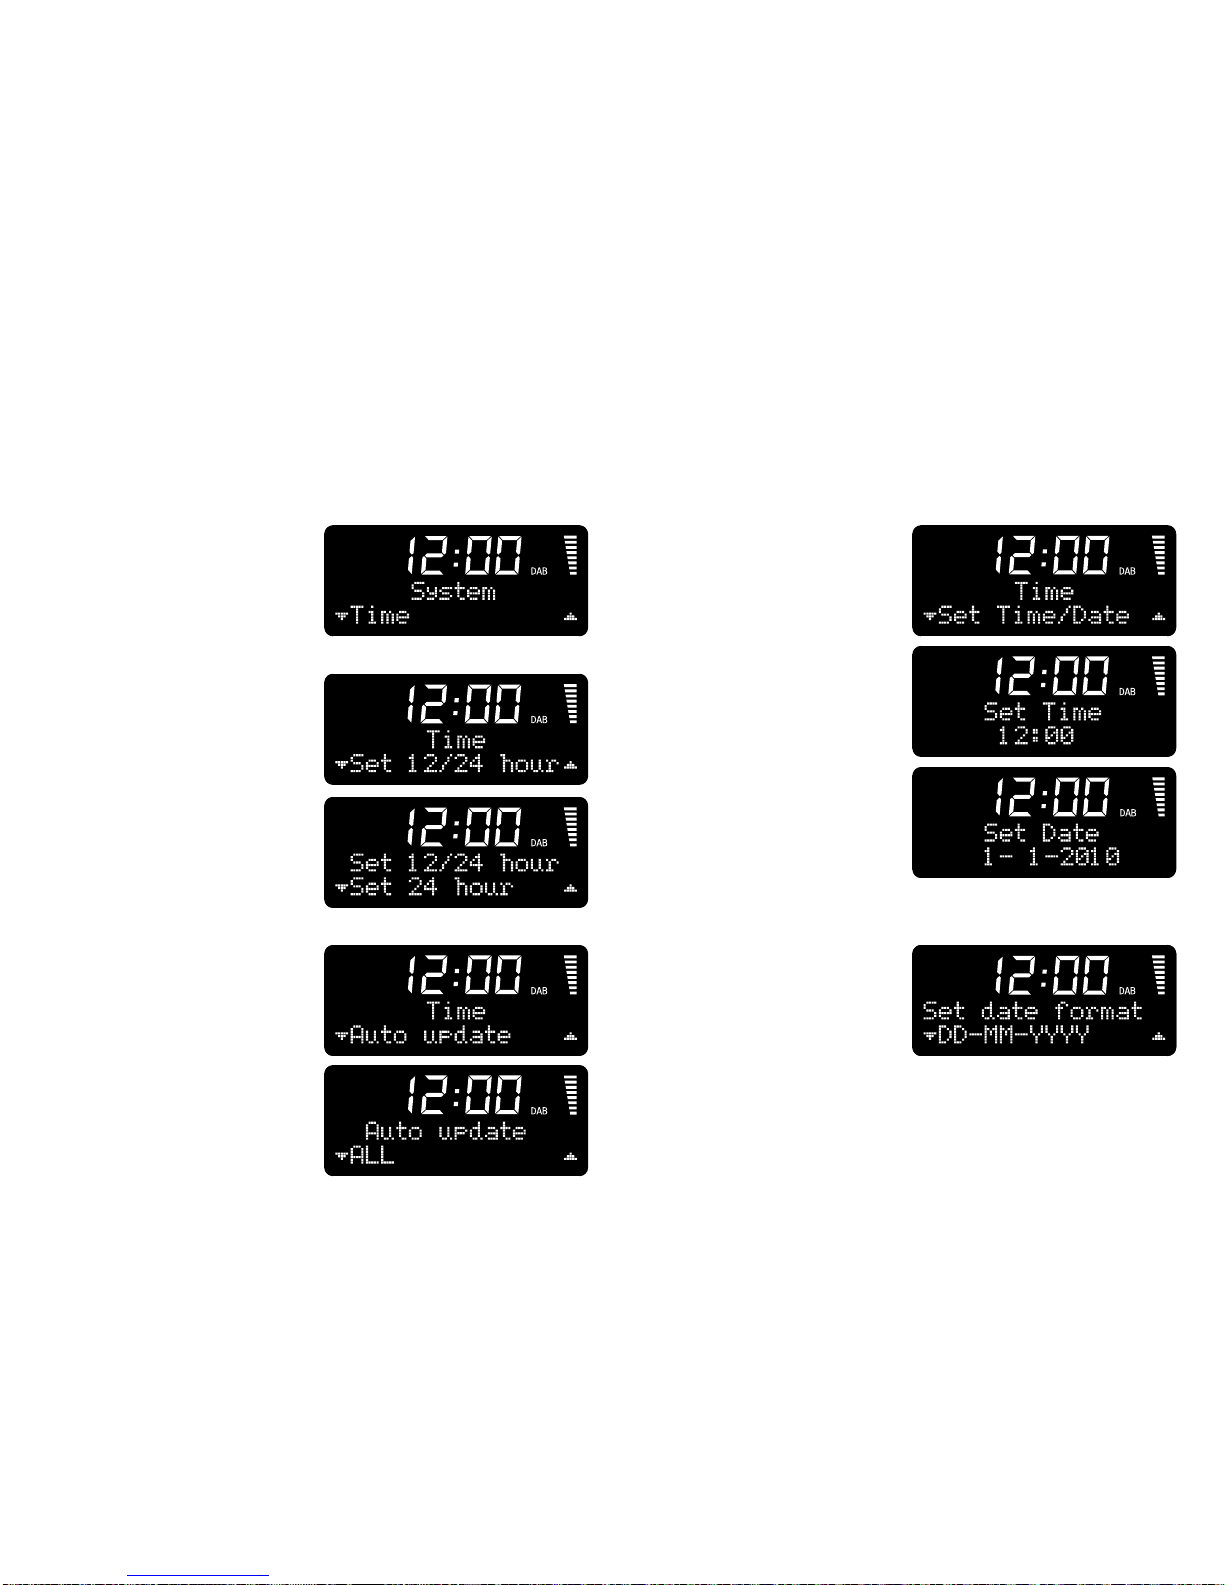
Set time/date
PLEASE NOTE: Manual time &
date settings are overwritten if
‘Auto update’ is on with DAB and
RDS signals.
1. In ‘Time’ menu, use ▼▲ to
cycle to ‘Set Time/Date’. Press OK
to confirm.
2. Use ▼▲ and OK to set hour
then minutes. Press OK to confirm.
3. Use ▼▲ and OK to set day,
month then year. Press OK to
confirm.
Auto update time
Adjust how time and date is
automatically updated.
1. In ‘Time’ menu, use ▼▲ to select
‘Auto update’. Press OK to confirm.
2. Use ▼▲ to select ‘All’, ‘DAB’,
‘FM’ or ‘Off’. Press OK to confirm.
Set date format
Adjust the on screen date format.
1. In ‘Time’ menu, use ▼▲ to
select ‘Set date format’. Press OK
to confirm.
2. Use ▼▲ to choose
‘DD-MM-YYYY’ or ‘MM-DD-YYYY’.
Press OK to confirm.
Time
Adjust how the time and date are
displayed.
In ‘System’ menu, use ▼▲ to
select ‘Time’. Press OK to confirm.
Set 12/24 hour
1. In ‘Time’ menu, use ▼▲ to
select ‘Set 12/24 hour’. Press OK
to confirm.
2. Use ▼▲ to select ‘Set 12 hour’
or ‘Set 24 hour’ clock format.
Press OK to confirm.
11
EN
FR
DE
IT
ES
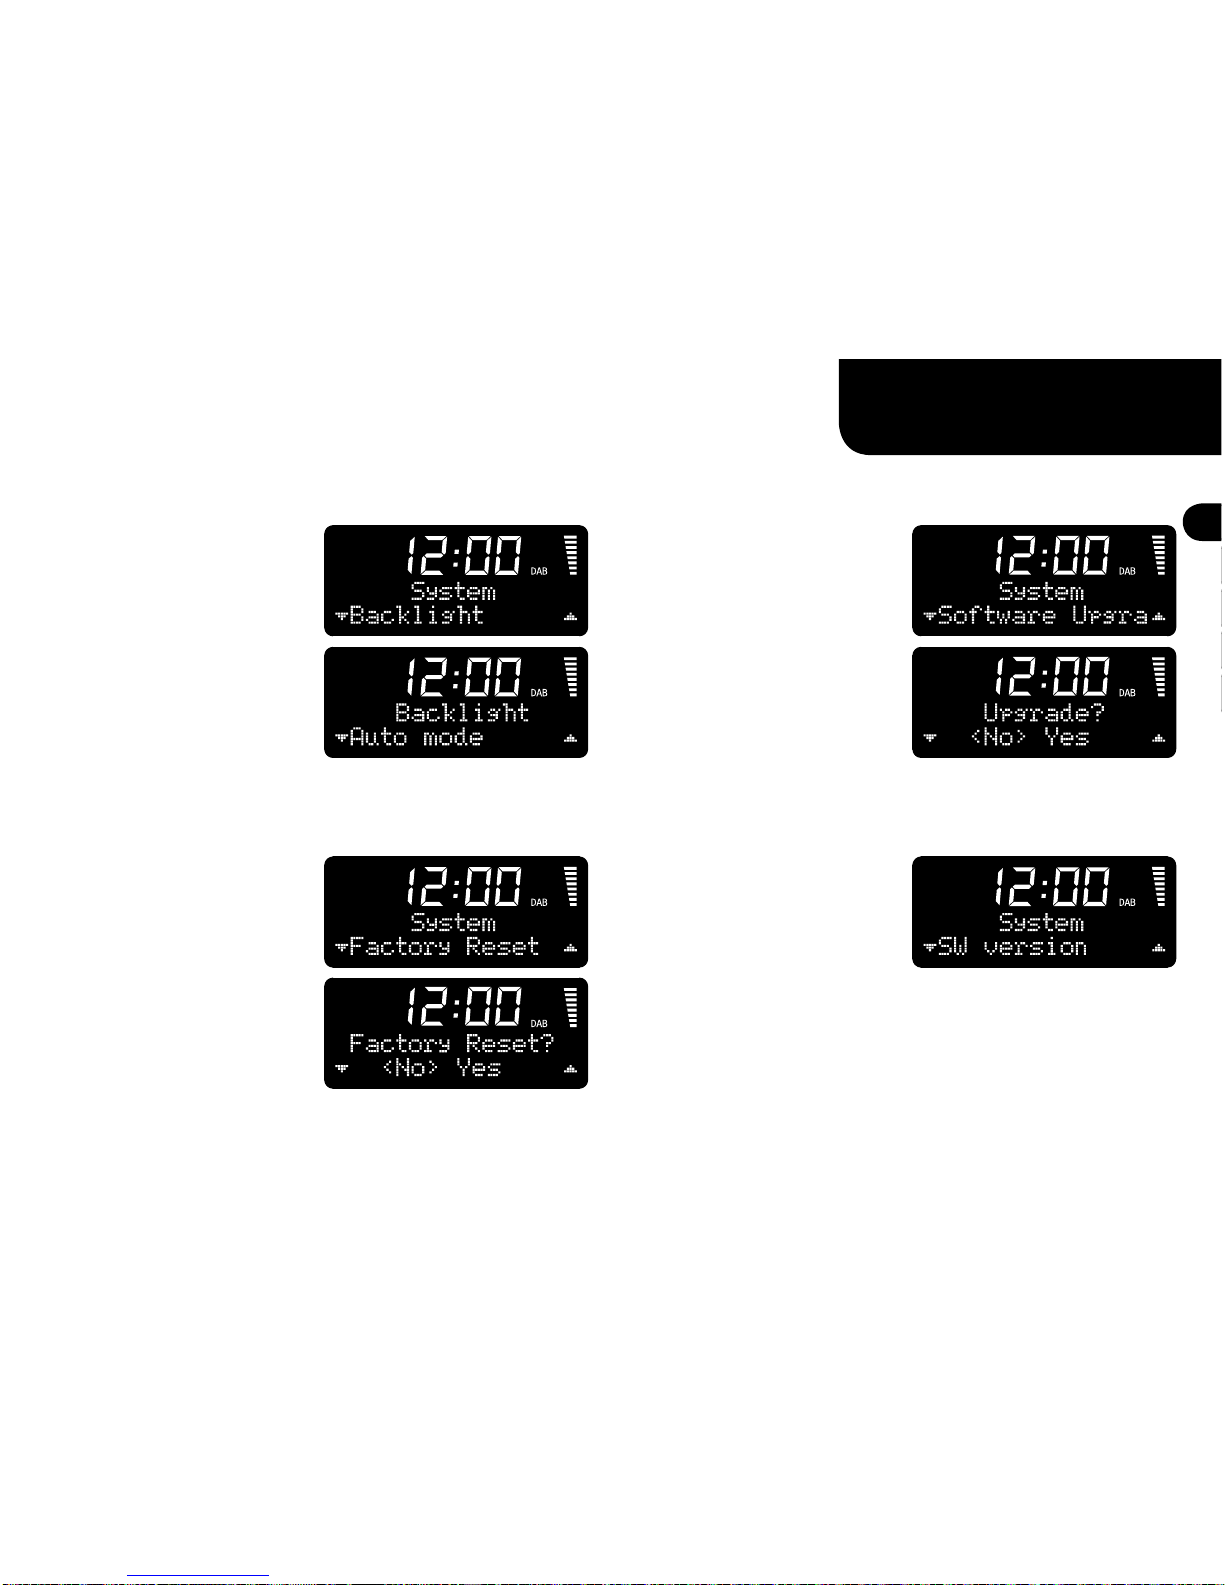
Backlight
The backlight automatically adjusts
to suit ambient light but you can also
set it to ‘time-out’ and switch off. We
recommend this setting is activated
when R1 is used with its optional
battery pack (BackPack) to give best
battery life.
1. In ‘System’ menu, use ▼▲ to
select ‘Backlight’. Press OK to
confirm.
2. Use ▼▲ to cycle through options.
Press OK to confirm.
Factory reset
Reset to default factory settings.
1. In ‘System’ menu, use ▼▲ to
select ‘Factory reset’. Press OK to
confirm.
2. Use ▼▲ to select ‘Yes’ or ‘No’.
Press OK to confirm.
Software version
Use this function to view the
Model Software version.
In ‘System’ menu, use ▼▲ to select
‘Software version’. Press OK to
confirm.
Software upgrade
This facility is for factory and dealer
use only. Its primary function is to
allow customisation for applications
such as Hotel use etc.
1. In ‘System’ menu, use ▼▲ to
select ‘Software upgrade’.
Press OK to confirm.
2. Use ▼▲ to select ‘Yes’ or ‘No’.
Press OK to confirm.
System settings
To change system settings press and hold INFO/MENU.
Use ▼▲ to select ‘System’ and press OK to confirm.
Did you know you can press INFO/MENU
at any time to return to previous step?
Guarantee information
We guarantee this product to be free from defects for a period of
two years from date of purchase, providing due care and attention
has been paid. Product failure through accidental damage (however
caused), excessive wear and tear, negligence or unauthorized
modification will void your guarantee.
Should you experience a problem please contact us either by
on 01702 601410 where we will advise the course of action. If your
product needs to be returned it should be packaged in its original
packing along with proof of purchase. If it is not possible to return
the product by hand, then it should be sent carriage prepaid by
a reputable parcel carrier. If the original packing is not available,
replacement packing can be purchased from us.
Guarantee for overseas sales
The distributor in the country of purchase guarantees products
purchased outside the UK. For details, please contact your local
VitaAudio distributor or outlet.
THIS GUARANTEE IN NO WAY VARIES OR REMOVES THE
PURCHASER’S STATUTORY RIGHTS. E&OE
59 Tailors Court - Temple Farm Industrial Estate - Southend on Sea - Essex - SS2 5TH - UK
Maintenance
To maintain the performance and finish of your R1:
Clean with a soft lint free duster or slightly dampened cloth.●Protect the RotoDial, drive units and contacts from●wax sprays and other substances. Contact with these
substances may degrade the system’s performance.
Natural wood finish cabinets will vary and lighten or darken●with age particularly when exposed to sunlight.
Do not expose your R1 to direct sunlight, high humidity, dust,●excessive vibration or extreme temperatures all of which can
affect the finish, performance and reliability of the unit.
The recommended operating temperature range is 5°C to 40°C.●Make sure that liquids, including rain, cannot penetrate the unit.●
a division of
User Guide
Guide de L’utilisateur
Bedienungsanleitung
Manuale Utente
Manual de Instrucciones
EN
FR
DE
IT
ES

14
Démarrage rapide
1Raccordez
l’antenne
Assurez-vous que l’écrou
de serrage est solidement
fixé et que l’antenne est
complètement déployée.
2Raccordez le
cordon
d’alimentation
3Appuyez sur le bouton marche/arrêt
Appuyez sur la molette de volume pour mettre
en marche.
4Patientez.....
La fonction réglage automatique recherche les stations
DAB/DAB+ disponibles dans votre région et règle l’heure
et la date.
Important : veuillez lire ce manuel attentivement avant d’utiliser votre R1 et le conserver pour pouvoir
vous y référer ultérieurement.
15
EN
FR
DE
IT
ES
Commandes de base
« Maintenir le bouton enfoncé » signifie que vous
devez appuyez sur le bouton et le maintenir
enfoncé pendant au moins 2 secondes.
Standby (Veille) – appuyez pour mettre en marche/arrêt.
Volume – tournez vers la gauche ou vers la droite.
Snooze (Répétition du réveil) – appuyez lorsque le
réveil se déclenche afin de le réactiver dans 5 minutes.
Cancel alarm (Annulation du réveil) – Maintenez le
bouton enfoncé lorsque le réveil se déclenche.
Stations préréglées
Vous pouvez mémoriser 5 stations
préréglées en mode DAB et 5 autres en
mode FM.
Pour sélectionner une station préréglée,
appuyez sur une touche numérotée.
Pour mémoriser la station en cours
d’écoute, appuyez sur une touche
numérotée et maintenez-la enfoncée.
Changer la source
Appuyez sur SOURCE pour faire défiler
les modes DAB, FM et AUX; la source
sélectionnée est automatiquement
chargée.
Fonction « Sleep »
(Arrêt programmé)
Réglez la fonction « Sleep » pour basculer
automatiquement le R1 en mode veille.
Appuyez sur SLEEP pour choisir un délai
de 15, 30, 45, 60, 90 minutes ou « off »
pour désactiver la fonction. Appuyez sur OK
pour confirmer.
Lorsque la fonction arrêt programmé est
active, appuyez sur SLEEP pour afficher le
délai restant. L’icône de l’horloge indique
que la fonction arrêt programmé est active.
Info
Appuyez sur le bouton INFO/MENU pour
faire défiler des informations sur la station,
par exemple du texte, la date et l’heure, le
type de contenu, etc.
Changer les stations
DAB : appuyez sur ▲▼ pour faire défiler
la liste des stations. Appuyez sur OK
pour sélectionner une station.
Recherche FM : maintenez enfoncées
les touches ▲▼ pour rechercher la
station suivante.
Réglage manuel en mode FM : appuyez
sur▼▲ pour changer la fréquence.
Fonction « Alarm »
(Réveil)
Consultez la page 6 pour obtenir des
informations détaillées sur l’utilisation du
réveil.
16
65 7
3
4
2
9
8
113
12
11
10
17161514
Familiarisation avec votre R1
1. Préréglages radio
Mémorisez 5 stations DAB et 5
stations FM
2. Veille/volume
Appuyez pour passer en mode
veille, tournez pour régler le
volume
3. SLEEP
Réglez la minuterie du mode arrêt
programmé
4. ALARM
Modifiez les réglages du réveil
5. ▼- Bouton de diminution
6. OK - Confirmez la sélection
7. ▲- Bouton d’augmentation
8. INFO/MENU
Modifiez les informations sur le
programme ou accédez au menu
des réglages
9. SOURCE
Appuyez pour sélectionner le mode
DAB, FM ou AUX
10. Informations sur le programme
Type de station/info sur la station
11. Nom de la station
12. Réveil activé
13. Arrêt programmé activé
14. Répétition du réveil activée
15. Affichage de l’heure grand
format
16. Source sélectionnée
17. Puissance du signal radio
17
24
18. Antenne
Télescopique amovible avec connecteur de type F
19. Port de programme
Usage réservé au fabricant et aux revendeurs
20. 14 VDC 1,5 A
Connecteur pour adaptateur
21. Prise pour casque 3,5 mm
22. Sortie de ligne - prise 3,5 mm
Raccordez à un amplificateur ou à un dispositif
d’enregistrement
23. Entrée de ligne - prise 3,5 mm
Raccordez une source externe, par exemple un
lecteur MP3
24. Capteur de lumière ambiante
Ajuste automatiquement la luminosité de l’écran
en fonction des conditions ambiantes.
IMPORTANT : pour un assurer le bon
fonctionnement, ne jamais couvrir le capteur.
Caractéristiques
techniques
Radio compacte R1
DAB/DAB+/FM avec RDS●Sortie pour casque 3,5 mm●Entrée de ligne auxiliaire -●jack stéréo de 3,5 mm
Sortie de ligne - jack stéréo de 3,5 mm●Haut-parleur 3,5” dans un●
boîtier bass reflex syntonisé
Puissance nominale 9 w●Antenne : télescopique amovible●avec connecteur de type F
Écran LCD rétroéclairé à●contraste élevé avec ajustement
automatique de la luminosité
Affichage de l’heure grand format●2 zones de 16 caractères●
pour l’affichage des noms
de stations/info, etc.
Dimensions : 175x130x135●mm (6,9x5,1x5,3 pouces)
Poids : 1,5 kg (3,3 lbs)●
Alimentation électrique
Puissance en entrée 90 V à●240 VCA 50-60 Hz 0,5 A
Puissance en sortie 14 VCC 1,5 A●
19 20 21 22 23
18
18
Fonction « Alarm » (Réveil)
Le R1 offre deux réglages de réveils distincts afin de vous permettre, par
exemple, de régler un réveil pour les jours de la semaine et un autre pour
les weekends.
Réglage du réveil
1. Appuyez sur ALARM pour
sélectionner « Alarm setup 1 » ou
« Alarm setup 2 ». Appuyez sur
OK pour confirmer.
2. Appuyez sur ▼▲ pour mettre
le réveil en marche/à l’arrêt.
Appuyez sur OK pour confirmer.
3. Appuyez sur ▼▲ pour régler
l’heure. Appuyez sur OK pour
confirmer. Appuyez sur▼▲ pour
régler les minutes. Appuyez sur
OK pour confirmer.
4. Appuyez sur ▼▲ pour définir la
durée du réveil : 15, 30, 45, 60 ou
90 minutes. Appuyez sur OK pour
confirmer.
5. Appuyez sur ▼▲ pour faire
défiler « DAB », « FM » ou «
Buzzer ». Appuyez sur OK pour
confirmer.
6. Appuyez sur OK pour vous réveiller
au son de la dernière station écoutée
ou sur ▼▲ puis OK pour choisir une
station préréglée. Remarque : ceci ne
s’applique pas si la fonction« Buzzer
» est sélectionnée.
7. Appuyez sur ▼▲ pour définir
un modèle de répétition : « Daily »
(quotidien), « Once » (une seule fois),
« Weekends » ou « Weekdays »
(jours en semaine). Appuyez sur OK
pour confirmer.
8. Appuyez sur ▼▲ pour régler le
volume du réveil. Appuyez sur OK
pour confirmer et sauvegarder le
réveil choisi. Les icônes de cloches
indiquent que les réveils sont actifs.
Fonction « Snooze »
(Répétition du réveil)
Lorsque le réveil se déclenche,
appuyez sur le bouton de volume
pour réactiver le réveil dans 5
minutes. Appuyez une nouvelle
fois pour ajouter 5 minutes
supplémentaires.
Annulation du réveil
Lorsque le réveil se déclenche,
appuyez sur le bouton de volume et
maintenez-le enfoncé.

19
EN
FR
DE
IT
ES
Réglages DAB avancés
Ces réglages ne sont disponibles que lorsque la source est réglée sur DAB.
Full scan
(Recherche complète)
Permet de mettre à jour la liste des
stations DAB.
1. Maintenez le bouton INFO/MENU
enfoncé jusqu’à ce que « Full scan»
apparaisse. Appuyez sur OK pour
confirmer.
2. Le R1 débutera une recherche
de toutes les stations DAB
disponibles.
Syntonisation
manuelle
Permet de changer manuellement
la fréquence.
1. Maintenez le bouton INFO/
MENUenfoncé. Appuyez sur ▼▲
pour sélectionner « Manual tune ».
Appuyez sur OK pour confirmer.
2. Utilisez ▼▲ pour changer la
fréquence. Appuyez sur OK pour
confirmer.
DRC (Dynamic Range
Control/Commande de plage
dynamique)
Certaines stations d’émissions de
débats ou de musique classique
transmettent un signal DRC qui permet
de rendre plus audibles les passages
bas dans des environnements bruyants.
Si le DRC n’est pas transmis, cette
fonction est inopérante.
1. Maintenez le bouton INFO/MENU
enfoncé.
Appuyez sur ▼▲ pour sélectionner
« DRC ».
Appuyez sur OK pour confirmer.
2. Utilisez les boutons ▼▲ pour faire
défiler «
DRC high » (DRC élevé), « DRC low
» (DRC bas) et « DRC off » (DRC
désactivé).
Appuyez sur OK pour confirmer.
Prune (Éliminer)
Permet de supprimer de la liste les
stations inutilisées ou indisponibles.
1. Maintenez le bouton INFO/MENU
enfoncé.
Appuyez sur ▼▲ pour sélectionner
« Prune ».
Appuyez sur OK pour confirmer.
2. Utilisez ▼▲ pour sélectionner «
Yes » (Oui) ou « No » (Non).
Appuyez sur OK pour confirmer.
Savez-vous que vous pouvez appuyer
sur le bouton INFO/MENU à tout moment
pour revenir à l’étape précédente ?

20
Réglages FM avancés
Ces réglages ne sont disponibles que lorsque la source est réglée sur FM.
Scan setting
(Réglage de la recherche)
Modifiez la manière dont la
recherche FM détecte les stations.
1. Maintenez le bouton INFO/MENU
enfoncé jusqu’à ce que «Scan
setting » apparaisse.
Appuyez sur OK pour confirmer.
2. Utilisez ▼▲ pour alterner entre
« Strong stations only » (stations
fortes uniquement) et « All stations »
(toutes les stations). Appuyez sur OK
pour confirmer.
Audio setting
(Réglages audio)
Permet de choisir le mode stéréo
ou mono. (Forcer le mode mono
peut améliorer le bruit de fond sur
les signaux faibles).
1. Maintenez le bouton INFO/
MENU enfoncé. Appuyez sur ▼▲
pour sélectionner « Audio setting ».
Appuyez sur OK pour confirmer.
2. Utilisez ▼▲ pour alterner entre «
Stereo allowed » (Stéréo autorisé)
et « Forced mono » (Mono forcé).
Appuyez sur OK pour confirmer.
Other manuals for R1
1
Table of contents
Languages:
Other vitaaudio Radio manuals


