Vitcas Casa Pizza Oven Installation and operating instructions

VITCAS
®
CASA
PIZZA OVEN
Copyright © 2011 All rights reserved
- 1 -
VITCAS
®
DOUBLE
CASA
PIZZA OVEN
VITCAS
®
WOOD
FIRED INDOOR OR
OUTDOOR PIZZA
OVEN
Vitcas®manufactures
sectional wood-fired outdoor
bread / pizza ovens made by hand in the traditional
way using high quality refractory materials.
Available in a range of sizes.
TRADITIONAL WOOD-FIRED BREAD & PIZZA OVENS
VITCAS®OVENS
Tel. +44 (0) 117 911 7895
Fax. +44 (0) 117 971 1152
8 Bonville Road Brislington
Bristol BS4 5NZ United Kingdom
email:i[email protected]
VITCAS
R
www.vitcas.com
ISO 9001 APPROVED

FIRE SAFETY INSTRUCTIONS:
This oven should function properly without fail if used following the manufacturer’s instructions carefully. Failure to do so
may result in property damage, or serious injury.
The installation procedures must be conformed to, conspicuous defects must be ruled out, and the safety instructions must
be understood and followed, before commencing use of the oven. Any liability against injury, loss or damage shall not be
recognized by VITCAS on instances where the oven has been used in deference to the given instructions.
In accordance with the manufacturer’s instructions, lighters should only be used sparingly to light the fire, and under NO
circumstances should flammable liquids such as lighter fluid, gasoline, diesel, oil, kerosene, or other derivatives, be used to
start or maintain the fire.
Water or any other extinguisher should not be used to control the fire in the oven.
ONLY untreated and dried hardwood must be used as fuel in the oven. REFRAIN from burning any refuse like plastics,
treated or laminated wood, wood chips, treated lumber, and sappy lumber.
KEEP IN MIND to wear protective clothing at all times, such as fire resistant gloves and other recommended implements
during oven operation, and the handling of pots, pans, and other kitchenware used within the oven range.
MAKE SURE that only materials and implements that are fire resistant are used with the oven. VITCAS will never assume
any liability for any loss, injury or damage resulting from the use of tools and implements that are not approved.
ALWAYS watch out for wayward sparks and take caution in the extreme temperatures working inside and outside the oven.
REFRAIN from using the oven indoors.
REFRAIN from exposing the hands or arms inside the oven during and after the operation. Burns and scalds must be
thoroughly immersed in cold water and must be given immediate medical attention.
REFRAIN from exposing any materials within the range of the oven at all times. This includes combustible materials such
as furniture, clothes, electrical appliances, and even nearby trees and shrubs.
MAKE SURE that you follow the required clearances and spacings for the oven installation.
MAKE SURE that the preparation and serving areas have ample clearance away from the oven and all utensils must be
properly secured.
AVOID touching any part of the oven, including the block and cover any time during and after the operation.
KEEP children, pets, and other people away at a safe distance from the oven during and after its use.
Throw away the ashes properly, using a metal shovel, when already cold, and storing them in a metal bin with sealed lid.
Make sure the ashes are disposed away from combustible materials.
As a protective measure, keep a bucket of sand, a fire extinguisher, or a fire blanket within reach from the oven area. Also
maintain a ready first aid kit box nearby.
REFRAIN from making any alteration on the oven that differs from the manufacturer’s specifications and configuration.
Oven Assembly and Operation Manual
VITCAS
R
Copyright © 2011 All rights reserved - 2 -

VITCAS
R
A. Having Your Own Oven
A-1. External Protection Of Your Oven
A-2. Finishing
A-3. Accumulation Of Soot
A-4. Hairline Cracks
A-5. Fibre Reinforcement
A-6. Maintaining Your Oven
B. Clearance Requirements
B-1. Delivery and Assembly
B-2. Extra Insulation
A. Having Your Own Oven
Congratulations on the purchase of your new oven. Only the best quality refractory materials are used by VITCAS in producing
your oven which is handmade by Vitcas. In order to maximize the benefits of your oven, it is advised for you to read carefully
and to adhere to the operating manual with precautionary and safety instructions.
C. Pointers In Using The Oven
C-1. Slow Burning
C-2. Proper Ash Disposal
C-3. Implements
C-4. Caution On The Oven Door
D. Starting To Cook
D-1. Different Wood-Fired Cooking
E. Fire Protection
Table of Contents
A-1. External Protection Of Your Oven
The following instructions are meant to ensure safe and proper operation of your oven and for it to last a long time.
The oven is manufactured using materials which are resistant to high temperatures but more importantly resistant to exposure to
the weather including water and frost.
However, in extreme weather conditions we recommend the use of the VITCAS
oven cover when using your oven, as its special waterproof construction would
protect your oven against water or frost intrusion.
Make sure that the oven is cooled down and no heat is retained when you place
the cover over the oven. During the autumn and winter periods, you should follow
the slow firing periods (as mentioned in C-1. Slow Burning).
Copyright © 2011 All rights reserved
VITCAS®CASA PIZZA OVEN
Internal: 370mm deep x
600mm wide x 400mm high
VITCAS®DOUBLE CASA PIZZA OVEN
Internal: 860 mm deep x 600mm wide x
400mm high
VITCAS®POMPEII OVEN
Internal: 800 mm wide x 400mm high
Weight: 150 kg (330 Ibs) Weight: 300 kg (661 Ibs) Weight: 350 kg (771 Ibs)
Oven Assembly and Operation Manual
o 80
220mm
440 mm
1000 mm
1120 mm
440 mm
o 80
340mm
260mm
670mm
550mm
520mm
o 80
260mm
340mm
520mm
670mm
1010 mm
- 3 -
A-2. Finishing
There would be some natural variations in the appearance of the ovens brought about by the casting process. It is normal and
expected for the ovens to have their individual country characteristic to complement your home. All the ovens are exclusively
produced and crafted in England.
A-3. Accumulation Of Soot
Darkening of portions of the oven, specifically those that are exposed to fire, because of the accumulation of soot is a normal
expectation after initial use. This happens on any wood fired oven and there is no need to worry about this.
A-4. Hairline Cracks
Hairline cracks would be manifested on the oven during and after the operation because of the natural effect of expansion and
contraction when heating and cooling, respectively. These are superficial cracks only and do not affect the structural integrity of
the oven, nor will it adversely affect the life and effectiveness of your oven.
A-5. Fibre Reinforcement
There would be instances when the small steel fibres of the oven would protrude from the base or the dome of the oven. These
are also normal occurrences and extra care should be taken when moving or using the oven so as not to damage these fibers
when in use.
A-6. Maintaining Your Oven
There is minimal effort in maintaining and cleaning your oven, as all residual food could be removed by the pizza peel (as included
in C-3. Implements) or could be burned off by the oven’s accumulated heat.
The basic requirements are to keep the oven covered when cooled down, to protect it against the elements, and to clean the oven
of its residual ashes before the next use (as described in C-2. Proper Ash Disposal.)
CAUTION ON ITS HOT SURFACE!
Strictly observe the minimum clearances required on the oven to prevent any fire incidence.
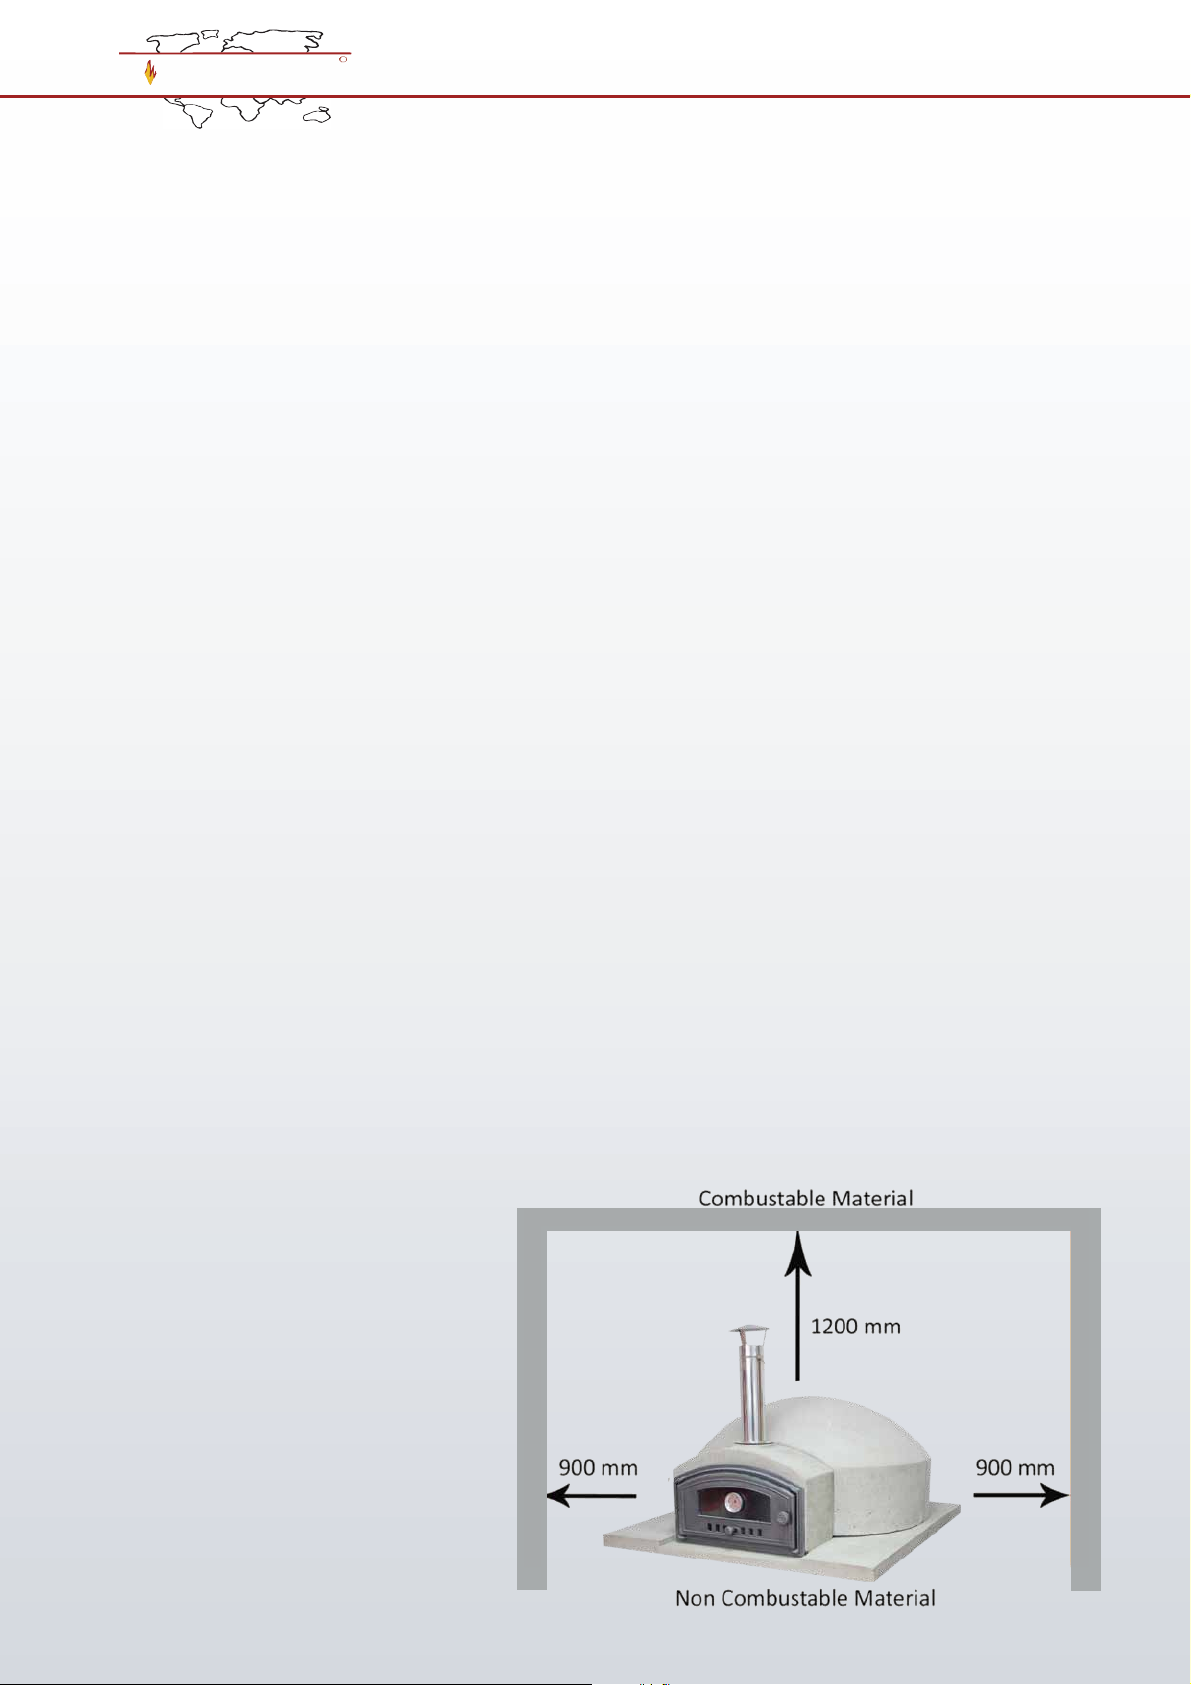
B. Clearance Requirements
It is important to remember that proper clearances around the oven are necessary before it is used. All materials and items,
regardless of its level of combustibility, must be kept at a safe distance from the oven during and after its operation. The
recommended minimum clearances for walls and ceilings are 1200 mm on top of the oven and 900 mm on all sides of the oven.
It is important to watch out for wayward embers and sparks. When the base assembly of the oven is used as storage for wood, it
is advised to cover the storage with fire resistant cover to protect it against such embers and sparks. This is to ensure that there
is ample fire protection of the storage and its contents.
Not To Scale
Example of required clearances for all ovens
illustrated with a Pompeii model by way of example.
VITCAS
R
Copyright © 2011 All rights reserved - 4 -
VITCAS
R
B-1. Delivery And Assembly
THE OVEN SHOULD ALWAYS BE MAINTAINED IN AN UPRIGHT POSITION.
The first step is to choose an appropriate space outdoors to contain the oven, seeing to it that the base is level, that you follow all
the required clearances (as shown in B. Clearance Requirements), and that the location would not in any way cause interference
or disruption with the neighbour’s property.
The second step is to make your own base construction, VITCAS advises to make the base with a solid foundation, making sure
that the entire oven footprint is fully covered by the base. The base should be able to carry a load of at least 200 kg for Casa model
and 300 kg for Double Casa and Pompeii Models. Extra care should be taken when assembling the oven.
Only persons familiar with lifting procedures are recommended to move the oven to its position with two or more persons.
Take caution and utmost care in handling the oven pieces and base which are fragile and should avoid chipping and other
damages. On the pre-constructed base or frame, the oven base must be carefully laid down.
1. Place the base in its nal position
Casa Oven Assembly
2. Place the back in the slot 3. Place the front and run a bead of silicone
over the top of the back and the front
4. Place one of the sides 5. Run silicone along the edge of this rst
side and then place the other side
6. Run silicone on the top of the oven
before placing the top
7. Finally seal underneath the chimney ange with silicone
Copyright © 2011 All rights reserved - 5 -

VITCAS
R
1. Place the two bases in their nal
position
Double Casa Oven Assembly
2. Fill the slot in the centre with the Outdoor
Oven Cement (provided)
3. Place the front and back and run a bead of
silicone over the top of the back and the front
4. Place the rear sides with silicone on
the top edges and repeat for the front
5. Run silicone on the top of the oven before
placing the tops
6. Finally seal underneath the chimney ange
with silicone
Copyright © 2011 All rights reserved - 6 -

VITCAS
R
1. Place the two bases in their nal position 2. Fill the join with VITCAS Outdoor
Oven Cement (provided)
3. Place the back section 0 mm from the
back of the base.
4. Place the front section and put heat resistant
silicone on one of the faces to be joined
5. Place the front arch and join in
the same way
6.Trowel outdoor oven cement
around the opening of the front arch
7. Push the door frame into the arch while the
cement is still wet and drop the locking pin
into position
8. Thread the nut onto the pin 9. Put Heat Resistant Silicone around
the top of the vent before dropping the
ue into position
Pompeii Oven Assembly
Copyright © 2011 All rights reserved - 7 -
VITCAS
R
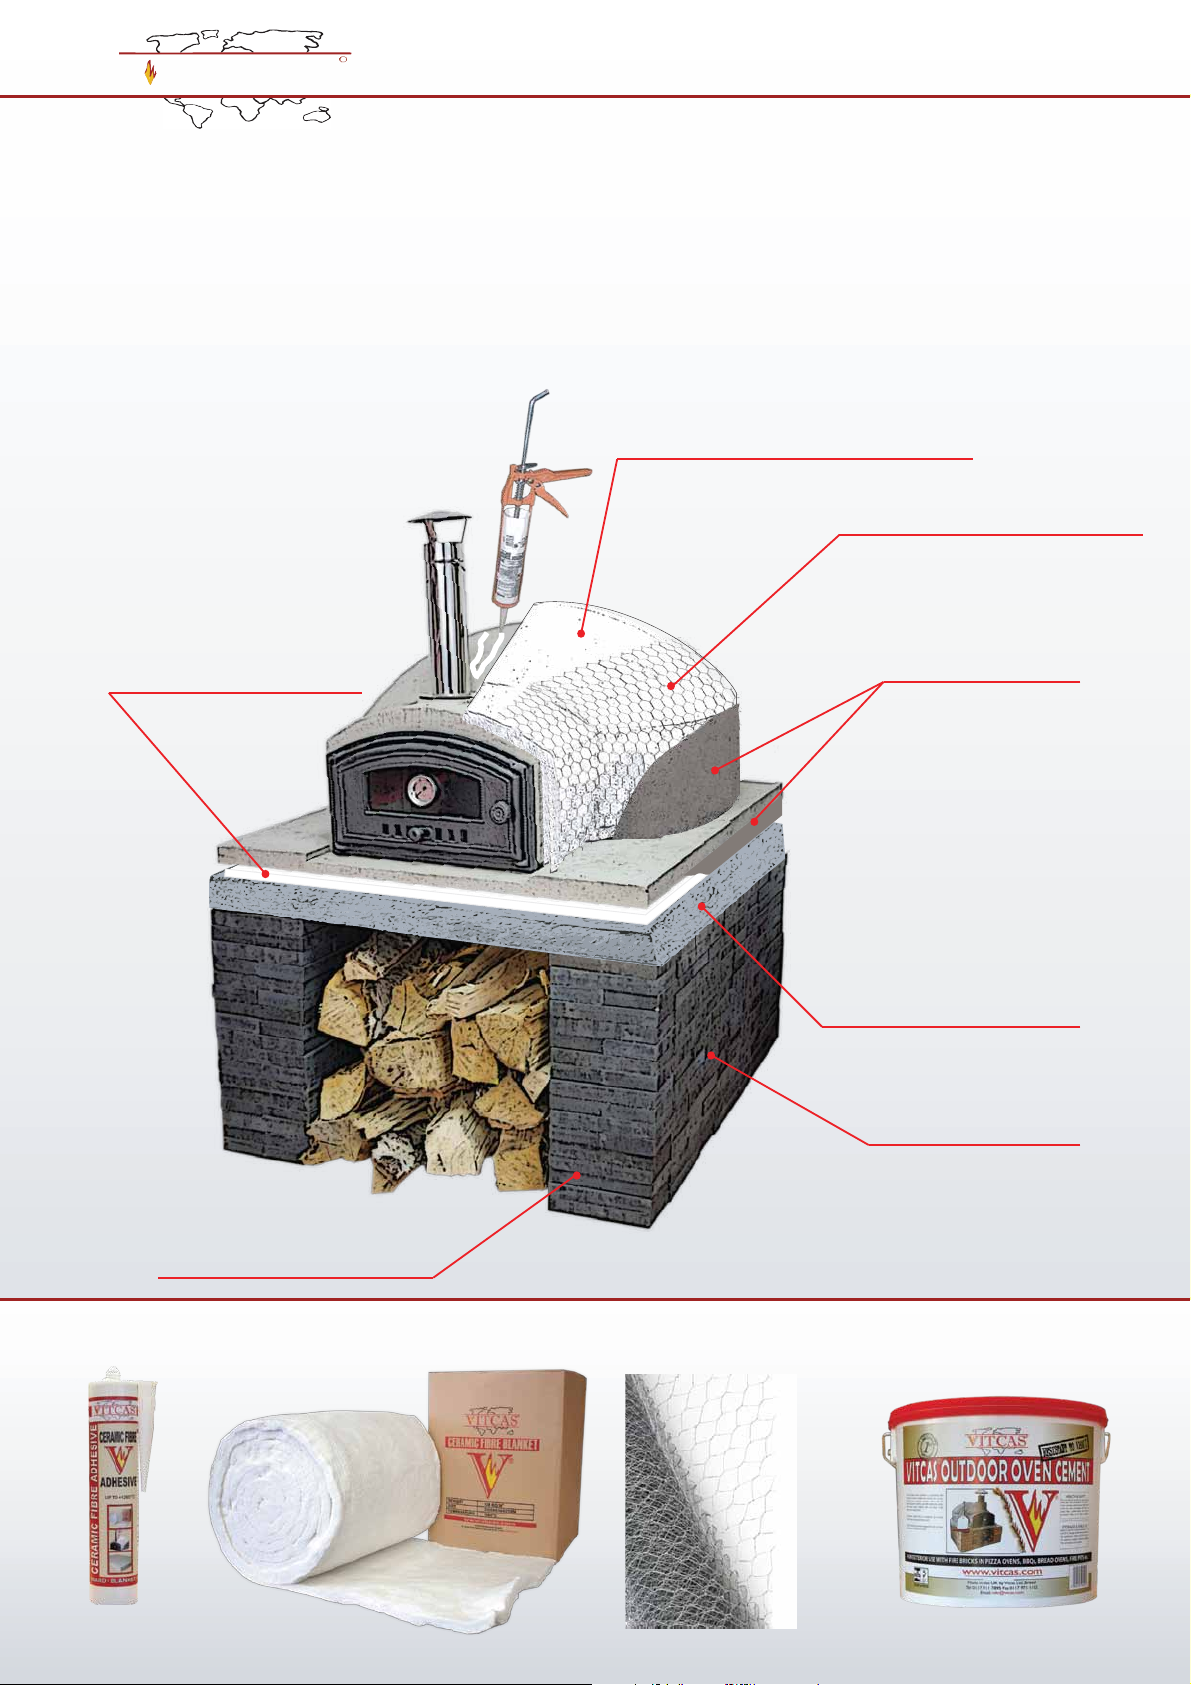
B2 – Insulation
Depending on your cooking methods (see section C) we recommend the installation of insulation. If you have ordered these
materials then you should proceed as follows:
After installing the oven as described in B1, the oven should be fired as per C-1 ‘Slow Burning’ at least twice to drive out the
moisture from the sections. Then the ceramic fibre should be applied over the sides and onto the back of the oven. It is held in
place with the wire mesh. It may be easier to put some thin wire additionally all around the oven and cut this off at the front later.
Then the oven can be rendered over onto the wire mesh using Outdoor Oven Cement to seal and weatherproof this insulation
layer. Finally the oven can be painted or customised – this is optional.
Vitcas® Chicken Wire Mesh
Vitcas® Outdoor
Oven Cement
Vitcas® Outdoor
Oven Cement
Vitcas® Ceramic Fibre Blanket
Vitcas®
Ceramic Fibre Adhesive
Vitcas® Insulation
Concrete Plinth
Vitcas® Firebricks or
Colored Firebricks
Vitcas® Ceramic
Fibre Blanket or Board
Copyright © 2011 All rights reserved
Vitcas®
Ceramic
Fibre Adhesive
Vitcas® Outdoor
Oven Cement
Vitcas® Ceramic
Fibre Blanket
Vitcas® Chicken
Wire Mesh
- 8 -

VITCAS
R
The recommended fuel is Kiln Dried Hardwood which is available from VITCAS. At the start some newspaper and a supply of
kindling (sticks) will also be required. The fire should be laid in the centre of the oven. The first step is to put some crumpled
newspaper and a firelighter in the centre. The second step is to build the kindling sticks over this as shown in the pictures.
Starting the Fire.
C. Pointers In Using The Oven
When you have positioned your oven in its proper place then you are ready to use it for cooking. The following are precautionary
measures and principles to follow in its usage.
REFRAIN from using flammable liquids or treated wood to fuel your oven.
REFRAIN from covering the entrance of the oven.
AVOID placing combustible materials within 900 mm from the edges of the oven.
AVOID overfilling the oven with wooden fuel.
REFRAIN from using wire or steel brushes, and charcoal in the oven.
AVOID contact by bare skin with the hot surfaces.
MAKE SURE minimum clearances of the oven are strictly followed.
MAKE SURE to use only untreated wood, organic lighters or newspaper.
ALWAYS wear protective clothing and use only prescribed tools.
ALWAYS dispose of oven ashes properly.
SEE TO IT that children and pets are kept at a safe distance from the oven.
ALWAYS check the oven for conspicuous defects before using it.
CAUTION ON ITS HOT SURFACE
It is important to take extra caution as the oven reaches extreme temperatures of up to 500 degrees Celsius both inside and
outside of the oven. Make sure to use only the correct tools and implements for the duration of the operation. Always wear gloves
and other protective clothing, including secured footwear. Take caution from wayward embers and sparks.
Copyright © 2011 All rights reserved - 9 -

Method 2
This method is most suitable for bread and slow cooked items which will suffer from too high a temperature and in this case will
not be properly ‘cooked through’. After achieving the established fire with glowing embers – allow the fire to burn almost away
and then pull the remains of the fire out of the oven. The initial temperature of the oven must be higher than the cooking
temperature because when the food is placed the temperature will drop. Then place the food to be cooked and seal the door
and chimney as much as possible to retain the heat for the cooking process. In this case the oven will benefit from the
recommeded insulation earlier described.
C-1. Slow Burning
During the autumn or winter periods and when the oven is first
fired, slow and steady start-up fires are required. A fire log may
be purchased from stores and suppliers in this regard. The use
of a fire log gives steady and stable fire, and should be done in
30 minutes, before reverting to the regular firing sequence of
the oven. When the oven is first fired it will not achieve its maximum
temperature because some of the heat will be used to drive out residual
water from the manufacturing process.
C-2. Proper Ash Disposal
Remember that ashes from your oven are considered as fire risks up to 24 hours from firing even when your oven appears to
have cooled down. Make sure that the oven is cooled down before removing the ashes using the correct tool and placing it in
a metal bin with fire resistant cover and keeping it away from combustible materials and items.
C-3. Implements
It is important to use only the correct and appropriate implements to
operate your oven safely and appropriately. VITCAS provides all the
necessary tools in this regard.
VITCAS
R
The next step is to light the newspaper.
The third step is to generate the fire with constant placing of kindling wood, making sure that the oven is not overfilled. You
would know that there is overfilling when the flames are going out of the oven opening. When this happens, simply wait for the
fire to subside before using the oven. Under no circumstances should you attempt to displace the burning material from the
oven. Simply combine crumpled newspaper with the cut kindling wood, light up the newspaper and let the fire develop and
grow into size.
The aim is to achieve an established fire with a hot base of glowing embers and then larger size pieces of wood can be added.
If the hardwood is supplied as quarter round it will be beneficial to split these sections down into two with an axe.
At this point there are two methods of cooking:
Method 1
This method is most effective for pizzas where the higher the temperature, the shorter the cooking time is. Push the fire to the
back and the sides of the oven. At this point there will be a marked increase in temperature from the action of disturbing the
fire. Place the food to be cooked in the centre of the oven. Utmost care should be taken when placing and removing the food
within the oven. You should move the embers to the side to give way to the cooking surface where the food is to be placed.
Remember to always rotate the food while in the oven in order to avoid burning and to ensure even cooking of the food. The
integral thermometer is used to decide when the right cooking temperature has been established. The final step is to time the
cooking of the food, depending on the dishes to be prepared, and leave the fire to dissipate. Remember to dispose of the ashes
properly (C-2. Proper Ash Disposal).
Copyright © 2011 All rights reserved - 10 -

D-1. Different Wood-Fired Cooking
Besides preparing pizza selections, which is the top-of-the-line offering of your oven, you would be able to try out different
international dishes and food creations which extend with your imagination.
The oven is easy to use and it features a self-clean characteristic which enables you to cut back on food cleaning and washing
time and effort.
You can have multitudes of choices from roast dinners of beef, pork, chicken, lamb and duck, and different recipes from fish
and other seafood selections. You can cook up your favorite vegetable dishes and casseroles, and bake sweet desserts to
satisfy your discerning taste.
An assortment of bread and dried fruit preparations can also be made with your oven. Keep updated with unique and delicious
recipes from our website.
E. Fire Protection
It is advised to always keep a water fire extinguisher, with at least 9 liters capacity and a bucket of sand ready nearby the oven
area to address any incidence of fire from use of the oven. Although the fire extinguisher may be adequate to stop a fire, the
use of sand to choke the fire may be more practical.
In order to meet International Safety Standards, it is recommended that the person designated to put out the fire should be
properly trained in fire safety by qualified experts.
F. The 1993 Clean Air Act
Outdoor ovens are exempt from the act as long as they are not part of the building in a smoke restricted area. Obviously if you
are not in a smoke restricted area then it is legal to use your oven.
VITCAS
R
C-4. Caution On The Oven Door
EXTRA CARE SHOULD BE TAKEN with the hot surfaces of the oven and the correct
gloves must be used.
With your purchase of the oven comes a metal door, which makes your operation more
flexible and makes you conserve heat for cooking for longer durations. This is ideal for cooking
roasts, casseroles and other specialty dishes. The air flow can be controlled on the Casa
models by the placement of the free standing door and on the Pompeii model by the integral
sliding vent.
When operating your oven, make sure NOT TO TOUCH THE METAL SURFACES and make
sure to use fire resistant gloves when taking on the wooden handles. The item should be
positioned on a fire resistive surface and must be kept away from children and pets.
D. Starting To Cook
With the set-up and firing of your oven ready, you can already begin cooking different delectable
dishes and VITCAS has an array of recipes to suit your taste buds. You can look over different
menus and cooking suggestions on our website.
Copyright © 2011 All rights reserved - 11 -
VITCAS
R
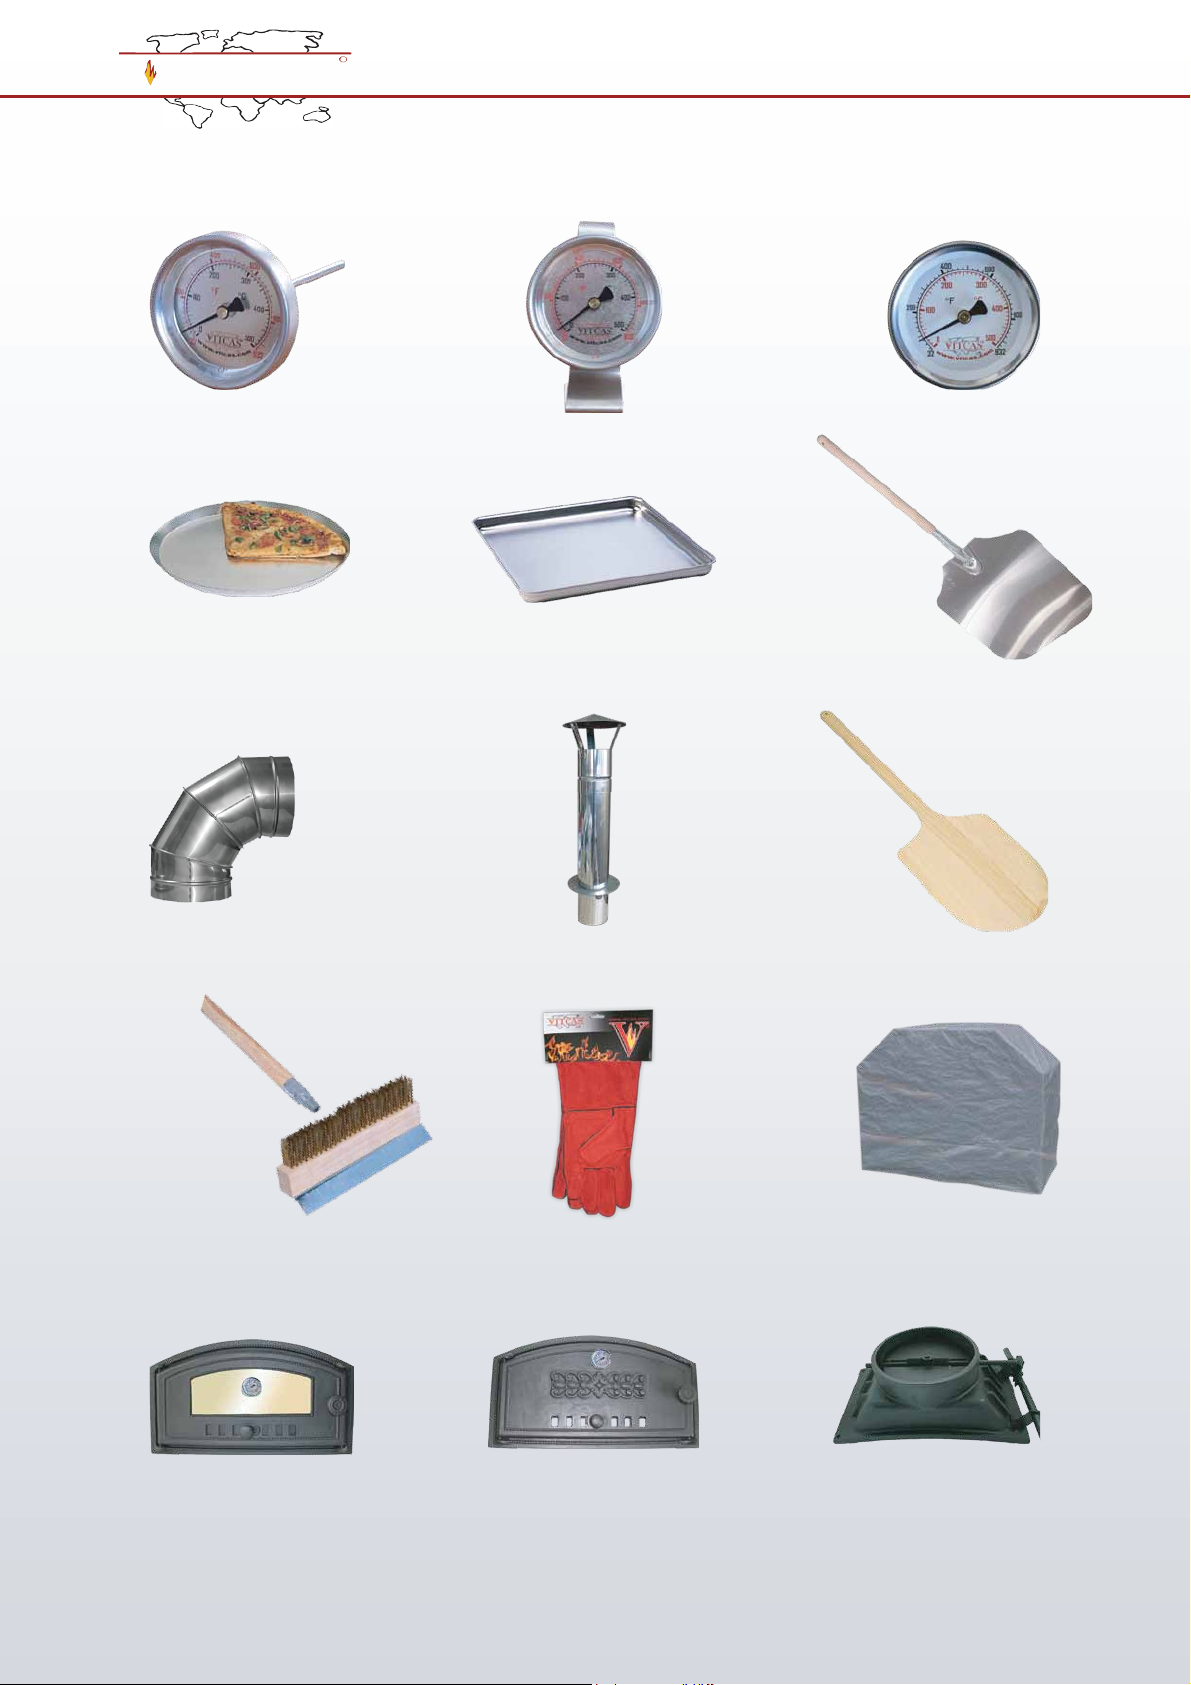
Copyright © 2011 All rights reserved
Pizza & Bread Oven Door with Heat
Resistant Glass & Thermometer 500oC
Chimney/Flue damper for building
into traditional pizza & bread oven
Pizza & Bread Oven Door with
Thermometer 500oC
Pizza Oven-Square Pan 10"
Metal Chimney Cowl
Vitcas®Outdoor Oven
Protective Cover
Pizza Oven Brush/Scraper-Vitcas®
Wooden Pizza Oven Peel-Vitcas®
Stainless Steel Parts
Vitcas®Heat Resistant Gloves
for Pizza Oven, Stoves, Fires, BBQ
Pizza-Bread Oven Peel
Pizza Oven Tapered Pan
Pizza-Bread Oven
Thermometer
Vitcas®Pizza-Bread Oven
Probe Thermometer Oven Freestanding
Thermometer
Accessories
8 Bonville Road Brislington, Bristol BS4 5NZ United Kingdom
Tel: +44 117 911 7895 Fax: +44 117 971 1152
email:[email protected]
www.vitcas.com
- 12 -
This manual suits for next models
2
Popular Oven manuals by other brands


Arctic
Arctic AM 5512 DTTL operating instructions

FWE
FWE LCH-G2 Series operating instructions

Panasonic
Panasonic NB-G110PW operating instructions

Bosch
Bosch Divar 700 Series use and care manual

Electrolux
Electrolux EW30EW55G - 30 in. Single Wall Oven specification

Fisher & Paykel
Fisher & Paykel OB76S installation guide