GE JTS10 User manual

OGEAppliances.com
U
o
LP
(b
LLJ
|
4-P
Safety Instructions ........ 2-4
Operating Instructions
Clock and Timer ................. 9
Controls ...................... 5,6
Oven ......................... 7,8
Sabbath Feature ............... 13
Special Features ............... 12
Thermostat .................... 11
Timed Bakingand Roasting...... 10
Care and Cleaning
Aluminum Foil................... 8
Control Panel .................. 14
Lift-Off Oven Door.............. 15
Light Bulb...................... 16
Packaging Tape ................ 14
Painted Surfaces ............... 14
Porcelain Oven Interior ......... 14
Racks.......................... 14
Troubleshooting Tips.. 17, 18
Accessories ................. 19
Consumer Support
consumer support ............. 22
warranty ...................... 21
..IKS1O- 27" Single Wall Oven
..ITSIO- 30" Single Wall Oven
Write the model and serial
numbers here:
Model #
Serial #
you can find them on a label on
the side trim or on the front of the
oven behind the oven door. 49-80645 ii-iiGE

IMPORTANT SAFETY INFORMATION.
READ ALL INSTRUCTIONS BEFORE USING.
WARNING!
Foryour safety, the information in this manual must be followed to minimize the risk of fire or explosion,
electric shock, or to prevent property damage, personal injury, or loss of life.
SAFETYPRECAUTIONS
When using electrical appliances, basic safety precautions should be followed, including the
following:
Use this appliance only for its intended purpose
as described in this Owner's Manual.
iiiiiiiiiiii_iiii
Be sure your appliance is properly installed
and grounded by a qualified technician in
accordance with the provided installation
instructions.
iiiiiiiiiiii_iiii
iiiiiiiiiiii_iiii
Do not attempt to repair or replace any part of
your oven unless it is specifically recommended
in this manual. All other servicing should be
referred to a qualified technician.
Have the installer show you the location of
the circuit breaker or fuse. Hark it for easy
reference.
iiiiiiiiiiii_iiii
iiiiiiiiiiii_iiii
iiiiiiiiiiii_iiii
Before performing any service, disconnect
the oven power supply at the household
distribution panel by removing the fuse or
switching off the circuit breaker.
Do not leave children alone-children should
not be left alone or unattended in an area
where an appliance is in use. They should never
be allowed to sit or stand on any part of the
appliance.
Do not allow anyone to climb, stand or hang
on the door. They could damage the oven, or
cause severe personal injury.

GEAppliances.com
SAFETYPRECAUTIONS
Be sure the oven is securely installed in a
cabinet that isfirmly attached to the house
structure. Never allow anyone to climb, sit,
stand or hang on the oven door.
iiiiiiiiiiii_i;i
iiiiiiiiiiii_i;i
iiiiiiiiiiii_i;i
iiiiiiiiiiii_i;i
iiiiiiiiiiii_i;i
iiiiiiiiiiii_i;i
iiiiiiiiiiii_i;i
iiiiiiiiiiii_i;i
Never leave the oven door open when you are
not watching the oven.
Always keep combustible wall coverings,
curtains or drapes a safe distance from your
oven.
Always keep dish towels, dish cloths, pot
holders and other linens a safe distance from
your oven.
Always keep wooden and plastic utensils and
canned food a safe distance away from your
oven.
Teach children not to play with the controls or
any other part of the oven.
Large scratches or impacts to glass doors can
lead to broken or shattered glass.
Do not store flammable materials in an oven.
ACAUT_ON: Items of interest to
children should not be stored in cabinets above
an oven; children climbing on the oven to reach
items could be seriously injured.
iiiiiiiiiiii_i;i
iiiiiiiiiiii_i;i
iiiiiiiiiiii_i;i
iiiiiiiiiiii_i;i
iiiiiiiiiiii_i;i
Never wear loose-fitting or hanging garments
while using the appliance. Be careful when
reaching for items stored in cabinets over the
oven. Flammable material could be ignited if
brought in contact with hot surfaces or heating
elements and may cause severe burns.
Use only dry pot holders-moist or damp pot
holders on hot surfaces may result in burns
from steam. Do not let pot holders touch hot
heating elements. Do not use a towel or other
bulky cloth.
Foryour safety, never use your appliance for
warming or heating the room.
Do not let cooking grease or other flammable
materials accumulate in or near the oven.
Do not use water on grease fires. Never pick up
a flaming pan. Turn the controls off.
Flame in the oven can be smothered
completely by closing the oven door and
turning the oven off or by using a multi-
purpose dry chemical or foam-type fire
extinguisher.
Do not store or use combustible materials,
gasoline or other flammable vapors and liquids
in the vicinity of this or any other appliance.

IMPORTANT SAFETY INFORMATION.
READ ALL INSTRUCTIONS BEFORE USING.
AWARNING!
COOK MEAT AND POULTRYTHOROUGHLY...
Cook meat and poultry thoroughly-meat to at least an INTERNALtemperature of l60°F and poultry
to at least an INTERNALtemperature of l80°K Cooking to these temperatures usually protects against
foodbome illness.
SAFETYPRECAUTIONS
iiiiiiiiiiii_iiii
Do not touch the heating elements or the
interior surface of the oven. These surfaces
may be hot enough to burn even though they
are dark in color. During and after use, do
not touch, or let clothing or other flammable
materials contact any interior area of the oven;
allow sufficient time for cooling first.
Potentially hot surfaces include oven vent
openings, surfaces near the openings, crevices
around the oven door, the edges of the window
and metal trim parts above the door.
REMEMBER: The inside surface of the oven
may be hot when the door is opened.
iiiiiiiiiiii_iiii
iiiiiiiiiiii_iiii
iiiililililililililililili
Never place cooking utensils or any other items
on the oven floor. There is a heating element
beneath the oven floor. Placing items on the
oven floor may cause the oven to overheat,
resulting in damage to the oven and risk of
damage or fire to cabinets.
Stand away from the oven when opening the
oven door. Hot air or steam which escapes can
cause burns to hands, face and/or eyes.
Do not heat unopened food containers.
Pressure could build up and the container
could burst, causing an injury.
Keep the oven vent unobstructed.
Keep the oven free from grease buildup.
iiiiiiiiiiii_iiii
iiiiiiiiiiii_iiii
iiiiiiiiiiii_iiii
Place the oven rack in the desired position
while the oven is cool. If racks must be handled
when hot, do not let pot holder contact the
heating elements.
When using cooking or roasting bags in the
oven, follow the manufacturer's directions.
Pulling out the rack to the stop-lock is a
convenience in lifting heavy foods. It is also a
precaution against burns from touching hot
surfaces of the door or oven walls.
Do not use the oven to dry newspapers. If
overheated, they can catch on fire.
Do not use the oven for a storage area. Items
stored in an oven can ignite.
Do not leave paper products, cooking utensils
or food in the oven when not in use.
After broiling, always take any broiler pan out
of the oven and clean it. Leftover grease in a
broiler pan can catch fire next time you use the
pan.
Never leavejars or cans of fat drippings in or
near your oven.
Clean only parts listed in this Owner's Manual.
Do not use aluminum foil to line the oven
bottom. Foil can trap heat or melt, resulting
in damage to the product and a shock or fire
hazard.
READAND FOLLOWTHISSAFETYINFORMATIONCAREFULLY.
SAVETHESEINSTRUCTIONS

Usingthe oven controls.
Throughout this manual, features and appearance may vary from your model.
GEAppliances.com
OVEN CONTROLS
AUTOMATIC OVEN
Oven Control, Clock and Timer Features and Settings
BAKE/TEMPRECALLPad
Pressthis pad to selectthe bakefunction.
BAKE Light
Flasheswhile in editmode-you can changethe
oventemperatureat this point.Glowswhenthe
ovenisin bakemode.
START/ONPad
Mustbe pressedto start anycookingfunction.
Display
Showsthe time of day, oventemperature, whether
the oven isin the bake or broil mode and the times
set for the timer or automatic oven operations.
Thedisplay will show "PrE"while preheating.When
the oven reaches the selected temperature, the
oven control will beep and the display will show
the oven temperature.
If "F-" and a number or letter flash in the display and
the oven control signals, this indicates a function error
code. Press the CLEAR/OFF pad. Allow the oven to cool
for one hour. Put the oven back into operation. If the
function error code repeats, disconnect the power to
the range and call for service.
Ifyour oven was set for a timed oven operation and a
power outage occurred, the clock and all programmed
functions must be reset.
The time of day will flash in the displuy when there has
been a power outage. Reset the clock.
KITCHENTIMERON/OFF Pad
Touch this pad to selectthe timer feature. Then
press+and - padsto adjust time.
TIHER Light
Flasheswhile in editmode-you can changetheset
time atthis point.Glowswhen thetimer hasbeen
activated.Flashesagain whenthe time hasrun out
until the control isreset.
CLOCKPad
Toset the clock,press this pad twice and then
pressthe + and - pads.Thetime of day will flash in
the display when the oven
isfirst turned on.
DELAYSTARTPad
Usealong with the COOKINGTIMEpad to set the
oven to start and stop automatically at a time you
set.
DELAYSTARTTime Light
Flasheswhile in editmode-you can changethe
delaystart settime at this point.Glowswhen the
function hasbeen activated.
COOKING TIMEPad
Pressthis pad and then touch the + or - pads to
set the amount of time you want your food to
cook.The ovenwill shut off when the cooking time
hasrun out.
COOKINGTIMELight
Flasheswhile in editmode-you can changetheset
time atthis point.Glowswhen thefunction hasbeen
activated.Flashesagain whenthe time hasrun out
until the control isreset.

Using the ovencontrols.
OvenControl,Clockand TimerFeaturesand Settings
AUTOMATIC OVENLight
Thislights anytime the oven has been
programmed using the COOKINGTIMEor DELAY
STARTfunctions.
-Pad
Shorttaps to this pad will decrease the time or
temperature bysmall amounts. Pressand hold
the pad to decrease the time or temperature by
larger amounts.
+Pad
Shorttaps to this pad will increasethe time or
temperature bysmall amounts. Pressand hold
the pad to increase the time or temperature by
larger amounts.
CLEAR/OFFPad
Pressthis pad to cancel ALL oven operations
except the clock and timer.
BROIL HI/LO Pad
Pressthis pad to selectthe broil function.
BROILLight
Flasheswhile in editmode-you canswitch from HI
to LOBROILat this point.Glowswhenthe ovenisin
broilmode.
Indicator Lights (on some pads)
EDITmode lastsseveralsecondsafter the
lastpad press.DELAYSTARTON/OFFand
COOKINGTIPIEON/OFFwill bethe only padslit
ifeitherofthese options isselected.(Example:
DELAYSTARTisselectedwith BAKE-the DELAY
STARTpadwill remainlit untiltheclock reachesthe
programmedtime, atwhich point itwillturn off and
the BAKE/TEPIPRECALLpad lightwill light up).
Power Outege
If a flashing time isin the display,you have
experienced a power failure. Resetthe clock. Toreset the clock, pressthe CLOCKpad. Enter
the correct time of day by pressing the + or -
pads. Pressthe START/ONpad.

Using the oven. GEAppliances.com
To avoid possible burns, place
t.....
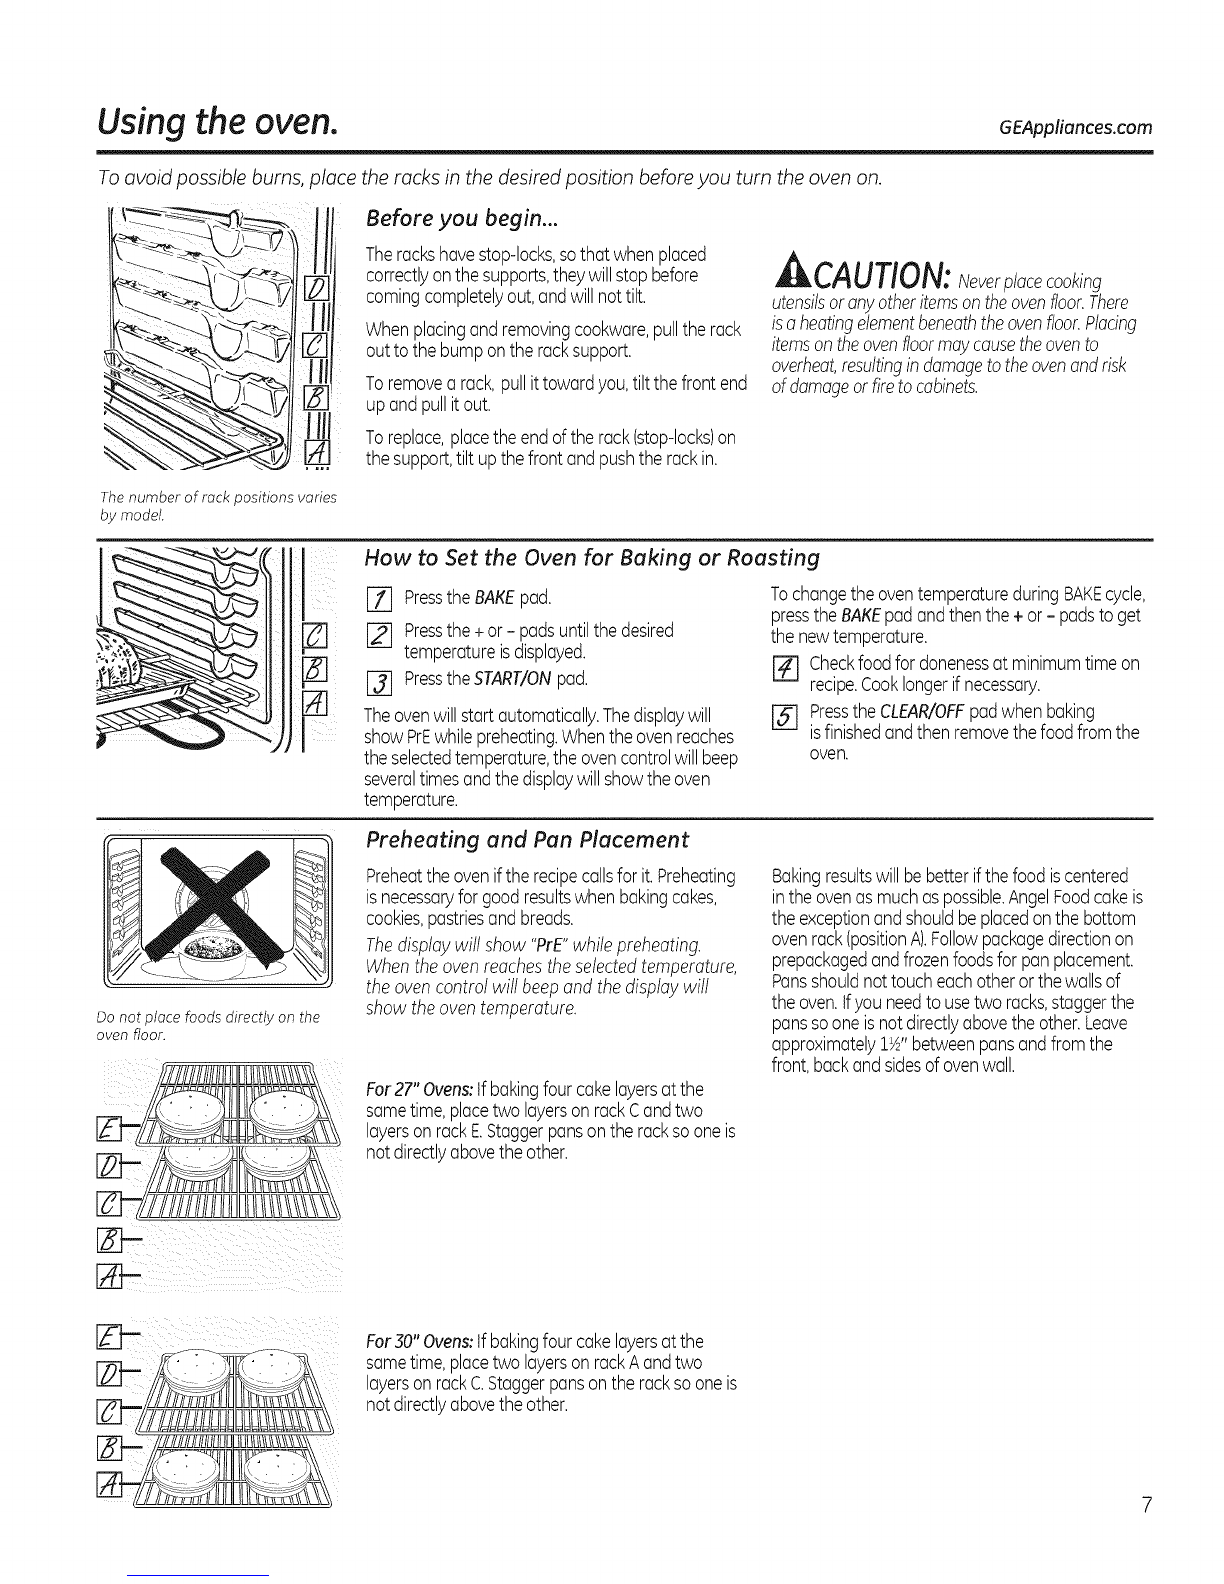
The number of rack positions varies
by model.
the racks in the desired position before you turn the oven on.
Before you begin...
Therackshavestop-locks,sothat whenplaced
correctlyonthesupports,theywillstopbefore
comingcompletelyout,andwillnottilt.
Whenplacingand removingcookware,pulltherack
outto thebumponthe racksupport.
Toremovea rack,pullittowardyou,tiltthefront end
upandpullitout.
Toreplace,placetheendoftherack(stop-locks)on
thesupport,tilt upthefrontandpushtherackin.
CAUTION: NeverUacecooking
utensilsoranyotheritemson theovenfloor.There
isaheatingelementbeneaththeovenfloor.Placing
itemsontheovenfloormaycausetheovento
overheat,resultingindamagetotheovenandrisk
ofdamageorfiretocabinets.
Do not place foods direct? on the
oven floor.
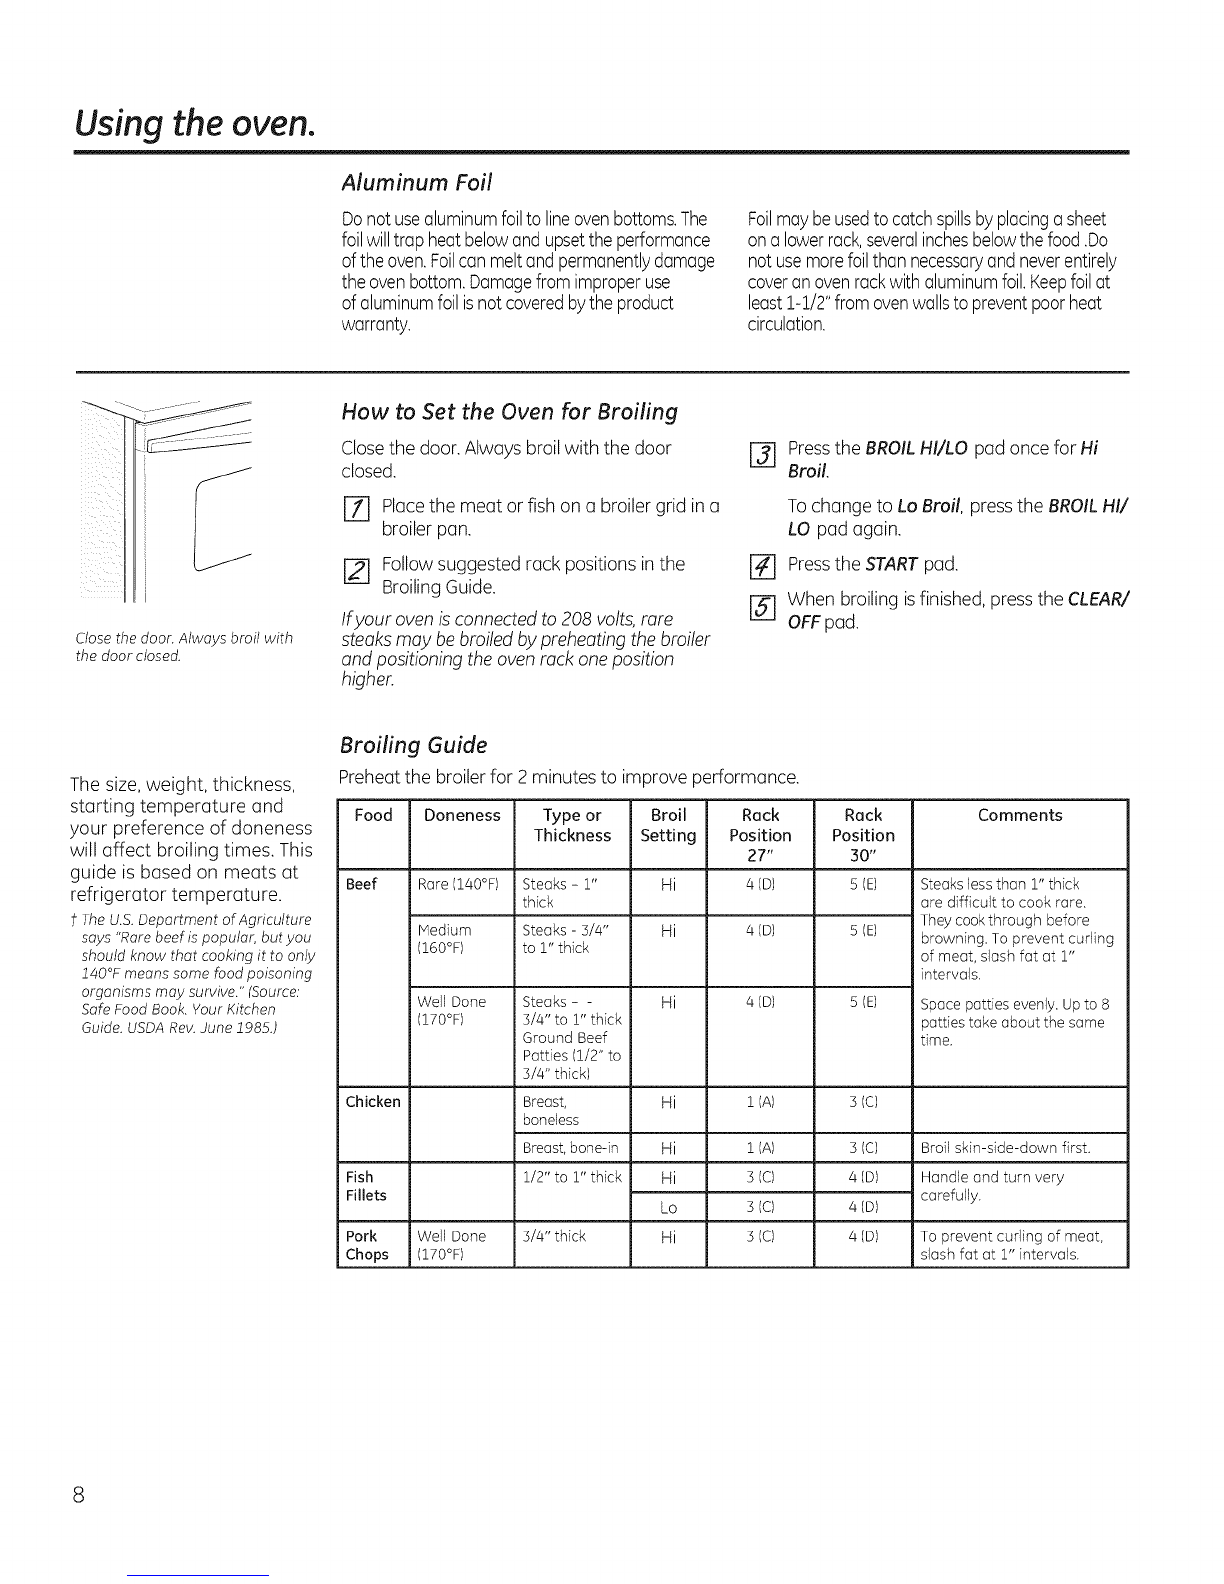
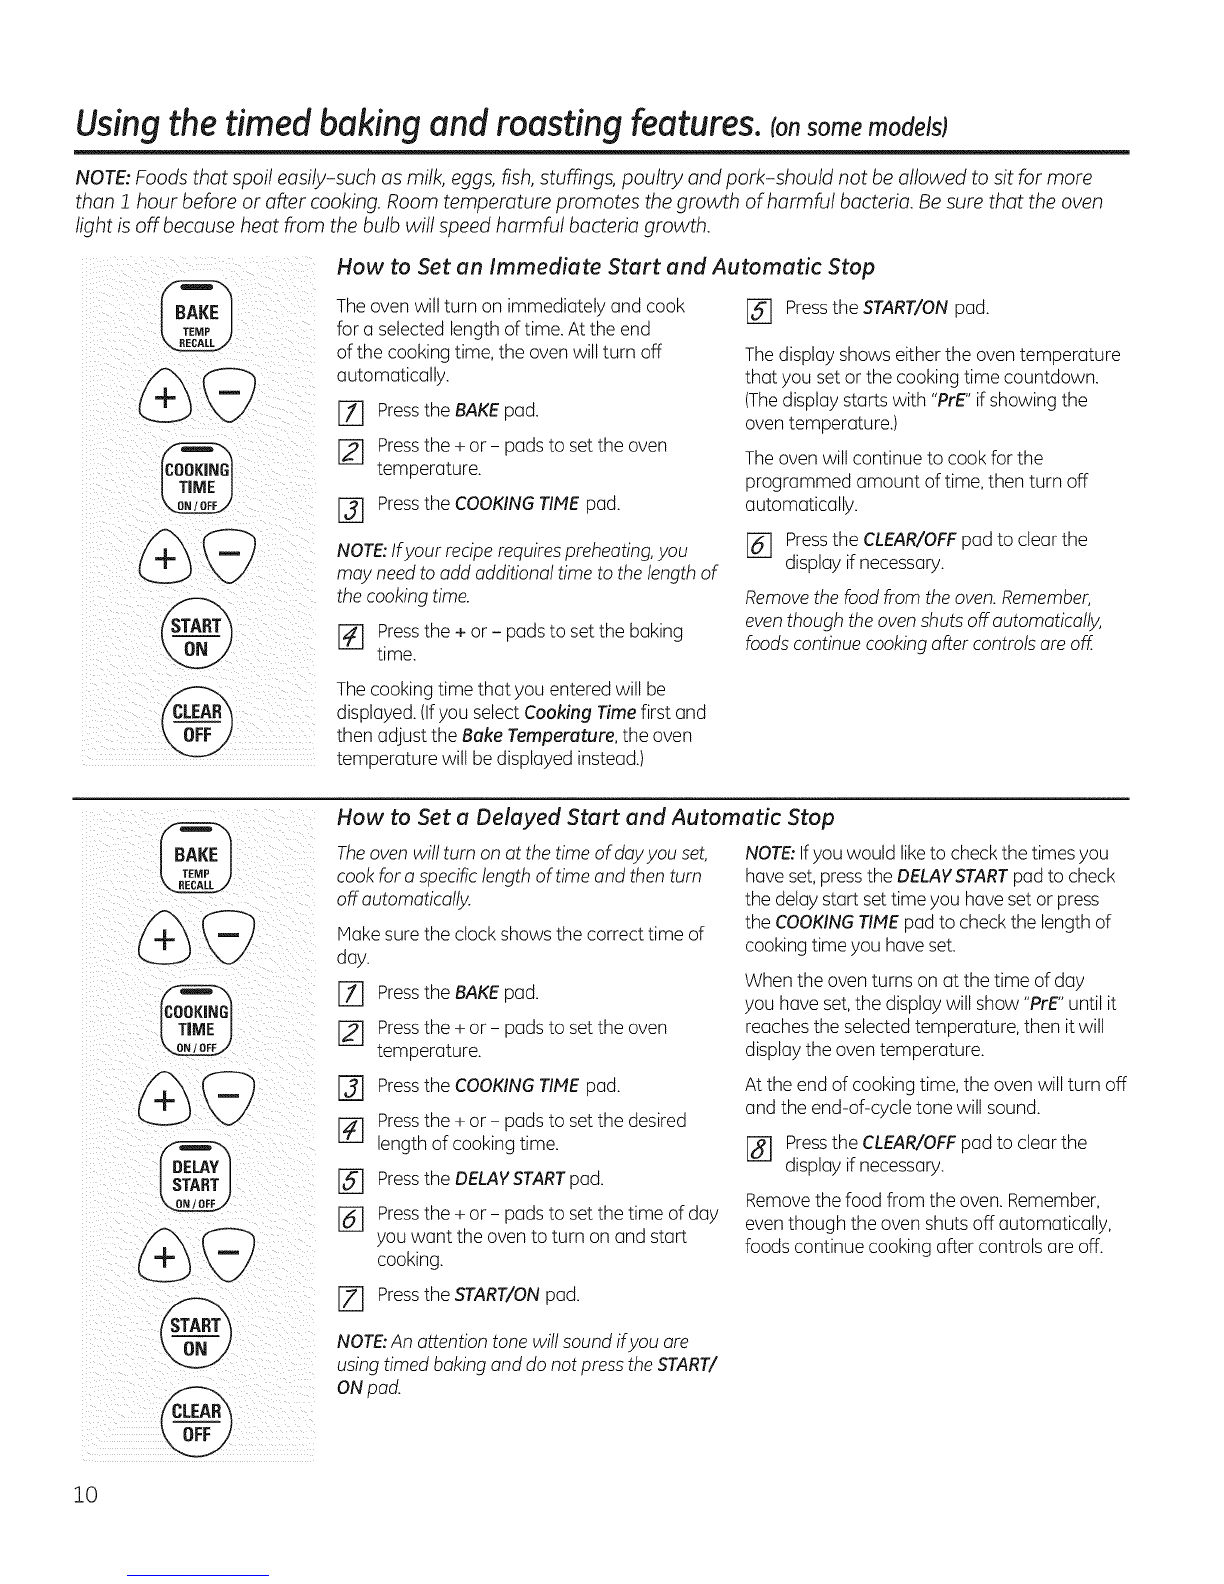
How to Set the Oven for Baking or Roasting
[Z] PresstheBAKEpad.
Pressthe+or - padsuntilthedesired
temperatureisdisplayed.
E_ PresstheSTART/ONpad.
Theovenwillstartautomatically.Thedisplaywill
showPrEwhilepreheating.Whentheovenreaches
theselectedtemperature,theovencontrolwillbeep
severaltimesandthedisplaywillshowtheoven
temperature.
TochangetheoventemperatureduringBAKEcycle,
presstheBAKEpadandthenthe+or- padstoget
thenewtemperature.
Checkfoodfordonenessatminimumtimeon
recipe.Cooklongerif necessary.
r_ presstheCLEAR/OFFpadwhenbaking
isfinishedandthenremovethefoodfromthe
oven.
Preheating and Pan Placement
Preheattheoveniftherecipecallsforit.Preheating
isnecessaryfor goodresultswhenbakingcakes,
cookies,pastriesandbreads.
Thedisplaywill show "PrE"whilepreheating.
Whentheovenreachestheselectedtemperature,
theovencontrol will beepand thedisplaywill
show theoventemperature.
For27"Ovens:if bakingfourcakelayersatthe
sametime,placetwo layerson rackCandtwo
layerson rackE.Staggerpansontheracksooneis
notdirectlyabovetheother.
Bakingresultswillbebetterifthefoodiscentered
intheovenasmuchaspossible.AngelFoodcakeis
theexceptionandshouldbeplacedonthebottom
ovenrack(positionA).Followpackagedirectionon
prepackagedandfrozenfoodsforpanplacement.
Pansshouldnottoucheachotherorthewallsof
theoven.tfyou needto usetwo racks,staggerthe
panssooneisnotdirectlyabovetheother.Leave
approximately1½"betweenpansandfromthe
front,backandsidesofovenwall.
EY- For30"Ovens:if bakingfourcakelayersatthe
sametime,placetwo layerson rackAandtwo
layerson rackC.Staggerpansontheracksooneis
notdirectlyabovetheother.

Usingthe oven.
Aluminum Foil
Donotusealuminumfoiltolineovenbottoms.The
foilwilltrap heatbelowandupsettheperformance
oftheoven.Foilcanmeltandpermanentlydamage
theovenbottom.Damagefrom improperuse
ofaluminumfoilisnotcoveredbytheproduct
warranty.
Foilmaybeusedtocatchspillsbyplacinga sheet
on a lowerrack,severalinchesbelowthefood.Do
notusemorefoilthannecessaryandneverentirely
coveran ovenrackwith aluminumfoil.Keepfoilat
least1-Z/2"fromovenwallsto preventpoorheat
circulation.
I
Close the door. Always broil with
the door closed.
How to Set the Oven for Broiling
Closethe door.Always broil with the door
closed.
r_ Placethe meat or fish on a broiler grid in a
broiler pan.
r_ Followsuggested rack positions in the
BroilingGuide.
Ifyour oven isconnectedto 208 volts,rare
steaks may bebroiled by preheating the broiler
and positioning the oven rack one position
higher.
[] Pressthe BROILHI/LO pad once for Hi
Broil.
Tochange to Lo Broil, pressthe BROILHI/
LO pad again.
r_ Pressthe STARTpad.
[] When broiling isfinished, pressthe CLEAR/
OFFpad.
The size,weight, thickness,
starting temperature and
your preference of doneness
will affect broiling times. This
guide is based on meats at
refrigerator temperature.
fThe U.S.Department of Agriculture
says "Rarebeef ispopular, but you
should know that cooking it to only
:]_40°Fmeans some food poisoning
organisms may survive." (Source:
Safe Food Book. Your Kitchen
Guide. USDA Rev. June :]_985.)
Broiling Guide
Preheatthe broiler for 2 minutes to improve performance.
Food Doneness
Beef Rare (140%)
Chicken
Fish
Fillets
Medium
(160%)
Well Done
(170%)
Pork Well Done
Chops (170°F)
Type or Broil Rack
Thickness Setting Position
27"
Steaks - Z" Hi 4 (D)
thick
Steaks - 3/4" Hi 4 (D)
to 1" thick
Steaks - -
3/4" to 1" thick
Ground Beef
Patties (1/2" to
3/4" thick)
Breast,
boneless
Breast,bone-in
1/2" to 1" thick
3/4" thick
Hi 4 (D)
Hi
Hi
Hi
Lo
Hi
1(A)
1(A)
3(c)
3(c)
3(c)
Rack
Position
30"
s (E)
S(E)
S(E)
3(C)
s(c)
4 (D)
4 (D)
4 (D)
Comments
Steaks less than 1" thick
are difficult to cook rare.
They cookthrough before
browning. To prevent curling
of meat, slash fat at1"
intervals.
Space patties evenly. Upto 8
patties take about the same
time.
Broil skin-side-down first.
Handle and turn very
carefully.
To prevent curling of meat,
slash fat at 1" intervals.

Using the clock and timer. GEAppliunces.com
Make sure the clock is set to the
correct time of day.
To Set the Clock
The clock must be set to the correct time of day
for the automatic oven timing functions to work
properly. Thetime of day cannot be changed
during a delayed cooking cycle.
[Z] Pressthe CLOCKpad twice.
[] Pressthe + or - pads.
Ifthe + or - pads are not pressedwithin one
minute after you pressthe CLOCKpad,the
display reverts to the original setting. If this
happens, press the CLOCKpad twice and
reenter the time of day.
[] Pressthe START/ONpad until the time of
day shows in the display.This enters the
time and starts the clock.
Tocheck the time of day when the display
isshowing other information, simply press
the CLOCKpad.Thetime of day shows until
another pad ispressed.
To Turn Off the Clock Display
Ifyou have severalclocks inyour kitchen,you
may wish to turn offthe time of day clock
display on your range.
[Z] Pressthe CLOCKpad onceto turn off the
time of day display.Although you will not
be able to see it,the clock maintains the
correct time of day.
Pressthe CLOCKpad twice to recallthe
clockdisplay.
The timer is a minute timer only.
The timer does not control oven
operations. The maximum setting
on the timer is 9hours and 59
minutes.
To Set the Timer
Thetimer doesnot control oven operations.
Themaximum setting on thetimer is9hours
and 59 minutes.
%
[] Pressthe KITCHENTIMERON/OFFpad.
Pressthe + or - pads until the amount of
time you want shows in the display.The
maximum time that can be entered in
minutes is59.Timesmore than 59
minutes should be changed to hours and
minutes.
Ifyou make a mistake,pressthe KITCHEN
TIMERON/OFFpad and begin again.
@Pressthe START/ONpad.Thetime will
start counting down, although the display
doesnot change until one minute has
passed.
%When the timer reaches :00, the control
will beep 3 times followed by one beep
every 6 seconds until the KITCHENTIMER
ON/OFFpad ispressed.
To Reset the Timer
Ifthe display isstill showing the time remaining,
you may change it by pressing the KITCHEN
TIMERON/OFF pad,then pressingthe + or -
pads untilthe time you want appears in the
display.
If the remaining time is not in the display (clock,
delaystart set time or cooking time are in the
display),recallthe remaining time by pressing
the KITCHENTIMERON/OFFpad and then
pressingthe +or - padsto enter the new time
you want.
To Cancel the Timer
Pressthe Kitchen Timer On/Off pad twice.

Using the timed baking and masting features. Ionsome modelsj
NOTE: Foods that spoil easily-such as milk, eggs, fish, stuffings, poultry and pork-should not be allowed to sit for more
than 1hour before or after cooking. Room temperature promotes the growth of harmful bacteria. Be sure that the oven
light is off because heat from the bulb will speed harmful bacteria growth.
How to Set an Immediate Start and Automatic Stop
Theoven will turn on immediately and cook [] Pressthe START/ONpad.
for a selected length of time.At the end
of the cooking time, the oven will turn off Thedisplay shows either the oven temperature
automatically.
[71 Pressthe BAKEpad.
[] Pressthe +or- pads to set the oven
temperature.
[] Pressthe COOKINGTIME pad.
NOTE:Ifyour reciperequirespreheating,you
may need to add additional time to the length of
the cooking time.
[] Pressthe + or - padsto set the baking
time.
that you set or the cooking time countdown.
(Thedisplay starts with "PrE"if showing the
oven temperature.)
Theoven will continue to cook for the
programmed amount of time,then turn off
automatically.
[] Pressthe CLEAR/OFFpad to clear the
display ifnecessary.
Removethe food from the oven.Remember,
eventhough theoven shutsoff automatically,
foods continue cooking after controlsare off.
Thecooking time that you entered will be
displayed.(Ifyou select Cooking Time first and
then adjust the Bake Temperature, the oven
temperature will be displayed instead.)
@
@
How to Set a Delayed Start and Automatic Stop
Theovenwill turn on at the time of dayyou set,
cook for a specificlength of time and then turn
off automatically.
Hake surethe clock showsthe correct time of
day.
I-_ Pressthe BAKEpad.
Pressthe +or - pads to set the oven
temperature.
[_ Pressthe COOKINGTIME pad.
Pressthe +or - pads to set the desired
length of cooking time.
Pressthe DELAYSTARTpad.
Pressthe +or - pads to set the time of day
you want the oven to turn on and start
cooking.
IZ] Pressthe START/ONpad.
NOTE:Ifyou would liketo checkthe times you
have set,pressthe DELAYSTARTpad to check
the delay start set time you haveset or press
the COOKINGTIlE pad to checkthe length of
cooking time you have set.
When the oven turns on at the time of day
you have set,the display will show "PrE" until it
reaches the selected temperature, then it will
display the oven temperature.
At the end of cooking time, the oven will turn off
and the end-of-cycle tone will sound.
[] Pressthe CLEAR/OFF pad to clear the
display if necessary.
Removethe food from the oven. Remember,
eventhough the oven shuts off automatically,
foods continue cooking after controls are off.
NOTE:An attention tone will sound ifyou are
using timed baking and do not pressthe START/
ONpad.
10

Adjust the oven thermostat--Do it yourselfl GEApplionces.com
You may find that your new oven cooks differently than the one it replaced. Useyour new oven for afew
weeks to become more familiar with it. Ifyou still think your new oven is too hot or too cold, you can adjust the thermostat
yourself.
Do not use thermometers, such as those found in grocery stores, to check the temperature setting of your
oven. These thermometers may vary 20-40 degrees.
NOTE: This adjustment will only affect baking and roasting temperatures; it does not affect the broiling temperature. The
adjustment will be retained in memory after a power failure.
%
dbg?
To Adjust the Thermostat
r-_ Press the BAKE and BROIL HI/LO pads at []
the same time for 3 seconds until the
display shows SF.
[] Pressthe BAKEpad.A two-digit number
shows in the display.
[] Theoventemperature can be adjusted up
to (+)35°F hotter
or (-)35°Fcooler.Tap the + pad to
increase the temperature in !-degree
increments.Tap the - pad to decrease the
temperature in !-degree increments.
When you have made the adjustment,
pressthe START/ONpad to go back to
the time of day display.Useyour oven as
you would normally.
The type of margarine will affect baking performance!
Most recipes for baking have been developed using high fat products such as butter or margarine (80% fat). If you
decrease the fat, the recipe may not give the same results as with a higher fat product.
Recipe failure can result if cakes, pies, pastries, cookies or candies are made with low fat spreads. The lower the fat
content of a spread product, the more noticeable these differences become.
Federalstandards require products labeled "margarine" to contain at least 80% fat byweight. Low fat spreads,on the other hand,
contain lessfat and more water. The high moisture content of these spreads affects the texture and flavor of bakedgoods. Forbest
resultswith your old favorite recipes,use margarine, butter or stick spreads containing at least 70% vegetable oil.
11

Special features ofyour ovencontrol.
Your new touch pad control has additional features that you may choose to use. The following are the features and how
you may activate them.
The special feature modes can only be activated while the display is showing the time of day. They remain in the control's
memory until the steps are repeated.
When the display shows your choice, press the START/ON pad. The special features will remain in memory after a power
failure.
@
12 Hour Shut-Off
With this feature,shouldyou forget and leave
the ovenon,the control will automatically
turn off theoven after !2 hoursduring baking
functions or after 5 hours during a broil function.
Ifyou wish to turn off this feature, follow the
stepsbelow.
I-_ Pressthe BAKEand BROILHI/LO pads at
the same time for 3 seconds until the
display shows SF.
[] Pressthe CLOCKpad until no shdn (no
shut-off) appears in the display.
[] Pressthe START/ONpad to activate the
no shut-off and leavethe control set in this
special features mode.
12

Using the Sabbath feature.
(Designed for use on the Jewish Sabbath and Holidays.) (onsome models) GEAppliances.com
The Sabbath feature can be used for baking/roasting only. It cannot be used for broiling or Delay Start cooking.
NOTE: The oven light comes on automatically (on some models) when the door is opened and goes off when the door is
closed. The bulb may be removed. See the Oven Light Replacement section. On models with a light switch on the control
panel, the oven light may be turned on and left on.
When the display shows D
the oven is set in Sabbath.
When the display shows D C
the oven is baking/
roasting.
How to Set Sabbath Feature for Regular Baking/Roasting
NOTE:Tounderstandhowtheovencontrolworks,practice
using regularbaking (non-Sabbath)before enteringSabbath
mode.
Makesuretheclockshowsthecorrecttimeofdayandthe
ovenisoff.
Z] pressandholdboththeBAKEandBROILHI/LOpads,at
thesametime,untilthedisplayshowsSl{
[_Tap theCLOCKpaduntilSAbappearsinthe display.
@
%
@
PresstheSTART/ONpadandD Willappearinthe
display.
PresstheBAKEpad.Nosignalwillbegiven.
Thepresetstartingtemperaturewillautomaticallybe
setto 350°.Tapthe+ or- padsto increaseor decrease
thetemperaturein 25° increments.Thetemperature
canbesetbetween175° and 550°.Nosignalor
temperaturewill begiven.
Pressthe START/ONpad.
r-7-] Afterarandomdelayperiodof approximately30
secondsto i minute,D C Willappearin thedisplay
indicatingthat the ovenisbaking/roasting.If D C
doesn'tappearinthe display,startagainat
Step4.
Toadjustthe oventemperature,presstheBAKEpadandtap
the +or- padstoincreaseordecreasethetemperaturein
25° increments.Pressthe START/ONpad.
NOTE:TheCLEAR/OFFandCOOKINGTIMEpadsareactive
duringtheSabbathfeature.
i ¸ @ ::
When the display shows D
the oven is set in Sabbath.
When the display shows D
c the oven is baking/
roasting.
ii i i
How to Set Sabbath Feature for Timed Baking/Roasting--Immediate Start and
Automatic Stop
NOTE:Tounderstandhowtheovencontrolworks,practice
usingregular(non-Sabbath)ImmediateStartandAutomatic
Stop beforeenteringthe Sabbath mode.
Makesure the clockshows the correcttime ofday and the
ovenisoff.
Z] PressandholdboththeBAKEandBROILHI/LOpads,at
thesametime,untilthedisplayshowsSF.
r2-] TaptheCLOCKpaduntilSAbappearsin thedisplay.
[-_1 PresstheSTART/ONpadandD Willappearin the
display.
[] PresstheCOOKINGTIMEpad.
-5-7 Pressthe+ or- padstosetthedesiredlengthof
cookingtime betweeni minuteand 9hoursand59
minutes.Thecookingtimethatyouenteredwillbe
displayed.
[] PresstheSTART/ONpad.
JZ] presstheBAKEpad.Nosignalwillbegiven.
%
%
[]
Thepresetstartingtemperaturewillautomaticallybe
setto 350°.Tapthe+ or- padstoincreaseor decrease
thetemperaturein 25°increments.Thetemperature
canbeset between175° and550°.Nosignalor
temperaturewillbegiven.
PresstheSTART/ONpad.
Afterarandomdelayperiodofapproximately30
secondsto ! minute,_ c willappearinthe display
indicatingthat the ovenisbaking/roasting.IfD c
doesn'tappearinthe display,startagainat
Step7.
Toadjustthe oventemperature,pressthe BAKEpadandtap
the+or - padsto increaseordecreasethetemperaturein
25° increments.PresstheSTART/ONpad.
Whencookingisfinished,thedisplaywillchangefromD C to
Dindicatingthat theovenhasturnedOFFbutisstillset
inSabbath.Removethecookedfood.
How to Exit the Sabbath Feature
[] PresstheCLEAR/OFFpad.
r_ ifthe oveniscooking,waitfor a randomdelayperiodof
approximately30secondsto ! minute,untilonly_ isin
the display.
[-_ PressandholdboththeBAKEandBROILHI/LOpads,
atthesametime,untilthe displayshowsSF.
%Tapthe CLOCKpaduntilONorOFFappearsin the
display.ONindicatesthatthe ovenwill automatically
turn offafter 12hours.OFFindicatesthat the ovenwill
notautomaticallyturnoff.Seethe SpecialFeatures
sectionforan explanationofthe 12-HourShutoff
feature.
r_ Pressthe START/ONpad.
NOTE:Ifapoweroutageoccurredwhiletheovenwasin
Sabbath,theovenwill automaticallyturnoffandstayoff even
whenthepowerreturns.Theovencontrolmustbereset. 13

Care and cleaning of the oven.
Be sure electrical power is off and all surfaces are cool before cleaning any part of the oven.
How to Remove Protective Shipping Film and Packaging Tape
Carefullygrasp a corner of the protective
shipping film with your fingers and slowly peel
it from the appliance surface. Donot useany
sharp items to remove the film. Removeall of
the film before using the appliance for the first
time.
To assure no damage is done to the
finish of the product,the safest way to remove
the adhesivefrom packaging tape on new
appliances isan application of a household
liquid dishwashing detergent. Apply with a soft
cloth and allow to soak.
NOTE'.Theadhesivemust beremoved from all
parts. It cannot beremoved ifit is bakedon.
Oven Racks
Cleanthe oven rackswith an abrasive cleanser
or steel wool. After cleaning, rinsethe rackswith clean water
and dry with a clean cloth.
Do not allow food spills
with a high sugar or acid
content (such as tomatoes,
sauerkraut, fruit juices or
pie filling) to remain on the
surface. They may cause a
dull spot even after cleaning.
Porcelain Oven Interior
With proper care,the porcelain enamel finish
on the insideof the oven-top, bottom, sides,
back and inside of the door-will stay new-
looking for years.
Let the oven cool before cleaning. We
recommend that you wear rubber gloves when
cleaning the oven.
Soapand water will normally do thejob. Heavy
spattering or spilloversmay require cleaning
with a mild abrasive cleaner. Soap-filledsteel
wool pads may also be used.
Household ammonia may make the cleaning
job easier. Place1/2 cup in a shallow glass or
pottery container in a cold oven overnight. The
ammonia fumes will help loosenthe burned-on
greaseand food.
If necessary,you may usean oven cleaner.
Followthe package directions.
Do not spray oven cleaner on the electrical
controls and switches because it could cause
a short circuit and result in sparking or fire.
Do not allow a film from the cleaner to build
up on the temperature sensor-it could
cause the oven to heat improperly. (The
sensor islocated at the top of the oven.)
Carefullywipe the sensor cleanafter each
oven cleaning, being careful not to move
the sensor asa change in its position could
affect how the oven bakes.
Do not spray any ovencleaner on the oven
door, handlesor any exterior surface of
the oven, cabinets or painted surfaces.The
cleaner can damage these surfaces.
Painted Surfaces
Cleanwith soapandwater or avinegarand
water solution. Do not use commercial oven cleaners,
cleansing powders, steel wool or harsh
abrasiveson any painted surface.
Control Panel
It's a good ideato wipe the control panel after
each use.Cleanwith mild soap and water or
vinegar and water, rinsewith clean water and
polishdry with a soft cloth.When cleaning, the
control panel should be at room temperature
and not in direct sunlight.
Do not useabrasive cleansers,strong liquid
cleansers,plastic scouring pads or oven
cleaners on the control panel-they will
damage the finish.A 50/50 solution of vinegar
and hot water works well.
14

GEAppliances.com
Lift-Off Oven Door
Slot
Pull hinge locks down to unlock
Removal position
The door is very heavy. Be careful when
removing and lifting the door.
Do not lift the door by the handle.
To remove the door'.
r_ Fullyopen the door.
[] Pullthe hinge locks down toward the door
frame, to the unlocked position.A tool,
such as a small flat-blade screwdriver,
may be required.
[] Firmlygrasp both sidesof the door at
the top.
r_ Closedoor to the door removal position
(seeillustration).
[] Liftdoor up and out untilthe hinge arm is
clear of the slot.
To replace the door'.
[-_ Firmlygrasp both sides of the door at
the top.
@
%
With the door at Bottom
the same angle edge of
aSthe removal slot
position, seat the
indentation of
the hinge arm
into the bottom edge of
the hinge slot.Thenotch
Ill Hing_ea'rm
in the hinge arm must be fully seated into
the bottom of the slot.
Fullyopen the door. If the door will not
fully open,the indentation is not seated
correctly inthe bottom edge of the slot.
Pushthe hinge locks up against the front
frame ofthe oven cavity,to the locked
position.
Hinge
arm
Hing
Push hinge locks up to lock
Closethe oven door.
Do not allow food spills with a
high sugar or acid content (such as
tomatoes, sauerkraut, fruitjuices or
pie filling) to remain on the surface.
They may cause a dull spot even
after cleaning.
To clean the inside of the door'.
Soapand water will normally do thejob.
Heavyspattering or spilloversmay require
cleaning with a mild abrasive cleaner.Soap-
filled steelwool pads may also be used.
If necessary,you may usean ovencleaner.
Follow the package directions.
Cleanthe insideofthe oven window with a mild
non-scratching cleanerand a damp cloth.
To clean theoutside ofthedoor'.
Usesoapand water to thoroughly clean the
top, sides and front of the oven door. Rinse
well. You may also use a glass cleanerto
clean the glass on the outside of the door. Do
not letwater drip into the vent openings.
Spillageof marinades,fruit juices, tomato
sauces and basting materials containing
acids may cause discoloration and should be
wiped up immediately. When surface iscool,
clean and rinse.
Donot useoven cleaners,cleaning powders
or harsh abrasiveson the outside of the door.
15

Care and cleaning of the oven,
j j SHOCK OR BURN HAZARD: Before replacing oven light bulb, disconnect the electricalAWARNING j powerto the oven at the main fuse or circuit breaker paneI. Failure to do so may result
in electric shock or burn.
[,& CAUTION IURN HAZARD: The glass cover and bulb should be removed when cool. Touching hotglass with bare hands or a damp cloth can cause burns.
ReceD_a@_ .Socket
_" G6.35 Bulb
on some moaels
ReceD_a@e Socket
_G9 Bulb
Tab
Oven Light Replacement
Toremove:
[-_ Turnthe glass cover counterclockwise 1/4
turn until the tabs of the glass cover clear
the grooves of the socket.Wearing latex
gloves may offer a better grip.
[] Using gloves or a dry cloth, remove the
bulb by pulling it straight out.
Toreplace:
[Z] use a new 120/130-volt halogen bulb,not
to exceed 50watts. Replacethe bulb with
the sametype of bulb that was removed.
Yourmodel will haveone of the two types
shown on the left.Todetermine the correct
replacement bulb,checkthe bulb terminals.
Bulbswith 2 straight pin terminals are
G6.35bulbs.Bulbswith 2 loopedterminals
are G9bulbs.(Donot interchange.) Besure
the replacement bulb israted 120volts or
130 volts(NOT12volts).
Using gloves or a dry cloth, remove the
bulb from its packaging. Donot touch the
bulb with bare fingers. Oilfrom skinwill
damage the bulb and shorten its life.
@
%
@
bk% : $/¸¸::¸¸¸¸¸¸¸¸¸¸¸¸¸%¸¸¸
: ii
Receptace
Qr
Pushthe bulb straight into the receptacle
all the way.
Placethe tabs of the glass cover into the
grooves of the socket.Turn the glass cover
clockwise 1/4 turn.
Forimproved lighting insidethe oven,
clean the glasscover frequently usinga
wet cloth. Thisshould be done when the
oven is completely cool.
Reconnect electrical power to the oven.
_nsome models)
Oven Light Bulb tonsomemodels)
m i
JMax / "'_:
I_engtK\ ):
,Bulb,m
m
NOTE:Theglass cover (onsome models)should
beremovedonlywhen cold.Wearinglatex gloves
may offer a better grip.
Beforereplacing the bulb,disconnect electrical
power to the oven at the main fuse or circuit
breaker panel. Letthe bulb cool completely
before removing it. Foryour safety, do not
touch a hot bulb with a damp cloth. Ifyou do,
_i the bulb will break.
Toremove:
@lasscover Turn the glass cover counterclockwise 1/4
turn until the tabs of the glass coverclear the
grooves of the socket. Removethe bulb.
16
Toreplace:
Putin a new 40-watt appliance bulb.Placethe
tabs of the glasscover into the grooves of the
socket.Turnthe glass cover clockwise 1/4 turn.
NOTE:
A40-watt appliance bulb issmaller than a
standard 40-watt household bulb.
Install and tighten the cover clockwise.
Reconnect electrical power to the oven.
For improved lighting inside the oven, clean
the glass cover frequently using a wet
cloth. This should be done when the oven is
completely cool.

Before you call for service... GEAppliances.com
Troubleshooting Tips
Save time and money! Review the charts on the
following pages first and you may not need to call for
service.
Causes What To Do
Control signals after You forgot to enter e bake . Pressthe BAKE pad and desired temperature.
entering cooking time tempereture.
or delay start
Food does not bake Oven controls improperly set. • Seethe Using theoven section,
or roast properly Rack position isincorrect • Seethe Using theoven section.
or the rack is not level.
Oven thermostat needs . See the Adjust the oven thermostat Do it yourself!
adjustment, section.
Fooddoes not Oven door is open. . Closethe door.This model isdesigned for closed door
broil properly broiling only.Always broil with the door closed.
Oven controls improperly set. • Hake sureyou pressthe BROILHI/LO pad.
Improper reck position • Seethe Broiling Guide.
being used.
Food being cooked • Forbest results,usea pan designedfor broiling.
in ahot pan. Hake sure it iscool.
Cookwere not suited . Forbest results,usea pan designedfor broiling.
for broiling.
In some ureas the power . Preheatthe broil element for 10 minutes.
(voltage) may be low. . Broil for the longest period of time recommended in
the Broiling Guide.
Clock and timer A fuse in your home may be • Replacethe fuse or reset the circuit breaker.
do not work blown or the circuit breaker
tripped.
Oven controls improperly set. . See the Using the clock and timer section.
Ovenlight does Light bulb is looseor defective. • Tighten or replacethe bulb.
not work Pad operating light is broken. . Call for service.
17

Before you call for service...
Troubleshooting Tips
Possible Causes What To Do
Oven temperature too Oven thermostat . See the Adjust the oven thermostat-Do it yourself!
hot or too cold needs adjustment, section.
Oven will not work A fuse in your home may . Replacethe fuse or resetthe circuit breaker.
be blown or the circuit
breaker tripped.
Ovencontrols improperly set. . See the Using the oven section.
"F-- and a number You have afunction . Pressthe CLEAR/OFFpad.Allow the oven to coolfor
or letter" flash error code. one hour. Putthe oven back into operation.
in the display If the function code . Disconnect oil power to the oven for at least 30
repeats, seconds and then reconnect power. If the function
error code repeats, coil for service.
Display goes blank Afuse in your home may be • Replacethe fuse or resetthe circuit breaker.
blown or the circuit
breaker tripped.
The clock is in the . See the Special features of your oven control section.
black-out mode.
Display flashes Power failure. . Resetthe clock.
Unable to get the Oven control pads were not .The BAKE and BROIL HI/LO pads must be pressed at
display to show "SF" pressed properly, the some time and held for 3 seconds.
Power outage, Power outage or surge. . Reset the clock. Ifthe oven was in use, you must reset
clock flashes it by pressing the CLEAR/OFF pod, setting the clock
and resetting any cooking function.
Strong odor An odor from the insulation . This is temporary.
around the inside of the
oven is normal for the first
few times the oven is used.
Fan noise Acooling fan may
automatically turn on. . This is normal. The cooling fan will turn on to
cool internal ports. It may run for up to 2 hours
offer the oven isturned off.
18

Accessories. GEAppliances.com
Looking For Something More? (Not all accessories are available for all models.)
You can find these accessories and many more at GEAppliances.com (U.S.) or
www.GEAppliances.ca (Canada), or call 800.626.2002 (U.S.) or 000.661.1616 (Canada)
(during normal business hours). Have your model number ready.
il iii ii
i i ii
Z
x
Oven Racks Oven Elements
Experience these other great products to keep your kitchen looking great!
Cleaning Kit. Cleaning Wipes Appliance Polish
Includes cleanec Wipes
scraper and pad
WX10X117 GCS WX10X305 WX10X10001
Stainless Steel
Appliance
Cleaner
Ph41OXSll
Get the most out of your Broiler Pan! (Not for use with Broiler Drawer models.)
Useyour pan and grid cover to broil hamburgers, seafood,steaks,vegetables,
bacon, chops and so much more! Thepan below catches the excessfats and oils.
GenuineGEPart
EasyToClean
One-YearWarranty
Limited Time Offer! Free Shipping!
When you order your broiler pan within 30 days of purchasing your GEcooking product.
Small Large* XL**
Pert #WB¢8X10055 WB¢8X10056 WB¢8X10057
Dimensions 8-3//4"Wxl-1//#"Hx13-1/2"D 12-3//#"Wxl-1//#"HxlS-1//#"D 15-1/2"Wxl-1//#"Hxlg"D
*Thelarge (standard)broil pan does not fit in 20"/2¢" ranges.
** TheXL pan does not fit in 2¢" wall ovens, 27" drop-ins or 20"/2¢" ranges.
Toplaceyour order: call 800.626.2002 (U.S.),800.661.1616 (Canada)or mail this form to:
Inthe U.S.:GEPorts,P.O.Box221027, Memphis,TN 38122-1027. In Canada:GEPorts,1 Factory Lone,IVloncton,N.B.EI C91v13
Quantity
Broiler Pan Order Form
Part Number
Model Number
First Name
Address
City
Phone
Check Money Order
Serial Number Brand Date of Purchase
Lust Name
State Zip Code
E-Mail
Cull 800.626.2002 in the U.S. or 800.661.6161 in Canada for current pricing. All credit card orders must be called in. 19

Notes.
20
Other manuals for JTS10
1
This manual suits for next models
1
Table of contents
Languages:
Other GE Oven manuals

GE
GE JKP30BMBB User manual

GE
GE 106611 User manual

GE
GE JCKSO6 How to use

GE
GE Advantium ZSC2201JSS User manual

GE
GE Monogram Advantium ZSC1001KSS Manual

GE
GE JRS04 User manual

GE
GE Profile Advantium PSB9100DFBB User manual

GE
GE Profile HGE6030DI User manual

GE
GE Monogram ZET1038 User manual

GE
GE JT3800 User manual