Bourgini Health Fryer Pro XL User manual

Gebruiksaanwijzing NL
Instructions EN
Mode d’emploi FR
Gebrauchsanleitung DE
Instrucciones de uso ES
18.2144.00.00 Health Fryer Pro XL 4.5L/1.5KG

Fig. 1
12
Fig. 2
1
4
2
11 12 13 14 15 16 17 18
10 8
349765
7
35
6
© THE BOURGINI COMPANY B.V. WWW.BOURGINI.COM

Gebruiksaanwijzing NL 4
Bourgini service en garantie NL 8
Instructions EN 9
Bourgini service and warranty EN 13
Mode d’emploi FR 14
Service après-vente et garantie Bourgini FR 18
Gebrauchsanleitung DE 20
Bourgini Kundenservice und Garantie DE 24
Instrucciones de uso ES 26
Servicio postventa y garantía de Bourgini ES 30

4
VEILIGHEIDSAANWIJZINGEN
Lees voor gebruik de
gebruiksaanwijzing
aandachtig door. Bewaar de
gebruiksaanwijzing.
Het apparaat kan worden
gebruikt, gereinigd en
onderhouden door kinderen
vanaf 8 jaar indien ze onder
toezicht staan van een
persoon die verantwoordelijk
is voor hun veiligheid.
Houd het apparaat en het
netsnoer buiten het bereik
van kinderen onder de 8 jaar.
Kinderen mogen niet met het
apparaat spelen. Houd altijd
toezicht op kinderen om te
voorkomen dat ze met het
apparaat spelen.
Het apparaat kan worden
gebruikt door personen
met een fysieke, zintuiglijke,
mentale of motorische
handicap en door personen
zonder de benodigde
ervaring en kennis indien ze
onder toezicht staan van een
persoon die verantwoordelijk
is voor hun veiligheid of
instructies krijgen over
hoe het apparaat op een
veilige manier te gebruiken
is en indien ze de gevaren
begrijpen die met het
gebruik samenhangen.
• Dit apparaat is uitsluitend bedoeld voor
huishoudelijk gebruik.
• Laat het apparaat niet onbeheerd achter tijdens
gebruik.
• Gebruik het apparaat en de toebehoren uitsluitend
voor de beoogde doeleinden. Gebruik het apparaat
en de toebehoren niet voor andere doeleinden dan
beschreven in de handleiding.
• Gebruik het apparaat niet als een onderdeel,
toebehoren, netsnoer of stekker beschadigd
of defect is. Laat een beschadigd of defect
onderdeel, toebehoren, netsnoer of stekker door
de leverancier of een erkend servicecentrum
vervangen.
• Gebruik het apparaat niet in de buurt van
voorzieningen die water bevatten zoals
badkuipen, douches en wastafels.
• Dompel het apparaat niet onder in water of andere
vloeistoffen. Als dit toch gebeurt, haal dan zo snel
mogelijk de stekker uit het stopcontact. Verwijder
het apparaat nooit uit water of andere vloeistoffen,
voordat de stekker uit het stopcontact gehaald is.
Een apparaat dat in water of andere vloeistoffen
terecht is gekomen kunt u niet meer gebruiken.
• Zorg dat er geen water in de aansluitpunten van
het netsnoer en het verlengsnoer kan komen.
• Houd het netsnoer uit de buurt van
warmtebronnen, olie en scherpe randen.
• Controleer voor gebruik altijd of de
netspanning overeenkomt met de spanning op
het typeplaatje van het apparaat.
• Sluit voor extra bescherming het apparaat
aan op een groep die beveiligd is door
een aardlekschakelaar met een nominale
aanspreekstroom van maximaal 30 mA.
• Bedien het apparaat niet door middel van een
externe tijdschakelaar of een apart
afstandsbedìeningssysteem.
• Wikkel het netsnoer en een eventueel
verlengsnoer altijd volledig af. Zorg dat het
netsnoer en een eventueel verlengsnoer niet over
de rand van een werkblad hangen, dat deze niet
per ongeluk verstrengeld kunnen raken en dat
niemand er over kan struikelen.
• Trek niet aan netsnoer om de stekker uit het
stopcontact te halen.
• Haal de stekker uit het stopcontact als het
apparaat niet in gebruik is.
• Gebruik het apparaat niet buitenshuis. Plaats het
apparaat op een stabiel en vlak oppervlak.
• Houd het apparaat Uit de buurt van
warmtebronnen. Plaats het apparaat niet op hete
oppervlakken of in de buurt van open vlammen.
• Zorg dat uw handen droog zijn voordat u het
apparaat aanraakt.
NL

5
• Haal de stekker uit het stopcontact voordat u het
apparaat gaat monteren of demonteren en voordat
u reinigings- en onderhoudswerkzaamheden aan
het apparaat gaat uitvoeren.
• Motor apparaten: pas op voor scherpe en/
of bewegende delen. Houd uw handen tijdens
gebruik, reiniging en onderhoud uit de buurt van de
bewegende delen.
• Verwarmingsapparaten: wacht totdat het apparaat
is afgekoeld voordat u de behuizing en de
onderdelen van het apparaat aanraakt.
Wees extra voorzichtig tijdens reiniging en onderhoud.
HYGIËNE
Om besmetting met bacteriën via rauw vlees, vis
of gevogelte te voorkomen is het belangrijk om
zorgvuldig met deze ingrediënten om te gaan
tijdens de bereiding. Hierbij zijn er een aantal zaken
waar u op moet letten.
Handen wassen
• Zorg dat u regelmatig uw handen wast, zeker
voordat u eten bereidt, na het aanraken van
rauwe ingrediënten en voordat u aan tafel gaat
• Was uw handen met een vloeibare zeep en
minstens 15 seconden. Daarna is het belangrijk
dat u uw handen afdroogt met een schone
handdoek of keukenpapier.
Tijdens de bereiding
• Tijdens het bereiden van rauwe ingrediënten is
het belangrijk dat de omgeving goed schoon is
en u gebruik maakt van een schone snijplank
en schoon bestek. Spoel materialen af met heet
water en een sopje voor volgend gebruik.
• Het is verstandig om voor groente en deeg/
brood een andere snijplank te gebruiken dan
voor rauwe ingrediënten.
• Het is belangrijk dat het bestek dat gebruikt
wordt voor het hanteren van de rauwe
ingrediënten niet gebruikt wordt voor het
hanteren van het voedsel als het gaar/
gebakken is. Er kunnen namelijk veel bacteriën
inzitten waar men ziek van kan worden. Was
bestek tussendoor af of zorg dat u verschillende
messen en vorken gebruikt.
• Daarnaast moet u er rekening mee houden
dat bereid voedsel niet in contact komt met
producten die nog rauw zijn.
• Ook is het belangrijk dat uw vlees niet
verbrand. Dit kan namelijk zorgen voor
schadelijke stoffen die dan gevormd worden.
Opdienen van de maaltijd
• Zorg ervoor dat u ook bij het opdienen van
vlees, vis & gevogelte dat het bereide voedsel
niet op hetzelfde bord gelegd wordt, als waar
het rauwe voedsel mee in contact geweest is.
DE VERSCHILLENDE
BEDIENINGSELEMENTEN EN ONDERDELEN
(Zie Fig. 1)
1. Touchscreen
2. Handgreep
3. Mandje
4. Lade-pan
5. Afschermkapje
6. Ontgrendelknop voor het mandje
7. Hengsel
TOUCHSCREEN TOETSEN
(Zie Fig. 2)
1. Power/Start/Pauze- knop
2. Menu knop
3. Temperatuurknop
4. Tijd instellen
5. Plus (+)
6. Min (-)
DISPLAY ICONEN
(Zie Fig. 2)
7. Verwarmen
8. Temperatuur
9. Tijd
10. Ventilator
11. Frites programma
12. Karbonades programma
13. Kip programma
14. Garnalen programma
15. Steak programma
16. Cake programma
17. Groenten programma
18. Vis programma
GEBRUIK
Algemene aanwijzingen:
• Verwijder voor het eerste gebruik alle
verpakkingsmaterialen.
• Reinig de lade-pan en het mandje eerst in een
sopje, spoel na met schoon water en droog deze
delen goed af.
• Rondom het apparaat moet voldoende ruimte zijn
om warmte te laten ontsnappen.
• Zorg voor voldoende ventilatie.
• Plaats het apparaat op een stabiel en vlak
oppervlak.
• Bedek de luchtinlaat – en uitlaatopeningen niet
tijdens het gebruik; zorg dat er geen gordijn
tegen het apparaat hangt en leg er geen
handdoek, vaatdoek e.d. op.
• Doe NOOIT olie, vet of andere vloeistoffen in de
pan want dit kan brandgevaar geven!
• Steek niet uw hand in de geopende Health Fryer
als deze in werking is vanwege de hete krachtige
luchtstroom.
NL

6
• Raak de lade-pan en het mandje tijdens en kort na
gebruik niet zonder ovenwanten aan want deze
delen worden zeer heet. Schakel na gebruik het
apparaat uit, verwijder de stekker uit het stopcontact
en wacht totdat het apparaat is afgekoeld.
• Berg het apparaat op een droge plaats
opwanneer het niet in gebruik is.
• Zorg ervoor dat kinderen geen toegang hebben
tot opgeborgen apparaten.
Basishandelingen:
• Steek de stekker in een geaard stopcontact.
• Laat de Health Fryer voorverwarmen:
• Druk op de powerknop.
Zodra de buitenpan en de frituurmand
correct in de behuizing zijn geplaatst, zal de
power/start/pauze-knop (1) oplichten. Als
de Startknop (1) wordt geselecteerd, wordt
de standaardtemperatuur van 200 graden
en een baktijd van 15 minuten getoond. Bij
het nogmaals indrukken van de Startknop
(1) zal het bakproces gestart worden.
Wanneer u de Power/Start/Pauze-knop (1) 3
seconden ingedrukt houdt, zal de Health Fryer
uitschakelen tijdens het bakproces. Alle lichten
gaan uit en de ventilator stopt met werken.
Opmerking: Tijdens het bakken kunt u op
de Power/Start/Pauze-knop (1) drukken
om het programma te pauzeren. U kunt op
deze manier de tijd en temperatuur van het
programma regelen.
• Om gebruik te maken van vooringestelde
programma’s kunt u gebruik maken van
de Menuknop (2). Er zijn 8 verschillende
programma’s. Eenmaal geselecteerd, start de
vooraf bepaalde tijd en baktemperatuur.
• De temperatuur kan geregeld worden met de
temperatuurknop (3). Door deze ingedrukt te
houden, verandert de temperatuur sneller. Het
temperatuurbereik is: 80°C - 200°C.
• Om de ingestelde tijd te veranderen kunt u de
gebruik maken van de tijd-knop (4). Met de
symbolen + en – kunt u de baktijd verlengen
of verkorten. Als u de knop ingedrukt houdt,
verandert de tijd sneller.
Bereiding:
• De Health Fryer is geschikt voor alle voedsel
dat normaal in een hete lucht oven bereid word;
het gaat vaak wel veel sneller vanwege de zeer
geconcentreerde luchtstroom en de compacte
ruimte waarin het voedsel gaar gemaakt wordt.
• Voor de bereiding van voorverpakt voedsel, zoals
bijvoorbeeld bevroren frites en snacks, raden
wij aan om de oven-variant te nemen, indien
beschikbaar.
• Ook treft u in de supermarkt frites en snacks
van diverse merken die speciaal voorbereid
is voor gebruik in een hetelucht friteuse (vaak
airfryer genoemd); volg bij deze bereiding de
aanwijzingen op de verpakking van het voedsel.
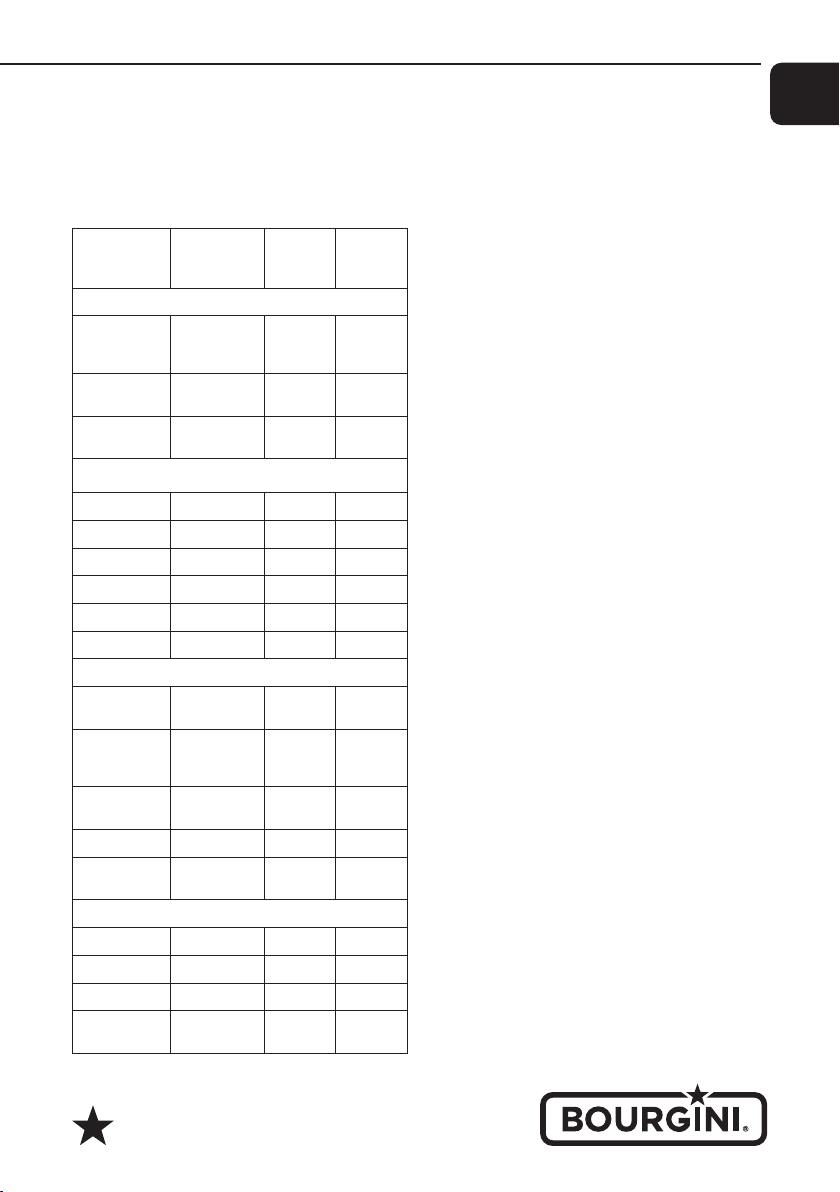
• In de onderstaande tabel treft u een indicatie van
voedsel dat geschikt is om in de Health Fryer te
bereiden. De aangegeven tijd en temperatuur
is bij benadering aangezien hoeveelheid en
de exacte samenstelling van het voedsel nog
invloed hebben. Soms is het nodig om wat te
experimenteren met de instellingen.
• In het algemeen is voor een grotere hoeveelheid
voedsel ook een wat langere bereidingstijd
nodig; de tijden in de tabel zijn voor een
hoeveelheid van ca 400 gram. Voor 1.5 kg zal de
bereidingstijd 3 keer langer zijn.
• Bereid niet meer dan 1.5 kg in één keer.
• Het mandje is luchtdoorlatend omdat dit
belangrijk is voor een goede werking van de
Health Fryer. Blokkeer de luchtstroom dus niet
door bijvoorbeeld aluminium folie in het mandje
te leggen.
• Bereid geen zeer vet voedsel en of voedsel dat
zeer sterk spat in de Health Fryer. Het vet zou
tegen de hete verwarming kunnen spatten en
gaan schroeien of zelfs branden.
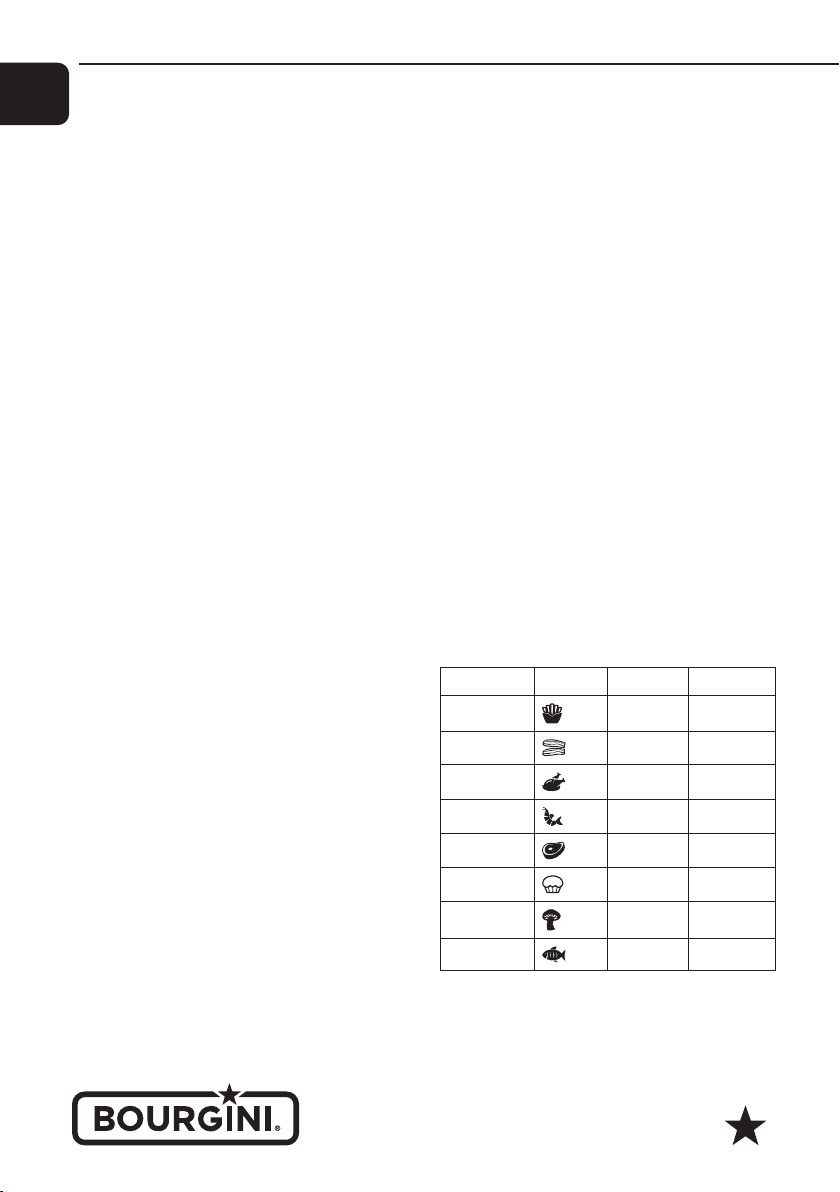
Programma’s:
De Health Fryer beschikt over 9 programma’s en
een standaard programma.
Programma Icoon Temp. (°C) Tijd (min)
Frites 200 20
Karbonades 180 6
Kip 180 25
Garnalen 180 12
Steak 180 16
Cake 180 12
Groenten 160 17
Vis 180 18
NL

7
Bereidingstabel:
De aangegeven tijd is voor een hoeveelheid van
ca 400 gram; wij raden aan om halverwege de
bereidingstijd het voedsel even om te schudden.
Min-Max
hoeveelheid
(g)
Temp.
(°C) Tijd
(min.)
Aardappel & Frites (Schudden)
Dunne
bevroren
Frites
400-500 200 18-20
Dikke bevro-
ren Frites 400-500 200 20-25
Aardappel
Gratin 600 200 20-25
Vlees & Gevogelte
Steak 100-600 180 10-15
Karbonades 100-600 180 10-15
Hamburger 100-600 180 10-15
Hotdog 100-600 200 13-15
Drumsticks 100-600 180 25-30
Kippenborst 100-600 180 15-20
Snacks (Oven geschikt)
Loempia’s
(Schudden) 100-500 200 8-10
Bevroren
kipnuggets
(Schudden)
100-600 200 6-10
Bevroren
vissticks 100-500 200 6-10
Kaas snacks 100-500 180 8-10
Gevulde
groenten 100-500 160 10
Bakken (Gebruik een bakvorm)
Cake 400 160 20-25
Quiche 500 180 20-22
Muffins 400 200 15-18
Zoete
deegwaren 500 160 20
Aardappel wordt alleen frites wanneer deze al een
keer in de olie gebakken is zoals bij voorgebakken
frites. Men kan verse aardappelen in allerlei
vormen snijden, dus ook in de vorm van frites.
Het eindresultaat zal echter meer naar gebakken
aardappelen smaken dan naar frites. De beste
methode om verse aardappel gerechten te bereiden
is als volgt:
• Laat de gesneden aardappelstukjes 20 a 30
minuten weken in koud water; laten uitlekken en
nadrogen met een keukendoek of keukenpapier.
• Doe een eetlepel olie (zonnebloemolie of
olijfolie) in een schaal en strooi er wat peper en
zout bij.
• Doe de aardappelstukjes ook in de schaal en
haal deze door de olie totdat de aardappel-
stukjes bedekt zijn met een laagje olie.
• Haal de aardappelstukjes uit de schaal met een
schep oid en doe ze in het mandje van de Health
Fryer. Giet de schaal niet leeg in de mand
anders zou er teveel olie meekomen.
Olie:
• De Health Fryer werkt zonder dat men olie moet
en mag toevoegen; gerechten zijn dus veel
minder vet en bevatten 65% minder olie dan bij
traditionele bereidingswijzen (gemeten t.o.v.
een Bourgini friteuse met frituurolie).
• De enige toepassing waarbij men een geringe
hoeveelheid (één eetlepel = 15 ml) olie moet
gebruiken is de bereiding van verse aardappel.
REINIGING EN ONDERHOUD
• Verwijder voor reiniging en onderhoud de
stekker uit het stopcontact en wacht totdat het
apparaat is afgekoeld.
• Dompel het apparaat noch de onderdelen onder
in water of andere vloeistoffen.
• Gebruik geen bijtende of schurende
reinigingsmiddelen.
• Gebruik geen scherpe voorwerpen.
• Alleen de verwijderbare mand en de lade-pan
mogen in de vaatwasser worden gereinigd. Het
apparaat zelf en de overige toebehoren mogen
niet in de vaatwasser worden gereinigd.
• De lade-pan en de mand kunnen ook in een
sopje gereinigd worden; hierna goed naspoelen.
• Maak de buitenkant van het apparaat schoon
met een zachte, vochtige doek. Droog de
buitenkant van het apparaat grondig.
• Reinig de binnenzijde eveneens met een
zachte vochtige doek en droog deze na met
keukenpapier.
• Controleer het apparaat regelmatig op
mogelijke schade.
NL

8
Voor een grondige reiniging:
• Vul de pan met ca. 0.5 liter water.
• Plaats de pan terug in het apparaat en zet
de Health Fryer circa 20 minuten aan op 200
graden Celsius.
• Verwijder de pan en laat de Health Fryer
afkoelen.
• Haal de stekker uit het stopcontact en verwijder
de pan.
• Keer de Health Fryer om, de losse resten zullen
er nu uitvallen.
• Zet de Health Fryer weer recht en zet de pan er
terug in.
• Laat de Health Fryer circa 10 minuten drogen
voor deze weer te gebruiken.
E1/E2 melding op display:
Indien de melding E1 of E2 verschijnt, trek dan de
stekker uit het stopcontact. Laat het apparaat 30
minuten afkoelen en schakel het apparaat weer aan.
Als de melding terug blijft komen, is het apparaat
defect.
AFVALVERWIJDERING
Elektrische apparaten, accessoires en hun
verpakkingen moeten op een voor het milieu
verantwoorde wijze zoveel mogelijk worden
hergebruikt. Gooi deze materialen dus niet bij het
huisvuil. Alleen voor landen van de EU:
Volgens de Europese WEEE richtlijn
2002/96/EG voor afdanken van elektrische en
electronische oude apparaten moeten niet meer
bruikbare apparaten apart worden ingezameld
en op een milieu verantwoorde wijze worden
gerecycled.
BOURGINI SERVICE EN GARANTIE
Garantie wordt verleend gedurende 2 jaar vanaf
de aankoop datum volgens de kassabon, welke
tevens het garantiebewijs is. Voor garantie
wendt u zich tot de winkelier. Geen garantie voor
defecten welke het gevolg zijn van verkeerd
gebruik, ondeskundige demontage, schade
door vallen, stoten e.d. en schade door niet
tijdig ontkalken van apparaten welke met water
worden gebruikt. Indien bij een bepaald product
specifieke garantievoorwaarden worden vermeld,
hebben deze prioriteit boven de algemene
voorwaarden. De garantie is niet van toepassing op
gevolgschade. Voor vragen over het gebruik van
het product kunt u onze website raadplegen
www.bourgini.com.
DISCLAIMER
Wijzigingen voorbehouden; specificaties kunnen
zonder opgave van redenen worden gewijzigd.
NL

9
SAFETY INSTRUCTIONS
Read these instructions
carefully before use and
keep them in a safe place.
This appliance may be
used, cleaned and serviced
by children older than 8
years of age provided they
are supervised by a person
responsible for their safety.
Keep the appliance and
the power cord away from
children younger than 8.
Children are not allowed
to play with the appliance.
Children should always
be monitored to prevent
them from playing with the
appliance.
The appliance may be
used by persons with a
physical, sensory, mental
or motor disability and
by persons without the
necessary experience and
knowledge, provided they
are supervised by a person
responsible for their safety,
or when they are given
instructions on how to
safely use the appliance
and if understand the
dangers that come with the
use of the appliance.
• This appliance is only intended for normal
household use.
• Never leave the appliance unattended when in use.
• Only use the appliance and accessories for their
intended purposes. Do not use the appliance
and accessories for any other purposes than
those described in the instructions.
• Do not use the appliance when a part,
accessory, the power cord or plug is
damaged or defective. Only let the supplier
or an acknowledged service centre replace a
damaged or defective part, accessory, power
cord or plug.
• Do not use the appliance near facilities
containing water, such as bath tubs, showers
and wash basins.
• Do not immerse the appliance in water or any
other liquid. If this nevertheless happens,
unplug the appliance from the wall socket as
soon as possible. Never remove the appliance
from water or other liquids before unplugging it
from the wall socket. You can no longer use an
appliance that has been immersed in water or
other liquids.
• Make sure that water cannot get into the
connection points of the power cord nor the
extension cord.
• Always keep the power cord away from heat
sources, oil and sharp edges.
• Always check, before use, that the mains
voltage corresponds to the voltage on the rating
plate of the appliance.
• For extra safety, connect the appliance to
a group protected by a residential current
operated circuit breaker with a nominal
operating current of max. 30 mA.
• Never operate the appliance by means of an
external time switch or a separate remote
control system.
• Always unroll the power cord and extension
cord (when applicable) fully. Make sure that
the power cord and extension cord (when
applicable) do not dangle over the edge of
the worktop to prevent them from becoming
entangled or somebody accidentally tripping
over them.
• Do not unplug the appliance by pulling the
power cord.
• Always unplug the appliance when not in use.
• Do not use the appliance outdoors. Place the
appliance on a stable and level surface.
• Keep the appliance away from heat sources. Do
not place the appliance on hot surfaces or near
open flames.
• Make sure your hands are dry before you touch
the appliance.
• Unplug the appliance before assembling or
EN

10
disassembling it and before cleaning or servicing
the unit.
• Engine driven appliances: beware of sharp and/
or moving parts. Always keep your hands away
from the moving parts when using, cleaning or
servicing the appliance.
• Heating devices: wait until the appliance has
cooled down before you touch the housing and
parts of the unit.
Be extra careful during cleaning and servicing.
HYGIENE
In order to avoid contamination with bacteria via raw
meat, fish or poultry, it is important to handle these
ingredients carefully during the preparation process.
There are a number of things you should be aware of.
Hand washing
• Be sure to wash your hands regularly, especially
before preparing food, after touching raw
ingredients and before eating.
• Wash your hands with a liquid soap, for at least 15
seconds. Afterwards it is important that you dry
your hands with a clean towel or paper towel.
During preparation
• When preparing raw ingredients, it is important
that the environment is clean and that you use
a clean cutting board and clean cutlery. Rinse
materials with hot water and soapy water for
next use.
• It is a good idea to use a different chopping board
for vegetables and dough/bread than for raw
ingredients.
• It is important that the cutlery used to handle the
raw ingredients is not used to handle the food once
cooked or baked. It may contain a lot of bacteria,
which can make you sick. Wash the cutlery in
between or use different knives and forks.
• You should also ensure that prepared food does not
come into contact with products that are still raw.
• It is also important to not burn your meat, as this
could cause harmful substances to form.
Serving the meal
• When serving meat, fish & poultry, make sure
that the prepared food is not placed on the same
plate that the raw food has been in contact with.
CONTROLS AND PARTS (See Fig. 1)
1. Touch screen
2. Handle
3. Basket
4. Tray
5. Protective hood
6. Release button
7. Handle
TOUCHSCREEN BUTTONS (See Fig. 2)
1. Power/Start/Pause button
2. Menu button
3. Temperature control button
4. Timer
5. Plus (+)
6. Minus (-)
DISPLAY ICONS (See Fig. 2)
7. Preheat
8. Temperature
9. Time
10. Fan
11. Chips programme
12. Pork chops programme
13. Chicken programme
14. Prawns programme
15. Steak programme
16. Cake programme
17. Vegetables programme
18. Fish programme
USE
General directions:
• Remove all packaging before using the product
for the first time.
• Clean the tray and the basket with soapy water,
rinse with clean water and dry thoroughly.
• There should be enough space around the
appliance to let the heat escape.
• Make sure there is enough ventilation.
• Place the appliance on a stable and level
surface.
• Do not obstruct the air intake and exhaust
openings during use; ensure that no curtains
hang against the appliance and do not cover the
appliance with a towel, cloth, etc.
• NEVER put oil, fat or other fluids in the tray, as
this is a fire hazard!
• Do not place your hand in the open and Health
Fryer while it is in operation, on account of the
hot and powerful airflow.
• Do not touch the tray or the basket without oven
gloves while the appliance is in use, nor shortly
thereafter, as these parts become extremely
hot. After use, switch off the appliance, unplug it
and wait for it to cool down.
EN

11
• When not in use, store the appliance in a dry place.
• Keep stored appliances out of the reach of
children.
Basic operation:
• Insert the plug into an earthed socket.
• Preheat the Health Fryer:
• Press the Power button. As soon as the
outside pan and frying basket have been
correctly placed in the housing, the power/
start/pause button (1) will light up. If the
Start button (1) is selected, the standard
temperature of 200 degrees and a frying time
of 15 minutes will be displayed. When the
Start button (1) is pressed again, the frying
process will be started. If you hold down the
Power/Start/Pause button (1) for 3 seconds,
the Health Fryer will switch off during the
frying process. All lights will go out and the
fan will stop working.
Note: While frying, you can press the
Power/Start/Pause button (1) to pause the
programme. You can control the time and
temperature of the programme in this way.
• To use preset programmes, you can
use the Menu button (2). There are 8
different programmes. Once selected, the
predetermined time and cooking temperature
will start.
• The temperature can be adjusted with the
temperature button (3). By pressing and
holding this, the temperature will change
faster. The temperature range is: 80°C - 200°C.
• To change the set time, you can use the time
button (4). With the + and - symbols you can
lengthen or shorten the frying time. If you
press and hold down the button, the time will
change faster.
Preparation:
• The Health Fryer is suitable to prepare all foods
that may normally be cooked in a convection
oven. Food will often be ready more quickly
in the Health Fryer due to the concentrated
airflow and the compact space in which food is
prepared.
• If it is available, we recommend the oven-
version for users who wish to prepared
pre-packaged foods, such as frozen chips and
snacks.
• In supermarkets, you may also find various
brands of chips and snacks specially intended
for use in an airfryer. When preparing these
foods, please follow the instructions on the
foods’ packaging.
• The following table gives examples of foods
that are suitable for preparation in the Health
Fryer. The indicated times and temperatures are
estimates and will vary subject to the amount
of food placed in the appliance, as well as the
food’s composition. You will sometimes need to
experiment with the settings.
• In general, larger amounts of food will need
longer preparation times. The times stated in
the table apply to amounts of approx. 400g. For
1.5 kg the cooking time will be 3 times as long.
• Do not try to prepare more than 1.5 kg of food at
the same time.
• The basket is permeable to air because this is
essential to the proper operation of the Health
Fryer, so make sure you do not block the airflow
by, for instance, placing aluminium foil in the
basket.
• In the Health Fryer, do not prepare very fatty
foods and/or foods that spatter a lot, as the fat
could come into contact with the hot heating
element and begin to smoke or even burn.
Programmes:
The Health Fryer has 8 programmes and a standard
programme.
The programmes can be selected by means of the
menu button (2).
Programma Icoon Temp. (°C) Tijd (min)
Chips 200 20
Pork chops 180 6
Chicken 180 25
Prawns 180 12
Steak 180 16
Cake 180 12
Vegetables 160 17
Fish 180 18
EN

12
Preparation table:
The stated times are for 400g of food. We
recommend shaking the food half way through the
preparation time.
Min-Max
quantity (g) Temp.
(°C) Tijd
(min.)
Potatoes & Chips (Shake)
Thin frozen
chips 400-500 200 18-20
Thick frozen
chips 400-500 200 20-25
Potato gratin 600 200 20-25
Meat & poultry
Steak 100-600 180 10-15
Pork chops 100-600 180 10-15
Hamburger 100-600 180 10-15
Hotdog 100-600 200 13-15
Drumsticks 100-600 180 25-30
Chicken
breast 100-600 180 15-20
Snacks (Oven-suitable)
Spring rolls
(Shake) 100-500 200 8-10
Frozen
chicken
nuggets
(Shake)
100-600 200 6-10
Frozen fish
fingers 100-500 200 6-10
Cheese
snacks 100-500 180 8-10
Stuffed
vegetables 100-500 160 10
Baking (Use a baking tin)
Cake 400 160 20-25
Quiche 500 180 20-22
Muffins 400 200 15-18
Pastries 500 160 20
Potatoes only become chips when they have been
pre-fried in oil, such as is the case with pre-fried
chips. Potatoes can be cut into all types of shapes,
including the shape of chips. However, the final
result will more closely resemble fried potatoes
than chips. The best method to prepare freshly cut
chips is as follows:
• Soak the cut potato pieces for 20-30 minutes
in cold water, leave to drain, then dry with a
dishtowel or kitchen towel.
• Put a tablespoon of oil (e.g. sunflower seed oil
or olive oil) in a bowl and sprinkle with pepper
and salt.
• Place the potato pieces in the bowl and mix
until they are covered in a layer of oil.
• Remove the potato pieces from the bowl with a
spoon or similar and place them in the basket
of the Health Fryer. Do not pour the oil from
the bowl into the basket, as this overload the
appliance with oil.
Oil:
• The Health Fryer cooks food without the
addition of oil, as it is not possible to use oil in
the Health Fryer. Dishes are therefore far less
fatty and contain 65% less oil than food cooked
using traditional methods (measured against a
Bourgini deep fryer with deep frying oil).
• The only application which requires the addition
of a small amount of oil (i.e. 1 tbs = 15 ml) is the
preparation of fresh potatoes.
CLEANING AND MAINTENANCE
• Unplug the appliance and wait for it to cool down
before cleaning and/or servicing.
• Do not immerse the appliance or parts in water
or any other liquid.
• Do not use any acerbic or abrasive cleaning liquids.
• Do not use any sharp objects.
• Only the removable basket and tray can be
cleaned in a dishwasher. Do not clean the
appliance and the other parts in the dishwasher.
• The tray and the basket can also be cleaned with
soap and water. Rinse thoroughly once clean.
• Wipe the exterior of the appliance with a soft,
damp wiping cloth. Thoroughly dry the exterior of
the appliance.
• Clean the interior of the appliance with a moist,
soft cloth. Dry with kitchen towel.
• Check the appliance for any damage on a regular
basis.
To clean thoroughly:
• Fill the pan with approx. 0.5 litre of water.
• Replace the pan in the unit and switch on the Health
Fryer for circa 20 minutes at 200 degrees Celsius.
EN

13
• Remove the pan and leave the Health Fryer to cool.
• Remove the plug from the socket.
• Hold the Health Fryer upside down and the loose
remnants will fall out.
• Place the Health Fryer in the correct position and
replace the pan.
• Allow the Health Fryer to dry for approx. 10
minutes before using it again.
E1/E2 message on display:
If the E1 or E2 message appears, remove the plug
from the wall socket. Let the appliance cool for 30
minutes and then switch it on again. If the message
continues to appear, then the appliance is defective.
WASTE DISPOSAL
Electrical appliances, accessories and their
packaging must be reused as much as possible in
an environmentally sound manner. Do not dispose of
these items together with your normal rubbish. Only
for EU countries:
According to the European 2002/96/EG WEEE
Guideline on the disposal of old electric and
electronic appliances, the appliances that are no
longer used must be collected and recycled in an
environmentally sound manner.
BOURGINI SERVICE AND WARRANTY
The warranty is valid for a period of 2 years from
the date of purchase as stated on your purchase
receipt, which also your proof of warranty. Please
turn to your retailer to claim your warranty. The
warranty shall not apply if the product is subjected
to incorrect use,, improperly disassembled,
damaged by falls, impacts or similar, or if damage
is caused due to failure to descale in good time
products that are manufactured for use with water.
Should a certain product be provided with specific
warranty terms and conditions, these shall receive
priority over general terms and conditions. The
warranty shall not apply to indirect damages.
Should you have any questions regarding the use of
the product, please consult our website at
www.bourgini.com
DISCLAIMER
Changes reserved; specifications are subject to
change without stating grounds for doing so.
EN

14
CONSIGNES DE SÉCURITÉ
Lisez attentivement le
mode d’emploi avant toute
utilisation. Conservez le
mode d’emploi.
Cet appareil peut être utilisé,
nettoyé et entretenu par des
enfants à partir de 8 ans
sous la supervision d’un
adulte responsable de leur
sécurité. Tenez l’appareil
et le cordon électrique
hors de portée des enfants
de moins de 8 ans. Les
enfants ne doivent pas jouer
avec l’appareil. Surveillez
toujours les enfants pour
éviter qu’ils ne jouent avec
l’appareil.
L’appareil peut être utilisé
par des personnes ayant
un handicap physique,
sensoriel, mental ou
moteur et par des
personnes ne disposant
pas de l’expérience et des
connaissances nécessaires
à condition qu’elles soient
supervisées par une
personne responsable de
leur sécurité ou qu’elles
reçoivent des instructions
sur la façon d’utiliser cet
appareil en toute sécurité
et qu’elles comprennent les
dangers qui vont de pair
avec son utilisation.
•Cet appareil est uniquement conçu pour un
usage ménager.
• Ne laissez pas l’appareil sans surveillance
pendant son utilisation.
• Utilisez l’appareil et ses accessoires uniquement
pour l’usage pour lequel il est conçu. N’utilisez pas
l’appareil et les accessoires pour un usage autre
que ceux décrits dans le mode d’emploi.
• N’utilisez pas l’appareil lorsqu’un de ses
composants, un accessoire, le cordon ou la
fiche sont endommagés ou défectueux. Faites
remplacer un composant, accessoire, cordon
ou fiche endommagés ou défectueux par le
fournisseur ou un réparateur agréé.
• N’utilisez pas l’appareil à proximité d’éléments
contenant de l’eau tels que baignoires, douches et
lavabos.
• Ne plongez pas l’appareil dans l’eau ou tout
autre liquide. Si cela se produit, débranchez
immédiatement l’appareil de la prise de courant.
Ne sortez jamais l’appareil hors de l’eau ou autre
liquide avant d’avoir débranché la fiche de la
prise de courant. Vous ne pouvez plus utiliser
un appareil qui est tombé dans l’eau ou un autre
liquide.
• Évitez que l’eau ne puisse pénétrer dans les points
de connexion du cordon et de la rallonge.
• Tenez le cordon à l’écart de sources de chaleur, de
produits huileux et de rebords coupants.
• Avant emploi, vérifiez toujours que le voltage de
votre domicile correspond a voltage indiqué sur la
plaque d’identification de l’appareil.
• Pour une meilleure protection, branchez l’appareil
sur un groupe protégé par un disjoncteur avec une
tension nominale de 30 mA maximum.
• N’alimentez pas l’appareil au moyen d’une
minuterie externe ou d’un système séparé de
commande à distance.
• Déroulez toujours entièrement le cordon et
éventuellement la rallonge. Veillez à ce que le
cordon et éventuellement la rallonge ne pendent
pas sur le rebord d’un plan de travail, qu’ils ne
risquent pas de s’emmêler et que personne ne
risque de se prendre les pieds dedans.
• Ne tirez pas sur le cordon pour débrancher la fiche
de la prise de courant.
• Débranchez la fiche de la prise de courant
lorsque l’appareil n’est pas utilisé.
• N’utilisez pas l’appareil à l’extérieur. Placez
l’appareil sur une surface stable et plane.
• Ne placez pas l’appareil à proximité de sources de
chaleur. Ne placez pas l’appareil sur des surfaces
chaudes ou à proximité d’un feu ou de flammes.
• Veillez à avoir les mains bien sèches lorsque
vous touchez l’appareil.
• Débranchez la fiche de la prise de courant avant
de monter ou de démonter l’appareil et avant
FR

15
d’effectuer des opérations de nettoyage ou d’entretien.
• Appareils motorisés : faites attention aux parties
acérées et/ou mobiles. Pendant l’emploi, le nettoyage
et l’entretien, ne touchez pas les parties mobiles.
• Appareils de chauffage : attendez que l’appareil ait
refroidi avant de toucher le coffrage et les pièces.
Soyez particulièrement vigilant lors du nettoyage et
de l’entretien.
HYGIÈNE
Pour éviter toute contamination bactérienne, il est
important de manipuler les aliments crus (viande,
volaille ou poisson) avec précaution lors de leur
préparation. Nous en profitons donc pour vous
rappeler ici quelques consignes d’hygiène à suivre.
Se laver les mains
• Veillez à régulièrement vous laver les mains, surtout
avant de préparer les repas, après avoir touché des
ingrédients crus et avant de passer à table.
• Lavez-vous les mains avec un savon liquide
pendant au moins 15 secondes. Vous devez
ensuite vous sécher les mains avec une serviette
propre ou un morceau d’essuie-tout.
Lors de la préparation
• Lorsque vous préparez des ingrédients crus,
le plan de travail, la planche à découper et les
couverts utilisés doivent être parfaitement
propres. Lavez ensuite les ustensiles et la
vaisselle employés dans une eau savonneuse
très chaude.
• Nous vous conseillons d’utiliser une planche à
découper pour les légumes et le pain/la pâte et
une autre pour les ingrédients crus.
• Il est par ailleurs important de ne pas utiliser
les couverts qui ont servi à la préparation des
ingrédients crus pour manipuler des aliments
cuits dans la mesure où ils peuvent être
contaminés par des bactéries qui pourraient
vous rendre malade. Lavez régulièrement les
couverts ou veillez à utiliser des couteaux et des
fourchettes différents lors de la préparation de
votre repas.
• Assurez-vous également que les aliments cuits
n’entrent pas en contact avec les ingrédients
encore crus.
• Veillez par ailleurs à ce que la viande n’attache
pas afin d’éviter la formation de matières nocives.
Servir le repas
• Lorsque vous servez de la viande, du poisson ou
de la volaille, il est également nécessaire de ne pas
disposer les aliments cuits sur le même plat que
celui que vous avez utilisé pour les aliments crus.
DESCRIPTION DES DIFFÉRENTES
COMMANDES ET PIÈCES (Voir Fig. 1)
1. Écran tactile
2. Poignée
3. Panier
4. Bac-tiroir
5. Capot de protection
6. Bouton de déblocage
7. Poignée
TOUCHES DE L’ÉCRAN TACTILE (Voir Fig. 2)
1. Touche Allumage/Marche/Pause
2. Touche Menu
3. Touche Température
4. Réglage de la durée
5. Plus (+)
6. Moins (-)
ICÔNES D’AFFICHAGE (Voir Fig. 2)
7. Fonction chauffante
8. Température
9. Durée
10. Ventilateur
11. Programme Frites
12. Programme Côtelettes
13. Programme Poulet
14. Programme Crevettes
15. Programme Steak
16. Programme Cake
17. Programme Légumes
18. Programme Poisson
MODE D’EMPLOI
Généralités :
• Avant la première utilisation, retirez tous les
matériaux d’emballage.
• Nettoyez d’abord le bac-tiroir et le panier dans
du liquide vaisselle, rincez-les bien à l’eau claire
et séchez-les.
• Laissez suffisamment d’espace autour de
l’appareil pour permettre l’évacuation de la
chaleur.
• Assurez une ventilation suffisante.
• Placez l’appareil sur une surface horizontale et
stable.
• Ne recouvrez pas l’entrée d’air et les orifices
de ventilation pendant l’utilisation; veillez à ce
qu’aucun rideau ne pende contre l’appareil et ne
posez pas de serviette, de chiffon ou tout autre
élément similaire dessus.
• Pour éviter tout risque d’incendie, ne remplissez
JAMAIS le bac d’huile, de graisse ni de tout autre
liquide!
• En raison du puissant courant d’air chaud généré
par l’appareil, ne placez pas la main dans le
Health Fryer lorsqu’il est en position ouverte et
en marche.
FR

16
• Pendant et après l’utilisation, utilisez des
gants de cuisson pour manipuler le bac-tiroir
et le panier qui peuvent être brûlants. Après
utilisation, éteignez l’appareil, débranchez la
fiche de la prise de courant et attendez que
l’appareil ait entièrement refroidi.
• Stockez l’appareil dans un endroit sec quand il
n’est pas utilisé.
• Assurez-vous que les appareils ainsi stockés
sont hors de la portée des enfants.
Instructions de base :
• Branchez la fiche dans une prise de terre.
• Préchauffez le Health Fryer.
• Appuyez sur la touche de mise en marche.
Dès que le bac et le panier à friture sont
correctement mis en place dans l’appareil, la
touche Allumage/Marche/Pause (1) s’allume.
Si vous appuyez sur la touche Marche (1),
la température est réglée sur 200 degrés et
la durée de cuisson sur 15 minutes. Si vous
appuyez de nouveau sur la touche Marche (1),
la cuisson commence. Si vous appuyez sur la
touche Allumage/Marche/Pause (1) pendant 3
secondes, le Health Fryer s’éteint en cours de
cuisson. Toutes les lumières s’éteignent et le
ventilateur s’arrête de fonctionner.
Remarque : Pendant la cuisson, vous pouvez
appuyer sur la touche Allumage/Marche/
Pause (1) pour faire une pause en cours de
programme. Vous pouvez ainsi modifier la
durée et la température du programme.
• Pour utiliser l’un des programmes préréglés,
vous pouvez utiliser la touche Menu (2). Huit
programmes différents vous sont proposés.
Une fois qu’un programme est sélectionné, il
démarre pour la durée et la température de
cuisson préréglées.
• La température peut être réglée à l’aide de
la touche de réglage de la température (3).
Vous pouvez régler la température souhaitée
plus rapidement en maintenant cette touche
appuyée. La plage de températures va de 80°C
à 200°C.
• Pour modifier la durée de cuisson préréglée,
vous pouvez utiliser la touche de réglage
de la durée (4). Vous pouvez augmenter ou
raccourcir la durée de cuisson en appuyant
sur les symboles + et – . Vous pouvez régler la
durée de cuisson souhaitée plus rapidement en
maintenant cette touche appuyée.
Préparation :
• Le Health Fryer convient pour tous les aliments
pouvant normalement être préparés dans
un four à chaleur tournante; la préparation
est souvent bien plus rapide en raison de la
circulation d’air très concentrée et de l’espace
restreint dans lequel les aliments sont préparés.
• Pour la préparation d’aliments préemballés,
par exemple des frites ou des en-cas surgelés,
nous vous conseillons de choisir la variante pour
préparation au four, quand elle existe.
• Vous trouverez également en supermarché
des frites et en-cas de différentes marques
spécialement préparés pour la cuisson dans une
friteuse à air chaud pulsé (aussi appelée friteuse
sans huile ou airfryer); pour les préparer, suivez
les instructions sur l’emballage des aliments.
• Dans le tableau ci-dessous, vous pouvez voir les
types d’aliments pouvant être préparés dans le
Health Fryer. La durée et la température indiquées
sont approximatives, étant donné qu’il faut aussi
tenir compte de la quantité et de la composition
exacte des aliments. Il peut être parfois nécessaire
d’expérimenter avec les réglages.
• Généralement, une plus grande quantité
d’aliments nécessite aussi un temps de
préparation un peu plus long; les durées
indiquées dans le tableau sont calculées pour des
quantités d’environ 400 grammes. Pour 1,5 kg, il
faut multiplier le temps de préparation par 3.
• Ne préparez pas plus de 1.5 kg en une seule fois!
• Le panier laisse passer l’air: ce détail est
important pour permettre au Health Fryer de
bien fonctionner. Ne bloquez pas la circulation
d’air, par exemple en plaçant une feuille de
papier d’aluminium dans le panier.
• Ne préparez pas dans le Health Fryer des
aliments très gras ou qui giclent beaucoup; la
graisse risquerait de gicler sur l’élément de
chauffe et de roussir, voire de prendre feu!
Programmes :
Le Health Fryer dispose de 9 programmes en plus
de son programme standard.
Programme Icône Température Temps de
cuisson (min)
Frites 200 20
Côtelettes 180 6
Poulet 180 25
Crevettes 180 12
Steak 180 16
FR

17
Cake 180 12
Légumes 160 17
Poisson 180 18
Tableau de préparation :
La durée indiquée est calculée pour une quantité de
400 grammes env.; nous conseillons de secouer les
aliments dans le panier à mi-cuisson.
Min-Max
quantité (g) Temp.
(°C) Durée
(min)
Pommes de terre et frites (Secouer)
Frites fines
surgelées 400-500 200 18-20
Frites
épaisses
surgelées
400-500 200 20-25
Gratin de
pomme de
terre
600 200 20-25
Viande et volaille
Steak 100-600 180 10-15
Côtelettes 100-600 180 10-15
Hamburger 100-600 180 10-15
Hot-dog 100-600 200 13-15
Pilons de
poulet 100-600 180 25-30
Filet de
poulet 100-600 180 15-20
En-cas (Compatible pour cuisson au four)
Nems 100-500 200 8-10
Nuggets
de poulet
surgelés
100-600 200 6-10
Bâtonnets
de poisson
surgelés
100-500 200 6-10
En-cas au
fromage 100-500 180 8-10
Légumes
farcis 100-500 160 10
Pâtisserie (Utilisez un moule)
Cake 400 160 20-25
Quiche 500 180 20-22
Muffins 400 200 15-18
Produits à
base de pâte
sucrée
500 160 20
Les pommes de terre sont des « frites » uniquement
quand elles ont déjà été cuites une fois dans l’huile,
comme c’est le cas pour les frites précuites. On peut
couper des pommes de terre fraîches de différentes
façons, donc aussi en forme de frites. Cependant,
le résultat final aura plus un goût de pommes de
terre sautées que de frites. La meilleure méthode
pour préparer des pommes de terre fraîches est la
suivante:
• Trempez les pommes de terre coupées en
morceaux 20 à 30 minutes dans de l’eau froide;
égouttez-les et séchez-les avec un papier
essuie-tout ou un torchon.
• Versez une cuillerée d’huile (huile de tournesol
ou huile d’olive) dans un plat et ajoutez du
poivre et du sel.
• Ajoutez les morceaux de pomme de terre dans
le plat et passez-les dans l’huile jusqu’à ce
qu’ils soient recouverts d’une légère couche
d’huile.
• Sortez les pommes de terre du plat, avec une
louche ou une écumoire par ex., et placez-les
dans le panier du Health Fryer. Pour éviter un
surplus d’huile, ne videz pas le plat dans le
panier.
Huile :
• Le Health Fryer fonctionne parfaitement
sans qu’il soit nécessaire d’ajouter de l’huile.
Résultat : les plats préparés dans l’appareil
sont 65 % moins gras que les aliments cuits
dans une friteuse traditionnelle ! (mesuré par
rapport à une friteuse Bourgini remplie d’huile)
• Seule la cuisson de pommes de terre fraîches
nécessite l’ajout d’une petite quantité d’huile
(une seule cuillerée à soupe = 15 ml).
NETTOYAGE ET ENTRETIEN
• Pour procéder au nettoyage et à l’entretien de
l’appareil, retirez la fiche de la prise de courant et
attendez que l’appareil ait entièrement refroidi.
• Ne plongez pas l’appareil ni ses composants
dans l’eau ou tout autre liquide.
FR

18
• N’utilisez pas de nettoyants agressifs ni de
produits à récurer.
• N’utilisez pas d’objets tranchants.
• Seuls le panier amovible et le bac-tiroir passent
au lave-vaisselle. L’appareil lui-même et les
autres accessoires ne doivent pas être nettoyés
dans le lave-vaisselle.
• Le bac-tiroir et le panier peuvent aussi être
nettoyés dans du liquide vaisselle; prenez soin
de bien les rincer après.
• Nettoyez l’extérieur de l’appareil avec un
chiffon doux et humide. Séchez soigneusement
l’extérieur de l’appareil.
• Nettoyez également l’intérieur avec un chiffon
doux et humide et séchez-le ensuite avec un
papier essuie-tout.
• Vérifiez régulièrement que l’appareil n’est pas
endommagé.
Pour un nettoyage à fond :
• Remplir la cuve avec environ 50 cl d’eau.
• Remettre la cuve dans l’appareil et faire
fonctionner le Health Fryer à 200 °C pendant
approximativement 20 minutes.
• Retirer la cuve et laisser le Health Fryer refroidir.
• Débrancher l’appareil de la prise de courant.
• Retourner le Health Fryer afin de faire tomber
les restes alimentaires éventuels.
• Replacer le Health Fryer sur ses pieds et
reposer la cuve à l’intérieur.
• Laisser sécher le Health Fryer 10 minutes
environ avant de pouvoir le réutiliser.
Erreur E1/E2 affichée à l’écran :
Si l’erreur E1 ou E2 s’affiche, débranchez l’appareil,
laissez-le refroidir 30 minutes puis remettez-le
en marche. Si l’erreur perdure, cela signifie que
l’appareil est défectueux.
COLLECTE DES DÉCHETS
Les appareils et accessoires électriques ainsi que
leurs emballages doivent autant que possible être
recyclés en tenant compte de l’environnement. Par
conséquent, ne jetez pas ces matériaux avec les
ordures ménagères. Uniquement pour les pays de
l’UE:
Conformément à la directive européenne 2002/96/EG
DEEE relative aux déchets d’équipements électriques
ou électroniques, les appareils ne pouvant plus
être utilisés doivent être collectés et soumis à un
recyclage respectueux de l’environnement.
SERVICE APRÈSVENTE ET GARANTIE
BOURGINI
Le ticket de caisse fait office de bon de garantie
et vous permet de bénéficier d’une garantie de 2
ans à partir de la date d’achat. Pour la garantie,
veuillez vous adresser au magasin où vous avez
effectué votre achat. La garantie ne couvre pas les
dommages résultant d’une mauvaise utilisation et
d’un démontage non effectué par un professionnel
agréé. Vous ne pouvez bénéficier en outre de la
garantie si vous faites tomber votre appareil ou si
vous le cognez, et si vous ne détartrez pas à temps
les appareils nécessitant l’utilisation d’eau. Les
conditions de garantie spécifiques concernant un
produit particulier prévalent sur les conditions de
garantie générales. La garantie ne couvre pas les
dommages indirects. Pour toute question relative à
l’utilisation du produit, vous pouvez vous reporter
sur notre site Web www.bourgini.com
AVIS DE NONRESPONSABILITÉ
Sous réserve de modifications; les spécifications
peuvent être modifiées sans notification préalable.
FR

19
FR

20
SICHERHEITSHINWEISE
Diese Gebrauchsanleitung
vor der Benutzung des
Geräts bitte sorgfältig
durchlesen. Die Gebrauchs-
anleitung danach
aufbewahren.
Das Gerät kann von Kindern
ab 8 Jahren benutzt,
gereinigt und gepflegt
werden, allerdings nur
unter Aufsicht einer Person,
die für ihre Sicherheit
zuständig ist. Gerät und
Netzkabel von Kindern
unter 8 Jahren fernhalten.
Kinder dürfen nicht mit dem
Gerät spielen. Kinder immer
beaufsichtigen und darauf
achten, dass sie nicht mit
dem Gerät spielen.
Das Gerät kann von
Personen mit körperlichen,
sensorischen, mentalen
oder motorischen
Einschränkungen und
von Personen ohne
Vorkenntnisse und
Erfahrungen benutzt
werden, allerdings nur unter
Aufsicht einer Person, die
für ihre Sicherheit zuständig
ist, oder sofern sie
Anweisungen zum sicheren
Gebrauch des Gerätes
erhalten und die Gefahren,
die von der Benutzung
ausgehen, verstehen.
• Dieses Gerät ist ausschließlich für den
Hausgebrauch bestimmt.
• Das Gerät während des Gebrauchs nie
unbeaufsichtigt lassen.
• Das Gerät und die Zubehörteile dürfen nur
zweckgebunden benutzt werden. Verwenden
Sie das Gerät und die Zubehörteile niemals
für andere als die in der Gebrauchsanleitung
beschriebenen Zwecke.
• Bei Schäden an einem Element, einem
Zubehörteil, am Netzkabel oder am Stecker darf
das Gerät nicht benutzt werden. Beschädigte oder
defekte Elemente, Zubehörteile, Netzkabel oder
Stecker sollten nur vom Lieferanten oder von
einem anerkannten Kundendienst ausgetauscht
werden.
• Verwenden Sie das Gerät nicht in der Nähe
von Vorrichtungen, die Wasser enthalten, wie
Badewannen, Duschen oder Waschbecken.
• Das Gerät nie in Wasser oder andere
Flüssigkeiten tauchen. Sollte dies doch einmal
passieren, müssen Sie schnellstmöglich den
Netzstecker ziehen. Das Gerät niemals aus
dem Wasser oder aus anderen Flüssigkeiten
herausnehmen, solange der Stecker noch in
der Steckdose steckt. Ein Gerät, das ins Wasser
oder in sonstige Flüssigkeiten gefallen ist,
können Sie nicht mehr benutzen.
• Achten Sie darauf, dass kein Wasser in
die Anschlusspunkte von Netzkabel und
Verlängerungskabel gelangen kann.
• Das Netzkabel darf nicht in die Nähe von
Wärmequellen, Öl oder scharfkantigen
Gegenständen gelangen.
• Kontrollieren Sie vor Gebrauch immer, ob die
Netzspannung der auf dem Typenschild des
Geräts angegebenen Spannung entspricht.
• Für eine zusätzliche Sicherung sollte das
Gerät an eine Gruppe angeschlossen werden,
die durch einen Erdschlussschalter mit einem
Ansprechstrom von maximal 30 mA gesichert
ist.
• Bedienen Sie das Gerät nicht mithilfe einer
externen Zeitschaltuhr oder einer separaten
Fernbedienung.
• Netzkabel und ein eventuelles
Verlängerungskabel immer vollständig
abwickeln. Achten Sie darauf, dass das Netzkabel
und ein eventuelles Verlängerungskabel nicht
von der Arbeitsplatte herunterhängen, sodass
jemand sich darin verfangen oder darüber
stolpern könnte.
• Nicht am Netzkabel ziehen, wenn Sie den
Stecker aus der Steckdose herausziehen
möchten.
DE
This manual suits for next models
1
Table of contents
Languages:
Other Bourgini Fryer manuals

Bourgini
Bourgini 18.2021.00.00 User manual

Bourgini
Bourgini 18.2042.00.00 User manual

Bourgini
Bourgini 18.2149.00.00 User manual

Bourgini
Bourgini 18.1020.00.00 User manual

Bourgini
Bourgini 18.2143.00.00 User manual

Bourgini
Bourgini Health Fryer Plus User manual

Bourgini
Bourgini Health Fryer Plus User manual

Bourgini
Bourgini 18.2041.00.00 User manual

Bourgini
Bourgini 18.2042.00.00 User manual

Bourgini
Bourgini 18.2030.00.00 User manual