Vitrolife EmbryoScope Flex User manual

EmbryoScope™Flex incubator
User manual
EmbryoScope Flex incubator, software version 7.8
User manual, first issue 2021.08.02, revised 2022.06.01/EU/English

EmbryoScope Flex incubator
- 2 -
Table of contents
1Introduction............................................................................................................................5
1.1 Warnings, restrictions and limited warranty.....................................................................6
1.2 Intended use.................................................................................................................10
1.3 Intended users..............................................................................................................10
1.4 Clinical benefits.............................................................................................................11
1.5 Proposed workarounds.................................................................................................11
2Overview of the EmbryoScope Flex incubator................................................................... 12
2.1 Overview of features in the EmbryoScope Flex incubator .............................................13
2.1.1 Barcode labelling system...................................................................................15
2.2 Installation and required conditions...............................................................................16
2.2.1 Transportation and relocation of the EmbryoScope Flex incubator....................17
2.3 Starting up the EmbryoScope Flex incubator................................................................18
2.4 Shutting down the EmbryoScope Flex incubator and removing all culture dishes .........18
2.5 Restarting the integrated PC.........................................................................................19
3Connections to supporting systems .................................................................................. 20
3.1 Gas...............................................................................................................................22
3.2 ES server......................................................................................................................23
3.3 External alarm output....................................................................................................24
3.4 Incubator data...............................................................................................................24
3.5 USB connections ..........................................................................................................24
4Operating the EmbryoScope Flex incubator...................................................................... 25
4.1 The incubator screen ....................................................................................................25
4.1.1 Navigating on the incubator screen....................................................................26
4.1.2 Change set point mode...................................................................................... 27
4.1.3 Validation and calibration mode.........................................................................29
4.1.4 Controlling the incubator temperature................................................................32
4.1.4.1 Changing the temperature set point.....................................................32
4.1.4.2 Calibrating the temperature..................................................................33
4.1.5 Controlling the CO2/O2concentration.................................................................36
4.1.5.1 Changing the CO2/O2set point............................................................. 36
4.1.5.2 Validating the CO2/O2concentration ....................................................38
4.1.5.3 Calibrating the CO2/O2concentration...................................................41
4.1.6 Incubator O2regulation......................................................................................43

EmbryoScope Flex incubator
- 3 -
4.1.6.1 Turning on/off the O2regulation ...........................................................43
4.2 The PC screen..............................................................................................................44
4.2.1 PC home screen................................................................................................ 44
4.2.1.1 Colours on the home screen................................................................44
4.2.1.2 Starting an EmbryoSlide Flex culture dish............................................46
4.2.1.3 Barcode errors.....................................................................................50
4.2.1.4 Removing a single EmbryoSlide Flex culture dish................................ 52
4.2.1.5 Removing all EmbryoSlide Flex culture dishes.....................................52
4.2.1.6 Resuming culture in a culture dish .......................................................53
4.2.2 Culture dish overview screen.............................................................................55
4.2.2.1 Disabling image acquisition for individual wells....................................57
4.2.3 Settings screen..................................................................................................58
4.2.3.1 Enabling and disabling the screen saver..............................................59
5Cleaning and disinfecting the EmbryoScope Flex incubator............................................ 60
5.1 Periodic cleaning of the EmbryoScope Flex incubator...................................................60
5.2 Disinfection of the EmbryoScope Flex incubator........................................................... 63
6Changing the VOC HEPA filter............................................................................................ 66
7Replacing the main fuses.................................................................................................... 72
8Alarms, warnings and notifications....................................................................................74
8.1 Types of alarms, warnings and notifications..................................................................74
8.1.1 Alarms............................................................................................................... 74
8.1.2 Warnings...........................................................................................................75
8.1.3 Notifications.......................................................................................................75
8.2 Temporarily pausing alarms..........................................................................................76
8.3 Overview of the display colours of alarms, warnings and notifications........................... 77
8.3.1 Alarms............................................................................................................... 77
8.3.2 Warnings...........................................................................................................77
8.3.3 Notifications.......................................................................................................78
8.4 Multiple simultaneous alarms........................................................................................78
8.5 Resetting alarms...........................................................................................................79
8.6 Graphical overview of alarms and operator response....................................................80
8.7 Graphical overview of warnings and operator response................................................83
8.8 Graphical overview of notifications and operator response ...........................................85
8.9 Overview of error conditions and control unit responses...............................................86

EmbryoScope Flex incubator
- 4 -
8.10 External alarm system................................................................................................... 87
8.10.1 Overview of errors sent to the external alarm system ........................................87
8.10.2 Delay of external alarms and warnings..............................................................88
8.10.3 Connecting the external alarm...........................................................................88
9Emergency procedure ......................................................................................................... 89
9.1 Removing culture dishes after a system failure.............................................................89
10 Technical specifications......................................................................................................91
11 EMC and HF technical review.............................................................................................. 95
11.1 Electromagnetic emissions ...........................................................................................95
11.2 Electromagnetic immunity.............................................................................................96
12 Accessories and materials ................................................................................................ 100
13 Planned service and maintenance.................................................................................... 101
13.1 Planned service .......................................................................................................... 101
13.2 Planned maintenance ................................................................................................. 102
13.2.1 Maintenance screen ........................................................................................ 103
13.2.2 Generating a monthly incubation report...........................................................104
13.2.3 VOC HEPA filter and sensor maintenance.......................................................105
14 Symbols and labels............................................................................................................ 108
14.1 Product information labels...........................................................................................108
14.2 Warning labels............................................................................................................109
14.3 Connection labels .......................................................................................................110
14.4 Labels on the shipping crate .......................................................................................111
15 Disposal of waste............................................................................................................... 112
16 Contact information........................................................................................................... 113
CohortView, CulturePro, EmbryoScope, EmbryoSlide, EmbryoViewer, Guided Annotation,
iDAScore and KIDScore are trademarks or registered trademarks belonging to the Vitrolife Group.
©2022 Vitrolife A/S. All rights reserved.

EmbryoScope Flex incubator
- 5 -
1 Introduction
This user manual provides information on how to use the EmbryoScope Flex incubator.
The end user is strongly encouraged to carefully follow the scheme outlined in the section entitled
Planned service and maintenance to ensure error-free operation of the incubator.
The EmbryoScope Flex incubator is a medical device that must be operated by trained personnel
according to the instructions contained in this user manual. Users must be qualified to operate the
device and qualified to perform procedures associated with device use in accordance with local
qualification standards.
The product fulfils the requirements of the UL 60601-1 edition 1, IEC 60601-1:2012 and 61010-2-
081 standards; class I, type B equivalent. The EmbryoScope Flex incubator is suitable for
continuous operation.
•The EmbryoScope Flex incubator and related accessories conform to the requirements of
Regulation (EU) 2017/745 on medical devices, classified as class IIa.
•Conforms to ANSI/AAMI ES 60601-1:2005 + A1 + A2.
•Conforms to IEC 61010-2-081:2001 + A1:2003.
•Certified to CAN/CSA - C22.2 No. 60601-1:R2013 addendum.

EmbryoScope Flex incubator
- 6 -
1.1 Warnings, restrictions and limited warranty
Users must agree to read and understand this user manual and observe the safety instructions
before operating the incubator.
RESTRICTIONS ON USE
•The EmbryoScope Flex incubator may only be used by persons who have been trained in
its use by a person certified by Vitrolife.
•The EmbryoScope Flex incubator may only be used with sterile disposable EmbryoSlide
Flex culture dishes produced and sold by Vitrolife.
•The EmbryoSlide Flex culture dishes may not be reused.
•The EmbryoSlide Flex culture dishes must be covered with sterile lids before insertion
into the EmbryoScope Flex incubator.
•The EmbryoScope Flex incubator may not be used in a wet environment. No fluids other
than culture medium and oil and the cleaning agents specified in this user manual may be
used in or near the incubator.
•Never cover the vent holes on the back of the incubator in part or in whole as this may
cause the incubator to overheat.
•Users should contact Vitrolife immediately to report any incident and/or injury to a patient,
operator or maintenance employee that occurred as a result of operating the
EmbryoScope Flex incubator. Any serious incident that has occurred in relation to the
incubator should be reported to the competent authority of the Member State in which the
user is established.
•Should an accident occur while using the EmbryoScope Flex incubator, stop using the
incubator until it has been checked by a person certified by Vitrolife.

EmbryoScope Flex incubator
- 7 -
WARNING
•The EmbryoScope Flex incubator includes moving parts with safety stops. Do not try to
block safety sensors. If the safety sensors are blocked, inserting a finger or a hand into
the incubator while it is turned on is dangerous and may cause injury.
•To avoid risk of electric shock, this incubator must only be connected to a mains supply
with a protective earth connection.
•Detachable main power supply cords with inadequate ratings should not be used. See
section 10 for power supply ratings.
•The incubator must be positioned to allow the operator to turn on/off the main power
switch on the back of the incubator.
•Portable and mobile RF communications equipment may affect the EmbryoScope Flex
incubator.
•If the incubator is used in a manner not specified by Vitrolife, the protection against
hazards provided by the incubator may be impaired.
•The EmbryoScope Flex incubator is not suitable for use in the presence of a flammable
anaesthetic mixture with air or with oxygen or nitrous oxide.
•It is the user’s responsibility to validate the performance of the EmbryoScope Flex
incubator by performing quality control checks on the temperature, CO2and O2* levels
every two weeks.
* Only if the clinic incubates with reduced O2concentration.
•During initial start-up and after an incubator shutdown, always validate the gas and
temperature levels using calibrated, external validation devices as detailed in this user
manual. Do NOT rely solely on values displayed on the incubator screen.

EmbryoScope Flex incubator
- 8 -
INSTALLATION AND SERVICE
•Installation and service of the EmbryoScope Flex incubator may only be carried out by a
person certified by Vitrolife. The EmbryoScope Flex incubator must remain at the location
where it was installed. If the EmbryoScope Flex incubator is disconnected and/or moved
without supervision by a person certified by Vitrolife, the incubator is no longer approved
for clinical use and the warranty may be voided.
•If the EmbryoScope Flex incubator or parts of it are modified, appropriate inspection and
testing must be conducted by a person certified by Vitrolife to ensure continued safe use.
•When cleaning and disinfecting the EmbryoScope Flex incubator, always use the
prescribed chemical agents as specified in section 5 of this user manual.
TRANSPORTATION AND RELOCATION OF THE EMBRYOSCOPE FLEX INCUBATOR
•While the EmbryoScope Flex incubator is still in the shipping boxes, it must only be
moved by using a lift truck or a pallet lifter. Do NOT open the shipping boxes without the
presence of a person certified by Vitrolife.
•When the EmbryoScope Flex incubator has been unpacked, it must only be moved by
two persons supporting the incubator in accordance with the instructions contained in this
user manual and only under the supervision of a person certified by Vitrolife (see section
2.2.1).
CONNECTION TO EXTERNAL EQUIPMENT
(EN 60601-1 MEDICAL ELECTRICAL EQUIPMENT –PART 1)
•External equipment intended for connection to signal input, signal output or other
connectors must comply with the relevant IEC standard (i.e. EN 60601-1:2006 –Part 1
for medical electrical equipment). In addition, all such combinations –systems –must
comply with the standard EN 60601-1:2015 –Part 2, General requirements for basic
safety and essential performance. Equipment not complying with EN 60601-1:2006 –Part
1 must be kept outside the patient environment, i.e. at least 1.5 m from the patient or the
patient support.
•Any person who connects external equipment to signal input, signal output or other
connectors has formed a system and is therefore responsible for ensuring that the system
complies with the requirements of EN 60601-1:2006 –Part 1. If in doubt, contact a
qualified medical technician or your local representative.

EmbryoScope Flex incubator
- 9 -
ELECTROMAGNETIC COMPATIBILITY
•The EmbryoScope Flex incubator has been tested and found to comply with the limits for
medical devices set out in the IEC 60601-1-2 Edition 4.0 for electromagnetic compatibility.
These limits are designed to provide reasonable protection against harmful interference in
a typical medical installation.
Compliance with IEC 60601-1-2 Edition 4.0 ensures compatibility when the EmbryoScope
Flex incubator is placed at a minimum distance to nearby instruments. If the EmbryoScope
Flex incubator is placed close to other instruments, it is necessary to observe that the
performance of all instruments remains unaffected by the placement.
The EmbryoScope Flex incubator generates, uses and can radiate radio frequency
energy and, if not installed and used in accordance with the instructions, may cause
harmful interference to other instruments in the vicinity. However, there is no guarantee
that interference will not occur in a particular installation. If this incubator does cause
harmful interference to other instruments, which can be determined by turning the
incubator off and on, the user is encouraged to try to correct the interference by one or
more of the following measures:
a) Reorient or relocate the receiving instrument.
b) Increase the separation between the instruments.
c) Connect the incubator to an outlet on a circuit different from that to which the other
instrument(s) are connected.
Consult the manufacturer, its representative or its dealer for help.
WARNING
•The use of accessories, transducers and cables other than those specified, with the
exemption of transducers and cables sold by the manufacturer of the system as
replacement parts for internal components, may result in increased emissions or
decreased immunity of the equipment or system.
•The EmbryoScope Flex incubator should not be used adjacent to or stacked with other
equipment. If adjacent or stacked use is necessary, the incubator should be observed to
verify normal operation in the configuration in which it will be used.
CONFIDENTIALITY
•All identification numbers, names and treatment data presented in this manual are
fictional.

EmbryoScope Flex incubator
- 10 -
LIMITED WARRANTY
•Vitrolife warrants the EmbryoScope Flex incubator to be free from defects in materials
and workmanship for a period of one (1) year from the first installation date.
The limited warranty will terminate immediately if installation, service, repair or relocation
of the incubator is carried out by other than Vitrolife-certified personnel.
The limited warranty does not apply to damage resulting from:
a) failure to perform routine maintenance in accordance with this user manual;
b) accident, abuse, misuse or misapplication of the incubator;
c) use and operation that does not comply with instructions provided in this user
manual; or
d) normal wear and tear.
GENERAL CYBER SECURITY RECOMMENDATIONS
•Users are advised and expected to take the following measures to reduce cyber security
risk in order to ensure that the device will work as designed in the intended user
environment:
oEnsure that personnel are properly trained in cyber security awareness
oPrevent physical access to the equipment by unauthorised users.
•Users must inform Vitrolife A/S without any undue delay upon becoming aware of a cyber
security vulnerability incident or any suspected security events.
1.2 Intended use
The intended use of the EmbryoScope Flex incubator is to provide an environment with controlled
temperature and gas concentrations (CO2and optionally O2) for the culture of gametes and/or
embryos and to acquire images of these during incubation.
1.3 Intended users
Embryologists, other laboratory personnel and clinic staff at IVF clinics trained by Vitrolife A/S-
certified instructors.

EmbryoScope Flex incubator
- 11 -
1.4 Clinical benefits
•Improved embryo development
•Improved implantation/pregnancy rate
•Reduced pregnancy loss rate.
1.5 Proposed workarounds
For details about any known anomalies and limitations in the software as well as proposed
workarounds, refer to the separate handout on this subject provided by Vitrolife.

EmbryoScope Flex incubator
- 12 -
2 Overview of the EmbryoScope Flex
incubator
The EmbryoScope Flex incubator is a tri-gas incubator that acquires a series of unattended
measurements on individual embryos during their development. The measurements include: time-
lapse microscopy at multiple focal planes and logging of incubation conditions. Separate
processing units control the incubation environment and data acquisition to ensure safe and
reliable operation.
Service lid:
Access to reset button,
VOC HEPA filter, indicator
LEDs and USB connector
to access e.g. system log
data
Back of incubator:
Main power switch, main power
inlet, gas inlets, connection to
external alarm, Ethernet connection,
USB connection and connection to
external logging system
Incubator screen
Cover to gas
sample port
Load door
Emergency
unlock button
Load door
open button
PC screen
EmbryoScope Flex incubator
- 13 -
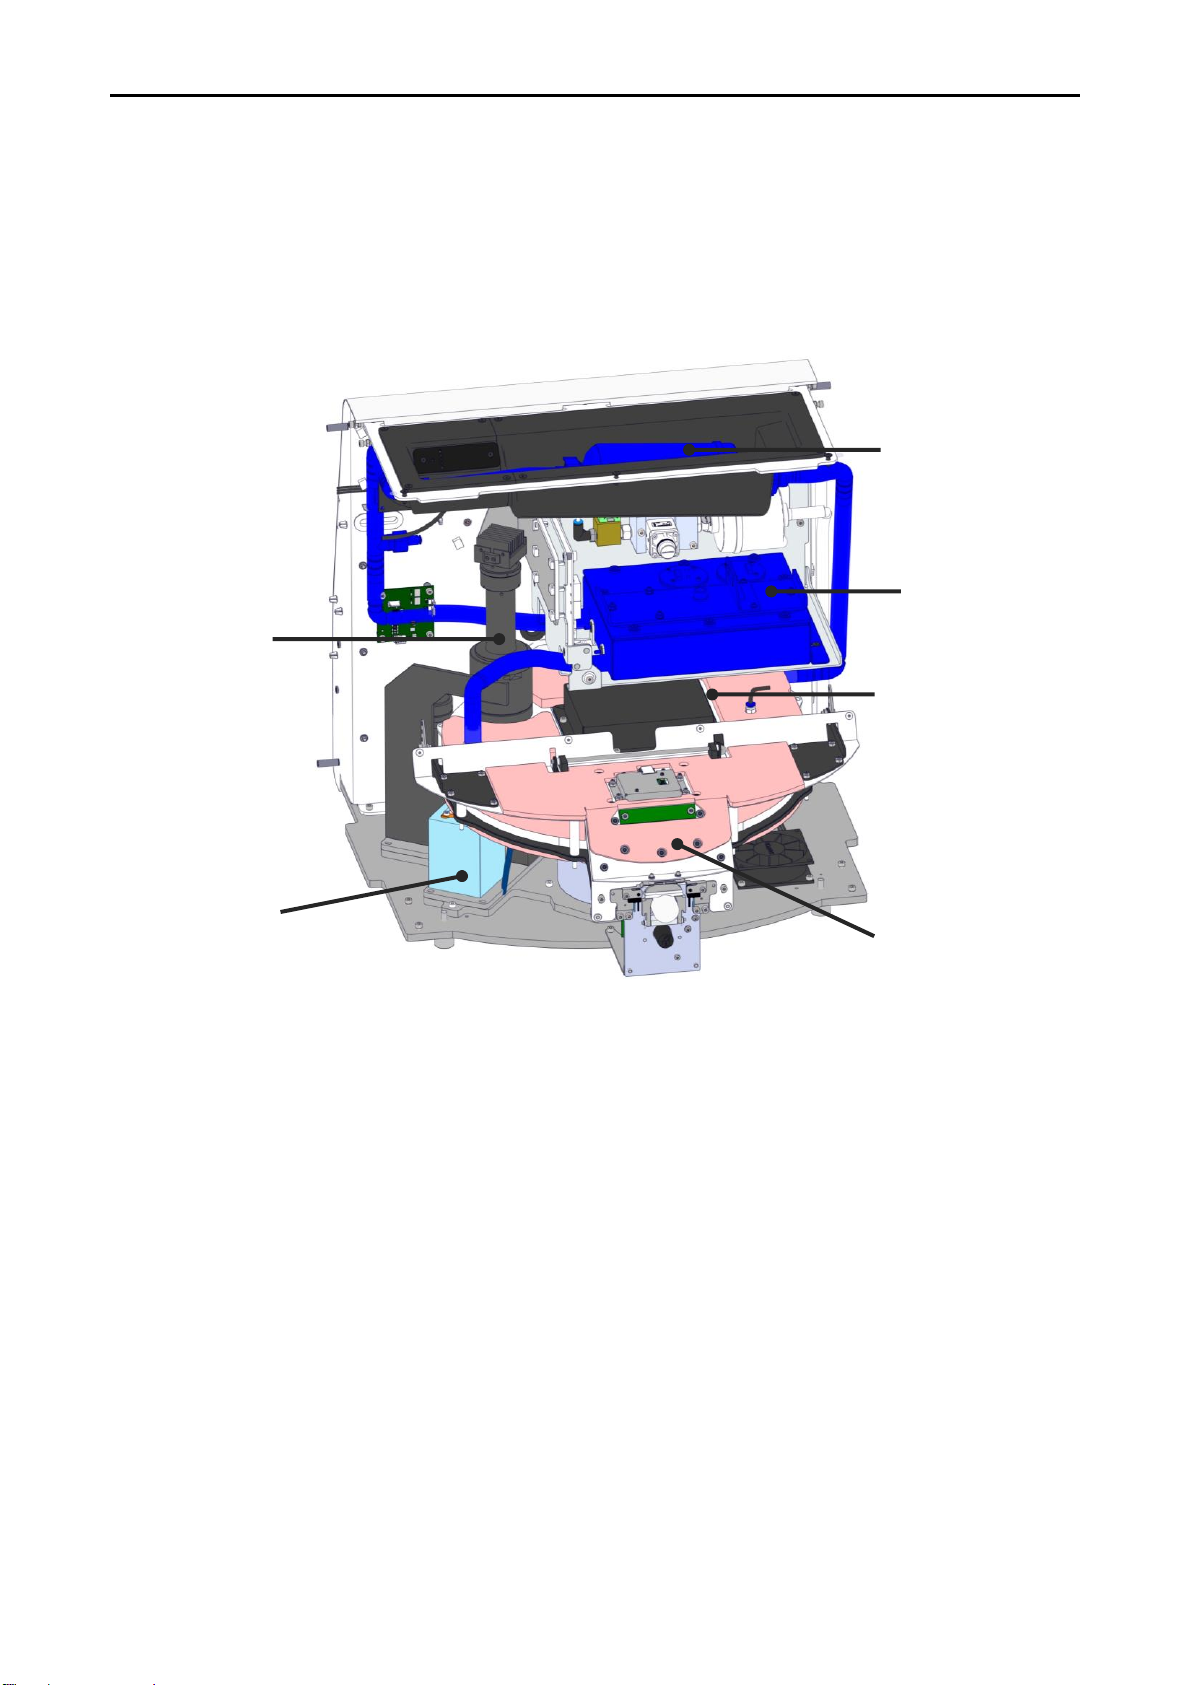
2.1 Overview of features in the EmbryoScope Flex incubator
The EmbryoScope Flex incubator comprises two separate systems: a computer and microscopy
system that controls the image acquisition and a gas and temperature system that controls the
incubation conditions.
The blue components in the above illustration represent the gas and temperature system of the
incubator. These components maintain the desired gas concentrations inside the incubation
chamber. The gas is circulated through a VOC HEPA filter before entering the incubation chamber.
The same system also controls the temperature conditions inside the incubation chamber.
The embryos that are incubated reside in the EmbryoSlide Flex culture dish inside the incubation
chamber. The culture dish holder in the incubation chamber is disc-shaped and has a maximum
capacity of 24 EmbryoSlide Flex culture dishes.
Microscope LED
illumination
Microscope/
camera unit
VOC HEPA filter
Gas flow
components
Incubation
chamber
Load door

EmbryoScope Flex incubator
- 14 -
The built-in microscope is a separate unit placed outside the incubation chamber. The microscope
consists of an LED illumination unit and a microscope/camera unit. The set-up corresponds to an
ordinary inverted microscope, i.e. with illumination from above and observation through an
objective placed beneath the examined embryos.
During image acquisition, each culture dish located on the culture dish holder is rotated to the
microscopy system, and individual image stacks are acquired from all individual embryos in each
culture dish. During the process, all embryos remain in an undisturbed incubation environment.
The culture dishes are placed on the culture dish holder in the EmbryoScope Flex incubator. The
culture dish holder is a sandwich construction controlled by a thermostat. The holder provides
direct heat transfer to the EmbryoSlide Flex culture dishes and automatically moves the culture
dishes from load position to camera position during time-lapse imaging.
Culture dish
holder
Microscope LED
illumination
Microscope/
camera unit

EmbryoScope Flex incubator
- 15 -
The incubation conditions inside the incubation chamber are unaffected by load door openings.
The removable frame surrounding the culture dish in load position combined with the fixed
partitions between the culture dishes shield the dishes contained within the incubator from outside
atmospheric conditions.
2.1.1 Barcode labelling system
In order to use barcode labels, the operator must print them from the EmbryoViewer and attach
them to the designated area on the culture dish (see the user manual for the EmbryoSlide Flex
culture dishes).
The information contained in the barcode is displayed in the Identification area of the PC screen
when a new culture dish has been inserted:
Removable frame
Partitions between
culture dishes

EmbryoScope Flex incubator
- 16 -
2.2 Installation and required conditions
The incubator must be set up in accordance with the installation checklist. It should not be moved
or disconnected by persons who are not certified by Vitrolife (see section 2.2.1 for information on
how to move the incubator).
Installation requirements:
•Clean room with a stable temperature between 20°C and 28°C.
•Sturdy table. The footprint of the device is approximately 0.6 m x 0.6 m. The lab bench
space required equals the size of the footprint with the addition of at least 22.5 cm on each
side of the device to allow maintenance operations to be performed. A minimum distance of
22.5 cm is also required between the EmbryoScope Flex incubator and other devices
placed on the same bench.
•Attachment plug provided with grounding pole and fulfilling local requirements.
•CO2gas supply with pressure regulator capable of providing stable output of CO2between
0.6 bar - 1 bar above ambient.
•N2gas supply with pressure regulator capable of providing stable output of N2between 0.6
bar - 1 bar above ambient (only required if the clinic wants to incubate with reduced O2
concentration).
•Medical electrical equipment requires special precautions regarding EMC and must be
installed and put into service according to the EMC information provided.
NOTE
•No cooling facilities are implemented in the incubation chamber. The incubation
temperature will always be higher than the ambient temperature. If the temperature rises
above the specified limits, the temperature inside the incubation chamber may exceed
the set point.
•It is strongly recommended, although not required, to connect the incubator to an
uninterruptible power supply (UPS) with earth connector to ensure stable operating
conditions in case of power failure. Any UPS connected to the EmbryoScope Flex
incubator must comply with the following directives and harmonised standards:
oLow Voltage Directive 2014/35/EU
oElectromagnetic Compatibility Directive 2014/30/EU
oEN 62040-1:2009 Uninterruptible power systems (UPS) –Part 1: General and safety
requirements for UPS
oEN 62040-2:2006 Uninterruptible power systems (UPS) –Part 2: Electromagnetic
compatibility (EMC) requirements.
For further details about how to install the incubator, refer to the manual entitled Planned service
and maintenance (English only).
EmbryoScope Flex incubator
- 17 -
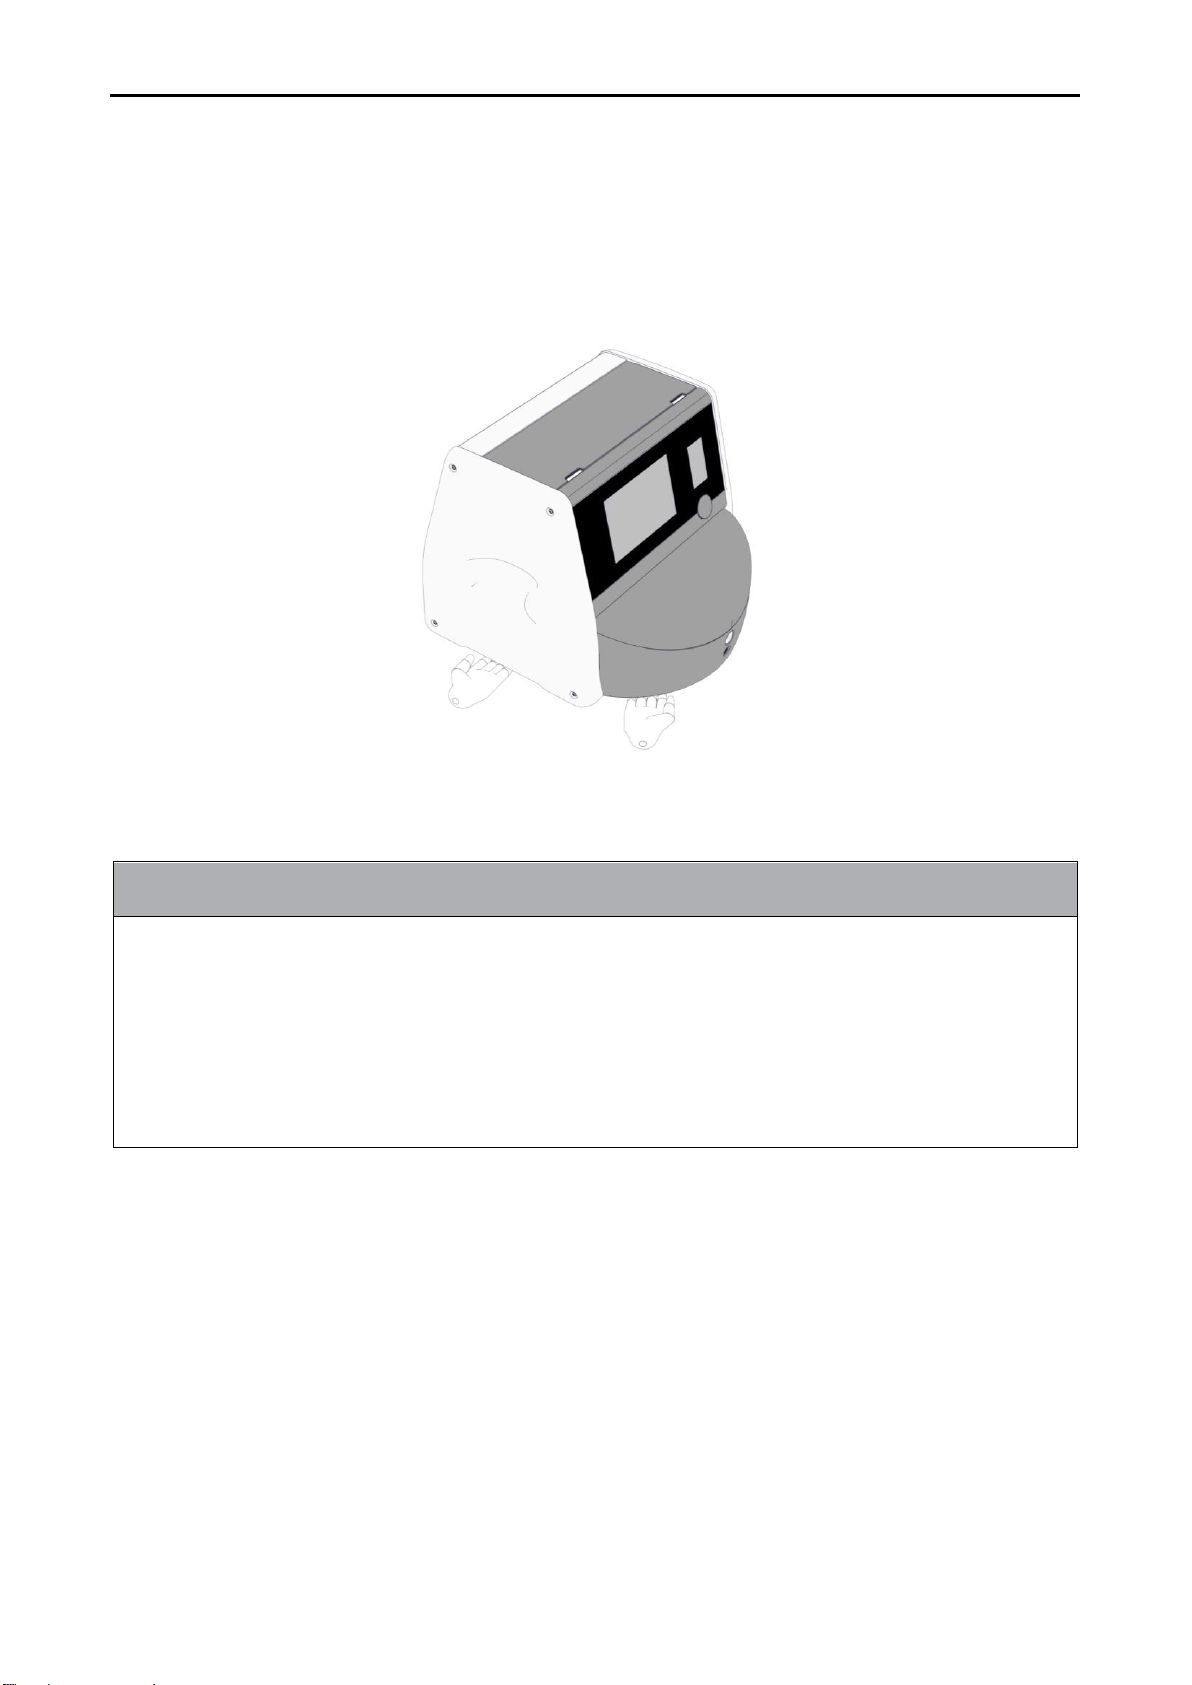
2.2.1 Transportation and relocation of the EmbryoScope Flex incubator
The EmbryoScope Flex incubator must be moved by two persons positioned on each side of the
incubator. Place one hand under the side of the incubator, and place the other hand to support the
front of the incubator as illustrated below:
TRANSPORTATION AND RELOCATION OF THE EMBRYOSCOPE FLEX INCUBATOR
•While the EmbryoScope Flex incubator is still in the shipping boxes, it must only be
moved by using a lift truck or a pallet lifter. Do NOT open the shipping boxes without the
presence of a person certified by Vitrolife.
•When the EmbryoScope Flex incubator has been unpacked, it must only be moved by
two persons supporting the incubator in accordance with the instructions contained in this
user manual and only under the supervision of a person certified by Vitrolife.

EmbryoScope Flex incubator
- 18 -
2.3 Starting up the EmbryoScope Flex incubator
In order to start up the EmbryoScope Flex incubator (e.g. after service or cleaning), turn on the
incubator by pressing the green main power switch on the back of the incubator. The incubator and
integrated PC will then automatically start.
After a complete shutdown and during the first installation of the incubator, the EmbryoScope Flex
incubator should be turned on at least three hours before use to ensure temperature equilibration
throughout the incubator. Ensure that the EmbryoScope Flex incubator is grounded through the
power connector, that the gas connections are not leaking, and that the connected gas cylinders
are full.
A gas regulator must be used to reduce the pressure in the connected CO2and N2gas tubes to a
level between 0.6 bar and 1.0 bar above ambient pressure.
2.4 Shutting down the EmbryoScope Flex incubator and
removing all culture dishes
NOTE
•In case of an emergency, follow the procedure described in section 9.
In order to shut down the EmbryoScope Flex incubator and remove all culture dishes (e.g. for
service or cleaning), follow the procedure described below.
1. On the PC home screen, press the settings icon and select Shutdown.
2. Select Remove all culture dishes and shut down and press OK. The first culture dish is
moved to the load door, which is unlocked.
3. Open the load door and remove the available culture dish.
4. Close the load door and confirm that you have removed the culture dish.
5. Continue until you have removed all culture dishes from the incubator.
6. Select Shut down computer.
7. In order to turn off the incubator completely, use the main power switch located at the back.

EmbryoScope Flex incubator
- 19 -
2.5 Restarting the integrated PC
In case an irrecoverable error occurs, an error message is displayed on the screen and the
integrated PC will automatically restart when you press OK.
To manually restart the PC:
1. Open the lid at the top of the incubator.
2. Use a pointed object such as a pencil or a ballpoint pen to press the small red button
available under the service lid:
The PC will now shut down.
3. Press the small red button again to restart the PC.
PC reset button

EmbryoScope Flex incubator
- 20 -
3 Connections to supporting systems
A number of connectors and sockets are found at the back of the EmbryoScope Flex incubator.
They should only be used by persons certified by Vitrolife for establishing the relevant connections
during installation. Operators should never use or attach any tubing/wiring to the incubator without
supervision.
Main power
inlet
N2inlet
CO2inlet
Product
information
label
Ethernet
connection
USB
connection
Connection for external
system to collect
incubation data
External
alarm
connection
Main power switch
This manual suits for next models
1
Table of contents
Other Vitrolife Accessories manuals


