Vivadia K004 User manual

Motorised Mini Exercise Bike
K004 v01: 01/09/21
Please read and retain these instructions for future reference
ASSEMBLY INSTRUCTIONS / INSTRUCTIONS FOR USE:
Unpack the components carefully. Please check all parts have been removed from the packaging.
General instructions
You should always observe certain safety precautions when using electrical appliances, including the
following.
Attention! To reduce the risk of electric shock:
Unplug the appliance from the mains socket immediately after use and before proceeding to clean it.
Carefully read through the instructions contained in this manual. It provides you with important information
about safety and maintenance of the Motorised Mini Exercise Bike.
1. Make sure that the mains supply voltage is suitable for the machine before plugging it in (220V). The
supply voltage must be the same as that stated on the rating label and the holes in the wall socket outlet
must match the pin configuration for the plug on the machine.
2. The unit has been designed for home use only.
3. Never leave the unit unattended when it is plugged in. Unplug it from the wall socket after each exercise
session.
4. Place your unit on a flat surface, with at least 0.5m of free space at the rear.
5. Parents and those responsible for children must always be aware of their curious nature and how this
can often lead to hazardous situations and behaviour which could cause accidents. This is why they
should always be supervised. Under no circumstances should this appliance be used as a toy.
6. Keep your hands well away from any of the moving parts.
7. Use suitable clothing and footwear. Make sure that all laces/cords are tied correctly.
8. It is not advisable to keep your unit in a damp place for long periods as it will be prone to rust.
9. Do not use the machine if the mains cable becomes damaged or worn.
10. Keep the mains cable away from hot surfaces.
11. Do not use the machine outdoors.
12. To unplug the machine, first put the switch to the “0”position and then unplug it from the wall socket.
Dimensions
48.5 x40 x30cm
Electric cable length: 120cm
•YOU DO THE MOVEMENT IT DOES THE HARD WORK
•THE BIKE THAT DOES THE EXERCISE FOR YOU
•DESIGNED TO IMPROVE CIRCULATION AND JOINT
MOBILITY
•COMES WITH A HANDY REMOTE CONTROL ON
SPRING CABLE SO YOU CAN SIT BACK, RELAX AND
CONTROL IN THE COMFORT OF YOUR ARMCHAIR
AND SAVES BENDING DOWN TO CHANGE THE
FUNCTION
•SIMPLE ON OF SWITCH AT BASE
•REMOTE CONTROL DISPLAYS : TIME, SPEED,
DISTANCE AND CALORIES
•1-15 MIN TIME SETTING WITH 12 SPEEDS
•FORWARD AND REVERSE FUNCTION
2 person assembly recommended
Max load: 100kg

Motorised Mini Exercise Bike K004 Instructions for Use
Please read and retain these instructions for future reference v001: 01/09/21
Precautions
Consult your GP before using the Mini Exercise Bike or any other fitness product. Especially if you suffer from
any of the following conditions:
1. Cancer patients
2. Convalescence after recent surgery
3. History of heart problems
4. Thrombosis
5. Fractured bones
6. Epileptic fits
7. DO NOT USE during pregnancy
Parts
Fig. 1

Motorised Mini Exercise Bike K004 Instructions for Use
Please read and retain these instructions for future reference v001: 01/09/21
Assembly
Take the unit out of the box and place it on the floor as shown in Fig. 1.
The assistance of a second person is advisable for the assembly work.
Make sure that all the pieces are there:
(A) Main body, (C-L) left pedal, (C-R) right pedal, (B) Stabiliser bar, (B1) rear stabiliser bar, (D) Screw M-4x25,
(E) Grower washer M-4, Pedal combination spanner.
1. Fitting the Stabilisers
Take the stabiliser (B) marked with the letter (A) and place it at the front of the unit marked with the letter
(A), as shown in Fig. 2, insert the M-4x25 screws (D).
Next, take the rear stabiliser (B1) marked with the letter (B), Fig. 3 and go through the same fitting
procedure as with the front stabiliser.
Attaching the Pedals
Right and left refers to the position that the user adopts when to do the exercises.
Insert the right-hand pedal (C-R), marked with the letter (R).
Next, Fig. 4
Insert the left-hand pedal (C-L) marked with the letter (L) onto the left-hand crank, also marked with an (L).
Fig. 4.
The pedal straps can be adjusted with a screwdriver.
Fig 2
Fig 3

Motorised Mini Exercise Bike K004 Instructions for Use
Please read and retain these instructions for future reference v001: 01/09/21
Mains connection
Connect the unit to a socket. Put the switch (L) in position (1).
Fig 4
Motorised Mini Exercise Bike K004 Instructions for Use
Please read and retain these instructions for future reference v001: 01/09/21
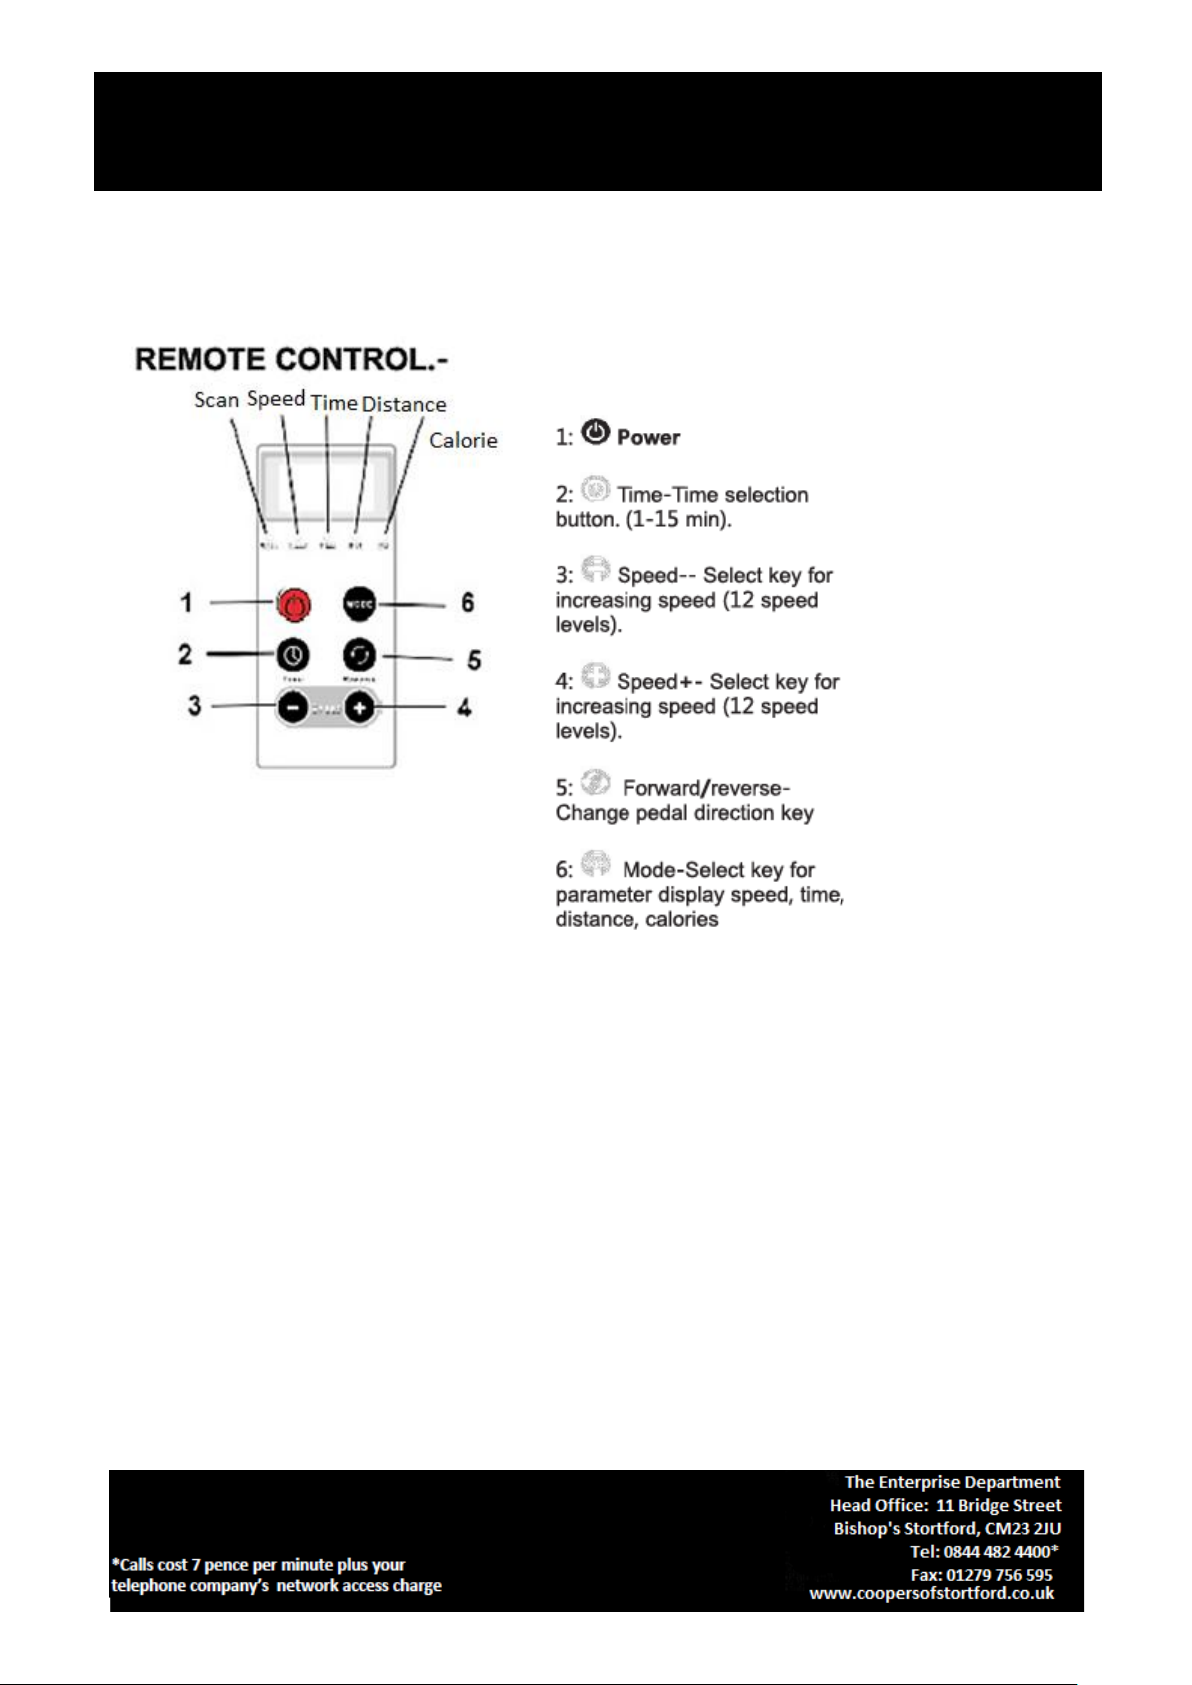
Remote control
Operation
•Plug the adaptor plug to the DC and press the red button below the remote support placing it in the
position I. Pressing the button (1) the unit will work with the speed at level 1 and time 5 min. The
display will show randomly, data speed, time, distance, calories (Scan).
•Pressing the button (2) Time, you can adjust the time period from 1 to 15 minutes. For faster
adjustment you may hold the key (2) down until you see the desired time.
•The device automatically turns off when the selected minutes have elapsed.
•To increase the speed press button (d). Speed+. To reduce the speed, press the button (3) Speed-.
For faster adjustment you may hold the key (4) or (3) down until you see the desired speed level.
•Using the button (5) Reverse it can change the direction of rotation of the pedals. It takes a moment
for this function to work. Do not keep pressing.
•Press (6) MODE one more time to display data speed (Speed), time (Time), distance (Dist.), calories
(Cal.). To display random parameters press the button several times until the red light shows
beneath the Scan letters. To turn off press (1). After finishing, press the red button below the remote
support by placing it in the 0 position to completely shut down the unit.
Display indicator: speed, time, distance travelled km),
calorie, Scan (The random sample data display speed,
time, distance, calories)
Motorised Mini Exercise Bike K004 Instructions for Use
Please read and retain these instructions for future reference v001: 01/09/21
OPERATING INSTRUCTIONS
Physical Fitness
It is advisable to cool down with a short exercise session of 3 to 6 minutes at a low speed, twice per day. See
examples of exercises below.
Gradually build up to a maximum of 15 minutes per session, twice per day. Once you feel comfortable
exercising you can try higher speeds.
INSPECTION & MAINTENANCE
Switch the unit off and unplug the mains cable.
ATTENTION
Periodically check that all of the fastening elements are duly tightened and connected correctly.
Check and tighten all the parts on your unit every three month.
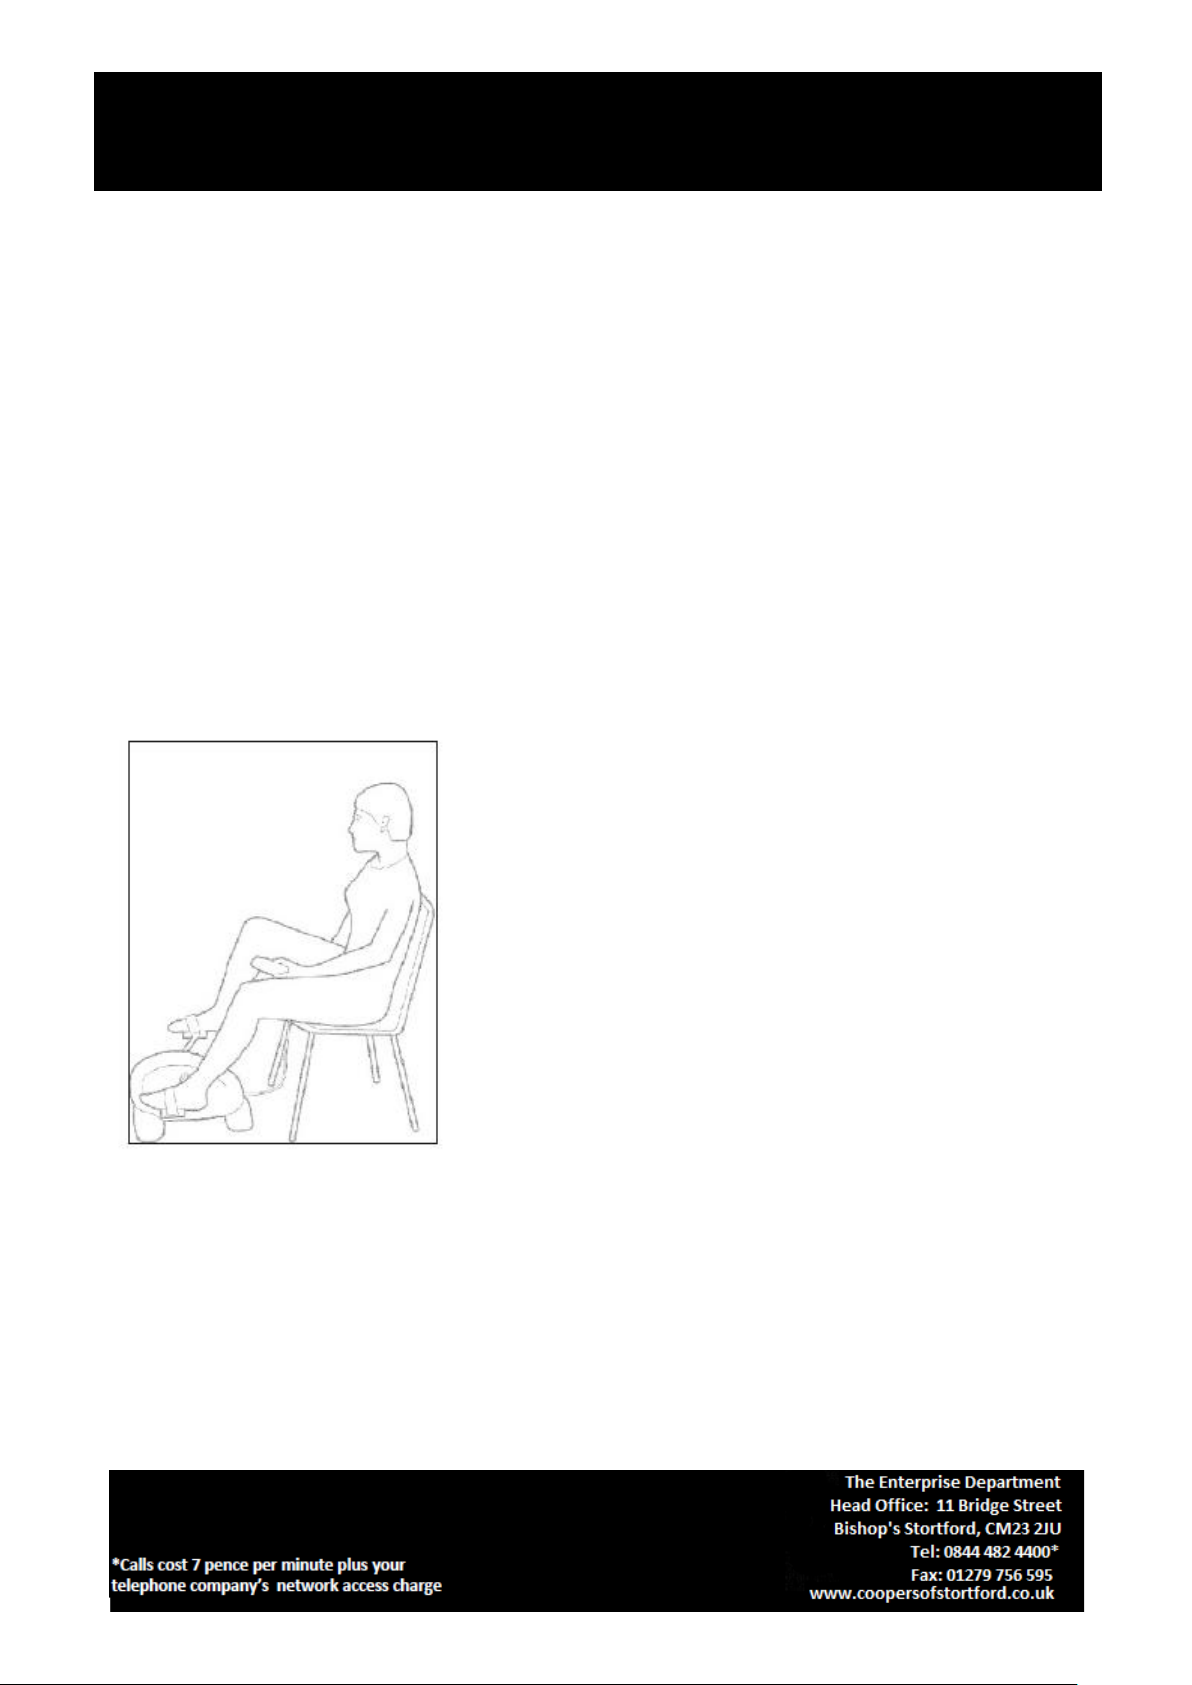
Exercises
Seated position
PLUG WIRING (UK & IRELAND)
This appliance is fitted with a BS 1363 13-amp plug. If you have to replace the fuse, only those that are ASTA
or BSI approved to BS1362 and with a rated current of 13-amps should be used. If there is a fuse cover fitted,
this cover must be re-fitted after changing the fuse. If the fuse cover is lost or damaged the plug must not be
used. Spare fuse holders and fuses are available from electrical outlets. If the socket outlets in your home or
office are not suitable for this product’s plug, the plug must be removed and disposed of safely. Attempts to
insert the plug into the wrong socket is likely to cause electric hazard. A replacement plug should be wired
according to the following instructions:
1. Use a stable, sturdy chair.
2. Be sure to place the Mini Bike at a comfortable distance
from the chair (so as not to overstretch your legs.)
3. Make sure that your lower back (lumbar region) is
supported when using the Mini Bike. We recommend
placing a small cushion at the base of the lumbar region.
4. Sit and place your feet on the pedals.
5. Take the control unit off its support and press the button
(1), the pedals will begin to rotate.
6. To stop the unit press (1).

Motorised Mini Exercise Bike K004 Instructions for Use
Please read and retain these instructions for future reference v001: 01/09/21
The cable
A mains electricity cable contains two or three inner wires. Each has a core of copper and an outer layer of
flexible plastic. This product is earthed; the wires in the cord set are colour coded in the following way:
BLUE NEUTRAL
BROWN LIVE
GREEN & YELLOW EARTH
The diagram shows the key features of a correctly wired
three-pin mains plug.
DISPOSAL
•Coopers of Stortford use recyclable or recycled packaging where possible.
•Please dispose of all packaging, paper, cartons, packaging in accordance with your local
recycling regulations.
•Plastics, polybags –this is made from the following recyclable plastic.
Code & Symbol
Type of Plastic
Polyvinyl Chloride
ABS
Commonly used for
Pipes, construction material,
flooring, windows, guttering,
plister packs
CD’s, crisp packets, various
flexible packaging, baby bottles,
sunglass lenses
Notes
Not usually colellected from
household recycling bins,
Sometimes recycled at local
waste management centres.
Not often or widely recycled
•At the end of the product’s lifespan please check with your local council authorised household waste
recycling centre for disposal.
Table of contents
Other Vivadia Exercise Bike manuals

Popular Exercise Bike manuals by other brands

Stamina
Stamina CONVERSION II 15-9003C owner's manual

Taurus
Taurus TF-Z9-PRO Assembly and operating instructions

Horizon Fitness
Horizon Fitness Comfort 3 owner's manual

Vision Fitness
Vision Fitness R2100 Assembly guide

Taurus
Taurus TF-Z99PRO-21 Assembly and operating instructions

NordicTrack
NordicTrack Gx 3.4 Bike Bruksanvisning


