VIVI TT2020-Z2 User manual

ELECTRIC BICYCLE
User Manual
[ VIVI TT2020-Z2]
READ THIS MANUAL CAREFULLY BEFORE USE – FAILURE TO DO SO MAY RESULT IN INJURY, PROPERTY DAMAGE AND
MAY VOID WARRANTY. • KEEP THIS MANUAL FOR FUTURE REFERENCE. • Products covered by this manual may vary in
Made in ChinAfter-sale Email: service.viviebike@gmail.com a

Table of Contents
Safety.......................................................................................................................... 1
Parts assembly............................................................................................................ 2
Front Wheel................................................................................................................ 2
Handlebars..................................................................................................................4
Seat..............................................................................................................................5
Front ligh.....................................................................................................................6
Pedals.......................................................................................................................... 7
Operation....................................................................................................................7
Operation and use...................................................................................................... 9
Using Gears............................................................................................................... 11
Guidelines for Using Gears....................................................................................... 11
Using Brakes..............................................................................................................12
Guidelines for Using Brakes......................................................................................12
Batteries and Battery Charging................................................................................ 13
To charge the battery:.............................................................................................. 13
Removing the Battery Pack...................................................................................... 14
Maintenance.............................................................................................................15
Battery Storage.........................................................................................................16
Battery Fuse.............................................................................................................. 17
Tyre Pressures...........................................................................................................17
Chain Care.................................................................................................................17
Torque Settings.........................................................................................................17
Frequently Asked Questions.................................................................................... 18
Troubleshooting........................................................................................................18
Record Your VIVI bike Info........................................................................................21

Safety
Safety messages are designed to alert you to possible dangers or hazards that could cause death, injury or equipment or
property damage if not understood or followed.
You WILL be KILLED or SERIOUSLY INJURED if you do not follow instructions
It is vital that you read and understand this user manual before using the product, including safety warnings, and any
assembly and operating instructions. Keep the manual for future reference. Safety precautions and recommendations
detailed here must be fully understood and followed to reduce the risk of injury, fire, explosion, electrical hazard, and/or
property damage. Safety information presented here is generic in nature – some advice may not be applicable to every
product. The term "equipment" refers to the product, be it electrical mains powered, battery powered or combustion
engine powered.
Before Use - If you are not familiar with the safe operation/handling of the equipment or are in any way unsure of any
aspect of suitability or correct use for your application, you should complete training conducted by a person or
organization quafied in safe use and operation of this equipment, including fuel/electrical handling and safety.
Do NOT operate the equipment in flammable or explosive environments, such as in the presence of flammable liquids,
gases or dust. The equipment may create sparks or heat that may ignite flammable substances.
Keep clear of moving parts.
Equipment may be a potential source of electric shock or injury if misused.
Do NOT operate the equipment if it is damaged, malfunctioning or is in an excessively worn state.
Do NOT allow others to use the equipment unless they have read this manual and are adequately trained.
Keep packaging away from children - risk of suffocation ! Operators must use the equipment correctly. When using the
equipment, consider conditions and pay due care to persons and property.
General Personal Safety
Wear appropriate protective equipment when operating, servicing, or when in the operating area of the equipment to
help protect from eye and ear injury, poisoning, burns, cutting and crush injuries. Protective equipment such as safety
goggles, respirators, non-slip safety footwear, hard hat, hearing protection etc should be used for appropriate equipment
/ conditions. Other people nearby should also wear appropriate personal protective equipment. Do not wear loose
clothing or jewellery, which can be caught in moving parts. Keep hair and clothing away from the equipment.
Stay alert and use common sense when operating the equipment. Do not over-reach. Always maintain secure footing
and balance.
Do not use the equipment if tired or under the influence of drugs, alcohol or medication.
This equipment is not intended for use by persons with reduced physical, sensory or mental capabilities.
General Equipment Use and Care
The equipment is designed for domestic use only.
Handle the equipment safely and carefully.
Before use, inspect the equipment for misalignment or binding of moving parts, loose components, damage or any
other condition that may affect its operation. If damaged, have the equipment repaired by an authorised service centre
or technician before use.
Prevent unintentional starting of the equipment - ensure equipment and power switches are in the OFF position before
connecting or moving equipment. Do not carry equipment with hands or fingers touching any controls. Remove any tools
or other items that are not a part of the equipment from it before starting or switching on.
Do not force the equipment. Use the correct equipment for your application. Equipment will perform better and be
safer
when used within its design and usage parameters.
Use the equipment and accessories etc. in accordance with these instructions, considering working conditions and the
work to be performed. Using the equipment for operations different from those intended could result in hazardous
situations.
Always keep equipment components (engines, hoses, handles, controls, frames, housings, guards etc) and accessories
(cutting tools, nozzles, bits etc) properly maintained. Keep the equipment clean and, where applicable, properly
lubricated.
Store the equipment out of reach of children or untrained persons. Toavoid burns or fire hazards, let the equipment
cool completely before transporting or storing. Never place or store the equipment near flammable materials,
combustible gases or liquids etc.
The equipment is not weather-proof, and should not be stored in direct sunlight, at high ambient temperatures or
locations that are damp or humid.
Do not clean equipment with solvents, flammable liquids or harsh abrasives.
For specific equipment safety use and care, see Equipment Safety.
1

Parts assembly
Carefully place the bicycle assembly on a flat surface so that it rests on the front fork and rear wheel.
Front Wheel
1. Remove the front fork protector from the front fork. (Please note: front fork protector is used to prevent
the fork from being deformed during transport. It belongs to the packing material. You can throw awayit!)
2. Take out the front wheel fixed axis, according to the picture installed in a good direction: thick washer is on the
right side of the thin washer is on the left (disc brake) direction;First remove the left direction of the nut washer
gasket, etc., put the shaft through the front wheel hole, and then put the left direction of the nut washer gasket,
etc., back on the shaft
2

3. When the front wheel is mounted on the fork, the washer is on the inside, and a gasket is added on the
outside and a safety hook is added.
Thin gasket Thick gasket
Safety hook
Safety hook
3
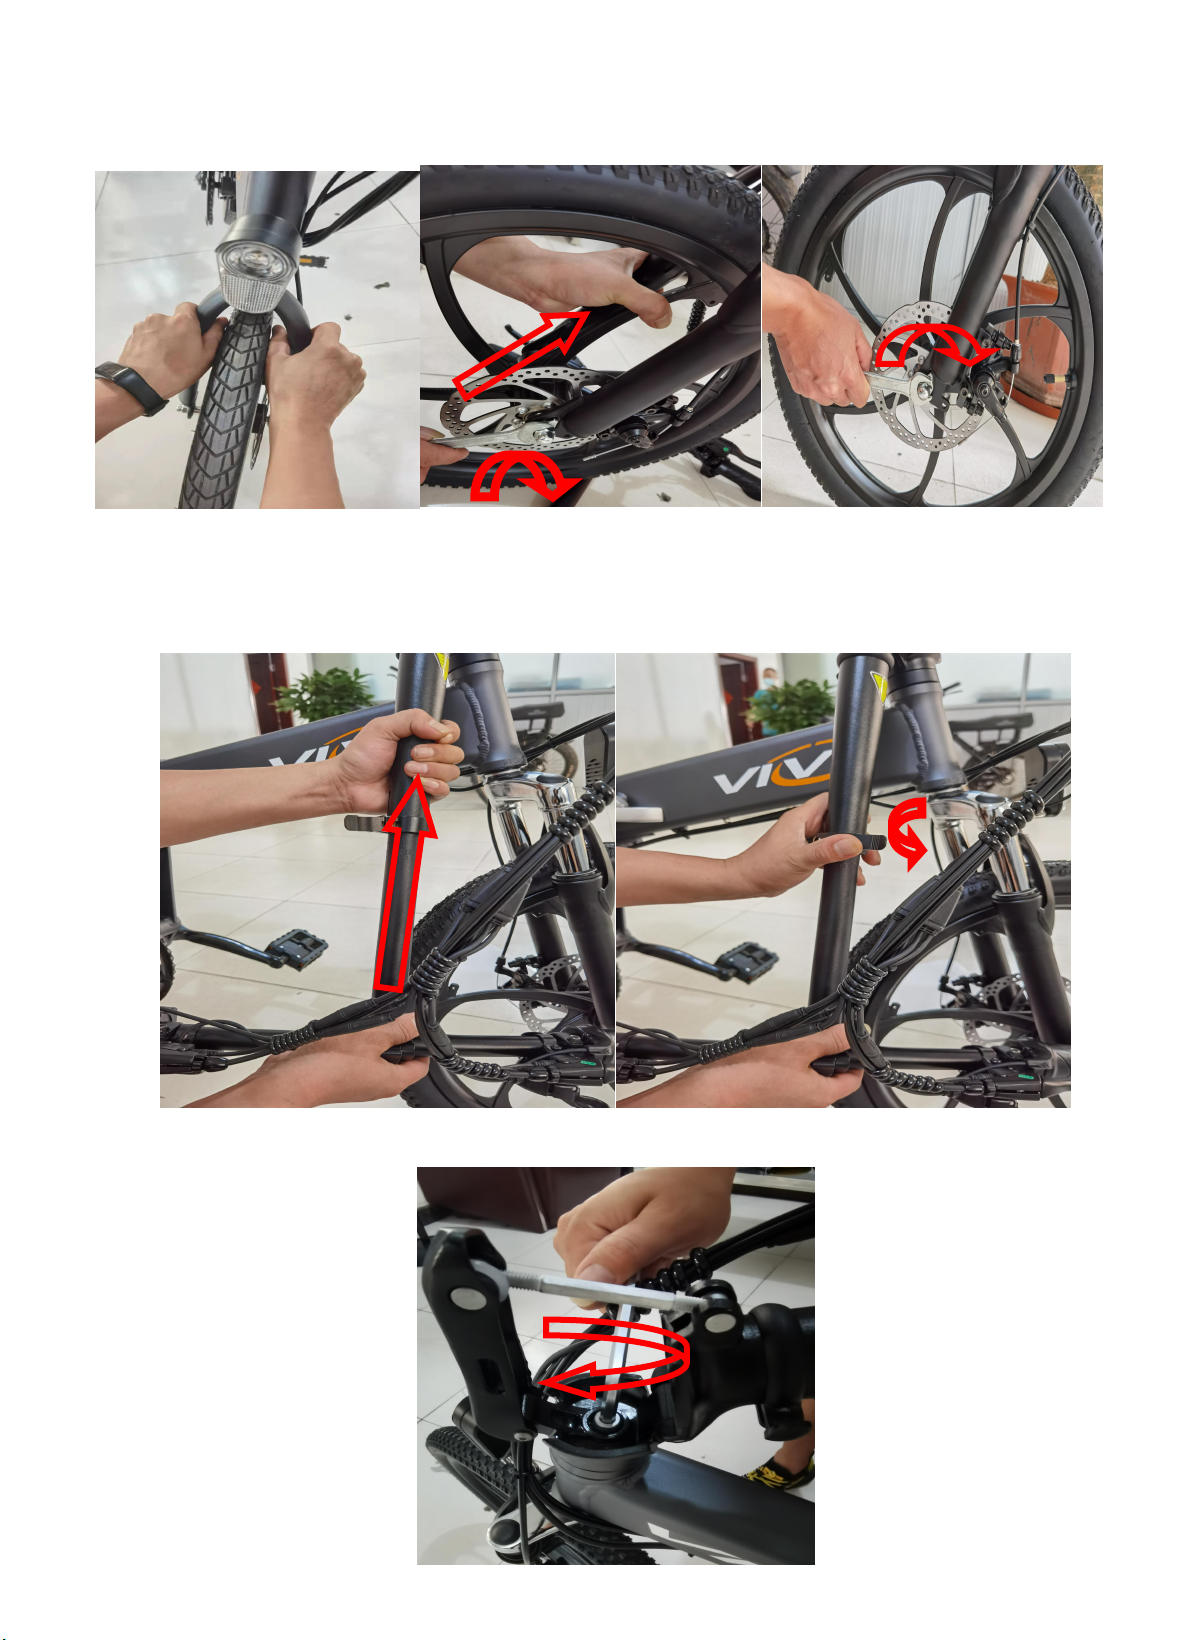
4. Use your thumbto measure the distancebetween the tires on bothsides and the front fork. Hold the front hub
with your right hand and lock the left nut and then the right nut until both sidesare locked
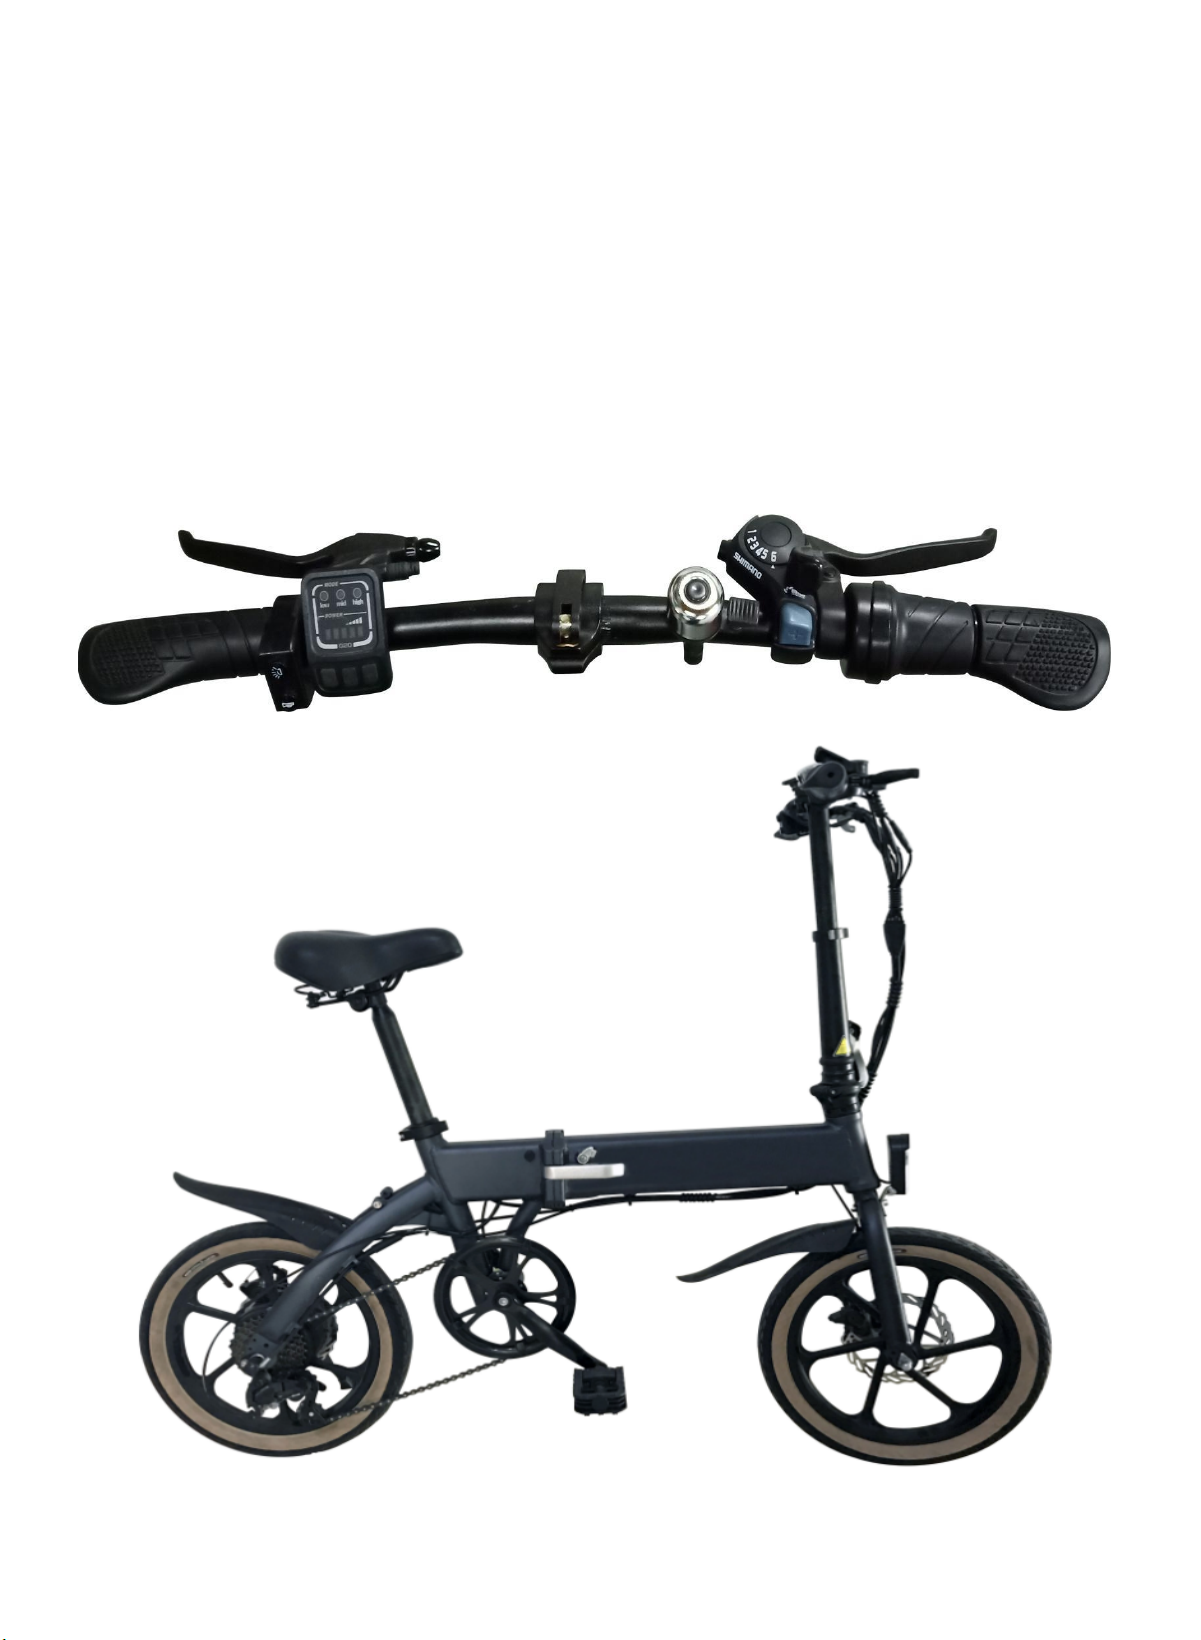
Handlebars
1. Insert the "T" tube into the folding handle, which can be determined according to the height of
the individual, and finally lock the quick release handle,If it feels too loose or too tight, adjust the nut
on the other side of the handle.
2. Tighten the head screws with a "6"# hex wrench;
4

3. lock the quick release handle with the palm of your hand until it is completely locked, preferably
with the safety plastic latch (this is very important!!)
4.Release the handlebar quick release handle, turn the handlebar hand, adjust the brake handle to the
plane or Angle you want about 15-30 degrees, and finally lock the quick release handle with your palm
until the lock is tight.If it feels too loose or too tight, adjust the nut below.
Seat
comfortable, but also safe. You should be able to remain stable and properly handle the bicycle when at
and comfortably and safely operate the handlebars and all controls. A good reference height for the seat is
at hip height. Do NOT have the seat raised enough so you can see the maximum height marker on the
seat post. • Ensure that when the seat is clamped, you cannot rock it back and forth orrotate it.
1.Insert the seat post/seat assembly into the bicycle frame and adjust it to a comfortable position-do NOT
have the seat raised enough so you can see the maximum height marker on the seat post.
2.Rotate the clamp lever from the unlock position to the lock position.It the seat post is not clamped
firmly,increase pressure by unlocking the clamp,then rotating the adjustment knob right(clockwise) a¼turn,
then re-test and adjust as necessary.
The seat angle can also be adjusted, again for best comfort. To adjust angle, using a 13mm spanner, loosen
(rotate left) the seat clamp nuts (CC) on either side of the seat until the front of the seat can be moved
up/down. Set the angle as required, then tighten the5nuts securely
adjust nut
5

Note that small changes in seat position can have a substantial effect on comfort. It is
recommended to make seat adjustments in small increments and test the position, then re-
adjust as necessary.
Front light
1.Use the "5"# hexagon tool to loosen the screw on the front fork, then screw through the
headlight rack hole to lock the screw
6

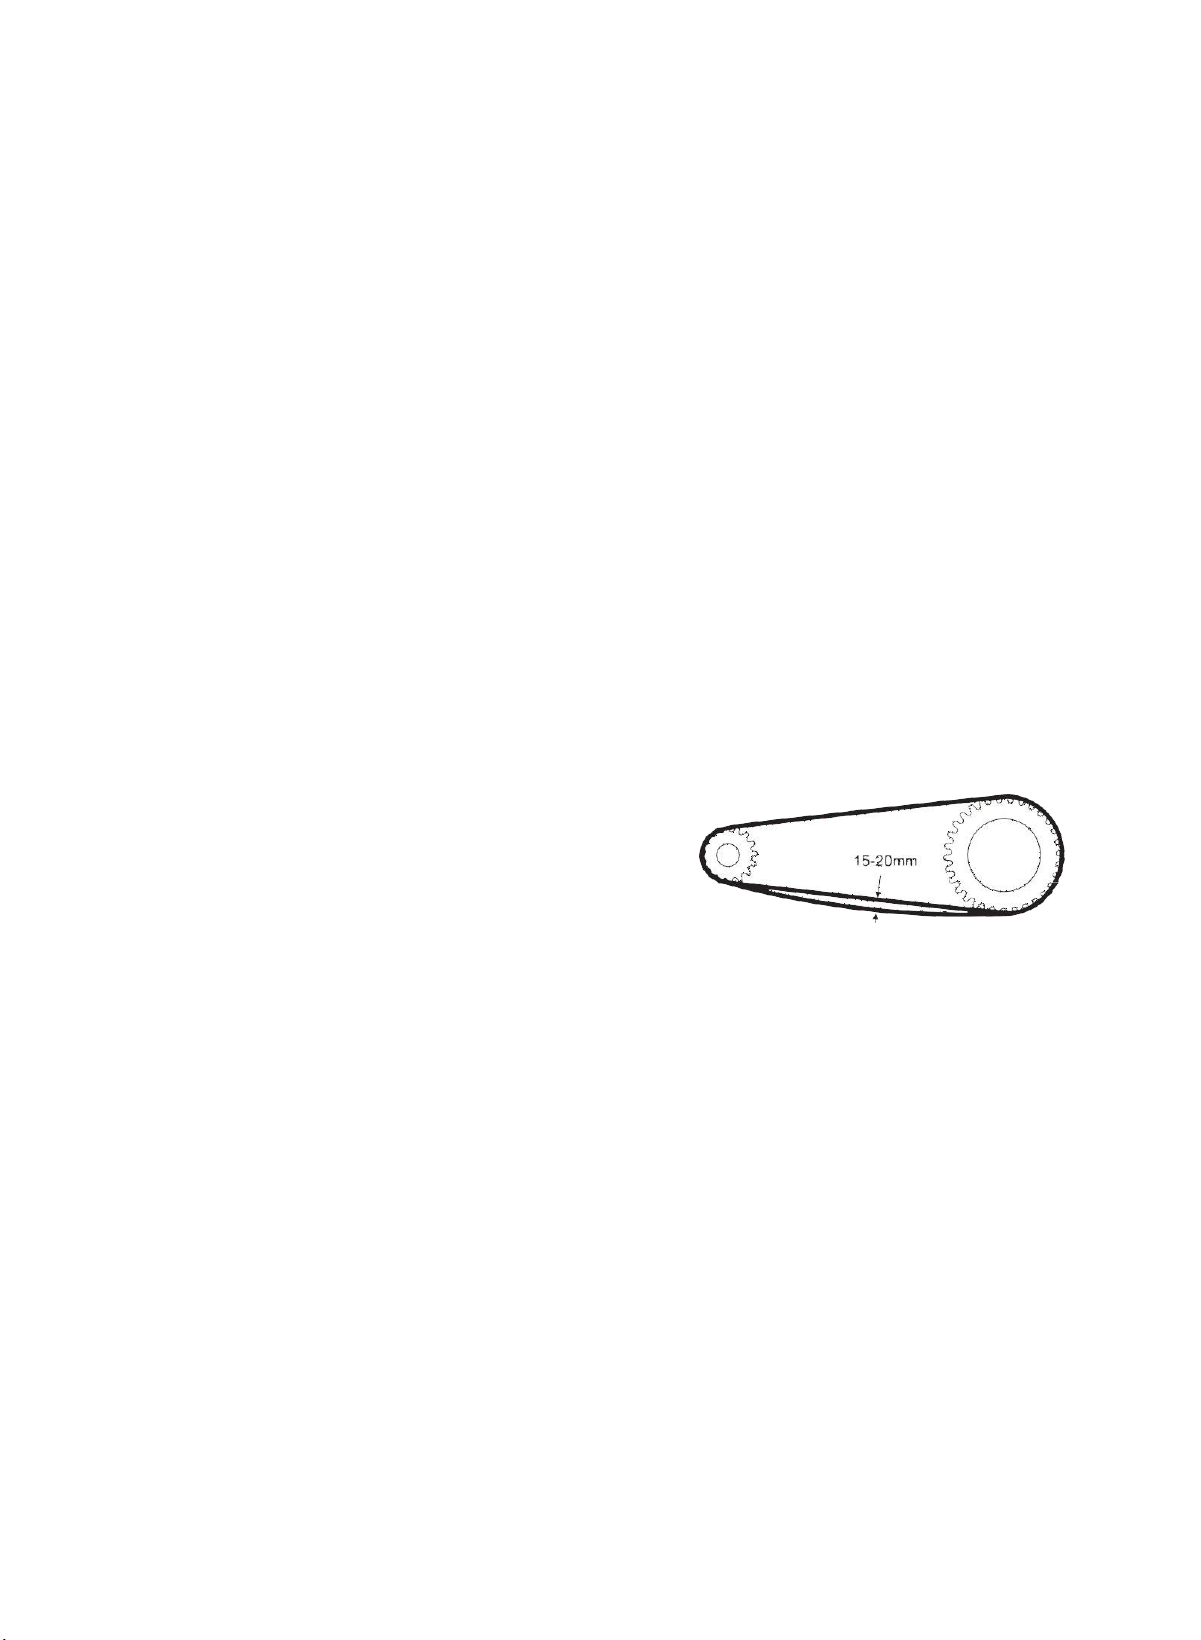
Pedals
It is critical that you follow the pedal to crank arm attachment procedure carefully to ensure correct
assembly. During assembly, do NOT use excessive force to screw the pedals into the crank arms – this may
indicate misalignment of the pedals or mis-matched threads. If the pedal does not
"feel right" when being screwed in, STOP immediately and check that it is the correct pedal and that it is
aligned properly with the crank arm. Failure to follow the instructions here or take due care may damage
the equipment and void any product warranty.
1.Starting with the rigat-hand crank arm,identify the right-hand pedal assembly,which is idsntified by having
the pedal bolt stamped "R".
2.Very carefully begin screwing the pedal bolt into the crank arm (rotate right / clockwise). If the bolt does
not "feel right" when being screwed in, STOP immediately and check that it is the correct bolt and that it is
aligned properly with the crank arm . Screw the pedal bolt in fully,then tighten to the specified torque using a
15mm spanner and torque wrench.
3.Repeat the above procedure for the left-hand crank arm,noting that the pedal bolt and crank armthread
is left-hand(rotate left/anti-clockwise to tighten)and that the pedal bolt is stamped “L”.
Operation
Before riding, ensure that all required fasteners are tightened to the correct torque.
Charge the battery prior to use.
Ensure that the pedal assistance system is switched OFF when the bicycle is not in use.
Always wear a helmet and appropriate safety equipment and always keep both hands on the handlebars
and both feet on the pedals whilst riding. Read, understand and follow all safety recommendations before
riding.
Avoid riding in damp conditions, rain etc. as this may affect operation or possibly damage the bicycle
electronics.
7

8
Ⅱ.Product components
1、Saddle
2、Seat tube
3、Battery box
4、Brake lever
5、Valve
6、Mudguard
7、Controller box
8、Front Fork
9、Freewheel
10、Brake disc
11、Motor
12、Rear derailleur
13、Quick lock
14、Folding system
15、Chain
16、Chain wheel
17、Crank
18、Pedal
19、Handle bar
20、Quick lock
21、Stem
22、Headlight
1
2
3
4
5
6
6
7
8
9
10
11
13 14
14
15
16 17
18
19
20
21
22
12
Saddle
Brake lever
Freewheel
Rear derailleur
Front Fork

9
Operation and use
("pedal power") alone can be used. It is recommended to use pedal assistance when necessary, and not
rely on it solely. When using pedal assistance, also pedal for best efficiency.
The bicycle must be moving,or have enough pressure placed on the pedals (in a forward direction) to
activate pedal assistance.
If you apply the brakes when pedal assistance is active,the drive provided by the motor reduces in
proportion to how much braking pressure you appiy.
Once hebicycle reaches a sufficiently slow speed or stops completely,pedal assistance automatically
deactivates.
The bicycle pedal assistance system comprises an electric motor built into the rear wheel hub, a
battery pack with key security and charging port (on the other side of the battery pack),pedal assist
throttle,and display.
10
-2-
3.Meter operation
3.1
Meter instruction
3.2
Meter operation
a, Please kindly note that the key must be fully pushed in for the bolt,and
must stay in to operate the ebike (there are 3 key spots - unlock, lock, and
lock on where you operate the ebike).
b, In the pedal assist mode,you need to step on the pedal so that the bike will
be moved.
c, In the pure electric mode,you can turn the right handle (throttle) to start
moving the bike.
Operating instructions
①Pedal Assist
Mode-Low
To switch on/off
the E-Bike
system, hold the
M button for 2s.
The default
value is “low”
pedal assist
level.
②Pedal
Assist
Mode-Middle
Press “+” to
crease into
pedal assist
level “Mid”. - 2 -
③Pedal Assist
Mode-High
Press “+”
again to move
into pedal
assist level
“High”. “High”
is the
maximum
power of PAS.
④Pure
Electric Mode
Press”-“, until
first row
indicators are
off.Then low
power mode
directly
convert to
pure electric
mode.
11
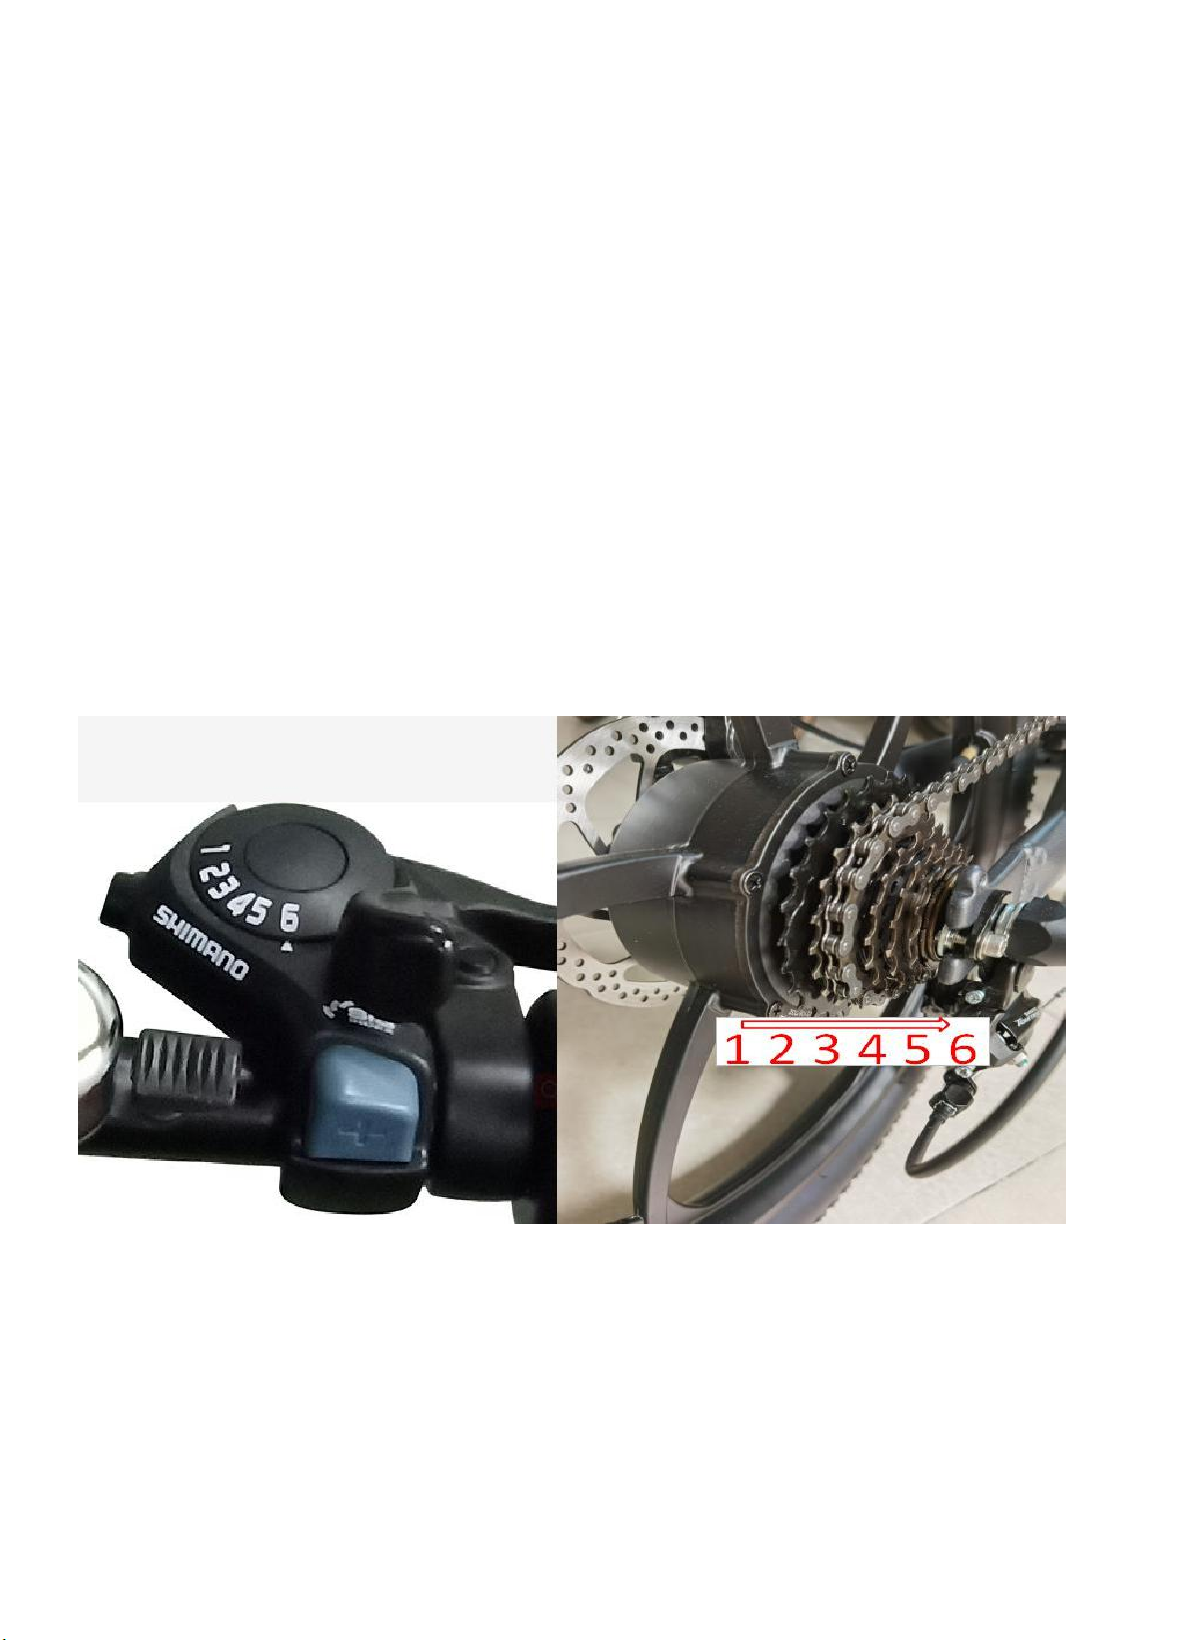
Using Gears
Some model bicycles are equipped with gears. Gears are used to change the ratio between rotations of
the rear wheel and the crank set. This enables you to pedal less and travel faster on flat or downhill
sections, or pedal faster and travel slower to climb hills. Gearing is independent to pedal assistance, so
pedal assistance operates the same regardless of selected gear. Remember, however, that pedal
assistance is "governed" by overall speed.
The selectable gears are located on the rear wheel, known as a "gear cluster" or "cassette". The larger
the gear, the smaller number of rotations per rotation of the crank. The largest gear is the "lowest" and
is referred to as "1". As each gear becomes smaller, it is a "higher" gear then the previous and is
numbered sequentially. The number of gears may vary between different models. Beneath the gear
cluster is the derailleur mechanism, which moves the chain, so it runs on different gears. The derailleur
is operated by the rider using controls mounted on the handlebars. The gear change is "indexed" so
each gear selection positively engages – this is factory set and should require no adjustment. There may
be slight variations between bicycle models in method to change gear "up" (from a lower gear to a
higher gear), or to change gear "down" (from a higher gear to a lower gear).
The image shows a "6-speed" type that uses a button for changing up gears (push button to activate
derailleur), and a lever for changing down gears (rotate lever forward to activate derailleur)
Guidelines for Using Gears
To get the best performance and service life from the gear change system, understand and apply the
following techniques:
You MUST be pedalling during gear changes.
Do not attempt to change multiple gears in a single action.Allow each gear change to complete fully
before the next change.
Always use an appropriate gear for your speed, the terrain and incline. This helps you ride most
efficiently.
Keep the chain and gears properly lubricated and clean.
If you notice noise after changing gear or an ability to select a gear or the chain not running
smoothly,have the gear system inspected and adjusted by a b1ic2ycle mechanic or suitably qualified
person.
12

Using Brakes
All bicycle models are equipped with a front and rear wheel braking system. Brakes are used to slow the
bicycle down. The braking systems may use different mechanics; however,the functionality is the same,
and that is to change the energy of the moving bicycle into heat energy(“friction”):
For disc brakes, this means pads made from a special friction material pinching against a disc mounted to
the centre of the bicycle wheel.
The brakes are operated by the rider through levers mounted to the handlebars,The left-hand lever
operates the rear brake,the right-hand lever operates the front brake. The ability of the rider to adequately
slow and/or stop the bicycle depends largely on the skill of therider, the surface being ridden on and other
factors such as rain, tyres,adjustment and condition of the brake parts etc.
Guidelines for Using Brakes
To get the best performance and service life from the brake system, understand and apply the following
techniques:
In wet conditions, which reduces friction, always provide additional distance for braking and adjust
how quickly you apply the brakes.
When applying the brakes, particularly the front brake, use a lower pressure to start with until you
feel the brakes starting to “bite”, then increase pressure as required.Do NOT over-apply the brakes
and cause the wheel to stop rotating - this may result in loss of control.
Maintain the brake friction components (pads, shoes, rubbers) in good condition and replace when
they reach the wear limit.
Maintain brake adjustment so that the brakes perform effectively, the levers are comfortably
positioned, and there is not excessive play in adjustable components.
If the brakes are not performing effectively, making abnormal noise or any part is not serviceable or
cannot be adjusted correctly, have the brakes inspected and adjusted by a bicycle mechanic or
suitably qualified person.
If the brake cables become frayed or otherwise damaged, have them replaced by a bicycle mechanic
or suitable qualified person.
13
Batteries and Battery Charging
Never modify the electrical system. Alterations may cause a fire, resulting in serious injury and
could also damage the electrical system.
Charge with the supplied charger only. Use of the wrong charger may cause a fire or explosion,
resulting in serious injury.
Ensure the voltage and
frequency of the charger is compatible with mains electrical supply.
Use the battery charger in dry locations only.
The battery must be charged before first use.
For maximum battery performance and service life, charge the battery after each use, and charge at
temperatures between 0 and 40°C (32 and 104°F).
Battery charging generally takes 4 to 6 hours from discharged to fully charged. Do NOT charge the
battery continuously for more than 24 hours.
If the bicycle has not been used for over 4 weeks, charge the battery before use.
Always switch the bicycle OFF after each use.
The battery pack can be recharged repeatedly. However, rechargeable batteries eventually need to be
replaced. A significantly reduced operating period after charging indicates that the battery is no longer
serviceable and should be replaced. Discard old batteries in an environmentally responsible manner.
The battery charger has a charge status LED indicator:
Red - Battery charging.
Green - Battery fully charged.
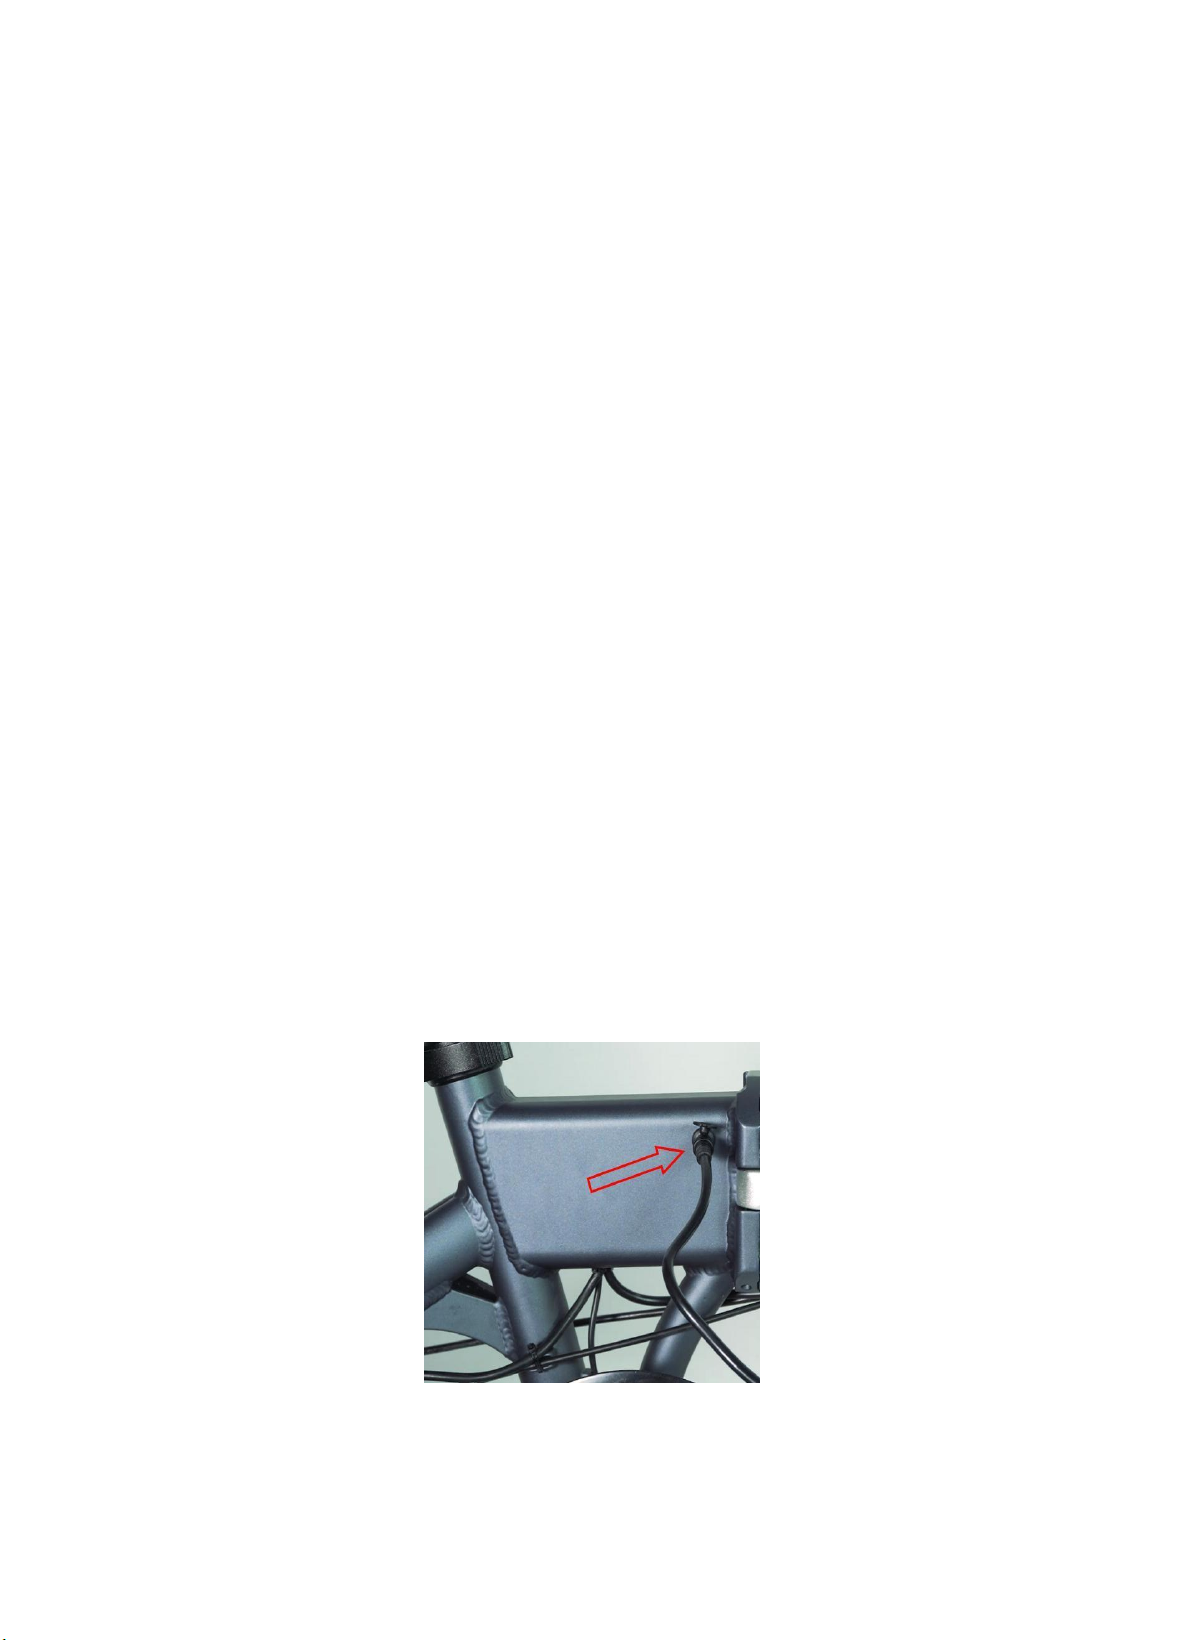
To charge the battery:
1. Plug the charger connector into the charging port.
2. Connect the charger to a mains electrical supply and switch ON. The indicator LED on the charger
illuminates red to show the battery is charging.
3. When the battery is charged (approximately 6 hours), the charger indicator LED illuminates green.
Disconnect the charger from the electrical supply, then disconnect it from the bicycle. Lower the
battery pack handle to protect the bicycle chargingport.
14
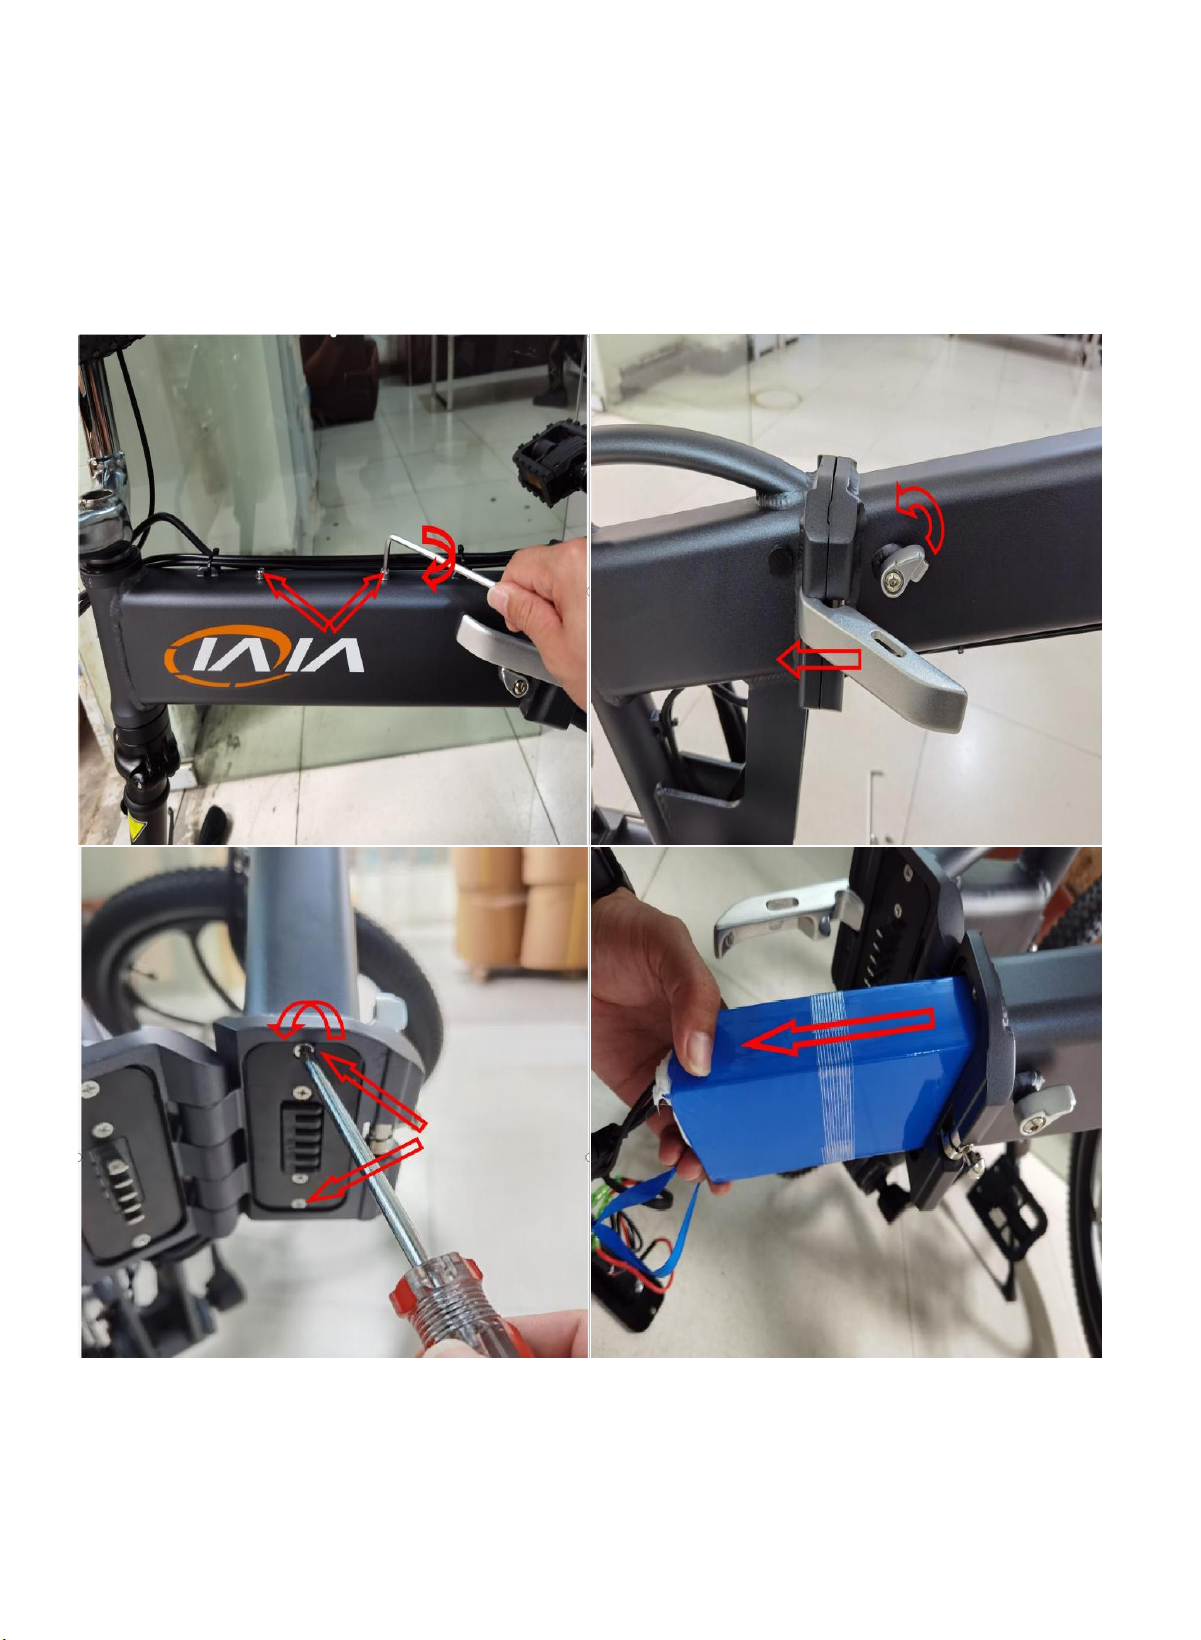
Removing the Battery Pack
Please first remove the two battery fixing screws under the car tube with the "4" # inner hexagon tool,
and then open the safety buckle and folding handle of the frame folding machine. After folding, you can
see the battery cover plate and remove the two screws with a Phillips screwdriver, and finally pull out
the battery.Install back to send steps in reverse order on the way.
15

Maintenance
Some maintenance activities described may be beyond the scope of some users. Do NOT attempt
procedures that you are not comfortable with, or do not have the necessary tools, experience or
knowledge for - take the unit to an authorised service centre or qualifed technician for servicing. Items in
the maintenance schedule below that are recommended to be performed by a qualified technician are
highlighted yellow.
Failure to follow the maintenance recommendations, using incorrect or non compatible accessories
or replacement parts, or general negligence may result in making the product warranty void.
Improper adjustment or service may result in damage to the bicycle or make it hazardous.
Maintenance requirements may be affected by any number of factors from your riding style to
geographic location.
When new, parts of the bicycle may "break-in" over the course of the first approximate 100km of
riding, possibly including the stretching of cables, spoke tension changes etc. It is recommended to
have the bicycle inspected and serviced at an authorised service centre or by a qualified technician.
The bicycle components are subject to wear and stress. If a component is weakened through stress,
age etc, it may fail without warning. It is important to regularly inspect the bicycle for any signs of
component fatigue - look for cracks, fraying, discoloration etc, as this may indicate that a part is near
the end of its useful life and should be replaced.
Clean the bicycle with a soft, damp cloth - do NOT use high pressure water cleaners or
hoses,pressurised air, solvents, abrasives etc. For the console, battery and motor, do NOT use any
liquids.
When transporting in a vehicle, it is recommended to have the battery out of the bicycle during
transport.
Store the bicycle where it will be protected from rain, sun etc to help prevent corrosion, fading etc..
For safety, longest possible service life and reliability, maintain the bicycle properly. Use the
components before each ride. The proper condition and function of these Systems is critical to your
maintenance schedule below for guidance. It is very important that you check certain systems and
safety.
16

Maintenance Schedule
Component / Condition Check Before
Every Ride
*Check
Periodically
Clean /
Lubricate
Adjust / Tighten /
Replace as Required
Tyre Pressure
Tyre Wear / Damage
Brake Adjustment
Handlebar Tightness
Controls and Display
Seat Post Tightness
Fasteners / Mounting Hardware
Brake Pads / Shoes
Brake Cable Wear
Chain
Reflectors
Battery / Charger
Steering Head Bearings
Derailleur
Wheel Spoke Tension
Wheel Trueness
Wheel Bearings
Bottom Bracket (Crank) Bearings
* Every 5 to 10 rides depending on ride length and conditions.
Battery Storage
When storing the batteries for a long period of time:
Charge the batteries at least every 30 days to avoid capacity loss. Batteries slowly self-discharge
when unused over a long period. If the battery cells are left at a critically low charge state, the
lifespan and capacity will be permanently reduced.
Always disconnect the charger from the mains electrical supply and battery before storing the
battery.
Avoid storing batteries in extreme temperatures, whether hot or cold. The recommended battery
storage temperature is between 0 and 25 ° C (32 to 77 ° F). Avoid exposing batteries to
temperatures at or above 40°C (104°F) for extended periods.
Batteries are best kept in a cool, dry place. Do not allow batteries to accumulate condensation,
as this may cause shorting or corrosion.
17
Battery Fuse
Use fuses of the same type only - the rating (in Amperes) is printed on the end of the fuse. . If the
fuse"blows" regularly, have the bicycle inspected at an authorised service centre.
The bicycle battery/ electrical system may feature fuse protection to prevent damage in the event of a
short circuit, overload or over current situation. For example, if the electrical system is exposed to
excessive moisture. On some model bicycles, the fuse is accessible and can be easily replaced. If the
fuse is "blown", the bicycle electronics will not be available until the fuse is replaced. To replace the
fuse:
1. Using a suitable screwdriver, remove (rotate left) the fuse holder on the battery pack until fully
unscrewed, then pull the fuse holder and fuse from the bicycle.
2. Discard the blown fuse. Insert the replacement fuse into the fuse holder.
3. Insert the fuse and fuse holder to the bicycle, and re install (rotate right) the fuse holder until fully.
Tyre Pressures
The tyres must always be inflated to the correct pressure (as specified on the tyre sidewall) before every
ride. Riding the bicycle with either too low or too high pressures will affect bicycle performance, may
affect effective electrical assistance range, and may render the bicycle as dangerous. Use an accurate
pressure gauge when checking pressures.
Chain Care
The chain periodically requires lubrication, depending on
frequency of use and conditions etc. If the chain is noisy
or running roughly, lubricate it by applying a small
amount of bicycle chain lubricant to it. Do not allow the
lubricant to get on to the tyres.
Torque Settings
It is important to regularly check all fasteners for adequate tightness. The following are considered
highly important and should be adjusted to the specified torque values using a suitable bicycle torque
wrench, sockets and adaptors. Depending on bicycle model and design, some fasteners listed below may
not be applicable:
• Front Axle Nut – 35Nm
• Rear Axle Nut – 35Nm
• Handlebar Clamp Bolt – 10Nm
• Handlebar Neck Lock Bolt - 15Nm
• Handlebar Stem Bolt – 24Nm
• Pedal Bolts – 35Nm
• Brake Calliper Mounting Bolt – 7Nm
• Brake Cable Anchor Bolt – 7Nm
18
Table of contents
Other VIVI Bicycle manuals


