VIVI MT26G User manual

American
VIVI
E-bike User’s Manual
CAUTION: READ THIS MANUAL BEFORE USING YOUR EQUIPMENT
MADE IN CHINA

CONTANTS
Safety instruction------------------------------------------------------------------Page 1
Technical configuration parameters------------------------------------------------------Page 1
Meter operation-------------------------------------------------------------------Page 2
Battery:Further information and maintenance-----------------------------------Page 4
About Charging---------------------------------------------------------------------------Page 5
Installation Instruction----------------------------------------------------------Page5-10

1
1.Safety Instruction __________________
1. Thank you for purchasing the VIVI E-BIKE. The E-BIKE features the most
recent innovation in technology.
2. For Safety reasons, it is most important that you read this user’s manual
before you operate the bike. Improper handling can reduce its riding
performance and most importantly, cause danger to your safe and healthy.
3. For handling and maintenance of the bicycle, please refer to the E-BIKE
user’s manual which is an integral part of this e-bike user’s manual!
4. Do not at any time dismantle or disassemble any of the above e-bike
components!
5. Please check all parts are tighten and locked before riding.
6. Please make sure that the battery charger and charging plug are always
kept dray and never get wet.
7. The charger should only be cleaned with a dry cloth. Never use a wet cloth,
oil or any other liquid.
2. Technical configuration parameters

2
1
2
3
4
5
6
7
8
Saddle
Meter
Front
derailleu
r
Headlight
Front
fork
Tire
Pedal
Controlle
r
9
10
11
12
13
14
15
16
Engine
Battery
Chain
cover
Transmission
chain
Brake
fender
Bicycle
rack
3. Meter operation
3.1 Meter instruction

3
Press the "+"
button for 2
seconds
during
power-on
state, the
system
defaults to
turning on the
front light.
When the
front light is
on, press the
"+" button for
2 seconds, the
system
defaults to
turn off the
front light.
3.2 Meter operation
3.3 Meter Solution Instruction:
1. Turn on the machine first and adjust the gear to high-speed gear;
2. Press the "+""-" buttons at the same time. Long press for 3 seconds to 5
seconds, this is the speed limit will be lifted;
3. If you want to restore the factory configuration after the speed limit is lifted,
repeat the above 1.2. operation.
Operating instructions
Hold the
button for
2s to switch
on/off the
E-Bike system.
The default
value is “low”
pedal assist
level. Full
Electric
Function (Pure
electric mode)
Press “+” to
crease into
pedal assist
level “Mid”.
Full Electric
Function
(Pure electric
mode)
Press “+”
again to move
into pedal
assist level
“High”. “High”
is the
maximum
power of PAS.
Full Electric
Function
(Pure electric
mode)
Foot riding
(without
pedal
assistant
and electric)

4
3.4 Operation Cautions
Be careful of the safety use. Don’t attempt to release the connector when
charging the battery.
● Avoid the risk of collision.
● Don’t modify system parameters to avoid parameters disorder.
● Make the display repaired when error code appears.
4. Battery: further information and maintenance
1. How far full charge battery can go? This will depends on the loading weight,
road condition and battery capacity. The average vehicle speed can continue
to travel for a long distance when its under the same condition.
2. It is important to place the fully charged battery on a flat surface in a dry
place when storing the battery for a longer time period, (e.g. during winter
time).
3. Attention: The battery should be re-charged once every 2-3 month when
it is not used.
4.Warning:
4.1.Please keep the battery out of reach of children.
4.2.Never try to open the battery.
4.3. Stop using a damaged battery if the battery is damaged because it has
been dropped somewhere or because of a biking accident. The battery might
contains risk of electrolytes leakage. Beware of chemical burns!
4.4 Do not touch the battery without a cloth or gloves and make sure no acid
touches your eyes.

5
5.Charging
1. For charging the E-bike, simply take the E-bike and bring near to the power
supply that is available. Connect the charging plug to the charging base and
then plug in the power plug of the charger to charger.
2.The battery can either be charged while on the bike or the battery can be
removed and charged at a place of your convenience.
3 .The RED light indicates it is in charging and GREEN light indicates the
battery is fully charged. (Please unplug from the wall) Normally the charging
time is 4-6 hours, depending on the battery capacity.
4. Warning: Charging time over 10 hours is prohibited please kept it away
from high temperature environment and stores it in a environmental
temperature.
6. Installation Instruction
1. Take out the E-bike from the carton and cut the wrapping rope with a tool.
2. Handlebar installation:
2.1 Insert the seat tube vertically and align it with the frame head tube. The
depth must exceed the minimum insertion depth marked on the seat tube.
2.2 Align the standpipe so that the handlebar and the frame are at 90
degrees, and then use an M6 hexagon wrench to tighten the mounting screws
on the standpipe.
2.3 Adjust the correct position of the handlebar, and then use tools to lock
the handlebar cover.
2.1 2.2 2.3
6
3. Headlight installation
3.1 Loosen the headlight screw from the front fork; install the headlight and
the front fender ears in the front fork screw hole, and tighten the screw with
an Allen tool.
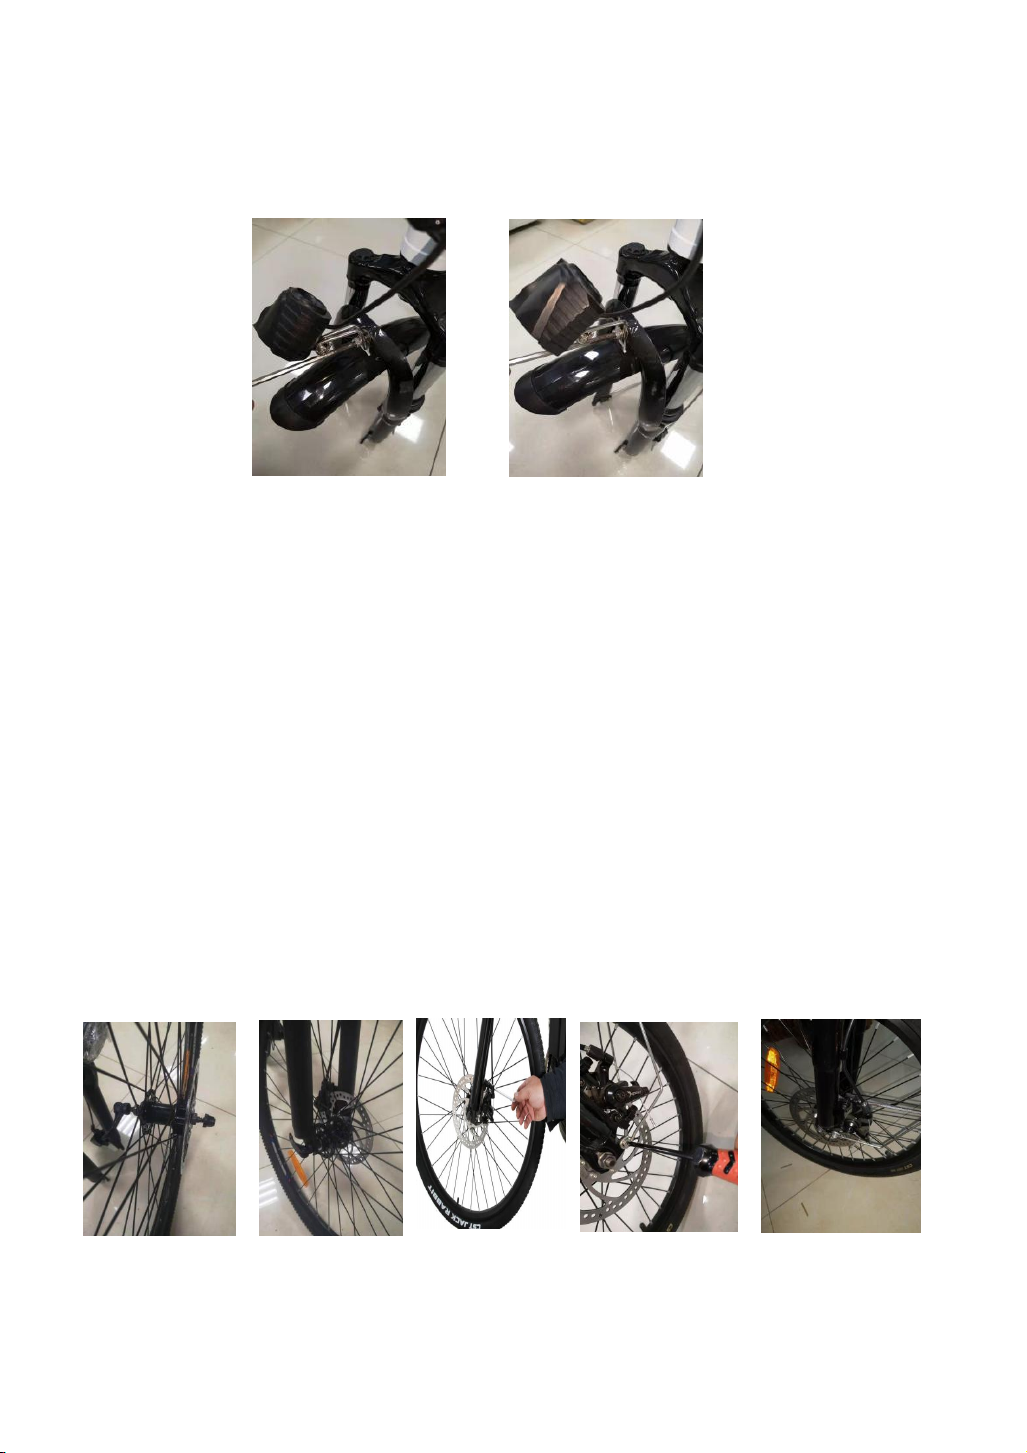
4.Front wheel installation:
4.1 Cut the wrapping rope, remove the front wheel, remove the front fork
protection lever and the front wheel protection cover.
4.2 Make sure that the front wheel is in line with the rear wheel, then start
installation. First install the front wheel installation quick release on the front
wheel hubs,(Note: The quick release handle is on the side of the wheel, and
both sides of the mandrel have conical spring heads inward.) Then pull the
wheel upwards, put the disc brake pad into the front brake caliper, and then
use hand to tighten the screw nut, and firmly lock the front hub with the quick
release handle backwards.
4.3 Adjust the adjusting screw of the disc brake to make the disc brake rotor
without obvious friction
5.Bicycle Rack installation:

7
5.1 First align the mounting holes of the rack with the mounting holes on the
frame, and then use an M4 hexagon wrench to tighten the mounting screws of
the rack respectively.
5.2Install the rear reflector in the small bag box on the lamp of the shelf.
6.Foot pedal installation:
Check the two pedals. The pedal with "L" printed on the end of the mandrel
should be installed on the left side of the vehicle (without chain ring), rotate
counterclockwise, and the "R" pedal should be installed on the right side.
(With chain ring), rotate clockwise, and then use a No. 15 wrench Tighten the
pedal spindle.
7.Saddle installation
7.1Open the package and take out the seat saddle and seat post. Install the
rear reflector on the seat post.
7.2Insert the seat post into the frame.
7.3Adjust the seat position to the height that best suits your riding position,
and tighten the quick release (please ensure that the quick release is locked).

8
8.Adjust the brakes, meters, and transmission system. tighten all of
them with tools.
9. Battery installation.
9.1 Hang on the battery on the handlebar first.
9.2 Pull out the power cord connector from under the battery bag.
9.3 Locate the power cord connector on the frame and the battery power
cord connector and insert them in place to complete the power supply
installation.
9.2 9.3
10.Tire inflation instruction
10.1 After the bicycle is assembled, please check whether the air pressure of
the front and rear tires is within the normal value.
10.2 When refilling tires, you must refer to the inflation reference range on the
side of the tire for refilling, generally between 35PSI---65PSI
(280Kpa--450Kpa).

9
11.Instructions for using Front derailleur
11.1 When you shift forward the right derailleur handle, the back derailleur will
move inside, at the same time, move the chain from the small part of the rear
flywheel to the large part. These steps will reduce the riding speed while riding,
also will reduce the pedaling strength of riding. When the handle bar at the
maximum position(as shown in picture 3 below), press the accelerator button
on the right derailleur handle, the back derailleur will move outward, at the
same time, move the chain from the large part of the rear flywheel to the small
part. These steps will increase the riding speed while riding, also will increase
the pedaling strength of riding.So as to realize the different speed of the back
derailleur.

10
More VIVI electric bike’s installation and repair instructions
Any question about the item, please contact.
Detail Packing List
Description
Quantity
E-Bike
1
Tools (13-15 spanner, 9-11 spanner, 8-10
spanner,14-17 spanner, eleven-shaped
screwdriver, M6, M5, M4, M3 Allen
wrench)
1
Manual
1
Charger
1
rear reflector
1
Pedal
1
Saddle
1
Seat tube
1
Battery
1
Fenders
1

English
VIVI
E-bike User’s Manual
CAUTION: READ THIS MANUAL BEFORE USING YOUR EQUIPMENT

CONTANTS
Safety instruction------------------------------------------------------------------Page 1
Technical configuration parameters------------------------------------------------------Page 1
Meter operation-------------------------------------------------------------------Page 2
Battery:Further information and maintenance-----------------------------------Page 4
About Charging---------------------------------------------------------------------------Page 5
Installation Instruction----------------------------------------------------------Page5-10

1
1.Safety Instruction __________________
1. Thank you for purchasing the VIVI E-BIKE. The E-BIKE features the most
recent innovation in technology.
2. For Safety reasons, it is most important that you read this user’s manual
before you operate the bike. Improper handling can reduce its riding
performance and most importantly, cause danger to your safe and healthy.
3. For handling and maintenance of the bicycle, please refer to the E-BIKE
user’s manual which is an integral part of this e-bike user’s manual!
4. Do not at any time dismantle or disassemble any of the above e-bike
components!
5. Please check all parts are tighten and locked before riding.
6. Please make sure that the battery charger and charging plug are always
kept dray and never get wet.
7. The charger should only be cleaned with a dry cloth. Never use a wet cloth,
oil or any other liquid.
2. Technical configuration parameters

2
1
2
3
4
5
6
7
8
Saddle
Meter
Front
derailleu
r
Headlight
Front
fork
Tire
Pedal
Controlle
r
9
10
11
12
13
14
15
16
Engine
Battery
Chain
cover
Transmission
chain
Brake
fender
Bicycle
rack
3. Meter operation
3.1 Meter instruction

3
Press the "+"
button for 2
seconds
during
power-on
state, the
system
defaults to
turning on the
front light.
When the
front light is
on, press the
"+" button for
2 seconds, the
system
defaults to
turn off the
front light.
3.2 Meter operation
3.3 Meter Solution Instruction:
1. Turn on the machine first and adjust the gear to high-speed gear;
2. Press the "+""-" buttons at the same time. Long press for 3 seconds to 5
seconds, this is the speed limit will be lifted;
3. If you want to restore the factory configuration after the speed limit is lifted,
repeat the above 1.2. operation.
Operating instructions
Hold the
button for
2s to switch
on/off the
E-Bike system.
The default
value is “low”
pedal assist
level. Full
Electric
Function (Pure
electric mode)
Press “+” to
crease into
pedal assist
level “Mid”.
Full Electric
Function
(Pure electric
mode)
Press “+”
again to move
into pedal
assist level
“High”. “High”
is the
maximum
power of PAS.
Full Electric
Function
(Pure electric
mode)
Foot riding
(without
pedal
assistant
and electric)

4
3.4 Operation Cautions
Be careful of the safety use. Don’t attempt to release the connector when
charging the battery.
● Avoid the risk of collision.
● Don’t modify system parameters to avoid parameters disorder.
● Make the display repaired when error code appears.
4. Battery: further information and maintenance
1. How far full charge battery can go? This will depends on the loading weight,
road condition and battery capacity. The average vehicle speed can continue
to travel for a long distance when its under the same condition.
2. It is important to place the fully charged battery on a flat surface in a dry
place when storing the battery for a longer time period, (e.g. during winter
time).
3. Attention: The battery should be re-charged once every 2-3 month when
it is not used.
4.Warning:
4.1.Please keep the battery out of reach of children.
4.2.Never try to open the battery.
4.3. Stop using a damaged battery if the battery is damaged because it has
been dropped somewhere or because of a biking accident. The battery might
contains risk of electrolytes leakage. Beware of chemical burns!
4.4 Do not touch the battery without a cloth or gloves and make sure no acid
touches your eyes.

5
5.Charging
1. For charging the E-bike, simply take the E-bike and bring near to the power
supply that is available. Connect the charging plug to the charging base and
then plug in the power plug of the charger to charger.
2.The battery can either be charged while on the bike or the battery can be
removed and charged at a place of your convenience.
3 .The RED light indicates it is in charging and GREEN light indicates the
battery is fully charged. (Please unplug from the wall) Normally the charging
time is 4-6 hours, depending on the battery capacity.
5. Warning: Charging time over 10 hours is prohibited please kept it away
from high temperature environment and stores it in a environmental
temperature.
6. Installation Instruction
1. Take out the E-bike from the carton and cut the wrapping rope with a tool.
2. Handlebar installation:
2.1 Insert the seat tube vertically and align it with the frame head tube. The
depth must exceed the minimum insertion depth marked on the seat tube.
2.2 Align the standpipe so that the handlebar and the frame are at 90
degrees, and then use an M6 hexagon wrench to tighten the mounting screws
on the standpipe.
2.3 Adjust the correct position of the handlebar, and then use tools to lock
the handlebar cover.
2.1 2.2 2.3

6
3.Headlight installation
3.1 Loosen the headlight screw from the front fork; install the headlight and
the front fender ears in the front fork screw hole, and tighten the screw with
an Allen tool.
4. Front wheel installation
4.1 Cut the wrapping rope, remove the front wheel, remove the front fork
protection lever and the front wheel protection cover.
4.2 Make sure that the front wheel is in line with the rear wheel, then start
installation. First install the front wheel installation quick release on the front
wheel hubs,(Note: The quick release handle is on the side of the wheel, and
both sides of the mandrel have conical spring heads inward.) Then pull the
wheel upwards, put the disc brake pad into the front brake caliper, and then
use hand to tighten the screw nut, and firmly lock the front hub with the quick
release handle backwards.
4.3 Adjust the adjusting screw of the disc brake to make the disc brake rotor
without obvious friction
Table of contents
Languages:
Other VIVI Bicycle manuals


Popular Bicycle manuals by other brands


BambinoBike
BambinoBike BambinoTrike operating instructions

Kona
Kona Hei Hei 29er Cleaning and Maintenance Tips

EcoSpeed
EcoSpeed Electric Mountain Drive Installation and assembly instructions

Momas
Momas JASON PRO user manual

DAHON
DAHON FUEGO instruction manual

Pedibal
Pedibal SCAMPA Assembly & riding advice manual


