Vividia HM-250 User manual
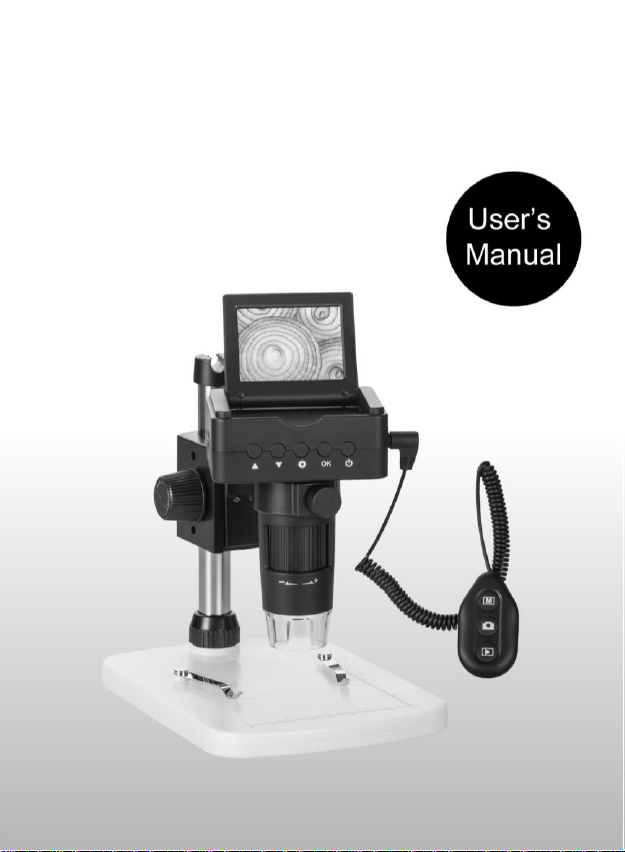
Vividia®HM-250 HDMI/LCD/USB/TV Portable
Digital Measurement Microscope

1
Table of Contents
1. Precaution…………………………………………….…3
2. Preparation……………………………………………..5
⚫Package Contents……………………………..…6
⚫Part Names & Functions………………………..6
3. Specifications…………………….….………..………7
4. Use the Microscope………..……….………………..8
⚫Charge Battery…………………….…..…………8
⚫Insert Micro-SD Card……………..……….……9
⚫Display Icons & Meanings…….……….….…...10
⚫Turn on/off the Microscope…….………………11
⚫Capture………………..…..…………………….12
⚫Playback………………………..………………..13
⚫Delete…………………………………………..13
⚫Zoom………………………………………….….13
⚫Download Files to Computer.…..….…..………14
⚫Output Live Video to Computer………….…..14
⚫Output Live Video to Monitor by HDMI/TV…15
5. Screen Menu introductions………...……….……..…16
⚫Photo Resolution……………………………...16
⚫Video Resolution……………………….……….16
⚫Exposure………………………………………..17
⚫Date/Time……………………………………..…17
⚫Date Stamp……………………………………...18
⚫TV Out……………………………..…………….18
⚫Loop Recording……………………………….19
⚫Auto Off…………………………………………..19

2
⚫Language………………………………………..20
⚫Format SD………………………………………20
⚫Default Setting…………………………….…..21
6. Troubleshooting………………………………….……22
PC Software Introductions…………………...………...23
Install the software ………………….……………………23
Start Microscope………………………………………….24
Software functions………………………………..………25
⚫Capture Photo……...…………………………25
⚫Capture Video………………….………………..25
⚫Timer……………………………………………..26
Calibration and Measurement…………………..………..27
⚫Calibration……………………………………..27
⚫Measurement……………………………………31
⚫Change Calibration…………………..………..32
⚫Draw and text…………………………………35
Software Interface Instructions………………...……....36
⚫Main Interface Icons…………………………....36
⚫Main Menu……………………………………….37
⚫Options…………………………………………..38
⚫Capture………………………………….……….39
⚫Measurement Interface Instructions…………40

3
Welcome
Thank you for purchasing the Vividia® HM-250
HDMI/LCD/USB/TV Portable Digital Microscope. This
digital microscope integrating LCD/HDMI/TV/USB
functions is highly useful for students, teachers, collectors,
hobbyists, and testers etc to explore the microscopic
world.
Please take a moment to read through this manual. Its
contents will help you get the best use of the innovative
microscope.
1. Precaution
Before using the LCD HDMI Digital Microscope, please
ensure that you read and understand the safety
precautions described below. Always ensure that the
Digital Microscope is operated correctly.
⚫The Microscope is not waterproof, so keep it dry.
⚫Do not use it in a humid place like bathrooms. Adry
environment will maintain its life to maximum.
⚫Use the Microscope only at -5℃-50℃.

4
⚫Sudden temperature change may form dew inside
the Microscope like entering a warm room in cold
winter. Put it inside a handbag or plastic bag to slow
down temperature changes.
⚫Do not point Microscope lens to the sun or strong
light for a long time. Powerful light may hurt the
light-sensitive electronics.
⚫Avoid touching the lens.
⚫The white LEDs which illuminate the Microscope
target field are very bright. Do not stare directly into
these LEDs as it may damage your eyes.
⚫The clear plastic distance shell sometimes picks up
dirt or toxic material from a microscopically observed
surface. Be careful that this doesn’t get in contact
with the human skin. Always wash carefully or
disinfect as needed.

5
2. Preparation
■Package Contents
Microscope
Stand
AC adaptor
Capture remote
HDMI cable
USB cable
TV cable
Micro-SD card
CD
Manual
6
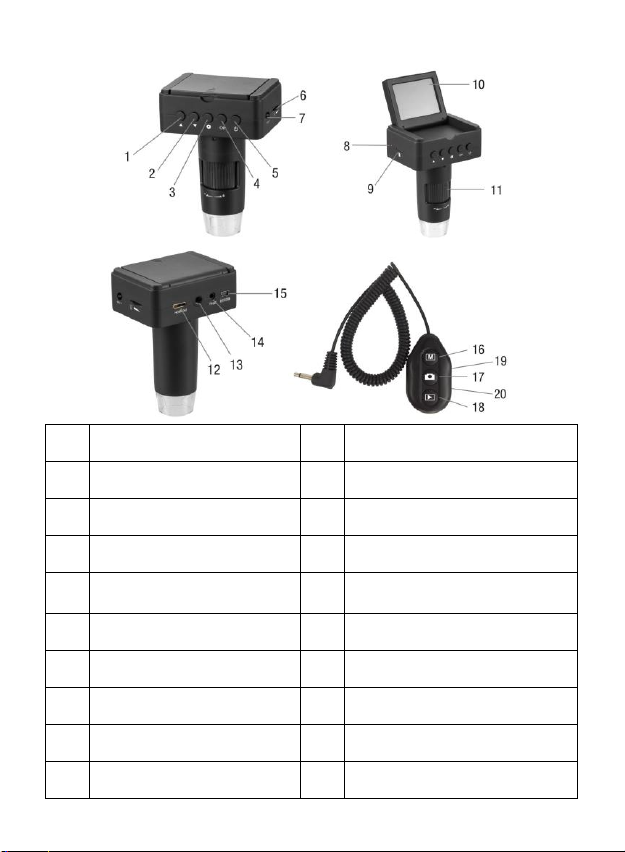
■Parts Names & Functions
1
Up
11
Focus wheel
2
Down
12
HDMI-out
3
Setup/Delete
13
1/4-inch screw
4
OK (Confirm)
14
TV-out
5
Power on/off
15
DC: charge battery
USB: output to PC
6
LED Dimmer
16
Photo/Video switch
7
Capture remote input
17
Capture
8
Charging indicator
18
Playback
9
Micro-SD slot
19
Zoom in
10
2.4-inch LCD
20
Zoom out

7
3. Specifications
Display: 2.4-inch LCD
Magnification Ratio: 10x to 220x
Image sensor: 3 Mega Pixels
Photo size: 3M, 5M, 8M, 12M
Video size: 1080P, 720P, VGA
Video output: HDMI/TV/USB
Focus Range: Manual focus from 10mm to 50mm
Storage: Micro-SD card, up to 32G
Measurement: Yes, when working as a USB microscope
Light source: LED (adjustable by dimmer)
Power source: Built-in Li-ion Battery or 5V DC-in
Battery working time: 1.5hrs
Battery charging time: 2hrs
Size: 110mm (H) x 80mm (L) x 55mm (W)

8
4. Use the Microscope
4.1 Charge the Built-in Battery
Before using the microscope, you are suggested to
charge the built-in battery by using the supplied power
adaptor.

9
4.2 Insert a Micro-SD Card
1) Turn off the microscope
2) Insert the Micro-SD card into the Micro-SD card slot;
gently press in until card is latched.
Note: Do not force the card into the slot; forcing may
damage microscope and the Micro-SD memory card.
Align Micro-SD card position (as marked) and try again.
The Micro-SD memory card must be formatted before
capture.
Table of contents
Popular Microscope manuals by other brands


VWR
VWR VisiScope 384 Series instruction manual

Nikon
Nikon ECLIPSE E200 POL instructions

Leica
Leica DI C800 User's manual & installation instructions

ThermoFisher Scientific
ThermoFisher Scientific Continuµm manual

ThermoFisher Scientific
ThermoFisher Scientific Continuµm manual

Olympus
Olympus SZ61 instructions