Vivitar DRC-333 User manual

USER’S MANUAL
DRC-333
SKY IS
THE LIMIT
WIFI DRONE
CAMERA
LIGHTS FOR
NIGHT FLYING
CONTROLED
VIA APP
32
WiFi
LED
25972

The manufacturer assumes no liability for accidental damages caused by improper assembly, or any unsafe usage
of this device. This product is intended for use by individuals aged 14 years or older. Please ensure that this product
is used in a safe environment.
We recommend that you seek the assistance of an experienced pilot before attempting tofly this aircraft for the
first time. This aircraft requires a certain degree of skill to operate, and is subject to normal wear and tear. Any
damage or dissatisfaction that result from accidents or modifications are not covered by this product’s warranty.
Thank you for purchasing the Vivitar Wifi Drone with built-in camera, item DRC-333. This remote controlled aircraft
is most suitable for outdoor flying. In order to get the most out of your device, please carefully read this manual before
using. In addition, be sure to keep this maunal in a safe place for future reference.
This device is not atoy. It is a miniature remote control six-axis aircraft. It is safe to use, as long it is used
as indicated in this instruction manual. This device should only be dismantled, disassembled or serviced by
trained professionals. Improper use of this product may be dangerousand lead to accidents or personal injury.
Mishandling caused by failure to follow these instructions may result in damage or injury.
WARNING
CAUTION
FORBIDDEN
Do not attempt under any circumstance.
Mishandling caused by failure to follow these instructions may result in danger.
WARNING LABEL DEFINITIONS
IMPORTANT NOTES
Fly only in safe areas away from other people. Do not operate this aircraft in the vicinity of large
crowds. This aircraft can be prone to accidents caused by pilot error or radio interference. The pilot of the aircraft
is responsible for any damage or injury caused in such instances.
CAUTION
1
1. FOREWORD
2.PRECAUTIONS

There are many sophisticated electronic components inside of your aircraft. As such, it is essential to avoid
exposing your aircraft to moisture or water vapor. Avoid using your aircraft in wet weather.
Make sure that the internal electronic components are not exposed to moisture or water vapor as well.
Please do not attempt to modify, upgrade or alter your aircraft in ways not suggested by the manufacturer.
Please only use the original parts and accessories to ensure safety.
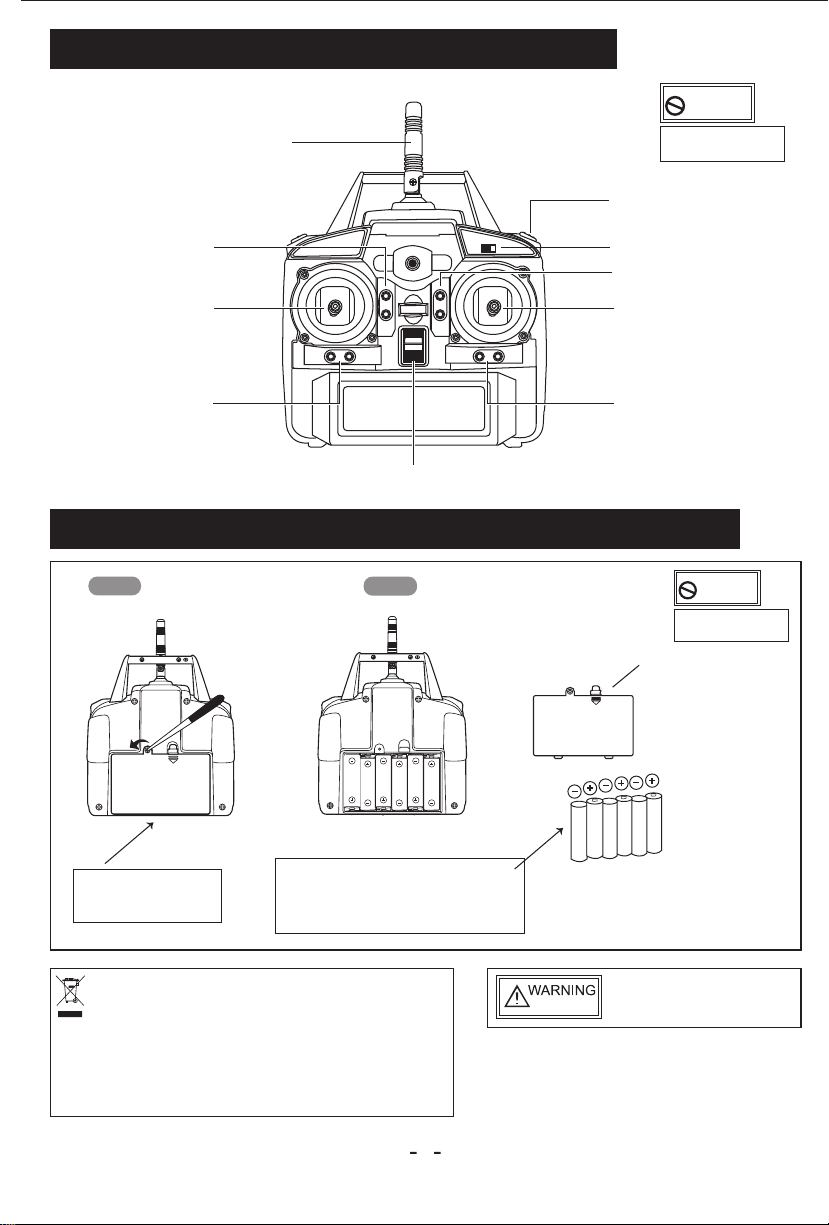
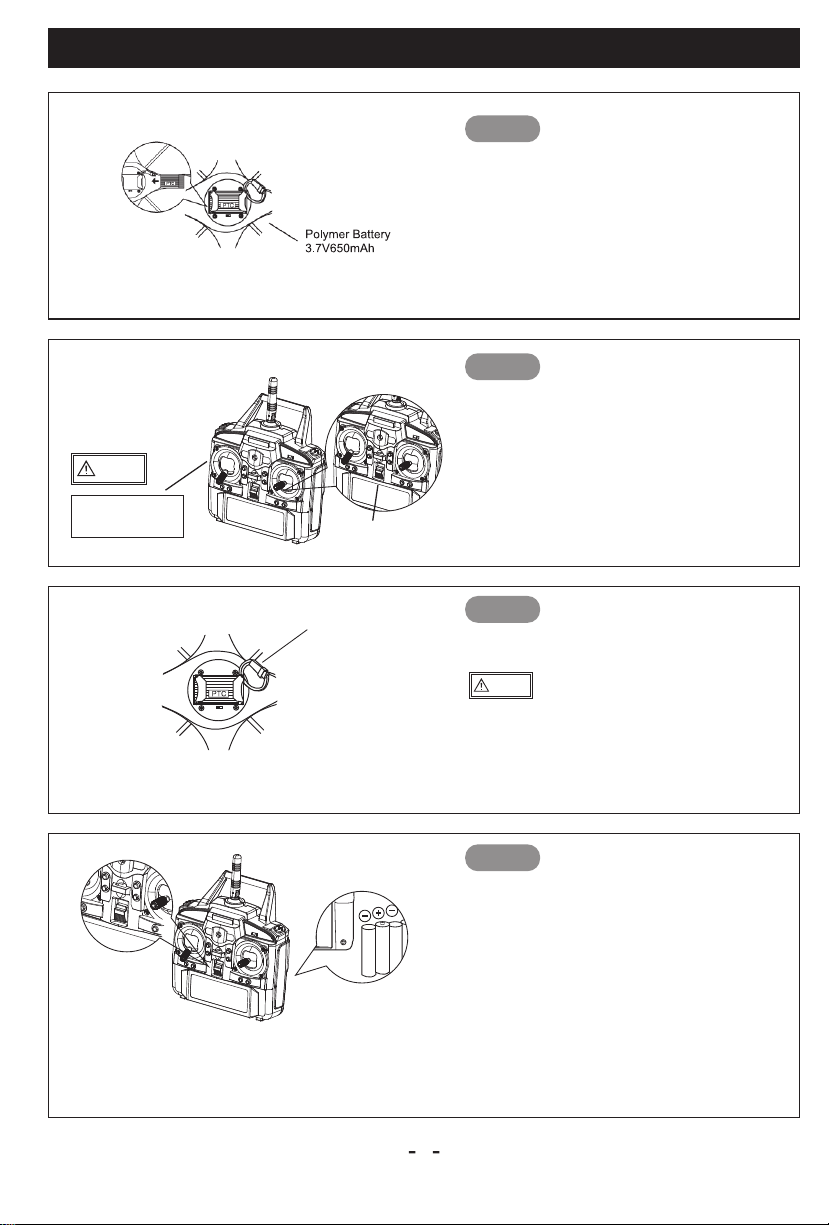
Make sure batteries are inserted with the correct polarity as indicated in the battery compartment.
Do no not mix different types of batteries or old and new batteries. In order to avoid leakage, remove
the batteries if you do not plan on using your device for extended periods of time. Please dispose
of depleted batteries according to local laws and ordinances. Do not dispose improperly.
Your aircraft and its remote control are made from various forms or plastic. Plastics are very
susceptible to damage or deformation caused by extremely hot or cold climates. Do not
store your device near extreme sources of heat. When not in use, try to store your device in a
cool, dry place.
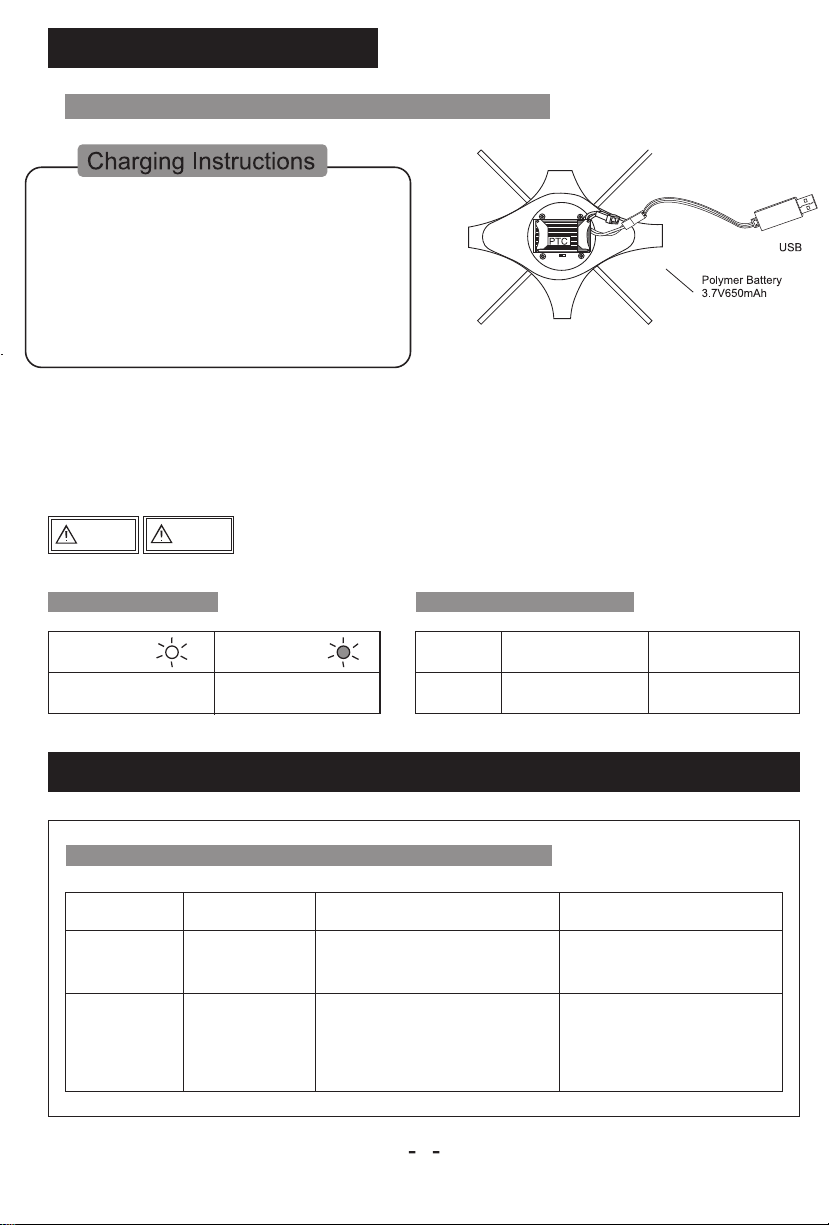
Lithium Polymer (Li-Po) batteries can pose higher operational risks compared to other types of batteries
if used incorrectly. The manufacturer assumes no liability for accidental damages caused by improper
usage. In order to avoid potential fire and explosion, do not use any chargers other than the ones
included with your unit. Do not crush, disassemble, burn, or reverse the polarity of the battery.
Do not allow the battery’s contacts to to come into contact with metal or metallic objects. To avoid fire
hazards, make sure that any chargers are supervised by an adult while charging. Keep chargers out of
the reach of children. Stop using any batteries which get abnormally hot, or start to expand or become
deformed. Please dispose depleted batteries according to local laws and ordinances.Do not dispose
improperly.
FORBIDDEN KEEP AWAY FROM OBSTACLES, HEAT AND ELECTRICAL WIRES
This product is suitable for outdoor use only. Avoid using in 15 mph or higher winds. Please do not use
in areas with many obstacles such as trees or branches. Keep away from crowds of people and pets. Don’t use
in locations that are unsafe, such as near sources of heat or electricity.
FORBIDDEN AVOID MOISTURE
2
FORBIDDEN PROPER OPERATION
FORBIDDEN SAFETY NOTEFOR NI-MH BATTERIES
FORBIDDEN SAFETY NOTEON LITHIUM POLYMER BATTERIES
CAUTION KEEP AWAY FROM HEAT
FIRE

This products is suitable for persons aged 14 years or older. Beginners and inexperienced users may
have difficulty learing to correctly use their aircraft and should seek guidance from an exprienced
pilot.
OBTAINING THE ASSISTANCE OF AN EXPERIENCED PILOT
WARNING
4. A QUICK LOOK AT YOUR AIRCRAFT
3
3. STANDARD ACCESSORIES
USB Charger
Receiver Board
Motor Block
Blade D
Blade C
Blade B
Blade A

5. A QUICK LOOK AT THE CONTROLLER
6. INSERTING BATTERIES
FORBIDDEN
Do not disassemble
FORBIDDEN
Do not disassemble
Battery lid
Use a screwdriver to open
the battery compartment.
Insert six AA batteries into the battery
compartment. Make sure the batteries are
inserted with the correct polarity (-,+) as
indicated in the battery compartment.
Step 1
Step 2
4
Power Switch
Left/Right Rotation Trim
Antenna
Single Eversion
Throttle
Throttle Trim
Directional Control Stick:
Forward/Reverse, Left/Right
Left/Right Roll trim
Pitch Forward/Reverse Trim
Speed: Slow 30%, Quick 60%, Fast 100%
CAUTION RISK OF EXPLOSION IF BATTERY IS
REPLACED BY AN INCORRECT TYPE.
DISPOSE OF USED BATTERIES ACCORDING
TO THE INSTRUCTIONS
Correct Disposal of this Product. This marking indicates that this
product should not be disposed with other household wastes
throughout the EU. To prevent possible harm tothe environment
or human health from uncontrolled waste disposal,recycle it responsibly
to promote the sustainable reuse of material resources. To return your
used device, please use the return and collection systems or contact the
retailer where the product was purchased to see if they can take this
product for environmentally safe recycling.

7. CHARGING
8. BATTERY AND CHARGER SPECIFICATIONS
Use the included USB charger to charge the aircraft’s battery
Battery usage and charge duration reference
For safety, battery charging must be done under adult supervision at all times.
WARNING
CAUTION
Battery type
Polymer battery Aircraft flight time5-7 minutes
Transmitter Operation TimeNon Rechargeable
18 Hours
About 110 minutes
3.7V, 650mAh
1.5V
(GP 15G R6P)
Carbon-Zinc
(Non Rechargeable)
Battery Specification Usage DurationCharge Time
LED lndicator LED Charger Specifications
Charge Complete Charging
InputCharging Current Full Voltage
110-240V650MA 4.25 ± 0.03V
5
Red light on Red light off
1. When charging, first make sure that your aircraft is powered off.
2. Disconnect the power cable located underneath your aircraft.
3. Plug the power cable into one end of the included charging cable.
4. Plug the other end of the charging cable into a computer’s USB
port or suitable AC adapter.
5. If the battery is warm after extended use of your aircraft, wait until it
cools before charging.

Connect the battery plug on the underside of your aircraft
to power it on. The light on the motherboard will illuminate.
Place the aircraft so that it lies flat on a stable surface such
as a table. Make sure that the aircraft lies still so that the
remote control can calibrate its frquency and determine its
neutral point.
9. SYNCHRONIZING THE AIRCRAFT WITH THE REMOTE
Step 1
Step 2
Step 3
Step 4
Pull the throttle stick straight down, and turn the remote
control’s power on.
ON/OFF
ON/OFF
When you are finished flying your aircraft,
unplug power cord.
Warning: If the power cord is not pulled out,
there may be excessive discharge, increasing the
risk of fire.
WARNING
Power down the remote control. If the transmitter will
not be used for an extended period of time, please
remove the batteries.
CAUTION
Pull the throttle
stick straight down.
6
Unplug

PRE-FLIGHT PREPARATION
10. FLIGHT ADJUSTMENTS AND SETTINGS
If you have never used your aircraft before, and you are not an experienced pilot, read this instruction manual first
before flying. Get familiar with all of the controls. If necessary, read through the instructions numerous times, and
practice handling the remote control until you feel completely comfortable and ready.
1.Place the aircraft in a clear, open field with the rear of the aircraft pointed in your direction.
2.Practice using the throttle stick and the directional control stick (see below).
3. By simulating using the remote and both sticks, you will grow more comfortable with the natural motions
required during flight and you will learn to react more rapidly to unexpected circumstances.
7
Push the throttle stick upwards and
the aircraft will ascend.
Pull the throttle stick downwards
and the aircraft will descend.
Push the directional control stick
upwards and the aircraft will tilt
downwards, causing it to move
forward.
Push the directional control stick
downwards and the aircraft will tilt
upwards, causing it to move
backwards.
Slide the throttle stick to the left to
turn the nose of the aircraft will turn
to the left. Slide the throttle stick to
the right and the nose of the
aircraft will turn to the right.
Slide the directional control stick to
the left and the entire body of the
aircraft will slide to the left.
Slide the directional control stick to
the right and the entire body of the
aircraft will slide to the right.
Ascend
Descend
Forward
Backward
Turn
Slide Left
Slide Right

8
Speed
Flipping
Slide the speed switch on the upper
right hand corner of your remote
control to the left to decrease the
speed of your aircraft, or to the right
to increase the speed of your
aircraft.
Press the button on the top right
hand corner of your remote control
while flying in order to test out more
advanced maneuvers such as
flipping.

ADJUSTING THE TRIM
Slowly raise the throttle stick and just as the aircraft lifts off the ground,
you can use the trim to make minor adjustments in how the the direction the aircraft
is tilted.
1.Rotation and Trim
Just before the aircraft lifts off, the nose
may lean left or right.
Adjust the trim accordingly to compensate
so that the aircraft straightens out.
2.Adjustment of Elevation and Trim
Just before the aircraft lifts off, the nose may
lean forward or backwards.
When leaning forward, adjust the trim down.
When leaning backwards, adjust the trim up.
3.Adjustment of Left and Right Sliding and Trim
Just before the aircraft lifts off, the body may
lean left or right.
When leaning right, adjust the trim to left side.
When leaning left, adjust the trim to right side.
IMPROVING AS A PILOT
9
After you become familiar and comfortable with the practice activities from the previous
page, you can work on improving your skills as a pilot. Try drawing a circle on the ground
page, practice within the circle to increase your accuracy.
You can reduce the size of the circle as you become more skilled and need a greater
challenge.
Narrow the circle
Left Right
Left
Right
Left Right
Forward
Backward
Left
Right
Up
DOWN

Situation
The receiver light keeps flashing
Motor does not respond to throttle stick,
receiver LED flashes.
Main rotor spins but is unable to takeoff.
Strong vibration of aircraft
Tail still off trim after tab adjustment,
or inconsistent speed during left/right
pirouette.
Aircraft wanders forward after trim
adjustment when hovering.
1.Deformed main blades 1.Replace main blades
Fully charge the battery,or replace with a
fully charged battery.
Battery needs to be charged or replaced.
Unable to sync to transmitter.
Repeat the power up initializing process.
The aircraft is not responsive
1.Power on the transmitter and receiver
2.Check transmitter and receiver voltage.
3.Check contact on battery terminals.
1.Deformed main blades.
2.Flight vehicle battery depleted
3.Undetected horizontal point.
1.Damaged tail rotors
2.Damaged tail drive motor
3.Undetected horizontal point
1.Gyroscope midpoint not calibrated 1.Reboot
1.Replace main blades
2.Replace the main motor
3.Place on flat ground,reboot
1.Replace main blades
2.Charge or replace with fully charged
battery.
3.Place on flat ground,reboot
1.Turn on transmitter and ensure
battery is inserted properly.
2.Use fully charged batteries.
3.Re-seat the battery and ensure good
contact between battery contacts.
Cause
Suggested Solution
10
11. RULE OUT TROUBLE DURING FLIGHT
Stable, flexible, flight routes,
or drifting, and 3D flying rolls
Ensure that the speed is set to 100%. While flying, press the Left/Right Roll Trim buttons. Hold down the
forward/backwards/left/right buttons for the aircraft to roll continuously.

11
1 . Attached toyour aircraft is a camera which allows you
to shoot videos of your flights. Note that in order to use
the camera, you will have to synch your aircraft to your
smartphone via wifi connection. For more information on
getting your aircraft synched with your smart phone, see
the section of this manual regarding Wifi and App usage.
Videos taken by your aircraft are stored on your phone.
12.

12
13. WIFI/APP USAGE
1. Use the Included Mobile Phone Holder to Connect Your Phone to the Remote
2. Download the VIVITAR-UFO app.
3. Using Wifi to Connect the Aircraft to Your Phone
4. Control Interface Display Screen
Go to the App Store or Google Play store and search for the Vivitar-UFO app. Follow the installation
instructions to proceed to download the app.
-Power on your aircraft. LED lights will illuminate to indicate that it is powered on.
-On your mobile phone find the Wifi Settings menu. Select the network labeled
VIVITAR-UFO-xxxxxx in order to sync your aircraft with your phone.
-Open the VIVITAR-UFO application on your phone. Press the “play” option on
the start interface in order to open the control interface.
1. Return to Menu
2. Photograph
3. Perturbation
4. Speed Selection
5. Gravity Sensor Control Mode
6. Show/Hide Control Interface
7. Rotate Screen
8. Headless Mode
9. Key roll
10. Throttle
11. Directional Control Stick
12. Forward/Back Trim
13. Rudder Trim
14. Left/Right Trim
Slide your phone into the
included phone holder.
Connect the phone holder to the remote
control so that it fits in place.
Start Interface
Control Interface

13
5. Start Interface Options
Tap Play to open Tap Review to access captured videos.
Tap Help for further instruction
on using the App
Tap Settings to open the
App’s settings menu.

14
Vivitar One Year Warranty
This warranty covers the original consumer purchaser only and is not transferable.
This warranty covers products that fail to function properly UNDER NORMAL USAGE, due to defects in material or workmanship.
Your product will be repaired or replaced at no charge for parts or labor for a periodof one year.
What Is Not Covered by Warranty
Damages or malfunctions not resulting from defects in material or workmanship and damages or malfunctions from other than
normal use, including but limited to, repair by unauthorized parties, tampering, modification or accident.
To Obtain Warranty Service and Troubleshooting Information:
Call 1-800-592-9541 in the U.S. or 0-800-917-4831 in the UK or Visit our website at www.vivitar.com.
To receive Warranty service along with the name and address of an authorized product service center, the original consumer
purchaser must contact us for problem determination and service procedures. Proof of purchase in the form of a bill of sale or
receipted invoice, evidencing that the Product is within the applicable Warranty period(s), MUST be presented in order to obtain
the requested service. It is your responsibility to properly package and send any defective products along with a dated copy of
proof of purchase, a written explanation of the problem, and a valid return address to the authorized service center at your
expense. Do not include any other items or accessories with the defective product. Any products received by the authorized
service center that are not covered by warranty will be returned unrepaired.
NO WARRANTIES, WHETHER EXPRESS OR IMPLIED, INCLUDING, BUT NOT LIMITED TO, ANY IMPLIED WARRANTIES
OF MERCHANTABILITY OR FITNESS FOR A PARTICULAR PURPOSE, OTHER THAN THOSE EXPRESSLY DESCRIBED
ABOVE SHALL APPLY. DISTRIBUTOR FURTHER DISCLAIMS ALL WARRANTIES AFTER THE EXPRESS WARRANTY
PERIOD STATED ABOVE. NO OTHER EXPRESS WARRANTY OR GUARANTY GIVEN BY ANY PERSON, FIRM OR ENTITY
WITH RESPECT TO THE PRODUCT SHALL BE BINDING ON DISTRIBUTOR. REPAIR, REPLACEMENT, OR REFUND OF
THE ORIGINAL PURCHASE PRICE - AT DISTRIBUTOR’S SOLE DISCRETION -ARE THE EXCLUSIVE REMEDIES OF THE
CONSUMER. IN NO EVENT WILL DISTRIBUTOR, ITS MANUFACTURERS, OR SAKAR INT. BE LIABLE FOR ANY
INCIDENTAL, DIRECT, INDIRECT, SPECIAL, PUNITIVE OR CONSEQUENTIAL DAMAGES (SUCH AS, BUT NOT LIMITED TO,
DAMAGES FOR LOSS OF PROFITS, BUSINESS, SAVINGS, DATA OR RECORDS) CAUSED BY THE USE, MISUSE OR
INABILITY TO USE THE PRODUCT. EXCEPT AS STATED HEREIN, NO OTHER WARRANTIES SHALL APPLY. NOTWITH-
STANDING THE FOREGOING, CONSUMER’S RECOVERY AGAINST DISTRIBUTOR SHALL NOT EXCEED THE PURCHASE
PRICE OF THE PRODUCT SOLD BY DISTRIBUTOR. THIS WARRANTY SHALL NOT EXTEND TO ANYONE OTHER THAN
THE ORIGINAL CONSUMER WHO PURCHASED THE PRODUCT AND IS NOT TRANSFERABLE.
Some countries, states or provinces do not allow the exclusion or limitation of incidental or consequential damages or
allow limitations on warranties, so limitation or exclusions may not apply to you. This warranty gives you specific legal
rights, and you may have other rights that vary from state to state or province to province. Contact your authorized
retailer to determine if another warranty applies. This product is manufactured, distributed and sold by SAKAR
International, Inc. All other trademarks are the property of the respective owner, who has not sponsored, endorsed or
approved this product.
This equipment is in compliance with the essential requirements and other relevant provisions of
Directive 1999/5/EC (R&TTE Directive).
Please visit www.vivitar.com for any further inquiries or details.
This equipment has been tested and found to comply with the limits for a Class B digital device,
pursuant to Part 15 of the FCC Rules. These limits are designed to provide reasonable protection against
harmful interference in a residential installation. This equipment generates, uses and can radiate radio
frequency energy and, if not installed and used in accordance with instructions may cause harmful
interference to radio or television reception, which can be determined by turning the equipment off and on,
the user is encouraged to try to correct the interference by one or more of the following measures:
__ Reorient or relocate the receiving antenna.
__ Increase the separation between the equipment and receiver.
__ Connect the equipment into an outlet on a circuit different from that to which the receiver is connected.
__ Consult the dealer or experienced radio/ TV technician for help.
For Items Purchased in the United Kingdom
For Items Purchased in the United States

This manual suits for next models
1
Table of contents
Other Vivitar Drone manuals