Vivitek novoenterprise User manual

EN-2

EN-1
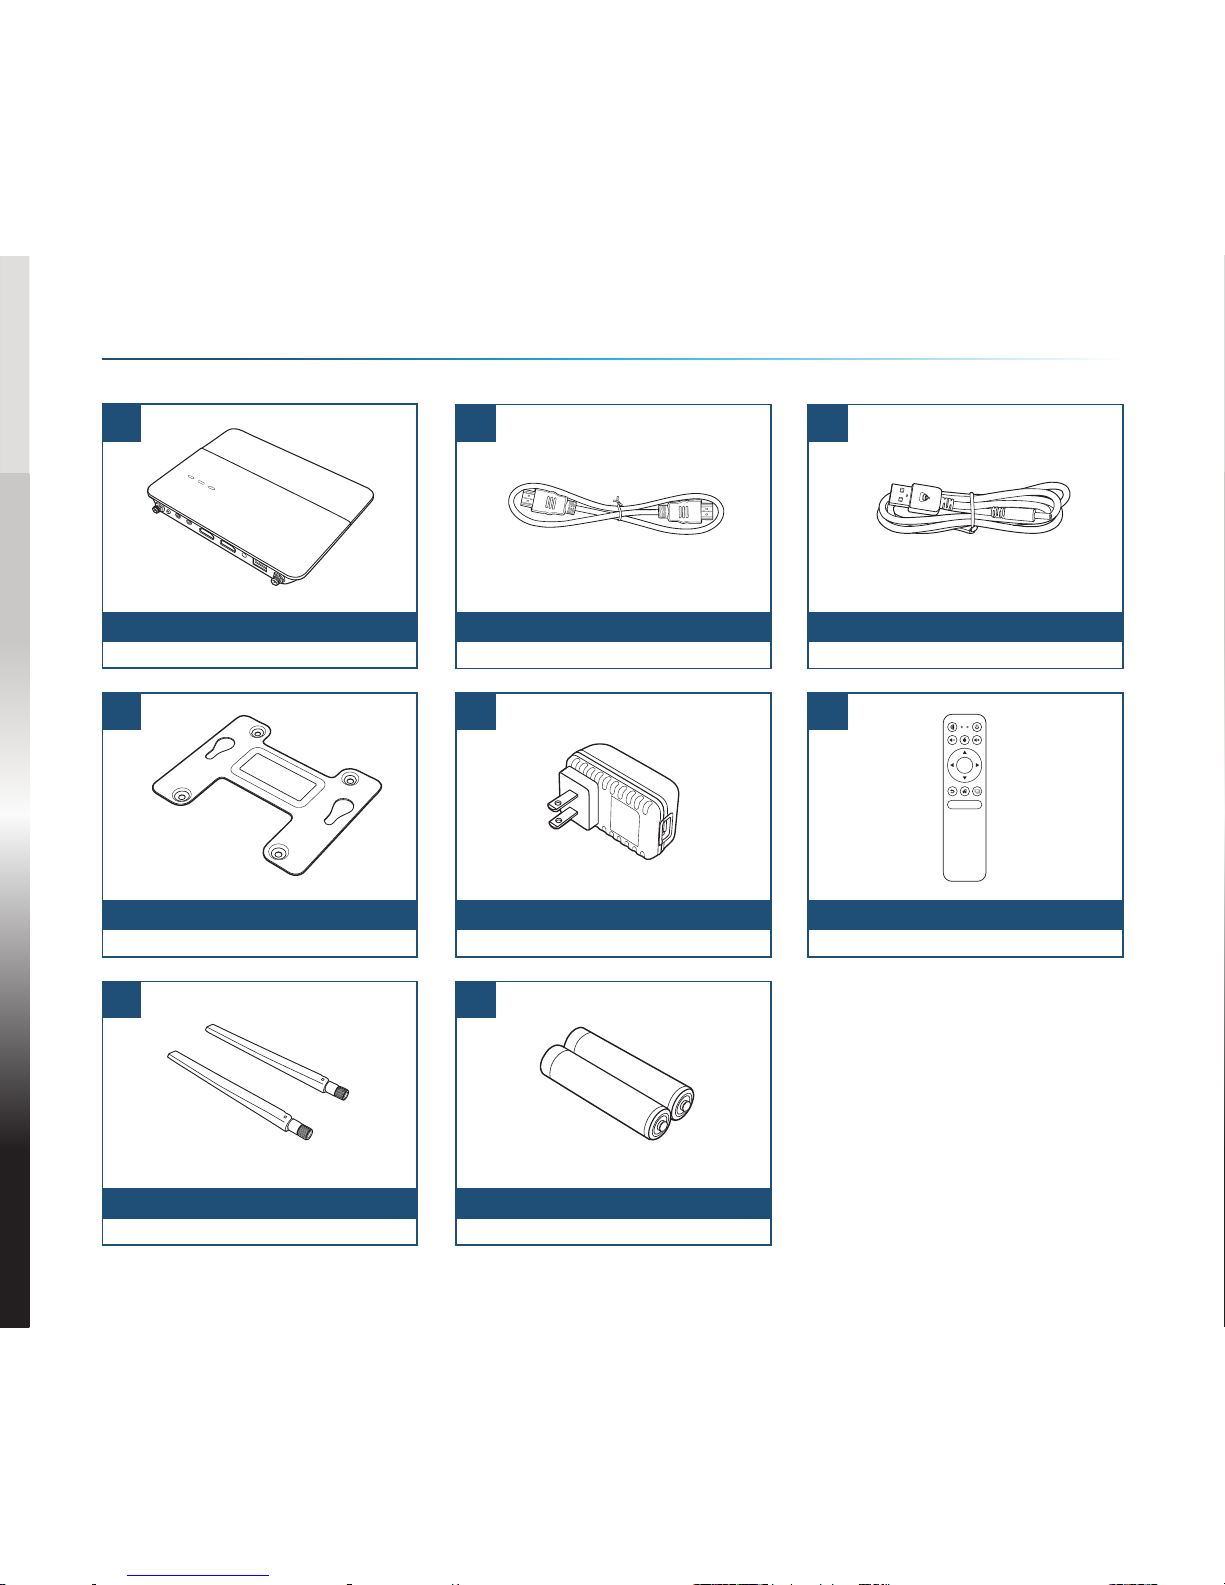
NovoEnterprise
Wall Mount
Antenna
HDMI-to-HDMI Cable
USB Power Adapter
Battery
USB-to-DC-in Power Cable
Remote Control
1
4
7
2
5
8
3
6
PACKAGE CONTENTS
OK
ABC

EN-2
NovoEnterprise OVERVIEW
SETTING UP NovoEnterprise
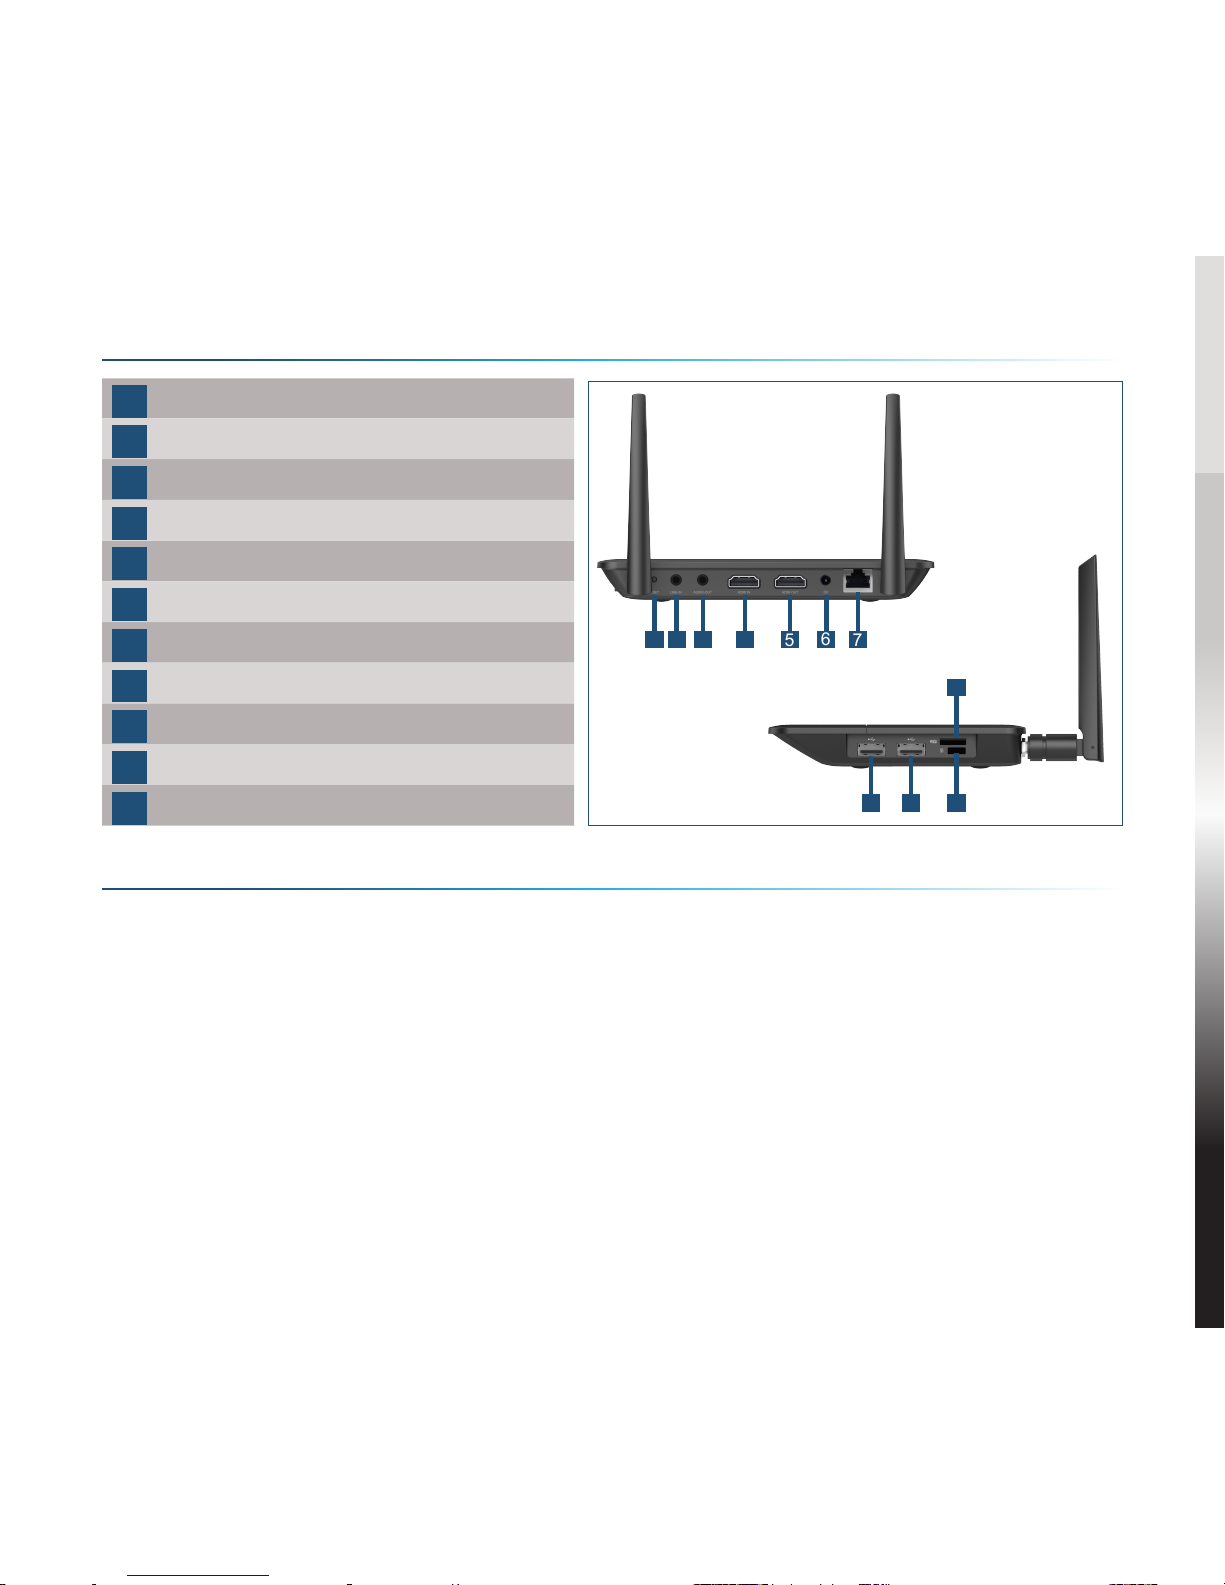
1Reset Button
2Line-in, 3.5mm Jack
3Audio-out, 3.5mm Jack
4HDMI-in Port
5HDMI-out Port
6DC 5V Power-in Jack
7RJ45 (Ethernet) PoE
8Type A USB Port
9Type A USB Port
10 MicroSD Card Slot
11 Kensington® Security Slot
Hardware Installation
HDMI Port: Connect to a projector.
USB Ports: Connect to a USB flash device, mouse, keyboard, or touch-
enabled interactive devices.
Ethernet Connection (Optional)
RJ45 (Ethernet) PoE: Connect to a wired network via an Ethernet cable.
Power Input
DC 5V Power Jack: Connect to the USB power adapter using the supplied
USB cable.
Power Over Ethernet: NovoEnterprise is an IEEE 802.3af compliant powered
device (PD).
1 2 34567
8911
10
EN-3
SETTING UP NovoEnterprise
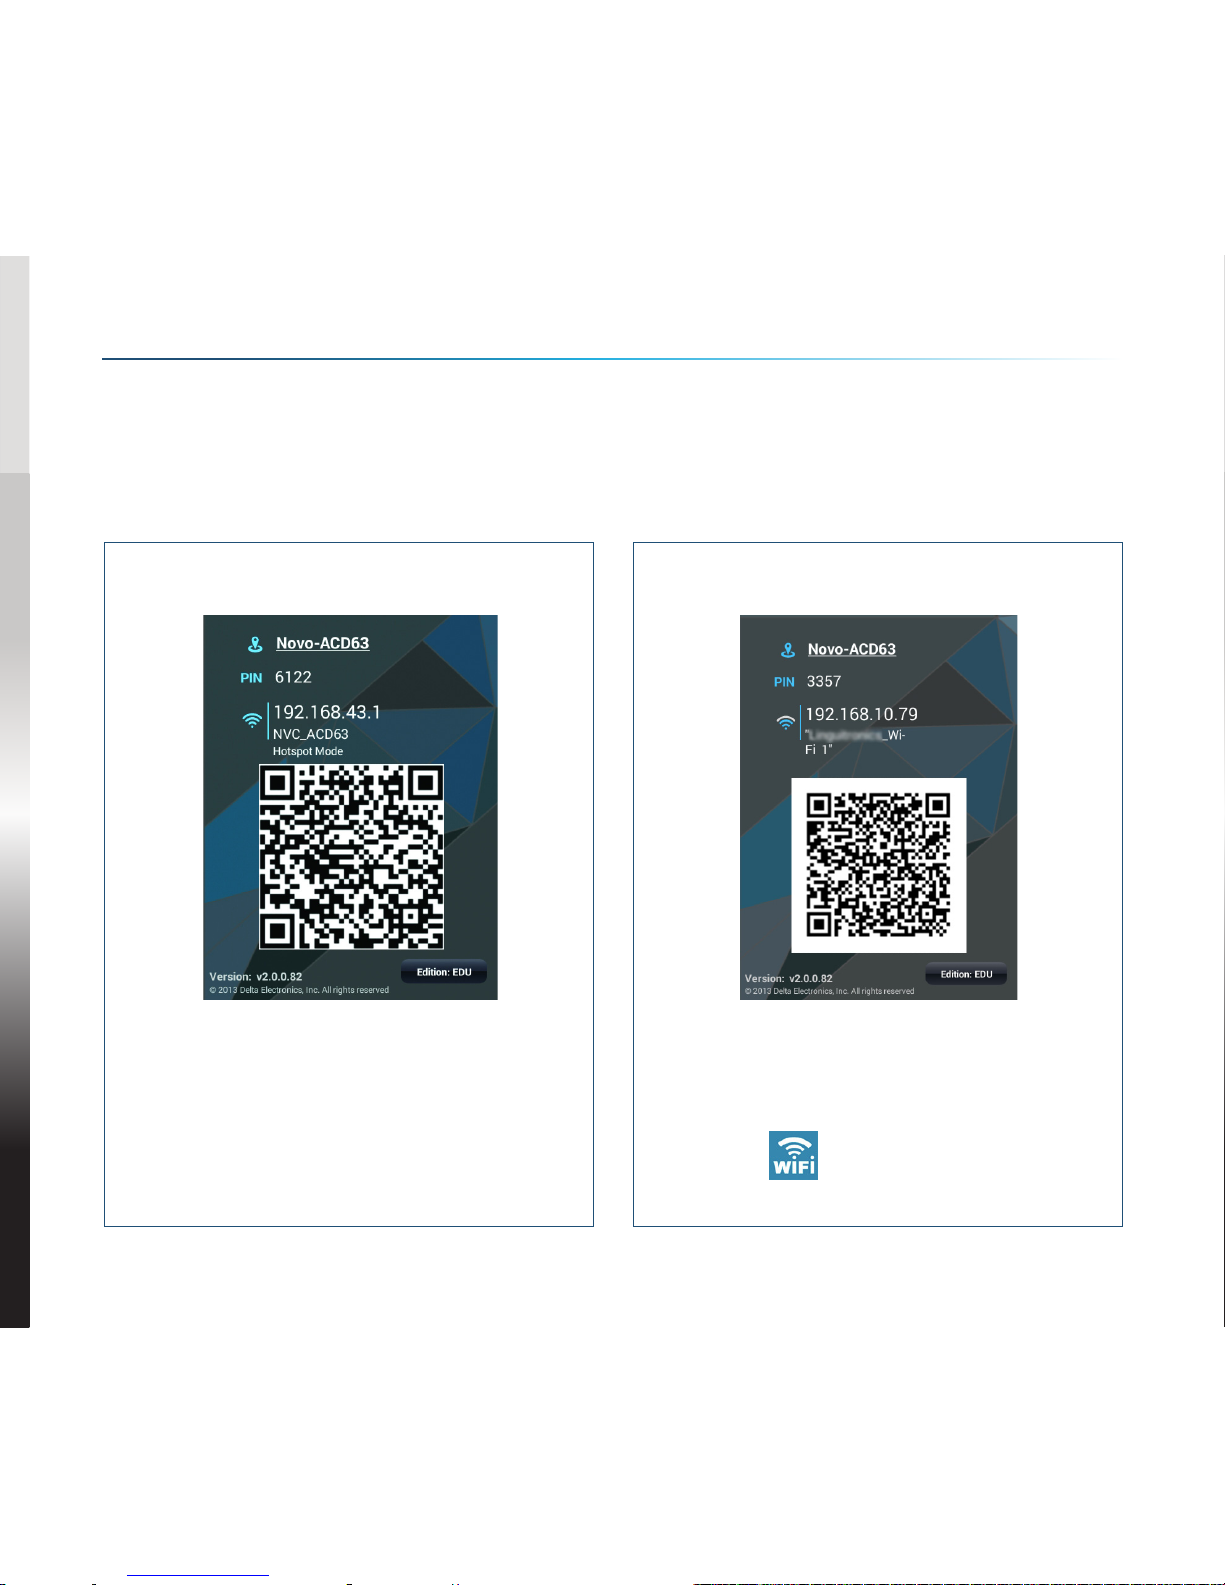
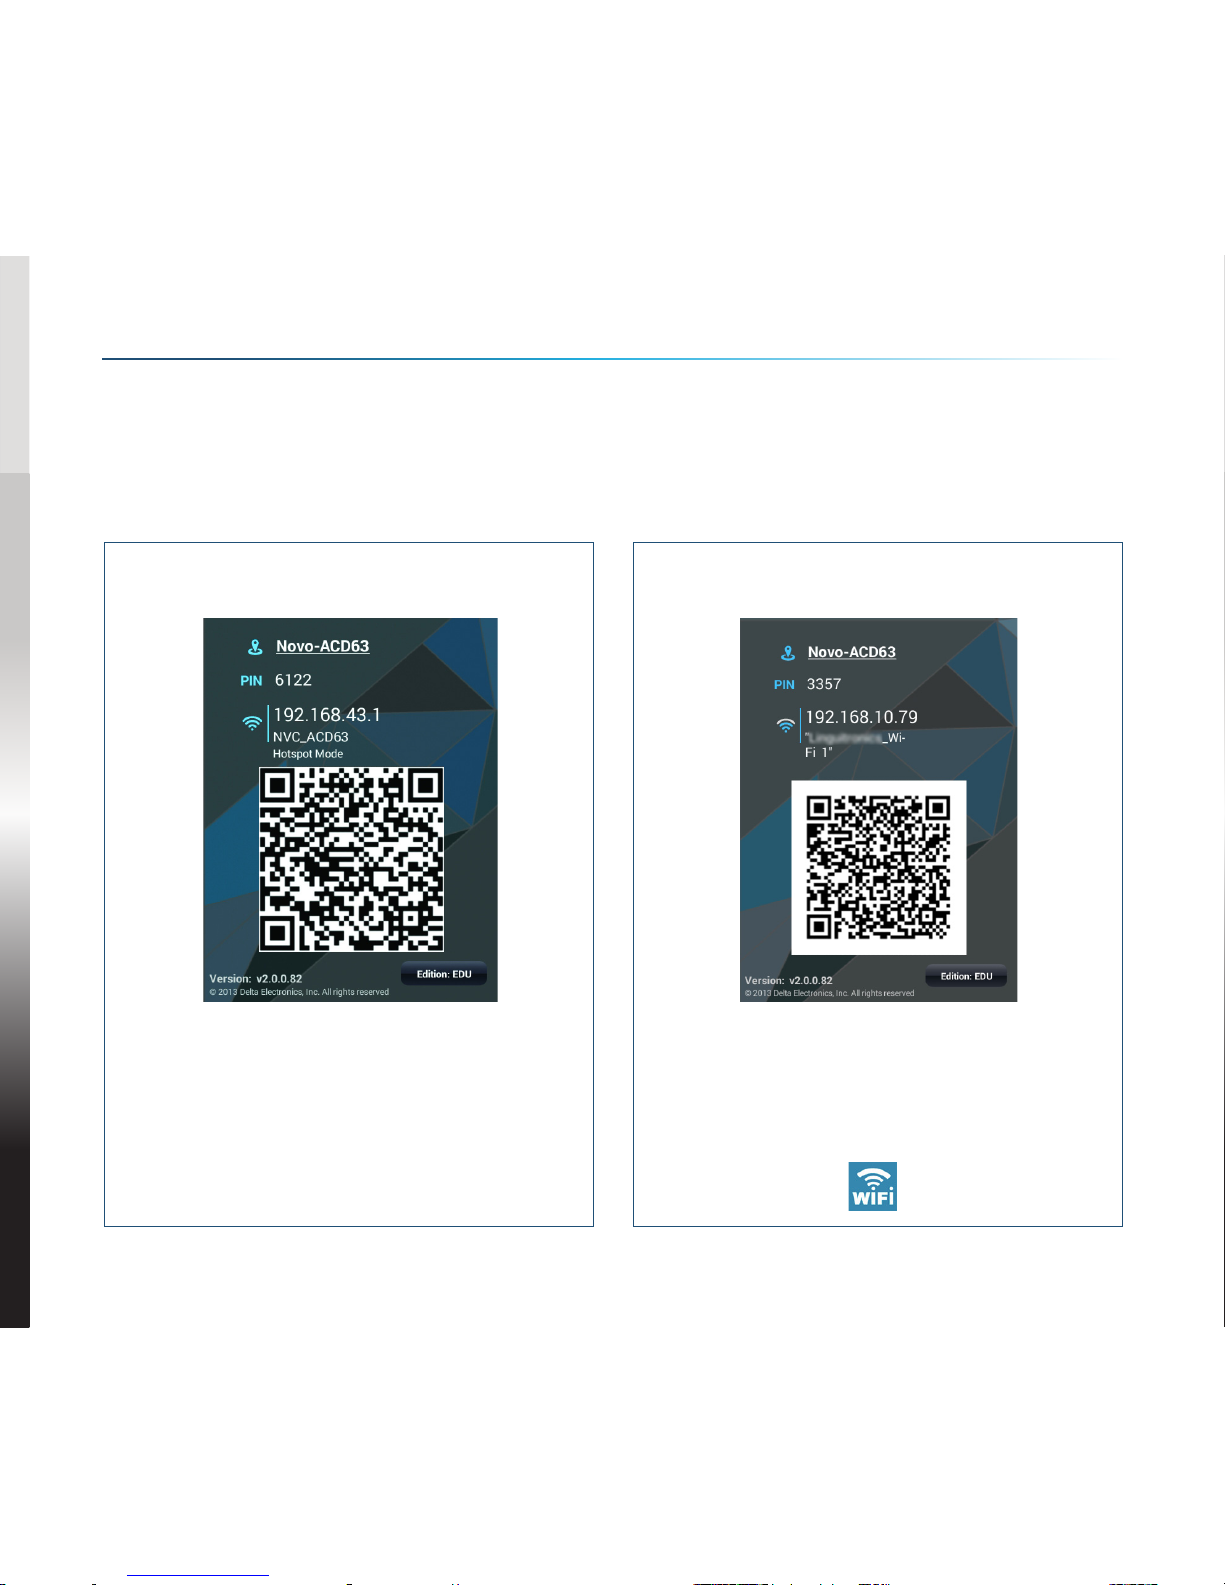
WiFi Setup
There are two ways to connect to NovoEnterprise:
Hotspot Mode Wireless AP Mode
The default setting is Hotspot
mode. Directly connect to the SSID
broadcasted by the device.
Simply connect NovoEnterprise
and the devices to the same Wi-Fi
network. Tap the WiFi button to
proceed.

EN-4
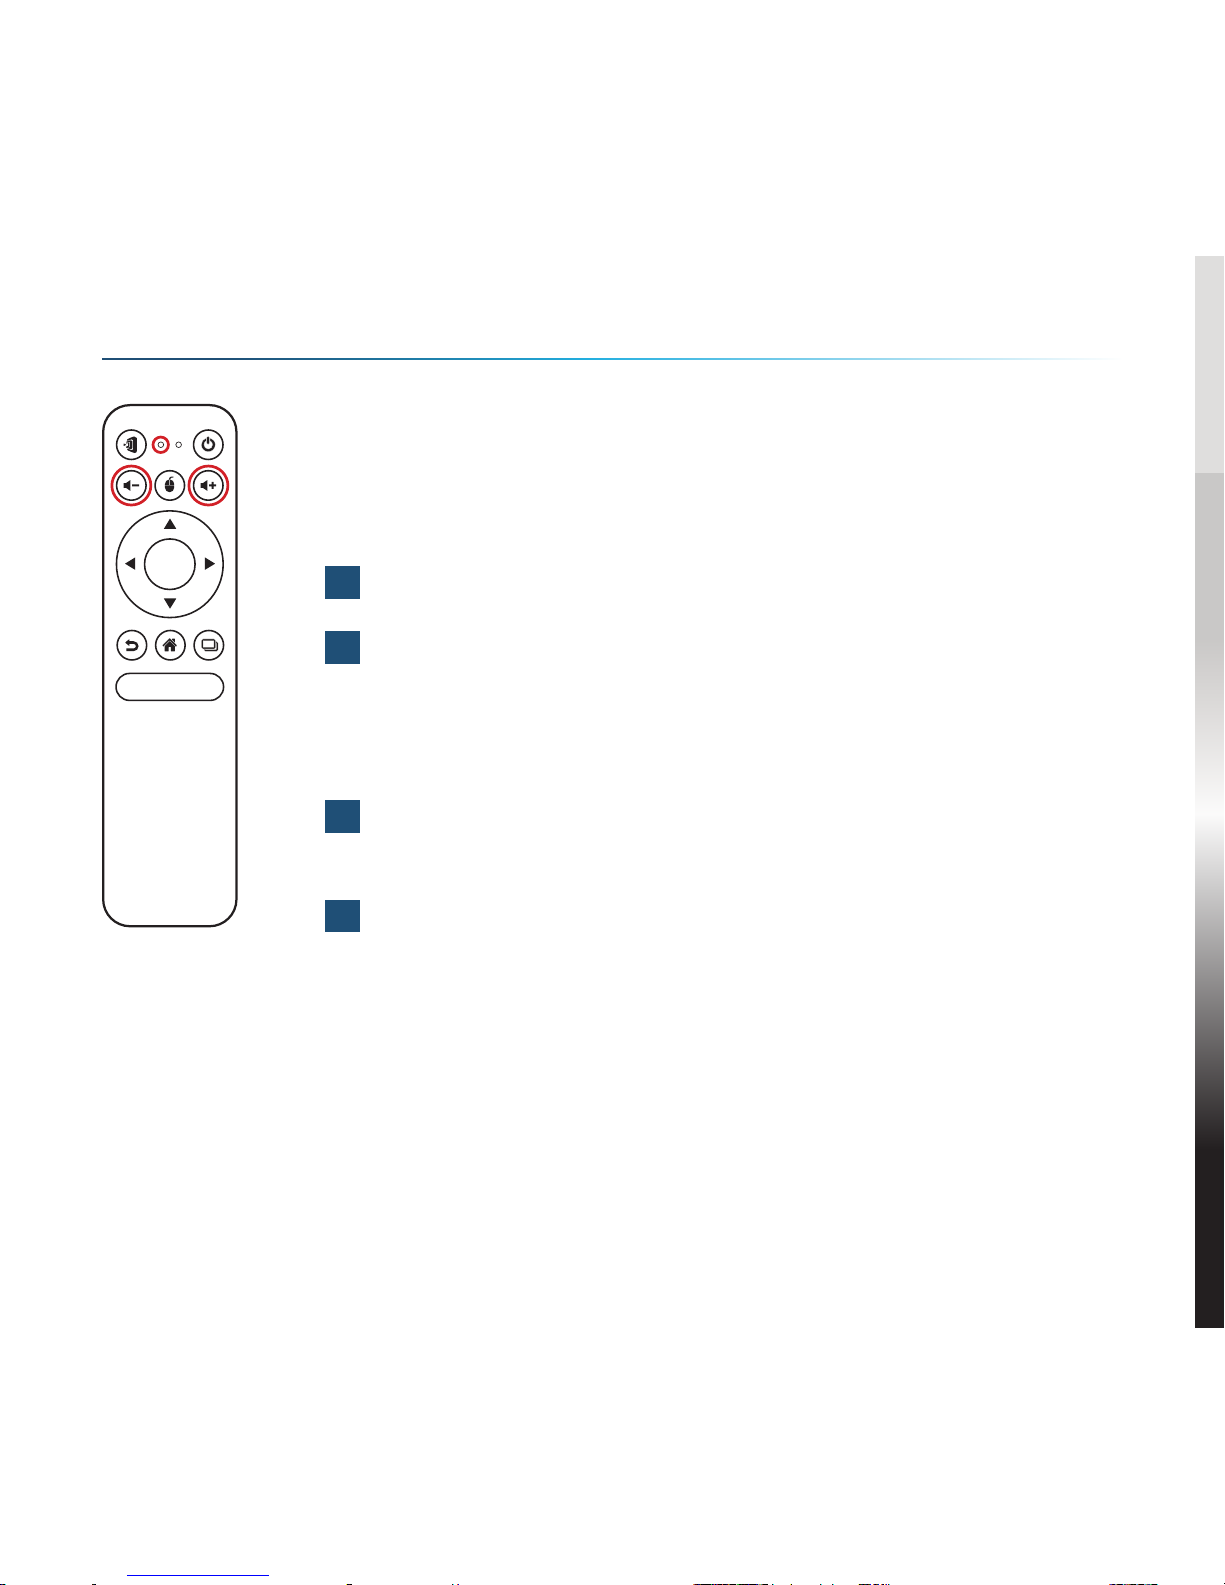
Before you can use the remote control you must first pair it
with your NovoEnterprise.
To pair the remote control:
1Power on the NovoEnterprise.
2With the remote control in range of the NovoEnterprise,
press and hold the Volume + and Volume - buttons
simultaneously for 2 seconds. The left LED will light up
and start blinking.
3Once the LED stops blinking and stays constantly lit,
pairing is complete.
4Release the Volume + and Volume - buttons and the LED
will turn off.
PAIRING THE REMOTE CONTROL
OK
ABC

EN-5
YOUR REMOTE CONTROL
Icon Item Description
Novo Launches Remote Viewer.
Power Turns on/off the remote control.
/ Volume +/- Increases/Decreases volume.
Mouse Simulates a left click on a mouse.
Direction Keys Navigates around the option menu.
OK
OK Selects an item from the menu.
Back Returns to previous page.
Home Returns to the home screen.
Recent Apps Opens a list of recently used apps.
OK
ABC
EN-6
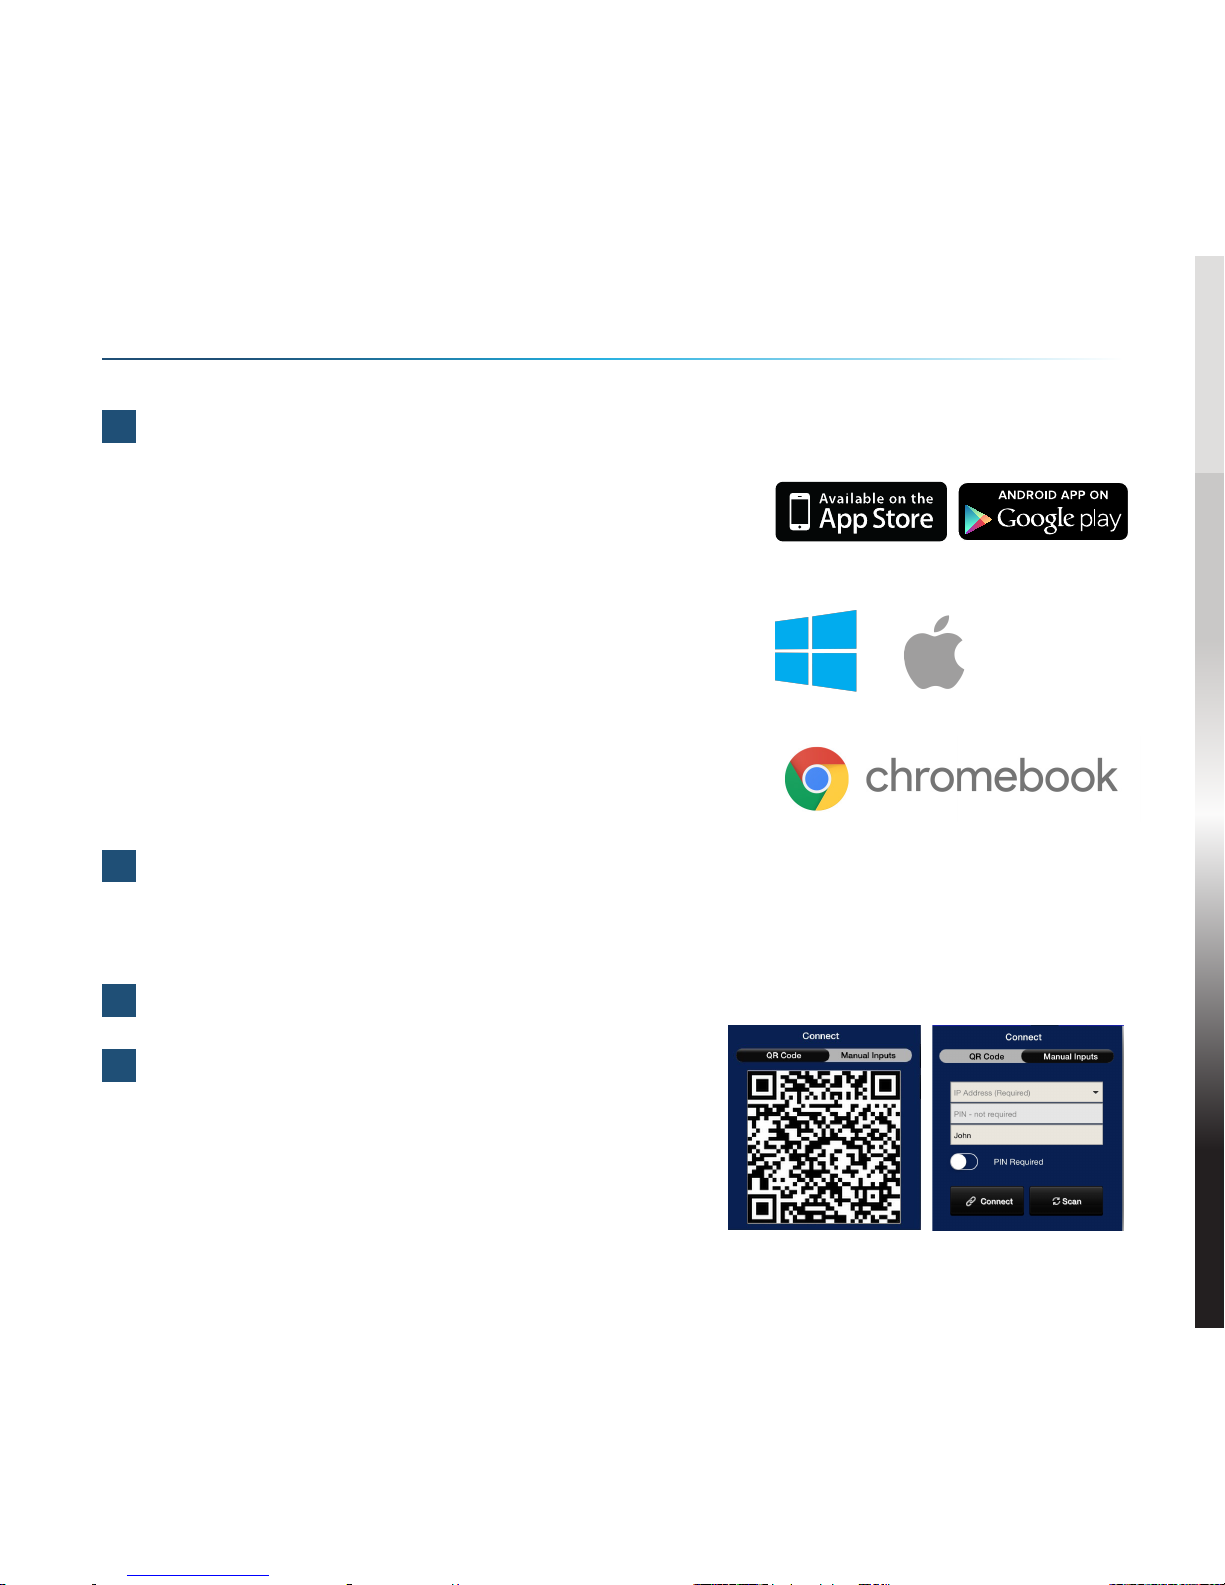
2Connect the tablet/smartphone, computer or Chromebook to the same
network as the NovoEnterprise. Follow the device’s WiFi procedures for
connecting to the WiFi network.
3Launch NovoPresenter or Desktop Streamer.
4Scan the QR code or manually input the
device’s IP address and PIN code (if
needed) to connect.
The device screen will appear
automatically upon successful connection.
1Install the app.
•For tablet/smartphone: Download
NovoPresenter from the iOS App Store or from
Google Play.
•For Windows/Mac computer: Download
Desktop Streamer from the Vivitek website
(www.vivitekcorp.com).
•For Chromebook: Download Desktop Streamer
from the Chrome Web Store.
GETTING STARTED
EN-7
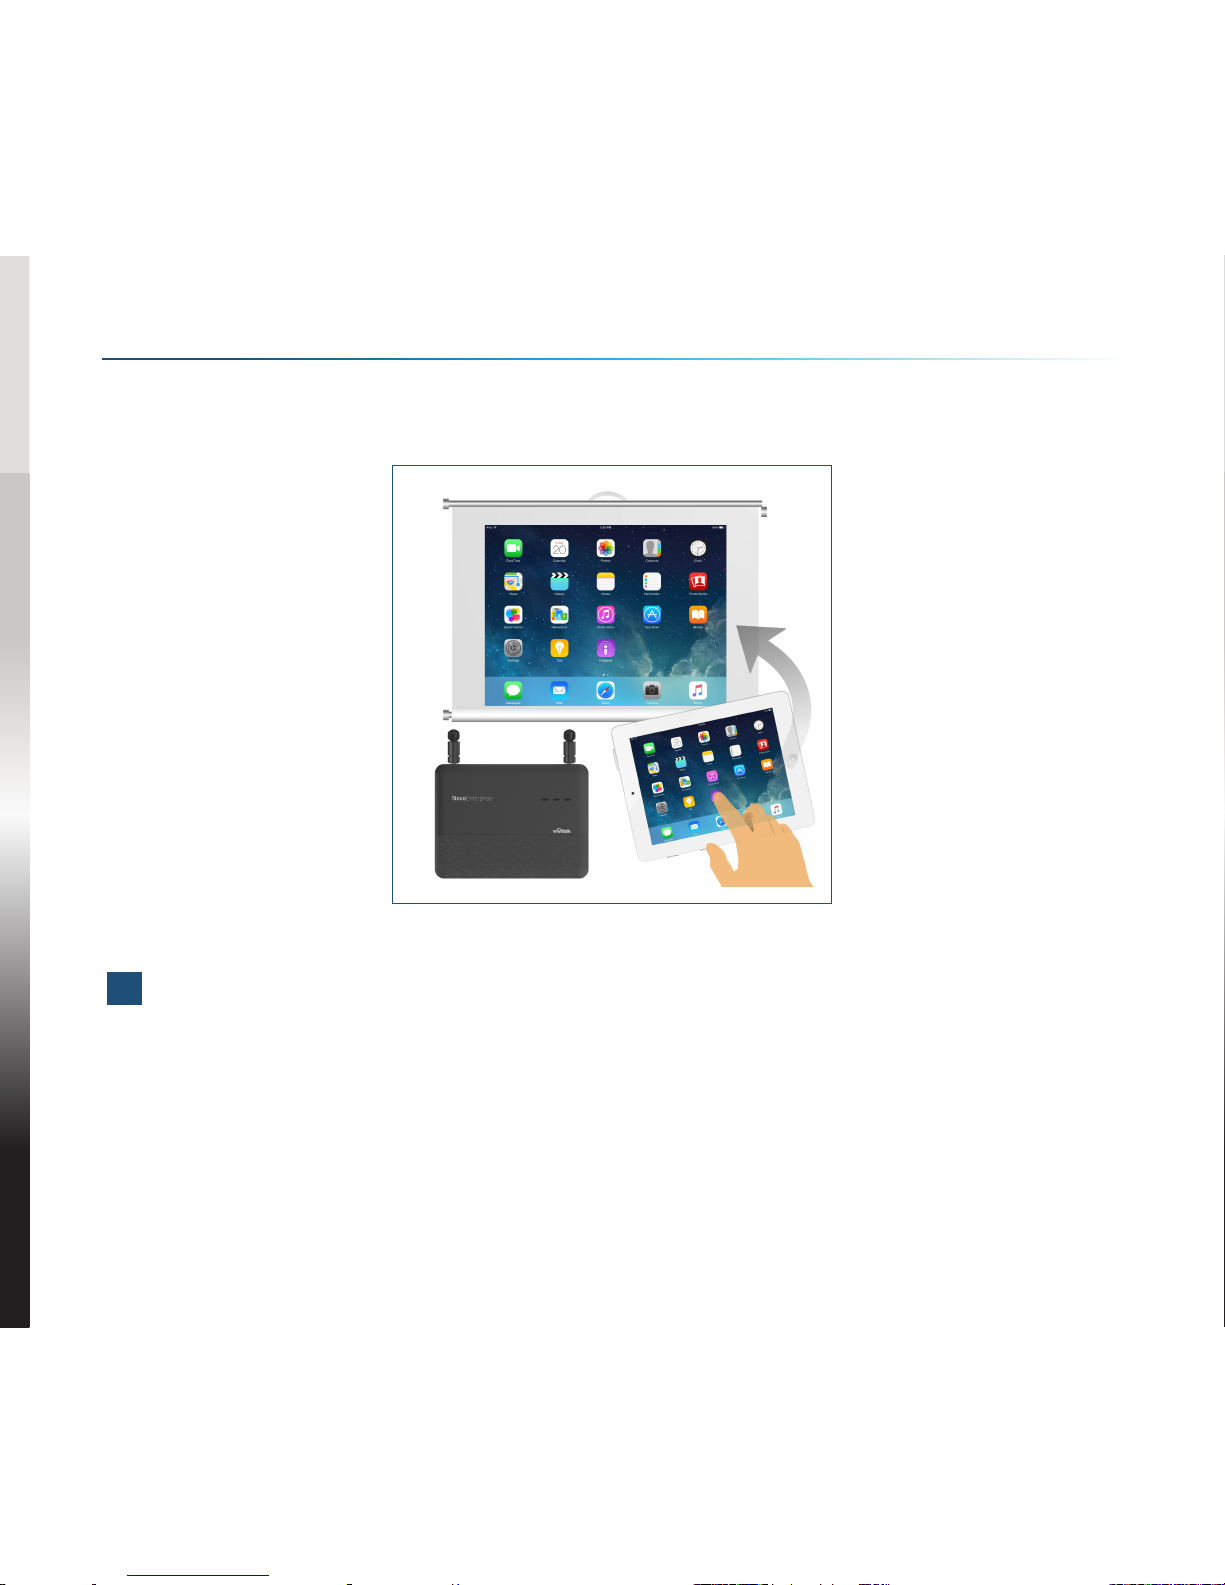
NovoEnterprise supports direct mirroring of Android™ and iOS device screens.
1Connect the Android™ or iOS device to the same WiFi network as the
NovoEnterprise. Then, follow the mirroring setup instructions for the
selected Android™ or iOS device.
•For Android devices, this is called GoogleCast.
•For iOS devices, this is called AirPlay®.
SCREEN MIRRORING

EN-8
Safety & Warning Information
FCC – Federal Communication Commission (USA)
This device contains the following wireless device and underwent the
certification process of FCC 47 CFR PART 15 SUBPART C/E under the
respective FCC ID below:
• FCCID: H79-0120C8
The FCC ID is indicated as the label affixed on the bottom side of your device.
CE - Conformité Européenne (EU)
This device intended for sale within the European Union are marked with the
Conformité Européenne (CE) Marking, which indicates compliance with the
applicable Directives and European Norms, and amendments, the following
standard were applied:
• EN55022/24:2010
• EN301 489-1 V1.9.2 (2011-09)
• EN301 489-17 V2.2.1 (2012-09)
• EN300 328 V1.9.1 (2015-02)
• EN301 893 V1.7.1:2012
• EN62311:2008
• EN60959-1:2006+A11:2009+A1:2010+A12:2011+A2:2013
ADDITIONAL INFORMATION

FR-1
NovoEnterprise
Montage mural
Antenne
Câble HDMI vers HDMI
Adaptateur secteur USB
Batterie
Câble d'alimentation USB vers entrée CC
Télécommande
1
4
7
2
5
8
3
6
CONTENU DE L'EMBALLAGE
OK
ABC

FR-2
APERÇU GÉNÉRAL DE NovoEnterprise
CONFIGURATION DE NovoEnterprise
1Bouton de réinitialisation
2Entrée ligne, prise 3,5 mm
3Sortie audio, prise 3,5 mm
4Port entrée HDMI
5Port sortie HDMI
6Prise entrée alimentation 5V CC
7RJ45 (Ethernet) PoE
8Port USB de type A
9Port USB de type A
10 Logement pour carte microSD
11 Fente de sécurité Kensington®
Installation matérielle
Port HDMI : Connecter à un projecteur.
Ports USB : Connectez à un périphérique flash USB, une souris, un clavier
ou à des périphériques interactifs tactiles.
Connexion Ethernet (en option)
RJ45 (Ethernet) PoE: Connecter à un réseau filaire via un câble Ethernet.
Entrée d'alimentation:
Prise d'alimentation 5V CC : Connecter à l'adaptateur secteur USB à l'aide
du câble USB fourni.
Power Over Ethernet: NovoEnterprise est un appareil alimenté conforme
IEEE 802.3af (PD).
1 2 34567
8911
10
FR-3
CONFIGURATION DE NovoEnterprise
Configuration WiFi
Il y a deux façons de se connecter à NovoEnterprise :
Mode Point d'accès Mode PA sans fil
Le réglage par défaut est le
mode Point d’accès. Connectez
directement au SSID diffusé par
l’appareil.
Connectez simplement
NovoEnterprise et les
périphériques au même réseau
Wi-Fi. Appuyez sur le bouton Wi-Fi
pour continuer.
FR-4
Avant de pouvoir utiliser la télécommande, vous devez
d'abord l'associer à votre NovoEnterprise.
Pour associer la télécommande :
1Allumez le NovoEnterprise.
2Avec la télécommande à portée de NovoEnterprise,
appuyez et maintenez les boutons Volume + et Volume
- simultanément pendant 2 secondes. La LED gauche
s'allume et commence à clignoter.
3Lorsque la LED cesse de clignoter et reste allumée,
l'association est terminée.
4Relâchez les boutons Volume + et Volume - et la LED
s'éteindra.
ASSOCIATION DE LA TÉLÉCOMMANDE
OK
ABC

FR-5
VOTRE TÉLÉCOMMANDE
Icône Elément Description
Novo Lancez Remote Viewer.
Alimentation Allume/éteint la télécommande.
/ Volume +/- Augmente/diminue le volume.
Souris Simule un clic gauche sur une souris.
Touches de
direction Parcourt le menu des options.
OK
OK Sélectionne un élément dans le menu.
Arrière Retourne à la page précédente.
Accueil Retourne à l'écran d'accueil.
Applications
récentes
Ouvre une liste d'applications
récemment utilisées.
OK
ABC

FR-6
2Connectez la tablette/smartphone, l'ordinateur ou Chromebook au même
réseau que le NovoEnterprise. Suivez les procédures WiFi de l'appareil
pour la connexion au réseau WiFi.
3Lancez NovoPresenter ou Desktop Streamer.
4Scannez le code QR ou entrez
manuellement l'adresse IP et le code PIN
de l'appareil (si nécessaire) pour vous
connecter.
L'écran de l'appareil apparaîtra
automatiquement lorsque la connexion
sera établie.
1Installer l'application.
•Pour tablette/smartphone : Téléchargez
NovoPresenter depuis l'iOS App Store ou
depuis Google Play.
•Pour ordinateur Windows/Mac : Téléchargez
Desktop Streamer depuis le site Web de
Vivitek (www.vivitekcorp.com).
•Pour Chromebook : Téléchargez Desktop
Streamer depuis le Chrome Web Store.
MISE EN ROUTE

FR-7
NovoEnterprise prend en charge la mise en miroir directe des écrans des
appareils Android™ et iOS.
1Connectez l'appareil Android™ ou iOS au même réseau WiFi que le
NovoEnterprise. Ensuite, suivez les instructions d'installation en miroir pour
l'appareil Android™ ou iOS sélectionné.
•Pour les appareils Android, cela est appelé GoogleCast.
•Pour les appareils iOS, cela est appelé AirPlay®.
MIROIR DE L'ÉCRAN

FR-8
Informations de sécurité et de mise en garde
FCC - Federal Communication Commission (Etats-Unis)
Cet appareil contient le dispositif sans fil suivant et a subi le processus de
certification de la FCC 47 CFR PARTIE 15 SOUS-PARTIE C/E sous l'ID FCC
correspondant ci-dessous :
• FCCID : H79-0120C8
L'ID FCC est indiqué par une étiquette apposée sur le dessous de votre
appareil.
CE - Conformité Européenne (UE)
Cet appareil destiné à la vente au sein de l'Union européenne comporte le
marquage de Conformité Européenne (CE), qui indique la conformité avec les
directives applicables et les normes européennes, et amendements, les normes
suivantes ont été appliquées :
• EN55022/24:2010
• EN301 489-1 V1.9.2 (2011-09)
• EN301 489-17 V2.2.1 (2012-09)
• EN300 328 V1.9.1 (2015-02)
• EN301 893 V1.7.1:2012
• EN62311:2008
• EN60959-1:2006+A11:2009+A1:2010+A12:2011+A2:2013
INFORMATIONS SUPPLÉMENTAIRES
DE-1
NovoEnterprise
Wandhalterung
Antenne
HDMI-auf-HDMI Kabel
USB-Netzadapter
Batterie
USB-auf-DC-in Stromkabel
Fernbedienung
1
4
7
2
5
8
3
6
LIEFERUMFANG
OK
ABC
DE-2
NovoEnterprise ÜBERSICHT
NovoEnterprise EINRICHTEN
1Zurücksetzen-Taste
2Line-Eingang, 3,5mm Buchse
3Audio-Ausgang, 3,5mm Buchse
4HDMI-Eingangsanschluss
5HDMI-Ausgangsanschluss
6DC 5V Netzbuchse
7RJ45 (Ethernet) PoE
8Typ A USB Anschluss
9Typ A USB Anschluss
10 MicroSD Karteneinschub
11 Kensington® Schloss
Hardware Installation
HDMI Anschluss: Anschluss an einen Projektor.
USB-Anschluss: Schließen Sie das Gerät an ein USB-Flash-Gerät, eine
Maus, eine Tastatur oder ein Touch-fähiges interaktives Gerät an.
Ethernet-Anschluss (Optional)
RJ45 (Ethernet) PoE: Anschluss an ein Kabelnetzwerk über ein Ethernet-
Kabel.
Stromanschluss
DC 5V Netzbuchse: Verbinden Sie den USB-Netzadapter mit dem
beiliegenden USB-Kabel.
Power Over Ethernet: NovoEnterprise ist ein IEEE 802.3af konformes
Elektrogerät (PD).
1 2 34567
8911
10
Table of contents
Languages:
Other Vivitek Network Router manuals


