Vivobike M-VFO20GR Specification sheet

1/40
M-VFO20GR/W
INSTRUCTIONS FOR USE AND MAINTENANCE
MANUALE D’USO E MANUTENZIONE
MODE D'EMPLOI ET D'ENTRETIEN

2/40
USER’S MANUAL FOR
E-1000 (EC FOLDING XVI)
Indicative photo
Congratulations on your purchase of this Electric Folding Bike E-1000 (EC FOLDING XVI). It has been
carefully designed and manufactured according to the latest international quality standards, including:
EN 15194

3/40
Please read this instruction manual carefully and thoroughly before riding.
It contains important information on safety, and maintenance.
It is the owner’s responsibility to read this manual before riding.
Should any original component prove defective in terms of workmanship within its warranty period, we
will replace it. Warranty period for the electric bikes is as follows.
Frames and rigid forks: 5 years
Electrical components: 2 years with proper care and maintenance
All other components: 2 years with proper care and maintenance.
This warranty does not include labors and transportation charges. The company cannot accept any
responsibility for consequential or special damage. This warranty applies only to the original retail
purchaser who must have a proof of purchase in order to validate any claim. This warranty applies only in
the case of defective components and does not cover the effects of normal wear, nor damage caused by
accident, abuse, excessive loads, neglect, improper assembly, for rental use, improper maintenance or the
addition of any item inconsistent with the original intended use of the bicycle.
No bicycle is indestructible and no claims can be accepted for damage caused by improper use, for rental
use, competition use, stunt riding, ramp jumping and leaping or similar activities. Claims must be
submitted through your retailer. Your statutory rights are not affected.
The company reserves the right to change or amend any specification without notice. All information and
specifications within this brochure are correct at time of printing.
Ⅰ. Conditions for riding
This pedal electric assistance bicycle is designed for riding on road or riding on a paved surface where the
tyres do not lose ground contact. It must be properly maintained according to the instructions found
within this book;
The maximum weight of the rider and load is required to be less than 100kg.
Safe cycling and safety tips:
Before you ride your pedal electric assistance bicycle always make sure it is in a safe operating condition.
Particularly check that your:
•Nuts, bolts, quick-release and parts refastened tight and not worn or damaged
•Riding position is comfortable
•Brakes are operating effectively
•Steering is free with no excessive play
•Wheels run true and hub bearings are correctly adjusted
•Wheels are properly secured and locked to frame/fork
•Tyres are in good condition and inflated to correct pressure
•Pedals are securely tightened to pedal cranks
4/40
•Gears are correctly adjusted
•All reflectors are in position
WARNING WHEELS: Every six months, your pedal electric assistance bicycle should be
professionally checked to ensure that it is in correct and safe working order. It is the
responsibility of the rider to ensure all parts are in working order prior to riding. It is very
important to check the rim wear monthly and monitor the rim wear line, if this grooves
become invisible ,the rim is past its safe working life. A severely worn rim is very dangerous
and must be replaced. Adjust the brake shoes accordingly to make the clearance at 1-1.5mm
from the track of rim.
REGULAR ATTENTION MUST BE PAID TO THE HUB MOTOR SPOKE TENSION.
Warning: You are warned that you assume the risk for personal injury, damage
or losses if you breach the above conditions and, the warranty will be void
automatically.
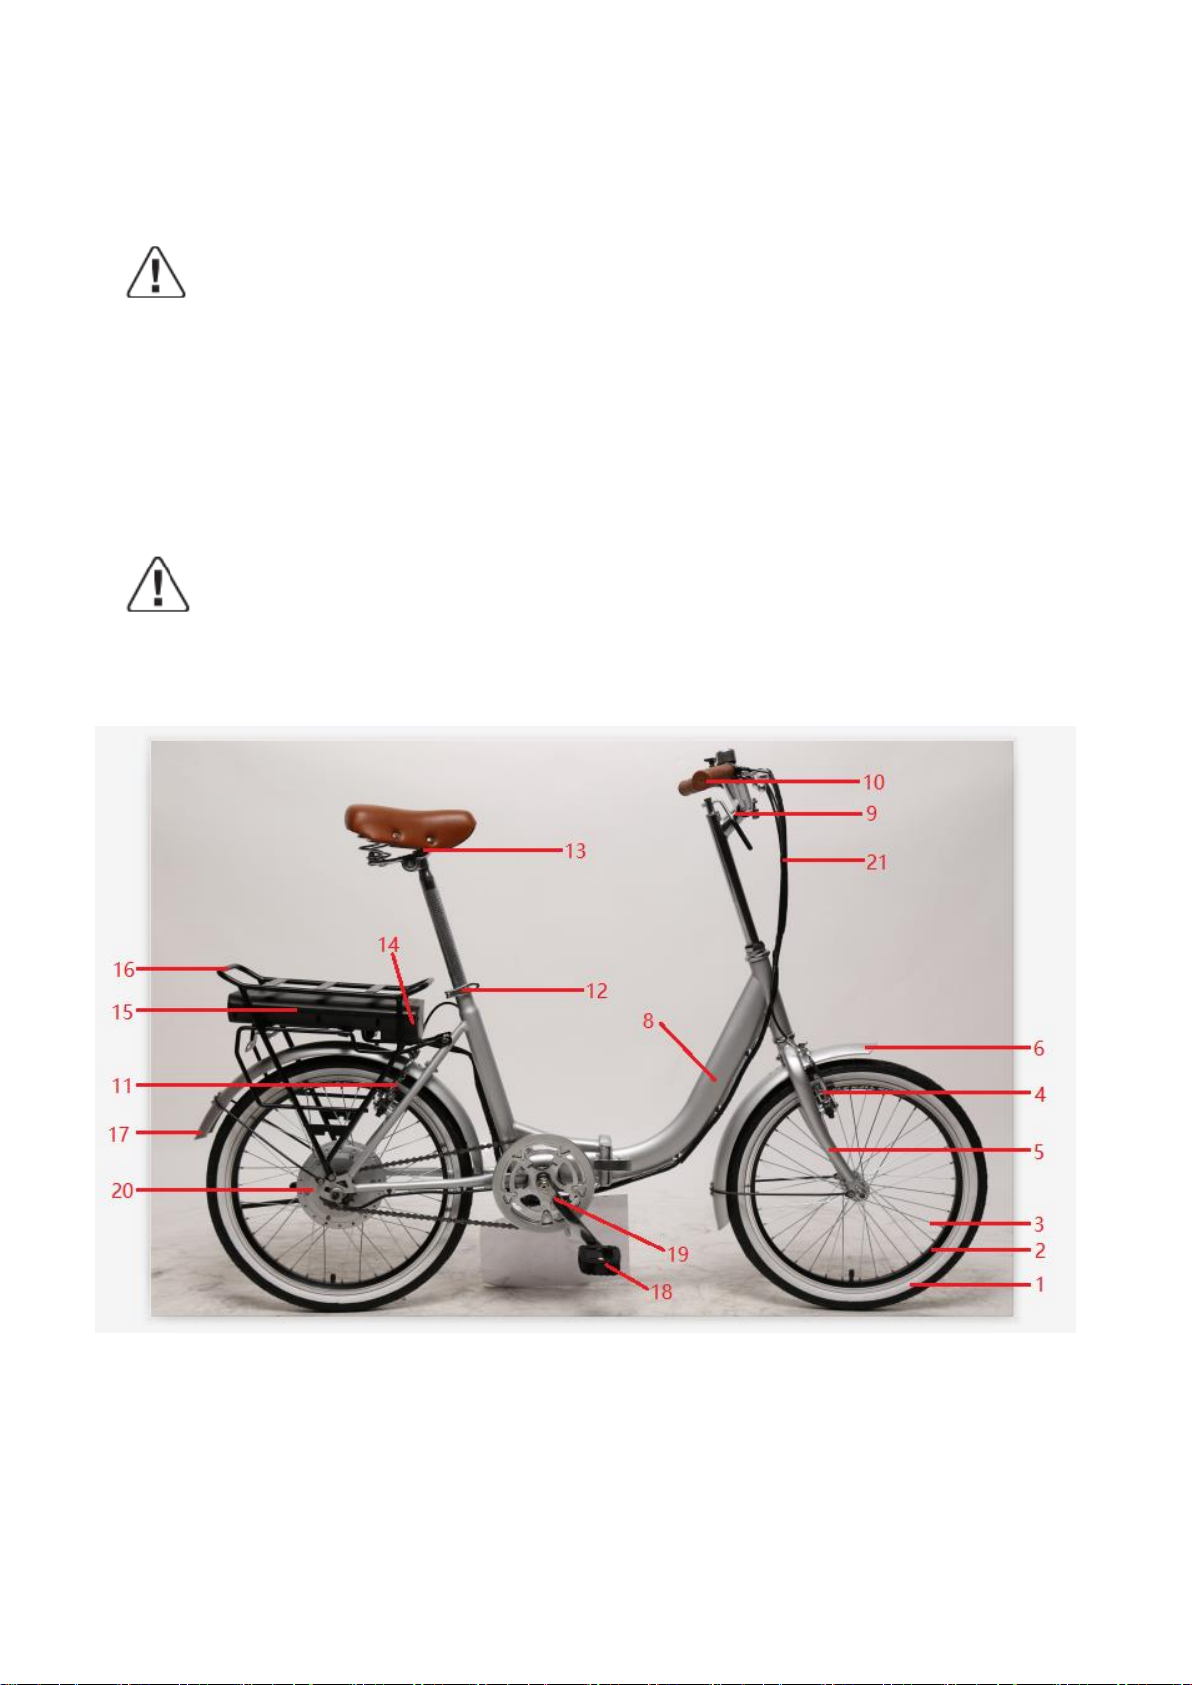
Ⅱ. Name of E-1000 (EC FOLDING XVI) Components
(Fig. 1)
1. Tyre & tubes
2. Rims
3. Spokes
4. Front brake
5. Front fork
6. Front mudguard
8. Frame
12. Seat clamp
13.Saddle&Seat post
14. Controller box
15. Battery box
16. Rear carrier
17. Rear mudguard
18. Pedals

5/40
Instruction
THE "EXTRAORDINARY" MAINTENANCE OF THE MECHANICAL AND ELECTRICAL COMPONENTS MUST BE
PERFORMED BY A QUALIFIED TECHNICIAN.
Ⅲ. MANUAL FOR THE ELECTRIC PARTS OF THE E-1000 (EC FOLDING XVI)
The rider must pedal forward to obtain any assistance from the motor. This is an important safety feature.
This electric pedal assistance bikes will provide assistance up to 25 Km/h, after that the motor will cut out.
You may go faster but must do so under your own effort without the electric assistance.
To start the bike turn on the main switch on the side of the battery. The motor will not work until you pedal
one/two revolution of the chain wheel. This feature protects the motor and controller from damage and
extends the service life of the electric components.
Contents
1. Structure of an electric assistance bike
2. Important safety cautions
3. Operation
4. Battery installation & usage
5. Using and maintaining the battery
6. Using and maintaining the charger
7. Using and maintaining the electric hub motor.
8. Maintaining the controller.
9. Maintaining the Power-off control of the brake lever
10. Simple trouble shooting
11. Electric circuit diagram and specifications
12. Main technical specification sheet
1. Structure of electric bikes (See partⅠ.Fig 1.)
2. Important safety cautions:

6/40
• We strongly advise wear an approved helmet, which meets local standards.
•Obey local road rules when riding on public roads.
•Be aware of traffic conditions
•The rider must beover 14 years old.
•Have your bike serviced only by authorized bicycle shops.
•Regular servicing will ensure a better and safe riding performance.
•Do not exceed more than 100 kg load on bicycle, including rider himself.
•Never have more than one rider on the bicycle.
•Ensure regular maintenance is carried out on the bike according to this owner’s manual
• Do not open or attempt maintenance on any electrical components by yourself. Contact your local
bicycle specialist for qualified service and maintenance when needed.
•Never jump, race, perform stunts or abuse your bicycle.
•Never ride under the influence of intoxicating drugs or alcohol.
•We strongly recommend using lights, when riding in the dark, fog or poor visibility.
•When cleaning this bike, please wipe the surface with a piece of soft cloth. For very dirty areas you can
wipe it with a little neutral soap and water.
Warning: do not wash this electric bike direct with spraying water, especially pressure washers.
Avoid water entering electric components as this may result in damage of the electric components.
3. Operation
Your new electric assistance bicycle is a revolutionary transport means, applying aluminum frame, Li-ion
battery, a super high efficiency electric hub motor and controller with electric pedal assistance system, to
support normal pedaling. The above mentioned equipment will ensure safe riding with excellent function
and performance. It is important for you to note the following guidelines to ensure getting the best
possible experience from your electric bicycle.
Checklist before Riding
3.1.1 Please ensure tyres are fully inflated as indicated on the tyre wall, before riding.
Remember, performance of the bike is directly related to the weight of the rider and baggage/load,
together with the stored energy in the battery;
3.1.2 Charge overnight, prior to riding the next day;
3.1.3 Apply chain oil periodically and clean if dirty or gummed up,using a degreaser, then wipe clean oil
bicycle chain again.
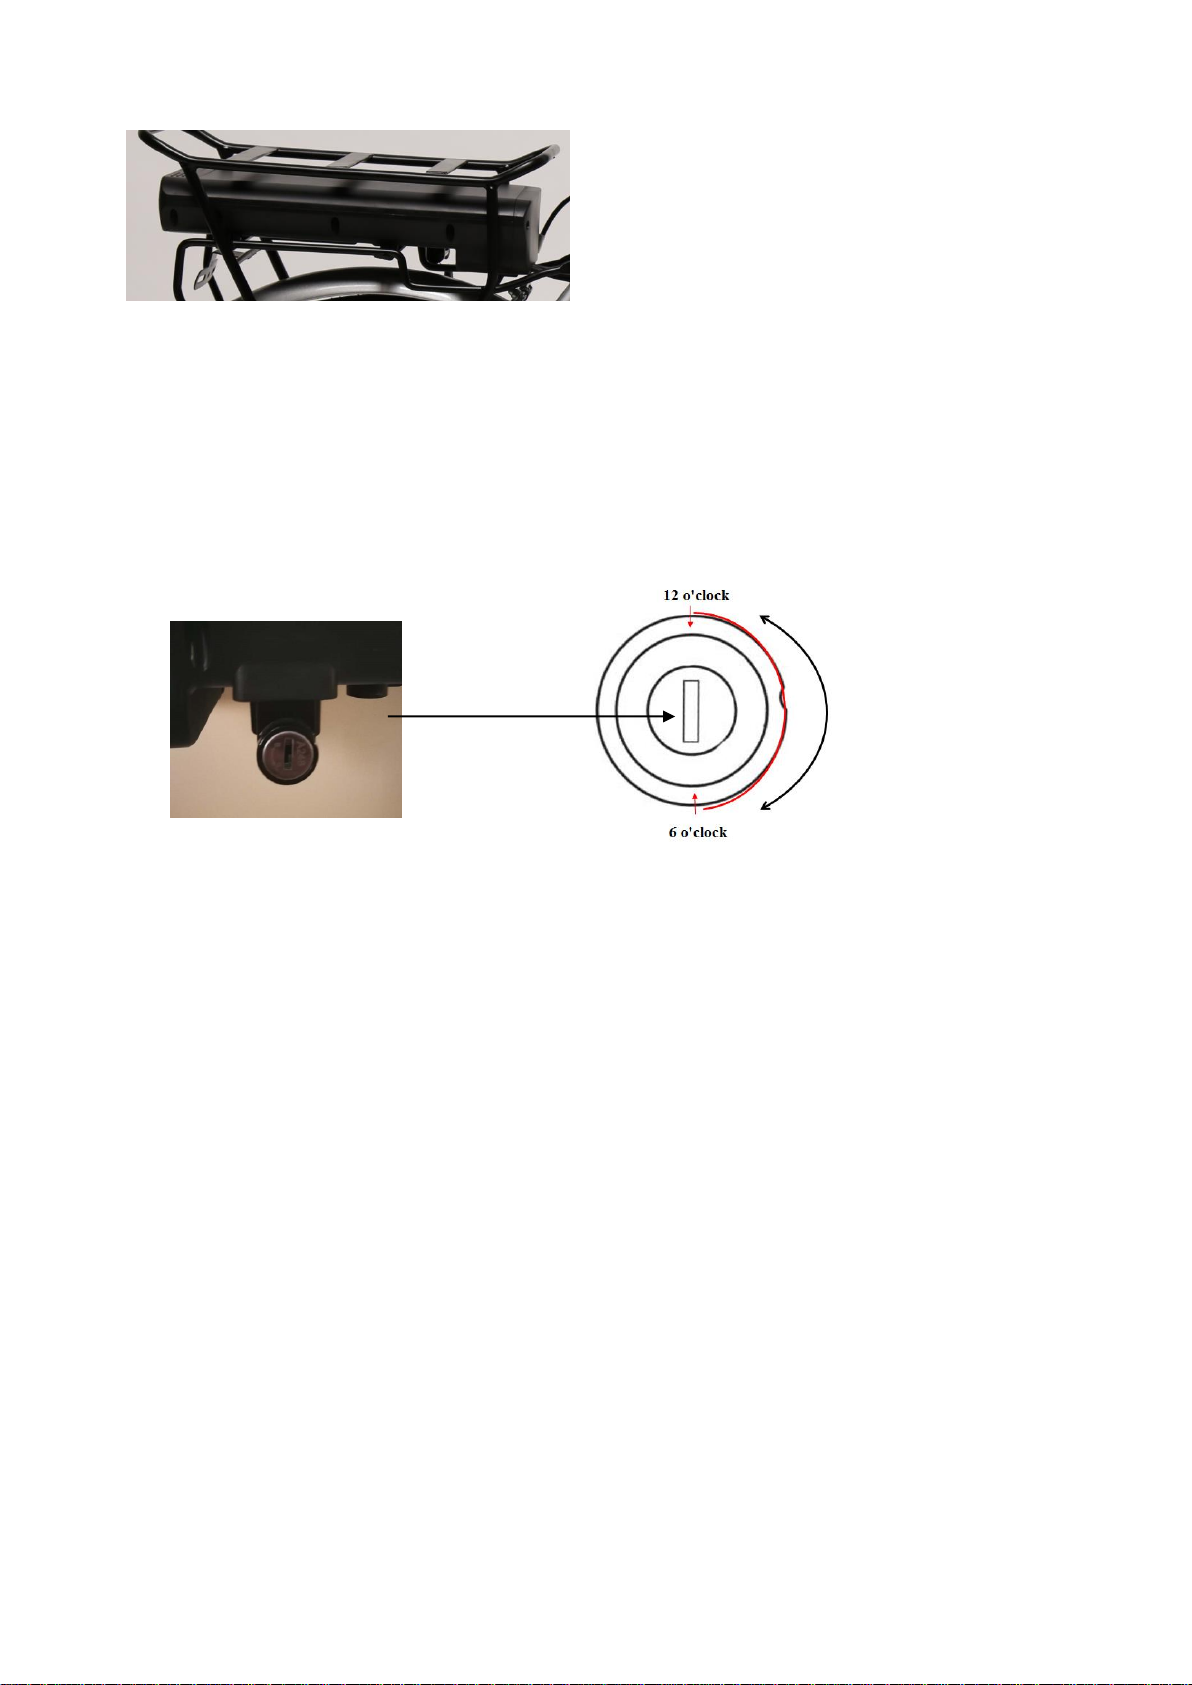
4. Battery installation & usage
The electric bikes have the battery positioned within the rear carrier (the battery pack is directly connected

7/40
to the controller box in the front (fig. 2).
The slider of battery is fixed on carrier.
Then the battery case is locked by the key see the operation details below. (Fig. 4.1 Fig. 4.2)
(Fig. 2)
Firstly, please put the battery case along this slider horizontally (as Fig. 2), then push it into and ensure a
snug fit. Second, make sure the battery pack is firmly pushed into the controller housing and its connector
is securely inserted inside the controller box.
Notice the battery lock (Fig. 4.1, 4.2)
From the initial position 12 o’clock (where the battery and carrier are unlocked), insert the key into the
key slot, press and turn it clockwise to position 6 o’clock (Then the battery is locked with the carrier). On
the contrary, you can unlock it.
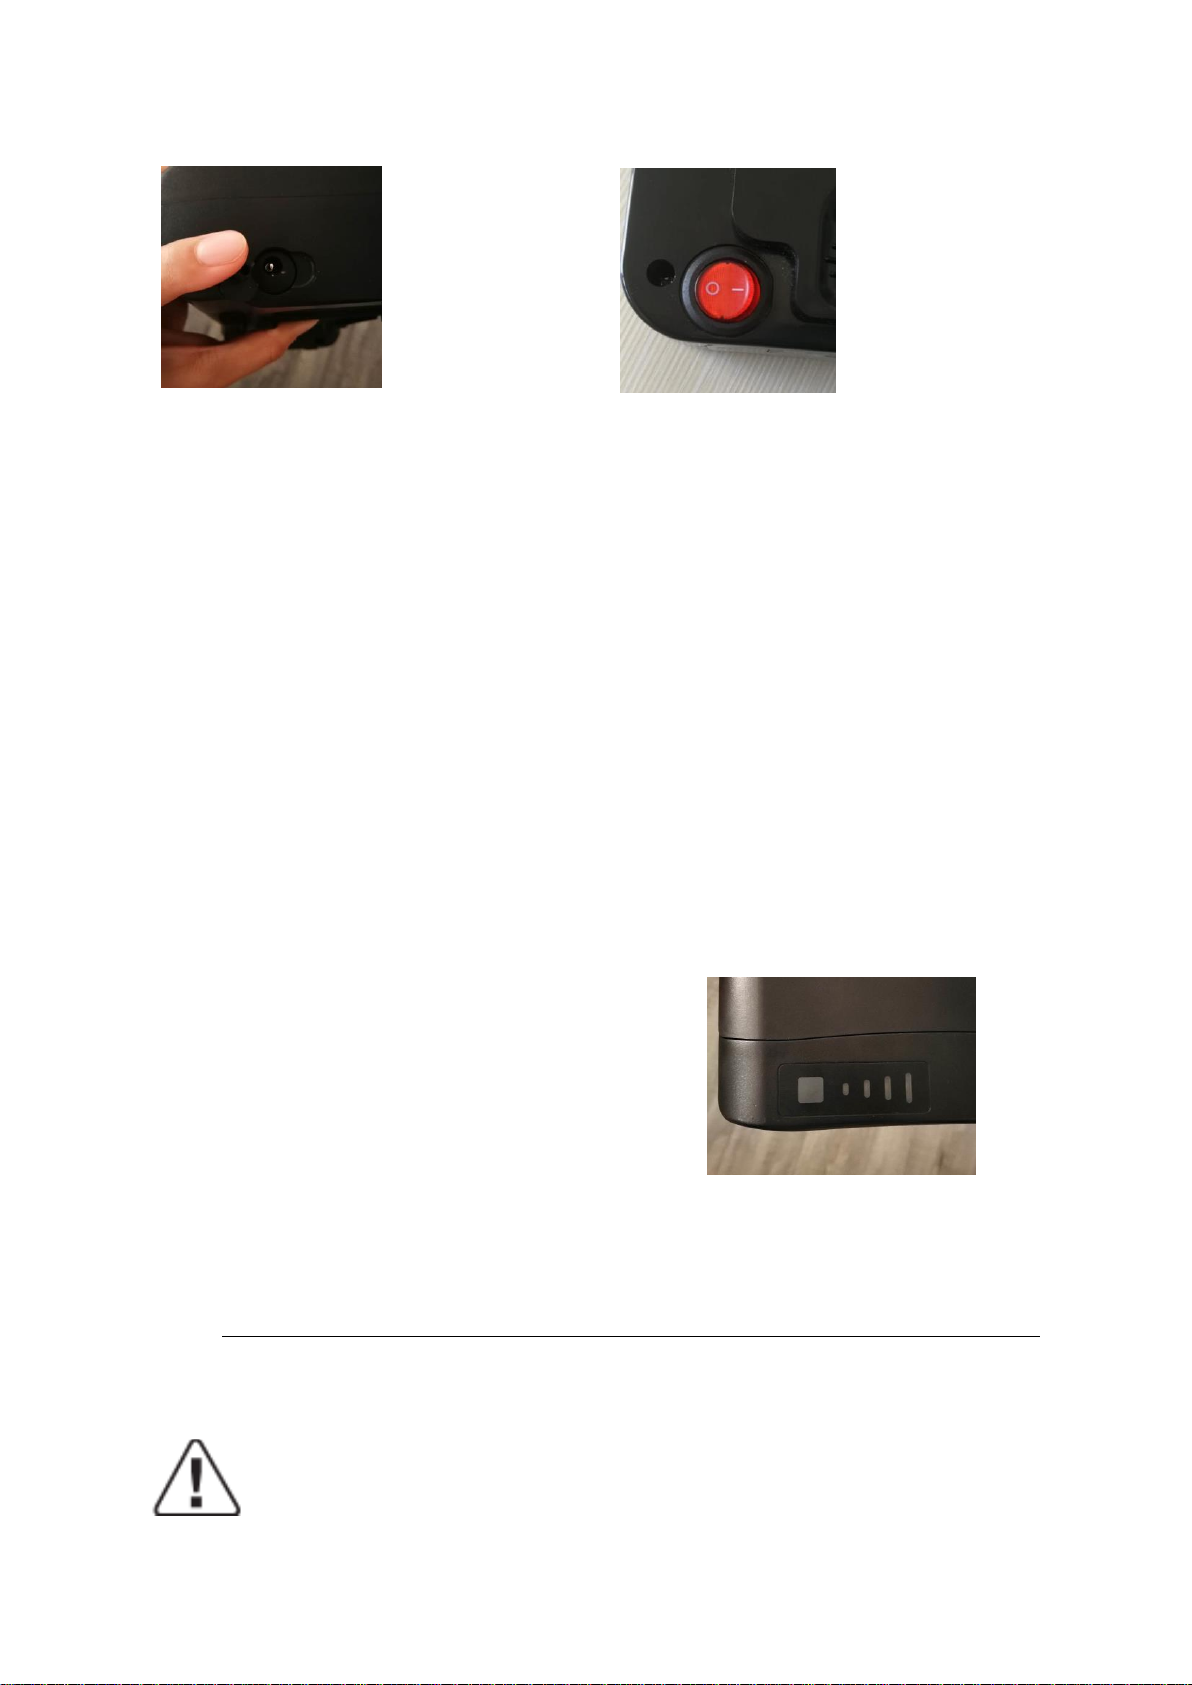
Battery charge
If an AC outlet is available within reach of your bike, you can charge your bike directly with the battery still
attached to the bike. The charging port is covered by a plastic cap, with a yellow arrow for notice (Fig 4.3).
Please open it ,then you charge the battery directly.
Removing the battery is useful for charging in a location where the bicycle may not fit or when no
reachable AC power supply exists at the place where the bike is parked
Before removing the battery from the bike, you need to unlock as following steps:
* make sure the switch is off (Fig4.4).
* Press the key and turn it anti clockwise from 6 o’clock to 12 o’clock position. (refer Fig 4.2)
* Remember to take off and care about the key after you withdraw the battery from the carrier!!!
(Fig. 4.2)
(Fig. 4.1)
8/40
5. Using and maintaining the battery
Advantages of Li-ion battery: this electric assistance bicycles are supplied with high quality Li-ion batteries,
which are light and create no pollution to the environment, as a typical green energy source. As well as the
above features, the Li-ion batteries have the following advantages:
• charging without memory effect
• big electric energy capacity, small volume, light in weight, with large current output, suitable for high
power vehicles.
• long life
• a wide working range of temperature: -10°C to +40°C
To ensure a longer battery life and protect it from damage, please use and maintain it according to the
guideline below
5.1 Remember to charge the battery full before you will
ride for a long trip!
Press the button on the end of battery case,
when the front 3 lights are all green color, it shows
the battery is full of power, when only the red light
near the button (on/off) is on, it means you
must charge it (Fig. 5.1)
5.2 If the bike is ridden less frequently or stored for quite a long time, it must be fully charged every
month.
IMPORTANT: Always turn off the battery from battery switch (I/O) when the bicycle is not in use.
Warning:
(Fig. 4.3)
(Fig. 5.1)
(Fig. 4.4)

9/40
1) The battery life may be reduced after long storage without regular charging as instructed above, due
to natural discharge;
2) Never use any metals directly to connect the two poles of the battery, otherwise, the battery will
be damaged due to short circuit.
3) Never put the battery near to fire or heat source.
4) Never strongly shake, punch and toss the battery.
5) When the battery pack is removed from the bike, keep it out of reach of children, to avoid any
unexpected accident.
6) The battery is forbidden to be disassembled.
6. Using and maintaining the battery charger
Before charging the battery, please read the owner’s manual and the charger manual accompanied with
your bike, if any. Also, please note the following points regarding battery charger.
* Do not use this charger in an environment of explosive gas and corrosive substances.
* Never shake, punch or toss the battery charger, to protect it from damage.
* Always protect the battery charger from rain and moisture!
* This battery charger should be normally used under temperature, ranged between 0°C to +40°C
* The charger is for bidden to be disassembled.
* Charge the battery in a dry place indoors.
* You should only use the charger provided with the electric bike, otherwise damage could occur to your
battery and void the guarantee.
* When charging, both battery and charger should be minimum 10cm away from the wall, or under a
condition of ventilation for cooling. Place nothing around the charger, while in use!
Procedure for charging
Please charge the bike battery according to the following procedure:
6.1 The battery can be charged by the AC, the switch is not necessary to be turned on.
6.2 Insert the charger output plug into the battery securely and then, plug the main cable of the charger
into a reachable AC outlet;
6.3 When charging, the LED on the charger will become red, showing the charging is on. When it
becomes green, you can finish charging the battery.
6.4 To finish charging, you must disconnect the charger input plug first from the AC outlet, and after that,
disconnect the charger output plug from the battery pack. Finally, close the cover on the charging
socket of the battery pack and check the socket, is covered
7. Using and maintaining the electric hub motor
7.1 Our intelligent e-bikes are programmed to start with the electric assistance after rotation of the chain

10/40
wheel.
7.2 Do not use the bike inflood waters or thunderstorm. Do not immerse the electric parts in water.
Otherwise, the electric components may be damaged.
7.3 Avoid any impact towards the hub motor, otherwise, the casting alloy aluminum cover and body may
break.
7.4 Make regular checks on the screws on both sides of the hub motor; fasten them even if they are just a
little bit loose.
7.5 It is necessary to check the cable connection to the motor.
8. Maintaining the controller
For our electric bikes the controller is usually equipped inside the battery pack holder.
It is very important to take care of this electronic component, according to the following guideline:
8.1 Pay attention to protect from ingress of water and immersion in water, which may damage the
controller.
Note: If you think water may have got into the control box, please switch off the power
immediately and pedal without electric assistance. You can pedal with electric assistance as soon as the
controller has dried out.
8.2 Pay attention to protect from any strong shaking and punching, which may damage this controller
8.3 The controller should be used in normal working temperature range from -15°C to +40°C
Warning: Do not open the controller box. Any attempt to open the controller box, modify
or adjust the controller will void the warranty. Please ask your local dealer or authorized
service specialist to repair your bike.
9. Maintaining the Power-off control of the brake lever*
This is a very important component for riding with safety. First, you should pay attention to protect it from
impact and avoid any damage. Second, make regular check on all bolts and nuts, and fasten them securely.
10. Simple trouble shooting
The information below is for purpose of explanation, not as a recommendation for user to carry out repair.
Any remedy outlined must be carried out by a competent person who is aware of the safety issues and
sufficiently familiar with electrical maintenance.
Trouble Description
Possible Causes
Trouble shooting

11/40
After the main battery
switched on, the motor
does not generate
assistance when
pedaling.
1)the motor cable (waterproof
connection joint) is loose; 2)brake
lever did not return well, which keeps
the switch in “power off” position;
3)battery fuse is broken; 4) the speed
sensor
is too far away from the magnetic
ring on the B.B.axle; 5) the
connection between the sensor and
the controller is loosen or not
connected well.
First of all, please check the battery if it is
empty. If yes, charge the battery immediately.
1) check if the connection is securely fixed. If
loose, joint them tightly. 2) make the brake
lever come back to its normal position with
care, without braking; 3) open the battery
pack top, and check if the fuse is broken. If
yes, please visit your vendor or authorized
service for installing a new fuse; 4) adjusting
the distance between the magnetic ring and
the sensor, to make sure the distance is
within 3mm ; 5) fix tight the connection
between the sensor and the controller.
The distance per charge
becomes short (Note:
performance of the bike
battery is directly
related to weight of the
rider and any
baggage/load / wind /
road / constant
braking ).
1) charging time is not enough; 2) the
environment temperature is so low
that it affects the battery working. 3)
frequently going uphill, or riding with
wind, or on poor road condition, 4)
the tyres have low pressure (to be
inflated); 5) frequently braking and
starting. 6) battery has been stored
without using for quite a long time.
1) please charge the battery according to the
instruction (chapter 7.3); 2) in winter or
under 0°C, you’d better store the battery
inside the house; 3) it will be normal if the
riding conditions are improved as regular; 4)
pump the tyres and ensure tyres are fully
inflated to 45psi for your bike; 5) it becomes
normal when the riding situation will be
better. No worry about such a trouble; 6)
make regular charging according to this
instruction manual (refer to Chapter 6.3 ) If
the above has no effect, please contact your
vendor or authorized service.
After plugging the
power outlet, no charger
indicator LED is lit.
1) trouble from the power outlet;
2) poor contact between charger
input plug and power outlet;
3) the temperature is too low.
1) check and repair the power outlet.
2) check and insert the power outlet tightly.
3) charge it in house.
If the above has no effect, please contact your
vendor or authorized service
After charging over 4-5
hours, the charger
indicator LED is still red,
while the battery is still
above not full (Note: it
is very important to
charge your bike strictly
according to this
instruction stated in
Chapter 7, to avoid any
trouble and damage
occurred to your bike.
1) environment temperature is 40°C
and above.
2) environment temperature is under
0°C.
3) failed to charge bike after riding,
resulting in over discharge.
4) the output voltage is too low to
charge the battery.
1) charge the battery in an area under 40°C,
or according to this instruction chapter 7;
2). charge the battery inside the house, or
according to this instruction chapter 7;
3) please well maintain the battery according
to the Chapter 6.3 to avoid natural
over-discharge;
4) no charging when the power supply is
lower than 100V.
If the above has no effect, please contact your
vendor or authorized service.

12/40
11. Diagram and specification
We reserve the right, without further notice, makes modifications to the product. For further advice, please
contact your vendor.

13/40
12. Main technical specification sheet
Please find model name of your bike below:
Model
Remark (for reference)
EC FOLDING XVI
E-1000RM
Here is some of the general technical data for these electric bikes:
Maximum speed with electric assistance:
25km/h ±5%
Distance per full charge:
24V: 20~25km (total loading ≦75kgs)
Weight e-bike:
18,8 Kg
Over current protection value:
10±1A
Under voltage protection value:
21.5V
Please find the crossed technical data regarding the bike motor below:
Motor type:
Brushless with Starry Gears_with Hall
Maximum riding noise:
<70db
Rated power:
150W
Maximum output power:
180W
Rated voltage:
24V
Please find the crossed technical data battery and charger below:
Battery Ttype:
Lithium
Voltage:
24V
Capacity:
7.8AH
Safety warnings
Disposal of electrical-electronic devices:
this symbol indicates that the product must not be disposed of as unselected waste but
must be sent to separate collection facilities for recovery and correct recycling, supporting
the disposal of materials and helping to prevent potential negative consequences for the
environment and health general.
The WEEE marking must appear on all electrical and electronic equipment placed on the
EU market.
For all additional information regarding recycling and disposal, consult your municipality, specific structure or
authorized dealer.
This treatment is applicable to all countries belonging to the European Union.
It is essential to store used batteries in the appropriate space to ensure correct disposal and respect the
environment.

14/40
MANUALE D’USO PER
E-1000 (EC FOLDING XVI)
foto indicativa
Congratulazioni per l’acquisto della Vostra nuova bicicletta mod. E-1000 (EC FOLDING XVI) accuratamente

15/40
progettata e prodotta in accordo con i più aggiornati standard qualitativi a livello internazionale includendo
altresì la seguente norma:
EN 15194
Per un corretto utilizzo della bicicletta si prega di leggere attentamente il manuale d’uso in essere prima
dell’utilizzo.
Esso contiene importanti informazioni riguardanti la Vs. sicurezza ed il mantenimento della Vs. bicicletta.
È fondamentale ed obbligatorio che il possessore/utilizzatore della bicicletta sia al corrente delle norme di
utilizzo del mezzo prima di essere adoperato.
Nel caso in cui un componente originale dovesse risultare difettoso in termini di lavorazione entro il
periodo di garanzia, verrà debitamente sostituito.
Di seguito la durata e validità della garanzia:
Telaio e forcella rigida: 5 anni
Componenti elettrici: 2 anni osservando cura e manutenzione adeguate
Tutti gli altri componenti: 2 anni osservando cura e manutenzione adeguate.
Questa garanzia non include i lavori di messa a punto e relative spese di trasporto. La compagnia non può
assumersi alcuna responsabilità per danni consequenziali o speciali. Questa garanzia si applica solo ed
esclusivamente all'acquirente originale il quale dovrà avere una prova dell’avvenuto acquisto al fine di
convalidare qualsiasi tipologia di reclamo. Questa garanzia si applica solo in caso di componenti difettosi e
non copre gli effetti dovuti alla normale usura, né danni causati da incidenti, abusi, carichi eccessivi,
negligenza, montaggio improprio, per uso a noleggio, per uso a noleggio, manutenzione impropria o
l'aggiunta di qualsiasi oggetto incoerente con l'uso previsto originale della bicicletta.
Nessuna bicicletta è indistruttibile e nessun reclamo può essere accettato per danni causati da uso
improprio, per uso a noleggio, uso da competizione, acrobazie, salti o attività similari a quanto descritto. Le
richieste devono essere inviate tramite il rivenditore. I Vs. diritti legali non sono interessati.
La società si riserva il diritto di apportare modifiche a qualsiasi specifica senza dover dare preavviso. Tutte
le informazioni e le specifiche contenute in questa brochure sono corrette al momento della stampa.
Ⅰ. Condizioni per una corretta guida
Questa bicicletta elettrica a pedalata assistita è progettata per la guida su strada o su superficie
pavimentata, dove i pneumatici forniti in dotazione non perdono il contatto con il terreno. Ciò deve essere
correttamente mantenuto secondo le istruzioni contenute in questo manuale; il peso complessivo del
ciclista, della bici compreso il carico non dovrà superare i 100 kg.
Consigli sulla Vostra sicurezza:

16/40
Prima di adoperare la bicicletta a pedalata assistita elettrica, assicurarsi sempre che sia in condizioni
operative sicure.
Verifica in particolare che:
dadi, bulloni, lo sgancio rapido e parti strutturali siano saldamente correttamente e non usurate o
danneggiate
la posizione di guida sia sempre confortevole
i freni funzionano in modo efficace
lo sterzo è libero senza gioco eccessivo
le ruote funzionano correttamente e i cuscinetti del mozzo sono regolati correttamente
le ruote sono correttamente fissate e bloccate al telaio/forcella
i pneumatici sono in buone condizioni e gonfiati con la giusta pressione
i pedali sono serrati saldamente alle pedivelle
gli ingranaggi sono regolati correttamente
tutti i riflettori sono in posizione.
AVVERTENZE: la bicicletta elettrica a pedalata assistita deve essere controllata in modo
professionale e minuzioso ogni sei mesi per garantire che sia in condizioni operative corrette e
sicure. È responsabilità del ciclista assicurarsi che tutte le parti siano funzionanti prima della
guida. È molto importante controllare l'usura del cerchio mensilmente e monitorare la linea di
usura della copertura, se questa scanalatura non è più visibile la copertura ha superato la sua
vita utile sicura. Un bordo molto usurato è molto pericoloso e deve essere sostituito. Regolare
le ganasce del freno in base alla distanza di 1-1,5 mm dalla pista del cerchio.
BISOGNA CONTROLLARE REGOLARMENTE LA TENSIONE DEI RAGGI.
Attenzione: Si avverte che in caso di violazione delle condizioni sopracitate, con
conseguente rischio di lesioni personali, danni o perdite, la garanzia decadrà
automaticamente.
Ⅱ. Glossario componenti bicicletta E-1000 (EC FOLDING XVI)

17/40
(Fig. 1)
1. Copertura e camera d’aria
2. Cerchi
3. Raggi
4. Freno anteriore
5. Forcella anteriore
6. Parafango anteriore
8. Telaio
9. Manubrio e piantone
10. Leve freno
11. Freno posteriore
12. Collarino reggisella
13. Sella e montante sella
14. Unità di controllo
15. Batteria
16. Portapacchi posteriore
17. Parafango posteriore
18. Pedali
19. Pedivelle e guarnitura
20. Motore mozzo anteriore
21. Cavo alimentazione

18/40
Istruzioni
LA MANUTENZIONE STRAORDINARIA DEI COMPONENTI MECCANICI E ELETTRICI DEVE ESSERE EFFETTUATA DA
UN TECNICO QUALIFICATO.
MANUALE E-1000 (EC FOLDING XVI)
Il ciclista dovrà pedalare in senso orario per ottenere la dovuta assistenza dal motore. Questa è
un'importante funzionalità di sicurezza. Questa bici elettrica a pedalata assistita fornirà assistenza fino ad
una velocità pari a 25 Km / h dopodiché, raggiunto la velocità indicata, il motore si spegnerà. Logicamente è
possibile aumentare la velocità ma adoperando esclusivamente il proprio sforzo a livello motorio senza
l'assistenza elettrica.
Per avviare la bicicletta è necessario attivare l'interruttore principale sul lato della batteria per fornire
corrente all’apparato. Il motore non funzionerà finché non si effettua uno/due giri completi della guarnitura.
Questa funzione protegge il motore e il controller da eventuali danni e prolunga la durata dei componenti
elettrici.
Contenuto:
1. Struttura di una bici ad assistenza elettrica
2. Importanti precauzioni di sicurezza
3. Funzionamento
4. Installazione e utilizzo della batteria
5. Uso e manutenzione della batteria
6. Uso e manutenzione del caricabatterie
7. Uso e manutenzione del motore elettrico
8. Manutenzione dell’unità di controllo
9. Manutenzione del comando di spegnimento della leva del freno
10. Risoluzione dei problemi
11. Schema elettrico e specifiche tecniche
12. Scheda tecnica principale
2. Struttura “Bici Elettriche” (vedere paragrafoⅠ.Fig 1.)
3. Precauzioni per la sicurezza:
• Si consiglia vivamente di indossare un casco approvato, conforme agli standard locali
• Rispettare le regole stradali locali quando si percorrono strade pubbliche
• Essere a conoscenza delle condizioni del traffico
• Il ciclista deve avere obbligatoriamente un’età superiore di 14 anni
• La manutenzione della bici deve essere eseguita solo da negozi di biciclette e tecnici autorizzati
• La manutenzione regolare garantirà prestazioni di guida migliori e sicure

19/40
• Non superare più di 100 kg di carico sulla bicicletta, incluso il pilota stesso
• L’utilizzo corretto della bicicletta deve essere effettuato da un solo individuo
• Garantire una manutenzione regolare sulla bicicletta seguendo rigorosamente questo manuale
• Non aprire o effettuare la manutenzione di componenti elettrici autonomamente. Rivolgersi al proprio
negoziante/tecnico di biciclette locale per assistenza e manutenzione qualificata quando necessario
• Non saltare mai, correre, eseguire acrobazie o abusare della bicicletta
• Non guidare mai sotto l'effetto di droghe o alcolici
• Si consiglia vivamente di azionare sempre l’impianto d’illuminazione in dotazione, quando si guida al buio,
nebbia o scarsa visibilità
• Per effettuare la pulizia della bicicletta pulire la superficie con un panno morbido. Nel caso vi sia un'area
molto sporca, è possibile pulirla con un po' di sapone neutro e acqua.
Attenzione: non lavare la bicicletta elettrica direttamente con un getto d’acqua diretto,
specialmente mediante idropulitrice. Evitare l’utilizzo dell’acqua in quanto potrebbe penetrare
all’interno dei componenti elettrici, recando così eventuali danni ingenti.
3. Funzionamento
La Vs. nuova bicicletta ad assistenza elettrica è un mezzo di trasporto rivoluzionario, con telaio in alluminio,
batteria agli ioni di litio, motore anteriore elettrico ad altissima efficienza e controller con sistema di
assistenza elettrica, per supportare la normale pedalata. Le attrezzature sopra citate garantiranno una guida
sicura con funzioni e prestazioni eccellenti. È importante che prendiate nota delle seguenti linee guida per
assicurarvi di ottenere la migliore esperienza dalla vostra bicicletta elettrica.
Lista di controllo per andare in bicicletta
3.1.1 Prima di guidare, assicurarsi che i pneumatici siano completamente gonfiati secondo le diciture
riportate sul lato della copertura.
Le prestazioni della bici sono direttamente correlate al peso del pilota e del bagaglio/carico, insieme
all'energia immagazzinata nella batteria;
3.1.2 Caricare la batteria durante la notte, prima di riutilizzare il mezzo il giorno successivo;
3.1.3 Applicare periodicamente l’olio lubrificante alla catena procedendo alla pulizia in caso di sporco o
residui dannosi all’utilizzo, si consiglia l’uso di uno sgrassante.
4. Installazione ed utilizzo della batteria
La bicicletta elettrica ha la batteria posizionata all'interno del portapacchi posteriore (il pacco batteria è
collegato direttamente alla scatola dell’unità di controllo nella parte anteriore. (Fig. 2)
La struttura portante della batteria è fissata sul supporto del portapacchi.
La custodia della batteria è bloccata dalla chiave (Fig. 4.1 e 4.2).
20/40
(Fig. 2)
Innanzitutto, posizionare la batteria lungo il dispositivo di scorrimento in senso orizzontale (come in Fig. 2),
spingerla all'interno e assicurare una perfetta aderenza. In secondo luogo, assicurarsi che il pacco batteria
sia inserito saldamente al connettore interno nell'alloggiamento dell’unità di controllo.
Bloccaggio batteria (Fig. 4.1, 4.2)
Dalla posizione iniziale (ore 12), premere la chiave e ruotare in senso orario in posizione ore 6 per effettuare
il bloccaggio. Effettuare il procedimento inverso per lo sbloccaggio.
Caricabatterie
Se è disponibile una presa alla portata della bicicletta, è possibile caricare la bici direttamente con la
batteria montata senza l’obbligo di doverla sfilare dal proprio alloggiamento. La porta di ricarica è coperta
da un cappuccio di plastica, con una freccia gialla per la notifica (Fig. 4.3).
Si prega di aprire la copertura di sicurezza, quindi caricare la batteria direttamente. Rimuovere la batteria è
utile per la ricarica in un luogo appropriato in cui la bicicletta potrebbe non essere adatta o quando non è
disponibile alcuna alimentazione nel luogo in cui è parcheggiata la bicicletta. Prima di rimuovere la batteria
dalla bici, è necessario procedere come segue:
* assicurarsi che l'interruttore sia spento, controllare la posizione del pulsante di accensione (Fig. 4.4).
* Premere il tasto e girare la chiave in senso antiorario per sbloccare la batteria. (vedi Fig. 4.2)
* Per la vostra sicurezza e della bicicletta stessa ricordatevi di togliere sempre la chiave dalla batteria!!!
(Fig. 4.1)
(Fig. 4.2)
This manual suits for next models
1
Table of contents
Languages:


