VKI Technologies Suprema Operation manual

VKI Publication # N016489 February 2012 Page 1 of 58
HOT BEVERAGE SYSTEM
Operation and Service Manual

SUPREMA - OPERATION & SERVICE MANUAL
Page 2 of 58 02-2012 Suprema - Operation & Service
TABLE OF CONTENTS
This table contains integrated hyperlinks (identified in blue or purple). If viewing this file on a computer, click on the section you
would like to see and you will be linked there automatically.
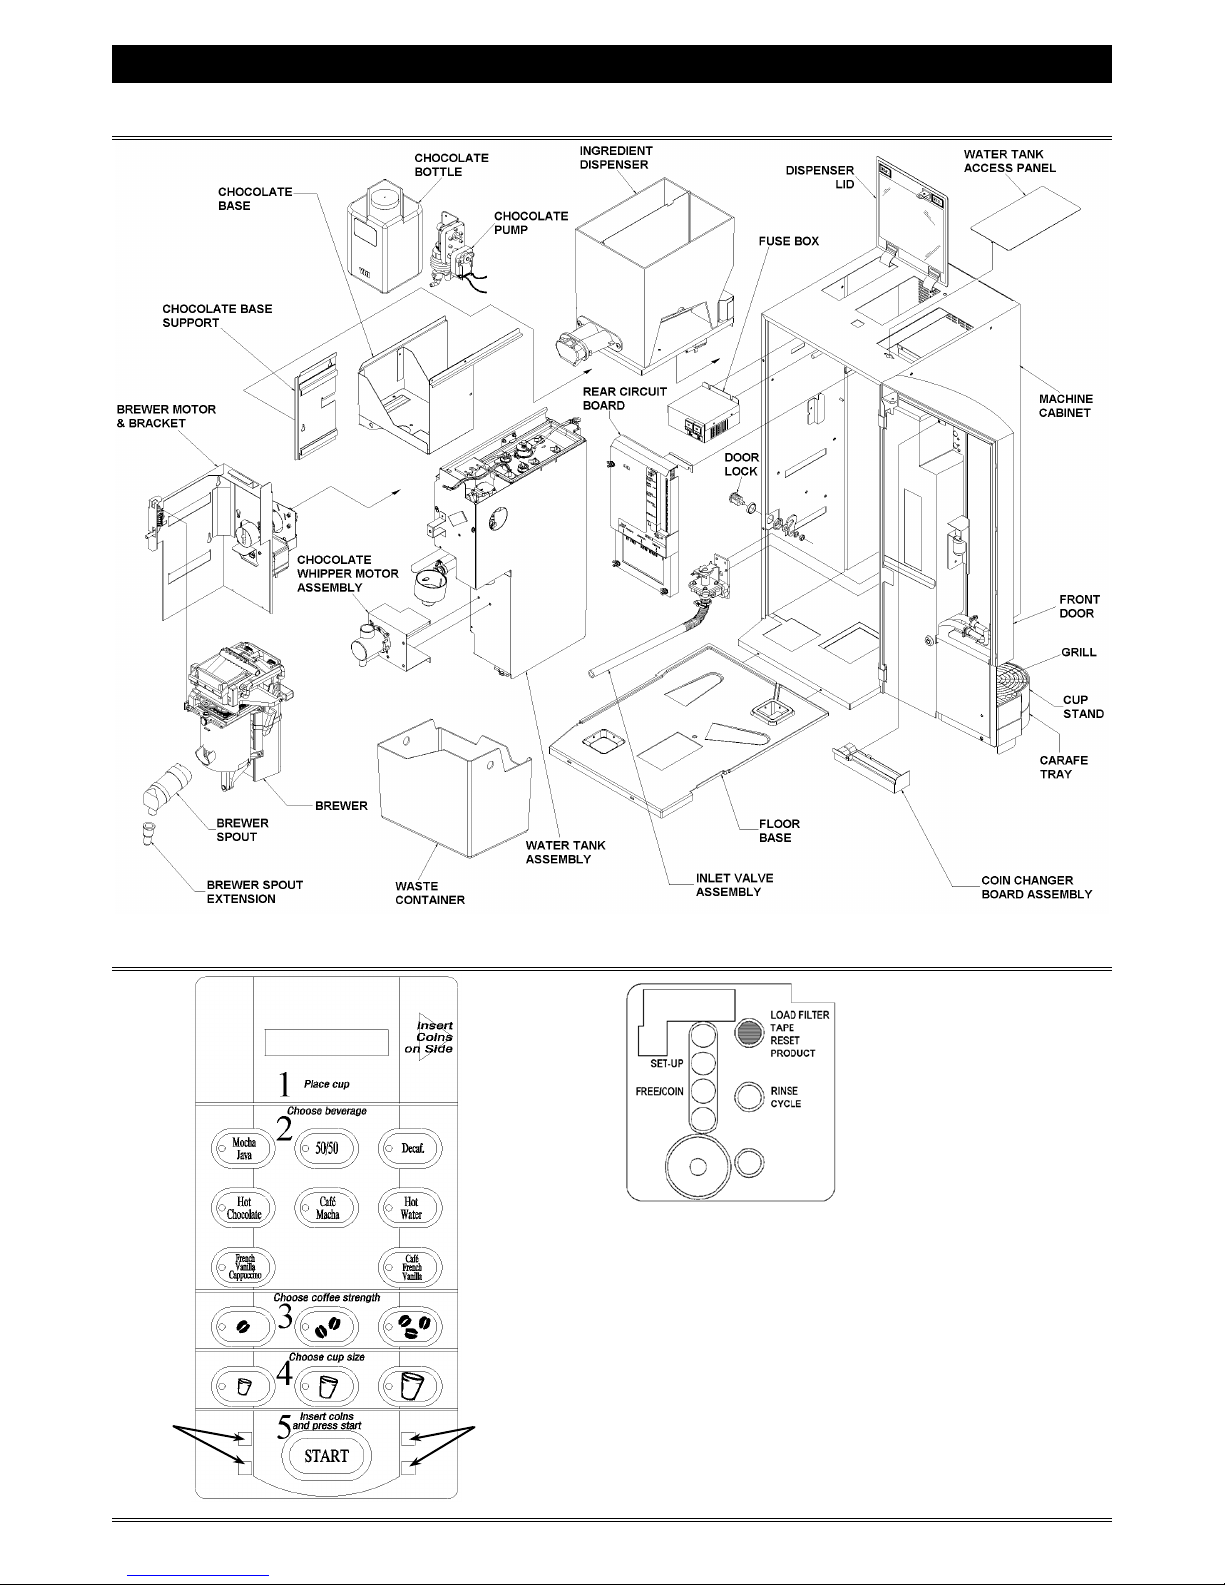
Overview of Components......................................3
Selection Panel & Interior Door Panels................ 3
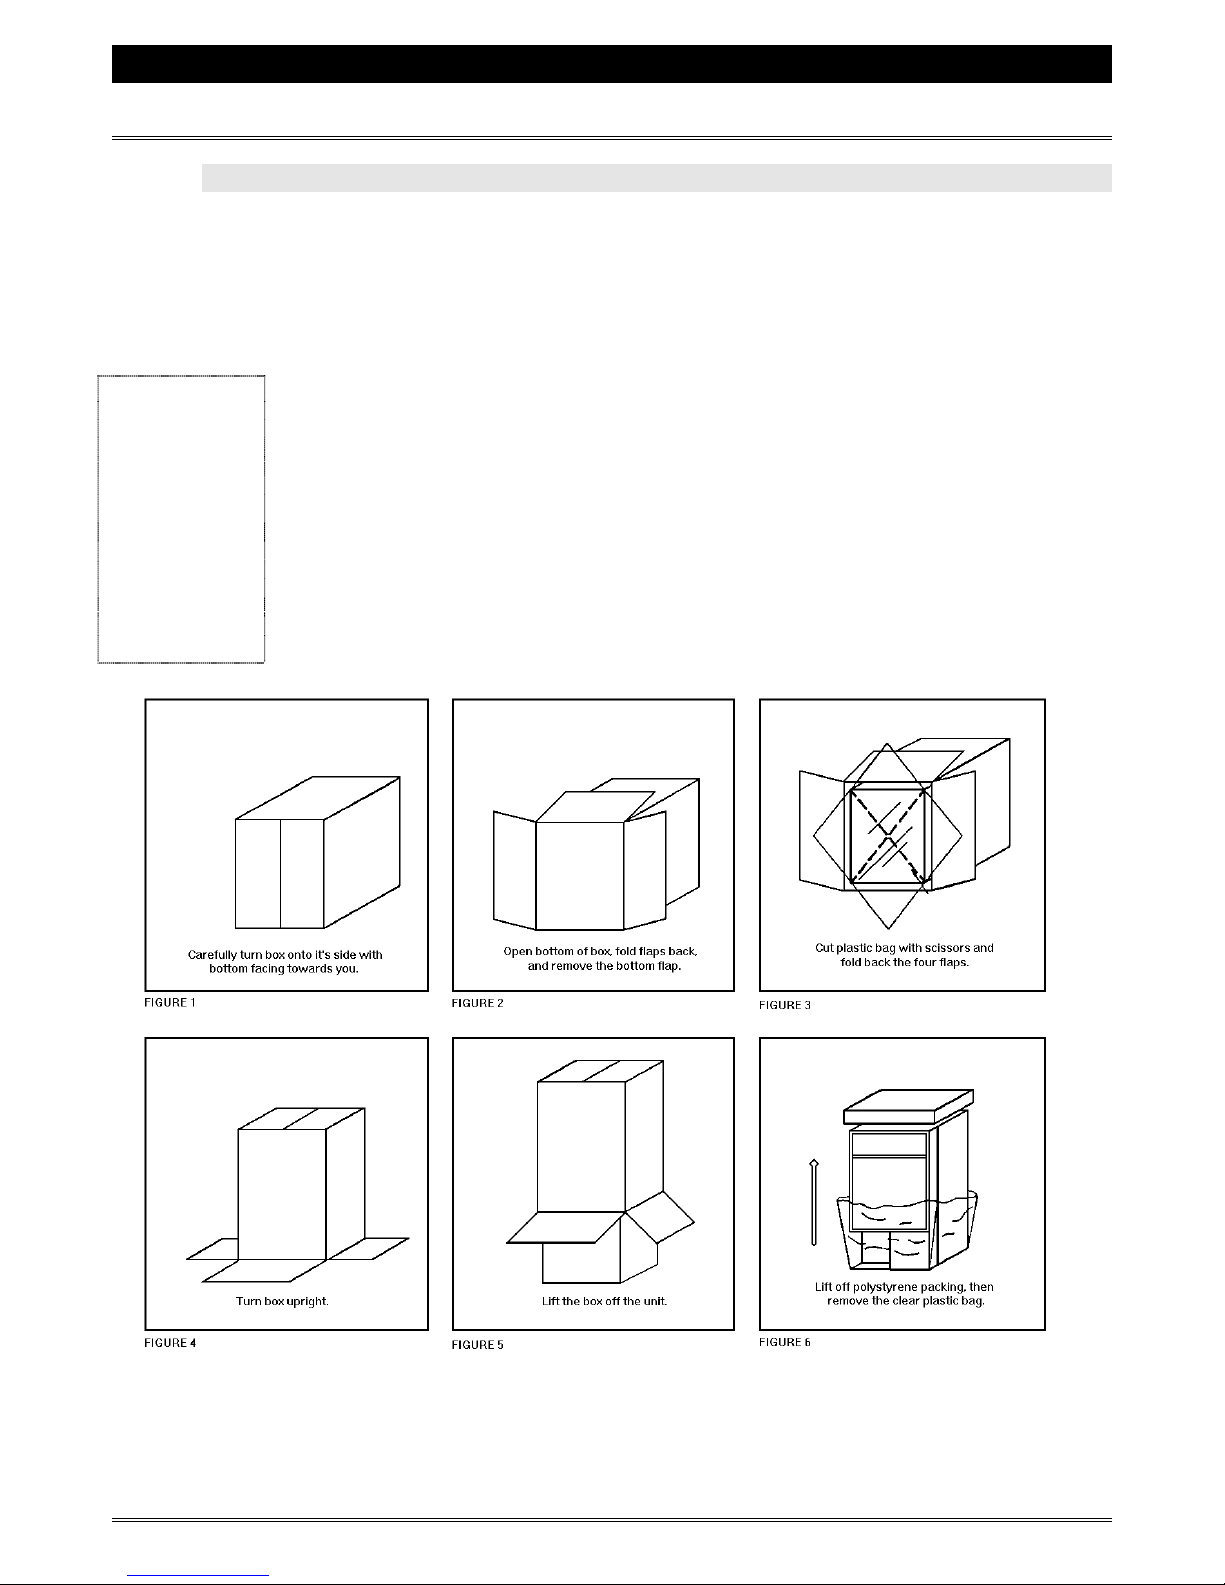
Unpacking and Setting Up..................................... 4
Unpacking the Equipment ................................4
Removing Shipping Materials...........................5
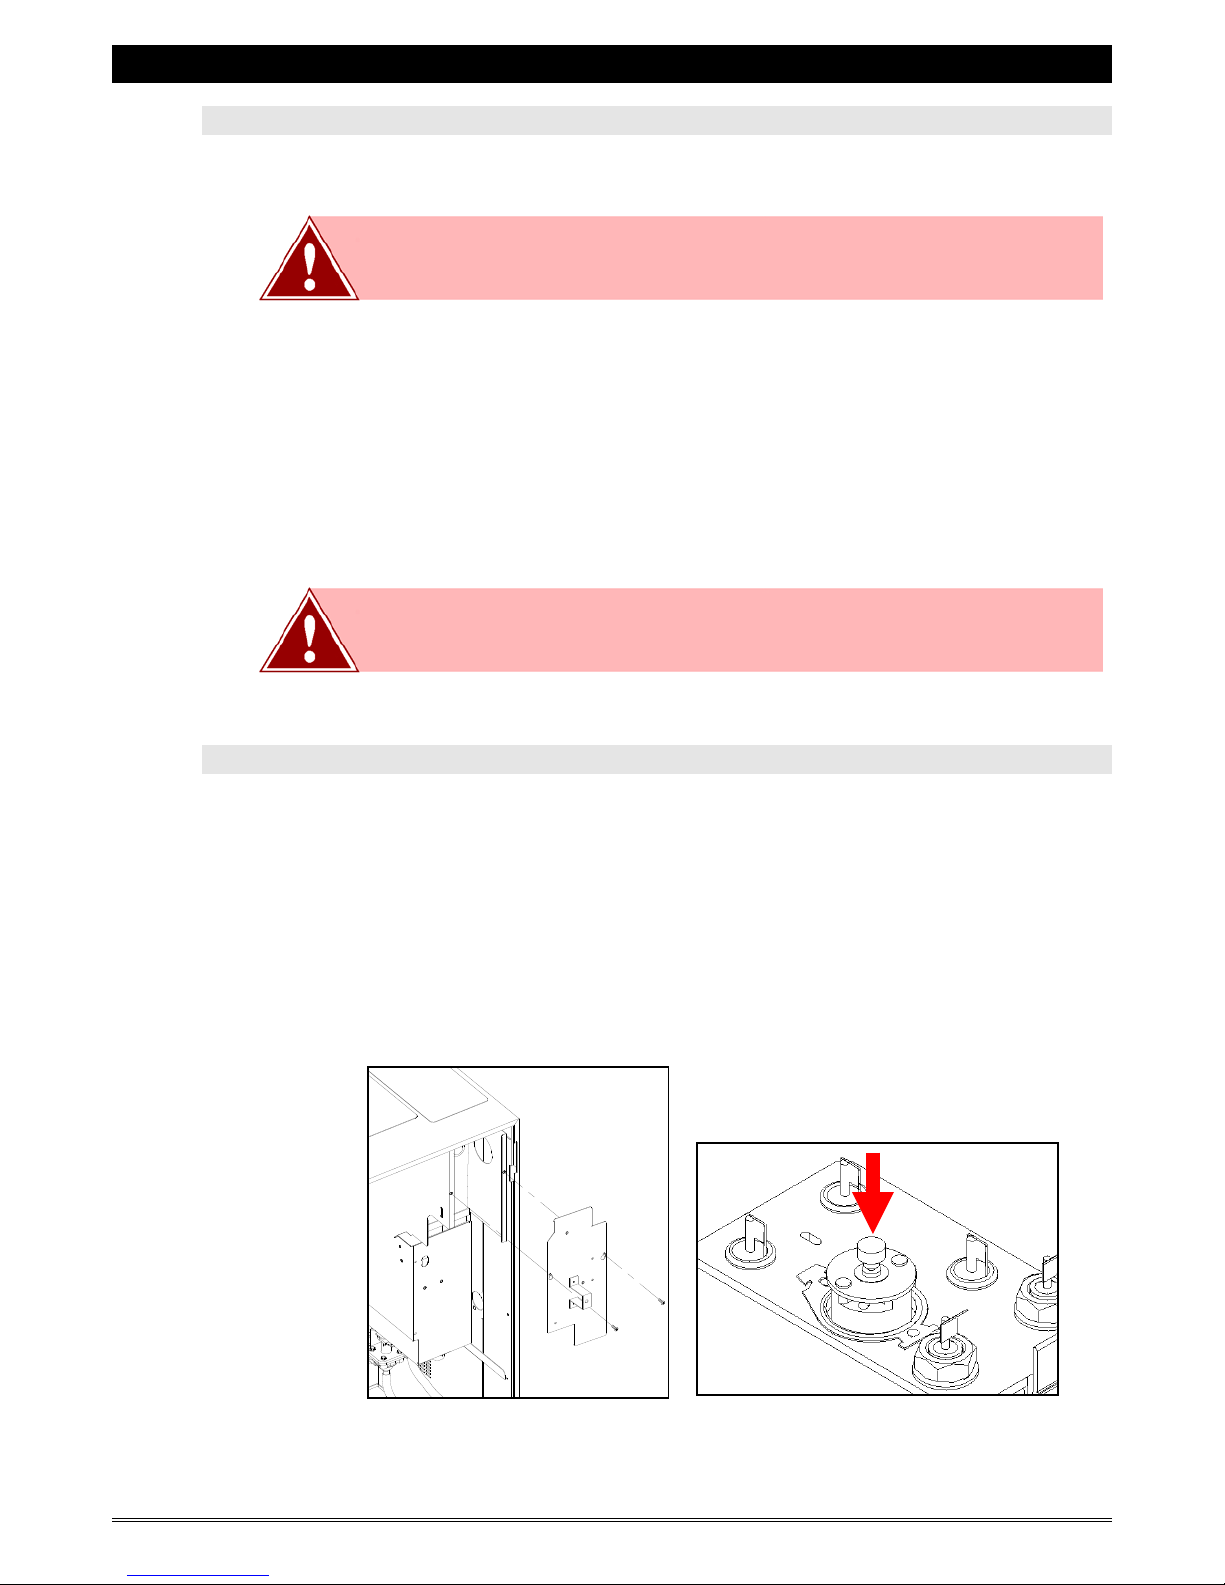
Connections and Adjustments..........................5
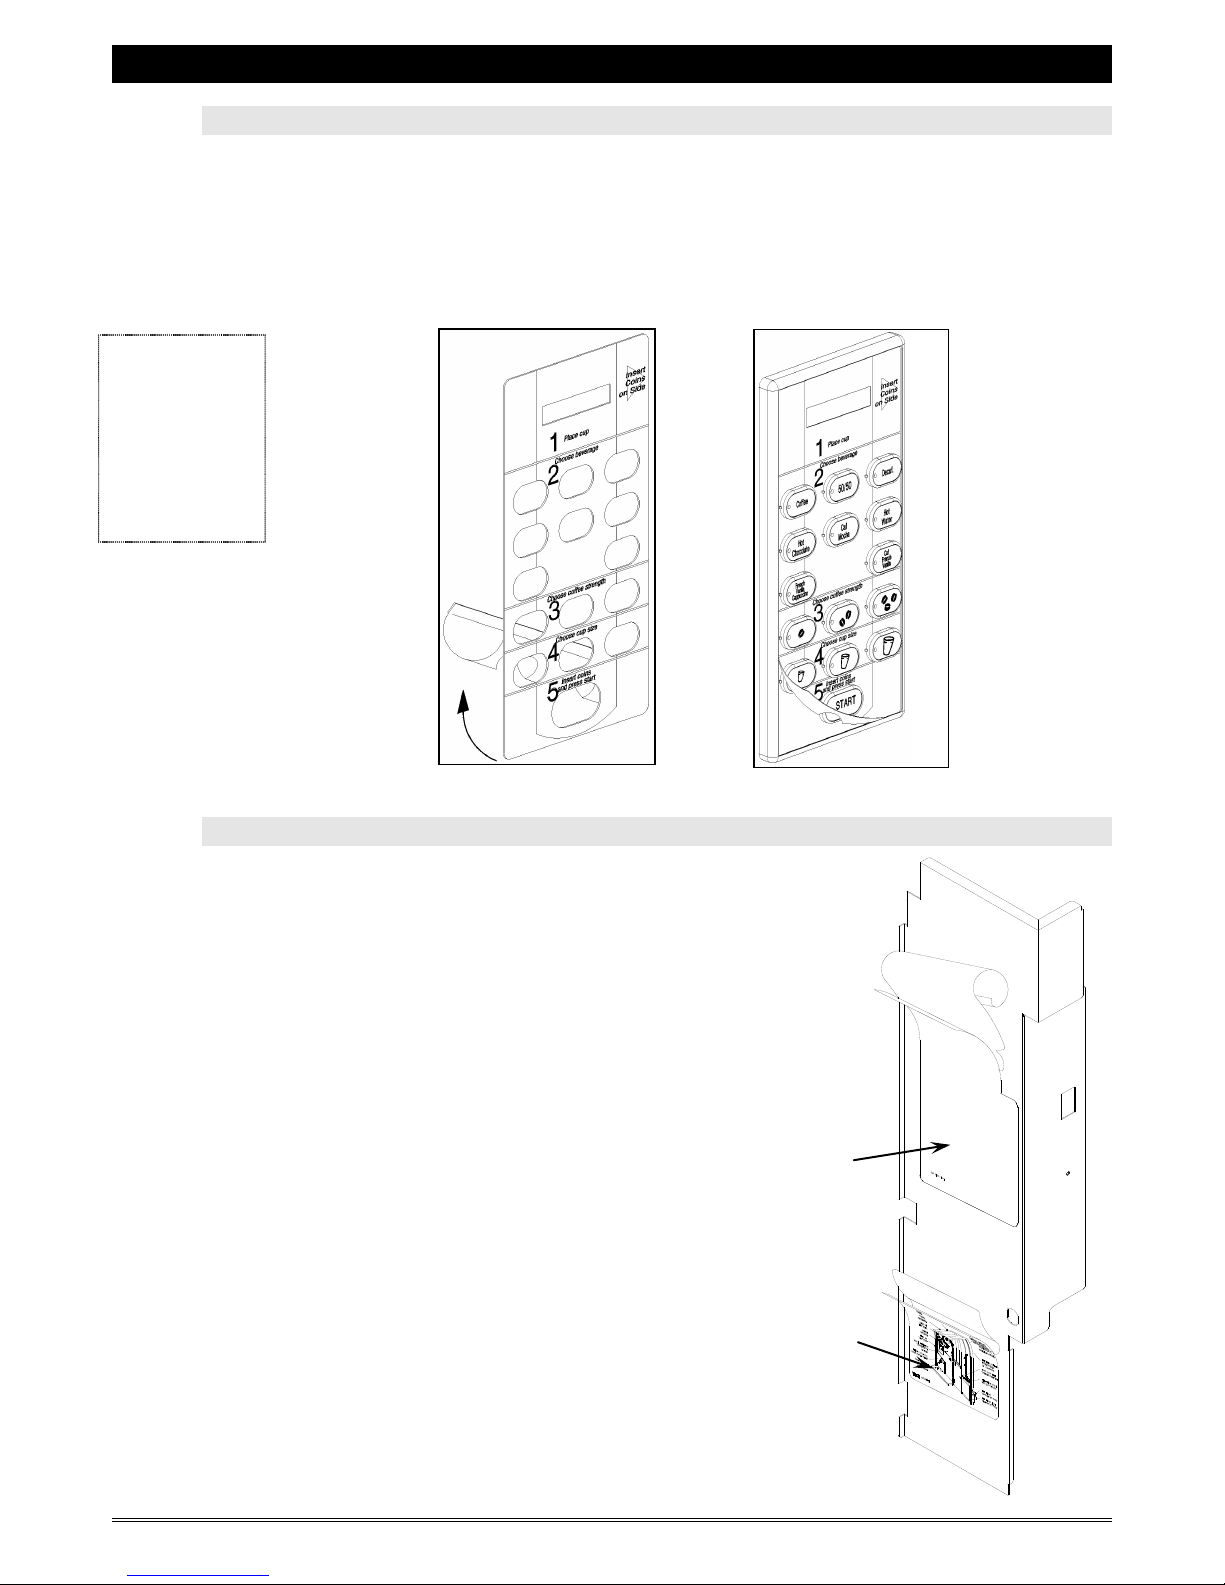
Applying the Fascia.......................................... 6
Applying the Inner Door Decals........................ 6
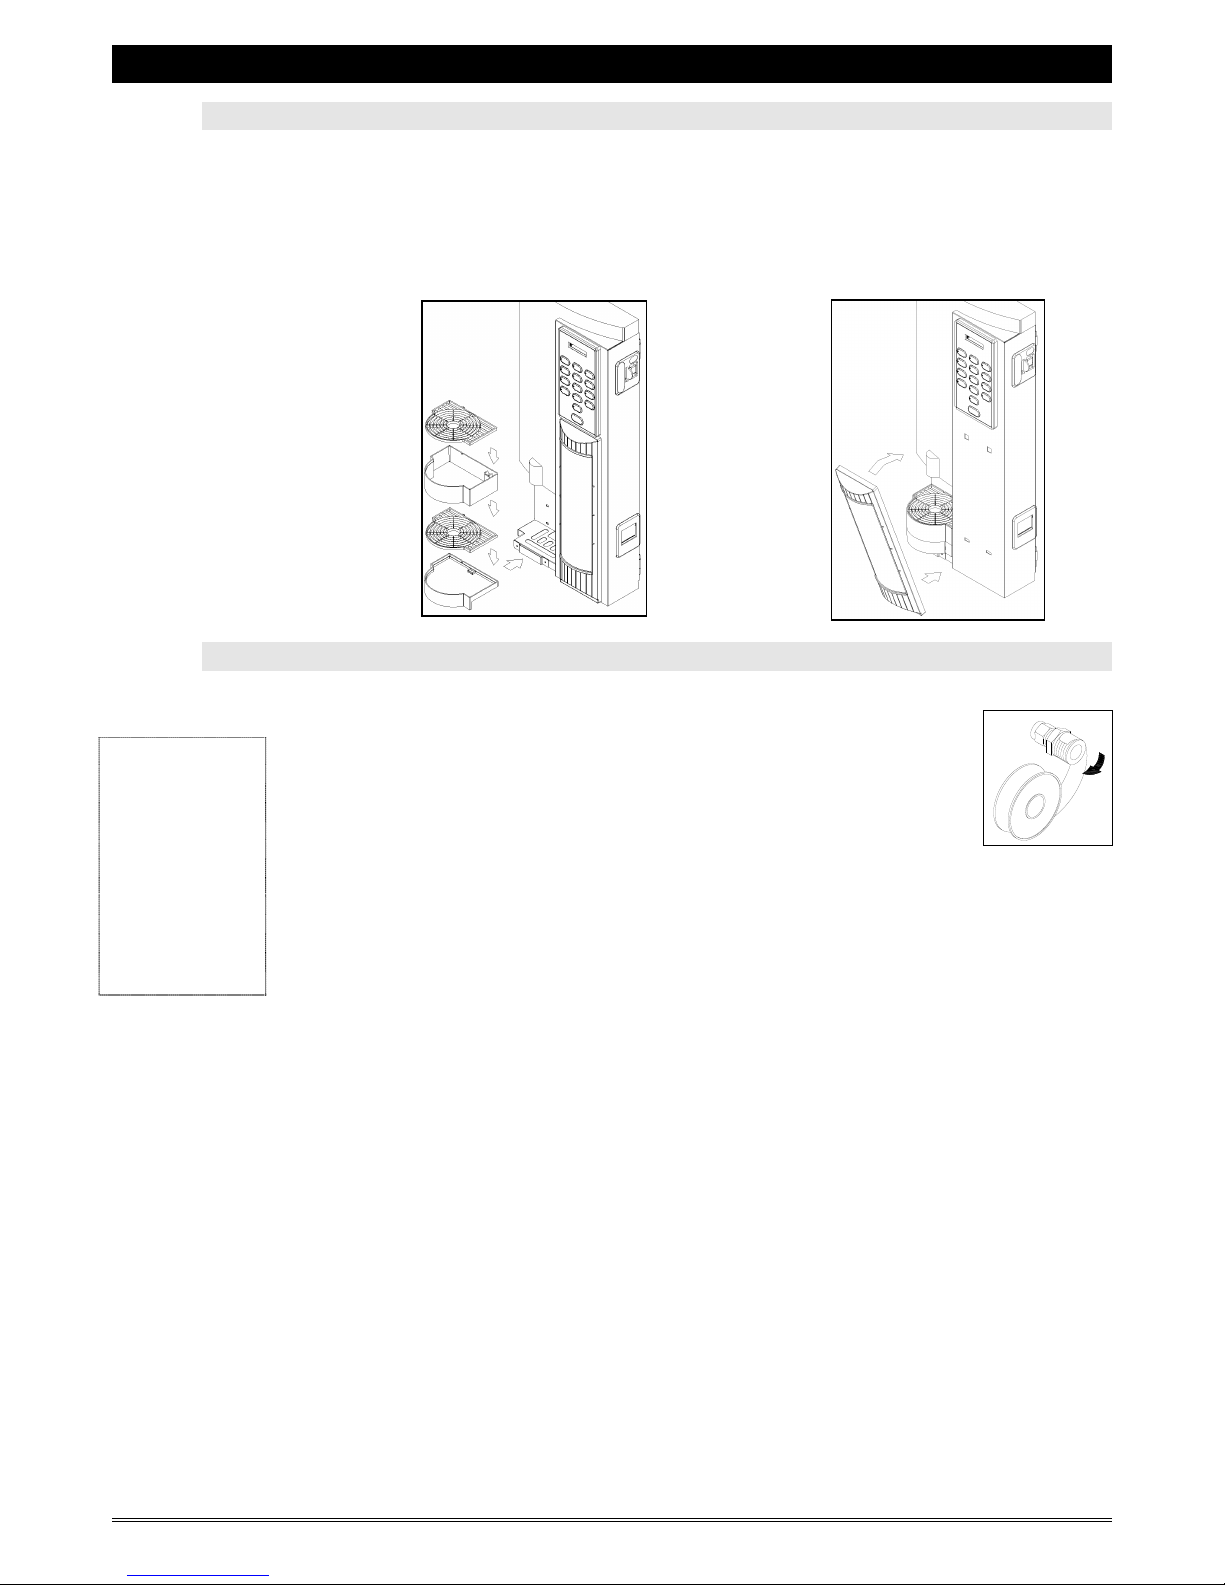
Installing Carafe Tray, Cup Stand & Bezel .......7
Water Connection.............................................7
Installation at an Account......................................8
Placement of the Equipment ............................8
Water Filter....................................................... 8
Connecting to a Water Supply..........................9
Running Copper Tubing .................................10
Finishing Touches ..........................................11
Programming the Equipment..............................12
Viewing and Resetting Counters....................12
Total per Selection Counter............................13
Coin Dispense................................................13
Total Counter Reset & Access Code.............. 14
Set-Up Mode & Access Code......................... 15
Product ON/OFF............................................. 16
Setting Products.............................................16
Setting Water..................................................17
Setting Prices .................................................17
Enabling Switches..........................................18
Canceling Individual Selections...................... 18
Default Setting................................................ 19
Top Pause......................................................19
Bottom Pause................................................. 20
Maximum Number of Cups per Carafe...........20
Frequency of Messages .................................21
Service Counter..............................................21
Bottom Pause Delay.......................................22
Canceling Messages......................................22
Free Vend Key Switch Set-Up........................ 23
Brewer Rewind Message................................23
Number of Chocolate Pump Cycles ...............24
Double-Cup Feature....................................... 24
Press-Hold Hot Water ....................................25
Temperature................................................... 25
Custom Message............................................ 25
Language........................................................ 26
Water Level Probe..........................................27
Post-Mix..........................................................27
Locking the Counters......................................28
Force Vend Feature........................................28
Operation Information..........................................29
Resetting Coffee and
Chocolate Refill Messages .............................29
Priming the Chocolate Pump..........................30
System Status Indicators................................30
General Information........................................31
Chocolate Rinse Cycle....................................32
Brewer Rinse Cycle ........................................33
Downloading Software and Transferring
Settings..................................................................34
Downloading Software Updates......................34
Transferring Settings.......................................36
Indicator messages ..............................................38
Replacing Major Components.............................41
Brewer.............................................................41
Brewer Motor ..................................................42
Inlet Valve.......................................................43
Outlet Valves...................................................44
Water Tank Assembly.....................................45
Water Tank Lid Assembly...............................46
Heater Element...............................................47
Drain Valve .....................................................48
Ingredient Dispenser.......................................49
Ingredient Dispenser Motor.............................50
Front Board.....................................................50
Rear Circuit Board ..........................................51
Fuse Box Assembly........................................52
Wiring Diagrams ...................................................53
Electrical Diagram...........................................53
Brewer Harness..............................................54
Overflow Harness ...........................................54
Temperature Probe Harness ..........................54
Chocolate Pump Harness...............................54
Fuse Box Harness ..........................................55
General Harness.............................................55
Water Tank Harness.......................................56
Coin Changer Installation ....................................57
Installing the Coin Changer ............................57
Installing the Pricing Decals............................58
COUNTERS
SET-UP MODE

SUPREMA - OPERATION & SERVICE MANUAL
Suprema - Operation & Service 02-2012 Page 3 of 58
Hidden buttons for
scrolling from menu
to menu.
Hidden buttons for
adjusting settings
within a menu.
OVERVIEW OF SUPREMA COMPONENTS
SELECTION PANELS & INTERIOR DOOR PANELS
SET-UP - Provides access to
the programming and to the
configuration of the machine.
FREE/COIN - Toggles the
machine from "FREE" mode to
"COIN" mode. Red indicator
LED will be lit when the
machine is in "FREE" mode.
OPEN BREWER / RESET PRODUCT - This button is red
to simplify identification for the caretaker. It opens the
brewer to perform maintenance.
RINSE CYCLE - Provides access to the rinse cycles for
the brewer and chocolate components.
Suprema Interior Door Panel
Suprema Selection Panel

SUPREMA - OPERATION & SERVICE MANUAL
Page 4 of 58 02-2012 Suprema - Operation & Service
UNPACKING & SETTING UP THE EQUIPMENT
Unpacking the Equipment
Check the shipping carton for shipping damage, prior to signing for the delivery. If any damage
is evident, indicate the damage on the delivery slip before signing. Make certain that the driver
signs in recognition of the damage. The carton left the factory free from damage. If there is
damage, the claim is to be made with the carrier, and not with VKI Technologies.
1. Remove the coffee maker from its shipping carton.
a) Lay the coffee maker on its side.
b) Cut the tape on the bottom of the carton.
c) Fold the flaps outwards and cut off the bottom flap.
d) Remove the polystyrene (foam) packing material, and cut the plastic bag with
scissors, as indicated in figure 3.
e) Turn coffee maker upright and lift off the carton.
f) Remove the remaining polystyrene packing and the plastic bag.
g) Remove the decal package and set it aside, for the moment.
Note:
Prior to signing for
any type of delivery,
check all packages
for shipping related
damage.
If equipped with a
“Tip-N-Tell” or a
“ShockWatch”
indicator, check the
status of the
indicator and note
any damage on the
bill of lading.

SUPREMA - OPERATION & SERVICE MANUAL
Suprema - Operation & Service 02-2012 Page 5 of 58
Removing Shipping Materials
1. Lift and place the coffee maker onto your workbench.
2. Open the outer and inner doors.
a) There are two sets of keys attached to an envelope on the service cord. The keys
numbered 8625 are for the outer door. The keys numbered 8645 are for the inner
door.
3. Remove all the shipping tape.
a) Shipping tape is found in the following areas: Valve cover, Service cord, Brewer
spout, Cup Trays.
Connections and Adjustments
When the water tank is drained after testing at the factory, it is possible for the element may
remain hot for a short while afterwards and trigger the thermal cut-off switch.
1. Reset the thermal cut-off switch.
a) Remove the valve cover (figure 1) on the front of the hot water tank.
b) Remove the plastic wing-nut securing the water tank access panel to the top of the
machine.
c) Remove the water tank access panel.
d) Press the “reset” button on the thermal cut-off switch (figure 2).
2. Re-install the water tank access panel, and the valve cover.
WARNING: Never lift the machine by placing your hand underneath the
front door. It is not designed to support the weight of the machine, and
serious personal injury and/or damage to the unit may occur.
WARNING: Do not connect the service cord to the wall outlet at this point
as more adjustments are still required to the machine.
Figure 1 - Remove valve cover.
Figure 2 - Reset the thermal cut-off switch.

SUPREMA - OPERATION & SERVICE MANUAL
Page 6 of 58 02-2012 Suprema - Operation & Service
Applying the Fascia
1. Apply the fascia to the Suprema front door.
a) Peel the backing paper from the rear of the fascia (Figure 3).
b) Align the fascia inside the plastic trim around the selection panel, making certain
that the fascia does not interfere with the buttons.
c) Once aligned, press the fascia firmly in place (Figure 4).
Applying the Inner Door Decals
1. Apply the "Care and Maintenance" decal.
a) Open the outer door.
b) Peel off the lower half of the backing paper.
c) Align the upper half of the decal with the right
side of the inner door.
d) When satisfied with the alignment, apply the
lower portion of the decal to the door surface.
e) Lift the upper portion of the decal and remove
the backing paper.
f) Apply pressure to the upper half of the decal,
from the center outwards.
2. Apply the "Diagram" decal.
a) Peel the backing from the decal.
b) Align the decal below the inner door grounds
deflector.
c) When satisfied with the alignment, apply
pressure to the decal.
Note:
Do not apply any
pressure to the
fascia until it is
placed in the proper
position. This way,
if it is not in the
right place, you can
carefully peel it off
and re-position it.
#8
#9
Figure 3 – Remove Backing
Figure 4 – Install Fascia

SUPREMA - OPERATION & SERVICE MANUAL
Suprema - Operation & Service 02-2012 Page 7 of 58
Installing the Carafe Tray, Cup Stand and Graphics Bezel
1. Install the carafe tray, cup stand and graphics bezel.
a) Install the carafe tray as illustrated below. Once done, install the cup stand on top
of the carafe tray.
b) Install the bezel by first inserting the tabs on bottom if it into the notches on the
door. Push the top of the bezel into the door until it clips in place.
Water Connection
1. Connect the water supply to the coffee maker.
a) Apply Teflon tape to a 3/8" plumbing fitting. If a 1/4" line is being
used, you will then need a 1/4 x 3/8" fitting.
♦Teflon tape should be applied in a clockwise direction, going with
the threads when tightening.
b) Thread the fitting into the inlet valve at the back of the coffee maker and tighten
with a wrench.
c) Connect the water line to the fitting.
d) Turn the water on at the source.
e) Plug the coffee maker into the wall outlet.
2. Switch the coffee maker "ON".
a) The main power switch is found on the back of the coffee maker.
b) When the power is switched "ON", you should hear the coffee maker filling with
water.
c) Check the plumbing for leaks and correct them, if necessary.
d) Check the display for any messages, and take the indicated action.
3. Fill the ingredient dispenser with coffee.
a) Open the front door of the coffee maker.
b) Lift the lid on top of the coffee maker.
c) One section of the ingredient dispenser is larger than the other. The large section is
for the coffee that is expected to have higher consumption. The smaller is for
decaffeinated or lower consumption blends.
d) Fill the ingredient dispensers by pouring coffee through the opening in the lid.
Note:
To simplify the initial
water connection at
your shop, we
recommend using
1/4" polytubing, and
an instant (quick
connect) fitting. For
field installation, we
recommend copper
tubing from the
source, all the way
to the coffee maker.
◄
Install the carafe tray
(and grill) and the cup
stand (and grill).
►
Install the pre-
assembled graphics
(and pricing) bezel.

SUPREMA - OPERATION & SERVICE MANUAL
Page 8 of 58 02-2012 Suprema - Operation & Service
INSTALLATION AT AN ACCOUNT
This section will assist you with the initial installation, taking into account several possible
circumstances. While not all can be described here, this information can be used in nearly all
types of plumbing you will encounter at a new account.
Placement of the Equipment
The location of the coffee maker placement at an account is a decision that is made with the
contact person at that account. This decision is usually made in advance by your company's
representative. It is important to remember that the coffee maker gets placed in an easily
accessible, and highly visible area for the majority of its customers, and that it is easily
accessible for any service that may be required. It is also important to consider height. The
person who will be filling the ingredient dispensers must be able to easily reach the top of the
coffee maker. There must be adequate room to lift the lid on top of the coffee maker, and to
open the front door. The tables below outline the clearances needed for the area in which the
coffee maker is installed.
Installation Dimensions
Suprema
Height:
41 inches (104.5 cm)
Depth:
28 inches (71.5 cm)
Width:
22.5 inches (57 cm)
Height -with Hopper
Extension
45 inches (114.5 cm)
Width -with cup holder
26.5 inches (67.5 cm)
Width - with A.P.P. unit or
bill acceptor unit or
condiment stand.
32.5 inches (82.5 cm)
Water Filter
We recommend the use of a high quality water filter (such as Everpure Filters). Filters will
eliminate most odors present in water, and will reduce the amount of particles entering the
water tank. The following are basic instructions for installing a cartridge type filter using a
head bracket (Everpure type filter).
1. Assemble the retaining bracket to the filter head.
2. Insert the cartridge into the filter head and turn the cartridge clockwise.
3. Apply Teflon tape to the threaded portion of two 3/8" x 1/4" fittings and screw each
into the filter head.
4. Mount the water filter at an easily accessible place for servicing, such as:
(a) Under the sink against the back or side wall,
(b) On the back of a utility cabinet,
(c) On the back of the coffee maker,
(d) Any location generally within 20 feet of the machine.

SUPREMA - OPERATION & SERVICE MANUAL
Suprema - Operation & Service 02-2012 Page 9 of 58
Connecting to a Water Supply
Plumbing - Self-Piercing Saddle Valve
The self-piercing saddle valve is used for tapping into larger or odd-sized pipes which you may
encounter, usually in older buildings.
1. Position the valve over the pipe it is to tap into.
a) With the valve gasket in place around the needle, tighten the screws or
bolts that clamp the valve to the pipe from both sides. Be extra careful not
to crush the pipe.
2. Tap into the pipe.
a) Turn the valve knob clockwise until it pierces a hole in the pipe. The
water will not start flowing at this point.
3. Attach your tubing to the outlet of the saddle valve.
a) Use the insert and the ferrule provided with the valve.
b) Tighten the nut.
Plumbing - "T" and Reducing "T" Fittings
1. Remove a 1" (2.5 cm) section of pipe being tapped, with a tubing cutter.
2. Insert a "T" in the space created.
a) Use a 1/4 x 1/4 x 3/8, or a 3/8 x 3/8 x 3/8, or a 1/2 x 1/2 x 3/8, depending
on the size of the piece of pipe that has been cut out. If using 1/4 tubing,
the last measurement of the above three descriptions should be 1/4.
3. Secure the fittings.
a) Using "T's” and reducing "T's”, insert the compression ferrules.
b) Carefully tighten the nuts.
4. Attach and secure the tubing.
a) Insert the tubing into the "T" with a compression ferrule.
b) Tighten the compression nut.
WARNING: Be certain of the type of water supply line you tap into. DO
NOT connect the coffee maker to a fire sprinkler water supply as this is a
very high pressure line. Connect to a drinking water supply only.
CAUTION:
There are potential problems when using a self-piercing saddle valve. It is
important when clamping the valve to the pipe that it remains straight. When you tighten the
nut on the outlet tubing, make sure the valve remains stationary on the pipe. Movement of the
valve will cause the needle to move, creating an oversized hole in the pipe, resulting in a leak.
Note:
A "T" fitting is used
when tapping pipes
commonly used at
the sink stand-pipe
or drinking fountain.

SUPREMA - OPERATION & SERVICE MANUAL
Page 10 of 58 02-2012 Suprema - Operation & Service
Running Copper Tubing
If the position of the coffee maker is near the water source, by far the simplest route for the
tubing is along the baseboard or straight down the wall. In both cases, the tubing should be
secured to the wall with self-adhesive or nail-on tubing clips.
In other cases, it may be practical to run tubing over the top of suspended ceilings. This helps to
run the water longer distances, up to 200 feet, with no tube showing. Running tubing inside
walls should be completely avoided. It is difficult and time consuming, and does not
appreciably improve the appearance of the installation. Please note, however, that neatness and
the appearance of the installation should be a top priority.
When it is necessary to make a hole in the wallboard, make it with a Phillips screwdriver, rather
than an electric drill. This will prevent hitting electrical wiring, telephone wiring, or a water
supply. If you must use a drill, be certain of what is on the other side of the wall, then proceed.
1. Connect the tubing to the inlet of the water filter.
a) Most filters have an arrow to indicate the direction of the water flow.
2. Connect a section of tubing to the water filter outlet, and run it to the inlet of the
machine.
a) Insert the tubing into the outlet side of the water filter and secure.
b) Coil an extra 18 inches (45 centimeters) of tubing behind the coffee maker to allow
for repositioning of the coffee maker.
c) Do not connect to the machine at this point.
3. Turn off the valve on the water filter head.
a) Some water filters may not be equipped with an inline valve. If this is the case, it is
recommended that one be installed prior to continuing.
4. Open the valve at the main water source.
5. Bleed the water lines.
a) Turn on the valve at the water filter and catch the first gallon (4 liters) of water.
This will remove any stagnant water and air from the line.
6. Turn off the valve on the water filter head.
7. Connect and secure the tubing to the inlet fitting of the machine.
a) Apply a fitting to the inlet at the rear of the coffee maker, using Teflon tape. Keep
in mind that Teflon tape should be applied in a clockwise direction.
8. Test for any leaks.
a) Plug in the machine, and switch the power “on”.
b) Listen for the sound of the tank filling.
c) Check all fittings for any leaks, and tighten where necessary.

SUPREMA - OPERATION & SERVICE MANUAL
Suprema - Operation & Service 02-2012 Page 11 of 58
Finishing Touches
1. Position the carafe tray/grill and the cup tray/grill on the coffee maker.
2. Follow this checklist before leaving the account.
Fill the ingredient dispensers with coffee. Reset the coffee
indicator messages (if used).
Fill the chocolate container with syrup. Reset the indicator
message (if used).
Install a waste bag into the waste container.
Test the water temperature with a thermometer.
Test brew a cup of coffee. Use coins to test a coin changer, if one
is being used.
Familiarize the caretaker with the coffee maker. This includes
cleaning, how to use the keys, whom to call in case of a problem,
etc.
Check for leaks one final time. Tighten fittings where necessary.
If the coffee maker is equipped with the hot chocolate option and uses the refillable chocolate
containers, leave an extra chocolate container with the caretaker, who will regularly have to
replace and clean these containers.
If any other options are being used with the equipment, familiarize the caretaker with their
operation and any maintenance that may be required.

SUPREMA - OPERATION & SERVICE MANUAL
Page 12 of 58 02-2012 Suprema - Operation & Service
PROGRAMMING THE EQUIPMENT
The first section of the "SET-UP" mode displays all the counters. These counters can be reset
while in this mode. The following table lists all the counters in the order in which they appear
at the beginning of the "SET-UP" mode;
CASHBOX TOTAL
VEND TOTAL
(RESETTABLE) VEND TOTAL RESET
TOTAL / SELECTION
COIN DISPENSE --- appears only in "COIN"mode
FREE VEND TOTAL
Viewing and Resetting Counters
When the Cash Box Total reaches $220, the machine will display a “CALL KEY OPERATOR”
message on the LCD. This indicates that the cash box must be emptied and the counter must be
reset.
1. Enter the "SET-UP" mode.
a) Press the "SET-UP"mode button on the interior door panel. The display will now
read,
b) To reset the "CASHBOX TOTAL", press the "START"button. To scroll to the next
counter, press the "UP"button on the hidden menu scroll buttons.
c) The next counter is the "VEND TOTAL"counter. This counter can only be viewed
and it is not possible to reset it at this point. To scroll to the next counter, press the
"UP"button on the hidden menu scroll buttons.
d) The next counter to be displayed is the "VEND TOTAL RESET"counter (resettable).
Press the “START”button to reset, if needed.
e) The next counter to be displayed is the "TOTAL/SELECTION"counter. Press the
“START”button to reset the counters.
A confirmation message will appear after “START”is pressed. To reset the
counters, press “START”again. To cancel the reset, press the “COFFEE”button.
f) The next counter to be displayed is the "FREE VEND TOTAL"counter. Press the
“START”button to reset, if needed.
CASH BOX
TOTAL= $XXXX.XX
Note:
While in the “SET-
UP” mode, pressing
the “SET-UP” button
once again will exit
this mode and save
all changes made to
the programming.
Note:
The “VEND TOTAL”
counter can only be
reset by performing
a “TOTAL COUNTER
RESET”.
Tip:
The “VEND TOTAL”
counter can also be
viewed by pressing
the “COFFEE”, “50/50”
and “DECAF” buttons
simultaneously. It will
appear immediately
after the product
status is displayed.

SUPREMA - OPERATION & SERVICE MANUAL
Suprema - Operation & Service 02-2012 Page 13 of 58
‘Total per Selection’ Counter
When scrolling through the counters, you will see a counter that is called the
"TOTAL/SELECTION" counter. This counter will display the number of cups brewed for the
selection that corresponds to the LED's that are illuminated on the selection panel. To get a
counter reading, press the buttons that would correspond to the counter you need to access. At
this point, the LED's for your selection will be illuminated.
EXAMPLE:
If you need to know how many MEDIUM cups of DECAF, STRONG strength have been
brewed, press the "DECAF", "STRONG", and "MEDIUM CUP" buttons. The LED's will
illuminate and the display will show how many cups of this particular selection were
brewed. To check any other selection, press the corresponding buttons on the selection
panel.
As previously stated, the counter reading on the display corresponds directly to the LED's
illuminated on the selection panel. This allows for many counter combinations, again
depending on what is pressed and which LED's are illuminated on the selection panel. To
switch an LED off again, press the corresponding button a second time.
Coin Dispense
The "COIN DISPENSE" menu will only appear and function if the coffee maker is in "COIN"
mode. If the coffee maker is in "FREE" mode, this feature will be completely disabled and the
message will not appear on the display.
1. To dispense coins, scroll in the "SET-UP" until the display reads,
a) To dispense nickels, press the "COFFEE"button.
b) To dispense dimes, press the "50/50" button.
c) To dispense quarters, press the "DECAF"button.
Use this chart as a quick reference.
5¢
Press “COFFEE”
10¢
Press “50/50”
25¢
Press “DECAF”
COIN DISPENSE
5¢ 10¢ 25¢
Note1:
When accessed, this
counter will default to
illuminating the
“COFFEE” button, all
cup sizes and all
strengths to give a
vend reading for the
total cups of coffee.
Note2:
Pressing the “START”
button while in this
mode resets all the
cup and product
counters to zero. It is
not possible to
individually reset any
of these counters.
Tip:
By keeping the
corresponding button
pressed while
dispensing,and the
coin changer will
dispense three coins
per second to help
empty the coin tubes
more quickly.

SUPREMA - OPERATION & SERVICE MANUAL
Page 14 of 58 02-2012 Suprema - Operation & Service
Total Counter Reset
This software contains a special access code that enables the service person to reset all the
counters to zero, including the "VEND TOTAL" counter. This operation should be performed
before a unit is re-installed in the field.
1. To perform a "TOTAL COUNTER RESET",
a) Switch the power to the coffee maker "OFF" (switch is at the rear of the unit).
b) Press the "SET-UP" mode button on the inside door panel and keep it depressed.
c) With "SET-UP" mode button pressed, switch power to coffee maker "ON".
d) The following message will now appear on the display,
e) Enter the "TOTAL COUNTER RESET" access code (described below).
" Total Counter Reset " Access Code
The following is the factory preset "TOTAL COUNTER RESET" access code - press the following
in the sequence outlined below;
Once the access code has been entered, a counter will appear on the top left of the display, and
will quickly increment from 0 to 255. When the reset is complete, the unit will automatically
exit to the “standby” mode, and the internal light will remain “ON”temporarily. It is now
necessary to press the “START”button for the brewer to cycle to re-establish its home position.
ENTER ACCESS
CODE:
1
COFFEE
2
MILD STRENGTH
3
LARGE CUP
4
MEDIUM CUP
5
SMALL CUP

SUPREMA - OPERATION & SERVICE MANUAL
Suprema - Operation & Service 02-2012 Page 15 of 58
Set-Up Mode & Access Code
After scrolling past all of the counters, an access code is required to get into the "SET-UP"
section of the software. This section allows changes to be made to the computer programming.
The procedures are outlined below.
1. Enter the factory pre-set access code.
a) Factory pre-set access code - press the following in the sequence outlined below;
b) The message on the display will now read,
2. The "SET-UP" mode has now been accessed, and changes can be made.
a) The following is the sequence of the settings that appear when you scroll through
the "SET-UP" mode. Please note that there are some differences between the
Regular software version and the APP software version.
Suprema Model Type
REG
APP
PRODUCT ON/OFF
●
SET PRODUCT
●
●
SET WATER
●
●
SET PRICE
●
●
ENABLE SWITCHES
●
●
SET DEFAULT
●
●
SET TOP PAUSE
●
●
SET BOTTOM PAUSE
●
●
MAXIMUM CUPS FOR CARAFE
●
●
FREQUENCY OF MESSAGES
●
SERVICE COUNTER
●
BOTTOM PAUSE DELAY
●
●
MESSAGES ON / OFF
●
●
FREE VEND KEY SWITCH
●
●
SET REWIND
●
●
CHOCO PUMP CYCLES
●
●
DOUBLE-CUP SET-UP
●
●
PRESS & HOLD HOT WATER
●
●
SET TEMPERATURE
●
●
CUSTOM MESSAGES
●
LANGUAGE
●
PRESS-HOLD WATER
●
●
SET WATER LEVEL
●
●
SET POWDER MIX
●
SET POWDER BEV.
●
WATER MAX. BREWER
●
●
BREWER SELECTION
●
●
LOCK COUNTERS
●
FORCE VEND
●
●
● Available Feature
1
COFFEE
2
50/50
3
DECAF
4
HOT WATER
PRODUCT ON/OFF
PRESS <START>
Tip:
To bypass the
counters and go
directly to the access
code menu, press the
hidden “DOWN”
menu scroll button,
after pressing the
“SET-UP” button.

SUPREMA - OPERATION & SERVICE MANUAL
Page 16 of 58 02-2012 Suprema - Operation & Service
Reminder: The “INCREASE” (+) and “DECREASE” (-) buttons are located to the right of the “START”
button, and the “MENU SCROLL UP” and “MENU SCROLL DOWN” buttons are located to the
left of the “START” button. See page 4 for illustration.
Product ON/OFF
This feature allows you to run a complete coffee or hot chocolate cycle (including the two
pauses) without any product being dispensed (no coffee or chocolate). This will allow you to
manually test brew different coffee blends for the customer to taste. The customer can then
decide which blend he prefers. To use it as a test brew cycle, simply weigh and manually pour
the coffee grounds into the brew chamber, and press the "START" button. This procedure can be
repeated if you need to test brew another blend.
1. To switch the product OFF, press the "UP" button on the hidden menu scroll buttons
and scroll until the following message appears,
a) Press the "START" button to enter set mode.
b) Switch the product "OFF" or "ON" by using the hidden setting adjustment buttons.
Press the "UP" button to toggle it "OFF" or "ON".
c) To exit the "PRODUCT on-off" mode and proceed to the next setting, press the
hidden "UP" or "DOWN" scroll buttons.
Setting Products
1. To adjust product settings, press the "UP" button on the hidden menu scroll buttons
and scroll until the following message appears,
a) Press the "START" button to enter the set mode.
b) At this point, you can now select the product settings for any cup size, product and
product strength by pressing the appropriate buttons on the selection panel. The
time setting displayed will correspond to the LED's that are illuminated.
c) Using the hidden setting adjustment buttons, increase or decrease the timing for the
product.
d) To exit the "SET PRODUCT" mode and proceed to the next setting, press the hidden
"UP" or "DOWN" scroll buttons.
PRODUCT ON/OFF
PRESS <START>
SET PRODUCT
PRESS <START>
Note:
If the product is
switched “OFF”, it
remains off until you
enter the “SET-UP”
mode to switch it
“ON” again. Please
make sure it is
switched “ON”
before you leave the
account.
Note:
The minimum
allowable setting
for all products is
0.5 seconds, and
the maximum is
8.0 seconds.
Tip:
While in the “SET
PRODUCT” or “SET
WATER” menus, you
can test the product
and water quantities
by pressing the
“START” button. The
product or water
tested will correspond
to the LED’s
illuminated on the
front selection panel.
Make certain you
have something ready
to catch the coffee
grounds or water that
will be dispensed.

SUPREMA - OPERATION & SERVICE MANUAL
Suprema - Operation & Service 02-2012 Page 17 of 58
Setting Water
1. To adjust water settings, press the "UP" button on the hidden menu scroll buttons
and scroll until the following message appears,
a) Press the "START" button to enter the set mode.
b) At this point, you can now select the water settings for any cup size and product by
pressing the appropriate buttons on the selection panel. The time setting displayed
will correspond to the cup size and product LED's that are illuminated.
c) Using the hidden setting adjustment buttons, increase or decrease the timing for the
water.
d) To exit the "SET WATER" mode and proceed to the next setting, press the "UP" or
"DOWN" scroll buttons.
Setting Prices
To operate this equipment in “COIN” mode, an optional Coinco 9300 series coin changer must
be installed. This changer can be purchased from your local Coinco retailer. Installation
instructions for the coin changer and pricing decals can be found on page 57 of this manual.
1. To adjust price settings, press the "UP" button on the hidden menu scroll buttons
and scroll until the following message appears,
a) Press the "START" button to enter the set mode.
b) At this point, you can now select the price setting for any cup size and product by
pressing the appropriate buttons on the selection panel. The price setting displayed
will correspond to the LED's that are illuminated.
c) Using the hidden setting adjustment buttons, increase or decrease the price.
d) To exit the "SET PRICE" mode and proceed to the next setting, press the "UP" or
"DOWN" scroll buttons.
SET WATER
PRESS <START>
SET PRICE
PRESS <START>
WARNING:Do not press the “START” button to exit this mode as it will do a
test cycle and dispense water. This does not apply to “CAFE MOCHA”, as there
is no test cycle for this product.
Note1:
The minimum
allowable setting for
water is 0.5 seconds,
and the maximum is
8.0 seconds for
coffee water and
20.0 seconds for
"HOT WATER".
Note2:
When adjusting the
water level for the
“CAFE MOCHA”, only
the chocolate valve
timing is adjusted.
The coffee valve
timing remains
unchanged as it is
calculated by the
microprocessor.
Note:
The maximum
allowable price
setting is $12.75.
This is the maximum
setting per cup, as
well as for a
complete carafe.

SUPREMA - OPERATION & SERVICE MANUAL
Page 18 of 58 02-2012 Suprema - Operation & Service
Enabling Switches
1. To enable the switches and functions that are required, press the "UP" button on the
hidden menu scroll buttons and scroll until the following message appears,
a) Press the "START" button to enter set mode.
b) On initial set-up, all the LED's will be illuminated at this point, meaning that
everything is switched "ON". To disable certain features, press the button that
corresponds to that feature and the LED will switch off. That feature has now been
disabled.
c) Repeat this procedure for any other feature that you require to cancel.
d) Press the “start” button to save any changes that were made.
e) To exit the "ENABLE SWITCHES" mode and proceed to the next setting, press the
hidden "UP" or "DOWN" scroll buttons.
When a selection is disabled and the customer presses the corresponding button for that
selection, the following message appears on the display,
Canceling Individual Settings
It is possible to cancel any individual setting on the selection panel (providing this setting can
be priced). For example, if all three cup sizes are required for coffee, but the customer requires
only a large cup for hot chocolate, it is possible to cancel only the small and medium cups for
hot chocolate, without canceling the large cup.
1. To cancel individual selections, press the "UP" button on the hidden menu scroll
buttons and scroll to the "SET PRICE" menu.
a) Press the "START" button to enter the set mode.
b) At this point, you can now select the price setting for the cup size and product you
want to cancel by pressing the appropriate buttons on the selection panel. The price
setting displayed will correspond to the LED's that are illuminated.
c) Decrease the price to zero by pressing the hidden "DOWN" button.
d) Once the price is at zero, press the hidden "DOWN" button once more. The price
will disappear, and a "DISABLED" message will appear on the second row of the
display. This indicates that this particular product is now canceled.
e) Repeat this procedure for another product, or press the "UP" or "DOWN" scroll
buttons to access another menu.
ENABLE SWITCH
PRESS <START>
SELECTION
NOT AVAILABLE
Note:
Selections with
illuminated LED’s
will be active, and
those without
illuminated LED’s
will be disabled.
Check the settings
before exiting and
once verified, press
the “START” button
to save them.
Note:
Only selections that
can be priced may
be canceled.
Once canceled, a
“SELECTION NOT
AVAILABLE” message
appears on the
display when the
product is selected
by the customer.

SUPREMA - OPERATION & SERVICE MANUAL
Suprema - Operation & Service 02-2012 Page 19 of 58
Setting the Default
1. To program the default settings, press the "UP" button on the hidden menu scroll
buttons and scroll until the following message appears,
a) Press the "START" button to enter the set mode.
b) The LED's that correspond to the current default setting will now be illuminated.
c) To change the default, press the buttons on the selection panel for the new default
settings. The LED's that are illuminated will now become the new default settings.
d) In no default is set, the LED’s on the selection panel will light and scroll until the
user selects one. This applies for the products, strengths, and cup sizes, therefore
three selections will be required by the user.
e) To exit the "SET DEFAULT" mode and proceed to the next setting, press the "UP" or
"DOWN" scroll buttons.
Setting the Top Pause
The “TOP PAUSE” occurs when the brewer is at top dead center, and is before the regular pause.
When the piston reaches top dead center in the cylinder, the brewer will pause for the amount
of time set in this menu, to allow the coffee and water to steep (mix together). The higher the
"TOP PAUSE" is set to, the stronger the cup of coffee that is brewed by the equipment.
1. To set the "TOP PAUSE" setting, press the "UP" button on the hidden menu scroll
buttons and scroll until the following message appears,
a) Press the "START" button to enter the set mode.
b) At this point, select the cup size by pressing the appropriate buttons on the
selection panel. The "TOP PAUSE" setting displayed will correspond to the cup size
that is illuminated.
c) Using the hidden setting adjustment buttons, increase or decrease the timing for the
"TOP PAUSE".
d) To exit the "SET TOP PAUSE" mode and proceed to the next setting, press the "UP"
or "DOWN" scroll buttons.
SET DEFAULT
PRESS <START>
SET TOP PAUSE
PRESS <START>
Note:
The minimum “TOP
PAUSE” setting is
2.0 seconds.

SUPREMA - OPERATION & SERVICE MANUAL
Page 20 of 58 02-2012 Suprema - Operation & Service
Setting the Bottom Pause
The bottom pause stops the piston before the pour spout area, creating a vacuum and allowing
time for the liquid coffee to be pulled through the coffee grounds and the filter. If this setting is
too low, it may create brewer flooding problems as there is not enough time to draw all the
liquid from the brew chamber into the brewer cylinder.
1. To adjust the "BOTTOM PAUSE", press the "UP" button on the hidden menu scroll
buttons and scroll until the following message appears,
a) Press the "START" button to enter the set mode.
b) At this point, you can now select the cup size and product by pressing the appropriate
buttons on the selection panel. The "BOTTOM PAUSE" setting displayed will correspond
to the LED's that are illuminated.
c) Using the hidden setting adjustment buttons, increase or decrease the timing for the
"BOTTOM PAUSE".
d) To exit the "SET BOTTOM PAUSE" mode and proceed to the next setting, press the "UP"
or "DOWN" scroll buttons.
Setting the Maximum Number of Cups per Carafe
This feature allows you to set the maximum number of cups to be brewed in a carafe cycle
(minimum 3 to maximum 10). When the carafe feature is selected, it will start at the maximum
number of cups set in this menu, and decrement by one cup every time the carafe button is
pressed.
1. To set the maximum number of cups for a carafe, press the "UP" button on the
hidden menu scroll buttons and scroll until the following message appears,
a) Press the "START" button to enter the set mode.
b) Using the hidden setting adjustment buttons, increase or decrease the maximum
number of cups that need to be set for the carafe.
c) To completely disable the carafe feature, change the setting to “OFF”.
d) To exit the "MAX CUPS/CARAFE" mode and proceed to the next setting, press the
"UP" or "DOWN" scroll buttons.
When the carafe is selected, a confirmation message will appear on the display. This
confirmation is there to avoid selecting the carafe by accident. When this message appears, you
will have to press the carafe button once more, and the cycle will commence. To cancel a carafe
cycle that is already in progress, press the "START" button and it will exit after the cup that is
already in progress has been brewed.
SET BOTTOM PAUSE
PRESS <START>
MAX CUP/CARAFE
PRESS <START>
Tip:
It is possible to adjust
a separate "BOTTOM
PAUSE" for both coffee
and decaf, if needed.
Note1:
By default, the carafe
feature is disabled. If
it is enabled, the
maximum number of
cups that can be
programmed for a
carafe is 10.
Note2:
If the carafe feature is
enabled, it overrides
the double-cup
feature (only if
double-cup is set on
the large cup).
Table of contents
Popular Kitchen Appliance manuals by other brands

Vicko
Vicko JC-603 instruction manual

Tower Hobbies
Tower Hobbies T13004 Safety and instruction manual

Cecilware
Cecilware SG-1LG Operation manual

Krampouz
Krampouz Saveur double Instructions for use

Trisa electronics
Trisa electronics 7738.7010 Instructions for use

Scarlett
Scarlett SC-JE50S53 instruction manual