Vmarker IR-pen Touch User manual

MANUAL (EN)
HANDLEIDING (NL)
IR-pen Touch

version: woensdag 14 september 2011
EN
1 General
This manual is still a work in progress, it will be regularly updated. You can e mail any
suggestions to further improve this manual to: ludwig@vmarker.org.
2 Setup
The Vmarker IR pen Touch requires 2 AA batteries. The battery holder is very tight to
prevent loosing the batteries.
Before placing batteries or before removing them, please switch off the IR pen.
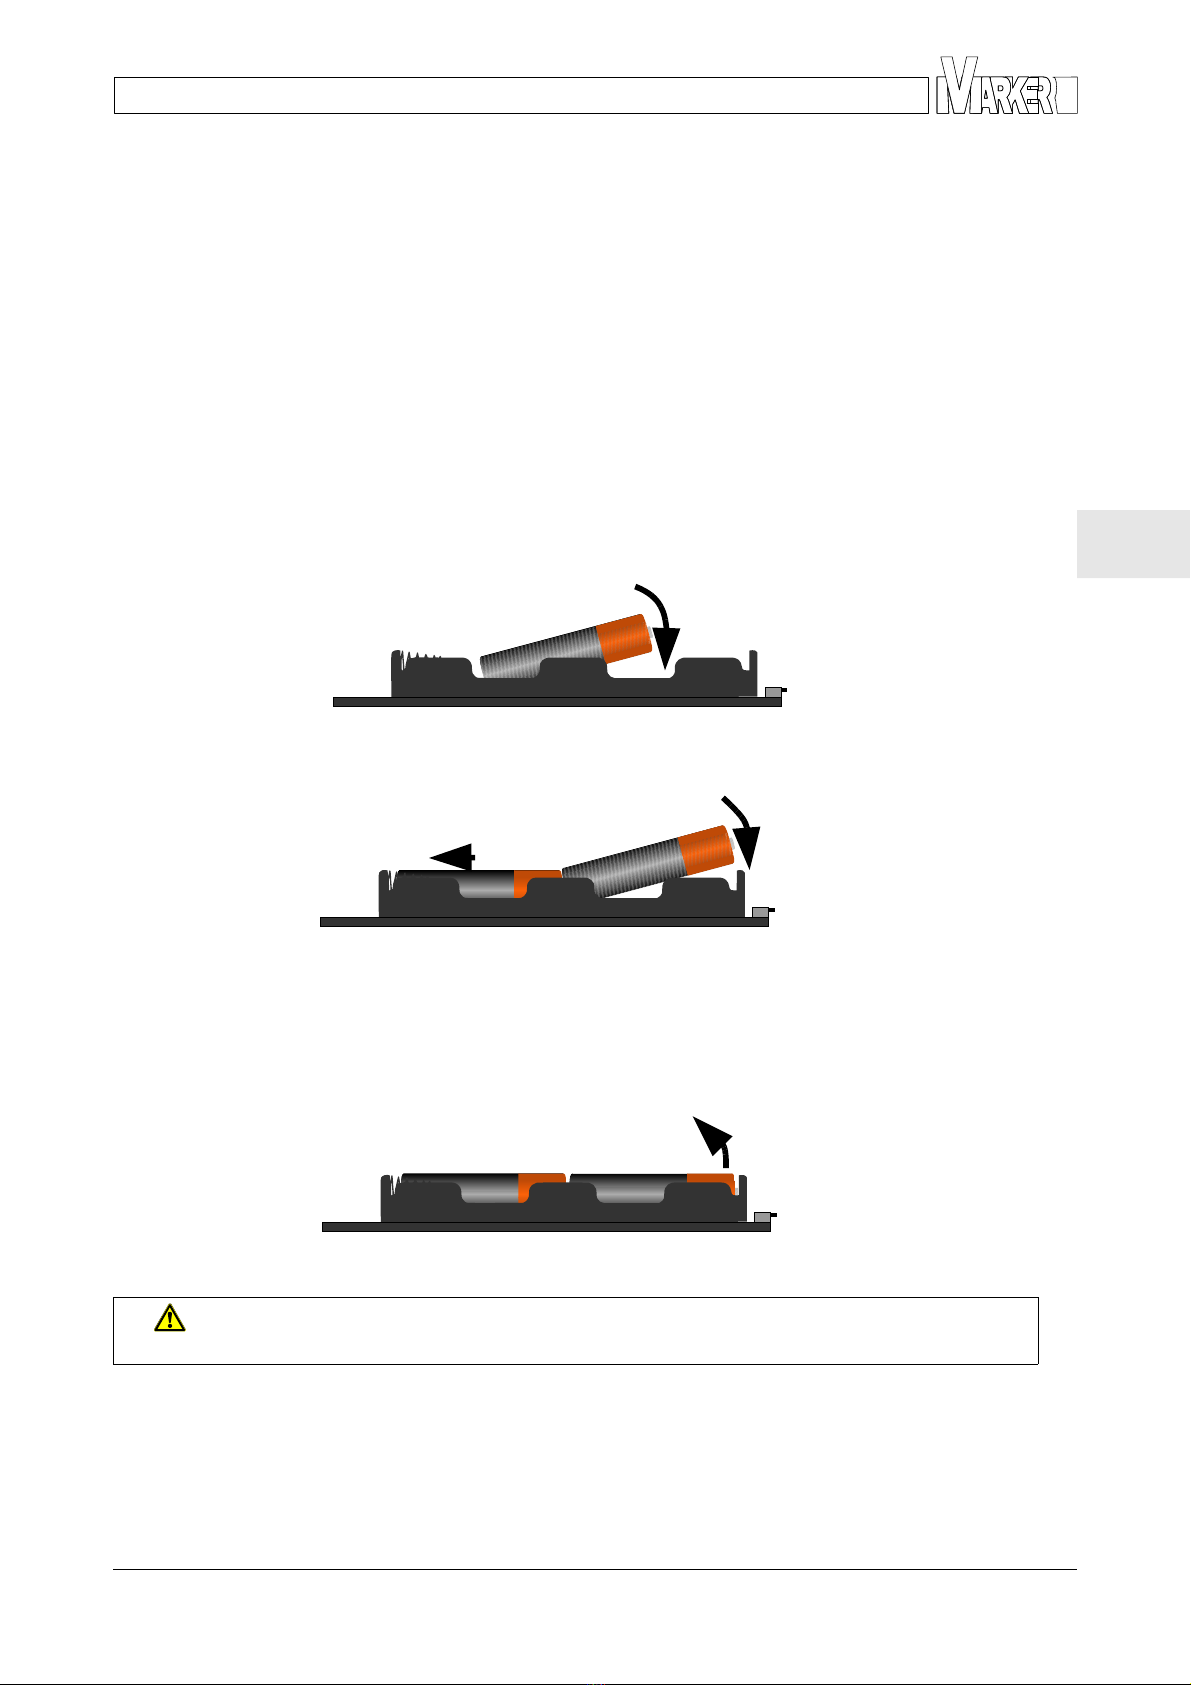
2.1 How to place the batteries
When placing batteries in your Vmarker IR pen Touch, you best put the negative ( )
terminal of the battery in the holder first and then tilt the battery into his place.
Shift the first battery to the spring contact to place the second battery. Again by placing
the negative (–) terminal first and then tilt the second battery in to his place.
2.2 How to remove the batteries
To remove the batteries you reverse the order, you first remove the battery on the positive
(+) terminal by tilting it. Then the remaining battery also by tilting the positive (+) terminal
out of the holder.
ATTENTION: Don't forget to switch off the IR pen before placing of removing
batteries.
Vmarker IR sensor USB 1
EN
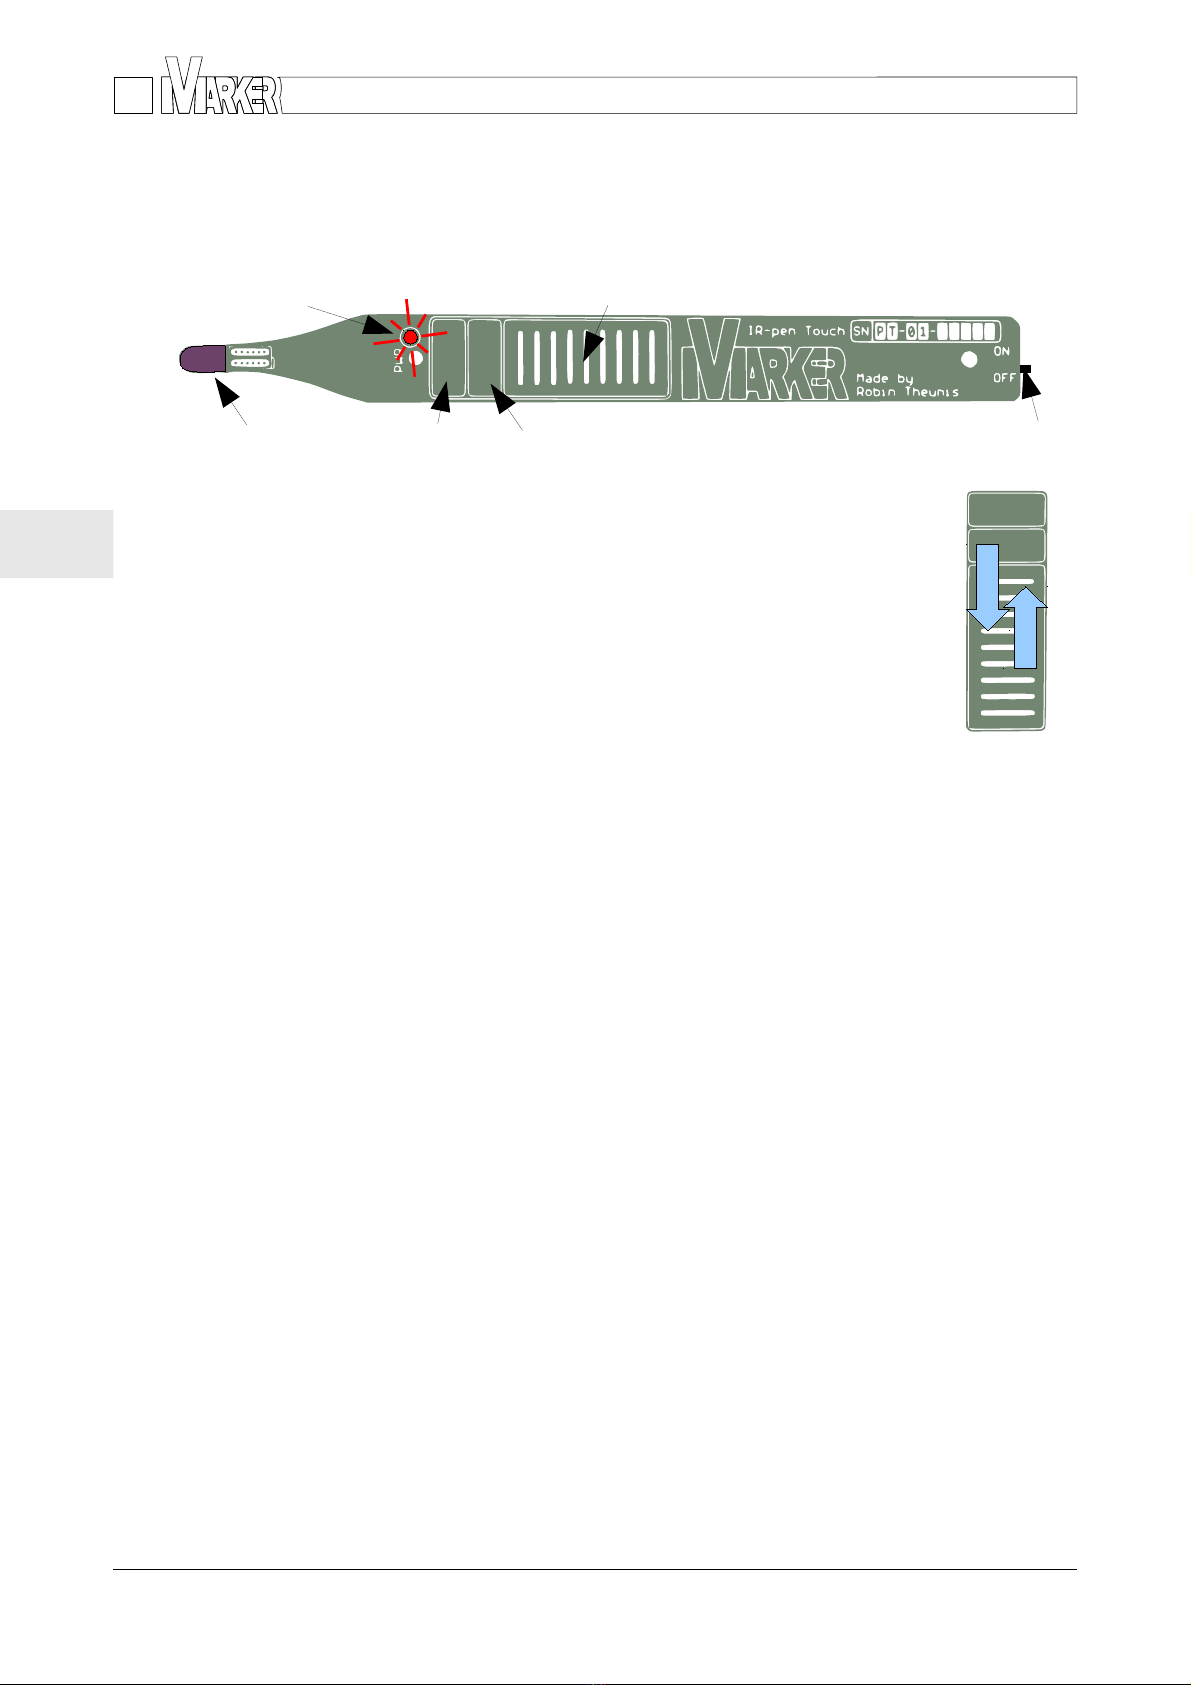
3 How to use the Vmarker IR-pen Touch
If fully charged batteries are installed you can switch the IR pen on. The on/off switch is
placed on the back of the IR pen.
The IR pen has 3 touch pads:
–one touch pad for the left mouse button
–a second touch pad for the right mouse button
–and a third touch pad to have the scroll function of the mouse. You
have to move your finger over this touch pad
By moving your finger over the touch pad, you will get the same action as the
scroll button of a scroll mouse.
(The first IR pens are programmed with reversed scroll function: by moving
your finger down over the touch pad the contents will also move downwards, and vice
versa.
When touching the touch pads the IR LED will be lit. Because you can't see this infra red
light with the naked eye, a second RED LED will be lit too.
If you use the IR pen when the IR LED is on the projected image, the mouse cursor will be
position accordingly. (When calibrated correctly of course.)
If you touch the IR pen outside the projected image, the mouse cursor position will not be
moved. But yet the mouse click is generated. This allows you to manipulate an
presentation like you do with a simple remote control.
2 Vmarker IR sensor USB
on/off switch
RED LED
IR LED Left mouse button Right mouse button
Scroll button

EN
Specifications
•The Vmarker IR pen Touch™ has a ATMEL ATTINY861 processor 8Mhz with 8kB
flash, 512 Bytes RAM and 512 Bytes EEPROM.
•The touch pads are measured by the processor. There are three touch area's, one
for the left mouse button, one for the right mouse button and one for the scroll
function.
•With a touch of the surfaces, the IR LED is then controlled by the processor in a
way the Vmarker IR sensor recognizes the corresponding function.
•An integrated circuit regulates the current to the IR LED.
•A second red LED indicates when the IR LED is switched on.
•The IR pen is powered by two AA batteries. Its possible to use rechargeable
batteries.
•With an on/off switch it is possible to switch off the IR pen completely.
5 Trouble shooting
5.1 The IR-pen does not function
The Vmarker IR sensor does not respond to the IR pen. Possible the Vmarker IR pen
does not work properly. Verify that the IR LED of the IR pen works. You can do this by
using a digital camera, from your mobile phone for example, and look with this at the IR
LED of the IR pen. When you touch one of the touch pads you can clearly see the IR LED
light up when you clearly see the button or touch button control.
When this is not the case possible reasons are:
•The IR pen is not enabled.
•The batteries are wrong, check the polarity of the batteries.
•The batteries are empty, replace the batteries.
•The oriëntaton of the IR pen to the surface is not good. Adjust the angle of the IR
pin towards the surface, also make sure there is nothing between the IR LED and
the Vmarker IR sensor.
Vmarker IR sensor USB 3

EN
6 Safety instructions
6.1 GENERAL
This product is NOT a toy. Only to be used under adult supervision.
This product is meant to be used in an Interactive White Board Setup. Please read the
manual completely before using this product.
You can download the operations manual from the website: http://www.vmarker.org.
6.2 MAINTENANCE:
Clean only with a dry cloth. Do not use cleaning solvents or abrasives.
6.3 BATTERY PRECAUTIONS
WARNING:
Leakage of battery fluid can cause personal injury as well as damage to your Vmarker IR
pen Touch™. If battery leakage occurs, thoroughly wash the affected skin and clothes.
Keep battery fluid away from your eyes and mouth. Leaking batteries may make popping
sounds.
To avoid battery leakage:
•Do not mix used and new batteries (replace all batteries at the same time).
•Do not mix battery types and do not mix different brands of batteries.
•Do not leave batteries in the IR pen for long periods of non use.
•Do not recharge alkaline or non rechargeable batteries.
•Do not put the batteries in backwards. Make sure that the positive (+) and negative
( ) ends are facing in the correct directions. Insert the negative end first. When
removing batteries, remove the positive end first.
•Do not use damaged, deformed or leaking batteries.
•Do not expose batteries to heat or dispose of batteries in a fire.
6. DISPOSAL
ATTENTION:
At the end of this product's life, please do not dispose this product in your
general household waste. Instead, please dispose the product separately in
accordance with your local recycling laws and regulations.
Batteries have to be removed from the Vmarker IR pen Touch™ before
disposing the unit.
Discarding batteries in your general household wast can be harmful to the
environment. When disposing of the batteries, follow appropriate local
guidelines and regulations.
4 Vmarker IR sensor USB
NL
1 Algemeen
Deze handleiding is nog volop in ontwikkeling en zal regelmatig geüpdatet worden.
Je kan je suggesties voor betering van deze handleiding e mailen naar
ludwig@vmarker.org.
2 Ingebruikname
De Vmarker IR pen Touch heeft 2 AA batterijen nodig. De batterijhouder is nauwsluitend
gemaakt om te vermijden dat de batterijen gemakkelijk zouden loskomen.
Alvorens je de batterij in de batterijhouder stopt of verwijderd schakel je de pen best uit.
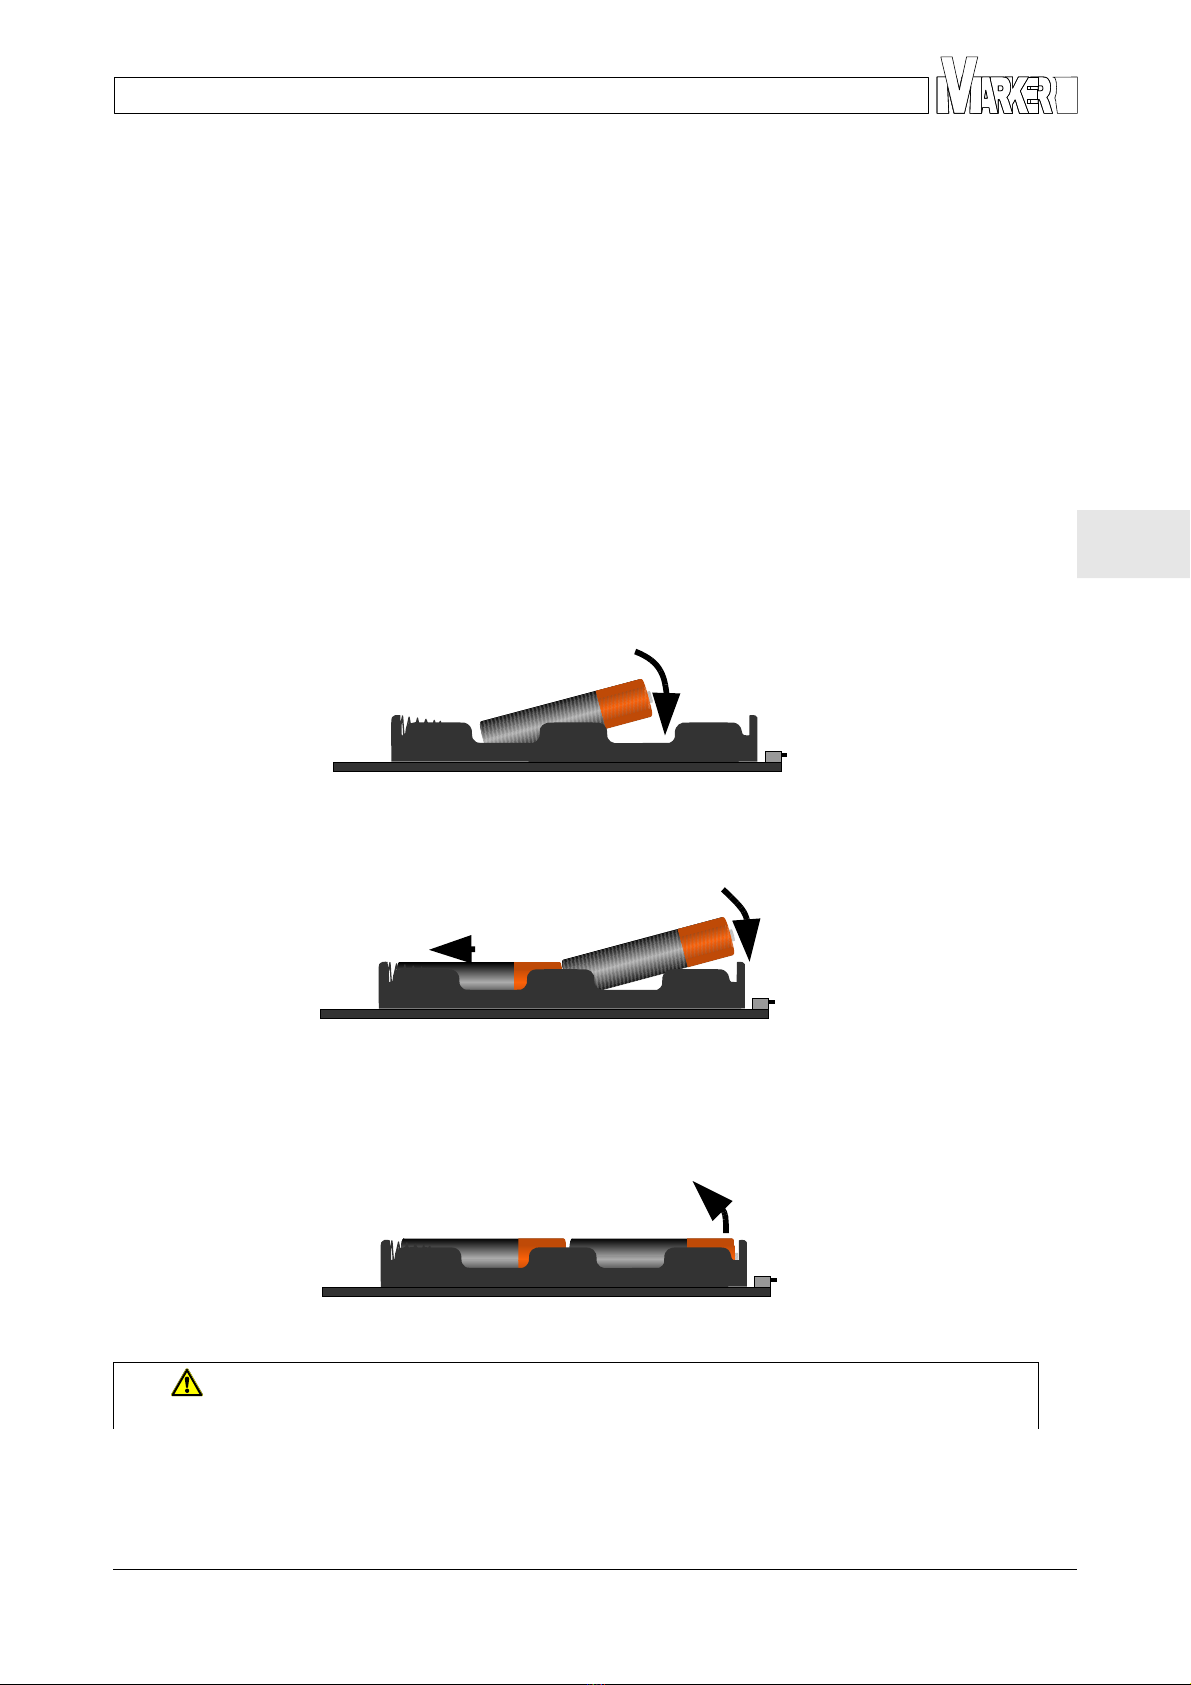
2.1 Batterijen plaatsen in de IR-pen
Door de nauwsluitende batterijhouder is het moeilijker om de batterijen te vervangen. Het
best stop je eerst de negatieve (–) pool van de batterij in de houder en kantel je dan de
batterij zodat de batterij volledig in de houder zit.
De eerste batterij schuif je vervolgens met de negatieve pool tegen de veer om dan de
tweede batterij de plaatsen, opnieuw de negatieve (–) pool eerst. Tegen de plus van de
andere batterij dus. Ook deze batterij kantel je dan in de houder.
2.2 De batterijen van de IR-pen verwijderen
Om de batterijen te verwijderen ga je het gemakkelijkst omgekeerd te werk. Je verwijdert
dus best eerst de batterij aan de plus (+) pool van de batterijhouder.
OPGELET: Vergeet de IR pen niet uit te schakelen tijdens het plaatsen of
verwijderen van de batterijen.
Vmarker IR sensor USB 1

NL
3 Gebruik
Als de batterijen geplaatst zijn kan je de pen inschakelen. Aan de achterkant bevindt zich
hiervoor een aan/uit schakelaar.
Op de pen zijn er 3 aanraakvlakken:
–het eerste aanraakvlak komt overeen met de linker muis toets
–het tweede aanraakvlak komt overeen met de rechter muis toets
–en het derde is een aanraakvlak om te 'scrollen'. Je scrolt door met de
vinger over het vlak te bewegen
De beweging over het Scrol vlak reageert op dezelfde manier als de scrol
knop van een scrol muis
De eerste IR pennen zijn uitgeleverd met omgekeerde functionaliteit: door
met de vinger over het vlak naar beneden te bewegen, beweegt bij deze pennen de
inhoud ook naar beneden, en omgekeerd.
Bij het aanraken van de aanraakvlakken zal de IR LED oplichten, omdat je infrarood licht
niet kan zien met het blote oog, zal ook de rode LED oplichten.
Als je de IR pen over het geprojecteerde beeld beweegt, zal de cursor volgen.
Als je de IR pen buiten beeld gebruikt, wordt wel een muisklik herkend maar wordt de
cursor niet verplaatst. Op die manier kan je de IR pen ook gebruiken als afstandbediening
om een presentatie te bedienen bijvoorbeeld.
2 Vmarker IR sensor USB
aan/uit schakelaar
RODE LED
IR LED Linker muis knop Rechter muis knop
Scrol vlak

NL
Specificaties
•De Vmarker IR pen Touch™ heeft een ATMEL ATTINY861 processor 8Mhz met 8kB
flash geheugen 512 Bytes RAM en 512 Bytes EEPROM.
•De aanraakvlakken worden door de processor gemeten. Er zijn drie aanraak
gebieden, één voor de linker muis knop, één voor de rechter muis knop en een
voor de scroll functie.
•Bij een aanraking van de vlakken wordt de IR LED door de processor aangestuurd.
•Via een geïntegreerde schakeling wordt er voor een constante stroom naar de IR
LED gezorgd.
•Een tweede rode LED gaat samen met de IR LED aan zodat het aansturen van de
infrarode LED 'zichtbaar' wordt.
•Twee AA batterijen zorgen voor de voeding van de IR pen. Het is dus mogelijk om
herlaadbare batterijen te gebruiken.
•Via een aan/uit schakelaar kan men de IR pen uitschakelen.
5 Problemen oplossen
5.1 De IR-pen functioneert niet goed
De Vmarker IR sensor reageert niet op de IR pen. Mogelijk werkt de IR pen niet naar
behoren. Controleer of de IR LED van je IR pen functioneert. Je kan dit door met een
digitale camera, van je GSM bijvoorbeeld naar de IR LED van de IR pen te kijken. Je moet
de IR LED duidelijk zien oplichten als je de drukknop of de touchtoets bediend.
Als dit niet het geval is zijn mogelijke oorzaken hiervan:
•De IR pen is niet ingeschakeld.
•De batterijen zitten verkeerd, controleer de polariteit van de batterijen.
•De batterijen zijn leeg, vervang de batterijen.
•De houding van de IR pen is niet goed, zorg dat er zich niets tussen de IR LED en
de Vmarker IR sensor bevindt, pas de hoek van de IR pen t.o.v. het oppervlak aan.
Vmarker IR sensor USB 3
NL
6 Veiligheidsinstructies
6.1 ALGEMEEN
Dit toestel is geen speelgoed. Gebruik van dit toestel door kinderen alleen onder toezicht
van een volwassene.
Het toestel is bedoeld voor gebruik in een interactief Whiteboard opstelling. Gelieve de
handleiding volledig te lezen alvorens de Vmarker (IWB) te gebruiken.
U kan de gebruikershandleiding downloaden van de website: http://www.vmarker.be.
6.2 ONDERHOUD:
Reinig de Vmarker toestellen enkel met een droge doek. Gebruik geen oplosmiddelen of
schuurmiddelen.
6.3 VOORZORGSMAATREGELEN
WAARSCHUWING:
Uitgelopen batterijvloeistof kan persoonlijke letsels en/of schade aan het toestel
veroorzaken. Als een batterij lekt, was dan grondig aangetaste huid en kleding. Zorg
ervoor dat in geen geval batterijvloeistof in ogen of mond terecht komen, spoel de ogen
grondig schoon met water, raadpleeg onmiddellijk een arts. Lekkende batterijen maken
meestal plof geluiden.
Batterijlekkage vermijden:
•Plaats geen gebruikte batterijen samen met nieuwe batterijen (vervang alle
batterijen tegelijkertijd).
•Plaats geen batterijen van verschillende types of van verschillende merken
tegelijkertijd in de batterijhouder.
•Laat de batterijen niet in de IR pen zitten, als deze voor langere tijd niet wordt
gebruikt.
•Probeer niet oplaadbare batterijen niet op te laden.
•Plaats batterijen niet achterstevoren (de plus en minpool moeten in de juiste
richting wijzen). Plaats eerst de minpool van de batterij.
•Gebruik geen beschadigde, vervormde of lekkende batterijen.
•Stel batterijen niet bloot aan hitte en werp ze nooit in vuur.
6. MILIEU
ATTENTIE:
Gooi het defecte toestel niet bij het gewone huisvuil. Gelieve in de plaats
daarvan het toestel gescheiden weg te werpen, volgens de locale
procedures en reglementeringen.
Alvorens de IR pen te recycleren moeten batterijen verwijderd worden,
deze moeten apart gerecycleerd worden.
Het is schadelijk voor het milieu om batterijen samen met het huisvuil weg
te gooien. Volg de instructies van de lokale overheid bij het weggooien van
de batterijen.
4 Vmarker IR sensor USB
Table of contents
Languages:
Popular Accessories manuals by other brands

Bontrager
Bontrager AIR RUSH REGULATOR manual

Tibhar
Tibhar ROBO PRO MASTER instruction manual

Bresser
Bresser Vixen SXD2 Equatorial Mount instruction manual

STEINEL PROFESSIONAL
STEINEL PROFESSIONAL HF 3360 Information manual

LEGRAND
LEGRAND DX2 Series user guide

Environmental Instruments
Environmental Instruments AQMesh operating manual


