Voca-Phone 4100 User manual
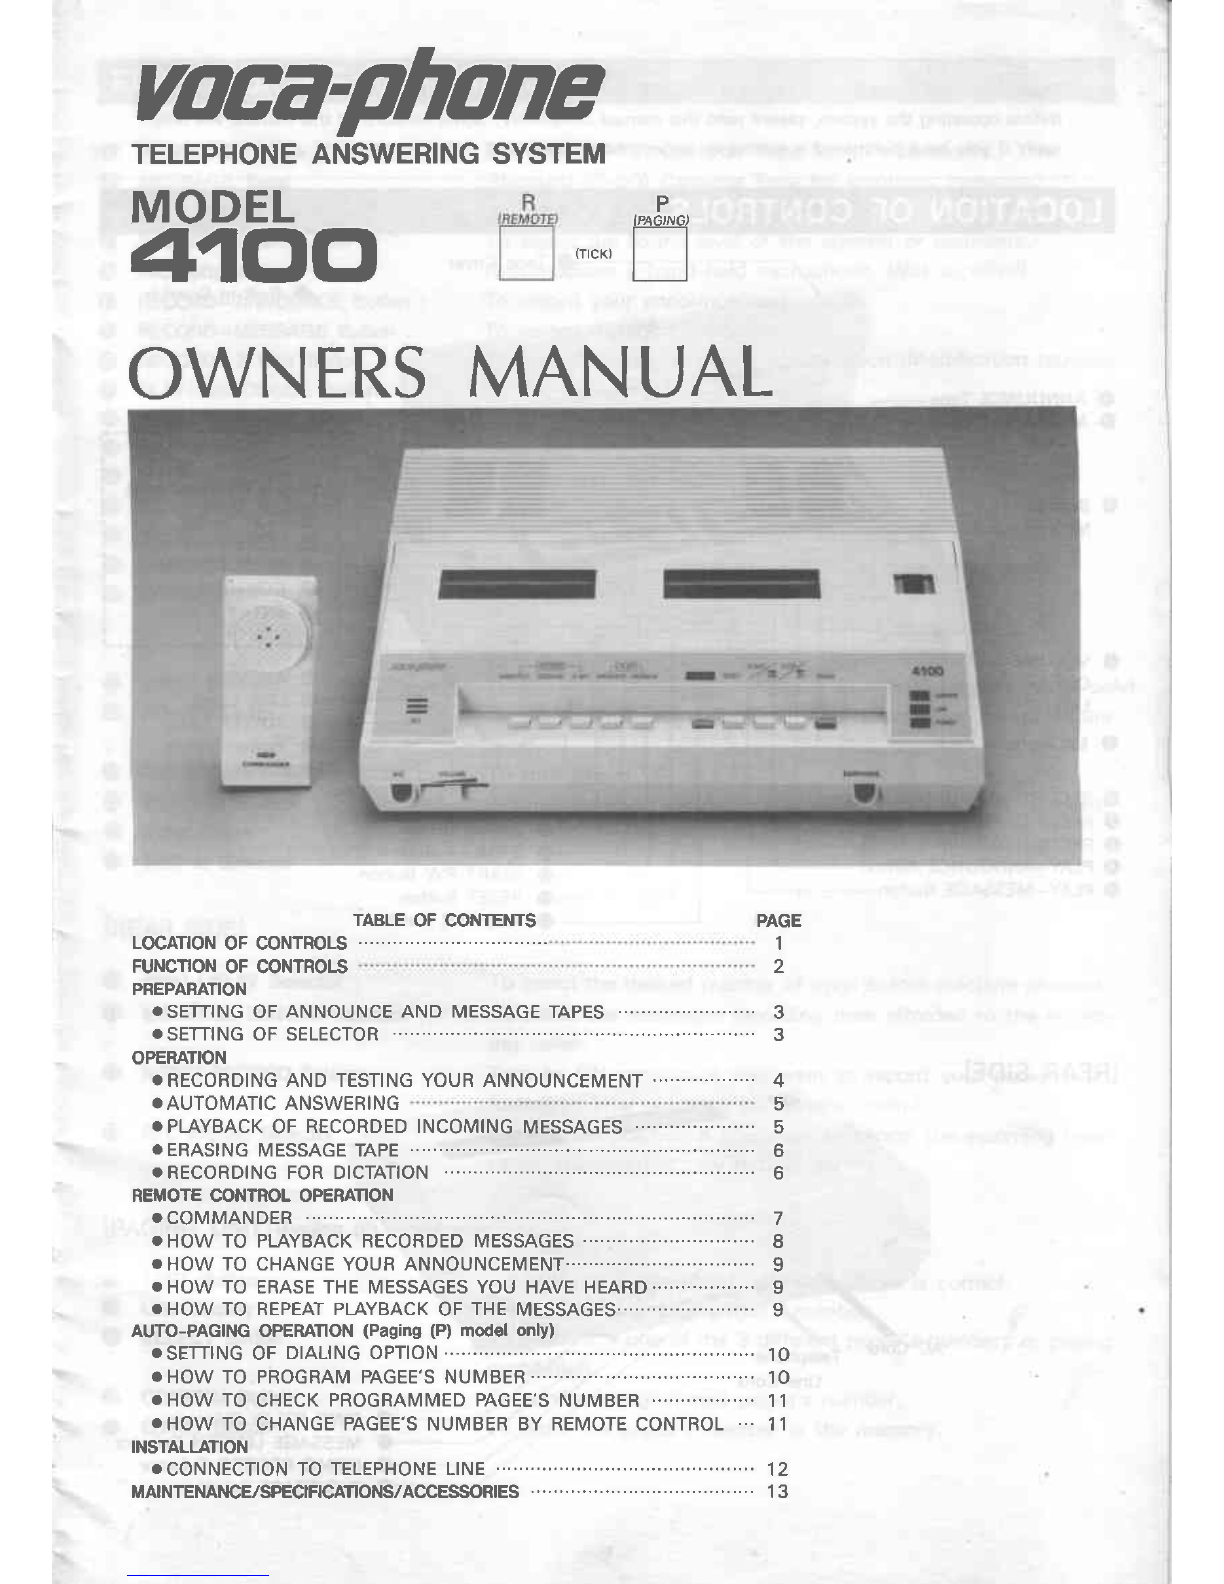
yotra-phone
TELEPHONEANSWERINGSYSTEM
MODEL
41o,o/
OWNERS
MANUAL
TABLEOF CONTENTS
P
IPAG]NG)
(rcK) | |
II
LOCATION
OF CONTROLS
FUNCNON
OFCONTROIS
PREPABATION
.SETTING
OF
ANNOUNCE
ANDMESSAGETAPES
........................
. SETTINGOF SELECTOR
OPERATION
. RECORDINGANDTESTINGYOURANNOUNCEMENT
."...............
.AUTOMATIC
ANSWEBING
. PLAYBACK
OF RECORDEDINCOMING
MESSAGES
. EBASING
MESSAGETAPE
................
. RECORDINGFORDICTATION
REMOTECONTROLOPERATION
. COMMANDER ..........................
7
. HOWTO PLAYBACKRECORDEDMESSAGES
..............................
I
. HOWTOCHANGEYOURANNOUNCEMENT........-.-...........
......'...
9
. HOWTO ERASETHEMESSAGESYOUHAVEHEARD
.........""..". 9
. HOWTO REPEATPLAYBACK
OF
THE
MESSAGES.............."........
9
AUTO-PAGINGOPERAnON
(Paging(P)modol
only)
.SETTTNG
OF
DTAL|NGOPTTON
............. ...............
10
. HOWTOPROGRAMPAGEE'SNUMBER ......"....'
10
. HOWTO
CHECK
PROGRAMMEDPAGEE'S
NUMBER
............"....
11
.HOW TO CHANGEPAGEE'SNUMBERBY REMOTE
CONTROL
... 11
INSTALLA'IION
.CoNNECTION
TO
TELEPHONEL|NE
..............
...... ........... 12
MATNTENANCE/SPECIF|CATIONS/ACCESSORTES
. . . . ............................. 13
PAGE
I
2
.t
4
5
5
o

Thank
you verymuchfor purchasing
a VOCATelephoneAnsweringSystem
Model
Beforeoperating
the system,
please
readthis manualcompletely.
Somesections
of
apply
if you have
purchased
a remoteor pager
model.{See
label
under
machine
)
4100.
this manualwill only
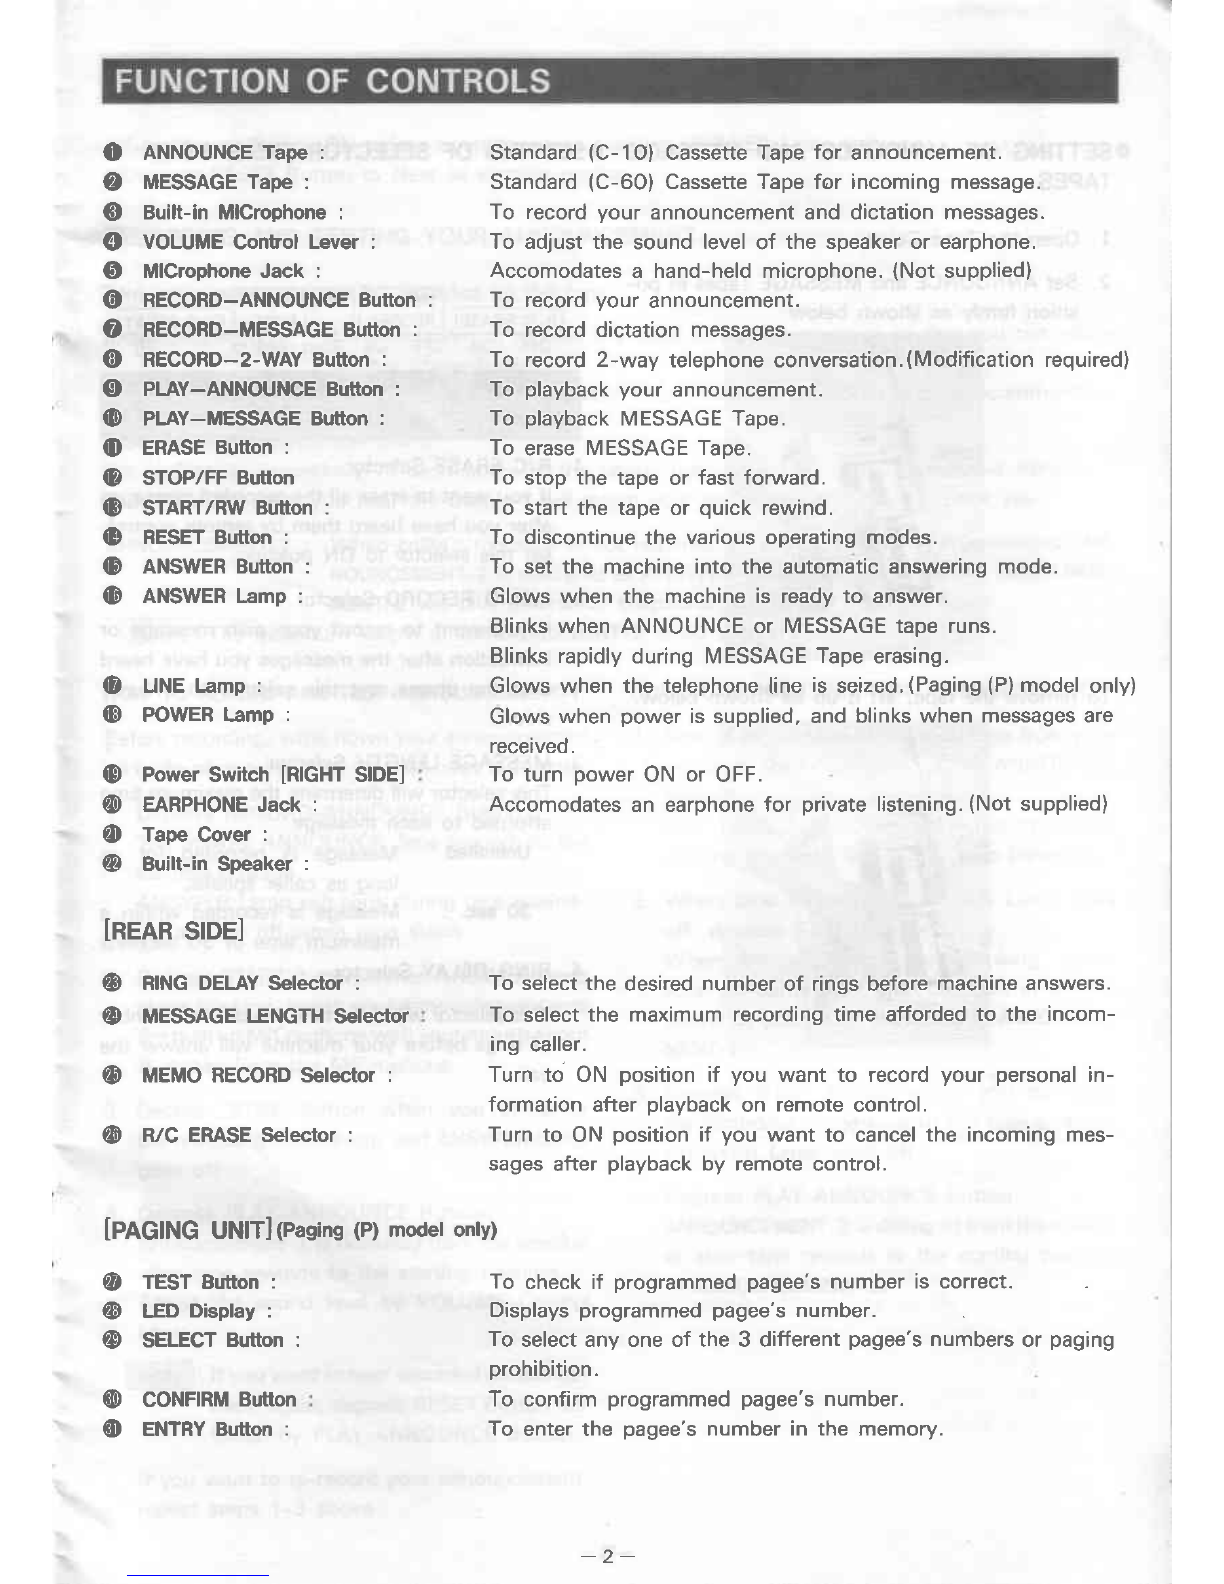
@ TapeCover . € Built-inSpeaker
o
@
oBuilt-in
o
o
o
o
o
o
@
ANNOUNCE
Ta
MESSAGETape
MlCrophone '" LL
ERASEButton
STOP/FF
Button
START/RW
Button
RESET
Button
ANSWERButton
IPAGING
UNIT]
(Paging
(P)modelonly)
TESTButton
LEDDisplay
SELECT
Button
CONFIRM
Button
ENTRYButton
ANSWER
Lamp
L
NE
Lamp
PO\,VER Lamp
Po'",/efSwitch
EARPHONEJack
RING
DELAYSelector
MESSAGELENGTHSelector
MEMORECORDSelector
R/C ERASESelector
MlCrophone
Jack
RECORD-ANNOUNCE
Button
RECORD-MESSAGE
Button
RECORD-2-WAY
Button
PLAY_ANNOUNCE
PLAY-MESSAGE
Button
IREAR
SIDE]
@
@
C
cord Telephone
LineCord
AC
1
0 AHlrtOUlCe
tape :
O MESSAGETape:
@ euift-inMlCrophone:
O VOLUME
Contsol
Lever:
@ MlCrophoneJack :
@ RECORD-ANNOUNCEButton:
O RECORD-MESSAGEButton
:
O REcoRD-z-wAYButton
:
O PLAY-ANNOUNCEBufton:
OD PLAY-MESSAGEButton:
O ERASE
Bufton:
(D STOP/FF
Button
(E START/RW
Button:
(D RESETButton:
(D ANSWERBufton:
(D aNswenump:
(D LINELamp:
@ POWERLamp:
@ Power
Switch
[RIGHT
SIDE]
@ EARPHONEJack :
O TapeCover :
@ Buitt-inSpeaker
:
lnem
sroel
{D R|NGDELAYsetector :
(D MESSAGE
LENGTH
Se|ec.tor
(D MEMoREcoRDselector
@ vC EMSE Selector:
[PAGING UN|T](Paging
(P)modelonly)
TESTBufton:
LED
Display:
SELECT
Button:
CONFIRM
Button
ENTRYButton:
Standard
(C-1O)
CassetteTape
for announcement.
Standard
(C-60)CassetteTapefor incomingmessage.
To record
yourannouncementanddictationmessages.
To adjustthe sound
level
of the speakeror earphone,
Accomodatesa hand-heldmicrophone.
(Notsupplied)
To record
yourannouncement.
To recorddictationmessages.
To record2-way telephoneconversation.
(Modification
required)
To playback
yourannouncement.
To playback
MESSAGETape.
To erase
MESSAGETaoe.
To stopthe tapeor fastforward.
To startthe tapeor quick
rewind.
To discontinue
the variousoperatingmodes.
To setthe machineintothe automatic
answeringmode.
Glowswhenthe machineis readyto answer.
BlinkswhenANNOUNCEor MESSAGEtaperuns.
Blinksrapidly
duringMESSAGE
Tape
erasing.
Glowswhenthe telephone
line
is seized.
(Paging
(P)
model
only)
Glows
whenpower
issupplied,andblinks
whenmessagesare
received.
ToturnoowerONor OFF.
Accomodates
an earphonefor private
listening.
(Notsupplied)
Toselectthedesired
number
of ringsbefore
machineanswers.
To select
the maximumrecordingtimeafforded
to the incom-
ing
caller.
Turnto ON position
if you want to record
your personal
in-
formation
afterplayback
on remote
control
.
Turnto ONposition
if you wantto cancel
the incomingmes-
sages
after
playback
by remote
control.
To checkif programmed
pagee's
numberis correct.
Displays
programmedpagee's
number.
Toselectanyoneof the3 different
pagee's
numbers
or paging
prohibition.
To confirm
programmed
pagee's
number.
To enterthe pagee's
numberin the memory.
@
@
@
@
q)
.SETTING OF ANNOUNCE
AND ME$SAGEOSETNNG
OFSELECTOR
(REAR
SIDE)
TAPES
1. Open
theTape
Cover.
2. Set
ANNOUNCEand
MESSAGETapesin po-
sition
firmlyasshownbelow.
To remove
the tape, lift it up as shown below.
R/C ERASESelector
lf youwantto erase
alltherecordedmessages
afteryou haveheard
them by remotecontrol,
set this selector
to ON position.
MEMORECORD
Selector
lf you want to recordyour own messageor
instruction
afterthe messages
you haveheard
over the phone, set this selectorto ON po-
sition.
MESSAGE
IINGTH Selestor
Thisselector
will determinethe maximumtime
afforded
to eachmessage.
Unlimitsd: Messageis recorded for as
longascallerspeaks.
30 sec. : Messageis recordedwithin a
maximum
timeof 3Oseconds.
RINGDEI-AYSelector
Thisselector
willdeterminethedesirednumber
of rings
before
your machinewill answer
the
call.
1.
2.
3.
4.
-3-
tTurn Power Switch ON beforeoperating
your machine. POWERLamp goes on.
. Depress
RESET
Button to clearall existingmodes.
.RECORDING
ANDTESTING
YOUR
ANNOUNCEMENT
Two announcements
canbe recordedon the tape.
ANNOUNCEMENT-I
: Announcement
to requestthe caller
to leavea message
sothatyoucanreturn
thecall
immediatelv.
IfVote-
l 'The
maximum
lengthof ANNOUNCEMENT-1
is
240seconds,
but30 seconds
isrecommended.
Exampleof this announcement:
"Hi - Thisis
""'speaking. I can't cometo the phoneright now. So please
leave
your nameand
phone
numberafter
you hearthe beep. I will return
your callwithin one hour. Thank
you."
ANNOUNCEMENT-2
: When caller's
messageis not required,
or when tape is full of messages,
AN-
NOUNCEMENT-2
is deliveredasANSWER-ONLY
feature-
Therefore,
ANNOUNCE-
MENT-2
will give alternative
telephone
numbersor business
hours'
Note I: Themaximumlength
of ANNOUNCEMENT-2
is 30 second.
HOWTO RECORDAND
TESTANNOUNCEMENT-I
Before
recording,
writedown
your
announcement
onaslip
of paper
so
that
you
cancopy
itfluently.
1. DepressRECORD-ANNOUNCE
Button.
This
makes
ANNOUNCE
Tape
rewindto the
starting
position.
ANSWER
Lamp
willblink
during
taperewind-
ing andgo off whentapestops.
2. Depress
START
Button.
WhenANSWER
Lamp
starts
blinking,
speak
your
announcement
into
thebuilt-in
MlCrophone
with
your
mouthabout
8 inches
fromthe MlCrophone.
3. DepressSTOP Button when you complete
therecording.
Tapestopsand
ANSWER
Lamp
goesoff.
4. DepressPLAY-ANNOUNCE
Button.
Announcement-1
isdelivered
from
the
speaker
after
taperewindsto the starting
position.
Adjustthe soundlevelby VOLUMEControl
Lever.
INote
l: lfyou
wantto hear
recordedannounce-
mentagain,
depress
RESETButton
fol-
lowed by PLAY-ANNOUNCE
Button.
lf Vouwant to re-record
your announcement,
repeatsteps 1-3 above.
2.
HOWTO RECORD
AND TESTANNOUNCEMENT-2
1. First
of all,removeMESSAGE
Tape
fromyour
machine,
then
depress
RECORD-ANNOUNCE
Button.
Thismakes
ANNOUNCE
Tape
runto there-
cording
position.
ANSWER
Lampblinks.
When tape stopsand ANSWER
Lamp
goes
off, depress
START
Button
WhenANSWER
Lamp
startsblinking,
speak
vourannouncement
intothe built-in
Mlcro-
phone
asyou
did
forrecording
of ANNOUNCE-
MENT-I.
Deoress
STOP Button when you complete
therecording.
Taperuns
to thetapeendand
ANSWER
Lamp
goes
off.
Deoress
PLAY-ANNOUNCE
Button.
ANNOUNCEMENT-2
isdelivered
fromthespeak-
er after
taperewindsto the starting
position
of ANNOUNCEMENT-2.
J.
4.
4-

OAUTOMATIC
ANSWERING
1. Check
ANNOUNCE
and
MESSAGE
Tapes
are
installed
in the proper
position
and Selectors
arepositioned
asYou
desire.
.PLAYBACKOF
RECORDED
INCOMING
MES-
SAGES
lf messages
arestoredin your machine,POWER
Lamo blinks to inform you that you have mes-
sages
to retridve.
FF
POWERLamp
B
utton
Button
B
utton
RW
RESET
Deoress
PLAY-MESSAGE
Button.
Messages
are played
backfrom the beginning
through the speaker
after tape automatically
returns
to the starting Position.
Tapestops automatically
after completeplay-
back of all messages.
Adjust the sound level by VOLUME Control
Lever.
When vou want to repeat
or skipthe message
duringplayback,
depress
RW or FF Button as
long as you estimate.
With the release
of the button, playbackof
the message
startsagainfrom that position.
lf you want to stop playback
of the message
temporarily for any reason, depress RESET
Button.
Simply
depress
PLAY-MESSAGE
But-
ton again
to continue
PlaYback.
PLAY-I\4ESSAGE
Button
1.
2.
'2.
INotel:lf the POWER
Lamp
blinks
rapidly.
it
isthe
signof wrong
installation
of AN-
NOUNCE
Tape.
-
ANNOUNCE
Tape
MESSAGE
Tape ANSWER
Lamp
ANSWER
Button
2. Deoress
ANSWER
Button. ANSWER
Lamp
will turn on andtapes
rewind
to the starting
position
ready
to record
incoming
messages.
NOW
YOUR
MACHINE
ISREADY
TOANSWER
FOR
YOU!
: Don't
forget
tocarry
COMMAND-
ER
with you whenYou
go out.
-CALL MONITORING
Sometimes,
you can't attendeverycall. UseCall
Monitoring Feature
by adjusting
the sound level
with VOLU
ME Control Lever.lt letsyou monitor
allincoming
calls.
To attend the call, simply take up your handset
and talk over
the phone
as normal.(Depending
on method of installation.
)
-ANSWER-ONLY
MODE_
When
vou
want
to use
only
ANNOUNCEMENT-2,
removeMESSAGE
Tapebefore
you depress
AN-
SWERButton.
When vou want to record your announcement
longer
than
30 seconds,
useANNOUNCEMENT-1
.
.ERASING
MESSAGE
TAPE
Youneednot eraseold messages
everytime. But
if you wish to, do the following.
1
. DepressPLAY-MESSAGEButton followed by
FF Button to locatetotal end of the messages
recordedonthetape,thenreleaseFFButton.
To playback
thedictation.depressPLAY-MES-
SAGE
Buttonand RW Buttonto rewindto the
starting position
-
ReleaseRW Buttonandthedrctationisolaved
back.
6.
- I
Lamp
ANSWER
Bunon ERASE
Button
RESETButton Button
Depress
RESET
Button at the end of the rec-
orded messages.Tapewill stop.
While ERASEButtonisbeing
pressed,
depress
ANSWERButton.WhenANSWERLamD
starts
blinkingrapidly, release
both buttons. (AN-
SWER Button remainslocked)
MESSAGETapewill be quickly
erased
while
rewrnorng.
4. DepressRESETButton when tape stops at
the starting position.
.RECORDING
FORDICTATION
You can leave
your messagefor your secretary
for dictation
purpose.
1. DepressANSWERButton
to get
to the start-
ing position
of MESSAGE
Tape.
2. Depress
RECORD-MESSAGEButton
after
you
get to the startingposition.
3. Depress
STARTButton and dictate
your mes-
sageinto the MlCrophone.
4. On completion of dictation, depress STOP
Button.
2.
-6

With Remote
Control
function in your machine,
you can replaycallers'
messages
from any telephone,
anywhere
in the world.
Simply
dial
the telephone
number
to which your machine
is attached.
Whenvou hear
your
announcement,
send
the commanding
signal.
Yourmachine
will play
the callers'
messages
back to you over the phone.
.COMMANDER
your COMMANDER
is a pocket
sized
light weight signaling
unit consisting
of 2 buttons
for oper-
ation, 1 function switch with 4 positions,speaker
to deliver
commandingsignal, DIP switch to de-
termineyour own code for commandingsignaland R03 (AAA) batteryas power source.
t
o
:\.
Is',
LOCATIONOF CONTROLS
.L
"l
xTo install the battery and to set DIP switch,
slide
the compartmentcover off downward as
shown below.
REMOTE
KEYCODE
(4-disit)
TheRemote
Key
Codewillprevent
any
unauthor-
izedcaller
from hearing
your messages.
To set
theRemote
KeyCode,
turn1-4 digitsto ON
or
OFF
position
as
you
desire
byusinga needle
or
thelike.
Besure
thatthe Remote
KeyCode
is the same
asthereception
codeon thebottom
of themain
unrt.COMMANDFR BOTTOI\4OFMAIN UNIT
LNotei: Please
do not touch SWI and SW2
on the bottom of the main unit.
Onlvuseat maintenance.
BATTERY
Insertone R03 (AAA size)battery, beingsure
to
observe
the correct polarity
REPLACEMENT
:
The battery life is about one year with normal
usage.
Neverleavea weak or deadbattery
in your COM-
MANDER.
Be sureto observe
the correctpolarity
when you
reolaceit.
B Button
Speaker
A Button
Function
Switch
COMMANDER
7-
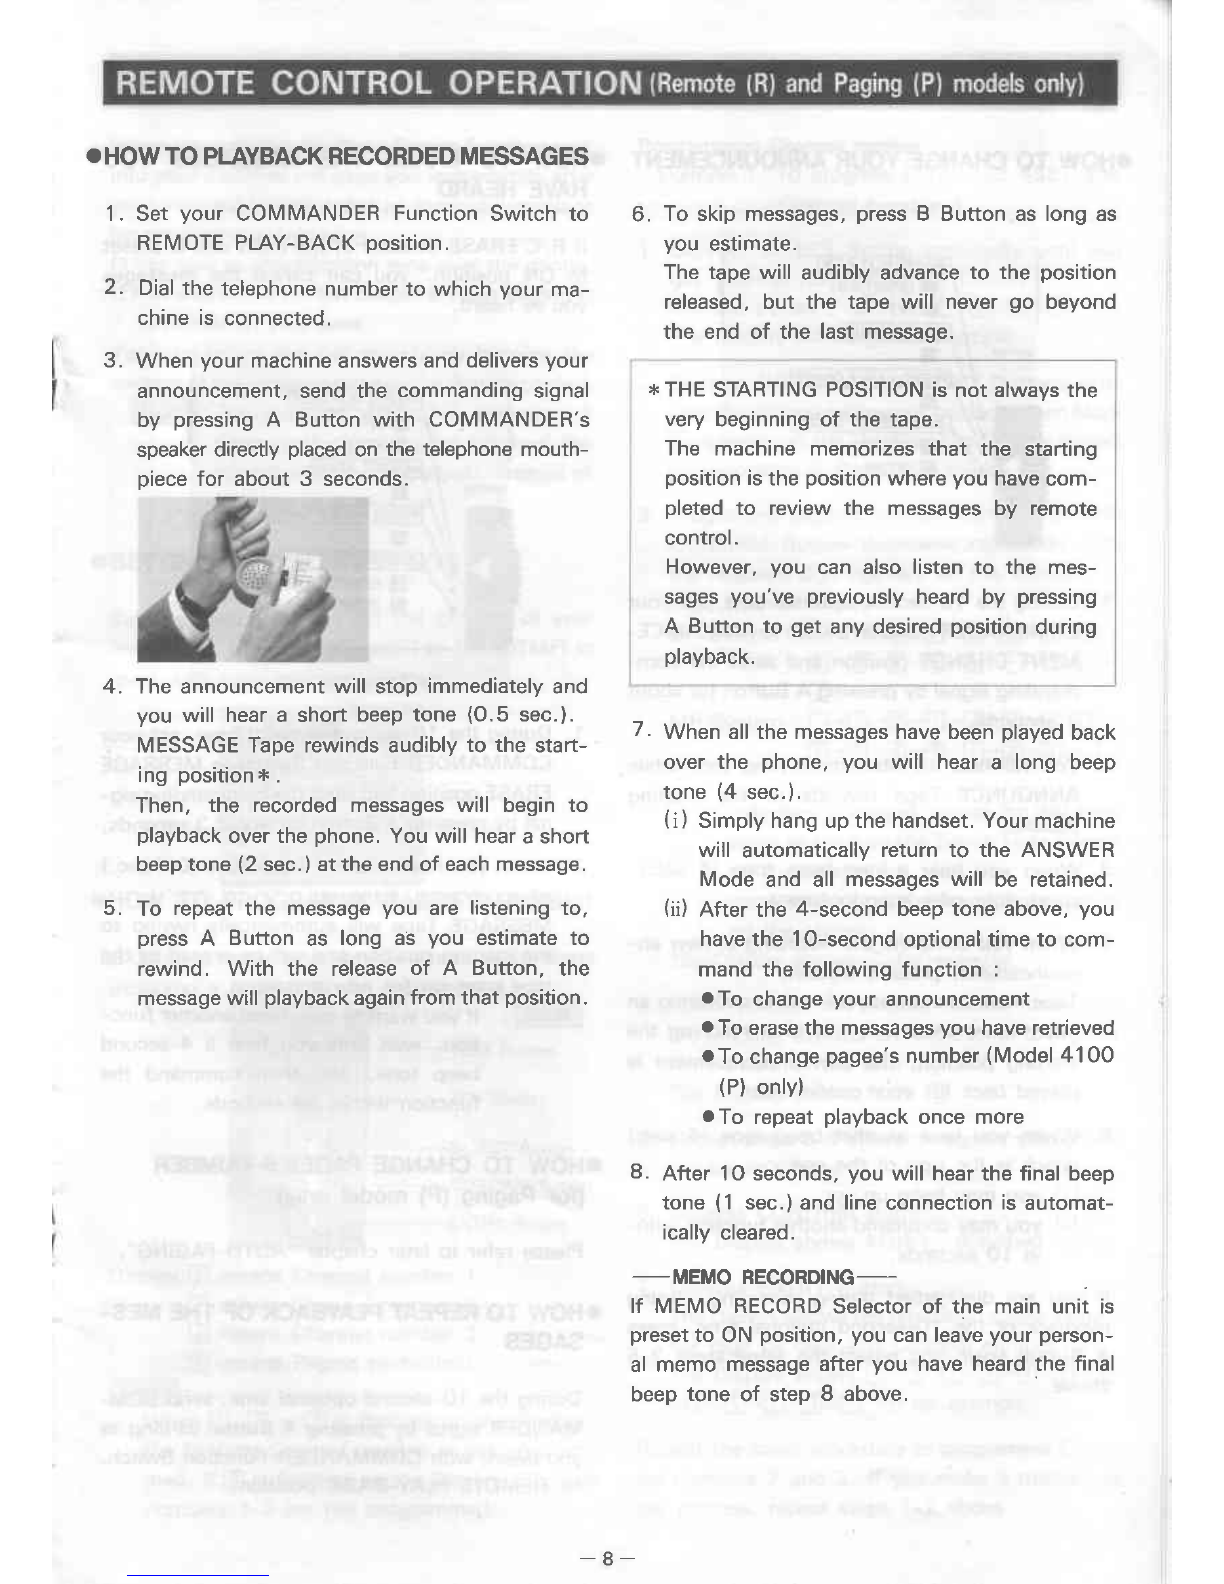
.HOWTOPLAYBACKRECORDEDMESSAGES
1. Set
yourCOMMANDER
Function
Switchto
REMOTEPLAY-BACKoosition.
Dialthe
telephonenumber
to which
your
ma-
chineisconnected.
When
your
machine
answers
anddelivers
your
announcement,sendthecommanding
signal
by pressing
A Buttonwith COMMANDER's
speakerdirectly
placed
onthetelephonemouth-
oiecefor about3 seconds.
Theannouncementwill stopimmediately
and
you
willheara short
beeptone
(O.5
sec.
).
MESSAGETaperewindsaudibly
to the start-
ing position
* .
Then, the recordedmessageswill beginto
playback
overthephone.
Youwillhear
ashort
beeptone
(2
sec.
)attheendofeachmessage.
To repeat
the message
you arelistening
to,
press
A Buttonas long aSyou estimateto
rewind. With the release
of A Button, the
message
will
playback
againfromthat
position.
To skipmessages,
press
B Buttonaslongas
you estimate.
Thetapewill audiblyadvance
to the position
released,but the tapewill never
go beyond
the endof the lastmessage.
,.THE
STARTINGPOSITIONisnotalwaysthe
verybeginningof the tape.
The machinememorizesthat the starting
position
is
the
position
where
you
have
com-
pletedto reviewthe messagesby remote
control
.
However,
you can alsolistento the mes-
sages
you'vepreviously
heardby pressing
A Buttonto getanydesired
position
during
playback.
7. Whenallthemessageshavebeen
played
back
overthe phone,you will heara long beep
tone
(4 sec.
).
(i
) Simplyhangupthehandset.Yourmachine
will automatically
returnto the ANSWER
Modeand all messages
will be retained.
(ii)Afterthe4-secondbeeptoneabove,
you
have
the 1
O-secondoptionaltimeto com-
mandthe followingfunction:
aTo change
yourannouncement
aToerasethemessages
youhaveretrieved
.To change
pagee's
number
(Model
4100
(P)
onlYl
aTo repeat
playback
oncemore
8. After 1Oseconds,
you will hearthe final beep
tone (
1 sec.
) and lineconnection
is automat-
icallycleared.
_MEMO RECORDTNG_
lf MEMO RECORD
Selectorof the main unit is
preset
to ON position,you canleave
yourperson-
al memo messageafteryou have heardthe final
beep tone of step 8 above
6.
2.
2
4.
I

E (srARr/Rw)
E (FF)
.HOWTOCHANGE
YOUR
ANNOUNCEMENT
'HOW TO ERASE
THE MESSAGESYOU
HAVEHEARD
lf R/C ERASESelectorof the main unit is preset
to ON position, you can cancel the messages
you've heard. I
1. Duringthe 1O-secondoptionaltime,set
your
COMMANDER
FunctionSwitchtoANNOUNCE-
MENTCHANGEDosition
andsendthe com-
mandingsignalbypressing
A Buttonforabout
3 seconds.
2. Youwill hear
an intermittentbeeptonewhile
ANNOUNCE
Tape rewindsto the starting
Dosition.
3. When you heara long beep
tone (4 sec.
),
speak
your newannouncement.
4. When
youcompletetherecordingof newan-
nouncement,
press
B Button.
Taperewindsautomatically
while
delivering
an
rintermittent
beeptoneandafter
reaching
the
starting
position,
the new announcementis
played
back
for yourconfirmation.
5. When you hearanotherbeep
tone (4 sec.)
whichis the signof the end,
(i) youmayhangup, or
(ii) youmaycommandanotherfunctionwith-
in 1Oseconds.
lf you are dissatisfiedduringrecording,during
playback
or the 1O-second
optionaltime, press
A Buttonagainand repeatthe samesteps2-5
above.
1. Duringthe1O-second
optionaltime,
set
your
COMMANDER
Function
Switchto MESSAGE
ERASE
position
andsendthe
commanding
sig-
nal
bypressing
A Buttonforabout
3 seconds.
2. When
you
heara shortbeeptone
(O.5
sec.)
of acceptance,
hangup.
MESSAGE
Tapewill automatically
rewindto
thestarting
position
andwillbeerasedasthe
goes
on lor newmessages.
: lfvou
wanttocommand
another
func-
tion, wait untilyou heara 4-second
beeptone, and then commandthe
function
within1Oseconds.
.HOW TO CHANGE
PAGEE'SNUMBER
(for Paging
(P)modelonly)
Please
referto laterchapter
"AUTO-PAGING".
.HOW TO REPEAT
PLAYBACK
OFTHEMES-
SAGES
Duringthe1O-secondoptionaltime,
send
COM-
MANDERsignal
by pressing
A Buftonaslongas
you desire
with COMMANDER
FunctionSwitch
tO REMOTEPLAY_BACKPOSitiON.
tape
tNA;l
(8rrf,rl n
F
I

When
you
areout,theAuto-Paging
function
built
into
your
machine
willpageyouimmediately
after
your
machine
hasrecorded
anincoming
message
by either
of thefollowing.
(1) to give
anidentificationtoneover
thephone.
(2) to soundthepocket
beeperif radio
paging
is
available
in yourarea.
You can return
the callquickly
by learning
the
contentofthemessage
retrievedbyremote
control.
f@], The machinewill redialmaximum
2
times until the machine
receives
the
remotecommanding
signal.Interval
of
redialingis 5 minutes.
SETTING
OF DIALING
OPTION
Set the switch locatedon the bottom of your
machineto either
DP
(Decadic)
orMF
(DTMF)
to
meetwith yourtelephonesystem
.
OHOW
TO PROGRAMME
PAGEE'S
NUMBER
3 different
pagee's
numbers,
each
up
to 2o-digits
includinga pause,
canbe programmed.
TEST
Button
LED
Display
-SELECT
Button
CONFIRM
Button
ENTRY
Button
Display
E means
Channelnumber1
@ means
Channelnumber2
E means
Channelnumber3
E meansPaging
prohibition
When
E, E or fl isflashing
on the Display,
theflashingChannelnumberis not program-
med.lf El isflashingonthe Display,
Channel
numbers1-3 arenot programmed.
Programming
Channelnumbel
Example: To program(7
14l. 123-4567 into
Channel
number
l.
1. Depress
SELECT
Buttonrepeatedly
untilyou
get Channelnumberon the Display.
Numbercycles: E, tr, E, tr, E, tr""".
TheDisplayshows
E for example.
Depress
CONFIRMandENTRYButtons
sim-
ultaneously
andreleasethebuttonswhen
Mark
E appearsonthe Display.TheDisplay
shows
E (Accepted
& Registeredmark).
Programme
pagee's
numberdigit
bydigitwith
CONFIRM
Buttondepressed
repeatedlyuntil
the required
digitappears
on the Display.
DigitNumbercycles:
DP
System
:tr-tr-Ettr-E*E-E-tr-
tr-E-ts-tr-E-tr-E-tr'
tct"""
MF
System
,n-n-g-n-E-tr-E-E-
tr-E-E-tr-tr-E-tr-tr-
E-tr.......
E"" indicates
3-second pause
for dialtone
E"" 'same
asthe
x ontheTouchToneButton
on the ohone
El" "same
as
the
+on theTouchToneButton
on the ohone
TheDisplay
shows
fl for example.
When
you getthe desirednumber
shownon
theDisplay,depressENTRY
Buttonto register
thenumberof thesaiddigit.
TheDisplayshowsMark
El.
Repeat
steps3-4 aboveto register
alldigitsof
the pagee's
number.
6. Depress
CONFIRM
Button.
TheDisplayshowsMark
E (Finished
mark).
7. DeoressENTRYButton
The
Display
showstheregistered
pagee's
num-
berdigitby digitandChannelnumber
last.
TheDisplayshows
E" E-tr-E-tr-ErE
-E-tr-tr-tr-tr...tr forexampte.
Repeatthesame
procedure
to programme
Chan-
nelnumbers2 and3. lf you makea mistake
in
the process,
repeatsteps
1-7 above.
2.
J.
4.
5.
- 10-

-uNE ACCESS
FROM
EXTENSION
When
yourmachine
isconnected
to a PABX
Ex-
tension,
vou must insert
a dial tone detection
pause
afterthe registration
of the access
code
(normally
O or anynumber
asspecified).
1. After step 2 above,programme
the access
code
numberwith
CONFIRM
Buttondepressed
repeatedlyandthen depress
ENTRY
Button.
2. Programme
Mark
E with CONFIRM
Button
depressed
repeatedly,
and
then
depress
ENTRY
Button.
3. Repeat
steps3-8 above.
.HOW TO CHECK
PROGRAMMED
PAGEE'S
NUMBER
When you want to check
programmedpagee's
numDer:
1. Select
Channel
numberby SELECT
Button.
2. DepressCONFIRM
Buttonuntil
you
get
Mark
! on the Display.TheDisplaywill automati-
callyshow
the pagee's
number.
HOW
TO CHECK
DIALING
1. Deoress
ANSWER
Buttonof themainunit.
2. Whenthe tapesstop
at thestarting
position,
depress
TEST
Button
byusing
aball-point
pen.
TheDisplay
goes
out. LINE
Lamp
glows
and
programmed
pagee'snumber
is dialed.
3. Check
if thecall
reaches
thepagee
or sounds
your pocket
beeper.
HOW
TOPLAYBACK
RECORDED
MESSAGE
When
youare
paged
over
thephone
atthenum-
berprogrammed,
do the following.
1. When
you pick
upthe handset,
youwill hear
an
intermittent
beep
tonethrough
theearpiece.
During
the intermittent
beeptone, send
the
commanding
signal
bypressing
A Button
with
COMMANDER
FunctionSwitch
to REMOTE
PLAY-BACK
position.
Refer
to steps5-g of foregoing
remotecon-
trol ooeration
instructions.
OHOW
TO CHANGE
PAGEE'S
NUMBER
BY
REMOTE
CONTROL
1. During
the 1O-second
optional
timeafter
you
have
heard
theincoming
messages
byremote
control,
set
your
COMMANDER
Function
Switch
to PAGING
NUMBER
CHANGE
position
and
sendthe commanding
signal
by pressing
A
Button
withCOMMANDER
against
themouth-
piece
of telephone.
withCOMMANDER
against
mouthpiece
oftel-
epnone.
2. Youwill hear
thesignal
to identify
the Chan-
nelnumber
consisting
of a long
beep
tone(1
sec.)
followed
by 1 short
beep.1 short
beep
means
Channel
number
1. lf you
wantto get
2 short
beeps
for Channel
number
2, press
A
Button
again
within
1Oseconds,
and
soon.
Channel
number
cycles
:
f,F EI-'EF-EF-tr
Channel
numbersignal
:
(1
sec.
)
Channel
number
1
Channel
number
2
Channel
number3
Channel
numberO
NoChannel
number
I I I f
(O.1
sec.
)
T
IT
TTI
(for paging
prohibitionl
2.
I ftfot"-l
, lf you do not use some of the
Channel
numbers,
the relevant
sig-
nalwill be skiPPed.
3
. When
youhearthedesiredsignal.
(1)
you
can
hang
uP,
or
(2) you canmakeother
remote
control
func-
tions
during
the1O-second
optional
timeaf-
ter
the
desired
signal
by
following
the
pro-
cedure
in REMOTE
CONTROL
OPERA-
TION
INSTRUCTIONS.
i
lmporta.nt
: When
yougo
our,
selectthechan-
nelnumber
You
want
to bePaged
bvSELECT
Button
onthe DisPlaY,
and
take
your
COMMANDER
and
pocket
beeper
if used.
Fo]e I , The memory
of programmed
pagee's
number
iswiped
outbyturning
Power
Switchoff or powerinterruption
for
about
oneweek.
3.
11-

.CONNECTION
TO TELEPHONELINE
Attached
to this machine
is a label
bearing
a TelecomAustralia
"Permit
Number".Thisnumberis
evidence
that it is a "Permitted
Attachment"whichhasbeen
authorized
byTelecom
to beconnected
to yourtelephoneservice.Conditionsrelating
to connection
andoperationof this Permitted
Attach-
mentarecontainedin Telecommunications
GeneralBy-law22O(5l,.
You areauthorized
by Telecomto install
this permitted
attachment
yourself
by plugging
it into the
line socketof any Telecomtelephone.You may connectit in place
of your Telecomtelephone
or to anysparetelephonesocketinstalled
in yourpremises.
To disconnect
your
Telecomtelephone
you mustfirst removeits plug
from the line
socket.
Youcan
theninsertthe plugof your PermittedAttachmentintothe socketanduse
yourequipment.
lf the plug
of your
Telecomtelephonecannotbe readily
removed,
you will haveto removethescrew
securing
it. To do this proceed
asfollows:
1. Loosen
screw
'A' sufficientlyto remove
the socketcover.(See
Fig. 1)
2. Removescrew
'B' andwithdrawthe plug. (See
Fig.2)
3. Replacescrew'B'. (See
Fig.3) Ensure
that it screws
completelyinto the socket
recess.
(lf the
screwistoo long,increasethe hole
depthor replace
the screw
with one5 mm shorter.
)
4. Replace
socketcoverandtightenscrew
'A'. (See
Fig.4)
Fig.1
Screw B
Fis.3
Youwill be unable
to connectthis permitted
attachment
if your
telephoneserviceconsistsonlyof a
wallphone
or anoldstyletelephonewhichis notconnectedby meansof a modern
plug
andsocket.
In suchcasesa newsocketwill needto be installed
by Telecom.
Whenyou requirethe installationof a socket
or a change-overswitch,contact
your localTelecom
BusinessOffice.All additionalsocketinstallations
or otheralterationsto your
existingwiringmustbe
carriedout by Telecom.Youwill be charged
for thiswork.
Plug
S
Socket
P
'* l,
Fig.2
Socket
I
Screw A
Fis.4
tz-
VOCA
COMMU
NICATIONSPTYLTD.
MELBOURNE697
TOOO
SYDNEY 5163777
CANBERRA A1 5922
BRISBANE 432
3232
ADELAIDE 224 O3OO
PERTH 325
9559
HOBART 23 '1333
NEWCASTLE 69 5811
FOR
SALES& SERVICE
Table of contents
Popular Answering Machine manuals by other brands


Panasonic
Panasonic KX-TG2248S - 2.4 GHz Digital Cordless Phone Answering... Service manual

Panasonic
Panasonic KX-TC1867B user guide

Panasonic
Panasonic KX-TCD510BXM operating instructions

HumanTechnik
HumanTechnik freeTEL II/S Operation instructions

Philips
Philips CD2353S Specifications

AT&T
AT&T EP5632 user manual