VOIGTLANDER Vito III User manual


35 mm
INSTRUCTIONS FOR U.9E

-the,reost
.flnfer*u4f 440ihf
of the
whole
booklet
of instructions
ison this
page:You
are requested
to read
the instructions
carefully,
and to make
yourselffamiliar
with the manipulation
of your
camera
before
youstart
taking
photographs
or investigate
its
mechanic-
alconstruction.
We Suggest
that you practicethe operating of the camera,aS shown in
Section
l, without
loading
it. Having
thus
gainedsome
experience,
readon to
get a complete
impression,
and only thenload your first
film.
you should
always
bear in rnind
that the Vito lll is a mechanical
precision
instrument
whichmust
be handled
withfeeling
and
understanding.
lt
willrepay
your
care
with an endless
number
of beautiful
and
wonderfullysharp
pictures. I
LVOIGTTANDER
A.G.
BRAUNSCHWEIG
www.orphancameras.com

Operoting the Comero
Looding
ond Unlooding
Accessories
Technicol Hints
CONIENIb pose:
Double exposure prevention-opening
the
camera
front 6
Shutter
- lrisdiaPhragm 7
Rangefinder
- SnaPshot
focusin$ 8
Holding
the
Vitolit
- ExPosu;e .l. 9
Howto open
andclose
camera
back 10
Inserting
the
filmcartridge- . 10-12
Setting
tfretitm
counter 12
Rewiniding
the
film
- Changing
pdftlyexposed
films ..?q 13
',
Focar
Lenses
for close-up
work . 14-15
Yellow-,
Orange-,
Green-
and
Haze-Filters
. 16-17
Lenshood
-View-finder
KONTUR 18
Flashequipment
Stops,
speed,
and
depth
of field ??
Caie of camera
and lenses 23
Soeedof Films 24
Ever-readv
case 25
-l -

vtTo lll
24x36-35mm
Synchro-Compur
www.orphancameras.com

I Key boord
to close cqmerq front
2 Shutterspeed ring
to set exposure time
3 Aperture lever
to set the stops
4 Shutter tensioning lever
' 5 Peg
to holdthedetochoblecomeroshoe
6 Focusingknob of rongefinder
7 Key to rewind the film
8 Synchronising
lever
lo sei the flqsh contqct
9 Floshcontoct
to connect flohs opporotus
l0 Body releose
I I Coble releose
12 A-Knob to tronsport
lilm
l3 R-Button
to rewind
thefiim

5 Peg
fo holdthe
detochoble
comero shoe
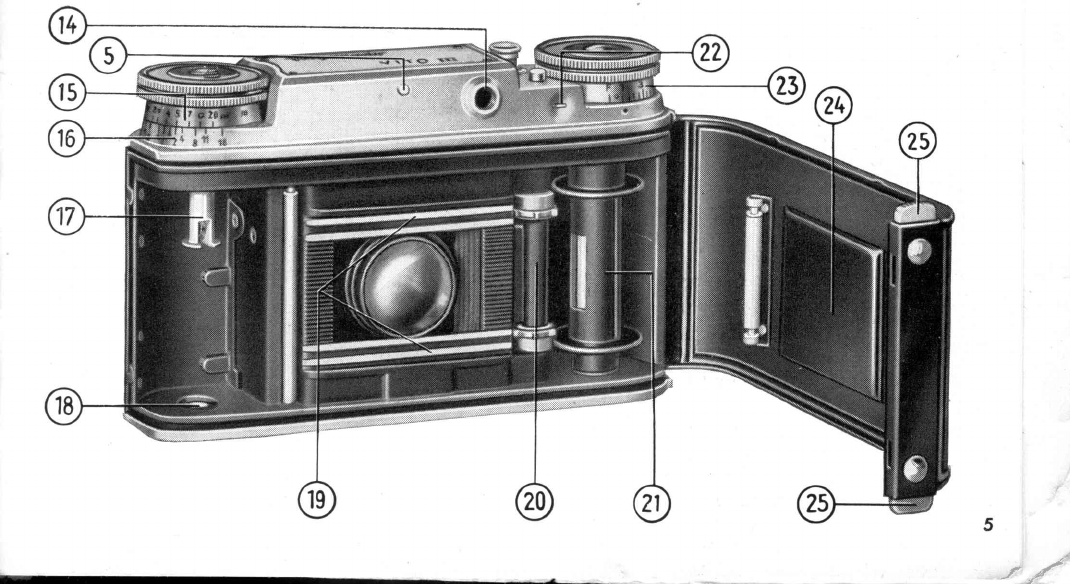
14 Eyepiecefor view ond rongefinder
l5 Distonce
scole
wilh zone focu'singsettings
'a6 Depth of field indicotor
'17 Axis of the R-Key
l8 Spool peg
for film cortridge
l9 Film
guides
20 Film tronsport shoft
2l Toke-up spool
not removoble
22 Film releose
to put lock out oI oction for looding or
chonging portly exPosed film
23 Film
counfer
24 Pressure
plote
25 Spring lotches
to close comerq bock
www.orphancameras.com
-r"/

The Dou
ble Exposure Lock
This
automaticdevice
prevents
doubleexposuresand blar.llr
f
rames.
Afterthe
exposure,
the
release
button
islocked
until
the
filrtt
is wound
on; the film trolrs-
port is then
locked
until
the
next time you press the
re
Iea
se.
The Film
Releose
Thisis needed
mainly
wlten
loading
the camera
or wlren
changing
partly
exposed
f
ilrns.
A short
pressure
releases
the
filrn
transportfor one frame.
Continuous
pressure
releases
the film transport
while the
pressure
lasts.Donotuse
the
film releasewhen rewindirro
thefilm.
26 Rewinding indicotor
2f Coloured f
ilm indicotor
28 Tripod bush
29 Button to open cqmelo lront
50 Front support; mqy be lolded oul
Press
button
29
ond the front will spring open.Holding it by both
corners
pull it down fully until the strut locks
firmly into position.
The lens is now in the toking position.
To close the comero, depress the wide key-boord under the lens,
ond fold the front bock until the lock cotches. Leove fingers on
key-boord until they ore outomoticolly pushed owoy by the lens
stondord. Previous
setting of lens to 1m or \ is not necessory.
www.orphancameras.com
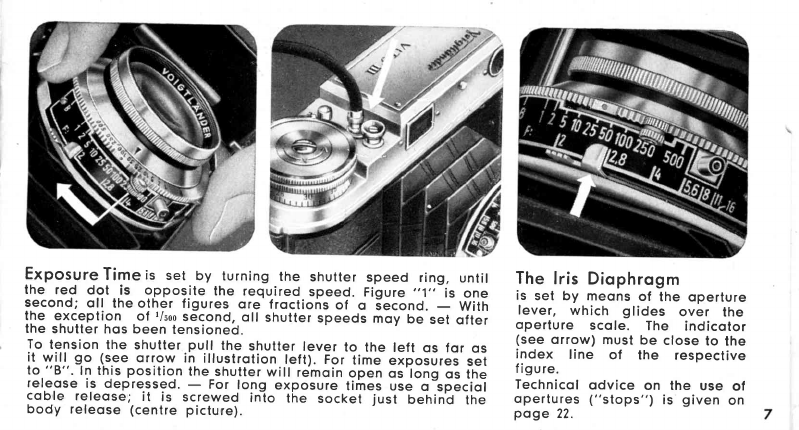
Exposure Time is set by turning the shutter speed ring, until
the red dot is g.pposite the required speed. Figure ',1" is one
second; oll the other figures ore froctions of o Second. with
llre exception ol r/;oo
second, oll shutter speeds moy be set ofter
the shutter
hos been tensioned.
To tension the shutter pull the shutter lever to the left os for os
it ry!]. go.(see orrow in illu.strotion
left). Fgr time exposures set
to "B". In this positio.n
the_shutter
wirr remorn
open os long os tne
releose is depre.ssed.
- For !olg exposure times use-o"speiiol
coble releose; it is screwed into the socket just behin'd tne
body releose (centre picture).
The lris Diophrogm
is set by meons of the operture
lever, which glides over the
operture scole. The indicotor
(see orrow) must be close to the
index line of the respective
figure.
Technicol odvice on the use ol
opertures ("stops") is given on
poge 22.

The Rongefinder
is combined with the viewfinder in one eye-piece (meosuring
finder). Looking through the eye-piece you will see o bright circle,
the meosuring field in the centre of the finder. As long os the
distonce indiEoted by the rongefinder does not corresp6nd with
the distonce of the subject focused ot, the subject within the
circle will oppeor double or hove double outlines. A slight
turn of the f
ocusing knob (orrow on left) will moke the two
imoges blend into one; the lens is focused occurotely. - Altern-
otively, the distonce moy be set by meons of the scole on the
focusing knob.
Snopshots
With Stop8
You con toke quick snopshots
without using the rongelinder by
moking use oi the two-point sett-
ing on the focusing knob ("zone
f
ocusing").
V:11'_ depth of field from
8' 3" to 16' 6" (os in
illustrotion).
O:35': depth of field from
16' 6" to oo.
t
www.orphancameras.com

When Toking
o Photogroph
look through the viewfinder eyepiece in such o woy thot you con
see oll four corners of the field of view. lt is suggested ihot tne
comero be held os shown obove.
Exposures longer thon 1/,';th
second should not, if possible, be
mode with the comero held in the hond. lf you conhot ovoid it,
rest your elbows on some support or leon ogoinst one. For long
time exposures use o tripod or, folding out the front support-,
ploce the comero on o level surfoce, such os o toble (The iront
support is usoble for horizontol pictures only; not for upright
ones).
Du
rin
g
the Moment of Exposure
hold your breoth, ond press the
releose quite sof
tly on no
occount jerkily os for os it
will go. With longer speeds (tl'o
to 1 second) keep the finger on
the releose until the shulter
movement hos run down com-
pletely. -
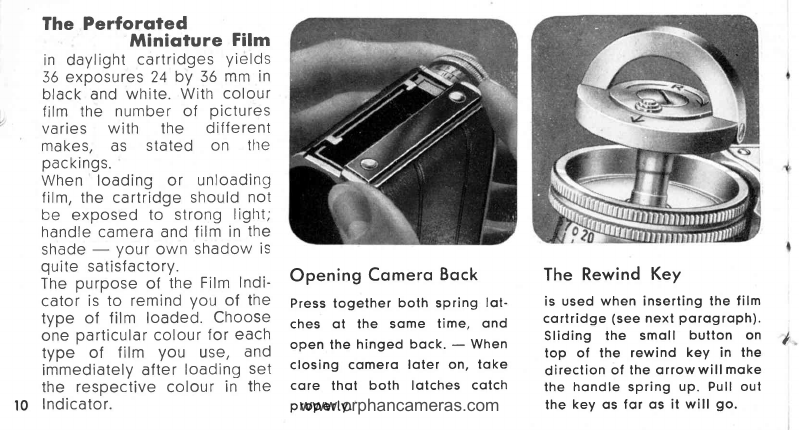
The Perforoted
Minioture Film
in daylight
cartridges
yields
36
exposures24
by 36
mmin
black
and
white.With
colour
film the number
of pictures
varies with the dif
fe
rent
makes, as stated on tlte
pac
kings.
When loadingor unloading
film,
thecartridge
should
not
be exposed
to strong
ligttt;
handlecameraandfilm
in
the
shade
- your
own
shadow
is
quite
satisfactory.
The
purpose
of the
Film
lndi-
cator
is to remind
you of the
type of film loaded.
Choose
one
particular
colour
for
each
type of film you use, a
nd
immediatelyafter
loading
set
the respective
colou
r in the
Ind
ica
tor.
Opening
Comero
Bock
Press
together both spring lot-
ches of the some time, ond
open the hinged bock. - When
closing comero loter oh, toke
core thot both lotches cotch
p
roperly.
The Rewind Key
is used when inserting the film
cortridge (see
next porogroph).
Sliding the smoll button on
top of the rewind key in the
direction of the orrow will moke
the hondle spring up. Pull out
the key os f
or os it will go.
I
l0
www.orphancameras.com
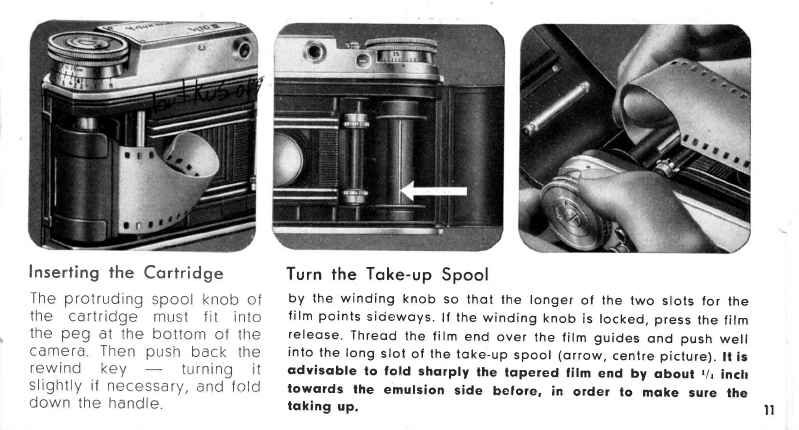
lnserting the Co
rtrid
g.
The protruding
spool knob of
the cartridge must fit into
the peg at the bottom of tlre
camera.
Then push back the
rew
ind key tu
rn
ing it
slightly
if necessa
ry,
and f
old
down the handle.
Turn the Toke-up Spool
by the winding knob so thot the longer of the two slots for the
film points siciewoys.
lf the winding knob is locked,press
the film
releose.
Threod the film end over the film guides ond push well
into the long slot of the toke-up spool (orrow, centre picture).
lt is
cdvisoble to fold shorply the lopered film end by obout r/r inclr
towcrrds the emulsion side berore, in order to mqke sule the
toking up. lr

Turnthe Winding Knob
until the full width of the film
lies over the tronsport shoft ond
both sprockets engoge in the
perf
orotion. Poy ottention thot
the film is running exoctly over
the slide guide ond is winding
well.
Now close the ccrmelq bqck.
Selting the FilmCounter
Turn
the winding knob until it locks (if not olreody locked). Then
pull it up, ond turn the counting disc underneoth to set lhe letter F
opposite the index mork. Fushthe winding knob bock ogoin, turn-
ing it slightly, if necessory, so thot it fits snugly on top of the
counting disc. Press the film releose once, ond turn the winding
knob until it locks. Repeot this once more. The index mork now
points to No. l ond the film is reody for the first exposure.
I
I
l2
www.orphancameras.com

Portly Exposed Films
can be taken out of the
camera and others inserted
(e.g exchanging
a black-and-
white
one for a colour
film).
The pa
rtly exposed film is
rewound,
as described.
All
you needdo is ma
ke a note
of the
last
number
on
thefilm
counter.Reloading
thefilm
is
donein
the
ordinarywayuntil
numbe
r "1" is set on the
counter.
Then,
with the film
release
pressed down
(continued
pressure)
turn A-
Knob
until
the counter
shows
one number
higher
thanthe
number
noted
down.
Now go
on exposing
until
you reach
the end of the film.
Rewinding
the ExposedFilm
After the lost exposure lift up -the hondle of the rewind key, but
9q.l_"1
prll.out the rewind key itserf (see iilustr. teft). oepre6; the
rewlnd button ond L."p it depressed vrhile turning the rewind key
in the direction of the'engroved orrow (see illustT.
rigntl
. -'
While rewinding the film, wotch the slotted end of the fitm trons-
pgrt sh-oft
turning in.the
b.ose
of the comero (see illustr.
on pog.6).
when it ceoses 1.o
!rln, the f
itm.is fy!ty rewbund in its coitriEgZ.
Releose the rewind button, ond. pu
ll but the rewind
-
rcei of -iG
hondle. Finolly open the comero bock ond toke out tne Cdrtiibge. l3

Close-Up'Work Wirh Focqr Lenses
Donotmiss
this
highly
interestingfield of photography
which,unfortunately,
so manyamateursneglect.
Large-
scale
pictures
of flowers,
butterflies,
and other small
animals,srnall
"objets d'art",etc. may yield effectsof
' extraordinary
beauty.Withthe
help
of Voigtl6nderFocar
lenses
you can, moreover,make excellent
copies ot
pages of books, stamps, or small pictures. Care,
however,is recommendedin
portraiture/
as
perspective
z mayeasilyappeardistorted
in this
case.
TheFocarlbnsesshortenthefocallengthof thecamera
lensandthusallowthecamera
to approachthe subject
muchcloser,
giving
a larger
image.
W FocorLensesin push-on
mountsare
suppliedfor two differentdistanceranges:
) Tf to, ,rU;"ct distoncesfrom 2'7Llz" lo l' 6" 'r./
F2 for subiectdistoncesfrom l' 5rlz" to 1' Llz"
t4 Suitable
size'.32mmdiameter.
FOCUSING TABTE
Disionce
I Sublect
in shorp
scole on
I foc6 when using
::ffi" l(t..., l) | tocor
2
@Zt 7tl2u | 1t5tlll
60' 2t 61h" | 1',5"
O | 2, 51/tt, lt 431{l
20' | 2' 331n" | 1' 4r1o"
15, | 2, 2Bl!, | 1, 4,,
12t a 2' 1311, 1t 33/{l
V | 2' ltlz't | 1'3tlr"
10' | 2t 7,t | 1, i1rt,,
g' | 1, 17"1r,, | 1t 2rlll
7t | 1' 11" | 1' 2t1r"
6t I 1t 10,t | 1t 2t,
5t | 1, Eslt't | 1'11r"
4'6tt | 1' g" 1 1t 1tl|tl
4' | 1' 7" | 1'sllt
Zt6tt | 1, 6,t | 1t llz,l
www.orphancameras.com

How to use the Focor Lenses:
. Screw comero to tripod, ond opprooch
subject until it oppeors in the desired
size in the viewfinder fiefd. According
to its distonce, you then ploce either F
1
or F
2 on the lens mount.
. Now meosure occurotety the distonce
between the front of the Focor tens ond
the centre of your subject, ond look up
this
distonce in the toble on the opposiie
poge (second or third column). In the
first column you will find the figure to
which the comero must be set.
. No chonge in exposure time is required
when using o Focor tens.
. At full operture the imoge is slighily
unshorp, especiolly neor the corners.
By stopping down def
inition is improved,
ond wilf be normol of t 11.
---t---
I
I
I
Seen
in
vtew-
f
inder
yu
On
Film

A Filter
for sfill better pictures
YourVoigtleinder
lenswill
giveyou
pictures
ofunsurpassable
sharpness;
but
the
mood
of the
picture
canbe
improved, and special pictorial
effects
achieved,by usinga filter.
Therefore,
when
taking
photographs
out-of-doors(with
only
a few excep-
tions)
usea filter
to enhance
your
picture. Especially
the sky,
with
andwithout
clouds,
isrendered
more
naturally,
andwill look
more
beauti-
lul
- even
"d
rama
lic"
,if
you
wish.
There
a
re onlyfew occasionswhen
d f
iltershouldnot be used:
when
very short
exposuretime must
be
given in unfavourable
light condi-
tions,for example
sport
pictures
in
dull
weather,fog
or
mist
scenes,
etc.
VoigtlHdder Filters
ore mode of spectroscopicolly tested,
solid opticol gloss, criticolly ground to plone-porollel
surfoces. This ensures thot the superb definition given
by the Voigtlonder onostigmots is fully retoined.
All filters ore supplied in push-on mounts, ond moy be
used in combinotion with o Focor lens ond I or Voigt-
lcinder lens hood
Suiloble size f
or Vito lll: 52
rnm
diometer.
L-
r6
www.orphancameras.com

ti$
\W Yellow
FilterGl
A light yellow filter recommended when only slight correction is desired, or where lhe increose in
exposure time required with Filter G 2 (medium yellow) cqnnot be given.
Filler fqctors (exposule increose): 1,5-2 times.
W YellowFilter
G2
The "univetsol filier" for oll outdoor work. Porticulorly suitoble to bring out cloud eflects on blue
sky: foir hoir, -ripe corn, spring ond outumn folioge ore given more biilliqnce. Indispensoble for
snow
pictures
in sunshine.-
tqctors: 2
-5 tim,es.
l@ OrongeFilter
Or
A filter.fgr. speciol effects. Renders the blue of the sky rother dorker thon noturol, mokes yellow
ond reddish colours stond out cleorly. In distont views'it reduces otmospheric misi, thus biinging
out detoil. In outdoor portroits it suppresses certoin skin blemishes.
Fqctors:
5
-6 times.
lW GreenFilter
Gr
for beller reproduction of gteen in londscopes. When using certoin ponchromotic films, highly sensitive
for red, the oction of green is pr.omoted Qy subdueing the red. Consequently too pole lips ond too
dork eyes qre ovoicied on portroits in qrtificiql light. -
diili'i;'L,' I't" ho.^td
\e*,c,
)
This filter is used i.n high qltitudes (mountoins) to suppress ultrq violet roys which moy couse
unshorpness..Wi!!'t
block qnd white moteriol the'delicotb'oeriol perspective id tutty retoin6d. With
colour mqteriol il counter-qcts the much disliked "blue tinge", decuiing wqrmer tdnes in generol.
Fqclors: No exposure increose for block qnd while moteriql. 1.5 times for colour
moteriql.
I
rt
*
&17
Other VOIGTLANDER Digital Camera manuals

VOIGTLANDER
VOIGTLANDER BESSA-R User manual

VOIGTLANDER
VOIGTLANDER Vito II User manual

VOIGTLANDER
VOIGTLANDER bessy k User manual

VOIGTLANDER
VOIGTLANDER BESSA-R2A User manual

VOIGTLANDER
VOIGTLANDER VITO IIa User manual

VOIGTLANDER
VOIGTLANDER BESSA-R2M User manual

VOIGTLANDER
VOIGTLANDER PROMINENT II User manual

VOIGTLANDER
VOIGTLANDER VF101 User manual

VOIGTLANDER
VOIGTLANDER Bessa III 667 User manual

VOIGTLANDER
VOIGTLANDER VITO Operating instructions


