VOIGTLANDER BESSA-R2A User manual
BEDIENUNGSANLEITUNG
INSTRUCTION
MANUAL
MANUAL
DE
INSTRUCCIONES
MANUALE
D1
ISTRUZIONI
Seit
1756
BESSA-R2A
BESSA-R3A

Congratulations
on
your
selection
of
Bessa
camera.
This
is
a
compact
and
lightweight
rangefinder
camera
with
VM
lens
mount.
Quick
and
accurate
focusing
is
possible;
turn
the
focusing
ring
until
the
doubled
images
seen
at
the
finder's
center
converge
to
a
single
image.
Utilizing
Auto
and
Manual
exposure
metering
systems
the
camera
is
equipped
with,
you
can
easily
get
the
proper
exposure.
You
will
be
aided
by
LED
indicators
displayed
in
the
viewfinder.
26

Description
of
Parts
(1)
Shutter
Speed
Index
(2)
Shutter
Speed
ISO/
Film
Speed
Ring
(3)
AE
Release
Button
(4)
Film
Speed
Window
(5)
Shutter
Release
Button
(
6
)
Film
Advance
Lever
I
—
(7)
Film
Counter
3
-
(
8
)
Main
Switch
5-
(9)
Neck
Strap
Eyelet
(10)
Lens
Release
Button
7
—
(11)
Accessory
Shoe
(12)
Frame
Selector
Lever
9
—
(13)
Film
Rewind
Shaft
io_
(14)
Film
Rewind
Crank
(15)
Film
Rewind
Knob
(16)
Backdoor
Lock
Lever
'17)
Rangefinder
Window
18)
Bright-line
Frame
Illumination
Window
19)
Viewfinder
Window
20)
VM
Lens
Mount
27

(21)
Synchro
Contact
(22)
Finder
Frame
(23)
Viewfinder
(24)
AE
Lock
Button
(25)
Tripod
Socket
(26)
Battery
Chamber
Lid
(27)
Film
Guide
Rails
(28)
Rewind
Fork
(29)
Film
Cartridge
Chamber
(30)
Film
Pressure
Plate
(31)
Film
Cartridge
Confirmation
Window
(32)
Back
Door
(33)
Winder
Coupler
(34)
Film
Rewind
Button
(35)
Film
Take-up
Spool
(36)
Film
Sprockets
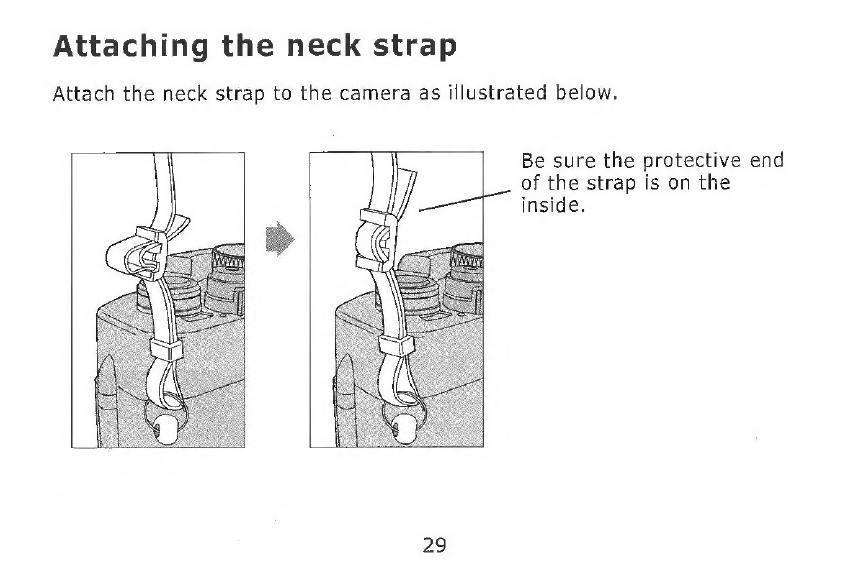
Attaching
the
neck
strap
Attach
the
neck
strap
to
the
camera
as
illustrated
below.
Be
sure
the
protective
end
of
the
strap
is
on
the
inside.
29
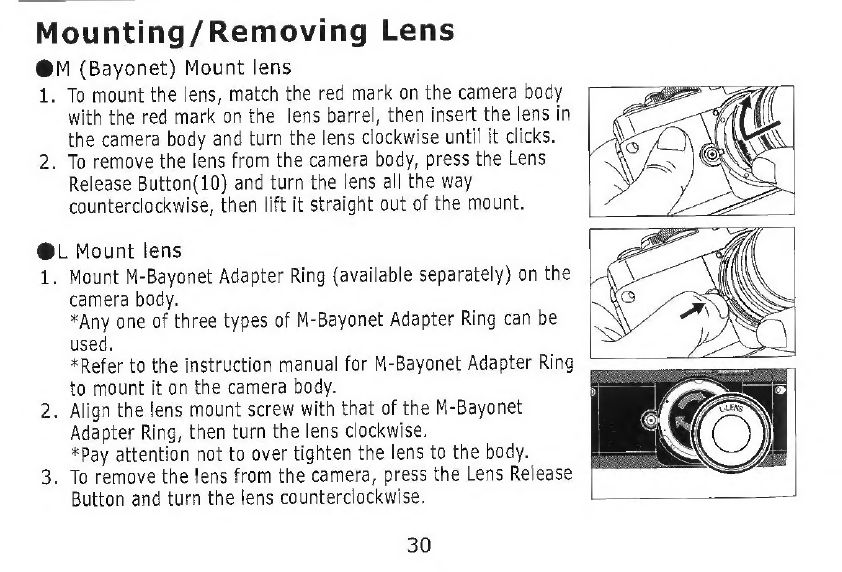
Mounting/Removing
Lens
•M
(Bayonet)
Mount
lens
1.
To
mount
the
lens,
match
the
red
mark
on
the
camera
body
with
the
red
mark
on
the
lens
barrel,
then
Insert
the
lens
In
the
camera
body
and
turn
the
lens
clockwise
until
it
clicks.
2.
To
remove
the
lens
from
the
camera
body,
press
the
Lens
Release
Button(lO)
and
turn
the
lens
all
the
way
counterclockwise,
then
lift
it
straight
out
of
the
mount.
•
L
Mount
lens
1.
Mount
M-Bayonet
Adapter
Ring
(available
separately)
on
the
camera
body.
*Any
one
of
three
types
of
M-Bayonet
Adapter
Ring
can
be
used.
*Refer
to
the
instruction
manual
for
M-Bayonet
Adapter
Ring
to
mount
it
on
the
camera
body.
2.
Align
the
lens
mount
screw
with
that
of
the
M-Bayonet
Adapter
Ring,
then
turn
the
lens
clockwise,
*Pay
attention
not
to
over
tighten
the
lens
to
the
body.
3.
To
remove
the
lens
from
the
camera,
press
the
Lens
Release
Button
and
turn
the
lens
counterclockwise,
30
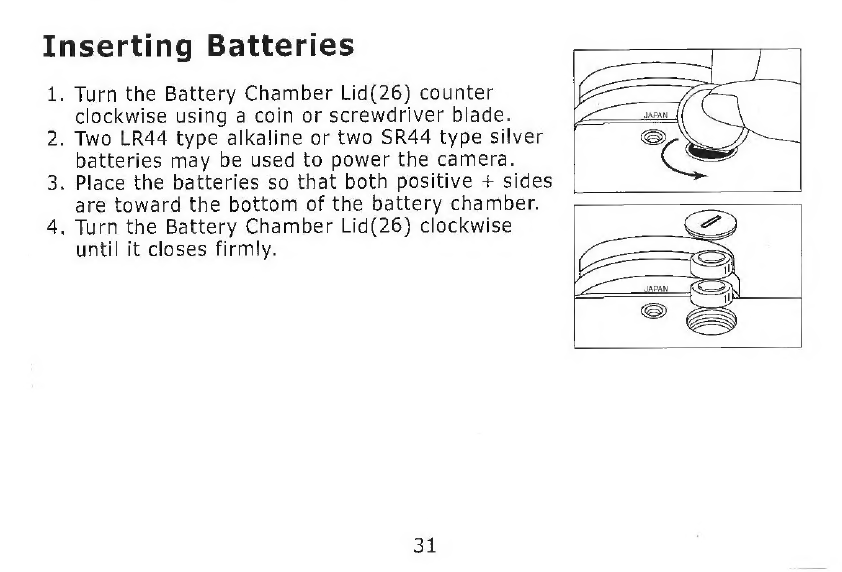
Inserting
Batteries
1.
Turn
the
Battery
Chamber
Lid{26)
counter
clockwise
using
a
coin
or
screwdriver
blade.
2.
Two
LR44
type
alkaline
or
two
SR44
type
silver
batteries
may
be
used
to
power
the
camera.
3.
Place
the
batteries
so
that
both
positive
+
sides
are
toward
the
bottom
of
the
battery
chamber.
4.
Turn
the
Battery
Chamber
Lid(26)
clockwise
until
it
closes
firmly.
31

Battery
Check
1.
Turn
the
Main
Switch(8)
to
the
ON
position.
2.
Wind
the
Film
Advance
Lever(6)
3.
Set
the
Shutter
Speed
Ring(2)
to
any
position
except
the
"B"(bulb)
position.
4.
Lightly
press
the
Shutter
Release
Button(5)
half
way
while
looking
thorough
the
View
Finder(23).
•
If
you
can
see
one
or
two
LEDs
lit
or
blinking
on
the
bottom
of
the
Viewfinder,
then
battery
condition
is
satisfactory.
•
If
both
"2000"
and
"1"
LEDs
are
blinking
slowly
in
addition
to
one
or
two
of
the
LEDs
mentioned
above,
then
the
batteries
are
running
out
of
power.
Prepare
a
new
set
of
batteries.
•
If
no
LED
is
lit,
then
the
batteries
need
to
be
replaced
or
have
been
loaded
incorrectly.
•
The
LEDs
will
remain
on
for
about
8
seconds
after
you
stop
pressing
the
Shutter
Release
Button.
Note:
In
order
to
avoid
battery
consumption,
turn
the
Main
Switch
to
the
OFF
position
while
the
camera
is
not
in
use.
32

Loading
Film
1.
To
open
the
back
Door(32),
unfold
and
lift
the
Film
Rewind
Crank(14)
up,
then
pull
the
Film
Rewind
Knob(15)
up
while
holding
the
Backdoor
Lock
Lever(16)
in
the
release
position.
When
the
Back
Door
is
opened,
the
Film
Counter(7)
will
automatically
reset
to
"S."
2.
Insert
the
film
cartridge
into
the
Film
Cartridge
Chamber(29)
so
that
the
protruding
end
of
the
film
cartridge
faces
downward.
Do
this
in
a
place
away
from
direct
sunlight.
3.
Rotate
the
Film
Rewind
Crank
carefully
while
pushing
down
lightly
on
the
Film
Rewind
Knob,
until
the
film
locks
on
the
Film
Rewind
Fork(28).
33
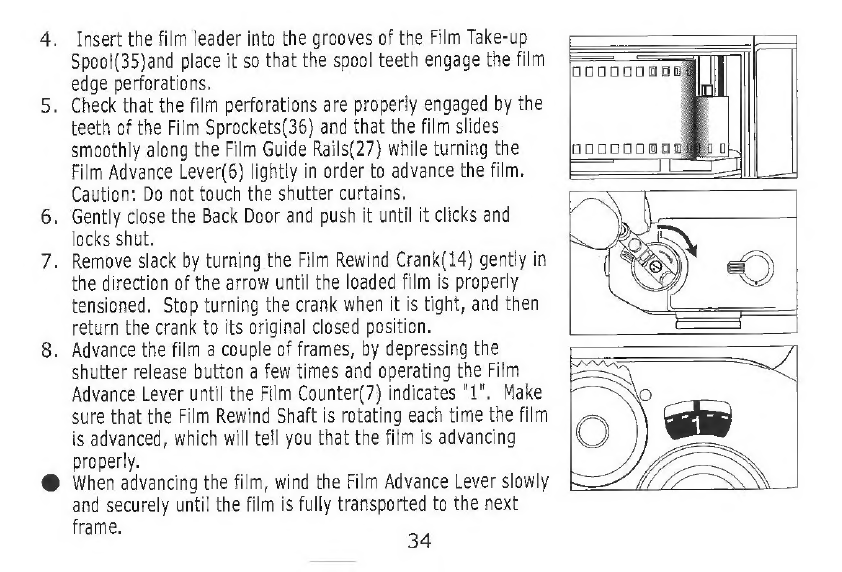
4.
Insert
the
film
leader
into
the
grooves
of
the
Film
Take-up
Spool(35)and
place
it
so
that
the
spool
teeth
engage
the
film
edge
perforations,
5.
Check
that
the
film
perforations
are
properly
engaged
by
the
teeth
of
the
Film
Sprockets(36}
and
that
the
film
slides
smoothly
along
the
Film
Guide
Rails(27)
while
turning
the
Film
Advance
Lever(6)
lightly
in
order
to
advance
the
film,
Caution;
Do
not
touch
the
shutter
curtains,
6.
Gently
close
the
Back
Door
and
push
it
until
it
clicks
and
locks
shut,
7.
Remove
slack
by
turning
the
Film
Rewind
Crank(14)
gently
in
the
direction
of
the
arrow
until
the
loaded
film
is
properly
tensioned.
Stop
turning
the
crank
when
it
is
tight,
and
then
return
the
crank
to
its
original
closed
position.
8.
Advance
the
film
a
couple
of
frames,
by
depressing
the
shutter
release
button
a
few
times
and
operating
the
Film
Advance
Lever
until
the
Film
Counter(7)
indicates
"I",
Make
sure
that
the
Film
Rewind
Shaft
is
rotating
each
time
the
film
is
advanced,
which
will
tell
you
that
the
film
is
advancing
properly.
#
When
advancing
the
film,
wind
the
Film
Advance
Lever
slowly
and
securely
until
the
film
is
fully
transported
to
the
next
frame.
34
Film
Speed
Setting
1.
Film
speed
is
indicated
on
the
outside
of
the
film
package
or
in
the
film
instructions.
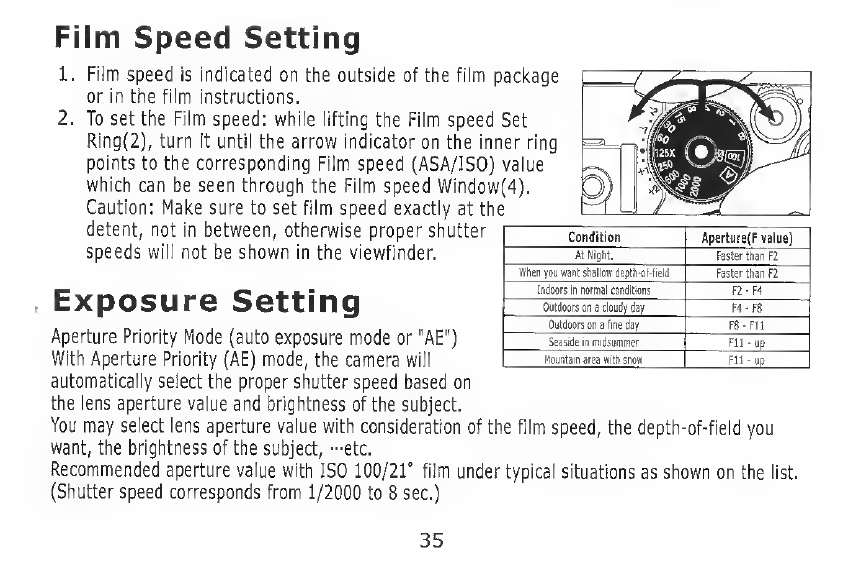
2.
To
set
the
Film
speed:
while
lifting
the
Film
speed
Set
Rlng(2),
turn
it
until
the
arrow
indicator
on
the
inner
ring
points
to
the
corresponding
Film
speed
(ASA/ISO)
value
which
can
be
seen
through
the
Film
speed
Window(4).
Caution;
Make
sure
to
set
film
speed
exactly
at
the
detent,
not
in
between,
otherwise
proper
shutter
speeds
will
not
be
shown
in
the
viewfinder,
Exposure
Setting
Aperture
Priority
Mode
(auto
exposure
mode
or
"AE")
With
Aperture
Priority
(AE)
mode,
the
camera
will
automatically
select
the
proper
shutter
speed
based
on
the
lens
aperture
value
and
brightness
of
the
subject,
You
may
select
lens
aperture
value
with
consideration
of
the
film
speed,
the
depth-of-field
you
want,
the
brightness
of
the
subject,
-etc.
Recommended
aperture
value
with
ISO
100/21°
film
under
typical
situations
as
shown
on
the
list.
(Shutter
speed
corresponds
from
1/2000
to
8
sec.)
35
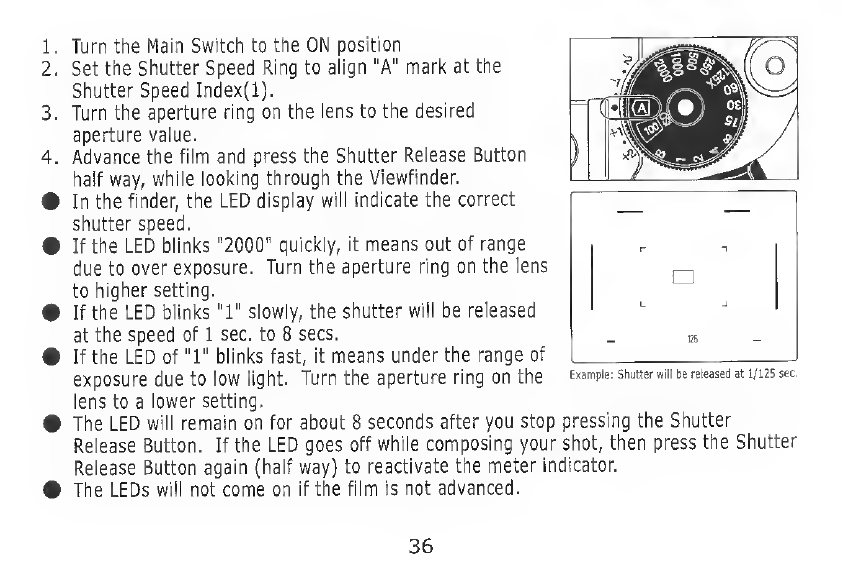
1
.
2
.
3.
4.
Turn
the
Main
Switch
to
the
ON
position
Set
the
Shutter
Speed
Ring
to
align
"A"
mark
at
the
Shutter
Speed
Index(l),
Turn
the
aperture
ring
on
the
lens
to
the
desired
aperture
value.
Advance
the
film
and
press
the
Shutter
Release
Button
half
way,
while
looking
through
the
Viewfinder,
In
the
finder,
the
LED
display
will
indicate
the
correct
shutter
speed.
If
the
LED
blinks
"2000"
quickly,
it
means
out
of
range
due
to
over
exposure.
Turn
the
aperture
ring
on
the
lens
to
higher
setting.
If
the
LED
blinks
"1"
slowly,
the
shutter
will
be
released
at
the
speed
of
1
sec.
to
8
secs.
If
the
LED
of
"1"
blinks
fast,
it
means
under
the
range
of
exposure
due
to
low
light.
Turn
the
aperture
ring
on
the
r
n
□
U
4
125
-
Example:
Shutter
will
be
released
at
1/125
sec,
lens
to
a
lower
setting.
The
LED
will
remain
on
for
about
8
seconds
after
you
stop
pressing
the
Shutter
Release
Button.
If
the
LED
goes
off
while
composing
your
shot,
then
press
the
Shutter
Release
Button
again
{half
way)
to
reactivate
the
meter
indicator.
The
LEDs
will
not
come
on
if
the
film
is
not
advanced.
36

Exposure
Compensation
You
can
also
use
the
Exposure
Compensation
mode
to
use
a
different
exposure
value
than
the
one
that
aperture
priority
has
determined
automatically,
You
can
change
the
value
to
both
brighter
(+
compensation)
or
darker
(
■
compensation),
The
amount
you
can
compensate
for
is
+/
■
2
steps,
by
1/2
step
increments.
Set
the
"A"
indicator
on
the
Shutter
Speed
dial
to
the
desired
value
of
compensation.
When
active,
the
Exposure
Compensation
Mode,
the
indicator
LED
of
the
compensated
shutter
speed
will
blink
slowly,
AE
Lock
function
Use
the
AE
lock
function
with
Aperture
Priority
mode
or
Exposure
Compensation
mode.
The
exposure
value
at
the
moment
when
AE
Lock
Button
is
pressed
will
be
stored
and
also
the
LED
indication
in
the
finder
will
be
locked.
1.
Place
the
camera
near
enough
to
the
subject
to
have
the
image
centered
in
the
middle
of
the
finder,
2.
Press
the
Shutter
Release
Button
in
a
half
way
and
check
the
LED
indicator
in
the
finder.
Then
press
the
AE
Lock
Button
(24)
and
reframe
your
composition,
#
Exposure
value
will
be
locked
while
the
AE
Lock
Button
is
pressed
and
held,
#
Exposure
value
will
be
released
when
you
stop
pressing
the
AE
Lock
Button,
3.
Create
your
composition
and
release
the
shutter,
#
The
LEDs
will
remain
on
about
8
seconds
after
you
stop
pressing
either
the
Shutter
Release
Button
or
the
AE
Lock
Button,
37
Example;
Compensate
by
-1.5
steps,
Exposure
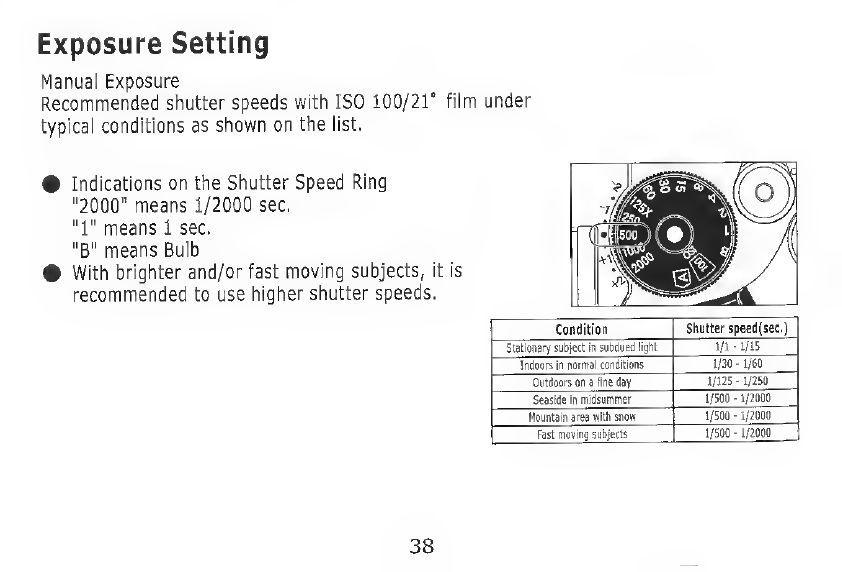
Setting
Manual
Exposure
Recommended
shutter
speeds
with
ISO
100/21“
film
under
typical
conditions
as
shown
on
the
list.
#
Indications
on
the
Shutter
Speed
Ring
"2000"
means
1/2000
sec.
"1"
means
1
sec.
"B"
means
Bulb
•
With
brighter
and/or
fast
moving
subjects,
it
is
recommended
to
use
higher
shutter
speeds.
Condition
Shutter
speed(sec.)
Stationary
subject
in
subdued
light
1/1
-
1/15
Indoors
in
normal
conditions
1/30
-
1/60
Outdoors
on
a
tine
day
1/125
•
1/250
Seaside
in
midsummer
1/500
■
1
/2000
Mountain
area
with
snow
1/500
■
1/2000
Fast
moving
subjects
1/500
■
1/2000
38
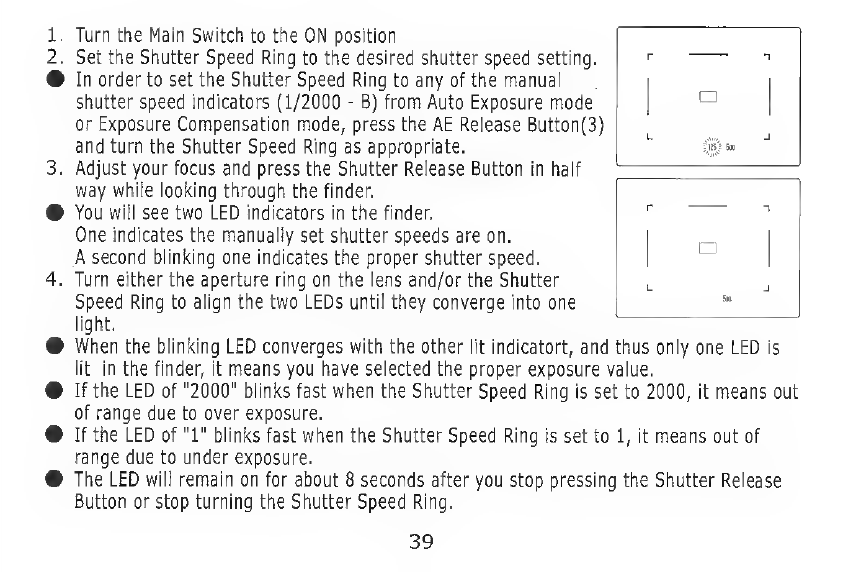
1.
Turn
the
Main
Switch
to
the
ON
position
2.
Set
the
Shutter
Speed
Ring
to
the
desired
shutter
speed
setting.
#
In
order
to
set
the
Shutter
Speed
Ring
to
any
of
the
manual
shutter
speed
indicators
(1/2000
-
B)
from
Auto
Exposure
mode
or
Exposure
Compensation
mode,
press
the
AE
Release
Button(3)
and
turn
the
Shutter
Speed
Ring
as
appropriate.
3.
Adjust
your
focus
and
press
the
Shutter
Release
Button
in
half
way
while
looking
through
the
finder.
#
You
wiil
see
two
LED
indicators
in
the
finder.
One
indicates
the
manually
set
shutter
speeds
are
on.
A
second
blinking
one
indicates
the
proper
shutter
speed,
4.
Turn
either
the
aperture
ring
on
the
lens
and/or
the
Shutter
Speed
Ring
to
align
the
two
LEDs
until
they
converge
into
one
light.
#
When
the
blinking
LED
converges
with
the
other
lit
indicatort,
and
thus
only
one
LED
is
lit
in
the
finder,
it
means
you
have
selected
the
proper
exposure
value.
#
If
the
LED
of
"2000"
blinks
fast
when
the
Shutter
Speed
Ring
is
set
to
2000,
it
means
out
of
range
due
to
over
exposure,
#
If
the
LED
of
"1"
biinks
fast
when
the
Shutter
Speed
Ring
is
set
to
1,
it
means
out
of
range
due
to
under
exposure.
#
The
LED
will
remain
on
for
about
8
seconds
after
you
stop
pressing
the
Shutter
Release
Button
or
stop
turning
the
Shutter
Speed
Ring.
r
-
-I
□
L
J
(
is)
500
r
-
T
□
L
J
Eoo
39

Selecting
Frame
Turn
the
Frame
Selector
Lever{12)
and
the
frame
illustrated
below
will
be
shown
in
the
finder.
The
frame
shows
the
range
to
be
included
when
used
with
the
lens
indicated,
Select
the
frame
pattern
according
to
the
focal
length
of
the
lens
you
have
mounted
on
the
camera.
Additionally,
the
parallax
is
automatically
corrected
according
to
the
combination
of
your
shooting
distance
and
the
lens
selected.
R2A
R3A
40

Focusing
1
For
accurate
focusing,
with
subjects
such
as
a
group
of
people,
a
"double
image"
viewfinder
with
a
central
focus
zone
will
ensure
that
sharp
images
are
easily
recorded.
To
achieve
this,
simply
turn
and
adjust
the
lens
until
the
double
image
converges
to
one,
Focusing
2
For
accurate
focusing
of
architectural
or
technical
subjects
with
vertical
lines,
use
the
"Split
image"
focusing
option.
To
achieve
this,
simply
turn
and
adjust
the
lens
so
that
the
lines
join
together.
*
When
focusing,
make
sure
to
put
your
eye
in
the
middle
of
the
Viewfinder.
In
focus
Not
in
focus
In
focus
41

Holding
Camera
1.
Hold
the
camera
in
the
palm
of
the
left
hand
so
as
to
turn
the
lens
focusing
ring
easily
with
your
left
hand.
2.
Hold
the
camera
body
steady
and
place
your
right
index
finger
lightly
on
the
shutter
release
button.
3.
Press
your
left
elbow
lightly
against
your
body
and
then
look
through
the
rangefinder
eyepiece
to
steady
the
camera
against
your
face.
Then
relax
your
right
arm
holding
the
camera.
42

Rewinding
the
Film
1.
When
the
roll
of
film
ends,
the
advance
lever
will
no
longer
advance
smoothly,
Check
the
Film
Counter(7)
display.
If
the
Film
Counter
shows
that
the
all
the
frames
of
the
loaded
film
have
been
exposed,
then
the
film
needs
to
be
rewound.
2.
Press
the
Film
Rewind
Button
(34)on
the
bottom
of
the
camera.
3.
Unfold
the
Film
Rewind
Crank(14)
and
turn
it
in
the
direction
of
the
arrow,
4.
Once
the
winding
tension
eases,
the
film
is
completely
wound
into
the
cartridge
and
it
is
ready
to
be
removed.,
5.
Pull
up
the
Film
Rewind
Knob
while
keeping
the
Back
Door
Lock
Lever
toward
the
rear
in
order
to
open
the
Back
Door
and
take
out
the
film,
6.
Remove
the
film
cartridge
in
a
place
away
from
direct
sunlight.
Note:
If
the
film
reaches
the
end
of
the
roll
during
film
advance,
the
film
advance
lever
will
lock.
Rewind
the
entire
roll,
then
complete
the
movement
of
the
film
advance
lever
after
removing
the
cartridge
which
will
reset
it.
43

"B"(bulb)
setting
1.
With
the
Shutter
Speed
Ring(2)
set
at
"B"
position,
the
shutter
will
remain
open
for
as
long
as
the
Shutter
Release
Button(5)
is
held
down.
2.
This
setting
is
useful
when
a
longer
exposure
than
one
second
is
required,
such
as
in
photography
at
night.
3.
Be
sure
to
use
a
tripod
and/or
cable
release
when
using
long
shutter
times
to
avoid
camera
movement.
44
Other manuals for BESSA-R2A
1
This manual suits for next models
1
Table of contents
Other VOIGTLANDER Digital Camera manuals

VOIGTLANDER
VOIGTLANDER VITO Operating instructions

VOIGTLANDER
VOIGTLANDER Vito III User manual

VOIGTLANDER
VOIGTLANDER VF101 User manual

VOIGTLANDER
VOIGTLANDER BESSA-R User manual

VOIGTLANDER
VOIGTLANDER Perkeo II User manual

VOIGTLANDER
VOIGTLANDER Bessa III 667 User manual

VOIGTLANDER
VOIGTLANDER BESSA-R2M User manual

VOIGTLANDER
VOIGTLANDER PROMINENT II User manual

VOIGTLANDER
VOIGTLANDER VITORET DR User manual

VOIGTLANDER
VOIGTLANDER Vito II User manual


