VOIspeed V-IP400 User manual

VOIspeed V-IP400 User Manual
©
VOI
SPEED
L
TD
.
1
User Manual
VOIspeed V-IP400
IP phone

VOIspeed V-IP400 User Manual
©
VOI
SPEED
L
TD
.
2
Content
1. Introduction ........................................................................................................... 3
2. Security information .............................................................................................. 3
2.1. How to use t e telep one correctly..................................................................... 3
2.2. Qualified personnel ............................................................................................ 3
2.3. Accessories ........................................................................................................ 3
2.4. Waterproof guidelines........................................................................................ 3
2.5. Connecting ot er devices ................................................................................... 3
2.6. Telep one position............................................................................................. 3
2.7. Connect t e power supply .................................................................................. 4
2.8. Cleaning t e device ............................................................................................ 4
2.9. Product Disposal ................................................................................................ 4
2.10. Product Warranty ........................................................................................... 5
3. General Information............................................................................................... 6
3.1. Components c eck list ....................................................................................... 6
3.2. General specifications ........................................................................................ 6
3.3. Before starting.................................................................................................... 6
3.4. Getting Started ................................................................................................... 7
4. Basic operations..................................................................................................... 9
5. Web configuration ................................................................................................12
5.1. Login ................................................................................................................13
5.2. Current state......................................................................................................14
5.3. Network ............................................................................................................15
5.4. VOIP.................................................................................................................16
5.5. Advanced configuration ....................................................................................17
5.6. Config Manager ................................................................................................22
5.7. Upgrade ............................................................................................................23
5.8. System management..........................................................................................24
6. Keyboard Configuration........................................................................................28
6.1. Enter t e telep one menu ..................................................................................28
6.2. Network settings (IP address, Netmask) ............................................................28
6.3. Telep one startup in POST mode ......................................................................28
6.4. Address book ....................................................................................................28

VOIspeed V-IP400 User Manual
©
VOI
SPEED
L
TD
.
3
1. Introduction
We would like to t ank you for your purc ase and for aving c osen one our products.
T is manual provides general guidelines for a correct use of t e product. In case you
require furt er information on t is product or to receive tec nical assistance please visit our
website: www.voispeed.com.
2. Security infor ation
You will find listed below security rules t at t e user s ould follow w en using t is device.
Please comply wit t ese guidelines to avoid taking unnecessary risks.
2.1. How to use the telephone correctly
Use t e telep one only in t e standard working position.
2.2. Qualified personnel
Any installations or repairs on t e product s ould be carried out only by qualified and fully
trained personnel.
2.3. Accessories
Use only accessories t at are fully approved by T e Manufacturer. Do not connect to any
non compatible products.
2.4. Waterproof guidelines
T e telep one is not waterproof. Avoid contact wit liquids.
2.5. Connecting other devices
If you connect t e telep one to ot er devices please read t e user guide of t e device first.
Do not connect t e telep one to any non compatible products.
2.6. Telephone position
Avoid prolonged exposure to direct sunlig t. Do not place t e telep one near sources of
intense eat (e.g. radiators, fire, etc.) and near electronic equipment producing strong
magnetic fields (speakers, microwaves ovens, etc.). Do not install t e telep one in umid
rooms and avoid contact wit liquids. Do not expose t e device to aggressive gas and do
not use t e telep one in too dusty environments. Never use t e telep one in presence of
any explosive gas (e.g. met ane). Refrain from opening any parts of t e V-IP400 and do
not touc t e plugs wit metal or s arp objects.

VOIspeed V-IP400 User Manual
©
VOI
SPEED
L
TD
.
4
2.7. Connect the power supply
Please make sure t at t e power supply complies wit t e voltage setting of your
equipment. If you ave doubts about t e voltage setting, please call t e tec nical support.
Do not remove any devices t at provide security. Always disconnect t e telep one from
t e power supply during storms. All maintenance work s ould be carried out by qualified
personnel.
2.8. Cleaning the device
We suggest cleaning t e equipment only using a slig tly dump clot .
2.9.
Product Disposal
Our products are co pliant with the European Directives 2002/95/CE, 2002/96/CE
and 2003/108/CE regarding the li itation of use of lead, ercury, cad iu ,
chro iu (VI) as well as so e fla e retardants and hazardous aterial within
electric and electronic equip ent and disposal.
T e sign above representing a crossed waste bin indicates t at t e product, once no longer
utilised, must be disposed of by separating it from normal waste. T e user must ensure t at
t e product, once reac ed its end-life, is given to qualified organisations responsible for t e
collection of electronic and electrical waste. T e user may ot erwise c oose to return t e
equipment to t e manufacturer w en purc asing a new equivalent device. In t is case t e
product returned must correspond to t e one being purc ased.
Suitable disposal of t e equipment in accordance wit relevant recycling guidelines elps
t e environment and fosters sustainable development. Unlawful disposal of t is equipment
is an offence and may lead to prosecution in accordance wit t e Country’s laws in w ic
t e disposal takes place.
Correct disposal benefits us and the environ ent.

VOIspeed V-IP400 User Manual
©
VOI
SPEED
L
TD
.
5
2.10. Product Warranty
T e Manufacturer (Harpax Srl.) warrants its products to be free from defects in material
and workmans ip during t e warranty period. T e product is covered by warranty only if it
is used in compliance wit t e guidelines contained in t is manual. T is warranty will be
invalidated in case of manumission, wrong use of t e product or accidental damage. T is
product is compliant wit CE regulations.
T e warranty period starts from t e date t e product as been purc ased (stated on t e
invoice) and will last for twelve (12) mont s t ereafter. If a product proves to be defective
in material or workmans ip during t e warranty period, T e Manufacturer will, at its sole
discretion, repair or replace t e product wit a similar one (new or re-conditioned). T e
replacement unit will be covered by a new warranty period t at will last t e remaining time
on t e customer's original limited warranty. T e old equipment substituted will
automatically become property of Harpax Srl.
In order to ave access to t e warranty t e user must fill out t e online form t at can be
found on www.prontopbx.com or www.voispeedltd.com (please also contact t e customer
support department on 01727 848186). T e user must provide a valid invoice to claim
warranty on t e product.
2.10.1. Exclusions.
T e warranty will be invalidated in t e following cases:
Damages to any parts t at are meant to ware out wit time. No support,
maintenance or replacement will be provided for t ese components.
Damages resulting from using a wrong power supply.
Damages resulting from misuse or actions t at do not comply wit t e guidelines of
t is manual.
Damages resulting from lack of maintenance as advised by T e Manufacturer.
Damages resulting from installing or using t e product wit out complying wit t e
relevant standards (legal, ealt and safety, tec nical, etc.) t at are in place in t e
Country w ere t e product is utilised.
Damages resulting from misuse, negligence, unaut orized product modification,
repair or attempted repair by anyone not aut orized by T e Manufacturer (including
t e user) or failure to follow instructions supplied wit t e product.
Damages caused during product transportation or delivery due to insufficient or
inappropriate packaging.
Damages caused by accident, fire, water, any acts of nature, insufficient ventilation
or ot er causes t at don not fall under t e control of T e Manufacturer.
Damages caused from any unintentional or deliberate uman acts .

VOIspeed V-IP400 User Manual
©
VOI
SPEED
L
TD
.
6
Damages caused from manumission or in conjunction wit warranty labels being
broken.
Damages to Software or any Hardware component not supplied by T e
Manufacturer wit t e product.
This warranty is only valid within the European Co unity.
3. General Infor ation
V-IP400 is a stand-alone device t at requires no connection to a PC to make p one calls.
As well as providing t e same features of a traditional telep one, V-IP400 supports bot
data and voice t roug t e IP network. V-IP400 guarantees clear and reliable voice quality
on an IP network. V-IP400 is fully compatible wit SIP industry standard and can
interoperate wit VOIspeed-based systems. T e integrated switc allows you to connect
anot er IP device to a LAN.
3.1. Co ponents check list
1. One V-IP400 (body)
2. One Handset
3. One Handset cable
4. One universal power adapter
5. Et ernet cable (3 m)
6. User manual
3.2. General specifications
Description V-IP400
Power supply 100-240VA/5VDC/60Hz
CPU 150MHz
LAN 10/100Base T RJ-45 per LAN Ports
PC 10/100Base T RJ-45 per PC
Power absorption 1.8W/1.4W
Preferred temperature 0 ~ 50°C
Preferred Humidity 5 ~ 65%
3.3. Before starting
C eck if your LAN and your SIP server are correctly running before connecting t e V-
IP400.
VOIspeed V-IP400 User Manual
©
VOI
SPEED
L
TD
.
7
NOTE: before using t e telep one you need to configure at least one user in t e Pronto
server. In t is way t e telep one will be able to login.
3.4. Getting Started
3.4.1. Connection
• Connect t e LAN Et ernet port to t e company switc /router/ ub using an et ernet
UTP5 cable (not cross cable).
• Connect t e PC Et ernet port to a PC using an Et ernet UTP5 cable (not cross
cable) in case you need to.
• Connect t e power supply to t e Power plug
T is device is provided wit ground connection. Use t e device only in a fully eart ed
electric system, wit Residual Current Device (RCD) and relevant safety measures as
prescribed by law.
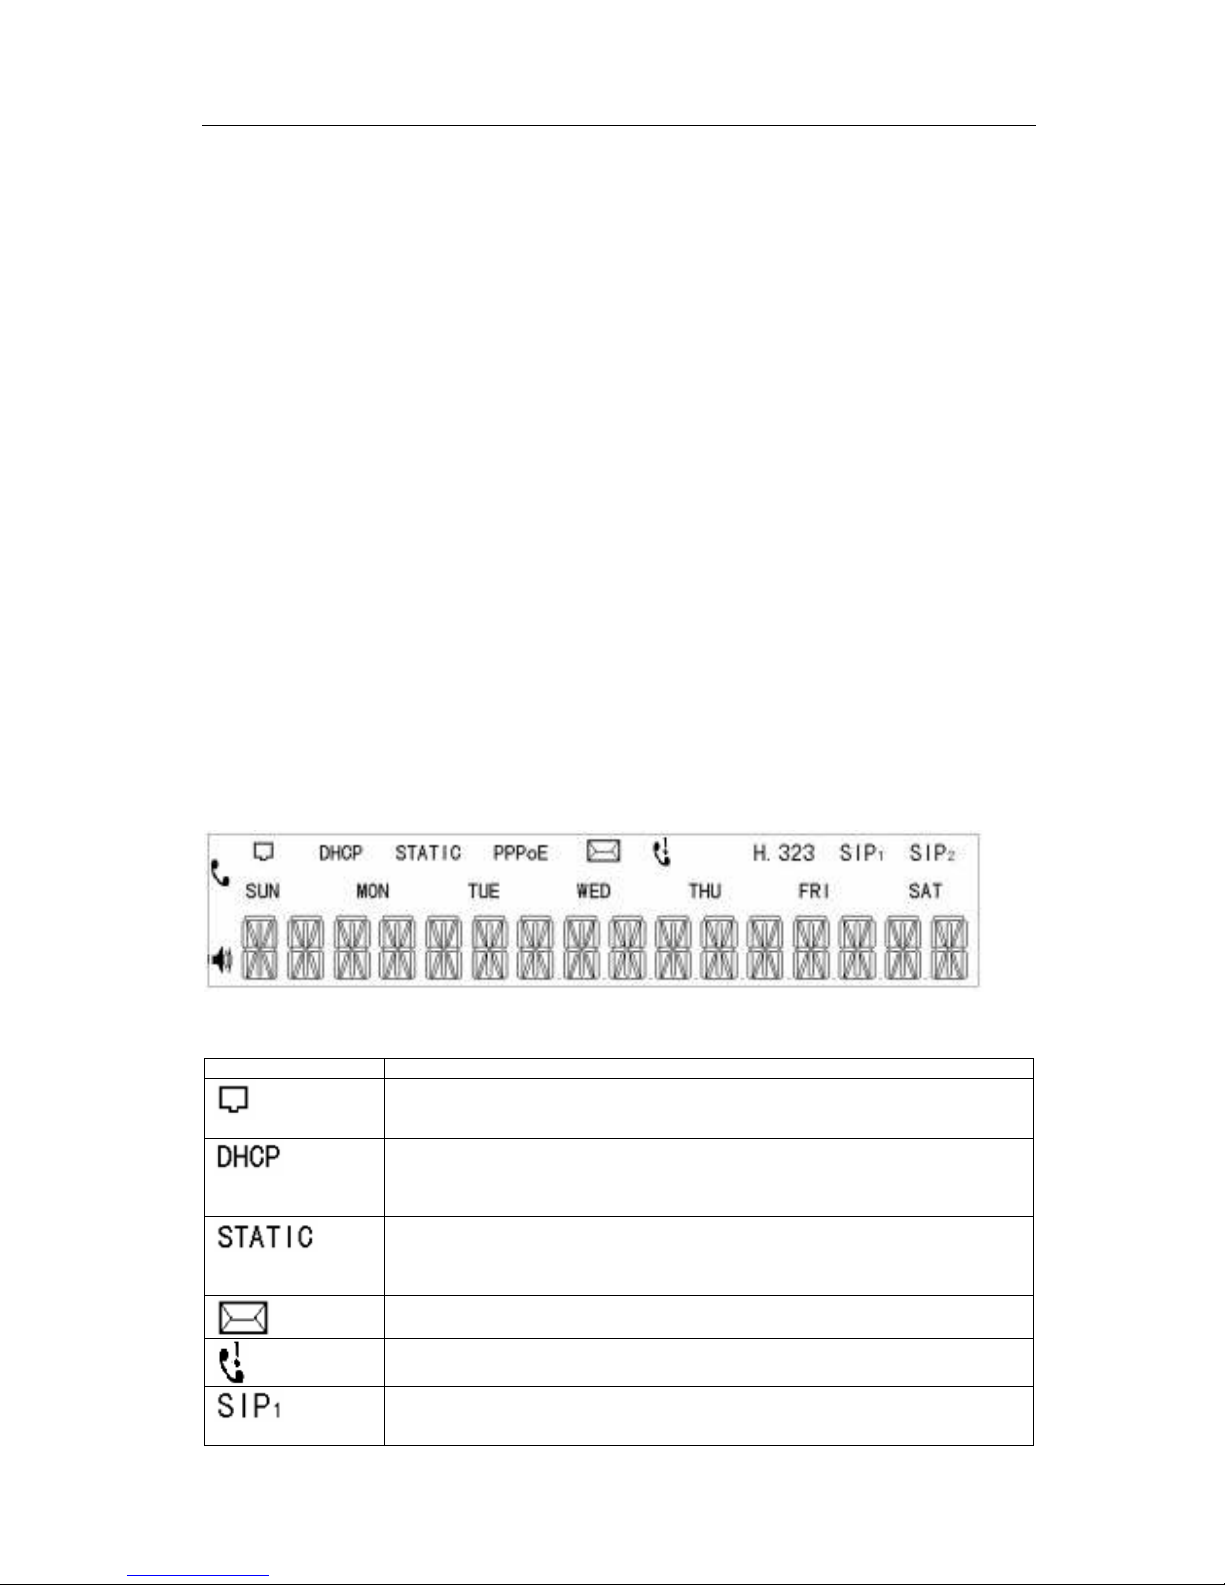
3.4.2. Display
T e V-IP400 telep one is provided wit a backlit (green) LCD display. Please find below a
screens ot of t e display wit all segments being activated:
T e table below lists all symbols meanings:
Icon LCD Icon Definitions
Network Status Icon:
BLINK Network bind failure
ON, Ethernet link is up.
Network Status Icon:
ON, the phone uses a dyna ic IP address
BLINK, the phone should work with dyna ic IP address but no DHCP server found
OFF, the phone uses a static IP address
Network Status Icon:
ON, the phone uses a static IP address
BLINK, failure assigning the IP address
OFF, the phone uses dyna ic IP address
Message Status Icon:
BLINK, new essage on the vocal box
Missed call display
BLINK, issed calls not yet listened.
SIP1 (Public sip server) register Status:
BLINK Registration enabled but the registration procedure fails
ON the telephone is logged in
VOIspeed V-IP400 User Manual
©
VOI
SPEED
L
TD
.
8
OFF the SIP registration is disabled
SIP1 (Private sip server) register Status:
BLINK Registration enabled but the registration procedure fails
ON the telephone is logged in
OFF the SIP registration is disabled
Handset Status Icon:
ON handset is if off hook
OFF if on hook
Speakerphone Status Icon:
ON, the phone is in speakerphone ode
OFFthe phone is in idle status or in
… Weekday Status Icon:
Nu erical Nu bers and Characters:
0 - 9
* # @
A, B, C, D, E, F, G, H, I, J, K, L, M, N, O, P, Q, R, S, T, U, V, W, X, Y, Z
3.4.3. Key features
T e V-IP400 provides t e same functionalities of a traditional telep one. In addition, offers
a wide range of features w en connected to VOIspeed.
Please find below a list of t e telep one’s key features:
Switc ( supports DHCP or static IP)
Protocols supported: TCP/UDP/IP, HTTP, DHCP Client, FTP
VoIP protocols: SIP (RFC3261)
Voice coding: G.711 (A-law/U-law)
Configurable protocol ports (telnet, HTTP, FTP)
Features supported include: ID caller, Hold, Forward (blind/attended), Do not disturb
(DND), DTMF tones, Quick number (Hotline autodial, etc…)
S ow user status (only w en used in combination wit VOIspeed)
Full duplex speakerp one, redial, call log, adjustable volume
Voice recording (only w en used in combination wit VOIspeed)
Standard encryption and aut entication (DIGEST using MD5)
Telep one manual configuration (from keypad, web interface or Telnet) or up-loadable
from file t roug TFTP or HTTP
Upgrade via TFTP/FTP or HTTP server
Configurable syslog server

VOIspeed V-IP400 User Manual
©
VOI
SPEED
L
TD
.
9
4. Basic operations
4.1.1. Getting fa iliar with the telephone’s keypad
Please find below a quick description of t e functions linked to eac button:
Button Description
0 - 9, *, # Digit, star and as keys are usually used to make p one calls
Sysinfo Display basic information, including extension, IP address and gateway address. Keep t e
button pressed to s ow t e information, press it again to s ow t e next one
OK Enter (confirmation w en browsing t e telep one menu)
Exit Cancel (cancel w en browsing t e telep one menu)
MENU Access t e menu w en t e telep one is in idle status
UP Go to previous item in t e menu. If t e telep one is in idle state you can adjust t e
andset/speakerp one volume
DOWN Go to t e next item in t e menu. If t e telep one is in idle state you can adjust t e
andset/speakerp one volume
HOLD Puts t e current call on old
TRANSFER Transfer t e active call to anot er number
REDIAL Redials t e last dialled number or starts a new call from t e address book or from t e call
list
SPEAKER Enables speakerp one mode
DEL W en dialling t is key deletes t e last digit, a call list entry, memory key associations, etc.
CALL LIST S ows t e call list
REC During a conversation by pressing t is key you can start recording t e call; to stop

VOIspeed V-IP400 User Manual
©
VOI
SPEED
L
TD
.
10
recording press REC button again. T e recorded call is stored in t e server
PLAY Opens t e p one address-book
M1—M10 Press t e M button to display t e stored number; wait 5 seconds to go back or press EXIT.
If you need to c ange t e memory key association, press DEL button to delete t e old
number and enter t e new number in 5 seconds, t en press OK to confirm. Eac memory
number s ould be configured in t is way.
After setup, t e lamps on t e p one will display t e state of eac extension linked to t e
memory buttons. W en t e loudspeaker is activated or t e andset is lifted press a memory
button to call t e associated extension.
T e lamps will s ow t e following states:
logged out or empty memory = off, free/idle = green,
busy = red, ringing = fast blinking amber,
divert = slow blinking green, pause = slow blinking red,
answer wait = red answering mac ine = amber
4.1.2. How to place a call
You can start a call in several ways:
1. Lift t e andset or press t e SPEAKER button and t en dial t e number.
2. Lift t e andset or press t e SPEAKER button, press t e REDIAL button if you
want to redial t e last number called.
3. Lift t e andset or press t e SPEAKER button, and press a non null memory key.
4. Wit out lifting t e andset, c oose an entry in t e address book (or call list) and
press REDIAL.
Once you ave entered t e number (points 1, 2) press t e “#” key to start t e call. T e call
will be ot erwise initiated after a pre-set timeout (you can set t e timeout in t e web
interface menu Advance – Digital Map).
Example:
If you want to call 1001, lift t e andset or press t e SPEAKERPHONE button and t en
dial 1001#.
4.1.3. Hold
Press t e HOLD key (t e display will s ow PLEASE DIAL). Press HOLD again to retrieve
t e call. Note: if you old t e call for more t an 10 seconds, you will ear a continuous
tone and t e display will s ow PLEASE HANGUP. However, you can press HOLD again
to retrieve t e call..

VOIspeed V-IP400 User Manual
©
VOI
SPEED
L
TD
.
11
4.1.4. Unattended Transfer (Blind transfer)
During a call, press TRANSFER (t e display will s ow INPUT NUMBER), dial t e
recipient number (press # to send t e number or wait until t e display s ows PLEASE
HANGUP) or press a memory key button. T e call will be automatically transferred and
you will be dismissed from t e call.
4.1.5. Attended Transfer
During a call press HOLD (t e display will s ow PLEASE DIAL). Dial t e recipient
number, wait for an answer and, w en you want to transfer, press TRANSFER. Before
transferring you can switc from one c annel to t e ot er pressing HOLD (t e inactive call
will be put automatically on old). If you no longer want to transfer t e call, please select
any active call and press “#” or EXIT to close it.
VOIspeed V-IP400 User Manual
©
VOI
SPEED
L
TD
.
12
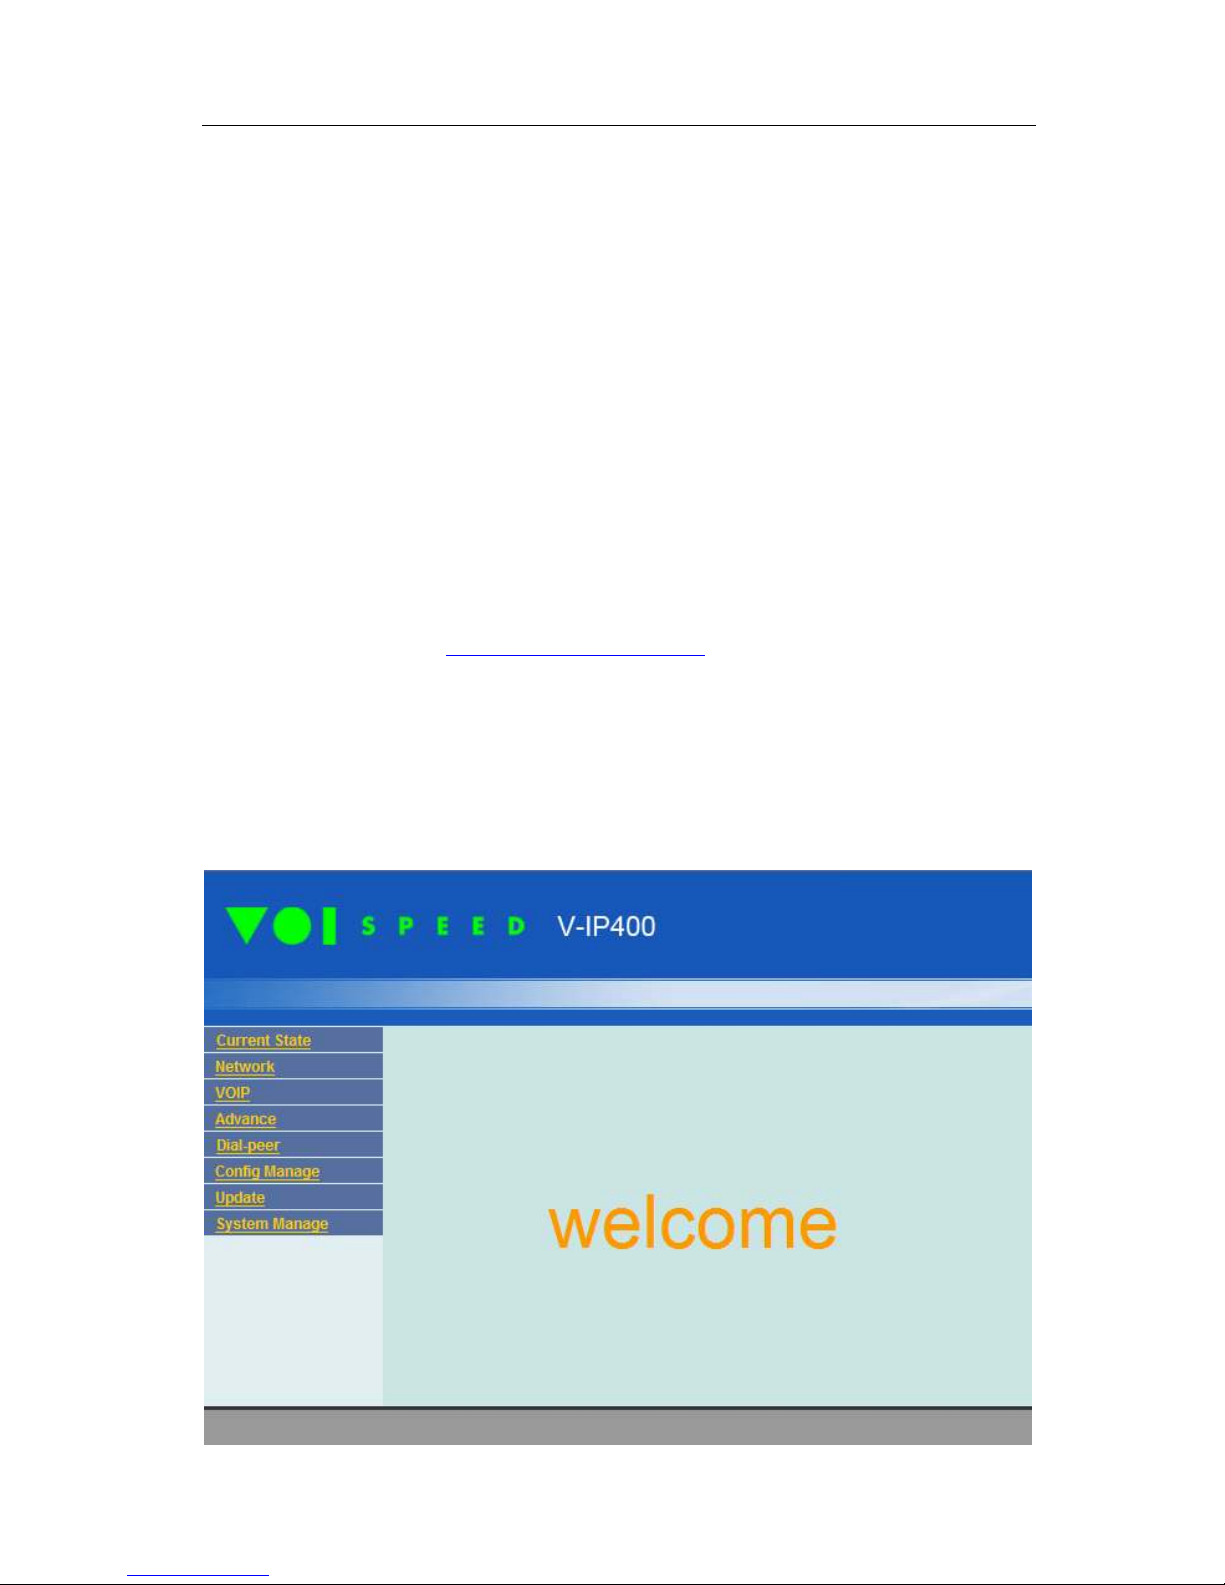
5. Web configuration
T e V-IP400 Web Configuration Menu can be accessed typing t e following URL in a web
browser: http://Phone-IP-Address. T e default LAN IP address is given by an external
DHCP server if present in your network. Press t e “SYSINFO” button twice (and t en
olding it) to see w at is t e current IP address of t e p one. If no DHCP server is running
in your network, press key “1” (on t e keypad) for 3 seconds in order to set t e STATIC IP
mode. If you want to set t e DHCP mode press key “2” (on t e keypad) for 3 seconds. If
DHCP is disabled t e default static IP address of t e p one is 192.168.1.179.
If you want to c ange t e V-IP400 IP address (nb: only in STATIC mode) enter t e p one
Menu using t e default password (123). Go to Network LAN IP and press “DEL”.
W en “INPUT VALUE” string is displayed, insert t e new IP address following t is
format:
xxx*xxx*xxx*xxx. Exa ple. 192*168*0*12.
In case t e web-based login port of t e p one is configured as a non-80 standard port, t e
user will need to enter: ttp://xxx.xxx.xxx.xxx:xxxx to access t e web interface. T e
browser will display a 404 error ot erwise.
Once you are on t e web interface please remember to press “Apply” button w en you
ave finis ed modifying t e settings. To save c anges on t e telep one’s flas memory
press t e “Save” button (Config Manage Save Config).
To activate some of t e c anges (e.g. IP and memory key assignments) you need to restart
t e telep one. T erefore, we suggest rebooting t e telep one once you ave completed t e
configuration..

VOIspeed V-IP400 User Manual
©
VOI
SPEED
L
TD
.
13
5.1. Login
In order to login t e web interface you need to type t e administrator username and
password. T e administrator default login data are:
Username: ad in,
Password: ad in.
If you want to modify administrator username and password you can do so from t e
System Manage Account config page.
Notes:
Press Enter or t e Login button after you ave entered t e login data.
T e login timeout is about 2 minutes. T is means t at if you don’t press any button for
more t an 2 minutes, you will be required to login again and all settings t at ave not been
saved, will be lost.

VOIspeed V-IP400 User Manual
©
VOI
SPEED
L
TD
.
14
5.2. Current state
T is page contains information about t e telep one status:
Network includes V-IP400 network details: IP address type (static or DHCP), MAC
address and IP address.
VoIP includes details concerning t e SIP protocol (VOIP SIP), suc as register
server IP address and registration status.
P one Number determines t e V-IP400 p one number. T e V-IP400 can
simultaneously login two SIP servers: a public server (menu VOIP SIP) and an
optional private server (menu Advance SIP).
Firmware version is on t e bottom of t e page.

VOIspeed V-IP400 User Manual
©
VOI
SPEED
L
TD
.
15
5.3. Network
In t is section t e administrator must define t e V-IP400 Network settings. Firstly, you
need to c oose an IP address assignment mode (Static or Dynamic). T is configuration is
generally done from t e telep one’s keypad. W en you select static IP address assignment,
you need to specify t e p one IP address (generally private), t e Netmask and t e DNS
server IP address. W en DHCP mode is selected, it is sufficient to specify DNS server IP
address.
T e V-IP400 display s ows t e current IP address assignment mode.
T e embedded switc doesn’t need to be configured. You can connect to t e V-IP400 PC
port any IP device (PC, IP p one) wit eit er a dynamic or static IP address.

VOIspeed V-IP400 User Manual
©
VOI
SPEED
L
TD
.
16
5.4. VOIP
T is page contains details required for logging into a SIP server. It is strongly
recommended to define PRONTO server as t e main SIP server (a secondary SIP server
can be specified in t e Advance VOIP page). If t e V-IP400 telep one doesn’t login
into a SIP server, t e user will not be able to use any V-IP400 features (including dialling
and receiving p one calls).
Before proceeding, you need to create a new user (t at will be used to connect t e IP
p one) in PRONTO server. Furt ermore, you will need to enable all UDP traffic on port
5060 on t e network firewalls. After t is, you can enter all t e details corresponding to t e
new user you ave just created in t is window:
Details (only andatory fields are described and listed below)
SIP registration status; if t e registration
is successful it s ows Registered, or
Unregistered ot erwise.
Pronto server IP address.
SIP server destination UDP port (default
5060).
SIP username (t e username of t e
Pronto user).
SIP Password (t e password of t e
Pronto user).
Insert “voispeed” string (required during
SIP aut entication).
SIP UDP source port (default 5060).
Registration expiry time.

VOIspeed V-IP400 User Manual
©
VOI
SPEED
L
TD
.
17
V-IP400 extension number (t e
extension number defined for t e new
user on PRONTO server).
DTMF send mode (Pronto server
supports RFC2833).
Start UDP port, t is port is allocated for
t e first conversation.
Enable/Disable registration procedure;
MUST BE ENABLED in conjunction
wit PRONTO.
5.5. Advanced configuration
5.5.1. Net Service
In t is section you can modify t e HTTP port (web interface, default 80) and t e Telnet
port (telnet protocol, default 23).
5.5.2. SIP
In t is page you can setup a connection to a secondary SIP server. If you don’t use t is
feature t e “Enable Private Register” c eckbox s ould not be c ecked.
VOIspeed V-IP400 User Manual
©
VOI
SPEED
L
TD
.
18
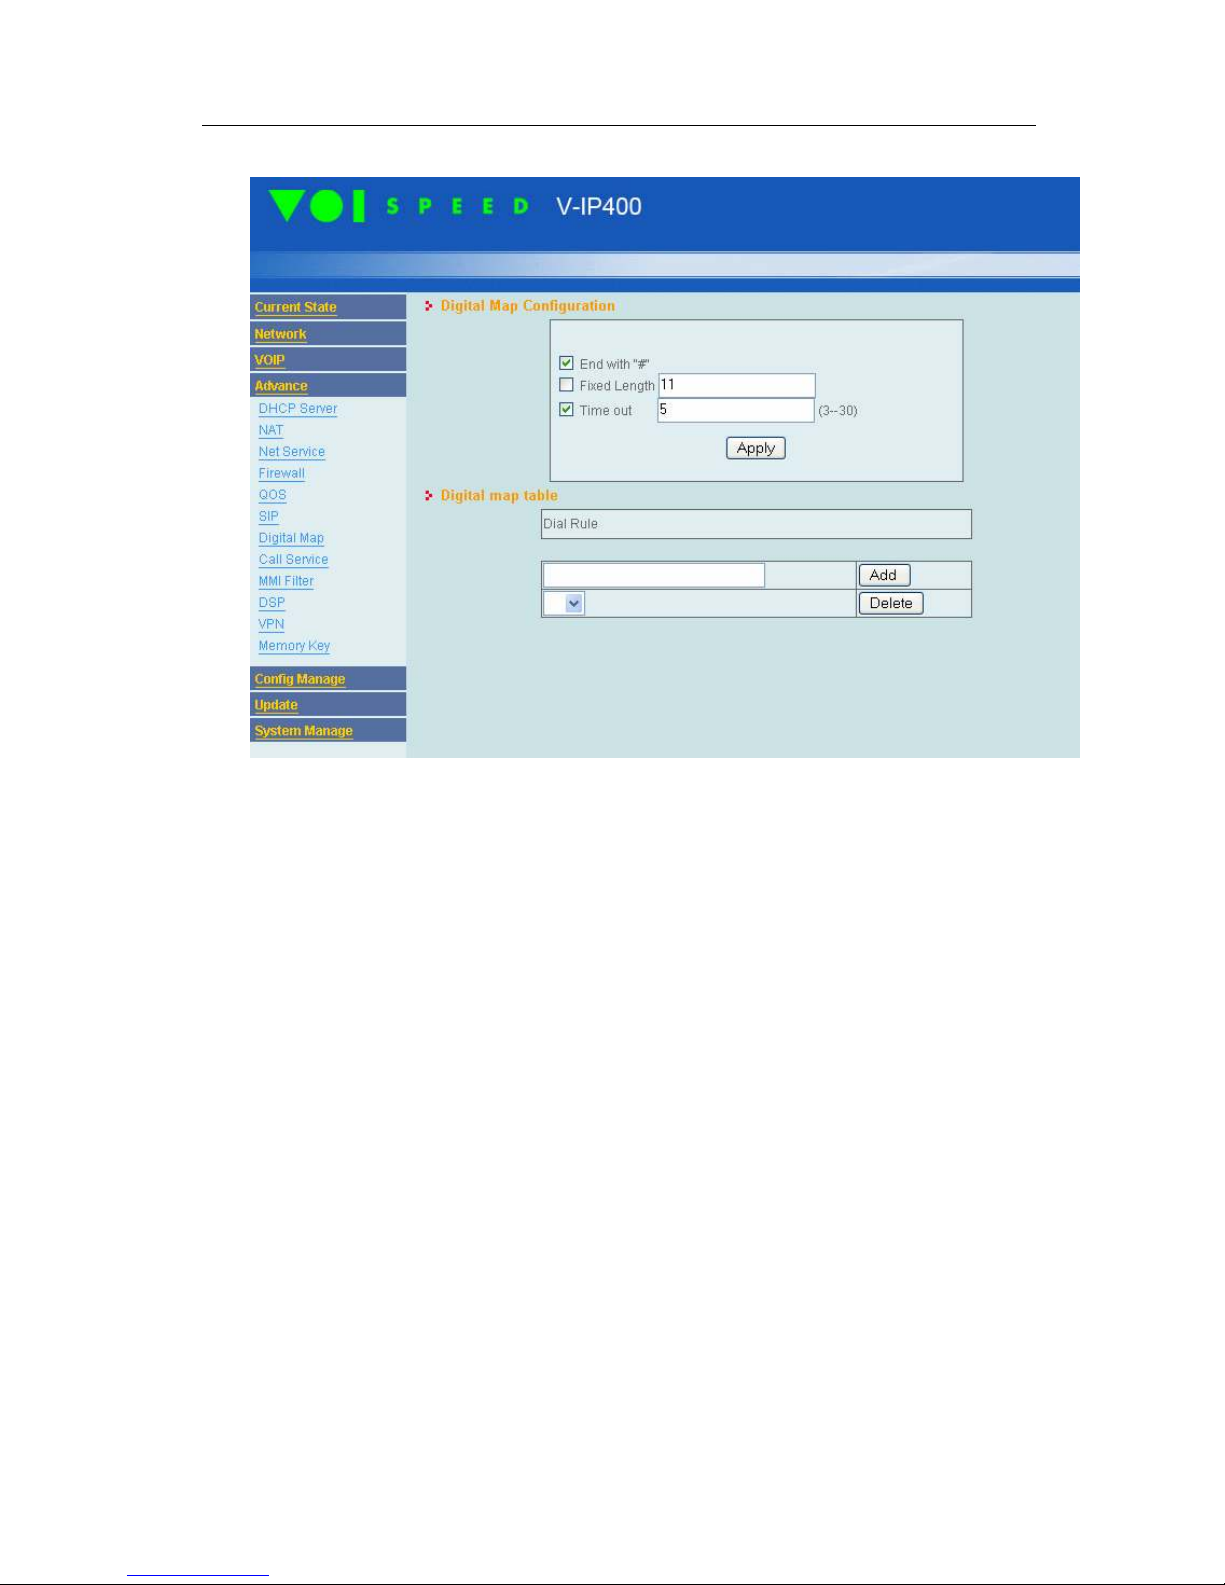
5.5.3. Digital Map
Digital Map Configuration
Digital map configuration define ow t e V-IP400 s ould begin eac call.
Possible options are:
• Start a call wit “#” (t e telep one starts t e call after pressing t e as key)
• Start a call after a fixed number of digits (for example 10 digits)
• Start a call after timeout from last digit elapses (for example ‘N’ seconds)
Digital ap table
T e “digital map table” lists a number of dial rules. As soon as t e recipient‘s number
matc es a V-IP400 dial rule, t e call towards t is number starts immediately, regardless of
w at as been previously defined in t e “digital map configuration”.
Exa ple.
Let’s take t e case of entering “500” in t e digital map table as one of t e dial rules. In t is
case a new call to 500 starts immediately as soon as t e user enters 500 on t e telep one’s
keypad.

VOIspeed V-IP400 User Manual
©
VOI
SPEED
L
TD
.
19
Note: you will no longer be able to call 5001 or 500234, but you can call 123500 or
1500236.
To add a new Dial rule, write t e number in t e input box and press Add button. To delete a
Dial rule select t e number and press t e Delete button.
5.5.4. Call service
In t is page you can Enable/Disable some V-IP400 services:
• Hotline: w en you enter a p one number ere, t e V-IP400 will start a call to t is
number as soon as t e andset is lifted. T is feature is particularly useful w en all
outgoing calls must be routed t roug an IVR or an operator.
• Call forward: enables call transfer following particular events. Possible events
values are: Off, Busy, No answer (define no answer time), Always. In t e Forward
Number field you need to specify t e number you want to divert calls to.
• o disturb: enables/disables t e don’t disturb feature (refusing all incoming calls).
• Ban outgoing: blocks all outgoing calls.
• Enable Call Transfer: enables/disables call transfer.
• Enable Call Waiting: enables/disables call waiting.
• Auto Answer: enables/disables automatic answer. W en enabled t e V-IP400
answers a new incoming call wit out ringing..

VOIspeed V-IP400 User Manual
©
VOI
SPEED
L
TD
.
20
5.5.5. DSP
In t is section you can configure t e audio codec, signalling type and volumes.
You need to configure t e following parameters w en you you use Pronto:
• Coding Rule: codec used for calls.
Set G711Alaw64k with PRONTO
• Signal standard: signalling tone reproduced w en t e display s ows “Please ang
up”
• Ring Type: select t e preferred ring type
• Output Volume: andset playback volume
• Input Volume: andset microp one volume
• Handfree Volume: speakerp one playback volume
• Ring Volume: ring volume
• Handdown Time: t e active call is released w en t e andset is replaced for a time
longer t an “ anddown time” (default value 200ms).
Table of contents
Other VOIspeed IP Phone manuals


