VOIspeed V-IP400P User manual

IP
T
ELEPHONE
VOI
SPEED
V-IP400P
User Manual

2
©
VOI
SPEED
L
TD
.
U
SER
M
ANUAL
© 2007 Voispeed Ltd. – All rights reserved.
Total or partial reprodu tion of this do ument is prohibited without prior written onsent of
the publisher. Su h onsent will only be granted in those instan es when the sour e of
the do ument is learly stated.
Revision: 1.0 Released on: 22/10/2007
De laration of onformity an been found at this internet address:
http://www.voispeed.com/products/conformity/V-IP400P_DDC.pdf

VOI
SPEED
V-IP400P
©
VOI
SPEED
L
TD
.
3
1 - Index
1 -
Index 3
2 -
Introduction 5
2.1 -
Se urity Information ..................................................................................5
2.2 -
Produ t Disposal .......................................................................................6
2.3 -
Produ t Warranty ......................................................................................7
3 -
Main Requirements 9
3.1 -
Des ription ................................................................................................9
3.2 -
General Spe ifi ations ..............................................................................9
3.3 -
Display.....................................................................................................10
3.4 -
Main Fun tionalities ................................................................................10
3.5 -
Pa kage Content.....................................................................................12
4 -
How to use the V-IP400P 12
4.1 -
Mounting Instru tions ..............................................................................12
4.2 -
General Requirements ............................................................................12
4.3 -
Phone Des ription...................................................................................13
4.4 -
Main Fun tionalities ................................................................................14
4.4.1 - Making a all .............................................................................................. 14
4.4.2 - Reje t an in oming all .............................................................................. 15
4.4.3 - Put a all on-hold ....................................................................................... 15
4.4.4 - Call Forwarding .......................................................................................... 15
4.4.5 - Three user onferen e ............................................................................... 15
4.4.6 - Call pi k-up ................................................................................................ 16
4.4.7 - Call Re ording............................................................................................ 16
4.4.8 - Speakerphone............................................................................................ 16
4.4.9 - How to hange the volume settings ........................................................... 16
4.4.10 - Text Messaging.......................................................................................... 16
4.5 -
Memory Buttons M1 – M10 .....................................................................16
4.5.1 - Setup.......................................................................................................... 17
4.5.2 - Extension Status ........................................................................................ 17
4.6 -
Conta t List .............................................................................................18
4.7 -
Call Logs .................................................................................................18
5 -
Manual Setting 18
5.1 -
Network Interfa e ....................................................................................19

4
©
VOI
SPEED
L
TD
.
U
SER
M
ANUAL
5.2 -
SIP Interfa e............................................................................................20
5.3 -
Call Servi e Settings ...............................................................................21
5.4 -
Advan ed Settings ..................................................................................23
5.5 -
System Settings ......................................................................................24
5.6 -
Telephone Status ....................................................................................24
5.7 -
Resetting the telephone ..........................................................................25
6 -
WEB Interface 26
6.1 -
Logon ......................................................................................................26
6.2 -
Current State ...........................................................................................26
6.3 -
Network onfiguration (LAN Config)........................................................27
6.4 -
SIP User Setting (SIP Config) .................................................................28
6.5 -
Advan ed Settings (Advan ed)...............................................................29
6.5.1 - Number input setting (Digital Map)............................................................. 29
6.5.2 - Call Settings (Call Servi e)......................................................................... 30
6.5.3 - Operating Settings (DSP)........................................................................... 32
6.5.4 - Memory Key Settings (Memory Key).......................................................... 33
6.6 -
Configuration Management (Config Manage).........................................33
6.7 -
Firmware Update (Update)......................................................................34
6.7.1 - Online Update (WEB Update) .................................................................... 34
6.7.2 - Update through TFTP/FTP server (FTP Update) ....................................... 34
6.8 -
V-IP400P System Management (System Manage) ................................34
6.8.1 - A ount Management (A ount Config)..................................................... 35
6.8.2 - Conta t List (Phone Book) ......................................................................... 35
6.8.3 - Syslog (Syslog Config)............................................................................... 36
6.8.4 - Time Setting (Time Set) ............................................................................. 36
6.8.5 - Restarting the V-IP400P (Reboot).............................................................. 37
7 -
V-IP400E Extension Module 37

VOI
SPEED
V-IP400P
©
VOI
SPEED
L
TD
.
5
2 - Introduction
Wel ome to VOIspeed V-IP400P user manual. We would like to thank you for your
pur hase and for having hosen one our produ ts. This manual provides general
guidelines for a orre t use of the produ t. In ase you require further information on this
produ t or to re eive te hni al assistan e please visit our website: www.voispeed. om.
2.1 - Security Information
Please read the se urity rules below. You should omply with these guidelines when
using this devi e. Please omply with these guidelines to avoid taking unne essary risks.
Use the devi e only in the standard working position.
Any installations or repairs on the produ t should be arried out only by
qualified and fully trained personnel.
Use only a essories that are fully approved by The Manufa turer. Do not
onne t to any non ompatible produ ts.
The devi e is not waterproof. Avoid onta t with liquids.
If you onne t the devi e to other devi es please read the user guide of the
new equipment first. Do not onne t the devi e to any non ompatible
produ ts.
Avoid prolonged exposure to dire t sunlight. Do not pla e the devi e near
sour es of intense heat (e.g. radiators, fire, et .) and near ele troni
equipment produ ing strong magneti fields (speakers, mi rowaves ovens,
et .). Do not install the devi e in humid rooms and avoid onta t with
liquids. Do not expose the devi e to aggressive gas and do not use it in too
dusty environments. Never use the devi e in presen e of any explosive gas
(e.g. methane). Refrain from opening any parts of the produ t and do not
tou h the plugs with metal or sharp obje ts.
Please make sure that the power supply omplies with the voltage setting of
your equipment. If you have any doubts about the voltage setting, please

6
©
VOI
SPEED
L
TD
.
U
SER
M
ANUAL
all the te hni al support. Do not remove any se urity devi es. Always
dis onne t the telephone from the power supply during storms. All
maintenan e work should be arried out by qualified personnel.
We suggest leaning the equipment only using a slightly dump loth.
2.2 - Product Disposal
Our products are compliant with the European Directives
2002/95/CE, 2002/96/CE and 2003/108/CE regarding the limitation
of use of lead, mercury, cadmium, chromium (VI) as well as some
flame retardants and hazardous material within electric and
electronic equipment and disposal
The sign above representing a rossed waste bin indi ates that the produ t, on e no
longer utilised, must be disposed of by separating it from any normal waste. The user
must ensure that the produ t, on e rea hed its end-life, is given to qualified
organisations responsible for the olle tion of ele troni and ele tri al waste. The user
may otherwise hoose to return the equipment to the manufa turer when pur hasing a
new equivalent devi e. In this ase the produ t returned must orrespond to the one
being pur hased. Suitable disposal of the equipment in a ordan e with relevant
re y ling guidelines helps the environment and fosters sustainable development.
Unlawful disposal of this equipment is an offen e and may lead to prose ution in
a ordan e with the Country’s laws in whi h the disposal takes pla e.
Correct disposal benefits us and the environment

VOI
SPEED
V-IP400P
©
VOI
SPEED
L
TD
.
7
2.3 - Product Warranty
The Manufa turer (Harpax Srl.) warrants its produ ts to be free from defe ts in material
and workmanship during the warranty period. The produ t is overed by warranty only if
it is used in omplian e with the guidelines ontained in this manual. This warranty will
be invalidated in ase of manumission, wrong use of the produ t or a idental damage.
This produ t is ompliant with CE regulations.
The warranty period starts from the date the produ t has been pur hased (stated on the
invoi e) and will last for twelve (12) months thereafter. If a produ t proves to be defe tive
in material or workmanship during the warranty period, The Manufa turer will, at its sole
dis retion, repair or repla e the produ t with a similar one (new or re- onditioned). The
repla ement unit will be overed by a new warranty period that will last the remaining
time on the ustomer's original limited warranty. The old equipment substituted will
automati ally be ome property of Harpax Srl.
In order to have a ess to the warranty the user must fill out the online form that an be
found on www.prontopbx. om or www.voispeedltd. om (please also onta t the
ustomer support department on 01727 848186). The user must provide a valid invoi e
to laim warranty on the produ t.

8
©
VOI
SPEED
L
TD
.
U
SER
M
ANUAL
Exclusions.
The warranty will be invalidated in the following cases:
• Damages to any parts that are meant to ware out with time No support,
maintenance or replacement will be provided for these components
• Damages resulting from using a wrong power supply
• Damages resulting from misuse or actions that do not comply with the
guidelines of this manual
• Damages resulting from lack of maintenance as advised by The
Manufacturer
• Damages resulting from installing or using the product without complying
with the relevant standards (legal, health and safety, technical, etc ) that
are in place in the Country where the product is utilised
• Damages resulting from misuse, negligence, unauthorized product
modification, repair or attempted repair by anyone not authorized by The
Manufacturer (including the user) or failure to follow instructions supplied
with the product
• Damages caused during product transportation or delivery due to
insufficient or inappropriate packaging
• Damages caused by accident, fire, water, any acts of nature, insufficient
ventilation or other causes that don not fall under the control of The
Manufacturer
• Damages caused from any unintentional or deliberate human acts
• Damages caused from manumission or in conjunction with warranty labels
being broken
• Damages to Software or any Hardware component not supplied by The
Manufacturer with the product
This warranty is only valid within the European Community.

VOI
SPEED
V-IP400P
©
VOI
SPEED
L
TD
.
9
3 - Main Requirements
3.1 - Description
V-IP400P is a stand-alone devi e that requires no onne tion to a PC to make phone
alls. As well as providing the same features of a traditional telephone, the V-IP400P
supports both data and voi e through the IP network. The V-IP400P guarantees lear
and reliable voi e quality over any IP network. It is fully ompatible with SIP industry
standard and provides full interoperability with VOIspeed-based systems. The integrated
swit h allows you to onne t an additional IP devi e to the LAN through the se ond
Cat5e so ket.
The telephone offers the following fun tionalities:
- Power over Ethernet
- Multiple ring-tones
- Internal onta t list
- Text messaging
3.2 - General Specifications
IN 100-240V AC
Power Supply
OUT 5V DC 1A
PC 1 – 10/100Base T RJ-45
802.3af ompatible (mode B)
LAN 1 – 10/100Base T RJ-45
Ports
MOD
To onne t the external memory
extension V-IP400E
CPU 150 MHz
Power <2W
Temperature 050
o
C
Humidity 565%
Dimensions 240mm x 184mm x 120mm

10
©
VOI
SPEED
L
TD
.
U
SER
M
ANUAL
3.3 - Display
The V-IP400P features a ba klit LCD (blue). When in standby (and with no a tive
alarms) the LCD would normally display time and telephone’s name. New events (e.g.
in oming alls) or errors (e.g. undete ted DHCP) are promptly displayed on the LCD.
3.4 - Main Functionalities
The V-IP400P features all the fun tions of a traditional phone. In addition, when used in
onjun tion with a VOIspeed PBX, more advan ed fun tionalities are available:
• Network proto ols: TCP/UDP/IP, HTTP, DHCP Client, FTP/TFTP, DNS, ARP, ICMP
• Power Over Ethernet: 802.3af (Mode B)
• Swit h (DHCP or stati IP) over two 10/100Base T RJ-45 ports
• Standard En ryption and authenti ation (DIGEST using MD5)
• Firmware upgrading via TFTP/FTP and HTTP
• Syslog: the phone an send events with debugging information to a syslog server with
in reased level of detail
• VoIP proto ols: SIP (RFC3261 e RFC2543)
• SDP (RFC2337)
• Voi e Code : G.711 (A-law/U-law), G.729, G.723-r63 e G.723-r53
• Jitter Buffer
• DTMF standard: relay, RFC2833 and SIP info
• G.168 e ho an ellation
• Voi e A tivity Dete tion (VAD)
• QoS supporting TOS / DiffServ
• Outbound proxy for NAT Transversal
• Caller ID
• Call on hold
• Call forwarding (blind/attended)
• Do not disturb

VOI
SPEED
V-IP400P
©
VOI
SPEED
L
TD
.
11
• Hot key: a predefined number is dialled as soon as the handset is lifted
• Redial
• Conferen e all on three hannels
• Auto Answer
• Possibility to define dialling rules
• Call log: in oming/outgoing/missed alls
• Conta t list with 8 ringtones
• Full duplex speakerphone
• Multiple ringtones (8)
• Volume ontrol for mi rophone and speaker (handset/speakerphone)
• Internal onta t list (up to 100 onta ts) a essible through the keyboard
• 10 memory buttons with extension status (only available with VOIspeed PBX) and
multiple ring-tones
• Automati dialling on engaged line (only available with VOIspeed PBX)

12
©
VOI
SPEED
L
TD
.
U
SER
M
ANUAL
3. - Package Content
• One V-IP400P (body)
• One Handset with able
• One network able UTP RJ45 CAT5 (1.5 mt.)
• Mounting supports
• One power supply 9V 600mA
• User manual
4 - How to use the V-IP400P
4.1 - Mounting Instructions
• Remove equipment from pa kaging
• Conne t the handset to the telephone using the able provided
• Conne t the phone to the swit h/router/hub through the Ethernet port using a UTPS
able with RJ45 onne tors (not rossed).
• If required onne t the additional Ethernet port to a se ond network devi e.
• Conne t the power supply (provided) in ase the network does not support power over
Ethernet (standard PoE 802.3af (Mode B).
4.2 - General Requirements
Make sure that both your server and the network are operating orre tly before
onne ting the phone.
Note: you will need to reate a new user at the server PBX in order to register the
phone onto the network.
VOI
SPEED
V-IP400P
©
VOI
SPEED
L
TD
.
13
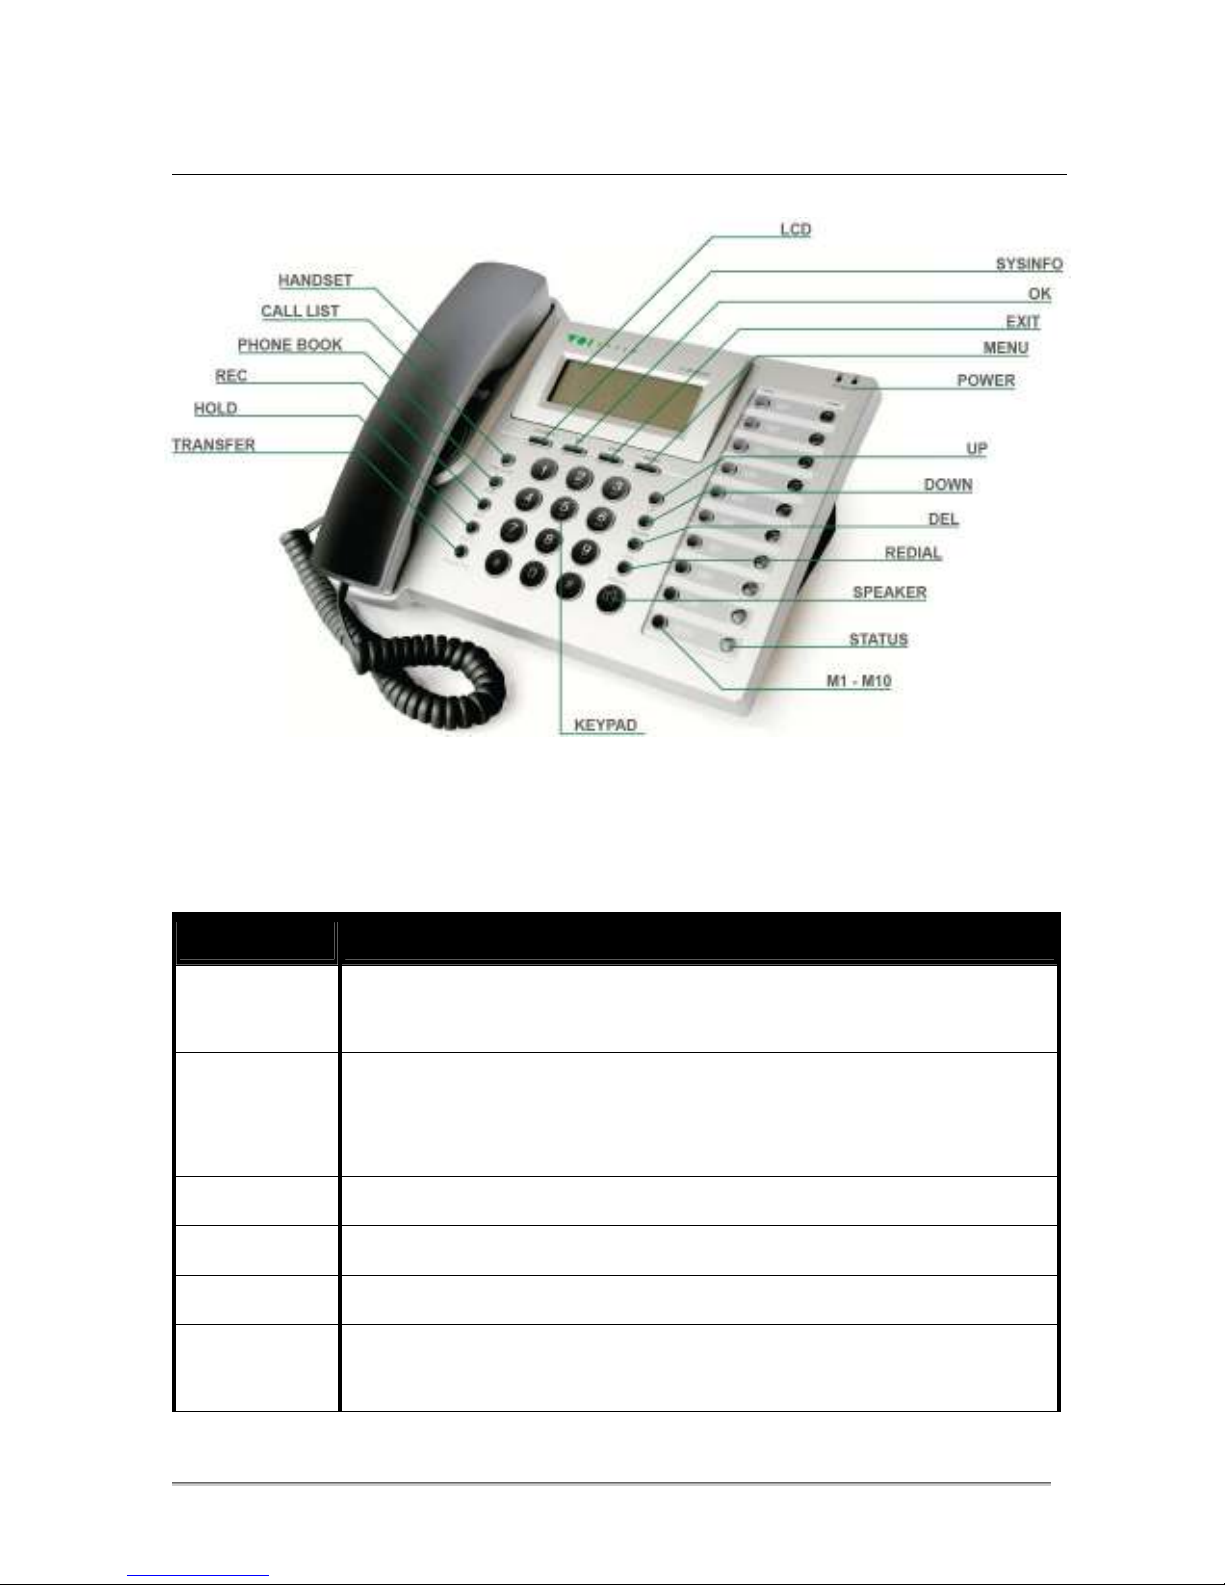
4.3 - Phone Description
Please find below a des ription of the main fun tions of the V-IP400P buttons.
BUTTON DESCRIPTION
KEYPAD
The keypad is used to enter numbers and hara ters (both upper and
lower ase).
SYSINFO
Displays general information: extension number, phone and gateway
IP address. Hold the button to a ess this information. Press agai
n to
move to the next item.
OK Press OK to onfirm a sele tion or browse the menu’.
EXIT Press to exit the menu’, refuse an in oming all or erase data.
MENU Press to enter the main menu’.
UP Press to browse menus and settings or to in rease the volume
during
a onversation.

14
©
VOI
SPEED
L
TD
.
U
SER
M
ANUAL
DOWN
Press to browse menus and settings or to de rease the volume during
a onversation.
DEL
Press to delete the last hara ter entered, delete stored messages,
all logs or other settings.
DIAL Press to re-dial the last number
entered, dial a new number or a
number linked to a onta t in the list.
SPEAKER Press to enable the speakerphone.
CALL LIST Press to a ess all logs or list of text messages.
PHONE BOOK
Press to a ess the list of onta ts.
REC Start/Stop all re ordi
ng (only available when used in onjun tion with
VOIspeed PBX).
HOLD Press to pla e a all on hold.
TRANSFER Press to transfer an a tive all.
M1 … M10
These memory buttons an be linked to extension numbers. Their
LEDs will display the state of ea h ex
tension (only when used in
onjun tion with VOIspeed PBX). They an also be used to pi k up an
in oming all or another extension (see se tion 4.5 -).
4.4 - Main Functionalities
The V-IP400P offers easy a ess to the general fun tionalities available in a traditional
phone in addition to advan ed features when used in ombination with a VOIspeed PBX.
4.4.1 - Making a call
There are multiple ways to make a phone all:
• Lift the handset (or press SPEAKER), enter a new number and then press DIAL.
• Lift the handset (or press SPEAKER) and press DIAL to all the last number entered.
• Lift the handset (or press SPEAKER) and press one of the memory buttons.
• Lift the handset (or press SPEAKER), sele t a onta t in the internal list and press
DIAL.

VOI
SPEED
V-IP400P
©
VOI
SPEED
L
TD
.
15
• Browse the all logs and press DIAL (the all will automati ally start using the
speakerphone).
By using the web interfa e you an link the ‘ash’ (‘#’) key to the DIAL button. Both keys
have the same fun tion by default. You an also determine a fixed amount of time after
whi h a all is automati ally started following the last key being entered (default value: 5
se onds).
With the V-IP400P you an also define some preset rules to enter a number and
automati ally start a all (see se tion 6.5.1 - for more information).
4.4.2 - Reject an incoming call
Press EXIT to reje t an in oming all either in stand-by or during a onversation (in order
to reje t a se ond in oming all).
4.4.3 - Put a call on-hold
Press the HOLD button to put an a tive all on-hold (the display will show ‘PLEASE
DIAL’). Press HOLD again to retrieve the all or enter a new number and press DIAL to
start a new all. Press ‘#’ key to terminate the new all (not the all on hold).
Note: if no number is entered within 10 se onds of pressing HOLD, the system will
emit a ontinuous tone and the message ‘PLEASE HUNG-UP’ is displayed. No
further keys an be entered and the user an only retrieve the all by pressing HOLD
again.
4.4.4 - Call Forwarding
Calls an be transferred with or without supervision (‘blind’ transfer). Transferring a all
with supervision entails pla ing the a tive all on hold, dialling a new number and then
pressing the TRANSFER button. The handset an then be repla ed. With blind transfer
the all is not pla ed on hold. The user will simply need to press TRANSFER, enter a
number and then repla e the handset.
Note: when the V-IP400P is used in ombination with a VOIspeed PBX, a all that
fails to transfer is sent ba k to the first user after a preset amount of time.
4.4. - Three user conference
Firstly, pla e an a tive all on hold. Se ondly, start another all and then press the star
(‘*’) key to start a onferen e all. Repla e the handset to terminate the onferen e.

16
©
VOI
SPEED
L
TD
.
U
SER
M
ANUAL
4.4.6 - Call pick-up
The V-IP400P an be used to pi k-up an a tive all dire ted to an extension linked to
one of the memory buttons. When an extension starts ringing (flashing amber LED), lift
the handset and press the relevant memory button to pi k-up the all. A pre-re orded
voi e will ask to repla e the handset in order to dire t the all to the V-IP400P.
Note: this feature is only available when the V-IP400P is used in onjun tion with a
VOIspeed PBX.
4.4.7 - Call Recording
Press the REC button during an a tive all in order to re ord a onversation. The
re ording is stored in the user’s vo al box.
Note: this feature is only available when the V-IP400P is used in onjun tion with a
VOIspeed PBX.
4.4.8 - Speakerphone
Press SPEAKER before or during a onversation in order to a tivate the speakerphone.
4.4.9 - How to change the volume settings
Press UP and DOWN buttons during an a tive all in order to modify the volume. The
relevant level is displayed on the LCD.
4.4.10 - Text Messaging
The V-IP400P supports SIP text messaging. A new in oming message is displayed
showing the sender’s extension on the first row and the ontent in subsequent rows.
Press EXIT to store the message and exit or DEL to erase the message. Press CALL
LIST to see the list of saved messages (press UP and DOWN to browse the list or DEL
to delete the message). Only 20 messages an be stored in the V-IP400P memory.
When this limit is rea hed old messages are automati ally repla ed by new one.
Note: in oming messages are not displayed in ase the LCD is informing the user
that an in oming all was lost.
4. - Memory Buttons M1 – M10
The V-IP400P features 10 memory buttons with asso iated LEDs. These memory
buttons an be further extended using the V-IP400E expansion module bringing the total
number of buttons to 30. Ea h button an be linked to an extension with the LED
displaying its status.
VOI
SPEED
V-IP400P
©
VOI
SPEED
L
TD
.
17
4. .1 - Setup
Press DEL and then one of the memory buttons in order to add or modify the extension’s
number asso iated to the memory button. Enter the extension number (press DEL to
erase any of the digits entered) and press OK to onfirm or EXIT to an el. The same
settings an be entered using the telephone web interfa e (see se tion 6.5.4 - ).
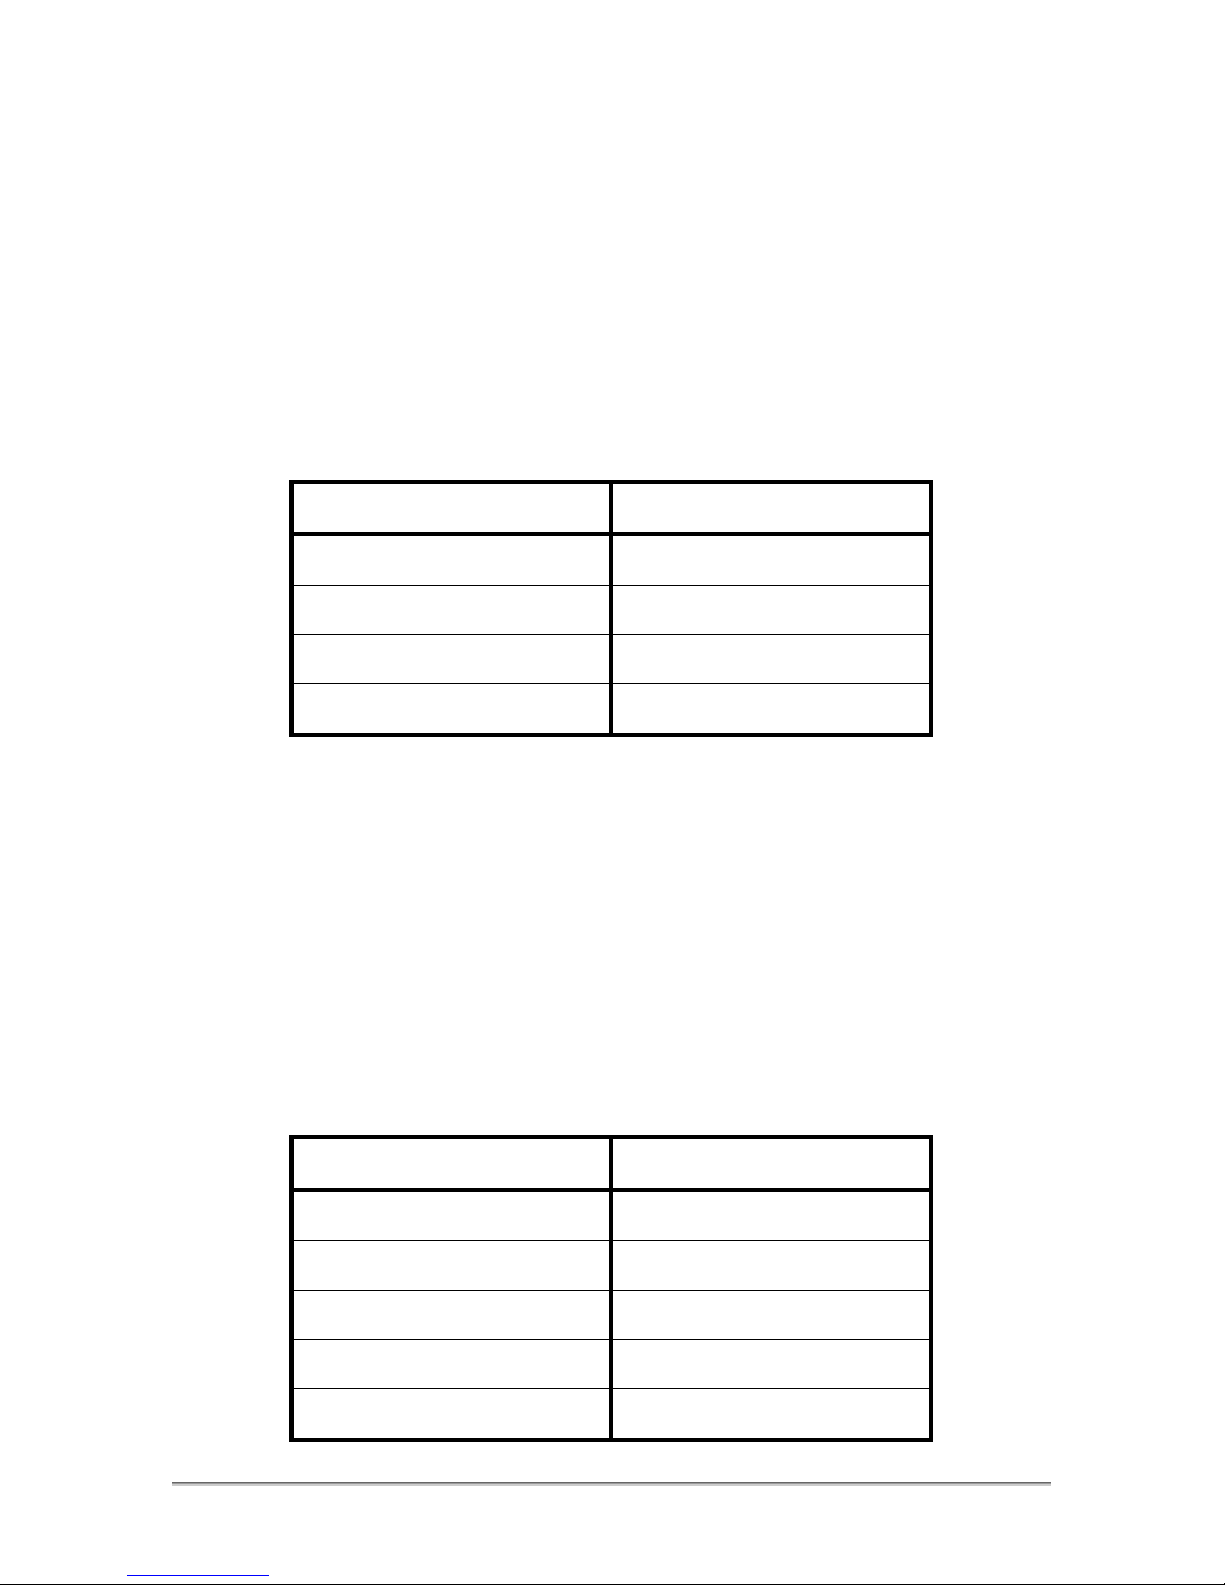
4. .2 - Extension Status
When a memory button is linked to a PBX extension, the orresponding LED will display
the extension’s status a ording to the table below:
STATUS LED
Free Green
Engaged Red
Ringing Flashing Amber
Do not disturb Flashing Red
When used in ombination with a VOIspeed PBX, the memory buttons an be used to
pi k-up an in oming all dire ted to another extension (see se tion 4.4.6 - ). In this ase
the LED asso iated to that extension will be flashing (amber) to indi ate that it is ringing.
You an link the extension number of the V-IP400P to one of the memory buttons. In this
ase you will need to press one of the memory buttons, then star (‘*’) and ash (‘#’) keys
in su ession and enter the extension number. When the V-IP400P is used with a
VOIspeed PBX, the LED (asso iated to that memory button) will show the status of the
V-IP400P a ording to the table below:
STATUS LED
Free Green
Voi e Mail Amber
Call Divert Flashing Green
Do not disturb Flashing Red
Telephone blo ked Red

18
©
VOI
SPEED
L
TD
.
U
SER
M
ANUAL
4.6 - Contact List
The V-IP400P internal onta t an store up to 100 onta ts. Ea h one an be linked to a
different ring-tone. Press PHONE BOOK to a ess the onta t list followed by one of
these ommands: SHOW to browse the list in alphabeti al order, ADD to enter a new
onta t and SEARCH to retrieve a onta t in the list.
When sele ting SHOW you an browse the list using the UP and DOWN keys. Press
DEL to delete or modify an entry. When sele ting ADD you an then enter the name of
the onta t, its telephone number and the ring-tone to be linked to that onta t (sele t a
value between 0 and 8, with 0 as default ring-tone). When sele ting SEARCH, the phone
prompts the user to enter a string that will be mat hed against the entries in the onta t
list. Any mat hes are displayed in alphabeti al order.
4.7 - Call Logs
The V-IP400P stores information about all in oming/outgoing/missed alls together with
a list of the last 20 text messages re eived. Press CALL LIST to a ess all logs and
messages and press UP or DOWN to browse amongst these options: DIALLED (list of
outgoing alls), RECEIVED (list of in oming alls), MISSED (list of missed alls) and
MESSAGES (list of stored messages). You an browse ea h list using UP/DOWN or you
an delete an entry pressing DEL. Press EXIT to go ba k.
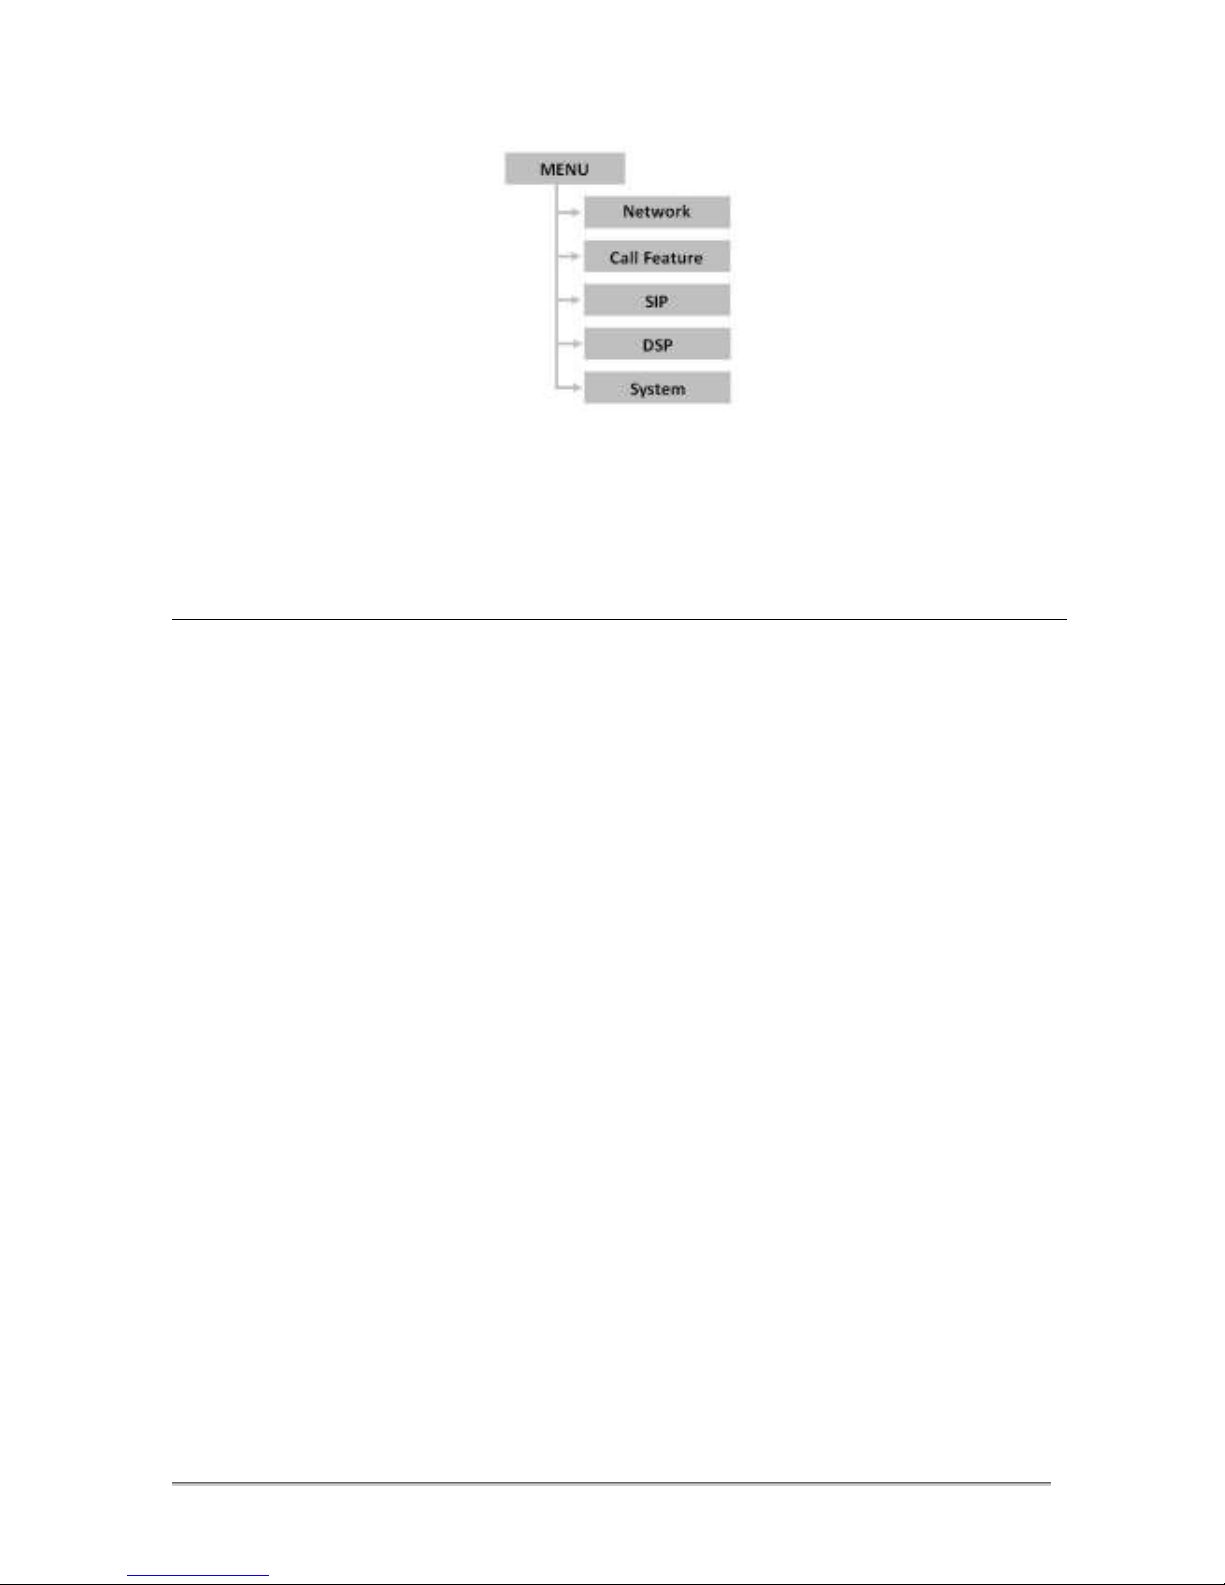
5 - Manual etting
Press MENU to a ess the V-IP400P main menu’ and use the button UP, DOWN, OK or
EXIT to navigate the menu’. To a ess the menu’ you will need to enter a numeri
password that an be hanged using the phone’s web interfa e (see se tion 6.8.1 -
default value: 123).
The main menu’ is stru tured into 5 se tions: Network (network interfa e), Call Feature
( all settings), SIP (SIP interfa e), DSP (advan ed settings) and System (system
settings).
VOI
SPEED
V-IP400P
©
VOI
SPEED
L
TD
.
19
Note: press UP and DOWN to browse the options, OK to sele t an option and
EXIT to go ba k. Press OK to display a setting and DEL to modify it.
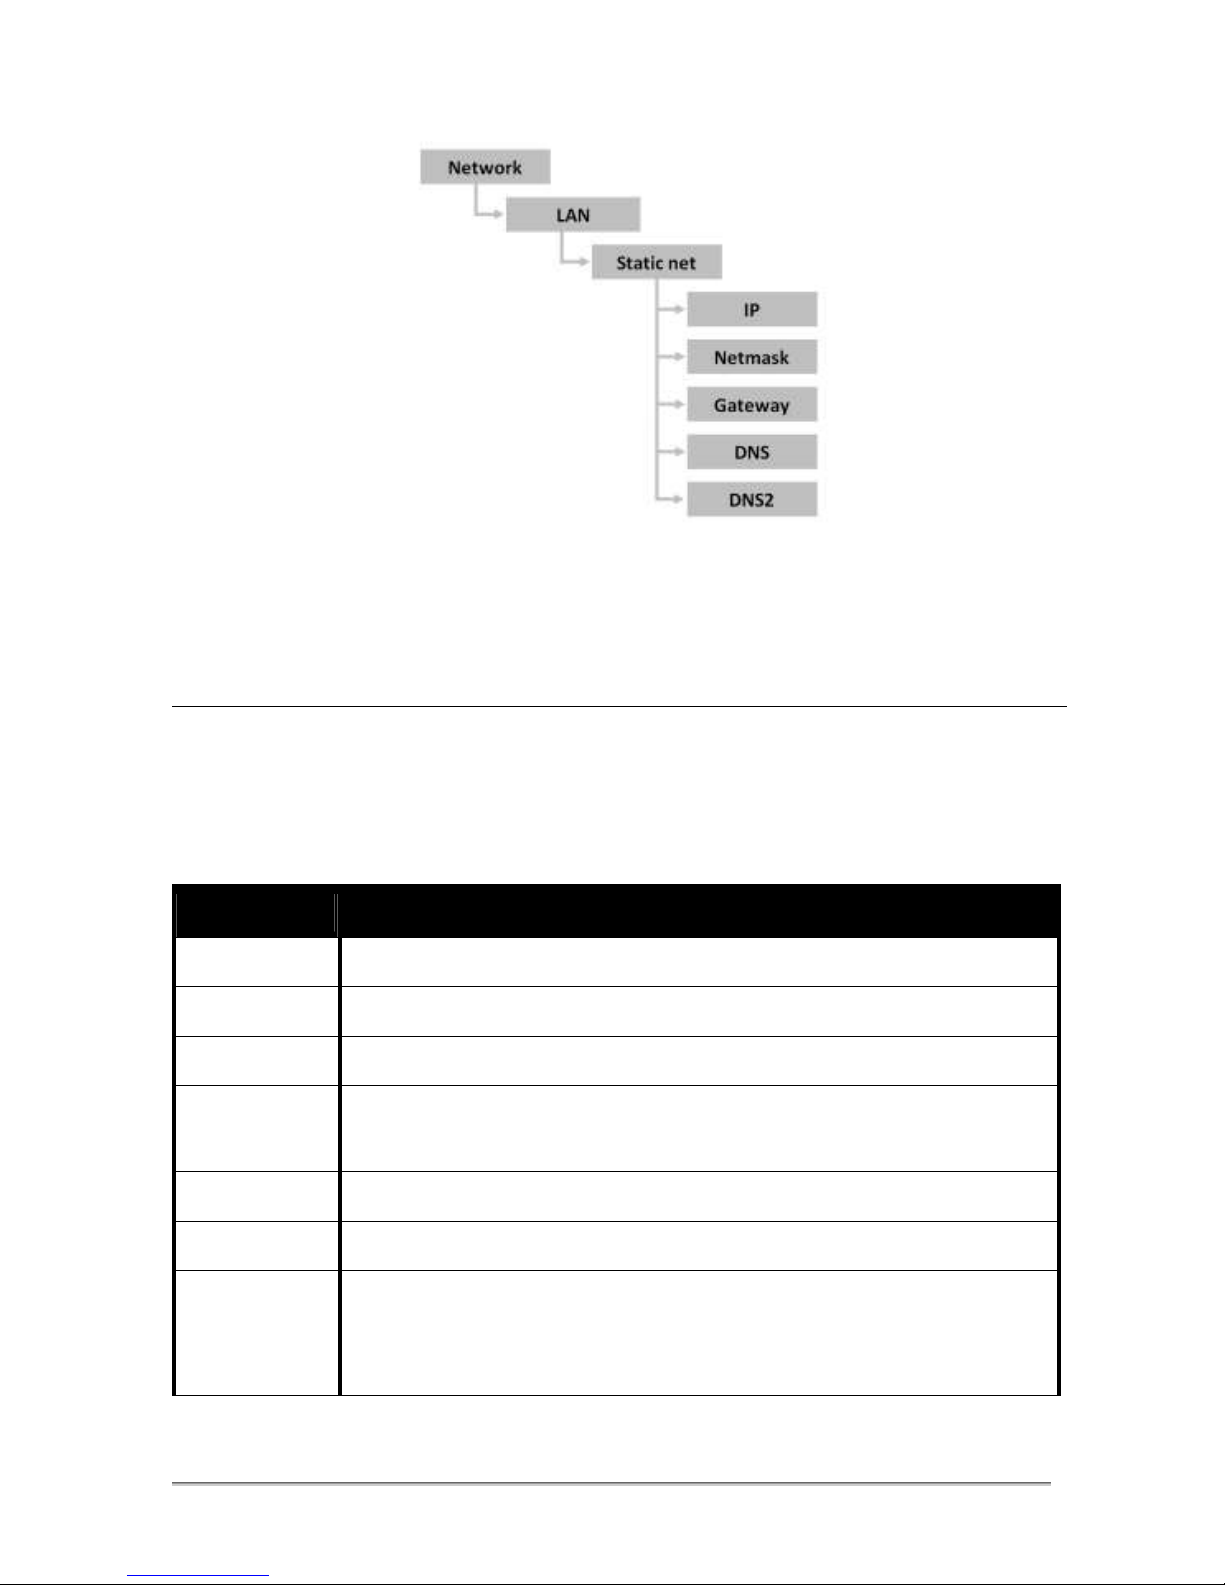
.1 - Network Interface
The V-IP400P a quires its settings from the DHCP server onne ted to the LAN. Press
SYSINFO to display these settings. In ase no DHCP server is available or in order to
assign a stati IP address to the V-IP400P, you will need to modify the way the phone
has a ess to the network. In this ase you will need to press the key ‘1’ until ‘Static
Mode’ is displayed. Hold the key ‘2’ until ‘DHCP Mode’ is displayed in order to go ba k
to the default settings. When in ‘Static Mode’ the following settings are assigned to the
phone:
• Network address: 192.168.1.179
• Network mask (netmask): 255.255.255.0
• Gateway: 192.168.1.1
• DNS Server: 202.96.134.133
• Alternative DNS server: 202.96.128.68
To modify any of these settings you will need to a ess the main menu and then enter
the Network se tion, sele t LAN and then Static Net.
20
©
VOI
SPEED
L
TD
.
U
SER
M
ANUAL
Here you an sele t or modify ea h of these settings (press OK to sele t a setting and
DEL to modify it, use * in pla e of dots).
.2 - SIP Interface
On e the network interfa e is operating orre tly, the V-IP400P an register onto the
PBX. In this ase you will need to a ess the telephone’s SIP settings. All the details
required for the registration are available in the Server sub-menu’.
ENTRY DESCRIPTION
Addr Server PBX IP Address.
Port PBX port used to ex hange SIP messages (default value: 5060).
User Username for the authenti ation at the server.
Password Password for the authenti ation at the server (the value is hidde
n
using *).
Domain PBX Server Domain. Same as ‘Addr’ for VOIspeed PBXs.
Phone Num V-IP400P extension number.
Expire Time
The registration of the V-IP400P at the PBX is performed at regular
intervals of time. This parameter determines the duration of ea
h
interval.
Table of contents
Other VOIspeed IP Phone manuals


