Adding a Speed Dial Button:
1. Press the SpDial softkey.
2. Press the Add softkey.
3. Enter the Name & press the Done softkey.
4. Press the Line/Feature button next to either the Number or
URI field.
5. Enter the Phone Number or URI as applicable.
6. Press the Done softkey and then press the Save softkey.
Updating a Speed Dial Button:
1. Press the SpDial softkey and use the Page Left or
Page Right buttons to locate the applicable Speed Dial button.
2. Press the Edit softkey,then press the Line/Feature button
next to the button you want to update.
3. Press the Line/Feature button next to the field you want to
update. Use the Left and/or Right Arrow softkey
to move the cursor and the Backspace Line/Feature button to
remove characters if applicable.
4. Press the Done softkey, then press the Save softkey.
Deleting a Speed Dial Button:
1. Press the SpDial softkey and use the Page Left or
Page Right buttons to locate the applicable Speed Dial button.
2. Press the Delete softkey, then press the Line/Feature
button next to the button you want to remove.
3. Press the Delete softkey again to confirm the deletion.
Making Calls:
• With the phone on- or off-hook, simply press
an available session (call) appearance, or pick
up the handset, activate the Speaker or
Headset. Dial a telephone
number or press
the URI softkey and enter a URI to call your
party.To redial, press the phone's dedicated
Redial button.
• To speed dial, press the SpDial softkey,
press Page Right or Page Left (if needed) to
locate the party you want to call, then press
the Line/Feature button next to that entry.
• From the Call Log, press the Log softkey.
Then select the appropriate Log sofkey
(Missed, InAns, or Outgo, as applicable). Use
the Page Right or Page Left button to locate
the party to be called in any of the three logs
(Missed,Incoming Answered or Outgoing),
press the Line/Feature button next to the
desired entry, then press the Call softkey.
• From a Web Page phone link, simply select
the link.
Call Log Navigation:
1. Press the Log softkey to display the
Call Log for missed (unanswered) calls.
2. Navigate to either the Incoming
Answered Call Log or the Outgoing
Calls Log by pressing the InAns or
Outgo softkey, respectively.
Note: (All logs have the same fields,
characteristics and softkeys.)
• To review calls, press the Page Right
button (to review the next 3 calls)
or Page Left button (to review the
previous 3 calls).
• To view call detail, press the Line/
Feature button next to the applicable
call, then press the Return softkey to
re-display the Call Log screen.
Logging Off the Phone:
Adding a Call Log Entry or
Web Phone Number to a
Speed Dial Button:
1. From a Call Log, press the
Line/Feature button to the left of the
party you want to add. To add a Web
phone number to a Speed Dial button,
start at the next step.
2. Select the AddtoSD softkey; edit the
name/number/URI by selecting the
appropriate field and using the Arrow
softkeys to move the cursor.
3. Press Done softkey, then press the
Save softkey. Press Phone/Exit to return
to the Phone screen, or select another
application tab as desired.
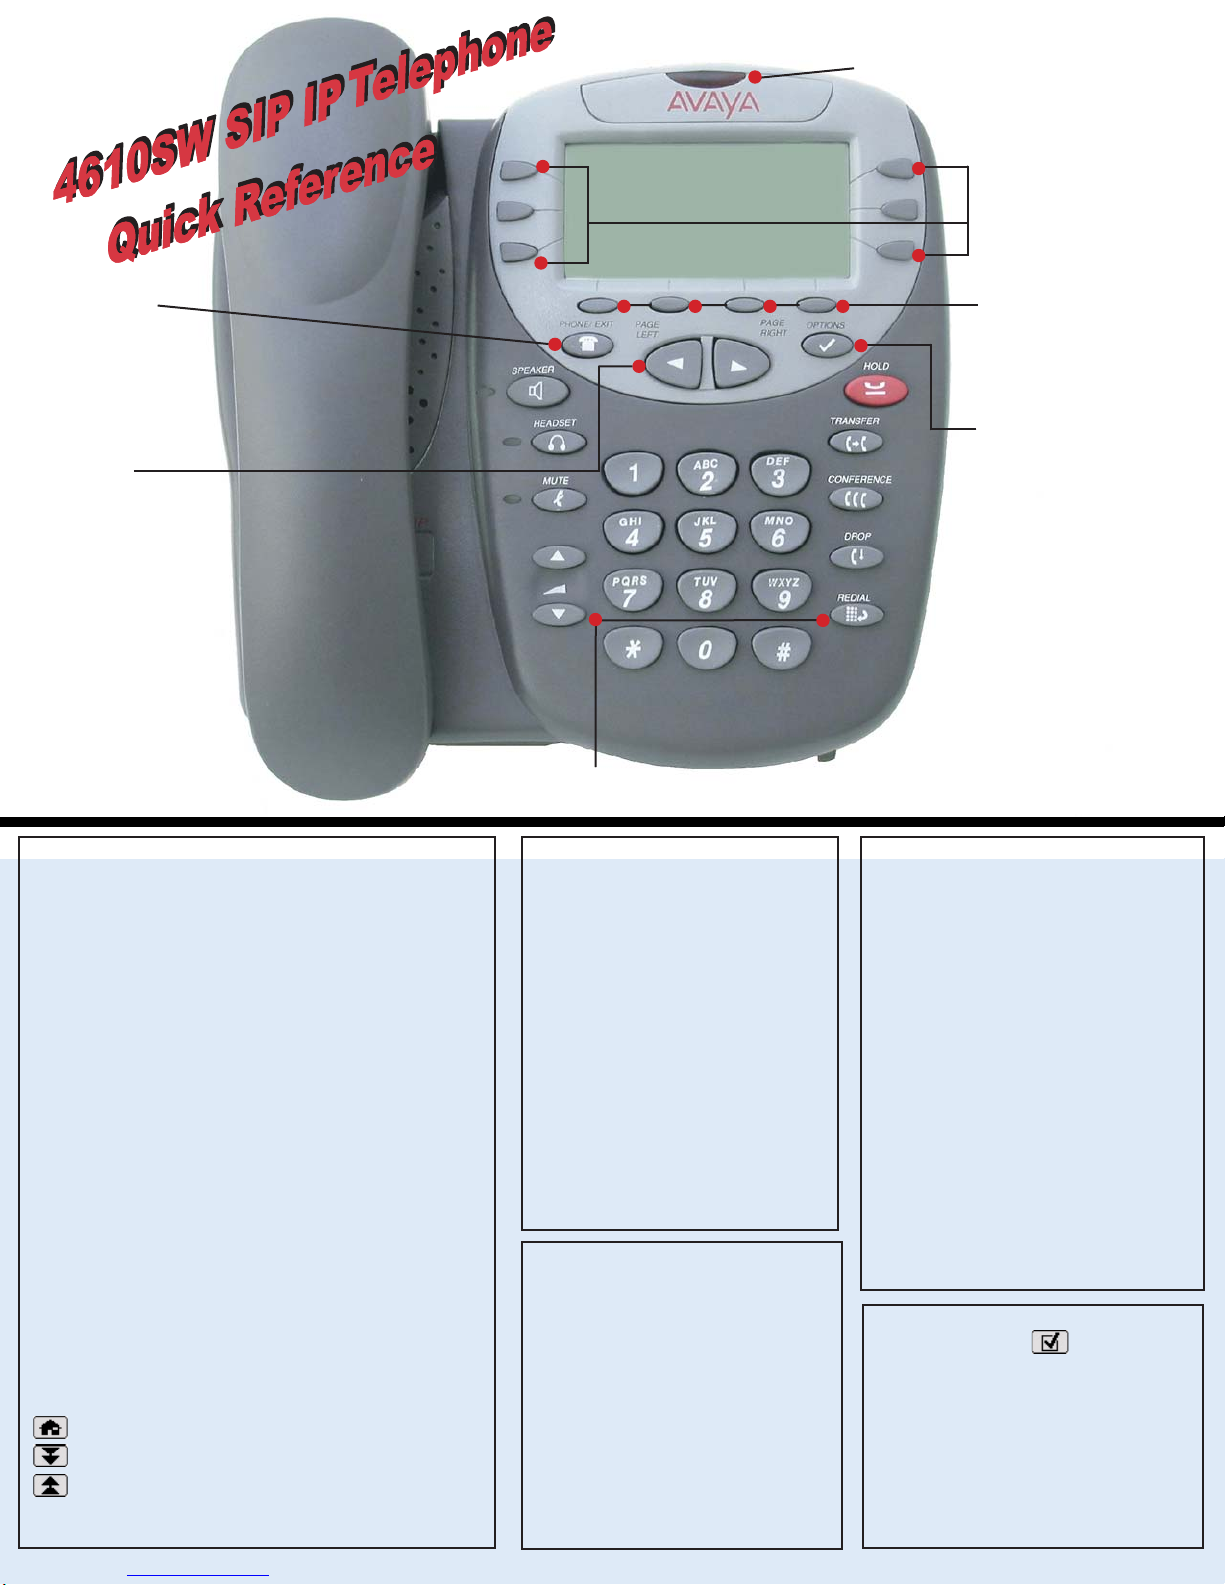
Use the Page
Right &Page Left
buttons to move
from one screen to
another when the
"paging indicator"
displays on the line
above the softkey
labels.
Use the Options button to
set up & update phone
appearance & screen
functions like:
• creating new or relabeling
existing Feature buttons
• backing up/restoring user
data
• changing the screen contrast,
call timer display, etc.
• Setting up attended or
unattended transfers
(See the User's Guide's
Chapter 6 for details.)
Dedicated Feature buttons (Redial,Speaker,Mute,Headset,Hold,Transfer,
Conference, Drop,and Volume Up and Down)control call activity.
Line/Feature buttons
provide lines for calls and
application-specific (Speed
Dial, Call Log, and Web)
sessions.
When lit you have a Voice Mail message
waiting. Follow your standard
voice mail retrieval procedures, as
provided by your System
Administrator.
The Phone/Exit
button displays
the Phone screen
from any other
application screen
and normalizes the
display.
Application Softkeys
navigate to application
screens or initiate actions like
Call a number/URI, Save data
or Cancel the current activity.
16-300473 Issue 1.0 August 2005
To Log in:
1. Enter your extension & press #
2. Enter your password & press #
1. Press the Options button.
2. Press the Page Right button and select
the Line/Feature button next to the Log Off
option.
3. To unregister the phone from the call
server, which restores options settings to
their default values and deletes your Call
Log entries, select the Line/Feature button
next to Yes.
Receiving Calls: Pick up the handset,
activate the headset or press the Speaker
button and talk.
Web Controls:
- Line/Feature button 5 - redisplays the Home page.
- Line/Feature button 6 - moves the page down 3 lines.
- Line/Feature button 4 - moves the page up 3 lines.
To use a link to switch pages, press the Line/Feature button
to the left of the line with an underlined link.
Use these buttons to navigate web pages:


