VonHaus 3500230 User manual

A5P | 01
3500230
Please read all instructions carefully before use and
retain for future reference.
Please read all instructions carefully before use and retain
for future reference.
INTENDED USE Only operate the power tool/machine
for its intended purpose and within the parameters
specied in this manual.
This power tool/machine is for domestic use only. Do not
use outdoors or on wet surfaces.
This power tool/machine is not intended for use by
persons with reduced physical, sensory or mental
capabilities, or lack of experience and knowledge, unless
supervised or given appropriate instruction concerning
the product’s use by a person responsible for their safety.
GENERAL PRECAUTION Do not allow to be used as a
toy. Children should be supervised to ensure they do not
play with the power tool/machine.
If the power tool/machine is not functioning properly,
has been dropped, damaged, left outdoors, or immersed
in liquid, do not use, contact DOMU Brands Customer
Services.
Do not use the power tool/machine if any parts appear to
be faulty, missing or damaged.
Ensure all parts are securely attached before use.
RISK OF PERSONAL INJURY Avoid body contact with
earthed or grounded surfaces such as pipes,radiators,
ranges and refrigerators. There is an increased risk of
electric shock if your body is earthed or grounded.
Prevent unintentional starting. Ensure the switch is in the
o position before connecting to the power source and/
or battery pack, picking up or carrying the tool. Carrying
power tools with your nger on the switch, or energising
power tools that are switched on, invites accidents.
Do not operate power tools in explosive atmospheres
such as in the presence of ammable liquids, gases or
dust. Power tools create sparks which may ignite the
dust or fumes.
Always wear eye protection. Any power tool can throw
Maintain a safe distance from bystanders.
CAUTION Sharp edges.
Protect your eyes.
Protect your ears.
Protect your hands.
Protective clothing must be worn
Protective Footwear must be worn

A5P | 01
foreign objects into your eyes and cause permanent
eye damage. Always wear safety goggles (not glasses)
that comply with ANSI safety standard Z87.1. Every day
glasses have only impact resistant lenses.
Do not expose power tools to rain or wet conditions.
Water entering the power tools will increase the risk of
electric shock.
Stay alert, watch what you are doing and use common
sense when operating a power tool/machine. Do not
use a power tool/machine while you are tired or under
the inuence of drugs, alcohol or medication. A moment
of inattention while operating power tool/machine may
result in serious personal injury.
Use personal protective equipment. Always wear eye
protection. Protective equipment such as dust mask,
non-skid safety shoes, hard hat, or hearing protection
used for appropriate conditions will reduce personal
injuries.
Prevent unintentional starting. Ensure the switch is in the
o-position before connecting to power source and/or
battery pack, picking up or carrying the tool.
Carrying power tool/machine with your nger on the
switch or energizing power tool/machine that have the
switch on invites accidents.
Remove any adjusting key or spanner before turning the
power tool/machine on. A spanner or a key left attached
to a rotating part of the power tool/machine may result in
personal injury.
Do not overreach. Keep proper footing and balance at
all times. This enables better control of the power tool/
machine in unexpected situations.
Dress appropriately. Do not wear loose clothing or
jewellery.
Keep your hair, clothing and gloves away from moving
parts. Loose clothes, jewellery or long hair can be caught
in moving parts.
If devices are provided for the connection of dust
extraction and collection facilities, ensure these are
connected and properly used. Use of dust collection can
reduce dust-related hazards.
WORK AREA SAFETY Keep work area clean and well lit.
Cluttered or dark areas invite accidents.
Do not operate power tool/machine in explosive
atmospheres, such as in the presence of ammable
liquids, gases or dust.
Power tool/machine create sparks which may ignite the
dust or fumes.
Keep children and bystanders away while operating a
power tool/machine. Distractions can cause you to lose
control.
GENERAL POWER TOOL USE AND CARE Do not force
the power tool/machine. Use the correct power tool/
machine for your application. The correct power tool/
machine will do the job better and safer at the rate for
which it was designed.
Do not use the power tool/machine if the switch does not
turn it on and o. Any power tool/machine that cannot
be controlled with the switch is dangerous and must be
repaired.
Disconnect the plug from the power source and/or the
battery pack from the power tool/machine before making
any adjustments, changing accessories, or storing power
tool/machine tools. Such preventive safety measures
reduce the risk of starting the power tool/machine
accidentally.
Store idle power tool/machine out of the reach of children
and do not allow persons unfamiliar with the power tool/
machine or these instructions to operate the power tool/
machine.
Power tool/machines are dangerous in the hands of
untrained users.
Maintain power tool/machines. Check for misalignment
or binding of moving parts, breakage of parts and any
other condition that may aect the power tool/machines
operation. If damaged, have the power tool/machines
repaired before use. Many accidents are caused by
poorly maintained power tool/machines.
Keep cutting tools sharp and clean.
Properly maintained cutting tools with sharp cutting
edges are less likely to bind and are easier to control.
Use the power tool/machine accessories and tool bits in
accordance with these instructions, take into account the
working conditions and the work to be performed.
Use of the power tool/machine for operations dierent
from those intended could result in a hazardous situation.
CLEANING & MAINTENANCE Never soak or immerse
electrical components and or a component that has a
plug attached.
Disconnect the plug from the power source before
making any adjustments, changing accessories, or
storing. Such preventive safety measures reduce the risk
of starting the power tool accidentally.
Ensure the motor has fully stopped before cleaning,
clearing a blockage, checking, or carrying out any
maintenance on the tool.
Maintain your power tool. Check for misalignment or
binding of moving parts, breakage of parts and any other
condition that may aect the power tool’s operation. If
damaged, have the power tool repaired by a qualied
repair person before use. Many accidents are caused by
poorly maintained power tools.
Keep cutting tools sharp and clean. Properly maintained
cutting tools with sharp cutting edges are less likely to
bind and are easier to control.
Regularly check external nuts and xings to ensure
vibration caused by normal use has not begun to loosen
them.
Store idle power tools out of reach of children and do
not allow persons unfamiliar with the power tool or these
instructions to operate the Breaker.
Locate the power tool out of reach of children, in a dry,
locked unit.
Make sure that the cord is located so that it will not
be stepped on, tripped over, or otherwise subjected to
damage or stress.
Remove the plug from the mains socket / battery (where
applicable) before carrying out any adjustment or
maintenance.
Always store the power tool/machine in a dry place.
If the power cord is damaged, it must be replaced by a
qualied service technician.
Keep the ventilation slots and motor housing as free of
dirt and dust as possible (where applicable).
Clean the power tool/machine by rubbing it with a clean
cloth and blow it clean using low-pressure compressed
air is recommended.
Ensure you have all the pieces listed. If you are missing
any components, contact our customer services
with assembly if any components are missing.
HAND HELD CHAINSAWS
Keep your body away from the chain when the chainsaw
is in use. Before starting your chainsaw, ensure it is not in
contact with anything.
Always hold the chainsaw with your right hand rmly
on the rear handle and your left hand rmly on the front
handle. Only hold the chainsaw by the insulated gripping
surfaces/handles. Contact between the cutter blades
and a ‘live’ wire can make exposed metal parts ‘live’ and
can cause an electric shock.
Wear safety glasses and hearing protection. Protective
equipment for head, hands, legs and feet is also
recommended. Do not operate when you are up a tree.
Only operate when standing on a secure, stable and level
surface. Slippery or unstable surfaces (such as ladders)
can cause loss of balance and potential loss of control.
When cutting a branch that is under tension be prepared
for the possibility of ‘spring back’. This is when the
tension in wood bres is released and a branch can
spring back, striking you and/ or potentially throwing you

A5P | 01
and the chainsaw out of control.
Use extreme caution when cutting brush and saplings.
Fine branches can catch in the chain, whipping them
towards you and/or pulling you o balance.
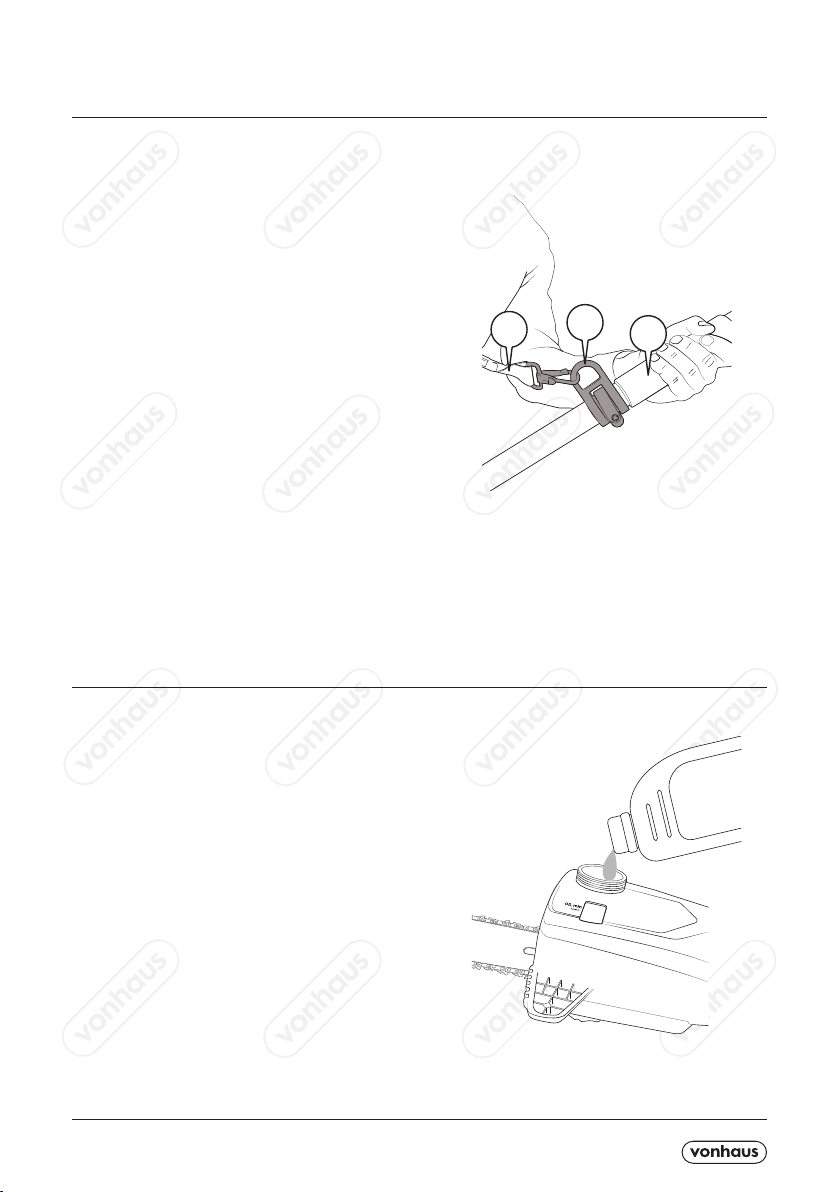
Always carry the chainsaw by its front handle, switched
o and away from your body.
When transporting or storing always t the guide bar
cover. Always follow instructions for oiling, adjusting
chain tension and changing accessories. Incorrect
tension or a poorly lubricated chain can break the chain
or increase the chance for kickback.
Always keep handles dry, clean, and free from oil and
grease.
Only use your chainsaw for cutting wood. Do not use it
for cutting plastic, masonry or non-wood materials as
this could result in a hazardous situation.
KICKBACK CAUSES & RELATED WARNINGS
Kickback is a sudden reverse reaction, which can make
your chainsaws guide bar rapidly kick back towards
you. Kickback is caused by tool misuse and/or incorrect
operating procedures/conditions.
Kickback can occur when; The ‘nose’ or the ‘tip’ of
your chainsaws guide bar touches an object or wood
contracts and ‘pinches’ the saw’s chain in a cut.
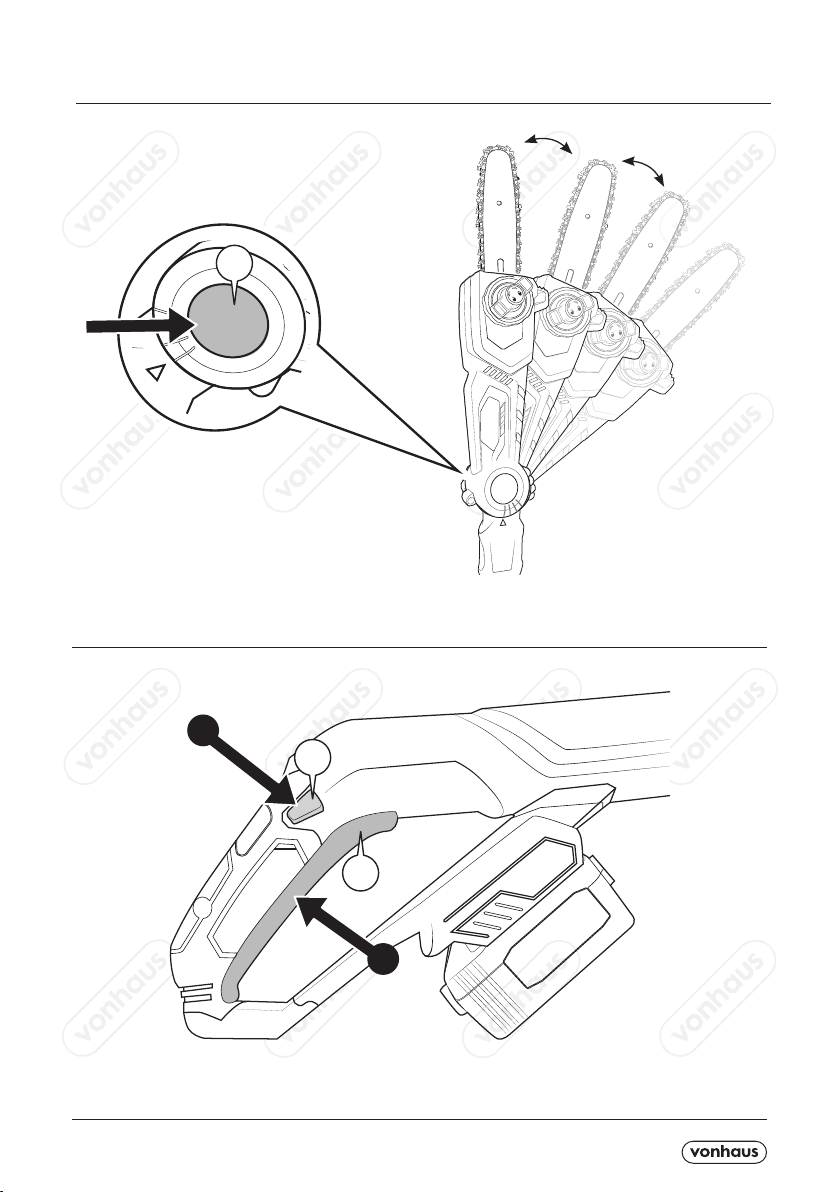
Keep a rm grip on the saw with both hands, with body
and arms braced to resist kickback.
Do not over-extend your reach or cut above shoulder
height.
Always start cuts with the chain saw already running.
Never start cutting with the tip of the guide bar.
Never cut with the tip of the guide bar.
Be careful when continuing cuts you are already working
on. Never cut through more than one branch at a time.
When lopping o branches, be careful not to touch any
other branches.
When cross-cutting, pay attention to trunks standing very
close to each other.
When possible use a saw-horse.
Only use replacement bars and chains specied by the
manufacturer.
Make sure that the chain is always properly sharpened.
Always follow the manufacturer’s sharpening and
maintenance instructions.
BATTERY WARNINGS (INCLUDING BUTTON CELLS,
AA BATTERY’S, LITHIUM PACKS)
WARNING The use, and particularly abuse of portable
sealed secondary lithium cells and batteries may result in
the creation of hazards and may cause harm.
Do not dismantle, open or shred secondary cells or
Keep batteries out of the reach of children.
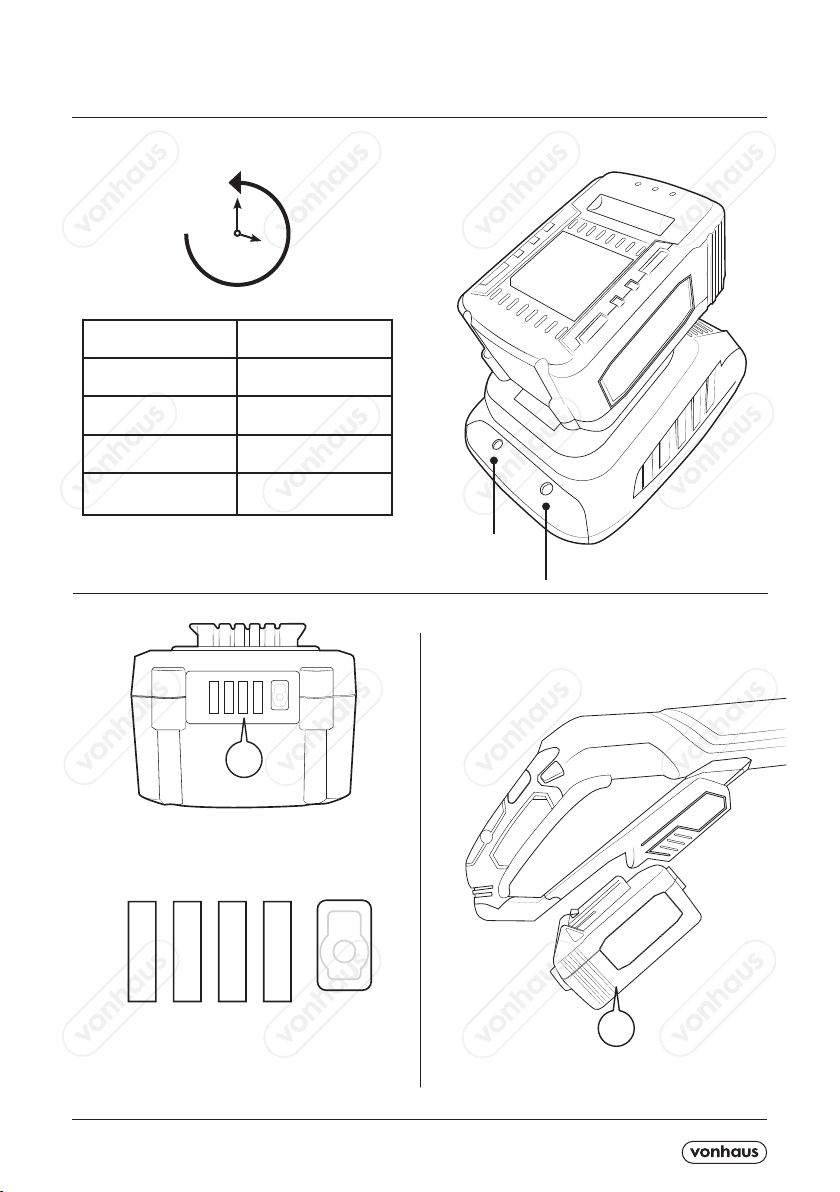
NOTE the battery pack is not fully charged out of the box.
Secondary cells and batteries need to be charged before
use, always refer to the cell or battery manufacturer’s
instructions and use the correct charging procedure.
Recharge only with the charger specied by the
manufacturer. A charger that is suitable for one type of
battery pack may create a risk of re when used with
another battery pack.
Use the appliance/power tool/machines only with
specically designated battery packs. Use of any other
battery packs may create a risk of injury and re.
First read the safety instructions and then follow the
charging notes and procedures.
Incorrect reassembly may result in a risk of electric shock
or re.
Protect the battery and charger against water and
moisture. Always keep cells and batteries clean and dry.
Wipe the cell or battery terminals with a clean dry cloth if
they become dirty.
Protect the battery from heat and re. Place the charger
in a position away from any heat source and avoid
storage in direct sunlight.
Do not maintain secondary cells and batteries on charge
when not in use.
After extended periods of storage, it may be necessary to
charge and discharge the cells or batteries several times
to obtain maximum performance.
Do not short-circuit a cell or battery.
Do not store cells or batteries haphazardly in a box
or drawer where they may short-circuit each other or
be short-circuited by conductive materials. When the
battery pack is not in use, keep it away from other metal
objects such as paper clips, coins, keys, nails, screws
or other small metal objects that can make a connection
from one terminal to another. Short-circuiting the battery
terminals together may result in burns or a re.
Do not expose cells or batteries to mechanical shock.
Never attempt to open the battery pack for any reason or
if the plastic housing of the battery pack breaks or cracks,
immediately discontinue use and do not recharge.
When possible, remove the battery from the appliance/
power tool/machine when not in use.
Do not leave a battery on prolonged charge when not in
use or stored for extended periods of time as this may
cause damage to the battery.
To facilitate cooling of the battery pack after use, avoid
placing the charger or battery pack in a warm environment
such as a metal shed or an uninsulated trailer.
To reduce the risk of electric shock, unplug the charger
from the outlet before attempting any cleaning. Removing
the battery pack will not reduce this risk.
In the event of a cell leaking, do not allow the liquid
to come into contact with the skin or eyes. If contact
has been made, wash the aected area with copious
amounts of water and seek medical advice.
Seek medical advice immediately if a cell or battery has
been swallowed.
Always observe the polarity marks (+) and (-) on the cell,
battery and equipment and ensure correct use.
Retain the original cell and battery literature for future
reference
When disposing of secondary cells or batteries, keep
cells or batteries of dierent electrochemical systems
separate from each other.
Do not use any cell or battery which is not designed for
use with the equipment.
Do not mix any cells of dierent manufacturers, capacity,
size or type within a device.
Always purchase the battery recommended by the
device manufacturer for the equipment.
ADDITIONAL SAFETY INFORMATION FOR BATTERY
CHARGERS.
This appliance should not be used by children and/
or persons with reduced physical, sensory or mental
capabilities or lack of experience and knowledge.
Children shall not play with the appliance.
Do not place any object on top of the charger or place
the charger on a soft surface that may result in excessive
internal heat.
Do not attempt to disassemble the charger. Take it to
an electrician or tool repairer when service or repair is
required.
Appliances/power tools/machines with Lithium-ion
batteries shall only be charged with the specically
designed Lithium-ion battery charger purchased with
this tool. Do not attempt to charge the battery with any
charger other than the one supplied as this is potentially
dangerous.
Before using the charger, read all instructions, labels and
cautionary markings on the charger.
The charger is not intended to be used for any purpose
other than charging the battery pack for this tool. Any
other use may result in risk of re or electric shock. Do
not attempt to use the charger on any other voltage or
rating than those stated on the rating plate.
Do not use the charger for any purpose other than that for
which it is intended.
Do not use the charger to charge any device other than
the appliance/power tool/machine it was sold with.
Do not use an extension cord unless absolutely
necessary. The use of an improper extension cord could

A5P | 01
result in re or electric shock.
Never attempt to connect two chargers together.
Use the battery charger indoors only.
Make sure that the charger cable is positioned where
it will not be stepped on, tripped over or otherwise
subjected to damage or stress. Keep the cord away from
operating appliance/power tool/machine.
Do not operate the charger in a cabinet or other enclosure
unless ventilation is adequate.
Do not place any object onto the charger or allow any
object to rest on the charger.
Never place the appliance/power tool/machine or charger
near or over a heat source such as radiator or heater.
WARNING Never charge your Lithium-ion battery below
or above temperatures recommended as this may result
in re or permanent damage to the battery.
The most suitable temperatures to charge the battery are
between 20°C/68°F and 25°C/77°F.
WARNING Do not allow water or any other liquid to come
into contact with the charger as this may result in electric
shock. Do not position the tool or battery charger near
water. Take care not to spill liquid of any kind on the tool
or charger.
DANGER Do not use the charger if it has been subjected
to a heavy knock, dropped, or otherwise damaged in any
way. Take the charger to an authorised service centre for
it to be checked and repaired.
Do not attempt to disassemble the charger by opening
or removing covers.
To reduce risk of damage to the electric plug and cord,
pull by the plug rather than the cord when disconnecting
the charger.
TECHNICAL SPECIFICATION
Battery Rating: 40V MAX 4000mAh
Charger Input: 220V-240V 50/60Hz, 100W
Charger Output: 42V 2.0Ah
1. Saw Head Connection
2. Rotate Button
3. Oil Cap
4. Oil Level
5. Chain Tension Dial
6. Locking Dial
7. Saw Chain
8. Guide Bar
9. Telescopic Connection Collar
10. Telescopic Release Lever
11. Foam Grip
12. Should Strap Clip
13. Battery Cavity
14. Lock O Switch
15. On/O Trigger
16. Shoulder Strap
17. Saw Chain Cover
18. 40V Battery
19. Release Button
20. Charge Level Indicators
21. Battery Charger
22. Green LED
23. Red LED
COMPONENT LIST

A5P | 01
COMPONENTS
2
1
5
678
9
10
16
17
11 12
13 15
14
19
18
20
22
21
23
3
4

A5P | 01
BATTERY
Red LED
Green LED
LED Status
Green Flickering Ready to charge
Solid Red Charging
Solid Green Fully Charged
Solid Green and Red Battery/Charger is
faulty.
60mins
100%
75%
25%
0%
18
20

A5P | 01
FITTING A NEW CHAIN
1. Remove the cover using the Chain Bar Locking Nut
(6) by unscrewing counter-clockwise until it detaches.
6
2. Wearing suitable heavy chainsaw gloves carefully
position the Chain (7) onto the Chain Guide Bar (8)
seating in the groove, ensuring it is facing the correct
way around.
3. Attach the Chain (7) over the Sprocket and hold the
Chain and Chain Guide Bar (8) in place.
4. Replace the cover turn the Chain Bar Locking Nut
clockwise, but do not fully tighten.
NOTE: As the chain loosens with use and as it warms
make adjustments where required and always check
before each use, especially when cold.
5. Check that the Chain (7) has very little
movement. Adjust with the Chain Tension Screw (5)
rotating clockwise until the correct movement is achieved
then tighten the Chain Bar Locking Nut (6).
Sprocket
8
5

A5P | 01
ASSEMBLY
TELESCOPIC ADJUSTMENT
1
10
9

A5P | 01
OPERATION
ANGLE ADJUSMENT
20º
40º
A
B
2
14
15

A5P | 01
BALANCE AND WORKING POSITION
Pole trimmers are often referred to as being dicult to
balance or being heavy as the motor in the cutting head
is far away from the position of the gripping surfaces
during use.
To ensure that good balance is felt in the product, it is
important to:
Always wear safety goggles, non-slip footwear and
gloves. Always attach the auxiliary handle and shoulder
strap. Maintain proper footing and balance. Be careful
not to overreach. Do not over extend your arms for
prolonged periods of time as this can cause fatigue.
When in use, always use either the foam grips or pole
in conjunction with your other hand on the rear handle
and trigger.
SHOULDER STRAP
The shoulder strap should be adjusted so that the pole
trimmer is comfortable against your body, and so that
the attachment point can be used as a pivot point when
in use.
FOAM GRIP AND POLE
This can be used as an alternative to the auxiliary
handle if it is more comfortable during use.
POLE LENGTH ADJUSTMENT
Always adjust the length of the pole to suit the size of
hedge to be cut.
Once the accessories have been adjusted to feel
comfortable the pole trimmer will balance and
counterbalance with less fatigue being felt.
Unscrew the Oil Cap (3) located on the top of the
Chainsaw attachment to carefully add oil (not supplied).
IMPORTANT: Always check the Chain Oil Tank before
use. Use a good quality Bar and Chain oil, which
contains additives to reduce friction and wear.
If the oil level height is below the scale line “MIN”, it
needs relling. Always ensure the automatic oiler system
is working properly.
Keep the Oil Tank lled with Bar and Chain or Sprocket
Oil.
IMPORTANT: Never starve the bar and chain of
lubricating oil.
Running the saw dry or with too little oil will decrease
cutting eciency, shorten chain life, cause rapid dulling
of the chain, and lead to excessive wear of the bar from
overheating.
Too little oil is evidenced by smoke or bar
discolouration.
Wipe o any excess oil and replace the Oil Cap (3)
tightly.
ADDING CHAIN LUBRICANT OIL
16 12 11

A5P | 01
WARNING: Wear heavy duty work gloves when handling
the bar and chain.
CAUTION: The sprocket tips on your new saw have
been pre-lubricated at the factory.
Failure to lubricate the guide bar sprocket tip will
result in poor performance and seizure, voiding the
manufacturer’s warranty.
Lubrication of the sprocket is recommended using a
maintnenace spray after 25 hours of use or once a
week, which ever occurs rst.
NOTE: Ensure you also lubricate underneath the
Sprocket.
Always thoroughly clean guide bar sprocket tip before
lubrication.
NOTE: it is not necessary to remove the saw chain to
lubricate the guide bar sprocket tip.
SPROCKET MAINTNENCE

A5P | 01
WARNING! BE THOROUGHLY AWARE OF THE DANGER OF REBOUNDING BRANCHES.
SAWING SMALL BRANCHES
Set your saw cut of small branches (0-3inches) from top
to bottom as illustrated.
Be aware of early breaking of the branch if you have
underestimated the size and weight.
CAUTION! Be completely aware of the falling cut
material.
WARNING: Do not stand underneath the branch you
are cutting.
SAWING LARGER BRANCHES
For controlled sawing of larger branches
(3-5.9Inches), rst select a relief cut (cutting A). This
is always made from below. Then, saw a notch in the
upper section of the branch (cutting B) until the two cuts
meet.
B
A
SAWING SECTIONS
If the branch you are sawing is particularly long, it is
highly recommended you cut these into sections as
illustrated.
This is the only way to safely ensure the point of impact
of the cut material.
After each cut, clear away any sections that are lying on
the ground to avoid any potential tripping hazards.
ABC
SAWING TECHNIQUES

A5P | 01
CHAIN TENSIONING AND ADJUSTMENT CHECK
Correct tension of the saw chain is extremely important
and must be checked before starting, as well as during
any cutting operation.
NOTE: A cold Chain is correctly tensioned when there
is no slack on the underside of the Chain Guide Bar,
the Chain is snug but can be turned by hand without
binding.
NOTE: The Chain must be re-tensioned whenever the
ats on the drive links hand out of the Chain Guide Bar.
(Fig A).
NOTE: During normal operation, the temperature of
the chain will increase. The drive links of a correctly
tensioned warm chain will hang approximately 1/16” out
of the Chain Guide Bar groove.
(Fig B).
Hold the nose of Chain Guide Bar (8) up and turn the
Chain Tension Dial (5) clockwise to increase chain
tension.
Turning the Tensioner counter-clockwise will decrease
the amount of tension on the chain. Ensure the chain ts
snugly all the way around the Chain Guide Bar.
CAUTION: A new saw chain stretches, requiring
adjustment after as few as 5 cuts. This is normal with a
new chain, and the interval between future adjustments
will lengthen.
CAUTION: If the saw chain is too loose or too tight, the
sprocket, bar, chain, crankshaft and bearings will wear
more rapidly.
GUIDE BAR MAINTENANCE
Most guide bar problems can be prevented by keeping
the chainsaw well maintained.
Insucient guide bar lubrication and operating the saw
with chain that is too tight will contribute to rapid bar
wear.
The Chain Guide Bar has a small oil way for lubrication
oil.
WARNING: Always wear protective gloves during
maintenance operations. Do not carry out maintenance
when the motor unit is hot.
To help minimise bar wear, the following guide bar
maintenance procedures are recommended.
WARNING! Always ensure the battery is removed before performing any cleaning and maintenance tasks.
CHAIN MAINTENANCE
Oil Way
Loosen Chain
Tighten Chain
FIG1
FIG 2
Flats
Approx
1/16”

A5P | 01
WARNING: Improper Chain sharpening increases
the potential of kickback. Failure to replace or correctly
repair a damaged Chain can cause serous injury.
For the inexperienced chainsaw user, we recommend
that your chain be professionally sharpened by your
nearest gardening equipment repair centre. If you feel
comfortable sharpening your own chain, special tools
are available to ensure that cutters are sharpened
at the correct angle and depth. A 4mm hand le is
recommended when sharpening by hand. Chains are
also easily replaced, see your local DIY store for a 40
drive link 9.84Inches chain.
To sharpen the chain, use suitable sharpening tools from
your local hardware or tool store:
• A 3/16 round hand le.
• A chain measuring calibre.
• An electric chain sharpener.
WARNING: All cutting teeth must be similarly long.
Dierent lengths can cause rough running and damage
to the chain and product motor.
Minimum length of the teeth must be 3/16. If they are
shorter remove the chain.
Angles, which the teeth are under, must be followed. To
sharpen the chain, make 2 to 3 pulls of the le from the
inside out.
WARNING: After 3 to 4 sharpening of the cutting teeth,
have the chain sharpened by a Professional for longevity
of use.
Parts of a Cutter
Top Plate
Cutting Corner
Side Plate
Gullet
Toe
Depth Gauge
Heel
Rivet Hole
CHAIN SHARPENING

A5P | 01
TROUBLESHOOTING
PROBLEM SOLUTION
Tool does not power on Ensure the Battery is fully charged and inserted correctly.
Activate the ON/OFF Trigger Switch.
Blade does not move Driver gear may be broken. Contact DOMU Brands Customer
Services.
Poor cutting performance
Chain may be damaged and will need changing as outlined in the
‘Chain Maintenance’ sections.
Material may not be suitable for the type of blade used.
Motor becomes hot
The tool has been heavily used.
Reduce the force applied to the tool. Do not exert extra pressure,
let the tool do the work.
Air vents have become blocked. Clean the air vents using com-
pressed air or a clean dry cloth.
Chain is juddering/vibrating abnor-
mally.
Blade tension may be loose. Tighten the blade tension.
Blade is not mounted correctly. Check the blade and replace if
necessary.
Machine bearings may be worn. Contact DOMU Brands Customer
Services.
The motor runs but the chain is not
turning.
The chain tension is too tight, re-Tension.
The Chain Guide Bar or chain is damaged, inspect and replace the
damaged part if required.
Guide Bar and Chain running hot and
smoking.
The chain tension is too tight, re-Tension.
The Oil Tank is empty, refill.

A5P | 01
DECLARATION OF CONFORMITY
We:
DOMU Brands Ltd
5th Floor The Tower
Deva City Oce Park
Manchester
M3 7BF
DOMU Brands Ltd
Unit 30, Finlan Road
Stakehill Industrial Estate
Middleton, Manchester
M24 2RW
Declare under our sole responsibility the product:
SKU
3500230
Description:
40V Cordless Pole Chainsaw
Complies with the essential requirements of the following directives:
2006/42/EC
2000/14/EC
2014/30/EU
2011/65/EU
2014/35/EU
2006/66/EC + 2013/56/EU
2014/56/EU
And the Standards
BS EN 60745-1:2009+A11:2010, BS EN 60745-2-13:2009+A1:2011, EN 55014-1:2006+A1+A2, EN 55014-2:2015
EN 61000-3-2:2014, EN 61000-3-3:2013, EN 60335-1:2012+A11:2014, EN 60335-2-29:2004+A2:2010
EN 62233:2008, IEC62133:2012, UN 38.3
Authorised Signatory on behalf of DOMU Brands Ltd.

A5P | 01

A5P | 01
EN
DISPOSAL INFORMATION Please recycle where facil-
ities exist. Check with your local authority for recycling
advice.
CUSTOMER SERVICE If you are having diculty using
this product and require support, please contact
WARRANTY To register your product and nd out if
you qualify for a free extended warranty please go to
www.vonhaus.com/warranty. Please retain a proof of
purchase receipt or statement as proof of the purchase
date. The warranty only applies if the product is used
solely in the manner indicated in the warnings page
of this manual, and all other instructions have been
followed accurately. Any abuse of the product or the
manner in which it is used will invalidate the warranty.
Returned goods will not be accepted unless re-pack-
aged in its original packaging and accompanied by a
relevant and completed returns form. This does not
aect your statutory rights. No rights are given under
this warranty to a person acquiring the appliance sec-
ond-hand or for commercial or communal use.
COPYRIGHT All material in this instruction manual are
copyrighted by DOMU Brands.Any unauthorised use
may violate worldwide copyright, trademark, and other
laws.
THANK YOU
Thank you for purchasing your product/appliance.
Should you require further assistance with your pur-
chase, you can contact us at
VonHaus is a registered trademark of DOMU Brands
Ltd. Made in China for DOMU Brands. M24 2RW.
C
Table of contents
Other VonHaus Saw manuals
Popular Saw manuals by other brands

Husqvarna
Husqvarna TS230F Spare parts

Chicago Electric
Chicago Electric 91995 Set up and operating instructions

Lissmac
Lissmac MULTICUT 400 D operating manual

BAUKER
BAUKER CMS185S user manual

Craftsman
Craftsman CMXETAX69434502 instruction manual

Clarke
Clarke Woodworker CTS10PLM operating & maintenance manual

DeWalt
DeWalt 14'' Metal/wood cutting band saw instruction manual

Black & Decker
Black & Decker 3935 instruction manual

Meister
Meister KS1200M Original instructions

Evolution
Evolution R185 SMS Original instructions

Axminster
Axminster WorkShop AW1950B Original instructions

Metabo
Metabo PowerMaxx ASE Original instructions