Voyager VGRE User manual

Read instructions before operating the machine.
Antes de usar la maquina lea atentamente el libro de instrucciones.
Lire attentivement le mode d’emploi avant la mise en service de la machine.
Vor Inbetriebnahme der Maschine Bedienungsanweisung lesen.
Leggere queste istruzioni prima di usare la macchina.
y
MODEL POWER SOURCE
VGRE 115V ELECTRIC
Beginning with Serial# 1000081026
E
98954
06/28/03

TABLE OF CONTENTS
VGRE 98954 10/19/02
2
MODEL
MODELO
MODELE
DATE OF PURCHASE
FECHA DE COMPRA
DATE D’ACHAT
SERIAL NUMBER
LAMINA DE NÚMERO DE SERIE
NUMERO DE SERIE
SALES REPERESENTIVE #
AGENTE DE VENTAS #
REPRESENTANT#
DEALER NAME
NOMBRE DEL DISTRIBUIDOR
NOMDUCONCESSIONNAIRE
Data Log/Table of Contents
Datos de la Máquina.Tabla de Contenidos
Registre d’informations/Table des Matières........ 2
Safety Instructions......................................... 3
Seguridad........................................................ 4
Sécurité........................................................... 5
Grounding Instructions
Instrucciones para la puesta a tierra
Instructions visant la mise à la terre................... 6
Technical Specifications
Especificaciones Técnicas
Caractéristiques Techniques............................. 7
Controls......................................................... 8
Mandos de Control
Commandes de Fonctionnement
Operations
Operación
Opération........................................................ 9
Wiring Diagram (115V)
Esquema Eléctrico (115V)
Schéma Électrique (115V).................................15
Maintenance
Mantenimiento
D’entretien........................................................16
Troubleshooting..............................................17
D’epannage de la Machine................................18
Guia de Localización de Probelmas ...................19
Service Schedule. ...........................................20
Part List
Lista de Piezas
Liste de Pièces ............................................22/42
Warranty
Garantía
Garantié...........................................................43
INSPECTION
Carefully unpack and inspect your machine for shipping damage. Each unit is operated and thoroughly
inspected before shipping, and any damage is the responsibility of the carrier, who should be notified
immediately.
INSPECCION
Desempaque cuidadosamente e inspeccione su machine por daños de embarque. Cada unidad es
operada y totalmente inspecionda antes de embarcar, y cualquier daño el la responsabilidad de la
compania de embarque, a quien se le deberia de notificar inmediatamente.
INSPECTION
Déballer et insecter votre machine soigneusement. Chaque machine est éssayée et inspectée
soignusement avant d’être remise au transporteur. Tout est la responsabilité même du transporteur et c’est
pour cela qu’il doit être notifié immédi

VGRE 98954 12/18/01 3
IMPORTANT SAFETY INSTRUCTIONS
When using an electrical appliance, basic precaution
must always be followed, including the following:
READ ALL INSTRUCTIONS BEFORE USING THIS MACHINE.
To reduce the risk of fire, electric shock, or injury:
Use only indoors. Do not use outdoors or expose to rain.
Use only as described in this manual. Use only manufacturer’s recommended components and attachments.
If the machine is not working properly, has been dropped, damaged, left outdoors, or dropped into water, return
it to an authorized service center.
Do not operate the machine with any openings blocked. Keep openings free of debris that may reduce airflow.
This machine is not suitable for picking up hazardous dust.
Machine can cause a fire when operating near flammable vapors or materials. Do not operate this machine near
flammable fluids, dust or vapors.
This machine is suitable for commercial use, for example in hotels, schools, hospitals, factories, shops
and offices for more than normal housekeeping purposes.
Maintenance and repairs must be done by qualified personnel.
During operation, attention shall be paid to other persons, especially children.
When leaving unattended, secure against unintentional movement.
The machine shall only be operated by instructed and authorized persons.
When leaving unattended, switch off or lock the main power switch to prevent unauthorized use.
Do not handle the plug or machine with wet hands.
Do not unplug machine by pulling on cord. To unplug, grasp the plug, not the cord.
Do not use with damaged cord or plug. Follow all instructions in this manual concerning grounding the machine.
Do not pull or carry by cord, use cord as a handle, close a door on cord, or pull cord around sharp edges or
corners.
Do not pull/run machine over cord. Keep cord away from heated surfaces.
Connect to a properly grounded outlet. See Grounding Instructions.
SAVE THESE INSTRUCTIONS
!
WARNING:

VGRE 98954 12/18/01
4
INSTRUCCIONES IMPORTANTES PARA SU SEGURIDAD
Durante la utilizaciÓn de un dispositivo eléctrico hay que tener en
cuenta una seria de medidas básicas de precauciÓn, que incluyen
lassiguientes:
Para reducir el riesgo de incendios, descargas
eléctricas o lesiones:
Nodeje nunca el aparato conectado a la red. Despues de su uso y antes de cualquier revision o reparacion,
desconecta el aparato de la toma de corriente. No usar nunca el aparato al aire libre ni sobre superfívies
humedas.
No permita que se utikice e aparato como un jugete. Hay que prestar especial atencion al utilizarlo en las
cercanias de ninos.
Utilzar el aparato solo como se describe en este manual. Emlpear exclusivamente los accesorios recomendados
por el fabricante. No poner en marcha el aparato con un cable electrico deteriorado. Si el aparato no funciona
como deberia, si se ha caido, danado, si ha permanecido al aire libre o si se ha caido al agua, dirijase a un taller
de servicio.
No tire del aparato ni lo transporte utilzando el cable electrico; no use el cable a modo de asa, ni cierre una
puerta con el cable pillado; no tienda el cable en torro a aristas vivas o esquinas.
No pase con el aparato por encima del cable. Mantenga el cable simpre lejos de superficies calientes. No
desconecte el enchufe de la red tirando del cable. Para desconectar el aparato hay que tirar del enchufe, no del
cable.
No maneje el enchufe ni el aparato con las manos humedas.
No introduzca ningun odjetoen las aberturas del aparato.
No utilice el aparato mientras esta bioqueada uns de las aberturas; evitela penetracion de polvo, hilachas, pelos
o cualquier objeto que pueda inhibie la circulacion del aire.
Mantenga su cabello, la ropa suelta, los dedos y todas las partes de su cuerpo alejadas de las aberturas y piezas
en movimiento. No utilice el aspirador para recoger cuerpos en llamas o humeantes, tales como cigarrilos,
cerillas o cenzas calientes.
Desconecte todos los interruptores antes de desenchufar el aspirador.
No utilice el aspirado para recoger liquidos inflamables o combustibles, tales como gasolina, ni maneje el
aspirador en zonas donde pueda haber liquidos de este tipo.
CONSERVE ESTAS INSTRUCCIONES A MANO
!
ADVERTENCIA

VGRE 98954 12/18/01 5
IMPORTANTES MESURES DE SÉCURITÉ
L’utilisation d’un appareil électrique demande certaines
précautions:
LIRE TOUTES INSTRUCTIONS AVANT DE FAIRE FONCTIONNER (CET APPAREIL)
Pour réduire les risques d’incendie, de choc électrique
ou de blessure:
Cet appareil ne doit être connecter qu a des prises ayant une sortie de terre. Se reporter aux instruction de mise à
la terre.
Ne pas laisser l’appareil sans surveillance lorsqu’il est branché. Débrancher lorsque l’appareil n’est pas utiliséet
avant l’entretien.
Avertissement. Pour reduire les risques de choc electrique, ne pas utiliser àl exterieur et ne pas aspirer de
matiéres humides.
Ne pas permettre aux enfants de jouer avec l’appareil. Une attention particuliére est nécessaire lorsque l’appareil
est utilisépar des enfants ou àproximitéde ces derniers.
N’utiliser que conformément àcette notice avec les accessoires recommandés par le fabricant.
Ne pas utiliser si le cordon ou la fiche est endommagé. Retourner l’appareil àun atelier de réparation s’il ne
fonctionne pas bien, s’il est tombe ou s’il a étéendommagé, oubliéàl’extérieur ou immerge.
Nes pas tirer soulever ou trainer l’appareil pas le cordon. Ne pas utiliser le cordon comme une poignée, le coincer
dans l’embrasure d’unée porte ou l’appuyer contre des arétes vives ou des coins. Ne pas faire rouler l’appareil sur
le cordon. Garder le cordon àl’écart des surfaces chaudes.
Ne pas débrancher en tirant sur le cordon. Tirer plutÔt la fiche.
Ne pas toucher la fiche ou l’appareil lorsque vos mains sont humides.
N’inserer aucun objet dans les ouvertures. Ne pas utiliser l’appareil lorsqu une ouverture est bloquée. S’assure
que de la poussiére, de la peluche des cheveux ou d’autres matiéres ne réduisent pas le débit d’air.
Maintenir les cheveux, les vétements amples, les doigts et toutes les parties du corps àl’écart des ouvertures et
des piéces mobiles.
Ne pas aspirerde matiéres en combustion ou qui dégagent de la fumée, comme des cigarettes, des allumettes ou
des cendres chaudes.
Mettre toutes les commandes àla position ARRET avant de débrancher l’appareil.
Ne pas aspirer des liquides inflammables ou combustibles, comme de l’essence, et ne pas faire fonctionner dans
des endroits oùpeuvent se trouver de tels liquides.
CONSERVER CES INSTRUCTIONS
!
AVERTISSEMENT

GROUNDING INSTRUCTIONS
VGRE 98954 12/18/01
6
THIS PRODUCT IS FOR COMMERCIAL USE ONLY.
ELECTRICAL:
In the USA this machine operates on a standard 15 amp 115 volt
A.C. power circuit (129V nominal). The amp, hertz, and voltage
are listed on the data label found on each machine. Using
voltages above or below those indicated on the data labelwill
cause serious damage to the motors.
GROUNDING INSTRUCTIONS:
This appliance must be grounded. If it should malfunction or break
down, grounding provides a path of least resistance for electric
current to reduce the risk of electric shock. This appliance is
equipped with a cord having an equipment-grounding conductor
and grounding plug. The plug must be inserted into an
appropriate outlet that is properly installed and grounded in
accordance with all local codes and ordinances.
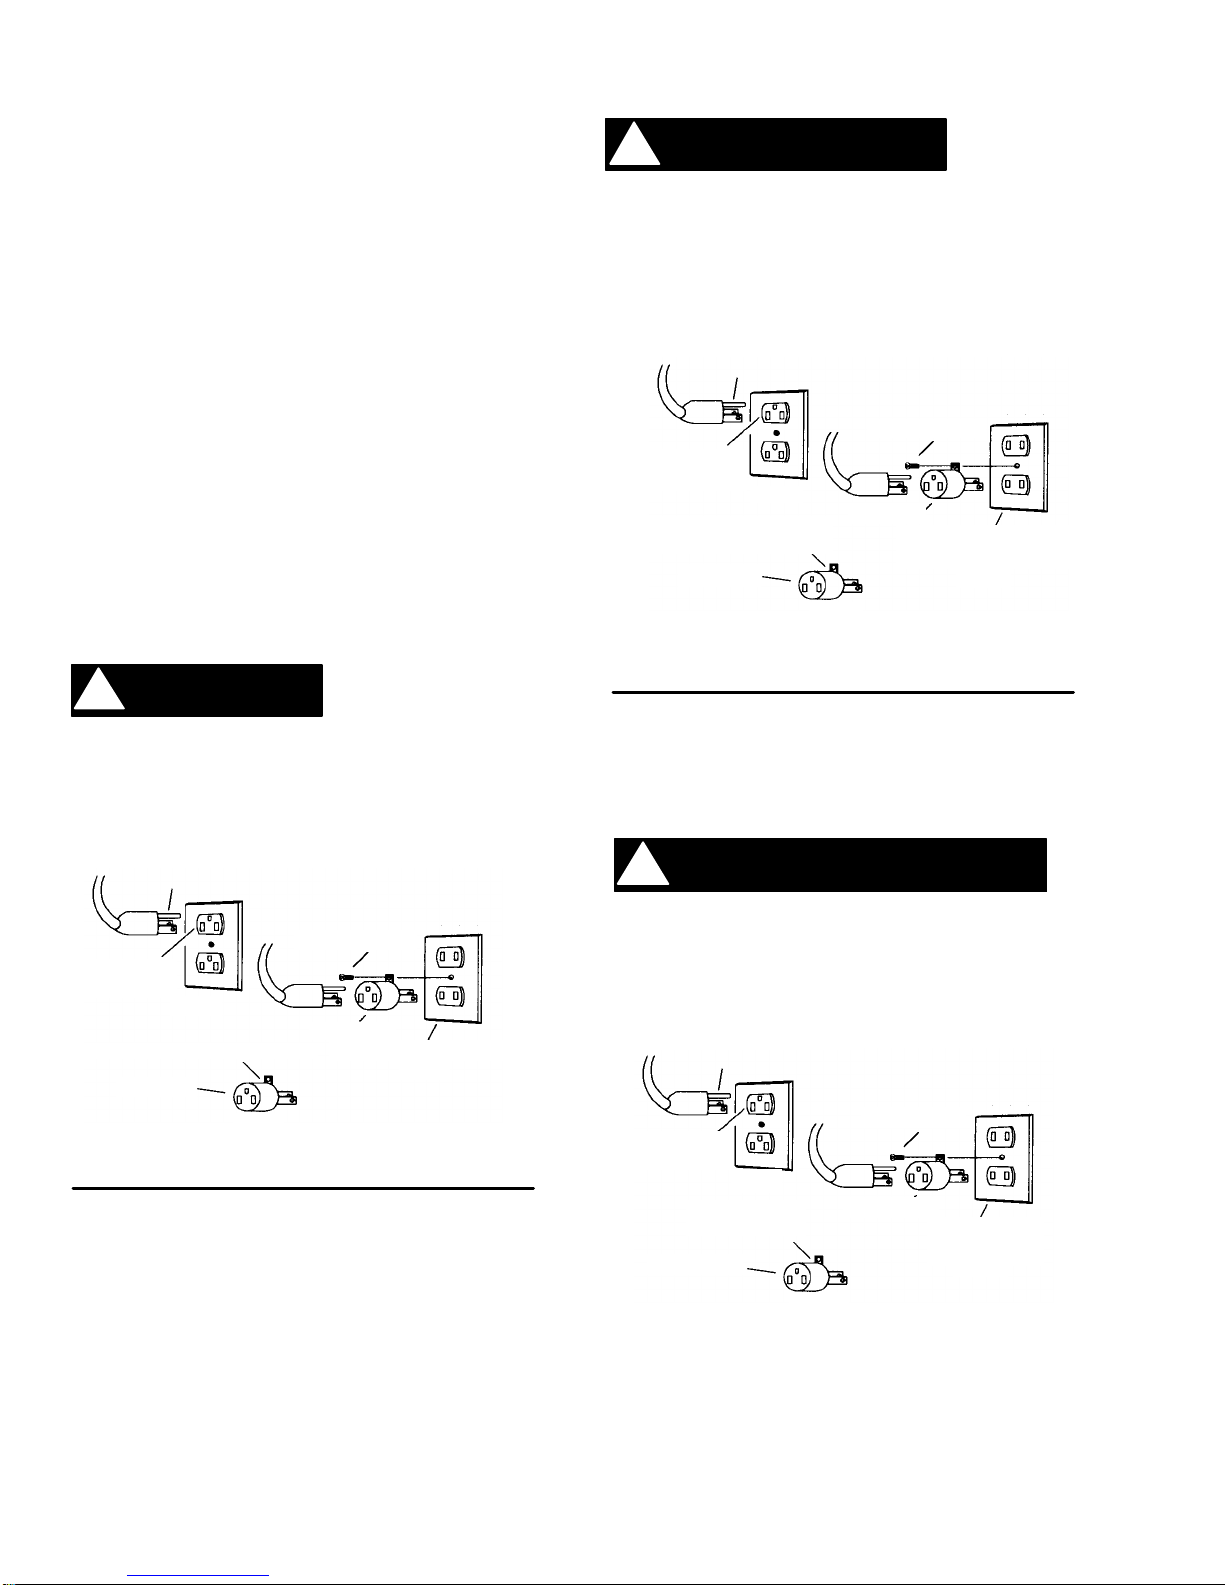
This appliance is for use on a nominal 120-volt circuit, and has a
grounded plug that looks like the plug in “Fig. A”. A temporary
adaptor that looks like the adaptor in “Fig. C” may be used to
connect this plug to a 2-pole receptacle as shown in “Fig. B”, if a
properly grounded outlet is not available. The temporaryadaptor
should be used only until a properly grounded outlet (Fig. A)can
be installed by a qualified electrician. The green colored rigid ear,
lug, or the like extending from the adaptor must be connected to a
permanent ground such as a properly grounded outlet box cover.
Whenever the adaptor is used, it must be held in place by a metal
screw.
Improper connection of
theequipment-
grounding conductor
can result in a risk of electrical shock. Check with a qualified
electrician or service person if you are in doubt as to whether
the outlet is properly grounded. Do not modify the plug
provided with the appliance – if will not fit the outlet, have a
proper outlet installed by a qualified electrician.
PROPER GROUNDING
INSTRUCCIONES PARA LA PUESTA A TIERRA:
Este dispositivotiene queser puesto debidamente a teirra. Sise
produceuna aceria o rotura, la conexion a tierra constituye el
camino de menor resistencia para lacorriente electrica,
reduciendose el riesgo de descargas peligrosas. El aparato
cuenta con un cable con conductor de puesta a tierra yun
enchufe conclavija de puesta a tierra de acuerdo con las normas
y ordenanzas locales.
Si se conecta
demodo
inadecuado
el conductor
de puesta atierra del aparato pueden producirse descargas
electricas peligrosaspara leusuario. En caso dedudas,
pedir aunelectricistadebidamente cualificado o auntecnico
delserviciopostventa que verifique que la toma decorriente
esta bien puesta a tierra. Sielenchufesuministrado conel
aparato no se adapta a la tome decorriente disponible, no
hay quemodificarelenchufe,sinodirigirse aunelectricista
paraque instale una tome corriene adecuada.
Cet appareil doit être mis à la terre. En cas de défaillance ou de
panne éventuelles, la mise à la terrefournit au courant un chemin
de moindre résistance qui réduit le risque dechoc électrique. Cet
appareil est pourvu d’uncordon muni d’un conducteur de terre et
d’une fiche avec broche deterre. La fiche doit être brancheé dans
une prise appropriéecorrectement installée et mise à la terre
conformément aux règlements et ordonnances munucipaux.
Un conducteur deterre cordé peutentraînerunrisquede
chocélectrique. Consulter unélectricienouuntechnicien
d’entretienqualifiési vois n’êtes pas certain que lapriseest
correctementmise à laterre. Ne pas modifier la fichefournie
avec l’appareil -siellene peutêtre insérée dans la prise,
faire installerune prise adéquate parunélectricienqualifié.
!
WARNING:
GROUNDING PIN
GROUNDED
OUTLET
METAL SCREW
ADAPTOR
GROUNDED OUTLET BOX
FIG. A
FIG. B
TAB FOR GROUNDING SCREW
ADAPTOR
FIG. C
NOTE: In Canada, the use of temporary
adaptoris
not permitted by the Canadian Electrical Code
!
ADVERTENCIA:
Clavija de puesta a tierra
Tornillo
metalico
Toma de
corriente
conectada a tierra
Apendice
para
tornillo de
conexion a tierra
Adaptador
FIG. A
FIG. B
Apendice
para
tornillo de
conexion a tierra
Adaptador
FIG. C
AVERTENCIA: en Canada, la Canadian Electrical Code
prohibe
el udo deadaptadores temporales.
!
ADVERTISSEMENT:
Avec
mise a la
terre
Prise de courant
Broche de
mise
a la terre
Vis metallique
Boite de sortie
mise a la terre
Adaptateur
Adaptateur
Platte
destinee a
la vise de
terre
FIG. A
FIG. B
FIG. C
NOTE: Au Canada,l’utilisation d’unadaptateur temporaire
n’est pas autorisée par le Code canadian del’électricité.

TECHNICAL SPECIFICATIONS
VGRE 98954 12/18/01 7
ITEM DIMENSION/CAPACITY
Electrical 115V, 15A, 60HZ
Electric Propelling Motor (1)-1/4 hp DC (186 watts) with variable speed
forward and reverse, with safety shut-off.
Drive System Belt Drive w/ manual clutching mechanism.
Operating speed” 0-100 ft/min (30 m/min)
Electric Vacuum Motor (1)-3 stage, 1 hp (746 watts), 99 cfm (2.80
m³/min.)
Waterlift 117” (397 cm). Electric float shut-off.
Electric Brush Motor (1)-0.4 hp (298 watts) permanent magnet, DC.
Brush Speed 1000 RPM
Solution Pump 100 psi, diaphragm style pump
Solution Capacity 40 Gallons (151 ltr)
Recovery Capacity 35 Gallons (132 ltr)
Vacuum Shoe 28” (71 cm) wide, cast aluminum, adjustable
floating and pivoting.
Wheels
-Front (2)
-Rear (2) 10” dia. (25 cm) by 2.5” wide (6.4 cm)
4” dia. (10cm) casters
Dimensions – Weight (empty) 280 lbs. (127 kg)
Dimensions
- Length
- Storage Position 60” (152 cm)
52” (132 cm)
Dimensions - Height 43” (109 cm)
Dimensions - Width 30” (76 cm)
SIDE VIEW
TOP VIEW

CONTROLS
VGRE 98954 12/18/01
8
1.
Brush Height Adjustment –
Raises and
adjusts the height of the brush.
2. Vac Shoe Lift Lever – Lifts the vac shoe up or
down and switches vac motor off and on. 2nd
slot for accessory tool use.
3. Electrical Power Cord
4. Main Power Switch – Turns On and Off the
machine and pump.
5. Drive Handle Control and Connection –This
is where the handle controls are connected
electrically to the drive.
6. Drive Motor Circuit Breaker – 3 amp, protects
the drive motor mechanism.
7. Vac Motor Circuit Breaker – 13 amp, protects
the vacuum motor.
8. Brush Motor Circuit Breaker – 4 amp, protects
the brush motor.
9. Accessory Tool Hookup –Used for various
auxiliary cleaning tools.
10. Hour Meter – Displays the running time for the
machine.
11. Belt Tension Handle –Puts machine into
“Dirve” or “Neutral” engagement.
12. Data Plate Label –Shows serial number, model
and voltage information.
13. Height Adjustment Handle –Adjusts the
handle height for comfortable operation.
14. Accessory Tool Hose Attachement –To use
accessory tool, remove hose from vac shoe and
attach to accessory tool adaptor.
DRIVE CONTROLS
A. The speed the machine will travel is regulated
by knob located on the controls which are found
on the main handle. Turn the knob to the right to
increase the speed of the machine.
B. Squeezing one or both of the control levers will
propel the machine forward at the selected
speed.
C. Releasing both control levers will stop the
machine.
D. Pressing forward on the levers moves the
machine backwards at the selected speed.
A
D
B
C
SEE BELOW
12
1
2
4
13
5
6
7
8
3
DRAIN
HOSE
SIGHT
FILL
TUBE
9
11
10
14

OPERATIONS
VGRE 98954 12/18/01 9
STEP
1
STEP
2
STEP
3
STEP
4
Add cleaning chemical.
Agregue el concentrado.
Y
ajounter
un
concentré
nettoyant
selon.
FILLING THE VOYAGER
NOTE: IF A BUCKET IS USED TO FILL THE
TANK, BE SURE IT IS CLEAN.
DO NOT PUT DEFOAMER, SOLVENTS,
SPOTTER OR PRESPRAY CHEMICALS IN THE
SOLUTION TANK.
CHEMICALS-QUIMICOS-CHIMIQUES
SUITABLE CHEMICALS NON-COMPATIBLE CHEMICALS
Alkalis Aldehydes
Detergents Aromatic Hydrocarbons
Hydroxides SP Butyls
Soaps Carbon Tetrachloride
Vinegar Chlorox*
D-Limonene@ Chlorinated Bleaches
@When properly Chlorinated Hydrocarbons
diluted Lysol*
* Registered Methyl EthelKetone (MEK)
Trademark Perchorethylene (perc)
Phenolics
Trichlorethyelene
NOTE: The internal parts of the pump used in the
extractor are suitable for use with most carpet cleaning
chemicals. However, it is susceptible to chemical attack
from cleaning substances, such as hydrocarbon
solvents and chlorinated bleaches. These
noncombustible materials are not of the type normally
used for carpet cleaning.

OPERATIONS
VGRE 98954 12/18/01
10
ADJUST
STEP
1
STEP
2
STEP
3
STEP
4
Remove cord from storage bin.
Saque el cordón eléctricodel compartimineto.
Retirer le câble du bac avant de la machine.
Adjust handle to operating position.
Ajuste la agarradera en la posición correcta.
Placez la poignée dans la position désirée.
Plug cord into grounded outlet.
Enchufe el cordón eléctrico a un toma corriente.
Brancher la machine à une prise avec terre.
Turn Main Power Switch “ON” – “
I
”
Encienda el interruptor principal.
Mettre la machine en marche.

OPERATIONS
VGRE 98954 12/18/01 11
STEP
5
STEP
6
STEP
7
STEP
8
Lift belt tension handle to “Drive” position.
Levante la palanca del la correa de tensión del
cepillo hacia la posición de marchar (“Drive”).
Enclencher la poignée de tension de la courrole
en position marche.
Adjust speed control knob to desired speed.
Establezca la velocidad utilizando el botan de
control de velocidad.
Ajuster le bouton de contrôle de vitesseã la
vitesse.
Turn vacuum motor on by lowering right hand
lever all the way down.
Baje la boquillade aspiractión utilizando la
palancade elevación localizada a la derecha.
Abaisser la poignée droite de contrôle de
l’aspiration.
Lower brush to correct setting using
left hand
lever, listening for low hum of brush.
Baje el cepilloutilizando la palancade elevación
de la izquierda.
Abaisser la poignée de contrôlede vitesse pour
faire avancer la machine.
INCORRECT
CORRECT

OPERATIONS
VGRE 98954 12/18/01
12
Si hay espuma
excesiva,
apague la
máquina y agregue un agente
despumante al tanque de
recuperación.
Mousse!
Si de la mousse
ou du
liquide sort de la machine,Y ajouter
un concentré qui ne fait pas de
mousse.
STEP
9
STEP
1
STEP
2
Depress speed lever to propel machine forward.
Pressing forward on levers moves machine in reverse.
Presionando una o las dos palancas de control, la
máquina andará hacia delante a la velocidad
selecionada.
Presionado hacia delantelas palancas, la máquina irá
marcha atrás a la velocidad seleccionada.
Enclencher la poignée de tension de la courroie en
position marche.
Pousser la poignée vers l’avant fait reculer la machine.
CLEANING PROCEDURE
Operate machinie in parallel passes. Clean
perimeter last.
Utilice la máquina en faces paralelas.
Utilser la machine en passages paralléles.
Use right side of machine for cleaning against walls.
Cuando utilice la máquina junto a las paredes, utilice
el lado derecho de la máquina.
Utiliser le côté droit se la machine pour nettoyer contre
les murs.
!
CAUTION
!
ATTENTION
Foam! Turn off machine and add
defoamer.
!
PRECAUCIÓN

OPERATIONS
VGRE 98954 12/18/01 13
STEP
3
STEP
4
STEP
5
STEP
6
To speed drying, use a WINDBLOWER
fan.
Para secar la alfombrar mas rapido, utilice un
abanico WINDBLOWER.
Pour accélérer le séchage, utiliser un
WINDBLOWER.
Empty recovery tank by releasing dump hose.
Desagüe el tanque de recuperación utilizando la
manguera.
Vider le réservoir eau sale en utilisant le tuyau de
vidange.
Turn Main Power Switch “OFF” – “
O
”.
Apagueel interruptor principal.
Eteindre la machine.
Unplug machine. Return cord to storage bin.
Desenchufe la máquina. Regreseel cordón
electricoal compartimiento de la máquina.
Débrancher la machine. Remettre le câble dans le
bac avant de la machine.

ACCESSORY TOOL USAGE
VGRE 98954 12/18/01
14
STEP
1
STEP
2
STEP
3
STEP
4
Insert collar over fitting.
Conecte la manguera de solución de la
herramienta de accesorio al anillo de latón de
desconectado rápido.
Attacher l’outil accessoire àla tétine de solution en
cuivre à l’arrière en bas du chassis de machine.
Insert
adaptor into
vac shoe hose
, then insert
accessory tool cuff onto adaptor.
Quite la manguera de la boquilla de aspiración.
Conecte la maguera de solución de la
herramienta de assesorio a la manguera del
tanque de recuperación.
Attacher l’outil accessoire.
Turn Main Power Switch “ON” – “
I
”
Lower vacuum lever to intermediate position.
Encienda el interruptor principal.
Mettre la machine en marche.
Squeeze handle on accessory tool to begin
cleaning.
Para empezar a limpiar, apriete la palancade
solución.
Presser la gâchette afin de commencer la
vaporisation.
REMOVE

WIRING DIAGRAM
ESQUEMA ELÉCTRICO
SCHÉMA ÉLECTRIQUE
(115V)
VGRE 98954 12/18/01 15

MAINTENANCE
VGRE 98954 10/19/02
16
Empty the Recovery Tank directly into the floor drain via drain hose. After each use, rinse tank (including the float
shut-off) with fresh water. Periodically inspect the recovery tank and decontaminate if necessary, using a Hospital
Grade Virucide or a 1-10 bleach to water solution. This will dissipate the exposure to blood born or infectious
contamination. Waste water should be disposed of properly. Clean the inside of the recovert dome also.
Empty the Solution Tank by detaching the sight hose and empty directly into the floor drain. Flush the Solution
System with 1 gallon of CLEAN water.
NEVER ALLOW RECOVERED SOLUTION TO REMAIN IN TANK WHEN NOT
IN USE; NOR ALLOW UNUSED SOLUTION TO REMAIN IN THE SOLUTION
TANK WHEN IN STORAGE. INSPECT AND CLEAN THE FILTER LOCATED UNDER THE MACHINE NEAR
THE PUMP. REMOVE AND RINSE WITH HOT WATER.
MANIFOLD / SPRAY JETS
To prevent clogged jets due to alkaline build-up, the spray
system should be flushed with 1 gallon of clean hot water
at the end of each work day. The VOYAGER-E is
equipped with “quick change” jets that can be easily
removed for cleaning. To remove – push jet in and rotate.
Do not use pins or wire to remove obstruction as this will
damage jet and alter spray pattern.
1 66095 PLUG, 1/8 NPT HEX BRASS
2 44052 JETBODY, BRASS W/ SEAL
3 54138 MANIFOLD ASM, 3 JET
4 40033 HOSEBARB, 1/4 MPT X 3/8 90D
5 66052 PIN, 1/8 X 1.0 ROLL
6 73576 SPRING, 2” X .600 OD
7 44060 JET, 8002 MINI-QUICK REPLACEMENT
8 44051 JET SEAL, MINI-QUICK
9 54162 MANIFOLD ASM, 3 JET
VAC SHOE TRACKING
To adjust vac shoe tracking, move eyebolts in or out to
increase or decrease spring force, respectively, until
desired tracking is reached.
VAC SHOE DOWNPRESSURE
NOTE: DOWMPRESSURE IS FACTORY SET AND
SHOULD NOT REQUIRE ADJUSTMENT.
If adjustment of downpressure is required, turn black knob
on top of vac shoe clockwise to increase downpressure
and counterclockwise to decrease downpressure.
VAC SHOE ANGLE
NOTE: THE ANGLE OF THE VAC SHOE IS FACTORY
SET AND SHOULD NOT REQUIRE ADJUSTMENT.
Periodically inspect the vac shoe angle by resting it on a
hard, flat surface. Use a square to verify a 90° angle
between the floor and vertical surface of the vac shoe.
If adjustment is required, remove one socket on each
lower arm (from the vac shoe or bracket) and turn
clockwise or counterclockwise to change the angle to the
recommended 90°. Attach the socket on each arm to its
respective location and recheck the angle using the
square. Repeat if necessary.
!
CAUTION
:
9
1
4
3
1
6
5
2
7
8
“QUICK
CHANGE
JETS”
VAC SHOE
PIVOT ASM
VERTICAL
SURFACE
OF VAC
90°
SQUARE
ADJUSTMENT
NUTS.
REF.
SOCKET
ARM REF.
VAC SHOE TRACKING
EYEBOLTS (REF.)
SIDE VIEW OF VAC
(REF. PAGE 37)
DOWN
PRESSURE
KNOB (REF.)

TROUBLESHOOTING CHART
VGRE 98954 12/18/01 17
CONDITION CORRECTIVE ACTION
No Power to Machine Faulty power cord Replace
Power switch failure Replace if necessary.
Internal wiring problem Have a trained service technician inspect and repair
the machine.
Electrical Shock Equipment not grounding Follow grounding instructions exactly.
Receptacle not grounded Have an electrician inspect the building’s wiring.
Internal electrical problem Have a trained service technician inspect and repair
the machine.
Nuisance Tripping of
Brush Circuit Breaker Brush “buried” in carpet Brush is adjusted to low, adjust position using Brush
control lever. Best cleaning results are achieved with
minimal brush/carpet contact.
Faulty circuit breaker Replace if necessary.
Mechanical problem Higher amp draws may indicate a mechanical
problem. Find parts which are not moving freely and
repair or replace.
Vacuum Motor Speed
Varies or Doesn’t Run Worn motor brushes Replace
Faulty switch Replace
Faulty circuit breaker Replace
Internal wiring problem Have a trained service technician inspect and repair
the machine.
Loss of Vacuum Loose dome Center dome over tank.
Crack in dome or poor joint Replace or repair using acrylic plastic cement only.
Damaged Dome Gasket Replace
Lint or dirt clogging
vacuum intake screen With power off, clean vac intake screen found in
dome.
Accessory tool clogged Clean out tool, ensure free air flow.
Internal electrical problem Have a trained service technician inspect and repair
the machine.
Machine does not
propel Belt tension handle on
“Neutral” Put belt tension handle in “Drive” position.

TABLA PARA CORREGIR PROBLEMAS
VGRE 98954 12/18/01
18
PROBLEMA ACCIÓN CORRECTIVA
Máquina sin corriente Cordón eléctrico
defectuoso Cámbielo
Falla del interruptor
eléctrico Pruebe la continuidad del interruptor/Cámbielo si es
necesario.
Disyuntor defectuoso Prueba la continuidad del disyuntor/Cámbielo si es
necesario.
Problema interno de
cableado
Con la máquina desenchufada, verifique y corrija
cualquier conexión eléctrica floja dentro de la
máquina, en los interruptores y el bloque de
terminales.
Choque eléctrico Equipo sin conexión a
tierra Siga las intrucciones de puesta a tierra al pie de la
letra.
Tomacorriente sin tierra Haga que un electricista inspeccione el cableado del
edificio.
Tomacorriente sin tierra
Asegúrese de que el cableado de la máquina
coincida con el diagramade cableado
correspondiente. Verifique y corrija cualquier
conexión de alambres flojos. Cambie los alambres o
componentes que estén corto circuitados.
Choque eléctrico Cepillo seco
Encienda el motor del cepillo y los interruptores de la
bomba con la máquina inclinada hacia atrás (el
cepillo sin tocar el piso). Baje lentamente la máquina
hasta la alfombra.
Disyuntor defectuoso Pruebe la continuidad del disyuntor/Cámbielo si es
necesario.
Problema macánico Un consumo muy elevado de amperios puede inicar
un problema mecáncio. Localice las partes que no se
están moviendo libremente y repárelas I cámbielas.
La velocidad del motor
de la aspiradora var¡a o
aquél no funciona
Escobillas del motor
gastadas Cámbielas
Motor gastado Cámbielas
Interruptor defectuoso Cámbielas
Disyuntor defectuoso Cámbielas
Problema de cableado
interno Localice y corrija cualquier conexión de alambres
flojos.
Pérdida de vacío Domo flojo Centre el domo sobre el tanque.
Domo rajado o articulatión
deficiente Cámbielos o repárellos usando cemento acr¡llico
para plástico solamente.
Junta del domo dañada Cámbiela.
Pelusa o basura tupiendo
la rejilla de entrada de
vacío
Con la electricidad desconectada, limpie la rejilla de
entrada de vacío en el domo.
La herramienta del
accesorio está tupida Limpie la herramienta del accesorio, y asegúrese de
que el aire fluye libremente.
Problema eléctrico interno Pídale a un técnico de servicio capacitado que
inspeccione y repare la máquina.

TABLEAU DE DÉPANNAGE
VGRE 98954 12/18/01 19
PROBLEMA ACCIÓN CORRECTIVA
Machine hors tension Cordon d’alimentation
défectueux Le remplacer
Défalliance de l’interruteur
de marche/arrêt Contrôler la continuité de l’interrupteur/Le replacer si
nécessaire.
Disjoncteur défectueux Contrôler la continuité du disjoncteur/Le remplacer si
nécessaire.
Problème de câblage
interne
Débrancher la machine, puis rechercher et rectifier
toute manvaise connexion à l’intérieur de la celle-ci
au niveau des interrupteurs et du bornier.
Décharge électrique Absense de mise à la terre
du matériel Suivre à la lettre les directives de mise à la terre.
Absence de mise à la terre
de la prise de courant Demander à un électricien d’examiner le câblage du
bâtiment.
Problema électrique
interne Vérifier que le câblage de la machine correspond au
schéma de câblage approprié. Remplacer tout fil ou
composant qui provoque des courts-circuits.
Déclechement
intempestif du
disjoncteur Brosse sèche
Tourner le moteur de brosse et actionner les
interrupteurs en inclinant la machine en arrèrre
(brosse décollée du sol). Rabaisser la machine
lentement jusque sur la moquette.
Disyuntor defectuoso Contrôler la continuité du disjoncteur/Le remplacer si
nécessaire.
Problème mécanique
Un accroissement de la consommation de courant
peut indiquer un problème mécanique. Identifier les
pièces qui ne se déplacent pas librement, puis les
réparer ou les remplace.
Variations de régime ou
non fonctionnement du
moteur Charbons du moteur usés Les remplacer.
Moteur détrioré par l’uage Les remplacer.
Interrupteur défectueux Les remplacer.
Disjoncteur défectueux Les remplacer.
Problème de câblage
interne Rechercher et rectifier toute mauvaise connexion.
Perte d’aspiration Dôme d’aspiration mal
adjusté Centrer le dôme sur le réservoir.
Dôme fêléou mai emboîté Le remplacer ou le réparer en n’utilisant que du
mastic acrylique.
Joint d’etanchéité du dôme
endommagé Le remplacer
Filtre d’entrée d’aspiration
bouché par des peluches
ou de la crasse
Con la electricidad desconectada, limpie la rejilla de
entrada de vacío en el domo.
Accessoire bouché Mettre la machine hors tension, puis nettoyer le filtre
d’aspiration qui se trouve dans le dôme.
Problème électirque
interne Demander à un technicien d’entretien qualifié
d’examiner et de réparer la machine.

MAINTENANCE
VGRE 98954 10/19/02
20
SERVICE SCHEDULE
MAINTENANCE DAILY WEEKLY QUARTERLY
Check machine for cord damage *
Check recovery dome and gasket for
damage and cleanliness *
Check brush – should be clean with no
lint or strings attached *
Inspect vac shoe for blockage; remove
fibers with coat hanger, etc. *
Check hoses for wear, blockages, or
damage *
Check handles, switches, and knobs
for damage *
Check vac motor intake filter and clean *
Run one gallon of water through
system *
Clean out recovery tank and check
float valve to make sure it moves freely *
Clean out solution tank and remove
and clean vacuum intake screen *
Clean outside of all tanks and check for
damage *
Run vac motor for at least one minute
to allow motor to dry *
Store with dome off tank to allow the
tank to dry *
Check all bearings for noise *
Check all gaskets for wear and leakage *
Check vacuum intake screen for
damage; replace if necessary *
Check pump pressure; observe spray
pattern and check with gauge if
necessary *
Check and clean solution screen *
Check belts for wear and replace as
necessary *
Check brush for wear; ensure bristles
are not damaged *
Check cables for fraying *
Check the spray bar (manifold) for
damage; replace if broken or bent *
Check condition of vac shoe and frame
for damage *
Check overall performance of machine *
Check vac motor carbon brushes *
Table of contents
Popular Floor Machine manuals by other brands

Triple S
Triple S Cougar 17 owner's manual

U.S. Products
U.S. Products KING COBRA 1200 PRO operating instructions

Powr-Flite
Powr-Flite PAS20BA-BC Operator's manual

Rawlins
Rawlins Floor Master Instructions for use

Kärcher
Kärcher KM 90/60 R Bp Original instructions

Clarke
Clarke BOS-18 II 56382453 Instructions for use