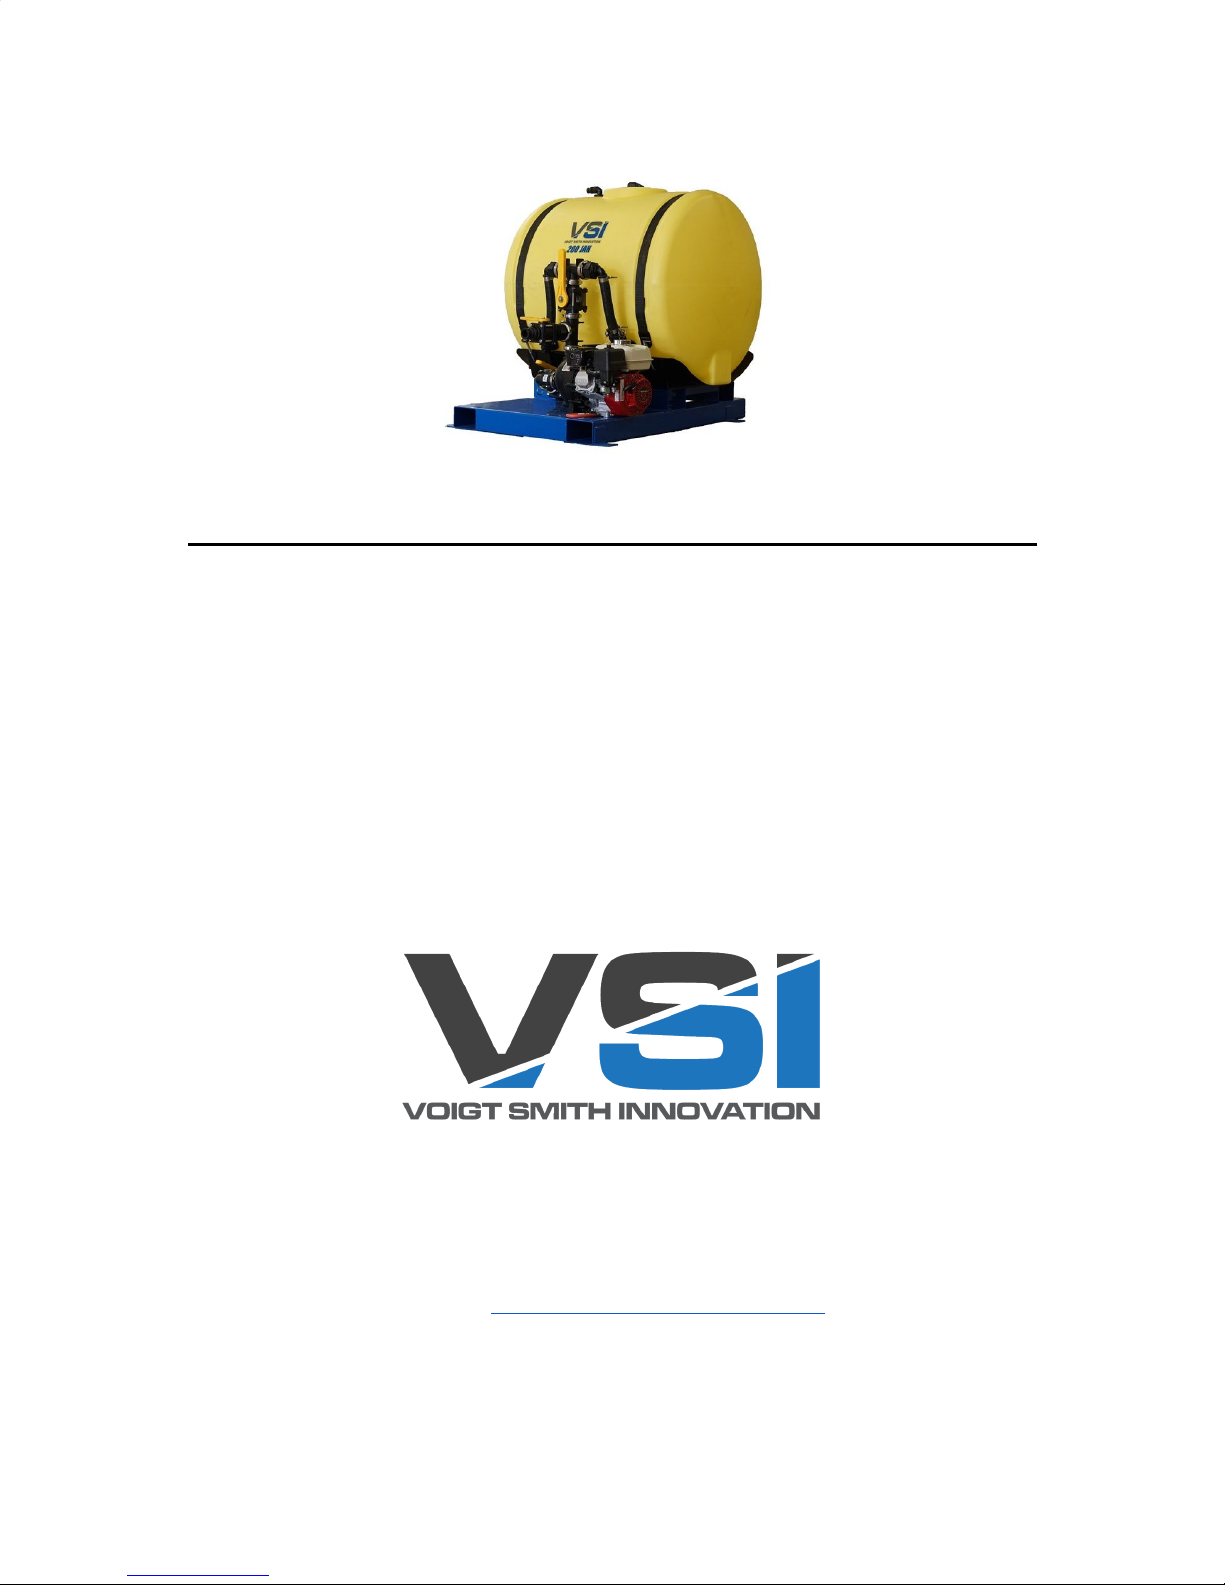
VSI 110 JAH Service manual

OPERATING AND SERVICE MANUAL
110 JAH and 200 JAH
150 East Sharon Street
Le Center, MN 56057
Office: 507-252-3033
Email: [email protected]

Introduction
Thank you for purchasing your new hydroseeder from VSI, our company greatly
appreciates your business! This manual outlines the basic operating procedures of your
hydroseeder. These machines have been designed to be user friendly. All of the motor
maintenance intervals and engine specifications can be found in your engine manual.
Contact Information
If you experience any problems with the unit, need parts, or have any other questions,
please feel free to contact us and we will be more than happy to help.
Voigt Smith Innovation
150 East Sharon Street
Le Center, MN 56057
Email: [email protected]
Office: 507-252-3033
“The VSI Guarantee”
At VSI, nothing is more important to us than your complete and total satisfaction with our
products and customer service. From the day you buy it until the day you retire it, we
want you to truly feel that the product you have purchased has served you as well or
better than any piece of equipment you have ever owned. We use only Honda engines on
our machines. These engines are tested by Honda to ensure they meet every
specification and parameter so that they will last for a very long time. The engines are
also backed by Honda’s 3 year commercial warranty. We use Banjo pumps, valves and
plumbing components on all og our machines. All Banjo products are warrantied against
manufacturing flaws for no less than 1 year from the date you purchase your machine.
At VSI we warranty our overall machines for 3 years from the date of purchase. We
understand that downtime is expensive and will make sure to minimize it for you. Even if
the part failure is your fault, we will overnight parts at wholesale cost to keep you up and
running.
VSI is under no liability or obligation of any kind with respect to an issue with a VSI
product that is directly or indirectly attributable to normal wear, corrosion, neglect,
misuse, alteration, modification, improper handling, improper storage, improper
installation, improper maintenance, improper repair, failure to follow VSI's oral or written
instructions, damage during or after shipment, any VSI product for a purpose or
application for which it is not fit or suitable.

Valves
As you are looking at your machine you will notice there are three valves. The valve
located on the bottom of the tank/suction line is used to shut off the flow to the pump
during transport or any time you need to isolate the tank from the pump. This valve
needs to be opened during operation to provide flow to the pump. Failure to have this
valve open will result in damage to the pump. The second valve is located on the
pressure side (top) of the pump. This vertically orientated valve controls the flow to the
agitation jets in the tank and also acts as your bypass during operation. The third and
smallest valve is also located on the pressure side of the pump. This is the valve that
controls the flow to the hose and gun. Make sure this valve is CLOSED unless the hose
and gun are attached. If this valve were to be opened upon start up, water/hydroseed
would begin to spray out of the valve.
Plumbing
All of our machines run a flange style poly plumbing system. These systems provide less
resistance and better flow than conventional threading plumbing and are easy to
disassemble/reassemble. All of the flange clamps use a regular 5/16” socket or wrench.
You will find a gasket located in between the two connects parts. If you ever disassemble
your unit take time to make sure the gasket is properly seated and clean before
reassembly
Camlocks
Most pieces of the hydroseeder use camlock fittings. These fittings make removal of the
sections quick and easy. You will notice that the gun, tips, and hose sections are all
connected using these fittings. To connect these fittings, simply insert the male end into
the female end and push each cam lever down until they are fully closed. There are two
camlock fittings located on the unit. The first is located on the valve the hose attaches to.
Simply take the female end of your spray hose and attach it in the way previously
described. Take time to make sure the levers are fully locked! The second camlock is
located on the top of the unit. This is for your garden hose water fill line. We will be
covering this next.

Filling The Machine
The first step in mixing a batch of hydroseed is filling the machine with water. Your
machine comes standard with a garden hose fill connection that is located at the top of
the tank. Thread the yellow female camlock connection to your garden hose and connect
it to the black male connection point.
Pond Suction Feature
Another way to fill your machine is with the optional Pond Suction Feature. This utilizes
the pump on the machine to self fill from a body of water or storage tank. A 15ft suction
hose with strainer basket is also available for purchase. See picture below LEFT for valve
configuration when using this feature.
Once the valves are in this configuration, submerse the end of the suction line in the
water. After the water has filled the suction hose, connect it to the 2” male camlock on
the suction side of the pump. Remove the plug in the top of the pump (See picture above
RIGHT) and fill it with water until full. Loosely install the plug and start the engine. With
the engine slightly above idle, allow the pump to purge all of the air from the hose. Once
the pump primes, tighten the top plug and throttle the engine up to fill the tank. Once the
tank is full, close the pond suction valve and open the tank valve.
NOTICE: Always use a strainer when drawing from a body of water to avoid drawing
debris into the pump and damaging the impeller!
When filling from a hydrant or auxiliary pump, leave the motor off and open the tank
valve to fill directly from the bottom of the tank.

Mixing a Load of Hydroseed
We recommend running a granular paper mulch in our hydroseeders for the best
performance. Wood mulch is NOT recommended and could damage the pump and clog
the system.
Once your tank is ¾ full, start the engine. Make sure your agitation and tank valves are
completely open (See picture LEFT) Mixing instructions are also labeled on each tank
near the lid (See picture RIGHT)
When the engine has warmed to operating temperature, increase the throttle until the
engine reaches maximum rpm. You will see the water churning inside of the tank. Begin
to add the mulch. Slowly dump half of the recommended amount of mulch in the tank,
pouring a large amount in at one time could result in the dry mulch reaching the suction
line and plugging. This is very rare but something to be aware of. The mulch will begin to
thicken in the tank as it absorbs water. After the first half is mixing in the tank, add your
seed and any other product such as fertilizer and tackifier to the tank. The mulch will help
mix the seed and prevent it from floating. Finally, add as much mulch as you need for
your machine (outlined in the end of this manual). The last mulch will push down any
floating seed that may be present. Keep the engine running at maximum rpm until the
mulch has absorbed its maximum capacity of water. You will notice the motion in the
tank begin to slow as it reaches this point (usually 5 minutes). You are now ready to
spray.

Applying the Hydroseed
Connect as many hoses to your machine as you need, dragging them out as you connect
each section. Finally, connect the gun to the hose. Make sure the gun valve is closed
before opening the hose valve on the hydroseeder. Keep the engine running at maximum
rpm to provide the best performance at the gun.
Begin to close the agitation valve. The further closed the valve, the more pressure will be
present at the gun. (See picture BELOW) In some situations, you may want to have the
agitation valve closed completely to achieve the maximum spray distance and flow from
the gun. Remember that the agitation acts as your bypass for the pump to prevent the
seals from burning out. If you run the machine with the valve closed, be mindful that you
will need to get back to open the agitation valve if you will not have any flow through the
gun for more than 30 seconds. It is best to keep the agitation opened slightly to have
constant bypass.
When spraying, work your way back and forth evenly covering the ground with mulch.
Every 100 gallons of product should cover roughly 1,000-1,200 square feet. In dry
conditions, you may find you can only cover ¾ of that amount. Use the valve on the gun
to control the flow to prevent splattering sidewalks and siding. If additional hoses are
installed, drop the hose sections as you go. This will reduce fatigue for the operator and
make moving across the area much easier. Simply drag the hose to the side.
When disconnecting hose sections, turn the valve off at the gun. Walk to the machine
and close the hose valve. Make sure to open the gun valve to relieve the built-up
pressure that is in the hose. Connect the gun to the next hose, open the hose valve, and
begin spraying again. Occasionally open the agitation system on the hydroseeder to
ensure the mulch and seed are evenly mixed. Spray until the tank is empty and repeat!

Cleaning the Hydroseeder
The final step in hydroseeding is cleaning the unit. Fill the tank with 25-50% of its
capacity with water. You may find it beneficial to wash any remaining hydroseed off of
the inside of the tank. Start the pump and let the system agitate. This will clean the mulch
out of the agitation lines. Connect any hoses that were used and flush the lines out with
the gun attached. If you are finding large amounts of mulch left in the tank, repeat the
process once more. The machine is now ready for the next job!
Winterizing
If you live in a cold climate you will need to winterize the pump and engine. Adding fuel
stabilizer in all fuel added to the engine is a good way to prevent build-up in the
carburetor. There are two plugs located on the pump, one on the top (See picture below
LEFT) and one on the bottom (See picture below RIGHT). Remove both plugs. You may
see water running out of the bottom drain line. Wait until all of the water has drained from
the pump. Open the tank valve if it is close to help drain any water in the suction line.
Install the bottom plug. Use a funnel to add RV antifreeze to the pump. Fill the pump until
you see the RV antifreeze beginning to fill the bottom of the tank. If the pump fills and
you do not see any antifreeze in the tank, pour the antifreeze in the bottom of the tank
until the suction line is full. Open all valves to remove any water and leave them open
during storage. The unit is now ready for the winter!

Table of Mixing Quantities
Model
Capacity
Coverage
Mulch (lbs)
Seed (lbs)
1-2 Punch*
Mix Time
110 JAH
110
Gallons
1,000-1,200
Square Feet
40-50lbs
5-7lbs
1 Scoop
3-5
Minutes
200 JAH
200
Gallons
2,000-2,400
Square Feet
80-100lbs
10-14lbs
2 Scoops
4-6
Minutes
* 1-2 Punch is the VSI brand of fertilizer and tackifier mix. One scoop per 100 gallons.
Machine Specifications
Model
Engine
Pump
Max
Hose
Length
Weight
(Dry)
Weight
(Loaded)
110 JAH
Honda GX200
Recoil Start
Banjo 2” poly
dry seal
150ft
290lbs
1,204lbs
200 JAH
Honda GX200
Recoil Start
Banjo 2” poly
dry seal
150ft
354lbs
2,002lbs
Model
Length (Inches)
Width (Inches)
Height (Inches)
110 JAH
45”
41”
44”
200 JAH
52”
47”
49”
For videos demonstrating these units, coverage techniques, mixing tutorials, and other
helpful information please visit our website, www.vsinnovation.com and click on the
VIDEOS tab. That will direct you to our YouTube channel.
This manual suits for next models
1
Table of contents
Other VSI Paint Sprayer manuals