VSI 400 JAH Service manual

OPERATING AND SERVICE MANUAL
400 JAH
150 East Sharon Street
Le Center, MN 56057
Office: 507-252-3033
Email: [email protected]


NOTICE:
READING THIS MANUAL IS
MANDATORY BEFORE OPERATING
THIS EQUIPMENT
Introduction
Thank you for purchasing your new hydroseeder from VSI, our company greatly
appreciates your business! This manual outlines the basic operating procedures of your
hydroseeder. These machines have been designed to be user friendly. All of the motor
maintenance intervals and engine specifications can be found in your engine manual.
Contact Information
If you experience any problems with the unit, need parts, or have any other questions,
please feel free to contact us and we will be more than happy to help.
Voigt Smith Innovation
150 East Sharon Street
Le Center, MN 56057
Email: [email protected]
Office: 507-252-3033

VSI Warranty Notice
At VSI, nothing is more important to us than your complete and total satisfaction with our
products and customer service. Proper setup, installation and best maintenance
practices are vital to ensure longevity of your VSI equipment.
Please go through the warranty registration form and procedure for your equipment in
order to register your three year Honda and one year overall product warranty. The
warranty form was sent to the same email address to which you received your invoice. If
you cannot find this form, please contact us at sales@vsinnovation.com. If the warranty
is not registered, your warranty claim may be denied due to improper setup, use or
install.
Our equipment is Honda tested and certified so your Honda engine comes with a three
year commercial warranty backed by Honda and any Honda certified repair center.
All other parts* on your equipment are warrantied against defect through VSI for one year
from the date of purchase.
*We do not offer a warranty on pump seals as over 99% of those failures are due to
improper use or running pumps dry.
This warranty is a parts and technical support only warranty, labor is not included.
Corrosion related issues including wire connections are not qualified warranty items.
We are not responsible for loss of product or productivity due to failures of any kind.
Your warranty will be void due to abuse, misuse, neglect, alteration, modification,
improper handling, improper installation, improper maintenance or failure to follow the
instruction and procedures in the VSI manual and warranty registration form.
Warrantied parts must be sent back to VSI within 30 days in order for us to process your
warranty claim. Replacement parts will be invoiced and will not be marked as paid until
the warrantied part items are returned to our manufacturing facility.

Valves
As you are looking at your machine you will notice there are five valves. The valve
located on the bottom of the tank/suction line is used to shut off the flow to the pump
during transport or any time you need to isolate the tank from the pump. This valve
needs to be opened during operation to provide flow to the pump. Failure to have this
valve open can result in damage to the pump. The next two valves (3”) are located on the
pressure side (top) of the pump. You will notice that one is oriented horizontally and the
other vertically. The horizontal valve is used to control the jets inside the tank. The
vertical valve is plumbed to a three inch line and acts as a high volume recirculation
valve for breaking up mulch and mixing any floating seed into the mulch. The third and
smallest valve is also located on the pressure side of the pump. This is the valve that
controls the flow to the hose and gun. Make sure this valve is CLOSED unless the hose
and gun are attached. If this valve were to be opened upon start up, water/hydroseed
would begin to spray out of the valve. The final valve is located on the suction line. This
is the valve to isolate the pond when utilizing the pond suction feature.
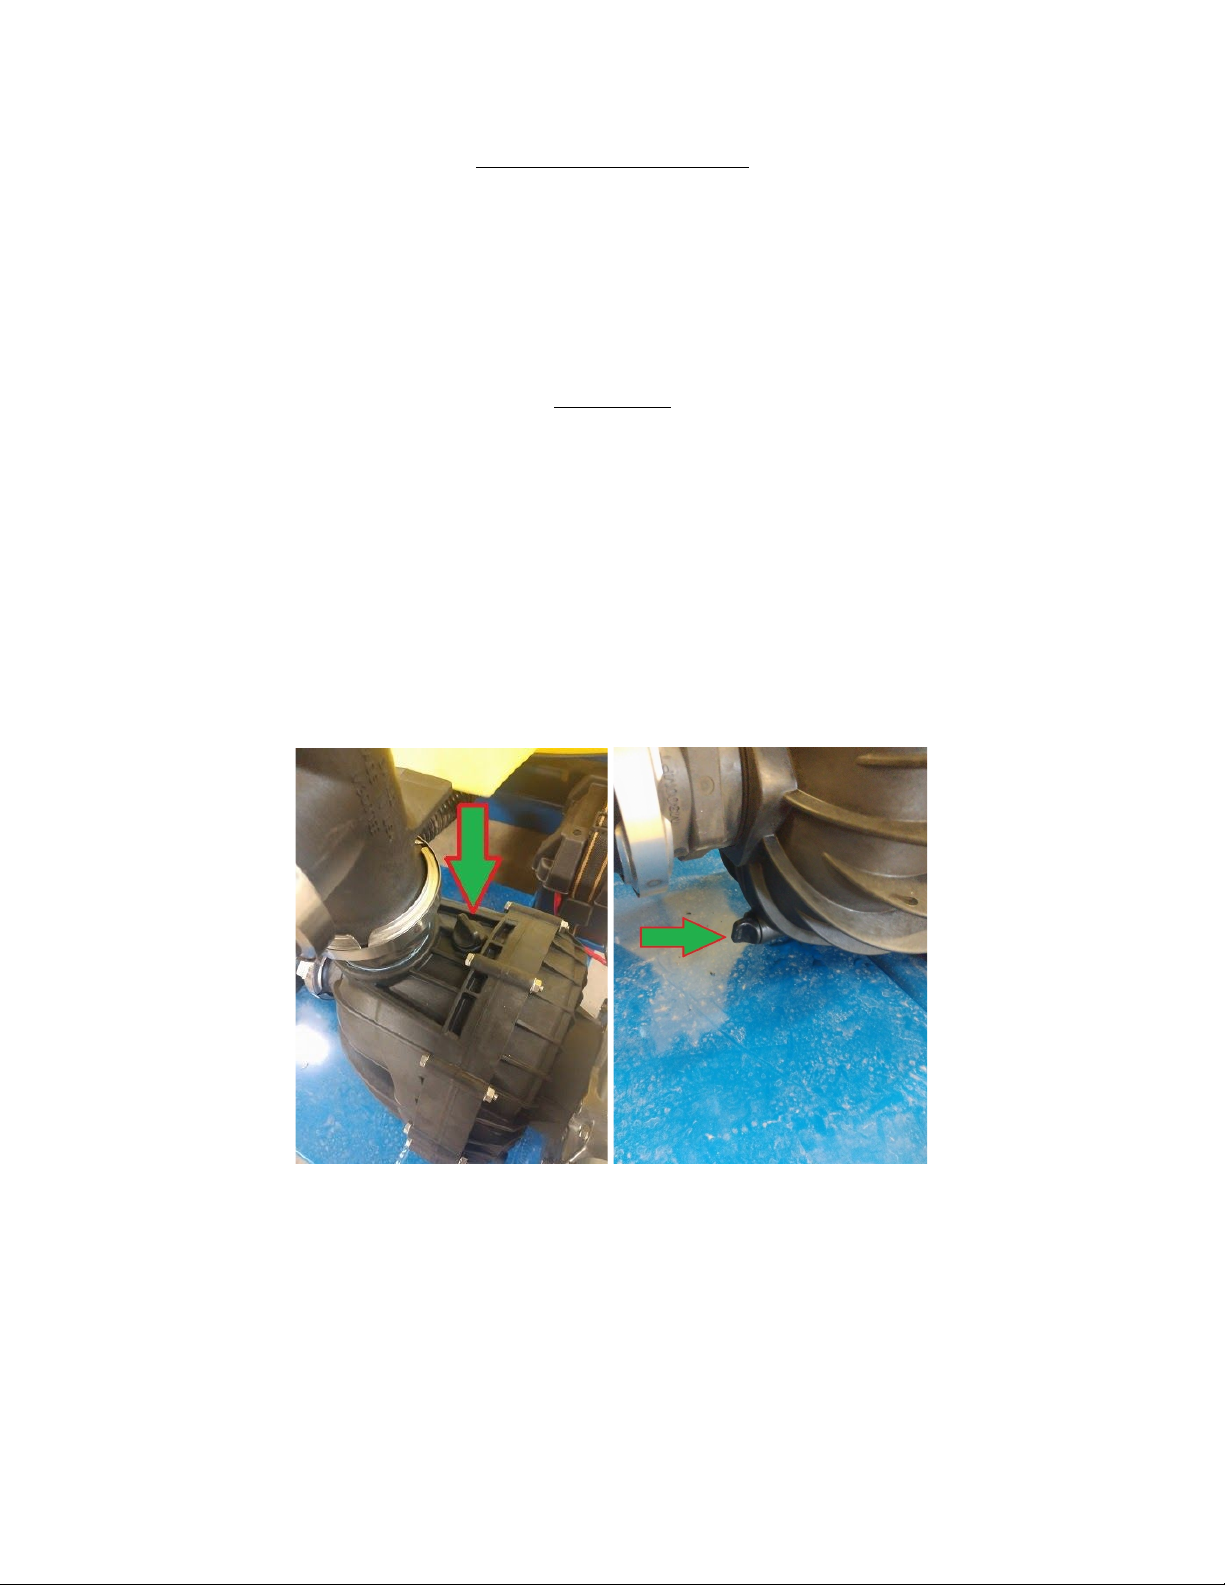
Plumbing
All of our machines run a flange style poly plumbing system. These systems provide less
resistance and better flow than conventional threading plumbing and are easy to
disassemble/reassemble. All of the flange clamps use a regular 5/16” socket or wrench.
You will find a gasket located in between the two connects parts. If you ever disassemble
your unit take time to make sure the gasket is properly seated and clean before
reassembly
Camlocks
Most pieces of the hydroseeder use camlock fittings. These fittings make removal of the
sections quick and easy. You will notice that the gun, tips, and hose sections are all
connected using these fittings. To connect these fittings, simply insert the male end into
the female end and push each cam lever down until they are fully closed. There are two
camlock fittings located on the unit. The first is located on the valve the hose attaches to.
Simply take the female end of your spray hose and attach it in the way previously
described. Take time to make sure the levers are fully locked! The second camlock is
located on the top of the unit. This is for your garden hose water fill line. We will be
covering this next.
Lifting and Moving Hydroseeder
The 400 JAH units are equipped with fully enclosed fork pockets for safe and confident
loading and unloading of the machine. NEVER attempt to lift or move the machine from
the front while loaded - damage WILL occur to the frame. You may pick up while machine
has product in it from the side fork pockets.

Filling The Machine
The first step in mixing a batch of hydroseed is filling the machine with water. Your
machine comes standard with a garden hose fill connection that is located at the top of
the tank. Thread the yellow female camlock connection to your garden hose and connect
it to the black male connection point.
Pond Suction Feature
Another way to fill your machine is with the optional Pond Suction Feature. This utilizes
the pump on the machine to self fill from a body of water or storage tank. A 15ft suction
hose with strainer basket is also available for purchase. See picture below LEFT for valve
configuration when using this feature.
Once the valves are in this configuration, submerse the end of the suction line in the
water. After the water has filled the suction hose, connect it to the 3” male camlock on
the suction side of the pump. Remove the plug in the top of the pump (See picture above
RIGHT) and fill it with water until full. Loosely install the plug and start the engine. With
the engine slightly above idle, allow the pump to purge all of the air from the hose. Once
the pump primes, tighten the top plug and throttle the engine up to fill the tank. Once the
tank is full, close the pond suction valve and open the tank valve.
NOTICE: Always use a strainer when drawing from a body of water to avoid drawing
debris into the pump and damaging the impeller!
When filling from a hydrant or auxiliary pump, leave the motor off and open the tank
valve to fill directly from the bottom of the tank.

Mixing a Load of Hydroseed
We recommend running a granular paper mulch in our hydroseeders for the best
performance. Wood mulch is NOT recommended and could damage the pump and clog
the system.
Once your tank is ¾ full, start the engine. Make sure your agitation and tank valves are
completely open (See picture LEFT) Mixing instructions are also labeled on each tank
near the lid (See picture RIGHT)
When the engine has warmed to operating temperature, increase the throttle until the
engine reaches maximum rpm. You will see the water churning inside of the tank. Begin
to add the mulch. Slowly dump half of the recommended amount of mulch in the tank,
pouring a large amount in at one time could result in the dry mulch reaching the suction
line and plugging. This is very rare but something to be aware of. The mulch will begin to
thicken in the tank as it absorbs water. After the first half is mixing in the tank, add your
seed and any other product such as fertilizer and tackifier to the tank. The mulch will help
mix the seed and prevent it from floating. Finally, add as much mulch as you need for
your machine (outlined in the end of this manual). The last mulch will push down any
floating seed that may be present. The top recirculation line helps mix any material that
may still be floating on the top of the tank. Keep the engine running at maximum rpm
until the mulch has absorbed its maximum capacity of water. You will notice the motion
in the tank begin to slow as it reaches this point (usually 5 minutes). You are now ready
to spray.

Applying the Hydroseed
Connect as many hoses to your machine as you need, dragging them out as you connect
each section. Finally, connect the gun to the hose. Make sure the gun valve is closed
before opening the hose valve on the hydroseeder. Keep the engine running at maximum
rpm to provide the best performance at the gun.
Begin to close the agitation valve. The further closed the valve, the more pressure will be
present at the gun. (See picture BELOW) In some situations, you may want to have the
agitation valve closed completely to achieve the maximum spray distance and flow from
the gun. Remember that the agitation acts as your bypass for the pump to prevent the
seals from burning out. If you run the machine with the valve closed, be mindful that you
will need to get back to open the agitation valve if you will not have any flow through the
gun for more than 30 seconds. It is best to keep the agitation opened slightly to have
constant bypass.
When spraying, work your way back and forth evenly covering the ground with mulch.
Every 100 gallons of product should cover roughly 1,000-1,200 square feet. In dry
conditions, you may find you can only cover ¾ of that amount. Use the valve on the gun
to control the flow to prevent splattering sidewalks and siding. If additional hoses are
installed, drop the hose sections as you go. This will reduce fatigue for the operator and
make moving across the area much easier. Simply drag the hose to the side.
When disconnecting hose sections, turn the valve off at the gun. Walk to the machine
and close the hose valve. Make sure to open the gun valve to relieve the built-up
pressure that is in the hose. Connect the gun to the next hose, open the hose valve, and
begin spraying again. Occasionally open the agitation system on the hydroseeder to
ensure the mulch and seed are evenly mixed. Spray until the tank is empty and repeat!

Cleaning the Hydroseeder
The final step in hydroseeding is cleaning the unit. Fill the tank with 25-50% of its
capacity with water. You may find it beneficial to wash any remaining hydroseed off of
the inside of the tank. Start the pump and let the system agitate. This will clean the mulch
out of the agitation lines. Connect any hoses that were used and flush the lines out with
the gun attached. If you are finding large amounts of mulch left in the tank, repeat the
process once more. The machine is now ready for the next job!
Winterizing
If you live in a cold climate you will need to winterize the pump and engine. Adding fuel
stabilizer in all fuel added to the engine is a good way to prevent build-up in the
carburetor. There are two plugs located on the pump, one on the top (See picture below
LEFT) and one on the bottom (See picture below RIGHT). Remove both plugs. You may
see water running out of the bottom drain line. Wait until all of the water has drained from
the pump. Open the tank valve if it is close to help drain any water in the suction line.
Install the bottom plug. Use a funnel to add RV antifreeze to the pump. Fill the pump until
you see the RV antifreeze beginning to fill the bottom of the tank. If the pump fills and
you do not see any antifreeze in the tank, pour the antifreeze in the bottom of the tank
until the suction line is full. Open all valves to remove any water and leave them open
during storage. The unit is now ready for the winter!

Table of Mixing Quantities
Model
Capacity
Coverage
Mulch (lbs)
Seed (lbs)
1-2 Punch*
Mix Time
400 JAH
400
Gallons
4,000-4,800
Square Feet
160-200lbs
20-28lbs
4 Scoops
5-7
Minutes
* 1-2 Punch is the VSI brand of fertilizer and tackifier mix. One scoop per 100 gallons.
Machine Specifications
Model
Engine
Pump
Max
Hose
Length
Weight
(Dry)
Weight
(Loaded)
400 JAH
Honda GX390
Electric Start
Hypro 3” poly
dry seal
200ft
659lbs
3,820lbs
Model
Length (Inches)
Width (Inches)
Height (Inches)
400 JAH
90”
60”
58”
For videos demonstrating these units, coverage techniques, mixing tutorials, and other
helpful information please visit our website, www.vsinnovation.com and click on the
VIDEOS tab. That will direct you to our YouTube channel.


Voigt Smith Innovation
150 East Sharon Street
Le Center, MN 56057
Email: [email protected]
Office: 507-252-3033
Table of contents
Other VSI Paint Sprayer manuals
Popular Paint Sprayer manuals by other brands

AG SPRAY
AG SPRAY FSBK-2 owner's manual

Larson Electronics
Larson Electronics IND-MD-DF-ESF-XX-SP1349 instruction manual

ASM
ASM Combo 6700 Series Operation

Task Force Tips
Task Force Tips Twister Instructions for installation, safe operation and maintenance

Fimco
Fimco LG-60-3PT-WP-309 owner's manual

Nordson
Nordson kinetix Customer product manual