VUDU BX100 User manual

USER GUIDE

Table of Contents
TABLE OF CONTENTS...............................................................................................................2
WELCOME TO VUDU.................................................................................................................4
PLAYER SPECIFICATIONS & DETAILS................................................................................5
SETTING UP YOUR VUDU INTERNET MOVIE PLAYER..................................................7
First Steps.....................................................................................................................................7
The Simple Set-up........................................................................................................................8
Alternate HDMI Set-ups ............................................................................................................10
Other Video Connections...........................................................................................................11
Other Audio Connections...........................................................................................................12
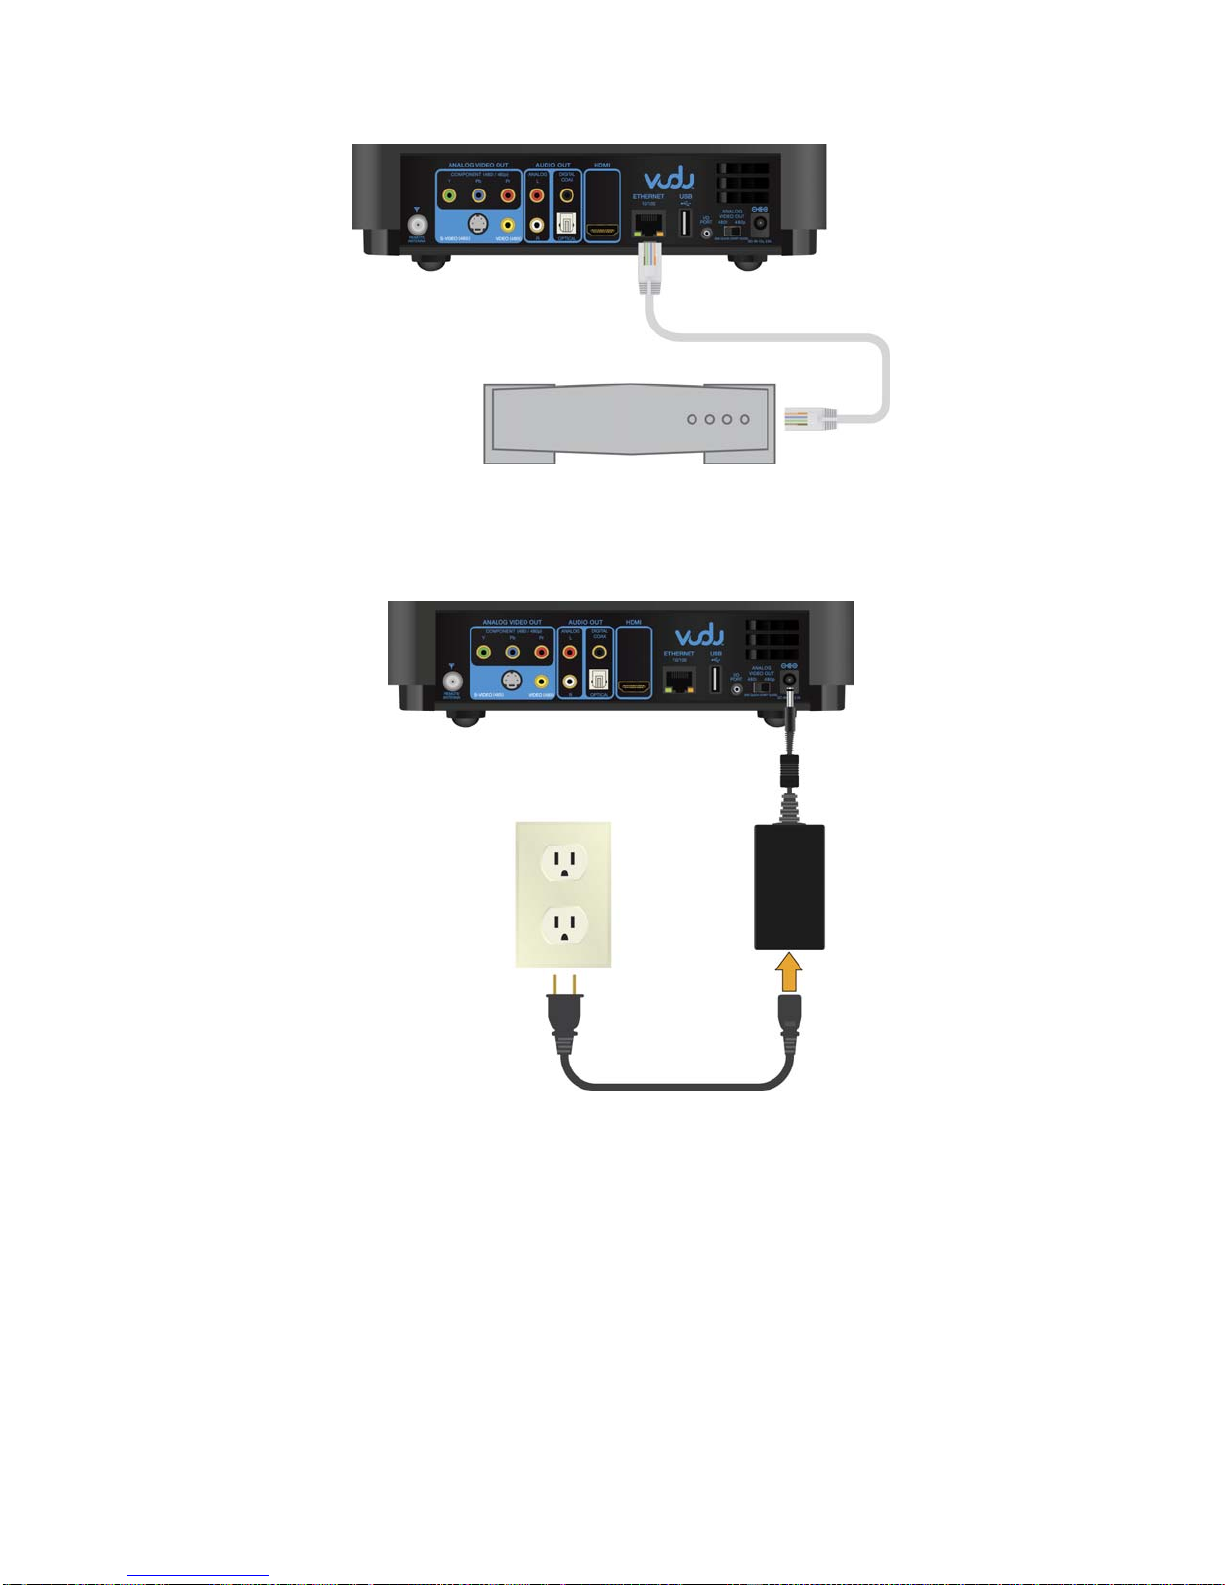
Connect Broadband Internet.......................................................................................................14
If You Have a VUDU Wireless Kit............................................................................................15
The Wireless Simple Set-up.......................................................................................................16
GUIDED SET-UP.........................................................................................................................19
THE SMART CARD ...................................................................................................................19
NETWORKING...........................................................................................................................20
Internet Connection Requirements.............................................................................................20
Use of a Router...........................................................................................................................20
The VUDU Wireless Kit............................................................................................................20
Manual Configuration of your Network.....................................................................................21
Use of Bandwidth.......................................................................................................................21
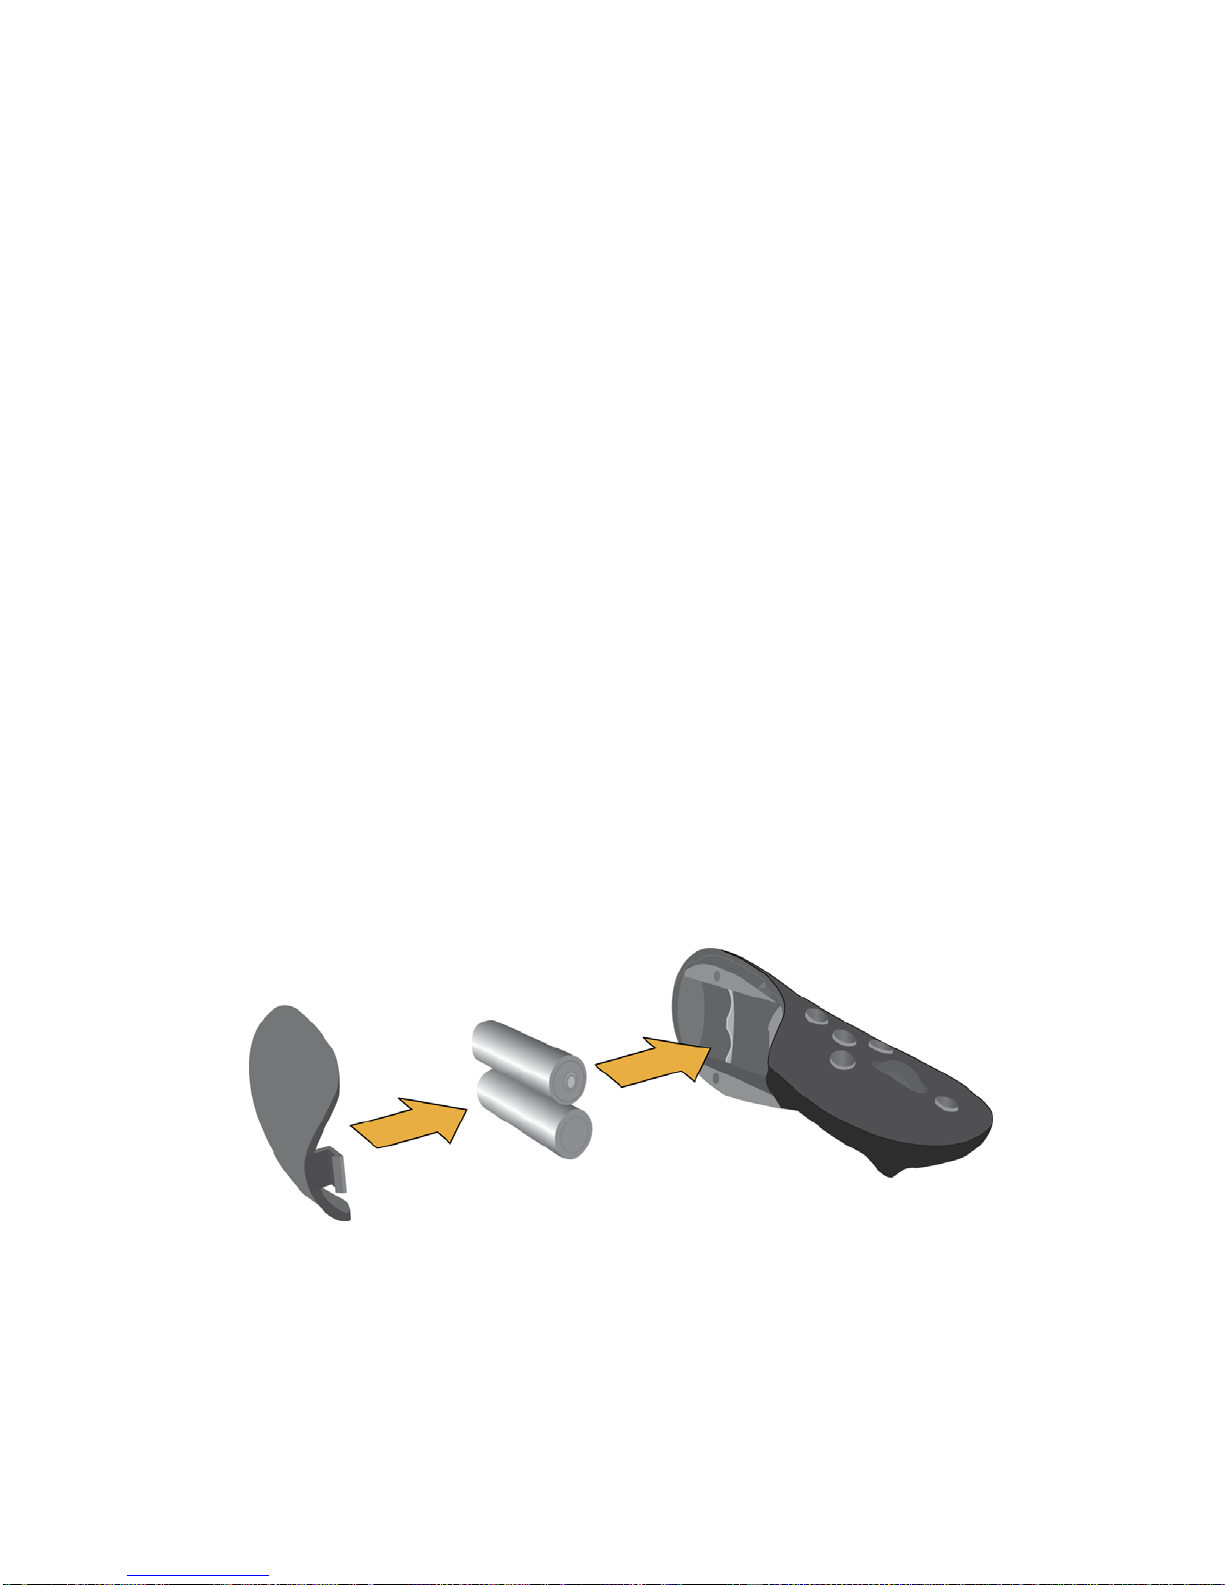
THE VUDU REMOTE................................................................................................................22
How to Use.................................................................................................................................22
Re-pairing your Remote.............................................................................................................23
Pairing Multiple Remotes...........................................................................................................23
FINDING MOVIES.....................................................................................................................25
Overview....................................................................................................................................25
The Film Strip ............................................................................................................................25
Movie Details Screen & Episode Details Screen.......................................................................25
THE VUDU HOME SCREEN....................................................................................................26
EXPLORE CATALOG...............................................................................................................27
Explore by Genre .......................................................................................................................27
Explore HD ................................................................................................................................27
Explore TV Shows.....................................................................................................................27
Search by Actor or Director .......................................................................................................27
Search by Title ...........................................................................................................................27
MY VUDU ....................................................................................................................................28
My Rentals.................................................................................................................................28
My Movies.................................................................................................................................28
My TV Shows ............................................................................................................................28
My Wish List..............................................................................................................................28
Archive or Delete.......................................................................................................................28
Discounted Extended Rentals.....................................................................................................28
VUDU LABS.................................................................................................................................29
YouTube.....................................................................................................................................29
On-demand TV...........................................................................................................................29
Flickr..........................................................................................................................................29
Picasa..........................................................................................................................................29
Now Being Watched ..................................................................................................................29
Kuiper.........................................................................................................................................29
Movie Tiles ................................................................................................................................30
2

FreeCell......................................................................................................................................30
Klondike.....................................................................................................................................30
INFO & SETTINGS ....................................................................................................................31
Service Quality...........................................................................................................................31
Parental Controls........................................................................................................................32
Audio Settings............................................................................................................................33
Video Settings............................................................................................................................33
Advanced Settings......................................................................................................................34
System Info. ...............................................................................................................................34
Credits........................................................................................................................................34
BUYING & RENTING MOVIES...............................................................................................35
Watching Movies .......................................................................................................................35
The AVN Channel on VUDU....................................................................................................35
The Track Bar..............................................................................................................................36
Storage........................................................................................................................................36
YOUR ACCOUNT.......................................................................................................................37
Activation...................................................................................................................................37
Billing.........................................................................................................................................37
Return Policy..............................................................................................................................37
Account Suspension...................................................................................................................37
Cancellation................................................................................................................................38
Limited Warranty.......................................................................................................................38
Customer Privacy.......................................................................................................................38
FAQS & TROUBLESHOOTING...............................................................................................39
SAFETY & REGULATORY COMPLIANCE INFORMATION...........................................43
CREDITS......................................................................................................................................45
3

4
WELCOME TO VUDU!
Thank you for choosing VUDU, instant access to thousands of movies and television shows right from
the comfort of your living room. It is our sincere hope that you will enjoy using VUDU as much as we
have enjoyed creating and evolving our unique product.
This User Guide is designed to offer assistance in the set-up and operation of your VUDU Internet Movie
Player and to define the features of the service and your account.
You can also find instructions for setting up your player in the Quick-start Guide included in the player’s
packaging and on our website at http://www.VUDU.com/VUDU_documentation.html
Additionally, our FAQs, located at www.VUDU.com/faq, may answer many questions you have.
More help is always available by emailing inquiries or comments to Customer Care at
support@VUDU.com.
Thank you again!

PLAYER SPECIFICATIONS & DETAILS
VUDU BX100
What’s Included
VUDU Internet Movie Player
VUDU Remote
HDMI™ Cable
Ethernet Cable
Composite Video with Analog Stereo Audio Cable
Power Supply & AC Cord
RF Antenna
2 AA Batteries
Dimensions
2.4”h x 8.9”w x 7.3”d
Weight: 4.2 lbs
Packaged Weight: 7.5 lbs
Storage
250 GB Hard Drive
Unlimited rentals
Approximately 50 owned standard definition movies
5

Networking Requirements
High-speed broadband Internet connection:
-4.0 Mbps actual for instant high-definition
viewing and delayed HDX viewing
-2.0 Mbps actual for instant standard definition
viewing
-1.0 Mbps actual for delayed viewing
Note: Speeds as advertised by ISPs may vary
from actual speeds
TV Compatibility
High-definition
Enhanced definition
Standard definition
Video Outputs
HDMI v 1.1
Component
S-Video
Composite
Audio Outputs
HDMI v 1.1
Digital Optical
Digital Coax
RCA
Video Resolution
1080p/24
1080i
720p
480p
480i
Connectivity
Ethernet
2 USB ports
Remote Specifications
RF
Range: 22 ft minimum
Environmental Requirements
Operating Temperature: 32 to 113 F (0 to 45 C)
Relative Humidity: 10 to 90% non-condensing
Audio Format
Source: Dolby® Digital Plus
Out: Analog Stereo, Stereo PCM, Dolby Digital
Video Format
MPEG-4
Limited Warranty
Limited 1 yr for parts & labor
VUDU WIRELESS KIT
Wireless Format
802.11g
Security
Designated secure network (128-bit WEP)
Size
2.4”h x 3.4” w x 0.7” d (each)
What’s Included
1 pair of pre-configured wireless adapters
2 Ethernet cables
2 power cables
1 set-up guide
Requirements
High-speed broadband Internet connection
VUDU HD, VUDU XL, or VUDU XL2
Internet Movie Player
6

7
SETTING UP YOUR VUDU INTERNET MOVIE PLAYER
First Steps
WHERE TO PUT YOUR INTERNET MOVIE PLAYER (Everyone)
•Please maintain a minimum of two inches clearance around the sides, front, and rear of the
VUDU Internet Movie Player to maintain proper ventilation for the unit.
•Do not place the player on an amplifier or any component with open vent holes on top. This
could cause the unit to overheat.
•Because VUDU’s remote control is an RF (radio frequency) remote, it does not require a line of
sight with the player for effective use. This means you may store the unit in a cabinet or drawer.
•Please refer to the Safety and Regulatory Compliance section of this User guide for care
instructions and more safety information.
Warning: Do not move the VUDU Internet Movie Player while it is plugged into a power source.
This may cause significant damage to the hard drive, resulting in loss of data or functionality.
INSERT BATTERIES (Everyone)
Insert the batteries into the VUDU remote.
Locate the two AA batteries provided in the player. Remove the battery cover from the side of the remote
by pressing it down and sliding it toward the rear. Match the “+” and “-” marks on the batteries to the “+”
and “-” marks on the interior of the remote. Snap the battery cover back onto the remote.

CONNECT ANTENNA (Everyone)
Next, locate the antenna. Twist it onto the connector on the back of the player labeled “Remote.”
Note: The VUDU remote is a radio frequency, or RF, remote. This means you don’t have to point it at the
VUDU Internet Movie Player for it to work. Because RF remotes use radio waves, however, it is
imperative to use the antenna in order for the player to receive input from the remote.
Next Steps
THE SIMPLE SET-UP
If you have an available HDMI input on your TV, you will be able to take the following three steps and
be ready to VUDU. If you don’t have an HDMI input, or you prefer other audio or video connections,
you may skip ahead to the section entitled “Other Video Connections.”
Please make sure you do the Simple Set-up in the following order:
1. Connect the VUDU Internet Movie Player to your television’s HDMI input using the supplied
HDMI cable.
2. Connect the VUDU Internet Movie Player to your broadband Internet connection using the supplied
Ethernet cable.
8

3. Connect the VUDU Internet Movie Player to a power source using the enclosed power supply and
AC cord. (First affix the cord to the player and then plug it into the outlet.) Use only the authorized
power supply and AC cord, provided by VUDU.
Note: The VUDU Internet Movie Player is capable of outputting Dolby Digital Surround Sound over
HDMI if your television supports it. To enable Dolby Digital over HDMI, go to the Audio Settings menu
once you have completed the Guided Set-up process and choose the HDMI “Surround Sound” option. If
you do this and do not hear any audio or hear static, one of your components may not support Surround
Sound and we recommend going back to the HDMI “Stereo” setting (its default setting).
9

WHAT TO EXPECT AFTER THE SIMPLE SET-UP
Now that you’ve connected power to your VUDU Internet Movie Player, you should see red and then
green LED indicators come on within a couple of seconds. In approximately 20 seconds, the VUDU logo
will appear on your television.
If you do not see the VUDU logo after one minute, consult your TV’s owner’s manual and make sure the
TV or monitor is set to the right video input.
Approximately one minute after the VUDU logo appears on-screen, you will be taken through a Guided
Set-up and be ready to watch movies.
Note: New players will have all titles available to them within 5 to 10 minutes of connecting to the
Internet for the first time. Initially, there may be a slight delay viewing titles not previously loaded (30 to
60 seconds depending upon available bandwidth), and posters for some movies will disappear as part of
this process. This DOES NOT impact the availability of those titles and original artwork will be restored
in the next couple of days.
In order to receive the latest movies and software updates on an ongoing basis, your VUDU Internet
Movie Player needs to remain connected to a power source and a broadband Internet connection.
ALTERNATE HDMI SET-UPS
Option A: HDMI through a Surround Sound Receiver
•Use the supplied HDMI cable to connect the VUDU Internet Movie Player to your surround
sound receiver and use another HDMI cable to connect your receiver to your television’s
HDMI input.
Note: The VUDU Internet Movie Player is capable of outputting Dolby Digital Surround Sound over
HDMI if your television and receiver components support it. To enable Dolby Digital over HDMI, go to
the Audio Settings menu once you have completed the Guided Set-up process and choose the HDMI
“Surround Sound” option. If you do this and do not hear any audio or hear static, one of your components
may not support Dolby Digital and we recommend going back to the HDMI “Stereo” setting.
If you’re not able to get surround sound to work over your HDMI connection, you can still output
surround sound by running a separate digital optical or coaxial cable to your receiver and selecting
“Surround Sound On” in the Surround Sound section of the Audio Settings.
Option B: HDMI to a DVI input
•Use a DVI to HDMI adapter or a DVI to HDMI cable to connect the VUDU Internet Movie
Player to your television’s DVI input. This option will only work if your television supports
HDCP (a copyright protection for digital video) which older DVI connections don’t support. In
such cases, we won’t be able to display video, only a warning that the display is not supported.
Note: Since DVI does not provide an audio signal to your television, you will need to connect audio
separately. Analog or Digital Audio options are listed below in Other Audio Connections.
10

OTHER VIDEO CONNECTIONS
If you are not using an HDMI connection for video, you will want to choose one of the video connections
below. We have listed these options in order from the most recommended for optimal video quality to
least recommended. Please choose the connection that works best with your television.
Option A:Component Video
•Use component video cables (sold separately) to connect your VUDU Internet Movie Player to
your television or receiver’s component video inputs.
Note: If you are using component video and your television supports 480p, set the switch on the back of
the player labeled “Analog Video Out” to “480p” (it is set to “480i” by default).
Option B:S-Video
•Use an S-Video cable (sold separately) to connect your VUDU Internet Movie Player to your
television’s S-Video input.
11

Option C:Composite Video
•Use the supplied composite video with analog stereo audio cable to connect your VUDU
Internet Movie Player to your television’s composite video input.
OTHER AUDIO CONNECTIONS
If you are not using an HDMI connection for audio, you will want to choose one of the audio connections
below. We have listed these options in order from the most recommended for optimal audio quality to
least recommended. Please choose the connection that works best with your television or A/V receiver.
Option A: Digital Audio
•If you have a Dolby Digital-capable receiver, use a digital optical audio cable (sold separately)
or a digital coaxial audio cable (sold separately) to connect your VUDU Internet Movie Player
to your A/V receiver’s digital audio input.
12

Option B: Analog Stereo Audio through an A/V receiver
•If you have analog stereo speakers, use a separate stereo audio cable with RCA connectors to
connect your VUDU Internet Movie Player to the analog stereo audio inputs on the back of your
A/V receiver.
Option C: Analog Stereo Audio through the TV
•If you have analog stereo audio within your television, use a separate stereo audio cable with
RCA connectors to connect your VUDU Internet Movie Player to the analog stereo audio inputs
on the back of your television.
13

Last Steps
CONNECT BROADBAND INTERNET
Once you have completed video and audio set-up, connect your VUDU Internet Movie Player to a
broadband Internet connection using the supplied Ethernet cable. For Networking possibilities, please
visit the Networking section of this User Guide.
CONNECT TO A POWER SOURCE
Connect the VUDU Internet Movie Player to a power source using the enclosed power supply and AC
cord. (First affix the cord to the player and then plug it into the outlet.) Use only the authorized power
supply and AC cord, provided by VUDU.
Warning: Do not move the VUDU Internet Movie Player while it is plugged into a power source.
This may cause significant damage to the hard drive, resulting in loss of data or functionality.
14

WHAT TO EXPECT AFTER VIDEO AND AUDIO SET-UP
Now that you’ve connected power to your VUDU Internet Movie Player, you should see red and then
green LED indicators come on within a couple of seconds. In approximately 20 seconds, the VUDU logo
will appear on your television.
If you do not see the VUDU logo after one minute, consult your TV’s owner’s manual and make sure the
TV or monitor is set to the right video input.
Approximately one minute after the VUDU logo appears on-screen, you will be taken through a Guided
Set-up and be ready to watch movies.
Note: New players will have all titles available to them within 5 to 10 minutes of connecting to the
Internet for the first time. Initially, there may be a slight delay viewing titles not previously loaded (30 to
60 seconds depending upon available bandwidth), and posters for some movies will disappear as part of
this process. This DOES NOT impact the availability of those titles and original artwork will be restored
in the next couple of days.
In order to receive the latest movies and software updates on an ongoing basis, your VUDU Internet
Movie Player needs to remain connected to a power source and a broadband Internet connection.
If You Have a VUDU Wireless Kit
15

THE WIRELESS SIMPLE SET-UP
If you have a VUDU wireless kit (optional) and an available HDMI input on your TV, you will be able to
take the following three steps and be ready to VUDU. If you don’t have an HDMI input, or you prefer
other audio or video connections, that’s fine too–we’ll take you through the alternatives (please see pages
11-13 of this guide).
Please make sure you do the Wireless Simple Set-up in the following order:
1: Connect the VUDU Internet Movie Player to your television’s HDMI input using the supplied HDMI
cable.
2: Connect the VUDU Internet Movie Player to your broadband Internet connection using VUDU’s
wireless kit.
Instructions: HOME NETWORK 1
A. Locate the wireless adapter marked HOME NETWORK 1. Locate one of the Ethernet cables
included with the wireless kit. Connect one end of the Ethernet cable to HOME NETWORK 1.
Connect the other end to your home network router or modem.
B. Locate the included AC to DC power cable. Insert one end into the DC-IN socket of HOME
NETWORK 1. Plug the other end into a wall outlet.
16

The LED indicators for Power and Ethernet on HOME NETWORK 1 will light up briefly and then go
off.
Instructions: VUDU BOX 2
A. Locate the wireless adapter marked VUDU BOX 2. Locate the other Ethernet cable included
with the wireless kit. Connect one end of the Ethernet cable to VUDU BOX 2. Connect the other end
to your VUDU Internet Movie Player.
B. Locate the included USB to DC cable. Insert one end into the DC-IN socket of VUDU BOX 2.
Connect the other end to one of the USB ports on the VUDU Internet Movie Player –on the back or
left-hand side. The LED indicators on VUDU BOX 2 will not light up until you connect power to
the VUDU Internet Movie Player at the conclusion of the Wireless Simple Set-up.
17

3: Place the VUDU Internet Movie Player where you plan to keep it. Then, connect the player to a power
source using the enclosed power supply and AC cord. (First connect the cord to the player and then plug it
into the outlet.)
The LED indicators for Power and Ethernet on VUDU BOX 2 will now light up. After a few seconds, the
LED indicator for Wireless will start blinking.
Going forward, all three LED indicators on both wireless adapters should be illuminated. When the LED
indicators for Wireless and Ethernet start to blink, data is being transmitted.
18

WHAT TO EXPECT AFTER WIRELESS SET-UP
Now that you’ve connected power to your VUDU Internet Movie Player, you should see red and then
green LED indicators on the front of the player come on within a few seconds. In approximately 20
seconds, the VUDU logo will appear on your television.
If you do not see the VUDU logo after one minute, consult your TV’s owner’s manual and make sure the
TV or monitor is set to the right video input.
Approximately one minute after the VUDU logo appears on-screen, you will be taken through a Guided
Set-up and be ready to watch movies.
Note: New players will have all titles available to them within 5 to 10 minutes of connecting to the
Internet for the first time. Initially, there may be a slight delay viewing titles not previously loaded (30 to
60 seconds depending upon available bandwidth), and posters for some movies will disappear as part of
this process. This DOES NOT impact the availability of those titles and original artwork will be restored
in the next couple of days.
In order to receive the latest movies and software updates on an ongoing basis, your VUDU Internet
Movie Player needs to remain connected to a power source and a broadband Internet connection.
GUIDED SET-UP
When you finish setting up your player and connect power for the first time, you will be led through a
short Guided Set-up video. The Guided Set-up process helps you test your audio/video connections and
allows us to check your network and update your software, if necessary. You will also be shown how to
use the VUDU remote.
In Guided Set-up, you will be prompted to visit our website to set-up and activate your VUDU account.
For more information, visit the Account Activation section of this User Guide.
Please be patient during the Guided Set-up process. Do not unplug or turn off your VUDU Internet
Movie Player. When Guided Set-up concludes, you will find yourself on the VUDU Home Screen. From
there you’ll be able to search for and watch movies.
THE SMART CARD
The Smart Card inserted into the front of your player is a part of VUDU’s encryption system and makes
your player secure. Do not remove your Smart Card. Should you accidentally remove it, put it back in
promptly. If you lose or damage your smart card, contact Customer Care at support@VUDU.com or 1-
888-554-VUDU (8838).
Your Smart Card’s ID number is located on the card itself. You can also view your Smart Card ID# in
the System Info screen of the Info & Settings menu in the user interface.
19

NETWORKING
INTERNET CONNECTION REQUIREMENTS
To use the VUDU service, you must have a high-speed broadband Internet connection (such as cable or
medium to high-grade DSL).
Instant playback of standard definition movies requires a bandwidth of 2.0 Mbps (Megabits per
second), usually advertised by ISPs as 3.0 Mbps. instant playback of high-definition titles requires
4.0 Mbps. HDX titles require a full download before playback begins. Actual download times may
vary.
VUDU downloads all titles, standard definition and high definition, at the highest available rate, up to 4.0
Mbps.
It is possible to operate the service in a delayed playback mode where you will experience a slight wait to
view movies. Delayed delivery requires a minimum of 1.0 Mbps (usually advertised as 1.5 Mbps).
If for any reason you wish to reduce the amount of bandwidth used by the VUDU service, you can set
bandwidth limits in the Service Quality screen, located in Info & Settings (refer to p. 31 of this guide).
If you are not sure how fast your Internet connection is, you can test its speed on our website
(www.VUDU.com) using our free bandwidth test, located on the “test me” page.
Bear in mind that Internet activities such as downloading or uploading files while taking the bandwidth
test could have a negative effect on the results.
Note: Make sure you take the bandwidth test with the same Internet connection that your VUDU Internet
Movie Player will utilize.
USE OF A ROUTER
The VUDU Internet Movie Player requires an RJ-45 Ethernet connection. It can connect to any available
RJ-45 Ethernet jack on your home or business network.
If you have only a single Ethernet connection on your DSL or cable modem, and your computer is
plugged into this connection, you will need to purchase a home router or gateway so that numerous IP
devices can share the single connection. These gateways/routers act like hubs, providing multiple
physical links to a single broadband connection into a home network.
For a list of routers and switches we’ve tested with the player, please visit our FAQs at
www.VUDU.com/faq.
THE VUDU WIRELESS KIT
The VUDU Internet Movie Player itself is not wireless, however, you can use VUDU’s proprietary
wireless adapters to create a dedicated, secure network for easy wireless operation of the VUDU Internet
Movie Player.
20
Table of contents