Waldorf AFB 16 User manual


Foreword
3 AFB16 User´s Manual
Foreword
Thank you for purchasing the Waldorf AFB16 Analog Filter
Bank. You now own an extraordinary product that integrates
16 analog filters with overdriveable VCA’s into a computer-
based music production environment.
Why should you read this manual ?
Even if you are a professional musician you should read this
manual front to back at least once. The basic concepts of the
AFB16 are totally new and will need some explanation.
Feel free to put this manual back into the package, but in our
opinion this is a bad choice.
If you do decide to read the manual we promise you a lot of
fun while reading about and working with the AFB16!
Your Waldorf Team
Waldorf-Music is not liable for any erroneous information
contained in this manual. The contents of this manual may be
updated at any time without prior notice. We have made every
effort to ensure the information herein is accurate and that the
manual contains no contradictory information. Waldorf-Music
extends no liabilities in regard to this manual other than those
required by local law.
This manual or any portion of it may not be reproduced in any
form without the manufacturer's written consent.
Waldorf-Music AG, Schloss Ahrenthal, D-53489 Sinzig,
Germany

Foreword
AFB16 User´s Manual 4
AFB16 Development Team
AFB16 Software: Stefan Stenzel
Plug-in Software: Wolfram Franke, Stefan Stenzel
USB driver: Dietmar Hoppe-Jagonak, Stefan
Stenzel
SDK: Wolfram Franke, Stefan Stenzel
Hardware: Thomas Kircher
Housing: Martin Neideck, Frank Schneider
Design: Axel Hartmann, Holger
Steinbrink
Manual/Layout: Holger Steinbrink
English proofing: Graham Hunter
Beta test/Sound design: Juergen Fornoff, Joerg Huettner,
Holger Steinbrink
Head: Wolfgang Dueren
Revision: Version 1.0, March 2003
We would like to thank
Holger Bahr, H.-P. “Bonni” Bonnenberg (†), Design Box,
Mert Erguen, Geoff Farr, Oliver Feinauer, Juergen Fornoff,
Gunther Graefe, Florian Gypser, Sigi Heinz, Martin
Herbst, Joerg Huettner, Graham Hunter, Thilo Kloft,
Werner Kramer, Dirk Krause, Achim Lenzgen, Sabine
Litauer, Wolfgang Moers, Dr. Georg Müller, Martin
Neideck, Optiprint, Ottic, PPF, Stefan Profittlich, Norbert
Reiss, Alex Sauff, Sven Steglich, Steinberg, Hermann Vogt,
Beate Walkowiak, Kurt “Lu” Wangard, KD Warnecke,
Rocco Zodiac … and anyone we have forgotten.

Content
5 AFB16 User´s Manual
Content
Foreword.............................................................................................................................................................................................3
Hint ................................................................... 3
AFB16 developing Team ......................................... 4
We would like to thank........................................... 4
Content...................................................................................................................................................................................................5
Features & Connections..........................................................................................................................................6
Front Panel .......................................................... 6
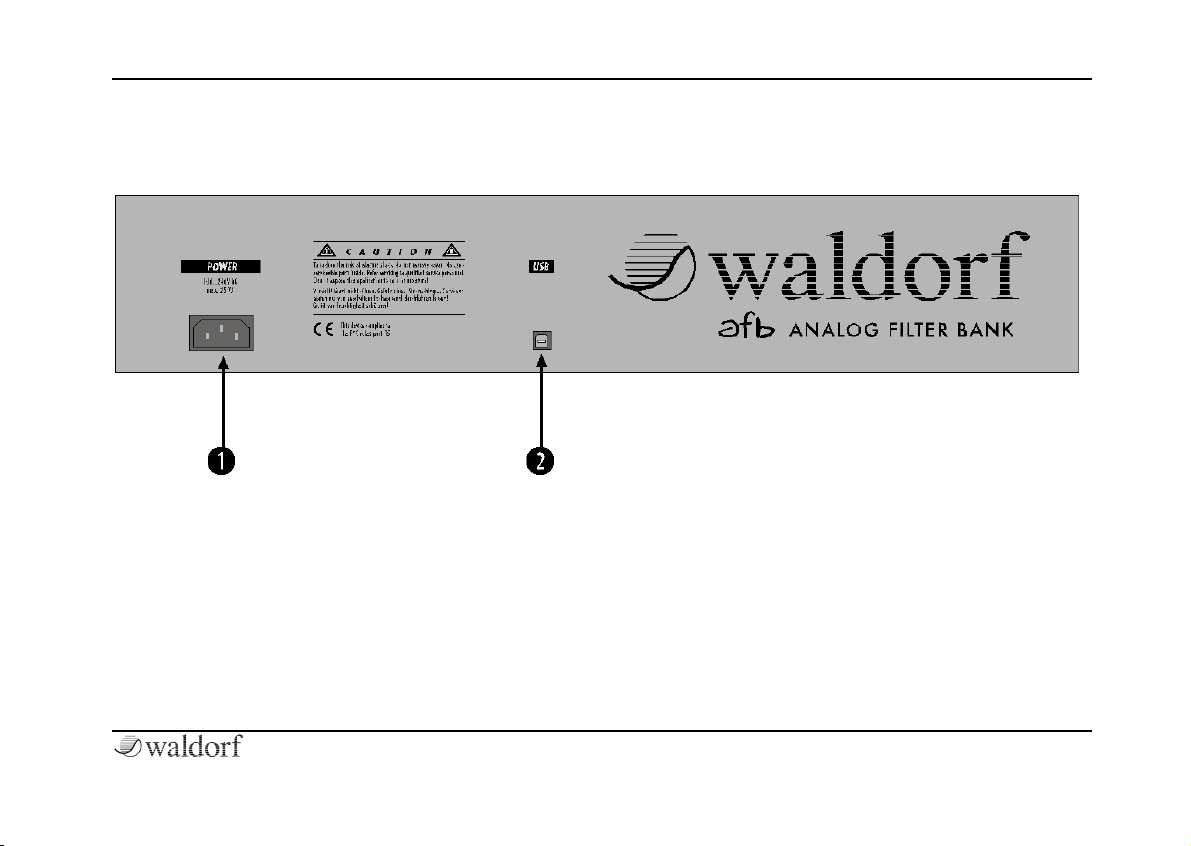
Rear Panel ........................................................... 7
Introduction....................................................................................................................................................................................8
About this Manual ................................................. 8
General Safety Guidelines ....................................... 9
Setup and Connection.............................................................................................................................................11
Inventory............................................................11
Setup.................................................................11
Connections........................................................11
Installation....................................................................................................................................................................................12
Installation under Windows ....................................12
Installation of the AFB16 Software ............................12
Installation of the included VST plug-Ins ....................12
Basic Operation AFB16.........................................................................................................................................13
What is the AFB16?.............................................. 14
AFB16 Control .................................................... 14
Practical use of the AFB16 ..................................... 14
How does a filter work?......................................... 15
Differences between digital and analog filters ............. 16
Waldorf ROT Analog Filter Step Sequencer Plug-In..........................................17
Waldorf PPG Red Wavetable Synthesizer............................................................................27
Other Functions AFB16.........................................................................................................................................59
Updating the AFB16 Software................................. 59
Appendix.........................................................................................................................................................................................60
Technical Data AFB Hardware................................ 60
MIDI controller numbers ROT ................................ 61
MIDI controller numbers PPG Red ........................... 63
Glossary ............................................................ 65
Conformity Declaration......................................... 71
Product Warranty/Product Support........................... 73
Warranty Card........................................................................................................................................................................74

Features & Connections
AFB16 User´s Manual 6
Features & Connections
Front Panel
!Power button with status LED
"USB activity status LED
#16 analog filter activity LED’s
$German synthesizer manufacturer from the Schloss Ahrenthal near River Rhine

Features & Connections
7 AFB16 User´s Manual
Rear Panel
%Power supply socket (100V to 240V AC)
&USB 2.0 jack for connection to a computer

Introduction
AFB16 User´s Manual 8
Introduction
About this Manual
This manual was written to help you to become familiar
with the AFB16,and will also assist experienced users
with routine tasks.
To avoid confusion, the terminology in this manual is
based on the parameter names used in the AFB16 and its
standard plug-ins. You will find a glossary at the end of
this manual that explains these terms in generic language.
We have also used a uniform set of symbols to show you
topics of particular interest or significance. Important
terms are highlighted in bold letters.
Symbols
!Caution – The comments that follow this symbol will
help you avoid errors and malfunctions.
!Info – Additional information on a given topic.
☞Instruction – Follow these guidelines to execute a
desired function.
Highlighted Control Features and Parameters
All of the AFB and plug-ins buttons, controls and
parameters are highlighted in bold letters throughout the
manual.
Example:
•Press the Power button.
The different modes and parameter pages of the plug-ins
are illustrated in the following chapters.
The value range of a continuous parameter is indicated
from low to high with both values shown in italic letters,
separated by three dots.
Example:
Cutoff 0…127

Introduction
9 AFB16 User´s Manual
General Safety Guidelines
!Please read the following safety tips carefully! They
include several precautions you should always
observe when dealing with electronic equipment.
Read all of the instructions before operating your
device.
Suitable Operating Conditions
•Only use the device in enclosed rooms.
•Never use the device in damp conditions such as in
bathrooms, washrooms or around indoor swimming
pools.
•Do not use the device in extremely dusty or dirty
environments.
•Make sure that adequate ventilation is available at all
sides of the device.
•Do not place the device near heat sources such as
radiators.
•Do not expose the device to direct sunlight.
•Do not expose the device to extreme vibrations.
Power Supply
•Never use a different power cable than the one that
came with the AFB16.
•Unplug the device when you are not using it for long
periods.
•Never touch the plug with wet hands.
•Always pull the plug when unplugging the device,
and never the cable.
Operation
•Never place objects containing liquids on or near the
device.
•Only place the device on a stable base, or use a
stable platform or rack.
•Make sure no foreign objects enter the chassis. If this
should occur, immediately switch the power off,
unplug the device, and consult a qualified repair
center.
•This device, whether used on its own or with
amplifiers, speakers or headphones, can generate
volume levels that may do irreparable damage to
your hearing. For this reason you should keep the
volume at reasonable levels.

Introduction
AFB16 User´s Manual 10
Maintenance
•Do not open the device or remove the cover. Refer
all service and repair tasks to qualified personnel
only. The interior of the chassis contains no user-
servicable components.
•Use only a dry, soft cloth or brush to clean the
device. Never use alcohol, cleaning solutions or
similar chemicals, as they will damage the surface.
Proper Use
This device is designed exclusively to produce low-
frequency audio signals for the purpose of generating
sound. Any other use is prohibited and voids the warranty
extended by Waldor-Music AG. Waldorf-Music is not
liable for damages due to incorrect use.
!Don´t leave your AFB16 near small children or
animals. This could lead to critical interactions.

Setup and Connection
11 AFB16 User´s Manual
Setup and Connection
Inventory
The Waldorf AFB16 comes in a box that includes:
•AFB16 hardware unit,
•Power cable and high-speed USB cable,
•CD-ROM with AFB installer and VST plug-ins, and
•This manual, including a warranty card on page 74.
Please ensure all of these items were included. If
something is missing, contact the dealer where you
purchased the unit for replacements.
We recommend that you save the original packing
material for future transport.
!Make sure you fill out the warranty card and send it
to your Waldorf distributor or to the address
printed on the card. This is the best way for us to
keep you informed of updates and upgrades.
Setup
Place the AFB16 on a clean, even surface. We
recommended installation in a stable 19-inch rack.
Connections
In order to get started with the AFB16 you will need an
AC power outlet and a compatible computer with USB
2.0 interface.
!The AFB16 can not work in “stand-alone“ mode - it
always
needs a computer to operate.
☞To connect the device:
1. Make sure your computer and the AFB16 are
turned off.
2. Connect the power cable to the Power Supply
'jack on the rear panel of the AFB16. Plug the
other end of the cable into a suitable AC power
outlet.
3. Connect the USB 2.0 jack of the AFB16 to a USB
2.0 interface port on your computer using the
supplied cable.
4. Switch your computer on.
5. Install the AFB driver as described on the next
page.

Installation
AFB16 User´s Manual 12
Installation
Installation under Windows
In order to use the AFB16 and the included VST plug-ins
you will need a PC with the following requirements:
Hardware Requirements
•Intel Pentium III or compatible processor, 500 MHz
or faster
•Minimum of 128 MB RAM
•30 MB free space on your hard drive
•USB 2.0 interface
•MME or ASIO compliant sound card with low-
latency driver
Software Requirements
•Microsoft Windows 98, ME, 2000 or XP
•Host application or plug-in that supports AFB
Installation of the AFB16 software
1. Insert the AFB16 CD-ROM into your CD-ROM
drive.
2. Switch on the AFB16. Windows will recognize
the new hardware and open the Add Hardware
wizard.
3. Click “Have disc“ and select the drive where
you inserted the AFB16 CD-ROM.
4. Follow the on-screen instructions.
Installation of the included VST plug-ins
1. Insert the AFB CD-ROM into your CD-ROM
drive.
2. Launch Windows Explorer or open the “My
computer“ window.
3. Double-click the symbol for the drive that
holds the AFB16 CD-ROM.
4. Double-click on the VST plug-ins installer
symbol.
5. Follow the on-screen instructions.

Basic Operation AFB16
13 AFB16 User´s Manual
Basic Operation AFB16
Switching on
The AFB16 is equipped with a power button.
☞To switch on the AFB16:
•Press the Power !button and the power LED
will turn on. If the AFB16 detects a PC, the USB
activity LED will light up quickly after this.
•After a couple of seconds, the filter LED’s will
light up to show the calibration of the analog
circuits. The AFB16 will be ready when these
filter LED’s turn off.
Switching off
☞To switch off the AFB16:
•Press the Power !button.
!To reset the AFB16 during operation, turn it off and
on from the front panel.

Basic Operation AFB16
AFB16 User´s Manual 14
What is the AFB16?
The AFB16 is a filter bank that features a filter stage with
16 real analog low pass filters followed by a Voltage
Controlled Amplifier (VCA) stage. Unlike other analog
filters, the AFB16 can be fully and seamlessly integrated
into a digital music production system.
There are no analog inputs or outputs on the AFB16´s rear
panel. This is because all audio data is transferred using
the USB connection, allowing you to forget all the usual
hassles of wiring and complicated input/output routings.
Included with the AFB are the first two AFB16-aware VST
plug-ins: the ROT Analog Filter Step Sequencer and PPG
Red Wavetable Synthesizer. More plug-ins and
adaptations of existing music software are currently in
development.
You will find a list of the latest AFB compatible software
on our web site:
http://www.waldorf-music.com/afb
AFB16 Control
An AFB16-aware plug-in can be thought of as a remote
control for the AFB16 hardware unit. It automatically
routes the audio signal to the AFB16 hardware and back
to the computer via the USB connection. At the same
time, the plug-in can also send control information for
cutoff, resonance, and VCA volume.
Practical Uses of the AFB16
•As a fully controllable analog filter bank that can
enhance mono or stereo audio tracks using the
included ROT VST Effect plug-in.
•As a fully controllable analog resonant filter inside the
signal path of a virtual instrument, such as the
included PPG Red VST instrument.
•As an analog overdrive for a dramatic upgrade to any
audio input.
!You can simultaneously use more than one AFB16-
aware application. For example, you can use 8 mono
plug-ins at the same time as a virtual instrument with
8 analog filter voices.

Basic Operation AFB16
15 AFB16 User´s Manual
How does a filter work?
The AFB16 is equipped with 16 analog low pass filters.
The low pass filter type dampens frequencies that lie
above a specified cutoff frequency, and frequencies
below this cutoff point are allowed to pass through
unaffected. The frequencies below the cutoff point are
referred to as the “pass band range”, and the frequencies
above are called the “stop band range”. The AFB16´s
filter dampens frequencies in the stop band with a slope
of either 12dB or 24dB per octave. This means that the
level of a frequency that lies one octave above the cutoff
point will be either 12dB or 24dB lower than the level of
those frequencies of the signal that fall into the pass band
range. The following picture shows the basic principle of
a low pass filter: Low Pass Filter principle
To give you a more specific example of the dampening
effect, consider this: a reduction of 24dB reduces the
original level one octave above the cutoff point by
approximately 94%. The dampening factor two octaves
above the cutoff point reduces the original level by more
than 99%, which in most cases means this portion of the
signal will no longer be audible.
The AFB16’s filter also features a Resonance parameter
(also called “emphasis”). In the context of a low, band or
high pass filter, resonance means that a narrow frequency
band around the cutoff frequency is emphasized. The
following picture shows the effect of the resonance
parameter on the filter’s frequency curve:

Basic Operation AFB16
AFB16 User´s Manual 16
Low Pass Filter Resonance
If the resonance is raised beyond a certain level, the filter
will begin to self-oscillate, and will generate an audible
sine wave even when it is not receiving an incoming
signal.
!After passing through the filter stage, the signal enters
an analog VCA stage which can be overdriven for
adding even more analog warmth to the signal.
Differences between digital and analog
filters
An analog filter is made of many individual electronic
components that interact with each other in a non-linear
fashion, especially with high resonance settings. This is
very much unlike a digital filter circuit, which has only
one part (the chip which it runs on), and usually sounds
very calculated and precise. Surprisingly, the less exact
sonic variations inherent in analog filters are actually
more pleasing to the human ear (whether trained or
untrained), and as such analog filters are usually
described as being very “warm” or “fat” when compared
to their digital equivalents.
Difference between digital and analog
distortion
An analog VCA, such as those found in the AFB16,
enables analog distortion without aliasing, which is a
common artifact of digital amplifiers. This means the
audio signal will sound more raw, leading to enhanced
focus in a mix.

Waldorf ROT Analog Filter Step Sequencer VST Plug-In
17 AFB16 User´s Manual
Waldorf ROT Analog Filter Step Sequencer VST Plug-In
What is ROT?
ROT is a pattern-controlled filter sequencer for the AFB16
that can create rhythmic filter effects. As well as routing
audio data, it sends cutoff frequency, resonance, and
drive control signals to the AFB16. All of this is set up
graphically in its sophisticated computer interface,
enabling a large amount of creativity with the high-quality
analog components inside the AFB16.
!ROT is the german word for “red”.

Waldorf ROT Analog Filter Step Sequencer VST Plug-In
AFB16 User´s Manual 18
Installing the ROT VST plug-in
The ROT installation program is on the CD-ROM
included with the AFB16. To install ROT:
1. Insert the AFB CD-ROM into your CD-ROM
drive.
2. Launch the Explorer or open the “My computer“
window.
3. Double click on the symbol for the CD-ROM
drive that holds the AFB CD-ROM.
4. Double click on the VST plug-ins installer
symbol.
5. Follow the on-screen instructions.
Setting up ROT
To make the best use of the ROT plug-in, we recommend
using it as an insert effect (i.e. serial processing). Please
read the documentation of your host application for
instructions on setting up a VST Effect in this way.
!When used in a stereo track, the ROT automatically
reserves two AFB16 filters.
Preset Banks and Programs
When you first load the ROT plug-in, you will find preset
programs filled with useful settings for various tasks.
Both Bank and Program presets are selected, loaded, and
saved directly in your host application. Please read the
corresponding section in your host application’s
documentation for instructions.
MIDI Controller Data
All ROT parameters can be dynamically controlled with
MIDI Controller data. A list of all available Controllers
can be found in the appendix of this manual on page 61.
Parameter Automation
Moving any control on the ROT will send automation
data to the host application. This data can be recorded,
manipulated, and sent back to control the ROT as you see
fit. For more details on handling automation data, please
read the corresponding section in your host application’s
documentation.

Waldorf ROT Analog Filter Step Sequencer VST Plug-In
19 AFB16 User´s Manual
The User Interface
The ROT user interface corresponds to the internal design
of the AFB16, and can be considered as a remote control
for the filter hardware. The following sections explain the
individual functions and parameters in detail.
The Operating Controls
All controls can be manipulated using the mouse.
Display: shows the active
parameter and its current
value. The display is also where you will find the
parameter name and corresponding numeric value of any
control you move the cursor over.
Knobs: clicking and dragging the mouse button
around a knob will set the value of that knob’s
parameter. Using a wider circular motion will
allow you to make more subtle changes. The
ROT display will update to show you the parameter you
are editing and its current value.
Buttons: are activated and deactivated by
clicking them with the mouse. An activated
button will be lit up in red.
Value Selectors: to change a value click on the
control and move the mouse up or down while
holding the button.
Faders: click on a fader and pull it up or down
while holding down the mouse button.
Waldorf Logo: opens a
window with information
about the plug-in.
Key Combinations
•While holding down the [CTRL] button on your
computer keyboard ([CONTROL] on Mac), clicking
on a parameter will reset the value to its default
setting (e.g. Resonance will become 0, Cutoff Mod
will become 0%, etc.)
•[ALT] + click ([OPTION] + click on Mac) changes a
value’s selection mode from circular to linear (and
vice versa).
•Other special key combinations for ROT are
explained in the next sections of this manual.

Waldorf ROT Analog Filter Step Sequencer VST Plug-In
AFB16 User´s Manual 20
The Step Matrix
The left matrix display shows the cutoff frequency pattern,
and the right display shows the resonance pattern. On both
displays, the horizontal axis shows up to 16 steps,
depending on the setting of the Length parameter, and the
upright axis shows the relative gain or trim applied to the
master cutoff and resonance settings for each step.
You can click and drag any single step with the mouse and
move it to the desired vertical position, or this can also be
accomplished by directly clicking the position you want
the step to move to. Clicking the mouse just above or
below the matrix display will automatically set the step to
its maximum or minimum position.
Using these techniques, you can “draw“ curves in the
display, or by pressing the [ALT] key all mouse movement
will be limited to the currently selected step.
[SHIFT] + click creates a linear slope, starting at the active
step and ending at the step where the mouse is clicked.
Holding down the [CTRL] key and clicking on a step will
set it to 0 (the midpoint on the vertical axis).
!You can also combine key combinations. For
example, use the [SHIFT] and [CTRL] keys together to
create a linear slope ending on the zero position.
The Grid Mode switch and Resolution
setting in the lower corners are used to
control the vertical resolution of the matrix.
When Grid Mode is deactivated, the grid operates in full
resolution, and each step can be freely placed on the
matrix.
When Grid Mode is activated, a grid will appear on the
matrix and have a series of discrete lines corresponding to
the Resolution setting. When in this mode, each step is
locked to a specific grid line. Clicking on the Resolution
setting and dragging the mouse up or down will change
the Resolution, and hence the number of lines that appear
on the matrix.

Waldorf ROT Analog Filter Step Sequencer VST Plug-In
21 AFB16 User´s Manual
Editing Functions and Pattern Presets
The editing functions and pattern presets that appear
below each matrix can be used to quickly change all
steps in a pattern.
Up and Down Arrows: All steps are
moved up or down by the smallest unit of
movement allowed by the current
resolution (see above).
Holding down the [ALT] key with the Up and Down
Arrows will instantly move the pattern to the top or
bottom of the matrix, leaving the pattern’s shape intact.
Right and Left Arrows: All steps are moved one position
to the left or right.
Expansion and Compression:These buttons
vertically expand (separate) or contract (bring
closer) all steps. Holding down the mouse button
will cause repeated expansion or contraction.
Holding down the [ALT] key with the Expansion Arrows
will expand all steps so that the the top or lowest step will
jump onto the maximum position. All other steps will be
moved in relation to that.
Mirror steps: The upper mirror symbol will flip
all steps across the vertical axis (from right to
left), and the lower symbol flips all steps across
the horizontal axis (from up to down).
Presets: The preset buttons
are used to recall one of ten
standard shapes into the
pattern matrix.
The default presets are are bipolar with both positive and
negative modulation amounts. To load a preset shape
with only positive modulation, hold down the [CTRL] key
when clicking on the preset. To load a preset shape with
only negative modulation, hold down the [CTRL] +
[SHIFT] keys when clicking on the preset.
Pressing the [ALT] key when selecting a preset will load
the vertical inverse of the default preset shape (i.e. a
mirror across the horizontal axis).
Table of contents
Other Waldorf Music Equipment manuals