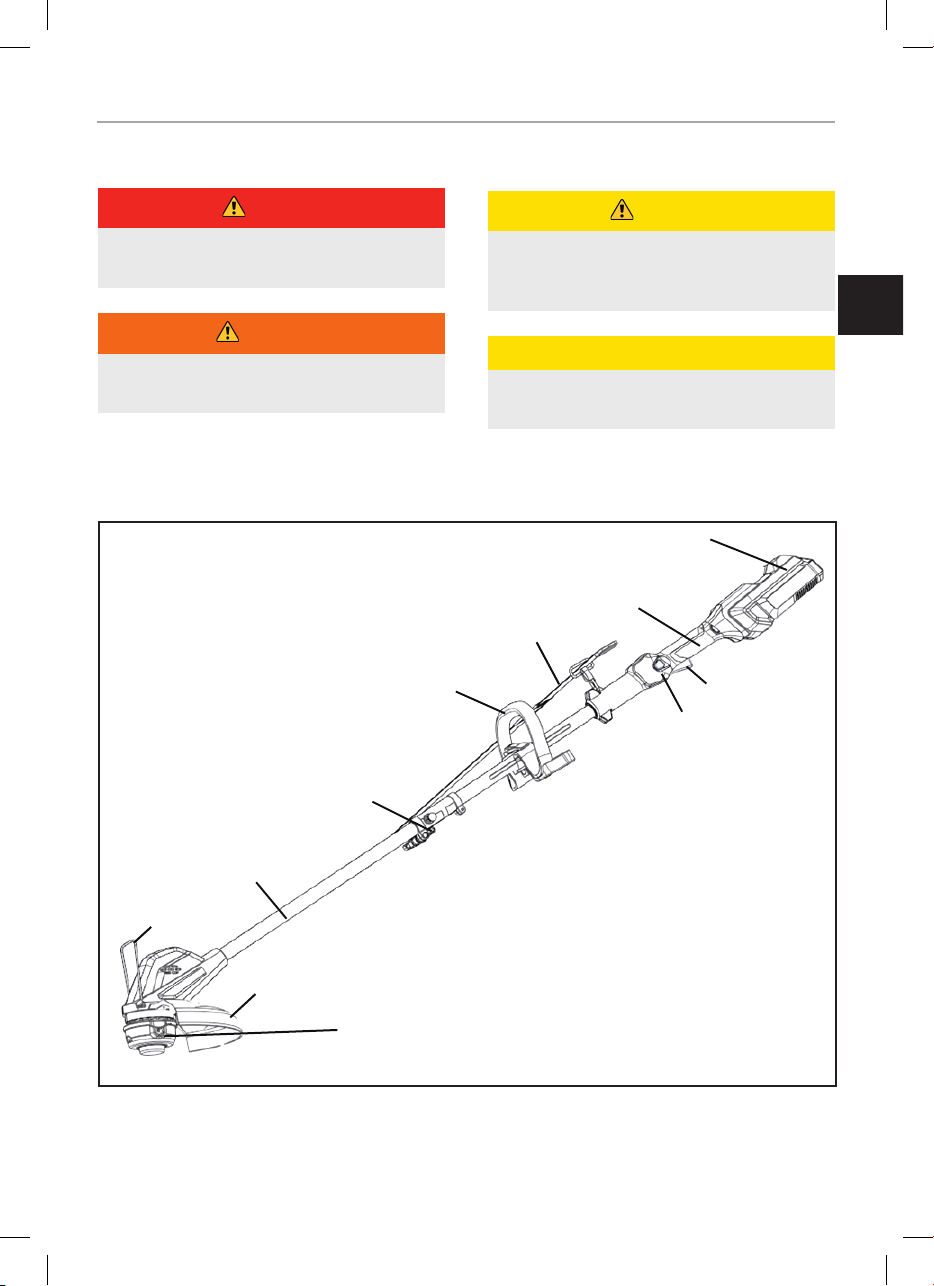
GENERAL SAfETy RULES
4
–Store idle appliances - When not in use, string
trimmer should be stored indoors in a dry, locked
place out of the reach of children like locked garage
or shed.
–Do not dispose of the batteries in a fire. The cells
may explode. Check with local codes for possible
special disposal instructions.
–Do not open or mutilate the batteries. Released
electrolyte is corrosive and may cause damage to
the eyes or skin. It may be toxic if swallowed.
–Do not place cordless tools or their batteries near
fire or heat. This will reduce the risk of explosion
and possible injury.
–Batteries can explode in the presence of a source
of ignition, such as a pilot light. To reduce the risk
of serious personal injury, never use any cordless
product in the presence of open flame. An exploding
battery can propel debris and chemicals. If exposed,
flush with water immediately and seek medical
advice.
–Do not crush, drop or damage battery pack. Do
not use a battery pack or charger that has been
dropped or received a sharp blow. A damaged
battery is subject to explosion. Properly dispose of a
dropped or damaged battery immediately.
–Exercise care in handling batteries in order not to
short the battery with conducting materials such as
rings, bracelets and keys. The battery or conductor
may overheat and cause burns.
–For best results, your battery should be charged in
a location where the temperature is more than 45
degrees but less than 104 degrees. To reduce the
risk of serious personal injury, never store batteries
outside or in vehicles.
–Under extreme usage or temperature conditions,
battery leakage may occur. If liquid comes in
contact with your skin, wash immediately with
soap and water, then neutralize with lemon juice
or vinegar. If liquid gets into your eyes, flush them
with clean water for at least 10 minutes, then seek
immediate medical attention. Following this rule will
reduce the risk of serious personal injury.
–If the power supply cord is damaged, it must
be replaced only by the manufacturer or by an
authorized service center to avoid risk.
–Never point the string trimmer in the direction of
people, pets or animals by doing so will void any
warranty offered.
–Maintain tool with care. Keep vents clean for best
and safest performance. Follow instructions for
proper maintenance. Do not attempt to clear clogs
from tool without first disconnecting the battery.
–To reduce the risk of electrical shock, do not expose
motor or electrics to moisture, do not use on wet
surfaces. Always store Indoors.
–Use Right Appliance - Do not use appliance for any
other job except that for which it is intended.
–Avoid Unintentional Starting - Do not carry string
trimmer with fingers on the switch. Be sure
the battery is disconnected or removed while
transporting.
–Check Damaged Parts - Before further use of the
appliance, a guard or other part that is damaged
should be carefully checked to determine that it will
operate properly and perform its intended function.
Check for alignment of moving parts, binding of
moving parts, breakage of parts, mounting, and
any other condition that may affect its operation.
A guard or other part that is damaged should be
properly repaired or replaced by an authorized
service center unless indicated elsewhere in this
manual.
–Save these instructions. Refer to them frequently
and use them to instruct others who may use this
power tool. If you loan someone this power tool,
loan them these instructions also.
CHILD SAFETY
–Tragic accidents can occur if the operator is not
aware of the presence of children.
–Keep children out of the working area and under the
watchful care of a responsible adult.
–Do not allow children under the age of 16 to operate
this trimmer. Children who are 16 years of age
and older must read and understand the operating
instructions and safety rules in this manual and
must be trained and supervised by a parent or
supervisor.
–Stay alert and turn the trimmer off if a child or any
other person enters the working area.
–Always look behind and down for small children
before and while cutting backwards.
–Use extreme care when approaching blind corners,
doorways, shrubs, trees, or other objects that may
obscure your view of a child who may run into the
path of the trimmer.