Watec WAT-2400 User manual

WAT-2400
User’s Manual
Rev. 2.00
Watec Co., Ltd.
2016/11/11

2
Revision Record
Rev.
Date
Changes
1.00
January 26, 2016
Initial Release
2.00
November 11, 2016
Change default settings
-Network settings
-Password for ONVIF client software
3. Checking the image from the camera
- Add descriptions on MJPEG stream
4.1.2 System
- Add settings on Network page (TELNET, SSH,
SNMP)
- Add Date & Time page
4.1.3 Camera
- Add descriptions on Video output settings
4.1.4 ONVIF
- Add ONVIF Settings page
- Add ONVIF User management page

3
Table of Contents
WAT-2400 User’s Manual ....................................................................................................... 1
Revision Record ..................................................................................................................... 2
Table of Contents .................................................................................................................... 3
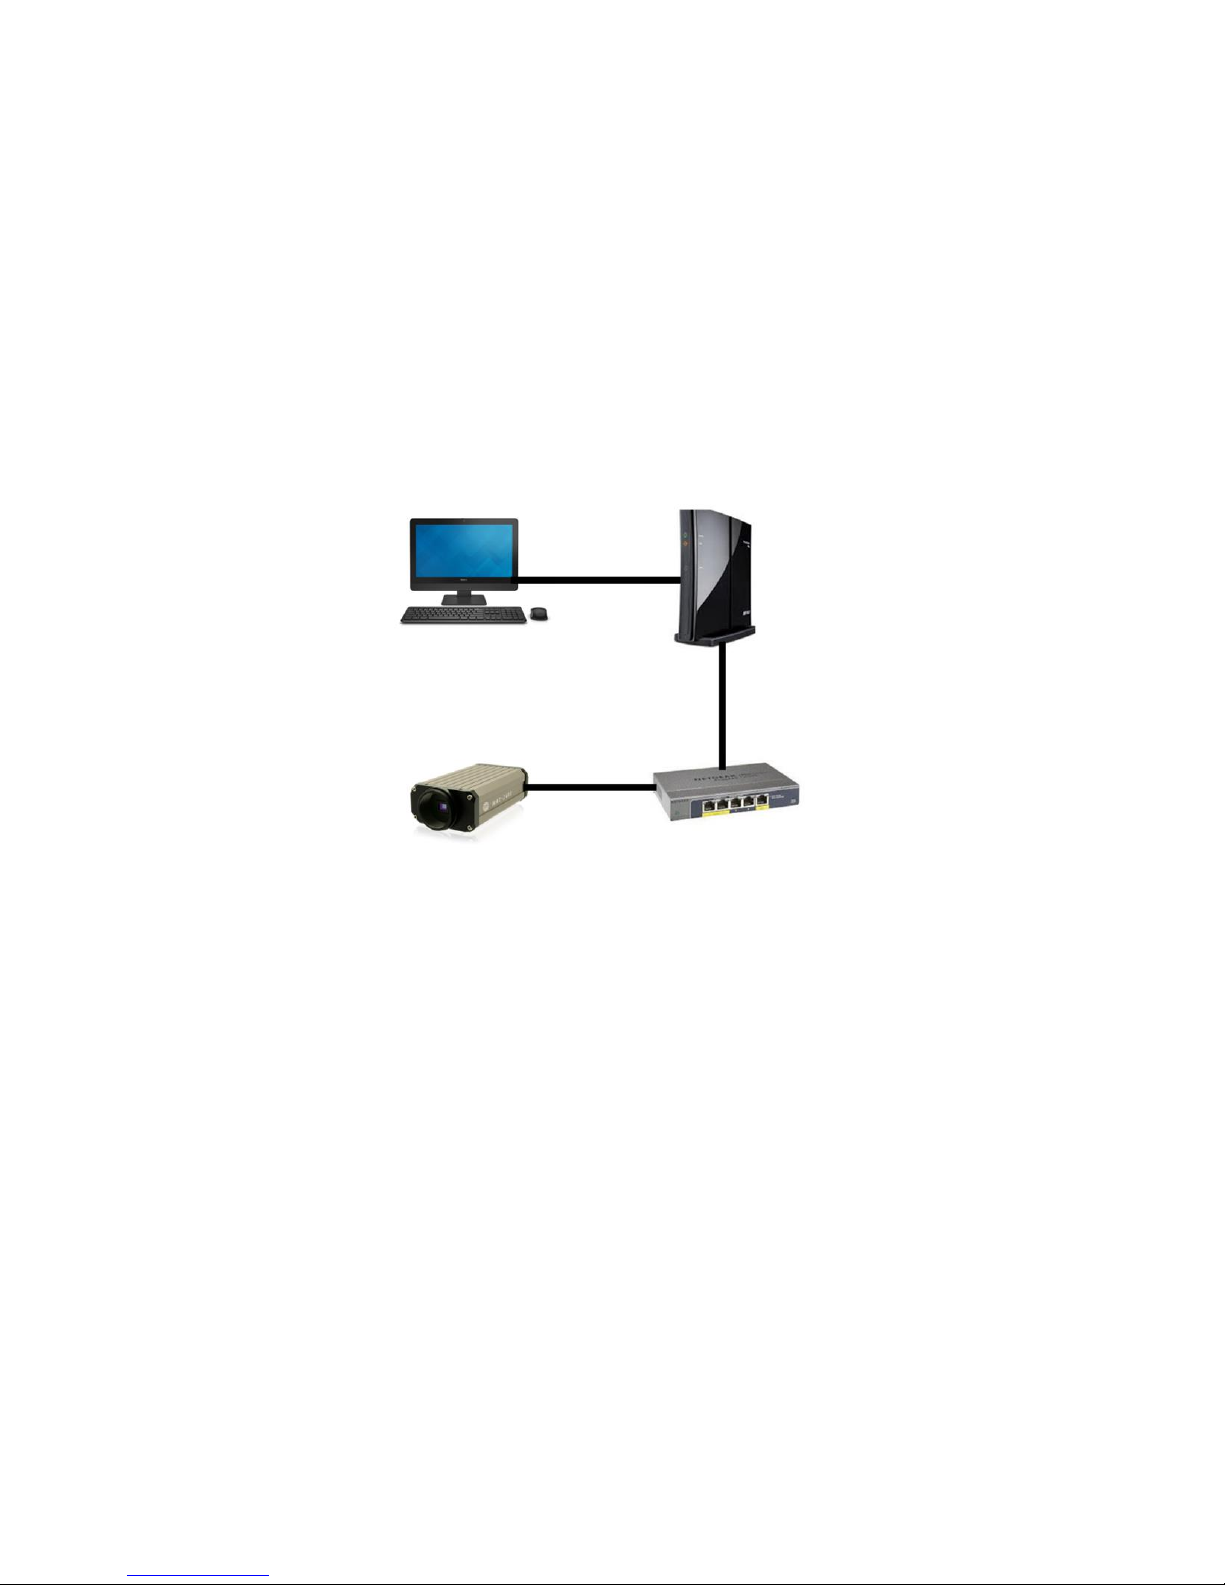
1. Connection and power activation of the camera ............................................................ 4
2. Network settings .............................................................................................................. 5
2.1. WAT-2400 network settings ..................................................................................... 5
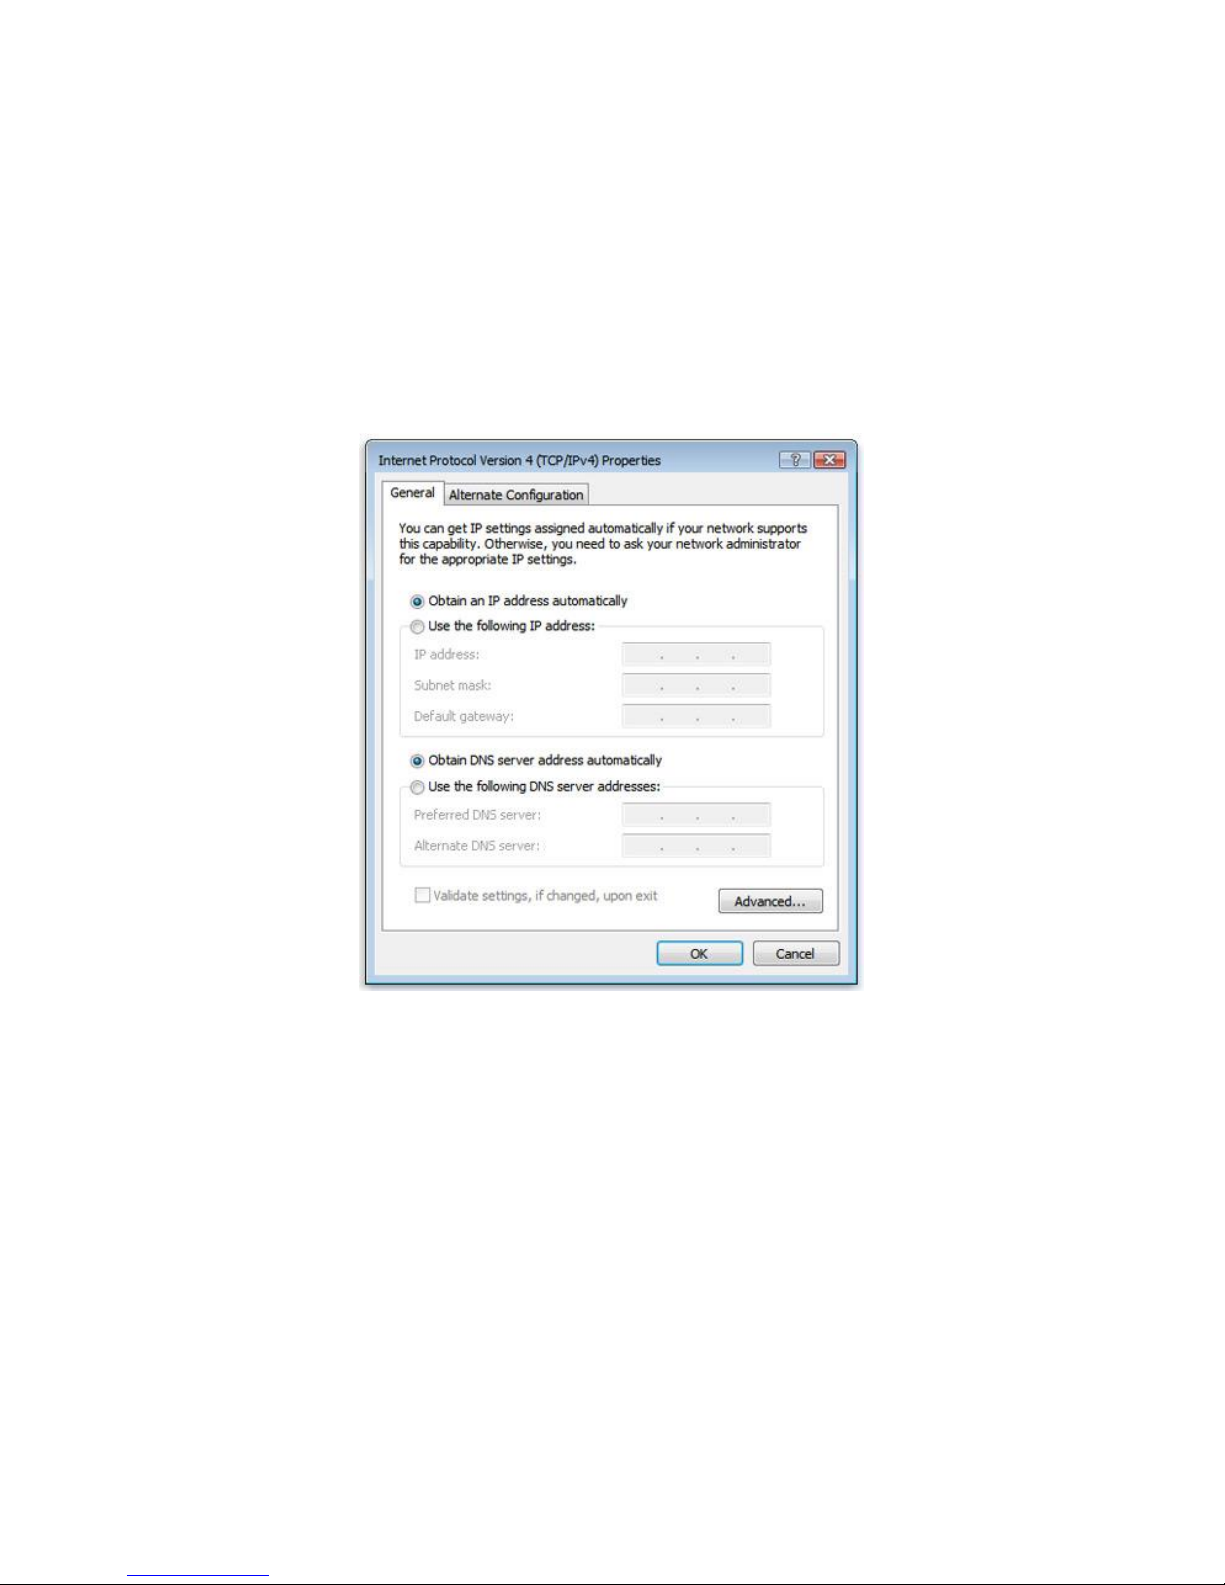
2.2. PC network settings ................................................................................................. 6
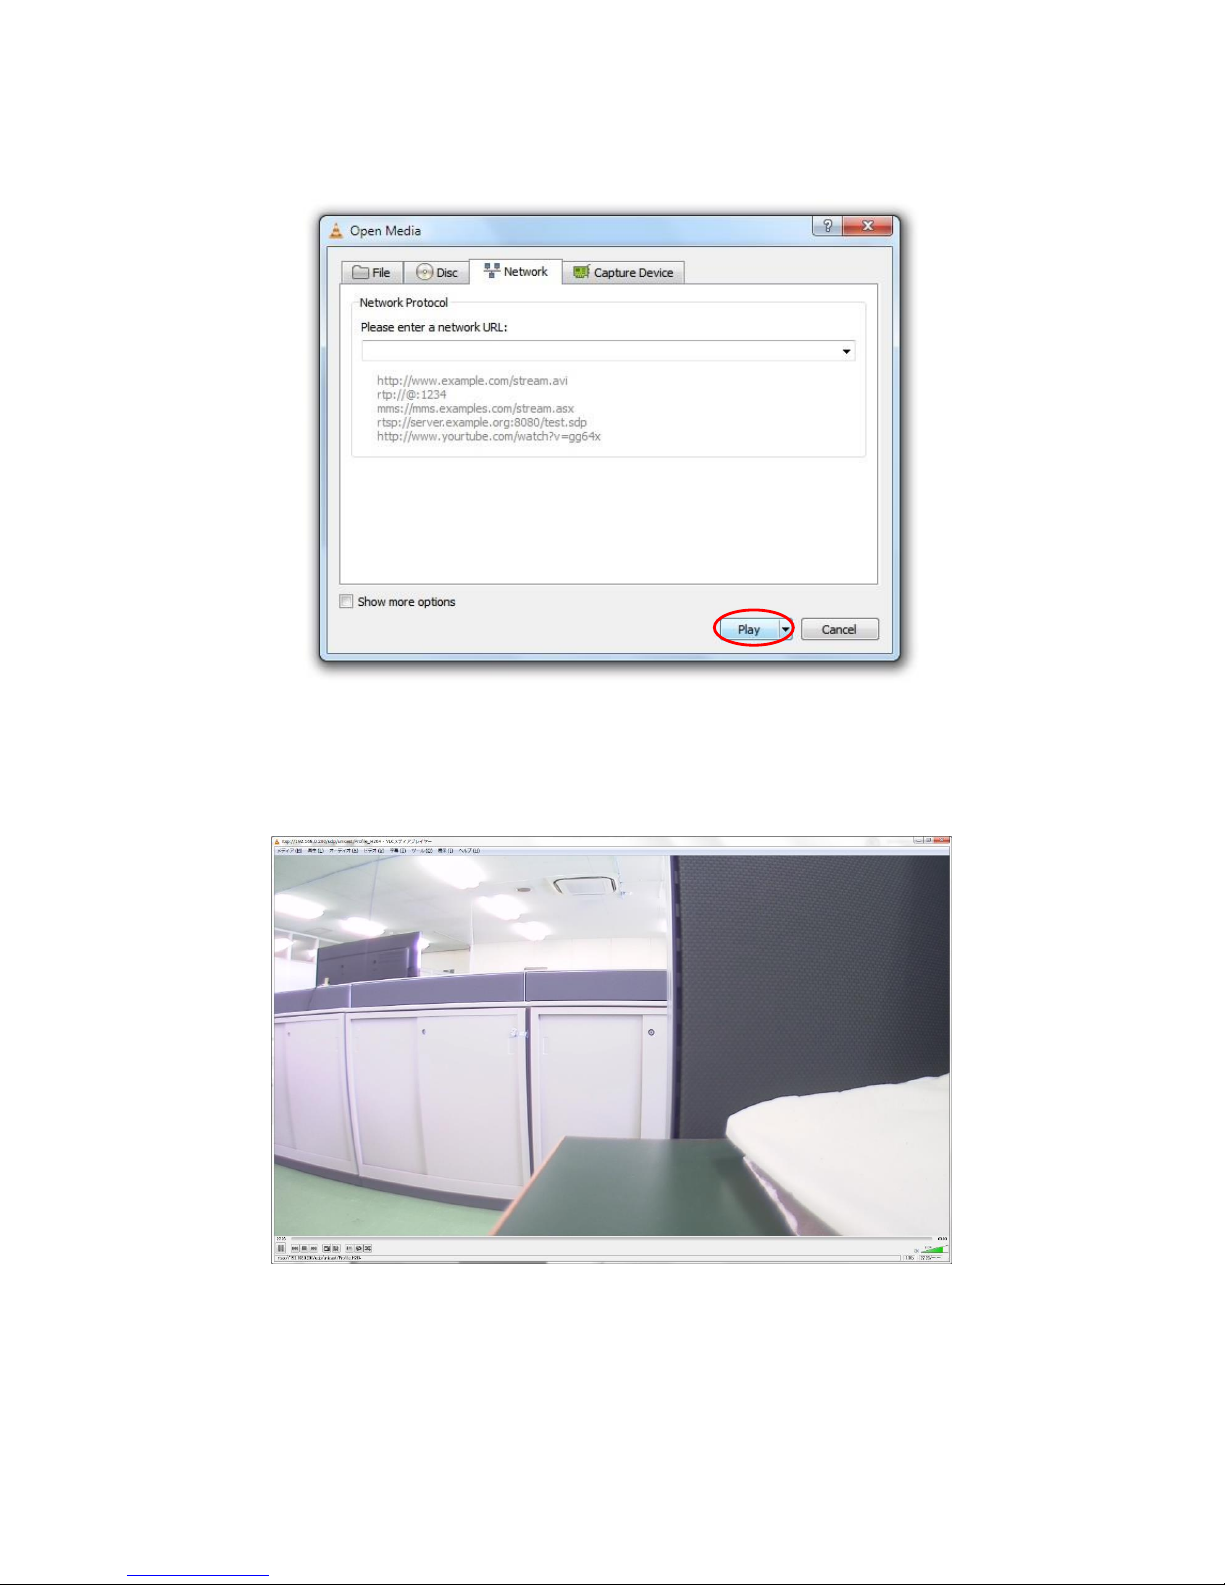
3. Checking the image from the camera ............................................................................. 8
A case of VLC media player ............................................................................................... 8
4. Changing the camera settings ....................................................................................... 11
4.1. Configuration changes from the Web browser (WAT-2400 System configuration) 11
4.1.1. WAT-2400 System Configuration: Overview (top page) .................................. 11
4.1.2. WAT-2400 System Configuration: System ..................................................... 12
4.1.3. WAT-2400 System Configuration: Camera .................................................... 23
4.1.4. WAT-2400 System Configuration: ONVIF ...................................................... 29
4.2. Setting initialization by the reset button ................................................................. 32
Reference ............................................................................................................................. 33
・ONVIF Device Manager setup steps ............................................................................ 33
・XProtect Essential setup steps ..................................................................................... 36

4
1. Connection and power activation of the camera
The WAT-2400 has two power supply systems. The one is powered by +12VDC input plug
on back panel of the camera, and the other is powered by PoE using a LAN connector.
Please feed by the one or the other of the way above and do not feed the both systems
simultaneously.
The below figure is a connection example of the power supply by PoE hub. In addition, you
need to have the power individually to the router and the PoE hub.
Connect the LAN cable of camera side to a PoE port of the PoE hub and connect the LAN
cable of the router side to a normal LAN port.
If you want to power the camera using the AC power supplies, connect the camera and the
router directly with exception of the PoE hub from the above. The router is also not required
if it is in a closed network configuration and not using DHCP protocol. In that case, connect
the PC and the camera directly in LAN cable.
It takes about 20 seconds to fully boot the WAT-2400 from the power supply start.
PC
WAT-2400
PoE hub
Router
LAN cable
LAN cable
LAN cable

5
2. Network settings
2.1. WAT-2400 network settings
The network default setting of the WAT-2400 is as follows;
IP Address
192.168.0.200 (static)
Netmask
255.255.255.0
Gateway
none
DNS Server
none
Host name
wat-2400-0
Since the used camera has a possibility to have the changed settings. In that case please
contact the administrator of the camera as there might need to change the viewed on PC or
the camera network in accordance with the situation.
The network settings of the WAT-2400 can be changed in the setting change by the Web
browser which will be described later.
If the network setting of the WAT-2400 is unclear, it is possible to initialize all the settings of
the camera, including the network settings while using the reset button which will be
described later.

6
2.2. PC network settings
Set the PC network settings in order to accommodate WAT-2400’s requirement.
PC network settings for a local area connection in Windows7 as follows;
Control Panel>>Network and Internet>>Network and Sharing Center
>>Local Area Connection >>Properties>>Internet Protocol Version 4(TCP/IPv4) Properties

7
An example of PC network settings
Connect the WAT-2400 and your PC as shown in the below figure. And if the network setting
of the camera is in default configuration (IP Address: 192.168.0.200 (static)), go through the
following steps to set up the PC network settings.
Control Panel>>Network and Internet>>Network and Sharing Center
>>Local Area Connection >>Properties>>Internet Protocol Version 4(TCP/IPv4) Properties.
Input the values below, press the “OK” and close the property.
PC
WAT-2400
LAN cable
PoE hub
LAN cable

8
3. Checking the Camera Images
It is available to check the camera images after completing the network setting.
This section describes the method in the case of viewing the image from the camera using
the VLC media player as a typical way.
WAT-2400 is able to stream by following settings.
ONVIF MODE
Encoding Method
Image Size
Frame Rate [fps]
enable
H.264
1280 * 720
20
MJPEG
1280 * 720
20
disable
H.264
1920 * 1080
30
H.264
1280 * 720
30
When ONVIF MODE is enabled, both of the streams can be distributed simultaneously.
When ONVIF MODE is disabled, only one of them can be distributed by switching settings.
A case of VLC media player
Download the appropriate VLC which meets your PC from VideoLAN official download page
(https://www.videolan.org/vlc/index.ja.html) and install.
Open the VLC media player when the installation is complete.

9
Click Media <Open Network Stream from the menu.
Paste your copied URI in the ‘Network Protocol’ box and click the play button. Wait till the
video start streaming in your VLC.
rtsp://”WAT-2400 IP Address”/udp/unicast/Profile_H264
(Example: rtsp://192.168.0.200/udp/unicast/Profile_H264)
The URI above is to see the stream of H.264 format.
The URI below is to see the stream of MJPEG format when ONVIF MODE is enabled.
rtsp://”WAT-2400 IP Address”/udp/unicast/Profile_JPEG
(Example: rtsp://192.168.0.200/udp/unicast/Profile_JPEG)

10
The network connections and settings work property, video starts to stream. Please check
again the network settings if it does not start.
The screen might become grey during the viewing, in that case, please click the stop button
in the lower left and click the play button again.
rtsp://192.168.0.200/udp/unicast/Profile_H264

11
4. Changing the camera settings
4.1. Configuration changes from the Web browser (WAT-2400
System configuration)
The network settings of the WAT-2400 can be changed in the setting change by the Web
browser. The Web browser must correspond to html5 and recommended web browser is
Internet Explorer 11.
4.1.1. WAT-2400 System Configuration: Overview (top page)
Open your web browser and go to following address page.
http://”WAT-2400 IP Address”/index.cgi
(Example: http://192.168.0.200/index.cgi)
Or
http://”WAT-2400 Host name”.local/index.cgi
(Example: http://wat-2400-0.local/index.cgi)
Network settings work properly, ”WAT-2400 System Configuration” will be displayed as
shown in the below figure. This page is the top page and includes a summary of the system.

12
・Network:
IP address, MAC address and Host name of the WAT-2400 will be displayed.
・Firmware:
The information about the version of the camera’s userland and kernel will be displayed.
There are 4 major menus and 8 submenus apart from the “Overview” in the WAT-2400
System Configurations. A description of each menu follows;
4.1.2. WAT-2400 System Configuration: System
Click on System from the menu and go to the page for updating the firmware and changing
of network settings. At the first time connection, the authentication window will open such as
shown in the below figure.
User name: admin
Password: admin
Enter the above and click the ”OK” button. The user name and password can be changed in
the password submenu which will be described later.
System has 6 submenus, System Overview, Network, Date & Time, Password, Firmware,
Save & Load.
A description of each submenu follows.
The server 192.168.0.200 is asking for your user name and
password. The server reports that it is from admin.
Warning: Your user name and password will be sent using
basic authentication on a connection that isn’t secure.

13
System Overview
Overview of the system will be displayed as same as top page.

14
Network
The current network settings of the WAT-2400 are displayed. At this page, you can change
the following network settings;
Switching of AUTO IP (DHCP) and STATIC IP
Advanced settings for STATIC IP
Changing the Hostname
Enabling / Disabling TELNET login
Enabling / Disabling SSH login
Enabling / Disabling SNMP agent function
Enter the each item and click the “Update” button then network settings will be changed.
Click the “Cancel” prior to clicking the “Update” then the settings will be before correction.

15
When the change of network settings is made, the below figure will be shown.
If you would like to change the network settings continuously, please access the top page of
the WAT-2400 System Configuration again. If you modify the TELNET or SSH settings,
please wait for the change completion about 15 seconds to re-access. At this time, the video
outputs pause due to change in the network settings.
Back to the top page and the following message will be displayed in upper right in the
window.
As per above message, if you made any configuration changes not only in the network
configuration, the changed configuration will not be saved and power-supply disconnection
will make the change go back to the original unless you save the configuration to the flash
ROM in the Save & Load page which will be described later.

16
Date & Time
This page is used to set the time on the system of WAT-2400.
Current System Time:
The current system time of WAT-2400 is displayed.
Time Zone:
The current time zone is displayed. It is able to select any one from the drop-down list.
Synchronize with NTP Server:
You can synchronize the system time with any NTP server by entering a valid IP
address or domain name of NTP server in the textbox.
Set manually:
You can set the system time manually by entering the “yyyy-MM-ddThh:mm:ss" format
in the textbox. (y: year, M: month, d: day, h: hour, m: minute, s: second)
After select and enter the each item, click “Update” to Date & Time settings will be changed.
If you click “Cancel” before clicking “Update”, the settings return to the pre-adjusted status.

17
Please do not change other settings along with the time zone settings. Even if you modify
the time zone settings and others simultaneously, only changes in the time zone settings will
be reflected but others will not be made.
When the change in the time zone settings is performed, the figure below is displayed.
If you want to return to the previous page from this page, please click not the browser’s back
function but the “Back” button displayed in this page. In addition, please wait for about 10
seconds due to the change completion.

18
Password
On this page, you can change the Username and Password to use for authentication when
entering the System page of the WAT-2400 System Configuration.
・Username:
Enter the new user name
・Current password:
Enter the current password
・New password:
Enter the new password
・Confirm new password:
To confirm, enter the new password again.
Click the “Update” button and the change will be made with the information entered in.
When you change the settings, the confirmation page will be displayed in the same way of
changing the network settings. If you would like to change the settings continuously, please
access the top page of the WAT-2400 System Configuration again.
Please note that when you made any configuration changes, the changed configuration will
not be saved and power-supply disconnection will make the change go back to the original
unless you save the configuration to the flash ROM in the Save & Load page

19
In addition to that, please be aware not to forget the new username and password,
when you access the page and will be required authentication after you change the
username and password.
Firmware
You can update the userland and kernel of the Linux which configure the systems of the
WAT-2400 at this page. These updates will be made by downloading each image file to
the WAT-2400 from our website via the internet. Therefore, the WAT-2400 must be
connected to the internet when you update the firmware.

20
Click the “Get firmware options” button once the WAT-2400 has been connected to the
internet. The list of available firmware will be displayed in the drop-down list if there is not a
problem with the connection.
Select the image file you would like to update from the list.
Click the “Update userland” button when you update the userland.
And click the “Update kernel” button when you update the kernel.
After you updated the firmware, the confirmation dialog will be displayed and click the OK
button. And the update will begin. During the update the below page will be displayed.
Please do not disconnect the network or turn off the camera until the display of the page is
finished. And the camera might not be able to reboot.
The update might takes about 10 minutes depending on the states network.
Table of contents
Other Watec IP Camera manuals