Waterflex LanaBike Evo User manual

Zachowaj niniejszą instrukcję / Keep this user’s manual
INSTRUKCJA OBSŁUGI
USER’S MANUAL

2
Zasady bezpieczeństwa / Safety Precautions
Dla własnego bezpieczeństwa prosimy o uważne zapoznanie się z niniejszą instrukcją przed użyciem!
For your safety, please read these instructions before use!
Złóż ten produkt prawidłowo, używając oryginalnych części zgodnie z instrukcją montażu. Przed
przystąpieniem do montażu należy sprawdzić integralność opakowania oraz dostępność części
zamiennych zgodnie z zasadami transportu i wykazem części zamiennych.
Assembly this product properly using original parts according to the installation instruction. Before assembly,
inspect whether packages are in good condition and whether spare parts are complete in accordance with
transport precautions and the list of spare parts.
Przed rozpoczęciem treningu upewnij się, że urządzenie jest dobrze zamocowane.
Prior to exercise, make sure equipment fasteners are in locking state.
Ustaw rowerek treningowy na suchej i równej powierzchni.
Please place the exercise bike on a dry and flat ground.
Pamiętaj, aby przed rozpoczęciem jakichkolwiek ćwiczeń skonsultować się z lekarzem. Nadmierny trening
lub trening nieprawidłowo wykonany może spowodować problemy zdrowotne.
Before starting any exercise, it is essential to consult your doctor. An excessive training or incorrectly
executed may cause health issues.
W przypadku długotrwałego użytkowania rowerka należy postępować zgodnie z poniższymi zaleceniami:
-Regularnie sprawdzaj poziom pH wody w basenie. Powinien znajdować się w zakresie od 6,7 do 7,6.
-W przypadku uzdatniania szokowego należy wyjąć rowerek z wody.
-Nie umieszczaj rowerka zbyt blisko króćca powrotnego.
-Po każdym użyciu wyjmij rowerek z wody i spłucz go czystą wodą.
For sustainable use of your bike, please follow these instructions :
-Regularly check the pH of your pool water. It must be between 6.7 and 7.6.
-In case of water shock treatment, please get out the bike from water.
-Avoid placing the bike too close of run-back nozzle.
-Get out the bike from water after each use and rinse with clear water.
Użyj dołączonych narzędzi lub innych odpowiednich narzędzi do montażu lub naprawy rowerka
treningowego.
Please use the attached or other appropriate tools to assemble or repair the exercise bike.
Wykonaj niezbędną konserwację przy użyciu oryginalnych części zamiennych.
Make necessary maintenance using original spare parts.
Dostosuj rowerek treningowy do swojego ciała, aby zapewnić sobie wygodę i bezpieczeństwo.
For your comfort and safety, adjust the bike pool according to your body.
Z tego rowerka treningowego może korzystać jednocześnie tylko jedna osoba.
This exercise bike is only for use by one person at one time.
Używaj tego rowerka wyłącznie zgodnie z jego przeznaczeniem, tj. do treningu sportowego.
Use this bike only for the purpose for which it was intended, that is sports practice exercises.
Dzieci i osoby niepełnosprawne powinny korzystać z rowerka w obecności osób dorosłych i zdrowych.
Children and disabled persons shall use the equipment in the presence of adults or healthy people.
Maksymalne obciążenie rowerka treningowego wynosi 150 kg.
The exercise bike has a maximum load of 150KGS.
Conseils d’entretien / Maintenance advices

3
Mesures de sécurité / Safety Precautions Konserwacja / Maintenance advices
Rowerek basenowy jest wykonany z anodyzowanego aluminium i stali nierdzewnej AISI 316L, które są
zgodne z Dyrektywą 2001/95/WE w sprawie ogólnego bezpieczeństwa produktów. Dzięki obróbce
antykorozyjnej nadaje się do stosowania w wodzie chlorowanej, morskiej i termalnej. Nie wymaga specjalnej
pielęgnacji w wodzie o kontrolowanym poziomie pH (6,7 / 7,6).
The bike is made of anodized aluminium and marine quality AISI 316L stainless steel conforming to
standard 2001/95/EC on the general safety of products. Its anti-corrosion treatment makes it suitable for
chlorinated water, seawater and thermal waters. It does not require any special care in pH-controlled water
(6.7 / 7.6).
1. Po każdym użyciu rowerek należy wyjąć z wody, opłukać miękką wodą i wysuszyć.
Remove the bike after every use, rinse it with soft water, and wipe it.
2. Regularnie sprawdzaj poziom pH wody basenowej (pożądany poziom pH 7,2).
Regularly check the pH of your swimming pool (pH 7.2 advisable)
3. W przypadku ręcznego dodawania chemikaliów lub uzdatniania szokowego należy wyjąć rowerek z
wody. Trzymaj rowerek z daleka, aby uniknąć rozprysków, które mogą pozostawić plamy (ze względu na
stężenie produktów chemicznych).
Remove the bike during manual dosages of chemical products or impact treatments. Keep the bike away to
avoid any splashes that can stain or any deposits (due to the concentration of chemical products).
4. Należy unikać osadów proszku, soli, agresywnych produktów, które przyczyniają się do procesu korozji.
Deposits of powder, salt, corrosive products that encourage the corrosion process.
5. Podczas czyszczenia powierzchni basenu po raz pierwszy (przed napełnieniem) i podczas późniejszej
konserwacji zalecane jest wyjęcie rowerka z basenu, aby uniknąć ryzyka powstania plam lub osadów.
When first cleaning the surfaces of the swimming pool (before filling it) as well as subsequent maintenance
cleaning, it is advised that you remove the bike from the pool so as to avoid any risk of stains or deposits.
6. Jeśli nie planujesz korzystać z rowerka w najbliższym czasie, należy go dokładnie opłukać miękką wodą, a
następnie wysuszyć i przechowywać z dala od środków chemicznych i urządzeń służących do dozowania
chemii do pielęgnacji basenu.
When you are not using the bike, it must be rinsed thoroughly with soft water, then dried and stored in a location
away from chemical products, as well as equipment used for dosing chemical products for pool maintenance.
7. Jeśli występują osady wapienne lub plamy, można je usunąć środkiem do czyszczenia aluminium
anodowanego i miękką, nierysującą ściereczką. Następnie należy spłukać czystą wodą i całkowicie wysuszyć.
If there are lime-scale deposits or stains, these can be removed with a cleaner for anodized aluminum and a
non-abrasive soft cloth. Then wash with clean water and dry it completely.
8. Gdy opuszczasz rowerek treningowy do wody, przytrzymuj go, aby zapobiec uderzeniu i uszkodzeniu
basenu lub rowerka basenowego.
When you put the bike on the water, hold back the bike for prevent impact and damage to your pool or your
bike.
UWAGA
Sprawdzaj poziom pH wody po każdym użyciu. Poziom pH powinien znajdować się w zakresie od 6,7 do 7,6.
Wszelkie uszkodzenia spowodowane niewłaściwą równowagą pH spowodują utratę gwarancji.
(Dla części wykonanych z anodyzowanego aluminium, stali nierdzewnej i silikonu)
WARNING
Check the pH of the water on each utilisations. The pH water should be between 6.7 and 7.6.
Any damages caused by a wrong pH balance cancel the warranty.
(For anodized aluminum, inox parts, and silicone parts)

4
1 2
10
3
9
8
19
16 3 17 16
13
15
14
14
15
10
9
8
7
6
5
4
20
21
22
21
20
19
23
11
12
Liste détaillée / Part List
Schemat budowy /Exploded view
18
Narzędzia / Tools
Uwaga: używaj tych narzędzi wyłącznie do montażu tego rowerka treningowego.
Note: use these tools only to assemble this exercise bike.
UWAGA: Trzymaj narzędzia z dala od dzieci.
WARNING: Keep the tools away from babies and children.
5
Wykaz części zamiennych / Part List
Nr Description / Opis Ilość / Quantity
1 Protective cap / Nasadka ochronna
2 Handlebar / Kierownica
3 Pedal (A-B) / Pedał (A-B)
4 Seat / Siodełko
5 Seat mounting plate / Płyta mocująca siedzisko
6 Seat tube / Rura podsiodłowa
7 Bolt M6×30mm / Śruba M6x 0 mm
8 Clench washer / Podkładka zaciskowa
9 Welded nut / Nakrętka spawana
10 Handle «Click & Turn» / Uchwyt „Click & Turn”
11 Anode / Anoda
12 Anode Screw / Śruba do anody
13 Behind tube / Tylny stojak
14 Crank / Korba (A-B)
15 Crank locknut (A-B) / Przeciwnakrętka korby (A-B)
16 Foot mat / Przyssawka
17 Height adjustment knob / Pokrętło regulacji wysokości
18 Front tube / Przedni stojak
19 Bolt M8×40mm / Śruba M8x40 mm
20 Wheel / Kółko
21 Washer ø8 / Podkładka ø8
22 Lock nut M8 / Nakrętka zabezpieczająca M8
2
1
2
1
1
1
2
2
2
2
1
2
1
2
2
4
2
1
2
2
2
2
23 Main frame / Rama główna 1
6
Installation / Installation
Montaż / Installation
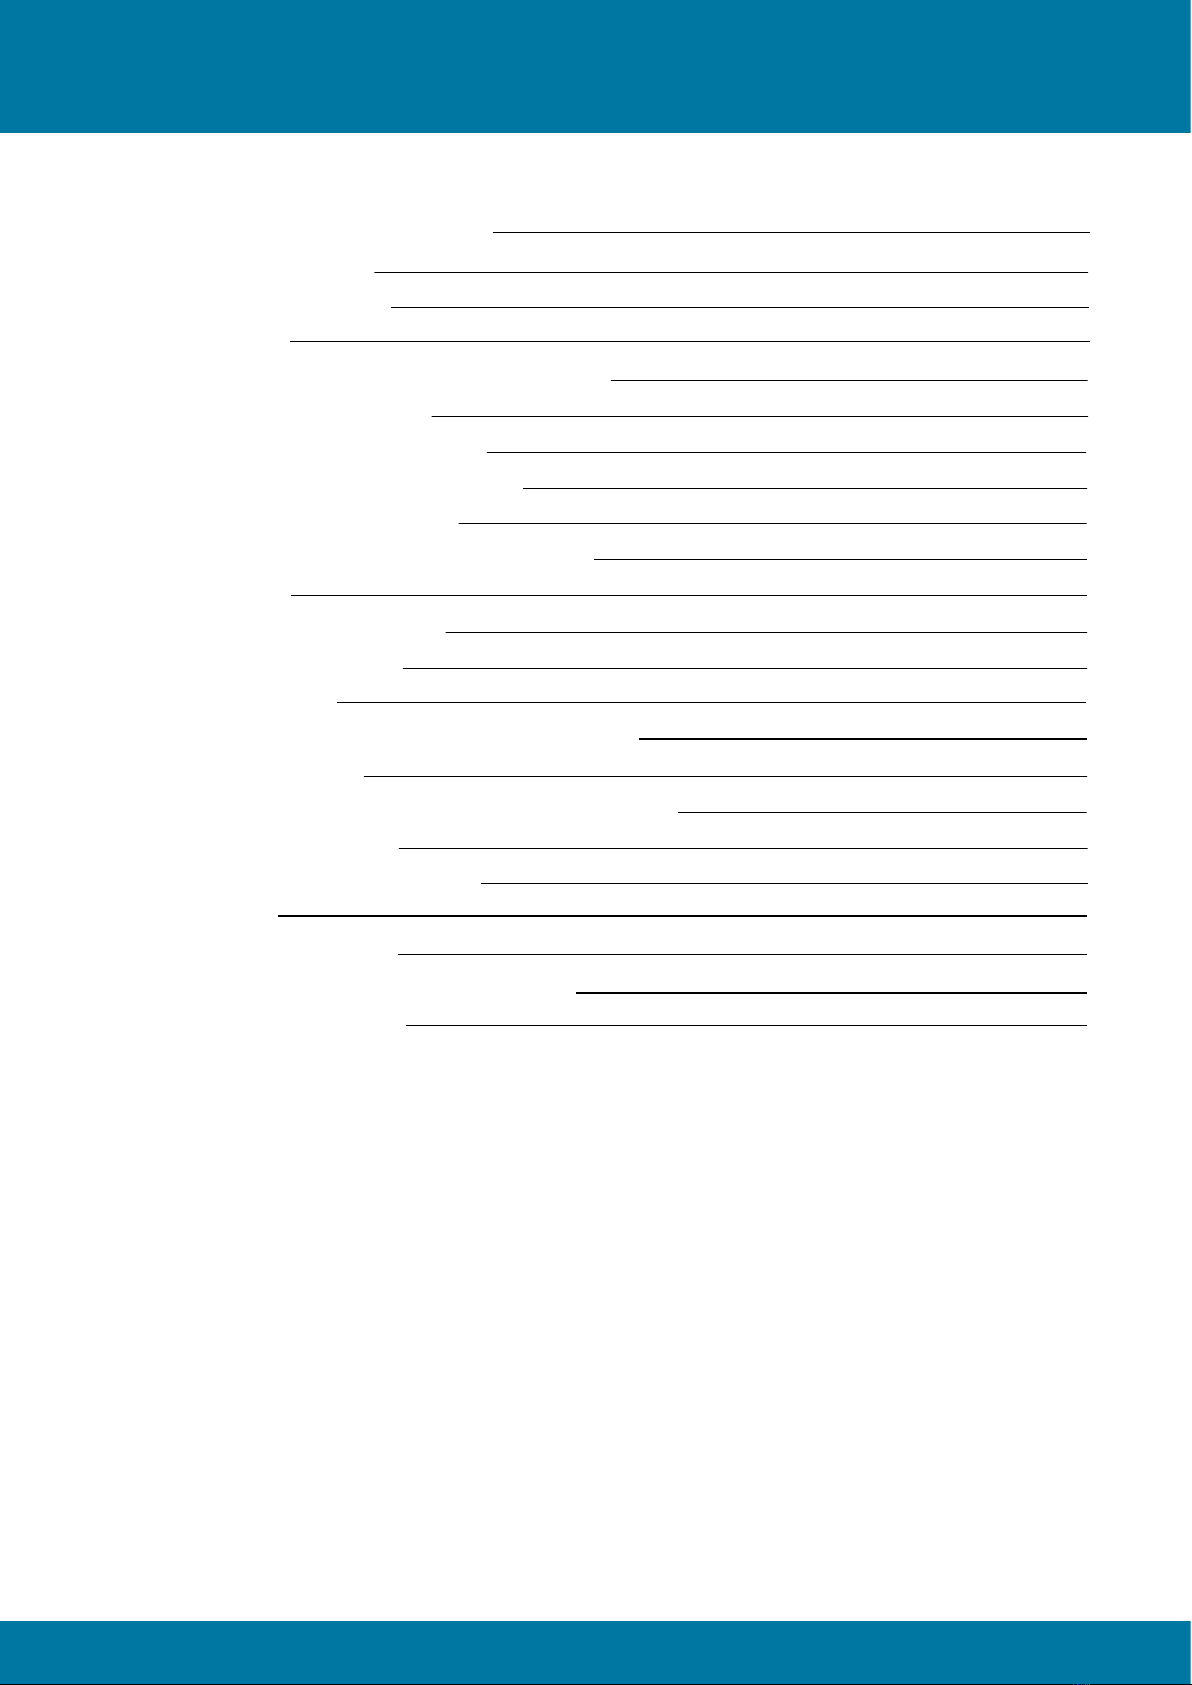
Krok 1 / Step 1:
Zamontuj kółka (20) na przednim stojaku za
pomocą śrub (19), podkładek (21) i nakrętek (22).
Install 20 to the front tube with 19, 21 and 22.
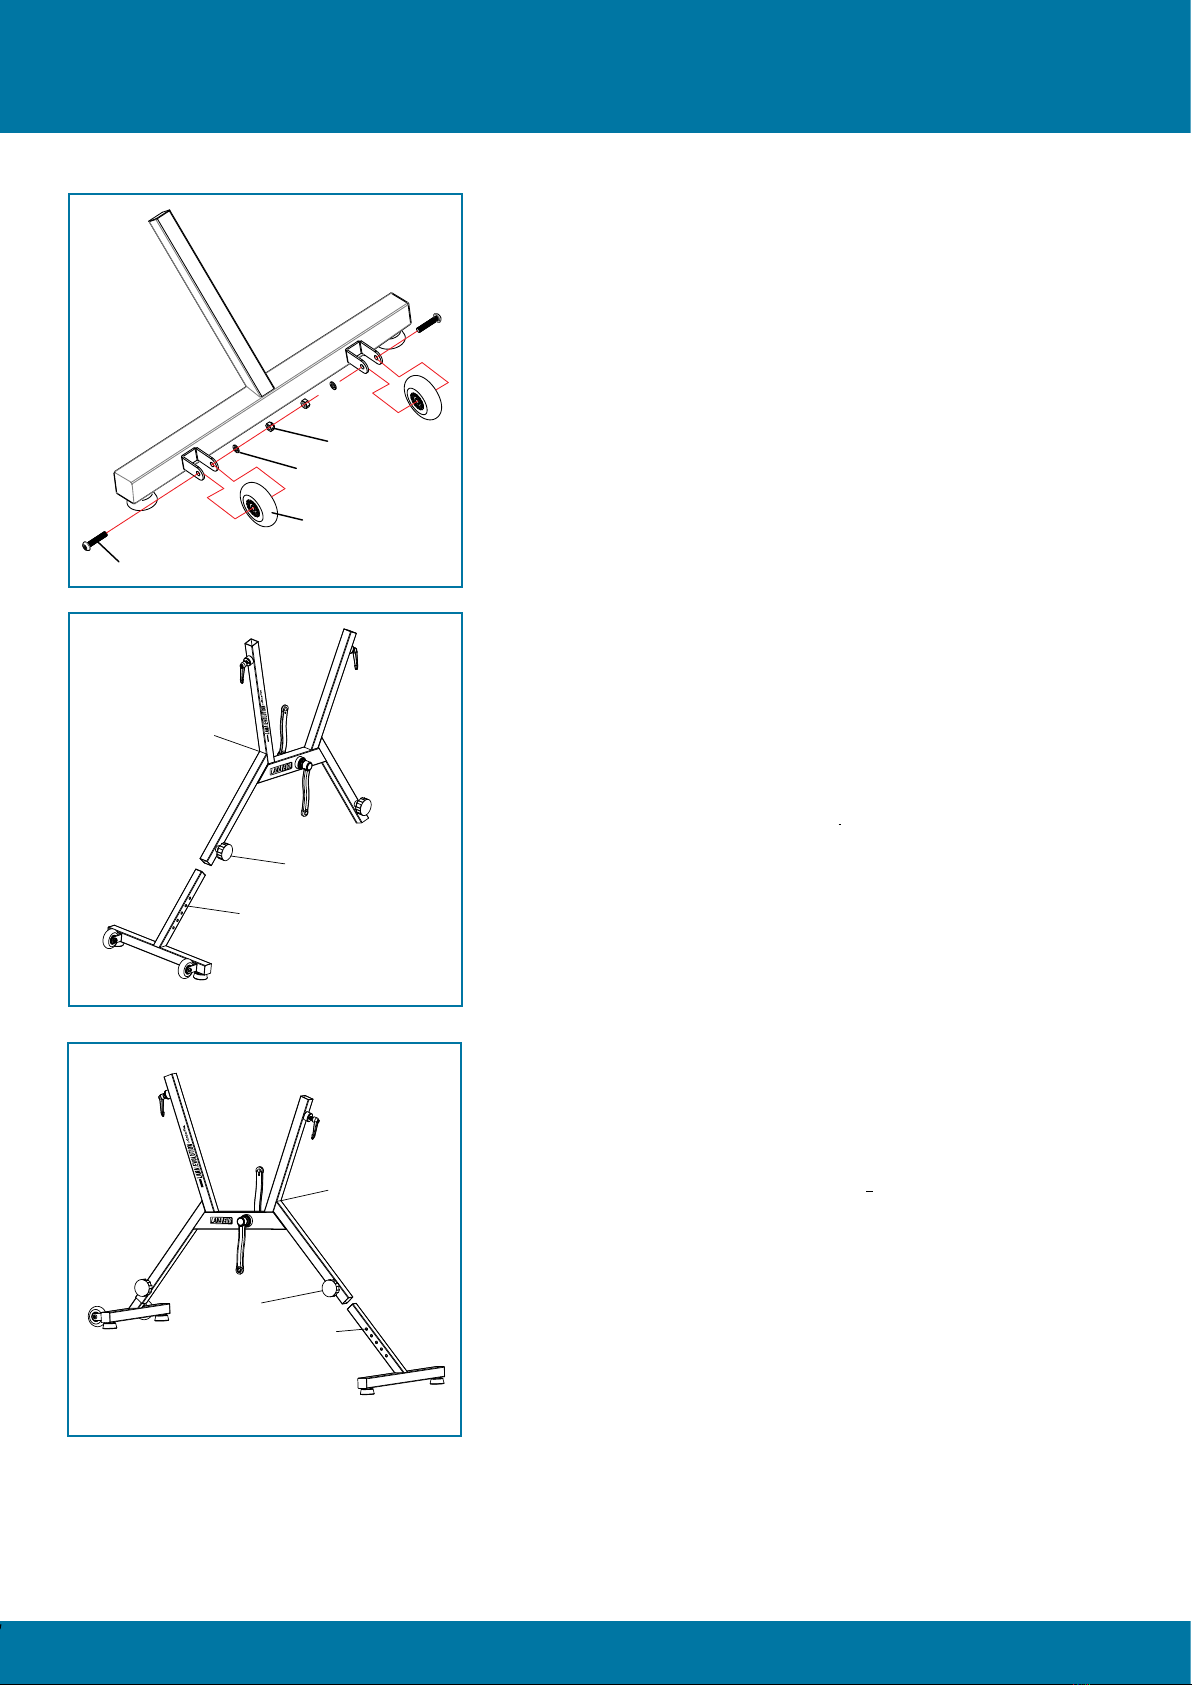
Krok 2 / Step 2:
Zamontuj przedni stojak (18) w ramie głównej (23) po stronie
logo, a następnie wyreguluj go za pomocą pokrętła (17).
Install the front foot tube (18) onto the main frame (23)
logo side, then adjust it with knob (17).
Krok 3 / Step 3:
Zamontuj tylny stojak (13) w ramie głównej (23), a następnie
wyreguluj go za pomocą pokrętła (17).
Install the back foot tube (13) onto the main frame (23),
then adjust it with knob (17).
20
21 22
19
2
14
14
13
13
14
14
3
9
9
4
5
19
6
16
16
15
15
17
17
18
10 11 12 12 11
10
20
21
22
23
25
25
25
25
26
26
27
27
28
28
27
27
28
28
29
29
8
7
7
24
24
23
18
17
23
6
10
3
15
15
3
30 31 14
14
2
14
14
13
13
14
14
3
9
9
4
5
19
6
16
16
15
15
17
17
18
10 11 12 12 11
10
20
21
22
23
25
25
25
25
26
26
27
27
28
28
27
27
28
28
29
29
8
7
7
24
24
23
18
17
13
17
23
23
6
10
3
15
15
3
30 31 14
14

7
Montaż / Installation
Krok 4 / Step 4:
Zamontuj kierownicę (2) w ramie głównej (23), a
następnie wyreguluj jej położenie za pomocą uchwytu
„Click-and-turn” (10).
Install handlebar tube (2) onto the main frame (23), then
adjust their position with the «Click-and-turn» handle (10).
Krok 5 / Step 5:
Zamontuj rurę podsiodłową (6) w ramie głównej (23), a
następnie wyreguluj jej położenie za pomocą uchwytu
„Click-and-turn” (10).
Install seat tube (6) onto the main frame (23), then adjust
their position with the «Click-and-turn» handle (10).
Installation / Installation
2
14
14
13
13
14
14
3
9
9
4
5
19
6
16
16
15
15
17
17
18
10 11 12 12 11
10
20
21
22
23
25
25
25
25
26
26
27
27
28
28
27
27
28
28
29
29
8
7
7
24
24
23
18
17
13
17
23
2
23
6
10
3
15
3
30 31 14
2
14
14
13
13
14
14
3
9
9
4
5
19
6
16
16
15
15
17
17
18
10 11 12 12 11
10
20
21
22
23
25
25
25
25
26
26
27
27
28
28
27
27
28
28
29
29
8
7
7
24
24
23
18
17
13
17
23
2
10
23 23
6
10
3
15
15
3
30 31 14
14
Krok 6 / Step 6:
Odkręć przeciwnakrętki (15) na wstępnie
zamontowanych pedałach.
Unscrew the locknuts against (13) pre-mounted pedals.
15
12
UWAGA: Aby zapobiec
obrażeniom, wyrównaj uchwyt
„Click-and-turn” z ramą.
(Patrz rysunek)
WARNING: To prevent injuries,
align the click-and-turn with the frame. (See picture above)
23
10

8
Montaż / Installation
2
14
14
13
13
14
14
3
9
9
4
5
19
6
16
16
15
15
17
17
18
10 11 12 12 11
10
20
21
22
23
25
25
25
25
26
26
27
27
28
28
27
27
28
28
29
29
8
7
7
24
24
23
18
17
13
17
23
2
10
23 23
6
10
3
15
15
3
30 31 14
14
A
LEWY/LEFT
Krok 7 / Step 7:
Przymocuj pedały (3) do korb (14) za pomocą
przeciwnakrętek (15).
Lock the pedals (3) on the cranks (14) with the lock-nuts
(15).
Krok 8 / Step 8:
Do lewego pedału A (z korbą A) nakrętka jest
przykręcana w kierunku przeciwnym do ruchu
wskazówek zegara, a przeciwnakrętka zgodnie z ruchem
wskazówek zegara.
To the left pedal A (with crank A) the nut is screwed
clockwise and against the lock-nut in the direction
clockwise.
Krok 9 / Step 9:
Do prawego pedału B (z korbą B) nakrętka jest
przykręcana zgodnie z ruchem wskazówek zegara, a
przeciwnakrętka w kierunku przeciwnym do ruchu
wskazówek zegara.
For the right pedal B (with crank B) the nut is screwed in
the anti-clockwise and against the lock-nut anti-
clockwise.
B
PRAWY/RIGHT

9
Installation / Installation
Pokrętło regulacji wysokości / Height adjustment knob:
Aby zmienić wysokość rowerka treningowego, pociągnij okrągłe
pokrętło regulacji wysokości, aby je odblokować. Wyreguluj
wysokość rowerka, a następnie ustaw pokrętło regulacji
wysokości w pierwotnym położeniu i mocno je dokręć.
To modify the height of your aquabike, unscrew and pull the round
adjustment knob to unlock the bike leg. Then adjust the length
and let the adjustment knob come back in position and screw it
irmly.
Pedał Aqua o podwójnej prędkości / Aqua double speed
pedal: Te ultrainnowacyjne pedały zostały wykonane według
nowej technologii w celu zwiększenia oporu dla zwiększenia
aktywności sportowej. Składane pedały zapewniają idealny opór
podczas rozgrzewki. W celu zwiększenia intensywności treningu
rozłóż pedały, aby zwiększyć powierzchnię kontaktu z wodą. W
ten sposób możesz podwoić swoje wysiłki.
Aby użyć dodatkowego oporu, naciśnij zatrzask z boku i
przesuń składaną część na przeciwną stronę, a następnie
zwolnij zatrzask.
These ultra-innovative pedals use a new technology, to increase
resistance for even more sport. The lateral valve folded under
the pedal offers ideal resistance for warming up. Toboost
your training, unfold the valve in order to widen the area in
contact with the water. This way you can double your effort.
To use the extra-resistance, push the latch on the side and toggle
the ap on the opposite side, and release the latch.
C
B r e v e t é
C
P a t e n t e d
1
2
Montaż / Installation

10
Garantie / Warranty
Porady dotyczące treningu / Training advices
Przed i po treningu
Exercises instructions
1. Rozgrzewka /The Warm Up Phase
Ten etap pomaga przyspieszyć krążenie krwi w ciele i sprawia, że mięśnie pracują prawidłowo.
Zmniejszy to również ryzyko skurczów i urazów mięśni. Zaleca się wykonanie kilku ćwiczeń
rozciągających. Każde ćwiczenie należy wykonywać przez około 30 sekund. Na tym etapie nie
przeciążaj mięśni, a jeśli poczujesz ból, natychmiast przerwij ćwiczenie.
This stage helps get the blood lowing around the body and the muscles working properly. It will
also reduce the risk of cramp and muscle injury. It is advisable to do a few stretching exercises as
shown below. Each stretch should be held for approximately 30 seconds, do not force or jerk your
muscles into a stretch – if it hurts, STOP.
2. Po treningu / The Cool Down Phase
Ten etap ma na celu rozluźnienie układu sercowo-naczyniowego i mięśni. Powtórz ćwiczenia
rozgrzewkowe bez obciążenia mięśni.
This stage is to let your Cardio-vascular System and muscles wind down. This is a repeat of the
warm up exercise e.g. reduce your tempo. The stretching exercises should now be repeated,
again remembering not to force or jerk your muscles into the stretch.
Z czasem może być konieczne trenowanie dłużej i intensywniej. Wskazane jest, aby trenować co
najmniej trzy razy w tygodniu i w miarę możliwości równomiernie rozłożyć treningi na cały tydzień.
As you get trained you may need to train longer and harder. It is advisable to train at least
three times a week, and if possible space your workouts evenly throughout the week.
3. Jeszcze jedna rzecz / One more thing
Szukasz porady dotyczącej korzystania z rowerka basenowego? Oto link:
You’re looking for advice for your aquabike use? One link:
www.waterex.fr/page/youtube

11
Twój produkt Waterflex jest objęty gwarancją na wszelkie wady produkcyjne; 2 lata na ramę
metalową; 6 miesięcy na części zużywające się zgodnie z poniższymi warunkami. Niniejsza
gwarancja rozpoczyna się od daty wystawienia faktury.
Gwarancja traci ważność w przypadku naprawy urządzenia przez osobę nieupoważnioną przez
firmę Waterflex. Wadliwe części powinny zostać zwrócone do firmy Waterflex w okresie
gwarancyjnym, aby zostały objęte gwarancją. Gwarancja nie obejmuje kosztów robocizny, kosztów
nieautoryzowanej wymiany ani kosztów transportu odpowiednich części.
Your Waterflex product is guaranteed against any manufacturing defect; 2 years for the metallic
frame; 6 months for the wear and tear parts in accordance with the terms below. This warranty runs
from the date of the invoice.
The warranty is rendered null and void in the event of a repair carried out to the equipment by a
person not approved by Waterflex. Faulty parts must be returned to Waterflex within the warranty
period in order to be covered. The warranty does not cover labor, the cost of unauthorized
replacement, or the cost of transporting the parts in question.
Gwarancja nie obejmuje następujących przypadków /The following are expressly excluded
from the warranty :
-Wadliwe działanie lub uszkodzenia wynikające z używania nieautoryzowanych akcesoriów.
-Malfunction or damage arising from the use of unauthorized accessories.
-Uszkodzenia spowodowane montażem lub naprawą z naruszeniem zasad bezpieczeństwa.
-Damage resulting from the installation or a repair which does not comply with the safety instructions.
-Usterka lub uszkodzenie wynikające z niewłaściwego środowiska chemicznego w basenie.
-Malfunction or damage resulting from the improper chemical environment in the pool.
-Wady spowodowane wypadkami, nieprawidłowym lub niewłaściwym użytkowaniem (uderzenia,
kontakt z produktami chemicznymi itp.), modyfikacjami, a także w wyniku normalnego zużycia
produktu.
-Defects resulting from accidents, incorrect or unreasonable use (impact, contact with chemical
products, inappropriate handling), alteration as well as the consequences of the normal wear and
tear of the product.
Za części szybko zużywające się są uważane: pedały (piankowe ochraniacze i paski), kółka,
silikonowe nóżki, uchwyty „click and turn”, pokrętło regulacji wysokości, nasadki ochronne,
anoda, uchwyt na butelkę.
Are considered wearing parts: pedals (foam protection and straps), wheels, silicone feet,
handles «click and turn», adjustment knob, protection plugs, anode, bottle holder.
Gwarancja / Warranty
Opakowanie powinno być utrzymywane w idealnym stanie przez cały okres obowiązywania
gwarancji. Gwarancja traci ważność w przypadku nieprzestrzegania tej klauzuli.
The shipping box must be kept in perfect condition throughout the duration of the warranty. The
warranty becomes void if failure to comply with this clause.

Waterflex est une marque du groupe Poolstar
www.poolstar.fr
Conseils
www.waterflex.fr
Assistance / SAV
http://support.waterflex.fr
Other manuals for LanaBike Evo
2
Other Waterflex Exercise Bike manuals


