Waterpik Waterflosser WP-150 Series User manual

Irrigador bucal
Waterpik®
Modelo
WP-150/152
.................
www.waterpik.com
Waterpik®
Water Flosser
Model WP-150/152
I
O
1
•
2
•
3
•
4
•
5
•
6
•
7
•
8
•
9
•
1
0
ON
OFF

2
Important Safeguards 3
Product Description 5
Getting Started 6
Cleaning and Troubleshooting Your Waterpik®Water Flosser 8
Limited Three-Year Warranty 9
TABLE OF CONTENTS

ENGLISH
3
IMPORTANT SAFEGUARDS
IMPORTANT
SAFEGUARDS
When using electrical products, especially when
children are present, basic safety precautions
should always be followed, including the
following:
READ ALL INSTRUCTIONS
BEFORE USING.
DANGER:
To reduce the risk
of electrocution:
• Always unplug product after using.
• Do not handle plug with wet hands.
• Do not place in or drop into water or
other liquid.
• Do not use while bathing.
• Do not place or store product where it can fall
or be pulled into a tub or sink.
• Do not reach for a product that has fallen into
water. Unplug immediately.
• Check the power supply cord for damage before
the first use and during the life of the product.
WARNING:
To reduce the risk of burns,
electrocution, fire, or injury
to persons:
• Do not plug this device into a voltage system
that is different from the voltage system
specified on the device or charger. Use with
improper voltage will damage product
and VOID warranty.
• If product is opened/disassembled for ANY
reason, warranty is VOID.
• Do not use this product if it has a damaged
cord or plug, if it is not working properly, if
it has been dropped or damaged, or dropped
into water. Contact Water Pik, Inc. or your local
distributor which can be found at
www.waterpik.com.
• Do not direct water under the tongue, into the
ear, nose or other delicate areas. This product
is capable of producing pressures that may
cause serious damage in these areas.
• Do not direct water into the nose or ear.
The potentially deadly amoeba, Naegleria
fowleri, may be present in some tap water or
unchlorinated well water and may be fatal if
directed into these areas.
• Use this product only as indicated in these
instructions or as recommended by your
dental professional.

4
• Only use tips and accessories recommended
by Water Pik, Inc.
• Do not drop or insert any foreign object into any
opening or hose.
• Keep electrical cord away from heated surfaces.
• Do not use outdoors or operate where aerosol
(spray) products are being used or where
oxygen is being administered.
• Do not use iodine or water insoluble
concentrated essential oils in this product.
Use of these can reduce performance and will
shorten the life of the product.
• Fill reservoir with water or other dental
professional recommended solution only.
• Remove any oral jewelry prior to use of
this product.
• Do not use if you have an open wound on your
tongue or in your mouth.
• If your physician or cardiologist has advised
you to receive antibiotic premedication before
dental procedures, you should consult your
dentist before using this instrument or any
other oral hygiene aid.
• Close supervision is necessary when this
product is used by, on or near children
or invalids.
• If the Pik Pocket™tip (not included in all
models) separates from the shaft for any
reason, discard tip and shaft and replace with
new Pik Pocket™tip.
• Do not use this product for more than
5 minutes in each two-hour period.
• Children should be supervised to ensure that
they do not play with the appliance.
• This appliance has a polarized plug (one blade
is wider than the other). As a safety feature, this
plug is intended to fit into a polarized outlet
only one way. If the plug does not fit fully into
the outlet, reverse the plug. If it still does not fit,
contact a qualified electrician. Do not attempt to
modify the plug in any way.
SAVE THESE INSTRUCTIONS

ENGLISH
5
I
O
1
•
2
•
3
•
4
•
5
•
6
•
7
•
8
•
9
•
1
0
ON
OFF
Reservoir
Reservoir
valve
Reservoir cover w/
tip storage
Tip
Handle
Water On/
O switch
Pressure
control dial
Power
On/O
Tip
eject button
Rotating
direction
control knob
Base
PRODUCT DESCRIPTION

6
GETTING STARTED
Powering the Unit
Plug the cord into an electrical outlet. If the outlet is
controlled by a wall switch, be sure it is turned on.
Preparing the Reservoir
Lift the reservoir lid, remove the reservoir, and fill
with lukewarm water. Replace the reservoir over the
base and press down firmly and close the lid.
Plaque Seeker
®
Tip BEST FOR
Toothbrush Tip BEST FOR
BEST FOROrthodontic Tip
General Use
General Use
Braces
BEST FORPik Pocket™ Tip
Periodontal Pockets
Furcations
Classic Jet TipBEST FOR
Tongue Cleaner BEST FOR
General Use
Fresher Breath
Replace Every 6 MonthsReplace Every 3 Months
Implants
Crowns
Bridges
Retainers
General Use
Inserting and Removing Tips
Insert tip into the
center of the Water
Flosser handle,
pressing down firmly
until the tip clicks into
place. The colored ring
will be flush with the top
of the handle if the tip
is correctly locked
into place. To remove tip
from the handle push the
tip eject button on the
handle.
NOTE: All tips not included in all models.
Replacement tips/attachments may be purchased
online at www.waterpik.com, or by phone from
Water Pik, Inc. at 1-800-525-2774 (USA). To find
detailed information about tips, other accessories,
and product usage please visit our website at
www.waterpik.com.
Fill
I
O
1
•
2
•
3
•
4
•
5
•
6
•
7
•
8
•
9
•
1
0
ON
OFF
Remove
NO
gap
ON
OFF
Tip
release
button

ENGLISH
7
Prime Unit (First Time Use Only)
Set pressure control dial on base to high (pressure
setting No.10), point the handle and tip into sink.
Turn power and water ON until water flows from
the tip. Turn unit OFF.
Adjusting the Pressure Setting
Turn the pressure control dial on the base of the
unit to the lowest setting (pressure setting No.1)
for first-time use. Gradually
increase pressure over
time to the setting you
prefer – or as instructed by
your dental professional.
Using the Water Flosser
Always place the tip in your mouth before
turning the water ON. With water switch on
handle in OFF position, turn power on. Lean over
sink and slightly close lips enough
to prevent splashing while still allowing
water to flow from mouth into
the sink. Turn water
switch ON.
When finished, turn water
switch and power OFF.
During use you can stop the
flow of water by sliding the
water switch on handle to the
OFF position.
NOTE: Motor will continue
to run.
Recommended Technique
For best results,
start with back teeth
and work toward the
front teeth. Direct the
stream at a 90-degree angle to your gumline with
tip in mouth. Glide tip along gumline and pause
briefly between teeth. Continue until you have
cleaned the inside and outside of both the upper
and lower teeth.
When Finished
Turn the unit off. Empty any liquid left in the
reservoir.
Note: If you used mouthwash or other solution
besides water, see “Using Mouthwash and Other
Solutions” section on page 8.
I
O
1
•
2
•
3
•
4
•
5
•
6
•
7
•
8
•
9
•
1
0
Low
I
O
1
•
2
•
3
•
4
•
5
•
6
•
7
•
8
•
9
•
1
0
ON
OFF
ON
OFF
Water
OFF
ON
OFF
I
O
1
•
2
•
3
•
4
•
5
•
6
•
7
•
8
•
9
•
1
0
ON
High
Water
ON

8
should not bend) massage the brush back and
forth with very short strokes – much like you
would with a manual toothbrush.
Plaque SeekerTip
To use the Plaque
Seeker®Tip, place
the tip close to the
teeth so that the
bristles are gently touching the teeth. Gently glide
tip along gumline, pausing briefly between teeth to
gently brush and allow the water to flow between
the teeth.
Using Mouthwash and
Other Solutions
Your Waterpik®Water Flosser can be used to
deliver mouthwash and antibacterial solutions.
After using any special solution, rinse unit to
prevent clogging by partially filling reservoir with
warm water and running unit with tip pointed into
sink until unit is empty.
Cleaning
Before cleaning, unplug from the electrical outlet.
Clean the product when necessary by using a soft
cloth and mild non-abrasive cleanser.
The water reservoir is removable for easy cleaning
and is top rack dishwasher safe.
NOTE: Remove reservoir valve by pushing up
from bottom of reservoir, before placing reservoir
in dishwasher.
CLEANING AND TROUBLESHOOTING YOUR WATERPIKWATER FLOSSER
Remove Replace
TIP USAGE
Pik Pocket™ Tip
The Pik Pocket™Tip is
specifically designed to deliver
water or anti-bacterial solutions
deep into periodontal pockets.
To use the Pik Pocket™
Tip, set the unit to
the lowest pressure
setting. Place the soft tip
against a tooth at a 45-degree angle and gently place
the tip under the gumline, into the pocket. Turn the
unit on and continue tracing along the gumline.
Tongue Cleaner Tip
To use the tongue cleaner tip,
set to lowest pressure setting,
place tip in the center/middle
of your tongue about half
way back and start the Water
Flosser. Pull forward with light
pressure. Increase pressure as
you prefer.
Orthodontic Tip
To use the Orthodontic
Tip, gently glide tip along
gumline, pausing briefly to
lightly brush area between
teeth and all around orthodontic bracket, before
proceeding to the next tooth.
Toothbrush Tip
Place the toothbrush
tip in mouth with
the brush head on
the tooth at the gum
line. The toothbrush tip can be used with or without
toothpaste. Turn the Water Flosser on so water flows
through the tip. Using a light pressure (bristles

ENGLISH
9
Removing Hard Water Deposits/
General Cleaning
Hard water deposits may build up in your unit,
depending on the mineral content of you water.
If left unattended, it can hinder performance.
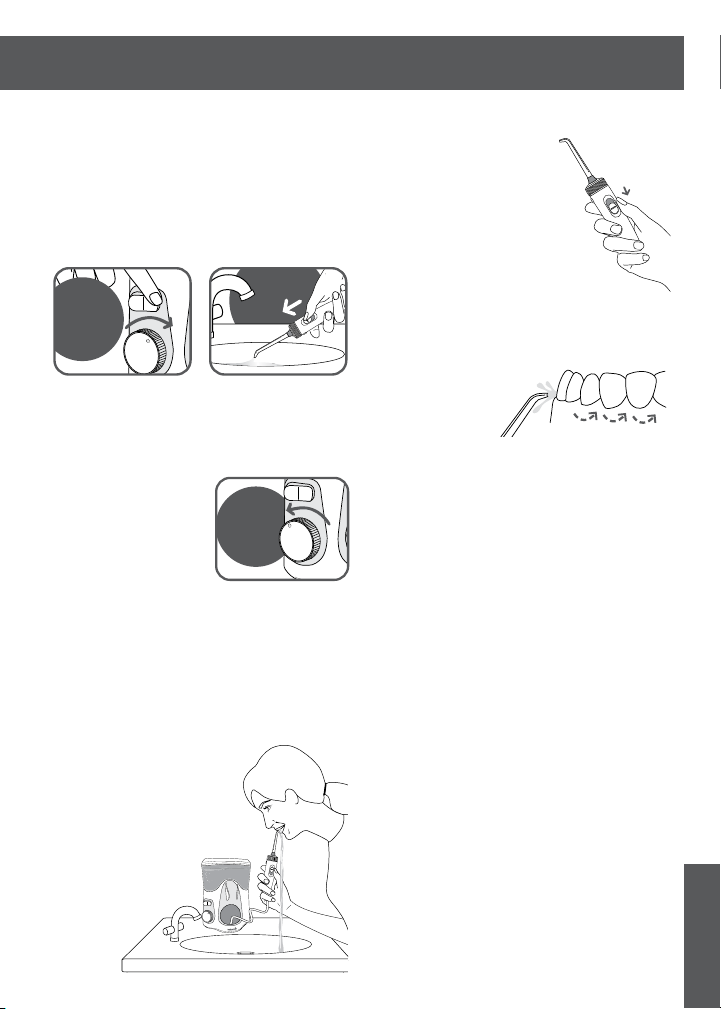
Cleaning internal parts: add 2 tablespoons of white
vinegar to a full reservoir of warm water. Point the
handle and tip into sink. Turn unit ON and run until
reservoir is empty. Rinse by repeating with a full
reservoir of clean warm water.
This process should be done every 1 to 3 months
to ensure optimal performance.
Leakage
If leaking due to a damaged hose, replacement
hoses and handles can be purchased at
www.waterpik.com or contact Water Pik Inc.
customer service for a self service repair kit.
If leakage occurs from the reservoir,
ensure the valve is right side up or
contact Water Pik Inc. customer service
for
a replacement valve.
Service Maintenance
Waterpik®Water Flossers have no consumer-
serviceable electrical items and do not require
routine service maintenance. For all parts and
accessories go to www.waterpik.com. You may
also call our toll-free customer service number at
1-800-525-2774 (
USA).
Refer to the serial and model numbers
in all correspondence. These numbers are located
on the bottom of your unit.
Still have questions? Go to www.waterpik.com.
LIMITED THREE-YEAR WARRANTY
Water Pik, Inc. warrants to the original consumer
of this new product that it is free from defects in
materials and workmanship for 3 years from the
date of purchase. Consumer will be required
to submit the original purchase receipt as
proof of purchase date and if requested,
the entire product, to support a warranty
claim. Water Pik, Inc. will replace at its discretion
any part of the product, which in its opinion is
defective, provided the product has not been
abused, misused, altered or damaged after
purchase, was used according to instructions, and
was used only with accessories or consumable
parts approved by Water Pik, Inc.
Installation is the responsibility of the consumer
and is not covered by the warranty. This limited
warranty excludes accessories or consumable
parts such as tips, etc. Use with improper
voltage will damage product and VOID
warranty.
This warranty gives you specific legal rights. You
may also have other rights that vary, depending on
the law in your place of residence.

10
ÍNDICE
Medidas de seguridad importantes 11
Descripción del producto 13
Introducción 14
Cómo limpiar y reparar su irrigador bucal de Waterpik®17
Garantía limitada de tres años 18

11
ESPAÑOL
MEDIDAS DE SEGURIDAD IMPORTANTES
MEDIDAS DE
SEGURIDAD
IMPORTANTES
Al utilizar productos eléctricos -especialmente
cuando hayan niños presentes- se deben seguir
siempre las precauciones básicas de seguridad,
incluida la siguiente:
LEA TODAS LAS INSTRUCCIONES
ANTES DE USARLO.
PELIGRO:
Para reducir el riesgo de
electrocución:
• Desconecte siempre el producto después
de usarlo.
• No manipule el enchufe con las manos mojadas.
•
No coloque el aparato ni lo sumerja en agua ni
otro líquido.
• No lo utilice mientras se baña.
• No coloque ni guarde el producto en donde
pudiera caerse o jalarse dentro de una tina
o lavabo.
•
No introduzca la mano para sacar un producto
que se haya caído en agua.
Desconéctelo
inmediatamente.
• Revise el cable de alimentación eléctrica para
detectar cualquier daño antes de usarlo y
durante la vida útil del producto.
ADVERTENCIA:
Para reducir el riesgo de
quemaduras, electrocución,
incendio o lesiones a personas:
• No enchufe este aparato en un sistema de
voltaje que sea diferente al especificado en
el aparato o el cargador. Si se usa con el
voltaje incorrecto, se dañará el producto
y la garantía se ANULARÁ.
• Si se abre/desarma el producto por
CUALQUIER razón, la garantía se ANULARÁ.
• No use este producto si tiene un cable o
enchufe dañado, si no está funcionando
correctamente, si se ha caído o dañado, o si se
ha caído en el agua. Póngase en contacto con
Water Pik, Inc. o con su distribuidor local que
puede encontrar en www.waterpik.com.
• No dirija el chorro de agua hacia abajo de la
lengua, hacia dentro de los oídos o a otras
áreas delicadas. Este producto es capaz de
producir presiones que pueden causar graves
daños en esas áreas.
• No dirija el agua dentro de la nariz ni del oído.
La amiba Naegleria fowleri, potencialmente
mortal, puede estar presente en cierto tipo de
agua del grifo o en agua de pozo que no ha sido
tratada con cloro, y puede ser fatal si se dirige
hacia estas áreas.
• Utilice este producto únicamente como se
indica en estas instrucciones o como lo
recomiende su dentista profesional.

12
• Utilice únicamente los cabezales y accesorios
recomendados por Water Pik, Inc.
• No deje que se caiga ni inserte ningún objeto
extraño en ninguna abertura o manguera.
• Mantenga el cable de electricidad alejado de
superficies calientes.
• No use el aparato al aire libre ni lo utilice donde
se estén usando productos en aerosol (espray),
o donde se administre oxígeno.
• No use yodo ni aceites esenciales
concentrados insolubles en agua con este
producto. El uso de estas sustancias puede
reducir el rendimiento del producto y acortará
la vida útil de este.
• Llene el depósito solamente con agua u
otras soluciones dentales recomendadas por
profesionales.
• Retire cualquier joya oral antes de usar este
producto.
• No lo utilice si tiene alguna herida abierta en la
lengua o en la boca.
• Si su médico o cardiólogo le ha aconsejado
tomar pre-medicación antibiótica antes de
cualquier procedimiento dental, debe consultar
a su dentista antes de usar este instrumento o
cualquier otro auxiliar de higiene bucal.
• Es necesario supervisar cuidadosamente a los
niños o a personas con capacidades reducidas
cuando usen este aparato o cuando se use
cerca de ellos.
•
Si por alguna razón el cabezal Pik Pocket
™
(no
incluido con todos los modelos) se separa del
tubo, deseche el cabezal y el tubo y reemplácelos
con un nuevo cabezal Pik Pocket.
™
• No utilice este producto durante más de 5
minutos en cada periodo de dos horas.
• Los niños deben ser supervisados para
asegurarse de que no jueguen con el aparato.
• Este aparato cuenta con un enchufe polarizado
(una de las hojas es más ancha que la otra).
Como medida de seguridad, este enchufe está
diseñado para insertarse de forma única en
un tomacorriente polarizado. Si el enchufe no
encaja completamente en el tomacorriente,
invierta la posición del enchufe. Si aun así no
encaja correctamente, póngase en contacto con
un electricista calificado. No intente modificar
el enchufe de ninguna manera.
GUARDE ESTAS INSTRUCCIONES.
Control de presión

13
ESPAÑOL
I
O
1
•
2
•
3
•
4
•
5
•
6
•
7
•
8
•
9
•
1
0
ON
OFF
Perilla de
control para el
sentido del giro
Válvula del
depósito
DESCRIPCIÓN DEL PRODUCTO
Depósito
Tapa del depósito
con estuche para
cabezales
Cabezal de
inyección
Mango
Interruptor
On/O
(Encendido/
Apagado)
de agua
Control de presión
Encendido/Apagado
Botón de
expulsión del
cabezal de
inyección
Base

14
INTRODUCCIÓN
Cabezal de cepillo
de dientes
IDEAL PARA
Cabezal Plaque Seeker®
IDEAL PARA
IDEAL PARACabezal ortodóncico
Uso general
Uso general
Aparatos de
ortodoncia
IDEAL PARACabezal Pik Pocket™
Bolsas periodontales
Bifurcaciones de la raíz
Reemplazar cada 3 meses
Cabezal clásico
del irrigador
IDEAL PARA
Uso general
Cabezal limpiador
lingual
IDEAL PARA
Aliento más fresco
Reemplazar cada 6 meses
Implantes
Coronas
Retenedores
Puentes
Uso general
NOTA: No se incluyen todos los cabezales en
todos los modelos.
Los cabezales de repuesto y/o los accesorios
pueden comprarse en línea en www.waterpik.com
,
o bien por teléfono llamando a Water Pik, Inc.,
al 1-800-525-2774 (EE. UU.). Para obtener
información detallada sobre los cabezales, otros
accesorios y el uso del producto, sírvase visitar
nuestro sitio de Internet en www.waterpik.com.
Cómo encender la unidad
Enchufe el cable en una toma de corriente
estándar. Si la toma de corriente se activa con un
interruptor de pared, asegúrese de que está
en posición de encendido.
Preparación del depósito
Levante la tapa del depósito, saque el mismo
y llénelo con agua tibia. Vuelva a colocar el
depósito sobre la base, presione hacia abajo
con firmeza y cierre la tapa.
Llenar
I
O
1
•
2
•
3
•
4
•
5
•
6
•
7
•
8
•
9
•
1
0
ON
OFF
Saque

15
ESPAÑOL
Ajuste de la presión
La primera vez que lo utilice, gire el control de
la presión situado en la base de la unidad para
seleccionar la presión más baja (nivel de presión 1).
Vaya aumentado
gradualmente la presión
con el tiempo, hasta llegar
al nivel que usted prefiera o
al que le haya indicado su
dentista.
Cómo usar el Irrigador bucal Waterpik®
Siempre coloque el cabezal en la boca
antes de colocar el agua en la posición ON
(Encendido). Teniendo el interruptor de agua del
mango en la posición OFF (Apagado), encienda
el equipo. Inclínese sobre el lavabo y cierre los
labios lo suficiente para evitar salpicar mientras el
agua continúa fluyendo de la boca hacia el lavabo.
Coloque el interruptor agua en la posición
ON (Encendido). Cuando termine, coloque
el interruptor de agua y el suministro
energético en la posición OFF (Apagado).
Durante el uso, puede detener el flujo de agua
deslizando el interruptor de agua del mango hacia
la posición OFF (Apagado). NOTA: El motor
continuará funcionando.
Montaje y desmontaje de cabezales
Inserte el cabezal en
el centro del mango
del irrigador bucal,
presionando hacia abajo
con firmeza hasta que
encaje en su lugar.
El anillo de color
estará al ras con la
parte superior del
mango si el cabezal
está asegurado
correctamente en
su lugar.
Para quitar el cabezal
del mango, presione el
botón de expulsión del
mango.
Preparación de la unidad
(solamente el primer uso)
Mediante el seleccionador de presión, ubicado en
la base, seleccione una presión alta (posición N.°
10), apunte el mango y
el cabezal
hacia el lavabo.
ENCIENDA la unidad hasta que comience a fluir el
agua por el cabezal. APAGUE la unidad.
I
O
1
•
2
•
3
•
4
•
5
•
6
•
7
•
8
•
9
•
1
0
Bajo
NINGÚN
hueco
I
O
1
•
2
•
3
•
4
•
5
•
6
•
7
•
8
•
9
•
1
0
ON
OFF
ON
OFF
Agua en la
posición OFF
(Apagado)
ON
OFF
Botón
de
liberación
del cabezal
ON
OFF
I
O
1
•
2
•
3
•
4
•
5
•
6
•
7
•
8
•
9
•
1
0
ON
(Encendido)
Alto
Agua en la
posición ON
(Encendido)

16
Técnicas Recomendadas
Para obtener mejores
resultados, comience
por los dientes
posteriores y trabaje
hacia los dientes frontales. Dirija el chorro hacia
sus encías en un ángulo de 90 grados con el
cabezal en la boca. Deslice el cabezal a lo largo de
las encías y haga pausas breves entre los dientes.
Continúe hasta que haya limpiado la parte interna
y externa de los dientes superiores e inferiores.
Al acabar
APAGUE la unidad. Tire el líquido que quede para
dejar el depósito vacío.
NOTA: Si usó enjuague bucal u otra solución
además de agua, vea la sección “Uso de enjuague
bucal y otras soluciones” en la página 17.
USO DE LAS CABEZALES
Cabezal Pik Pocket™
El cabezal Pik Pocket
™
está
diseñado específicamente
para hacer llegar el agua o las
soluciones antibacteriales a las
partes profundas de la cavidad
periodontal.
Para usar el cabezal Pik
Pocket,™fije la unidad
en el ajuste más bajo
de presión. Coloque el cabezal blando contra
un diente, en un ángulo de 45 grados y coloque
suavemente el cabezal bajo la línea de la encía, en
el saco. Encienda la unidad y continúe trazando a lo
largo de la línea de la encía.
Cabezal limpiador lingual
Para usar el cabezal limpiador
lingual, fije el aparato en el
ajuste de presión más bajo,
coloque el cabezal en el
centro/medio de la lengua,
aproximadamente a la mitad
del frente hacia atrás, y encienda el irrigador
bucal. Jale hacia el frente con una ligera presión.
Aumente la presión en la medida que desee.
Cabezal ortodóncico
Para usar el cabezal
ortodóncico, deslice
suavemente el cabezal
a lo largo de las
encías, deteniéndose brevemente para cepillar
ligeramente el área entre los dientes y alrededor
del frenillo de ortodoncia, antes de continuar con
el siguiente diente.
Cabezal de cepillo de dientes
Coloque el cabezal
de cepillo de dientes
en la boca, con la
parte del cepillo en
la encía. El cabezal del cepillo puede usarse con o sin
pasta de dientes. Encienda el irrigador bucal de manera
que el agua fluya a través del cabezal. Ejerciendo
ligera presión (las cerdas no deben doblarse) haga
un masaje en cepillo hacia adelante y hacia atrás con
golpes muy cortos – casi del mismo modo que lo haría
con un cepillo de dientes manual.

17
ESPAÑOL
Cabezal Plaque Seeker
Para usar el
cabezal Plaque
Seeker,
®
colóquelo
cerca de los dientes de modo que las cerdas toquen
ligeramente los dientes. Deslice suavemente el
cabezal a lo largo de la línea de la encía, haciendo una
breve pausa entre cada diente para cepillarlo y permitir
que el agua fluya entre los dientes.
Uso de enjuague bucal y otras
soluciones
Puede utilizar su irrigador bucal Waterpik
®
para aplicar enjuagues bucales y soluciones
antibacteriales. Después de usar cualquier solución
especial, enjuague la unidad para evitar que se
obstruya; llene el depósito parcialmente con agua tibia
y ponga a funcionar la unidad con el cabezal hacia el
lavabo, hasta que se vacíe la unidad.
Limpieza
Antes de la limpieza, desenchufe el producto del
contacto eléctrico. Limpie el producto con un paño
suave y un limpiador suave no abrasivo cuando
sea necesario.
El depósito de agua es removible para una
limpieza fácil, y puede lavarse en la canasta
superior de la lavavajillas.
NOTA: Quite la válvula del depósito empujando
hacia arriba desde la parte inferior del depósito
antes de colocar el depósito en la lavavajillas.
Limpieza general/Eliminación de
depósitos de agua dura
Se pueden acumular depósitos de agua dura en
la unidad que dependerá del contenido mineral
del agua. Si no se toman medidas, se puede ver
afectado el desempeño. Limpieza de las piezas
internas: agregue 2 cucharadas de vinagre blanco
a un depósito lleno de agua tibia. Apunte el mango
y el cabezal hacia el lavabo. Encienda la unidad
y haga funcionar hasta que se vacíe el depósito.
Repita para enjuagar usando un depósito lleno de
agua tibia limpia.
Este proceso debe hacerse cada 1 a 3 meses para
asegurar un óptimo desempeño.
Fugas
Si hay fugas por una manguera dañada, se pueden
comprar mangueras y mangos de repuesto en
www.waterpik.com, o bien póngase en contacto
con el servicio al cliente de Water Pik Inc., para
obtener un juego para hacer la reparación
usted mismo.
Si se filtra el agua del depósito, asegúrese de que
la válvula esté colocada correctamente, o bien
póngase en contacto con el servicio
al cliente de Water Pik Inc., para
obtener una válvula de repuesto.
CÓMO LIMPIAR Y REPARAR SU IRRIGADOR BUCAL DE WATERPIK
Saque Vuelva a colocar

18
Water Pik, Inc. garantiza al comprador original de
este nuevo producto, que está libre de defectos de
materiales y mano de obra, durante 3 años a partir
de la fecha de compra. El consumidor deberá
presentar el recibo original de compra
como comprobante de la fecha de compra y
encaso de ser solicitado, todo el producto,
a los fines de respaldar el reclamo de
garantía. Water Pik, Inc. reemplazará a su
discreción cualquier parte del producto que sea
defectuosa según nuestra opinión, siempre y
cuando el producto no haya sido objeto de abuso,
uso indebido, alteración o daños después de
la compra, que se haya usado de acuerdo a las
instrucciones y que se haya usado solamente con
los accesorios o las piezas de consumo aprobadas
por Water Pik, Inc. El consumidor es responsable
de la instalación, la cual no está cubierta por la
garantía. Esta garantía limitada excluye accesorios
y piezas consumibles como cabezales, etc. Si se
usa con el voltaje incorrecto, se dañará el
producto y la garantía se ANULARÁ.
Esta garantía le otorga derechos legales
específicos. Es posible que usted tenga también
otros derechos diferentes que varían según la
legislación de su lugar de residencia.
GARANTÍA LIMITADA DE TRES AÑOS
Servicio de mantenimiento
Los irrigadores bucales Waterpik®no contienen
elementos que puedan ser reparados por
el consumidor y no requieren servicio de
mantenimiento rutinario. Para ver todos los
accesorios, visite www.waterpik.com. También
puede llamar a nuestros números gratuitos al
1-800-525-2774 (EE. UU.).
Haga referencia al número de serie y de modelo en
toda su correspondencia. Podrá encontrar estos
números en la parte inferior de su unidad.
¿Todavía tiene preguntas? Vaya a www.waterpik.com.

19
ESPAÑOL
Other manuals for Waterflosser WP-150 Series
5
This manual suits for next models
1
Table of contents
Languages:
Other Waterpik Medical Equipment manuals