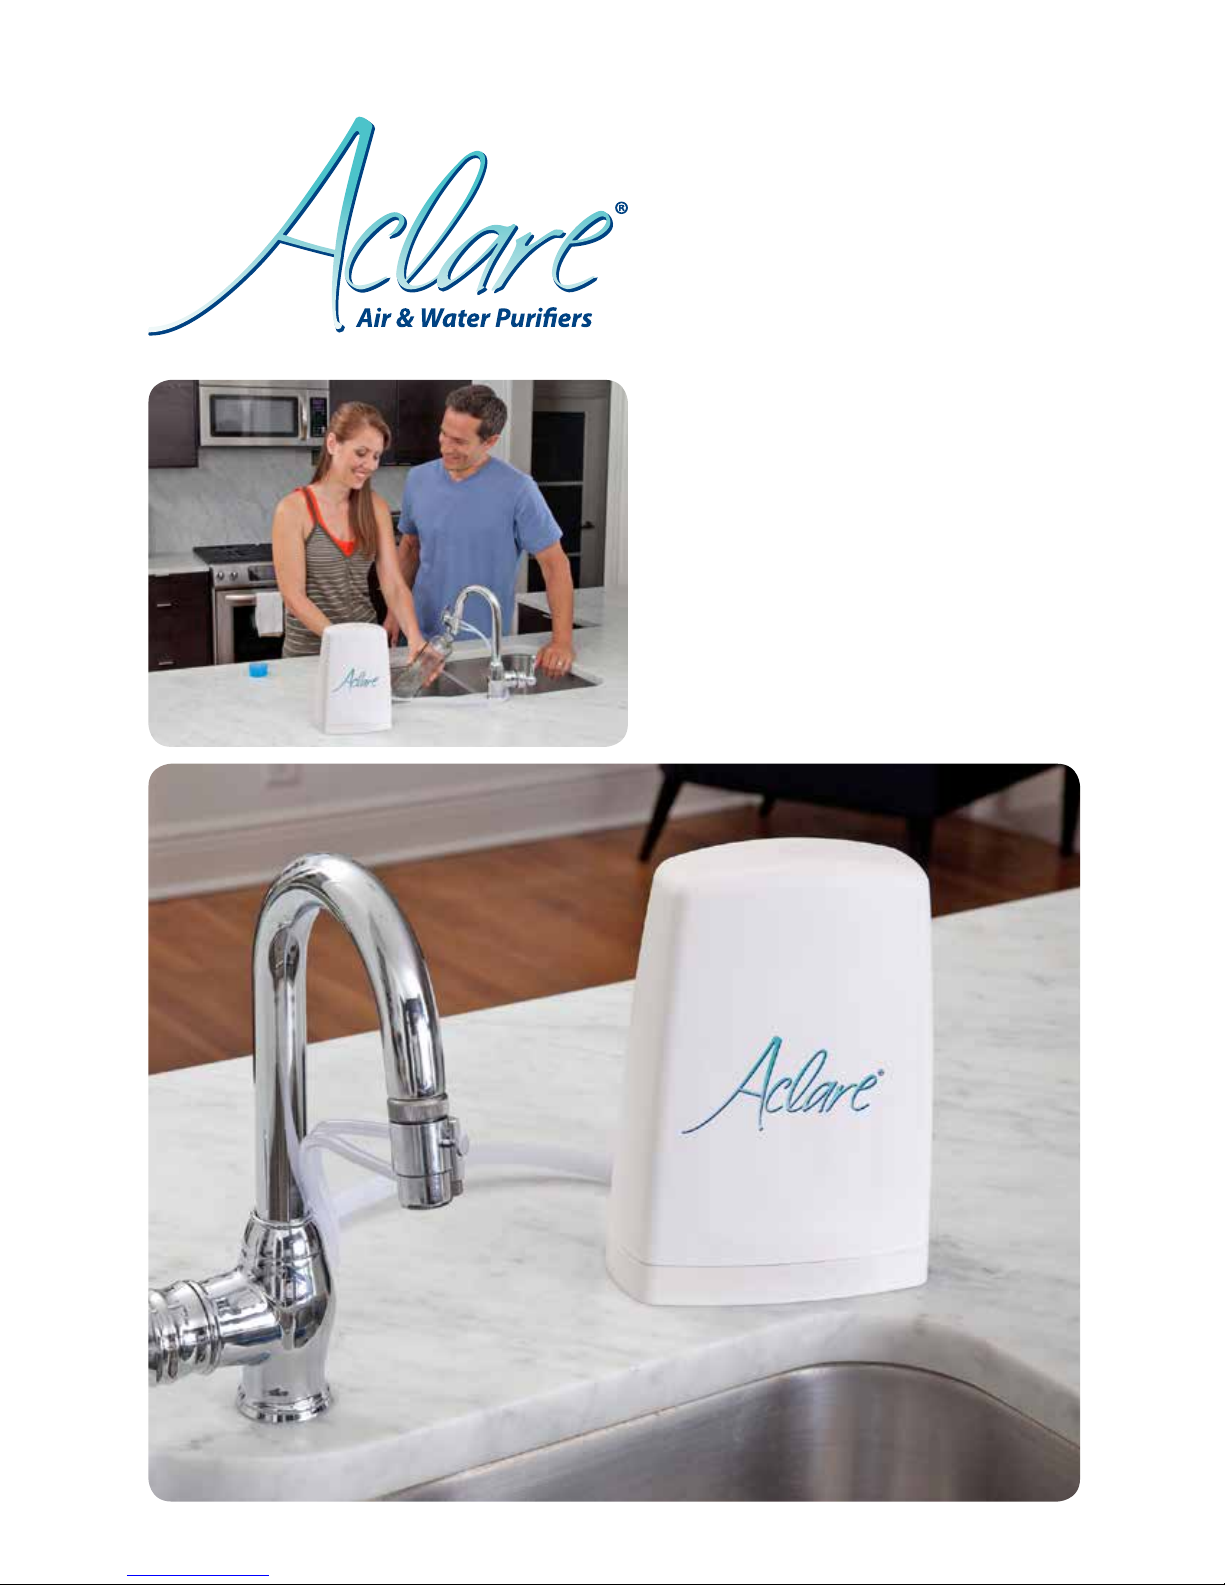
Waterwise Aclare Countertop User manual
Installation
Instructions
Aclare Countertop
Water Filter System
OWNER’S LIMITED WARRANTY
Waterwise warrants, to the original purchaser, this product against defects in ma-
terials and/or workmanship, for a period of one (1) year from the date of purchase.
Defects or failures due to shipping/handling, incorrect installation, improper use
or maintenance, including abuse or neglect, accidents, alterations or modifica-
tions, or unauthorized repair are specifically excluded from this warranty. No
dealer, distributor, agent, representative, or other person is authorized to extend
or expand this warranty.
Waterwise is not responsible or liable for personal injury, property damage, or
incidental or consequential damages arising out of, or in connection with, the use
or performance of the product or other damages with respect to loss of use, or
costs of removal, installation, or reinstallation.
Waterwise will, at its option, replace or repair the defective part(s) without charge,
provided they are returned, transportation prepaid by owner, to an authorized
service facility or to the address below. Enclose a letter describing the problem,
copy of dated proof of purchase, and your name, address and daytime telephone
number.
This limited warranty does not guarantee uninterrupted service. Repair or
replacement as provided under this warranty is the exclusive remedy of the
purchaser. This limited warranty is in lieu of all other warranties, expressed or im-
plied, including, but not limited to, any implied warranty of merchantability or fit-
ness for a particular use or purpose. This warranty gives you specific legal rights
and you may also have other rights which vary from state to state or province to
province.
Outside the United States, a dierent warranty may apply. For details, please
contact your authorized Waterwise distibutor.
This water filter system is designed and tested for use with genuine Aclare parts
including replacement filters and all hardware (diverter valve). Use of parts from
other manufacturers may result in loss of contaminant reduction performance,
system damage or failure. Use of parts from other manufacturers will also void
your warranty.
Visit www.healthyperceptions.com for all replacement parts.
Waterwise® Inc
3608 Parkway Blvd
Leesburg FL 34748-9399
1-888-340-0247
www.healthyperceptions.com

1. Unpack Contents
Package contains:
(1) Filter Housing Assembly
(2) Threaded Cartridge Caps A & B and O-rings (pre-installed)
(2) Filter Catridges A & B (pre-installed)
(1) Faucet Diverter Hose Assembly
(2) Brass Faucet Adapters, Rubber Washers and Installation Tool
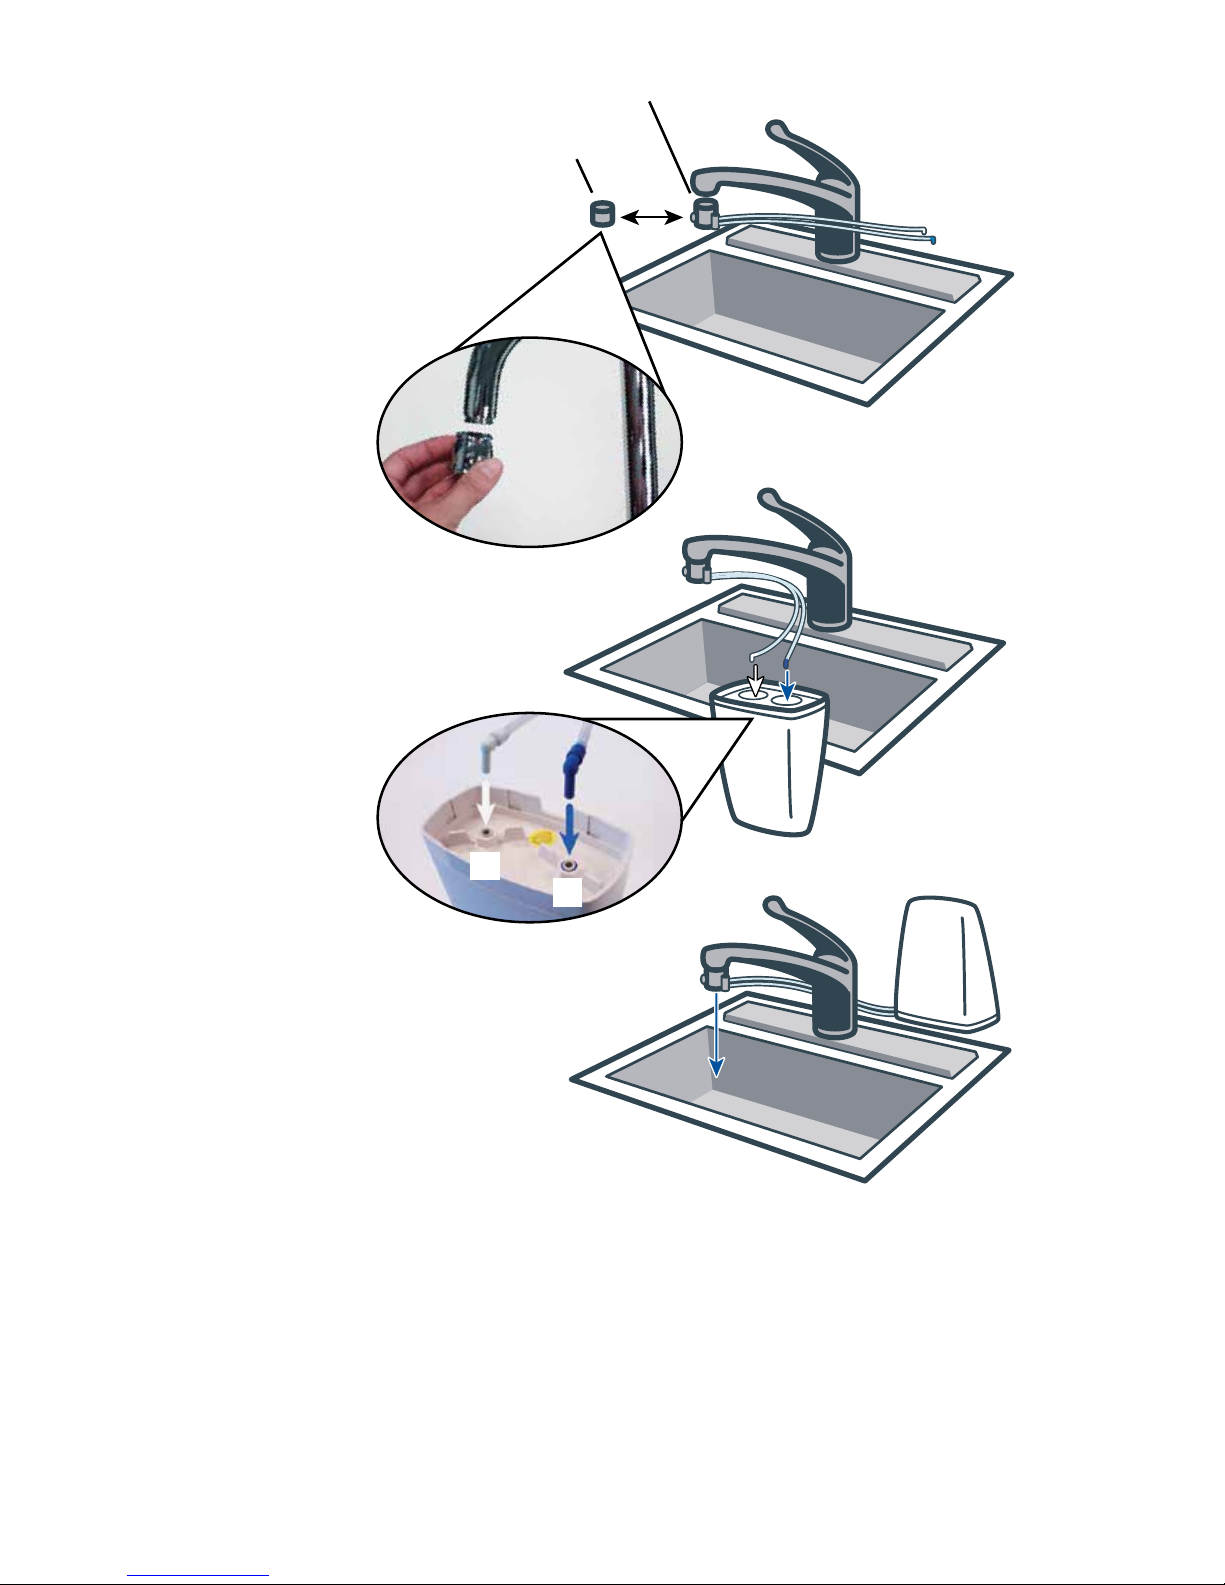
2. Remove Existing Aerator
from your faucet and also remove the washer if it’s attached to the faucet.
3. Attach the Faucet Diverter Valve
onto the faucet (Figure 1). If one of the supplied adapters is required, install
the adapter to the faucet first with the supplied washer and then attach the
diverter to the adapter. The adapters are designed so that they can be
tightened using the supplied white plastic hex tool. Make sure the rubber
washer is in place inside the chrome swivel collar on the diverter valve. The
provided adapters fit 95% of all faucets. If the adapters do not fit, you can
obtain additional sizes from your hardware or plumbing supply store. Take
aerator and diverter hose for a correct match.
4. Turn the Filter Housing Over
so that the hose outlet notch is facing up. Install the inlet hose to cap A by
pushing the plastic elbow firmly into the inlet hole as shown in Figure 2.
(To determine which hose is the inlet hose, hold the hose ends so they are
pointing into the sink, turn on the water supply and pull the activator button
on the diverter valve. The hose end that the water comes out of is the
inlet hose and should connect to the inlet fitting on cap A.) Connect the
outlet hose to cap B in the same fashion. If you need to disconnect either
hose after they have been inserted into the inlet/outlet connections, just
depress the gray release collet while pulling out on the hose end and elbow
(you can use a butter knife to help depress the gray collet).
5. Flush and activate the Filter
Turn filter unit up0right and place in your preferred position, turn on the cold
water supply and pull the round activator button on the diverter valve so that
water is diverted to the filter. The initial flow of water will be slightly discolored
and cloudy due to carbon fines and air bubbles. Allow the water to flow
through the filter in this position until the water runs clear, this will usually
take 10 minutes depending on your water pressure. Once the water appears
clear and free of air bubbles you may drink and enjoy!
NOTE: For the first 72 hours the faucet will drip intermittently, until the
filters become fully saturated. Once they are saturated, you should
anticipate a residual flow of water each time you use the filter, as
the system is vented and designed to self-clear the line.
IMPORTANT: This product cannot be used in constant pressure appli-
cations such as ice-makers or fountains.
White
(A-cap)
Specifications:
This product is intended for use on municipally treated cold water only.
DO NOT use on water that is microbologically unsafe or of unknown quality
without adequate disinfection before or after the system.
• This system and installation shall comply with applicable state and local regulations.
Min Operating Pressure: 20 psi (pounds per sq in)
Max Operating Pressure: 50 psi (open discharge)
Min Operating Temperature: 40° F (4° C)
Max Operating Temperature: 90° F (32° C)
Rated Service Flow: 0.4 gallons per minute
Capacity of Filter Cartridge: 500 gallons
Figure 1
Remove your aerator
and attach the
diverter valve
in its place.
Figure 2
Push the hoses
into the filter.
A–White Cap
B–Blue Cap
Turn on the diverter
valve and flush the filter
for 10 minutes.
A
B
Faucet Diverter Hose Assembly
Existing Aerator
1. Unpack Contents
Package contains:
(1) Filter Housing Assembly
(2) Threaded Cartridge Caps A & B and O-rings (pre-installed)
(2) Filter Catridges A & B (pre-installed)
(1) Faucet Diverter Hose Assembly
(2) Brass Faucet Adapters, Rubber Washers and Installation Tool
2. Remove Existing Aerator
from your faucet and also remove the washer if it’s attached to the faucet.
3. Attach the Faucet Diverter Valve
onto the faucet (Figure 1). If one of the supplied adapters is required, install
the adapter to the faucet first with the supplied washer and then attach the
diverter to the adapter. The adapters are designed so that they can be
tightened using the supplied white plastic hex tool. Make sure the rubber
washer is in place inside the chrome swivel collar on the diverter valve. The
provided adapters fit 95% of all faucets. If the adapters do not fit, you can
obtain additional sizes from your hardware or plumbing supply store. Take
aerator and diverter hose for a correct match.
4. Turn the Filter Housing Over
so that the hose outlet notch is facing up. Install the inlet hose to cap A by
pushing the plastic elbow firmly into the inlet hole as shown in Figure 2.
(To determine which hose is the inlet hose, hold the hose ends so they are
pointing into the sink, turn on the water supply and pull the activator button
on the diverter valve. The hose end that the water comes out of is the
inlet hose and should connect to the inlet fitting on cap A.) Connect the
outlet hose to cap B in the same fashion. If you need to disconnect either
hose after they have been inserted into the inlet/outlet connections, just
depress the gray release collet while pulling out on the hose end and elbow
(you can use a butter knife to help depress the gray collet).
5. Flush and activate the Filter
Turn filter unit up0right and place in your preferred position, turn on the cold
water supply and pull the round activator button on the diverter valve so that
water is diverted to the filter. The initial flow of water will be slightly discolored
and cloudy due to carbon fines and air bubbles. Allow the water to flow
through the filter in this position until the water runs clear, this will usually
take 10 minutes depending on your water pressure. Once the water appears
clear and free of air bubbles you may drink and enjoy!
NOTE: For the first 72 hours the faucet will drip intermittently, until the
filters become fully saturated. Once they are saturated, you should
anticipate a residual flow of water each time you use the filter, as
the system is vented and designed to self-clear the line.
IMPORTANT: This product cannot be used in constant pressure appli-
cations such as ice-makers or fountains.
White
(A-cap)
Specifications:
This product is intended for use on municipally treated cold water only.
DO NOT use on water that is microbologically unsafe or of unknown quality
without adequate disinfection before or after the system.
• This system and installation shall comply with applicable state and local regulations.
Min Operating Pressure: 20 psi (pounds per sq in)
Max Operating Pressure: 50 psi (open discharge)
Min Operating Temperature: 40° F (4° C)
Max Operating Temperature: 90° F (32° C)
Rated Service Flow: 0.4 gallons per minute
Capacity of Filter Cartridge: 500 gallons
Figure 1
Remove your aerator
and attach the
diverter valve
in its place.
Figure 2
Push the hoses
into the filter.
A–White Cap
B–Blue Cap
Turn on the diverter
valve and flush the filter
for 10 minutes.
A
B
Faucet Diverter Hose Assembly
Existing Aerator

Installation
Instructions
Aclare Countertop
Water Filter System
OWNER’S LIMITED WARRANTY
Waterwise warrants, to the original purchaser, this product against defects in ma-
terials and/or workmanship, for a period of one (1) year from the date of purchase.
Defects or failures due to shipping/handling, incorrect installation, improper use
or maintenance, including abuse or neglect, accidents, alterations or modifica-
tions, or unauthorized repair are specifically excluded from this warranty. No
dealer, distributor, agent, representative, or other person is authorized to extend
or expand this warranty.
Waterwise is not responsible or liable for personal injury, property damage, or
incidental or consequential damages arising out of, or in connection with, the use
or performance of the product or other damages with respect to loss of use, or
costs of removal, installation, or reinstallation.
Waterwise will, at its option, replace or repair the defective part(s) without charge,
provided they are returned, transportation prepaid by owner, to an authorized
service facility or to the address below. Enclose a letter describing the problem,
copy of dated proof of purchase, and your name, address and daytime telephone
number.
This limited warranty does not guarantee uninterrupted service. Repair or
replacement as provided under this warranty is the exclusive remedy of the
purchaser. This limited warranty is in lieu of all other warranties, expressed or im-
plied, including, but not limited to, any implied warranty of merchantability or fit-
ness for a particular use or purpose. This warranty gives you specific legal rights
and you may also have other rights which vary from state to state or province to
province.
Outside the United States, a dierent warranty may apply. For details, please
contact your authorized Waterwise distibutor.
This water filter system is designed and tested for use with genuine Aclare parts
including replacement filters and all hardware (diverter valve). Use of parts from
other manufacturers may result in loss of contaminant reduction performance,
system damage or failure. Use of parts from other manufacturers will also void
your warranty.
Visit www.healthyperceptions.com for all replacement parts.
Waterwise® Inc
3608 Parkway Blvd
Leesburg FL 34748-9399
1-888-340-0247
www.healthyperceptions.com
Table of contents
Other Waterwise Water Filtration System manuals


Popular Water Filtration System manuals by other brands


GENERAL ECOLOGY
GENERAL ECOLOGY Seagull IV X-6 Installation and use guide

Halsey Taylor
Halsey Taylor HWF172 Water Sentry VII installation instructions

Levoit
Levoit LV110WP-RF manual

Zuvo
Zuvo Water Purator owner's manual

Hozelock Cyprio
Hozelock Cyprio BIOFORCE REVOLUTION 12000 manual

Brita
Brita Maxtra+ Instructions for use

unGer
unGer nLite Hydro Power quick start guide

Sota
Sota WOZ5 manual

Purex
Purex FumeCube, FumeCube MAX, FumeSafe,FumeCube PRO, 2tiP, Xbase 200, Xbase 400,Alpha 200, Alpha 400,... operating manual

PondMAX
PondMAX UVC9W instruction manual

Zephyr
Zephyr Europa Series Use, care and installation guide

Premier Tech Aqua
Premier Tech Aqua Ecoflo ST-500 owner's manual