Wattbike Studio Edition User manual

Wabike Power Cycling
Studio Edition
User Manual

2
Power Cycling SE User Manual | 09/2014-v1.0EN
Contents
Overview..............................................................................................................................................................................................3
Minimum System & Set up Requirements .......................................................................................................................4
Installation of Power Cycling Studio Edition..................................................................................................................5
Set up/Wiring Diagram............................................................................................................................................................... 6
Connecting Bikes via USB..........................................................................................................................................................8
Connecting Bikes via ANT........................................................................................................................................................ 9
Power Cycling SE Launch Screen ........................................................................................................................................10
Race Activity .....................................................................................................................................................................................11
Group Activity ................................................................................................................................................................................16
Seings .............................................................................................................................................................................................. 26
Bikes......................................................................................................................................................................................................27
Device.................................................................................................................................................................................................. 28
Display................................................................................................................................................................................................ 29
User Data ..........................................................................................................................................................................................30

wabike.com | 0115 945 5450 | info@wabike.com @wabike facebook.com/wabike
1. Overview
Welcome to Wabike Power Cycling SE, innovative soware which enables you to motivate users
and enhance their performance.
With comprehensive functionality and a seamless user experience, Power Cycling SE allows you
to provide a wealth of feedback to your clients. Providing a unique and meaningful experience
will keep your clients motivated and engaged, whether in a personal training, fitness centre or
studio environment.

4
Power Cycling SE User Manual | 09/2014-v1.0EN
2. Set up/Wiring Diagram
There are many ways in which to connect the Wabikes to the soware via a wired connection.
(fig 3.0) wiring diagram shows the most reliable set up for 16 Wabikes.
This shows 16 Wabikes in a 4x4 paern, 4 bikes into every one USB Hub, with four USB Hubs
being directly connected to the PC/ Laptop then out to the TV/ Projector.
fig 3.0

wabike.com | 0115 945 5450 | info@wabike.com @wabike facebook.com/wabike
3. Minimum System & Set up
Requirements
System Hardware Requirements
To effectively* run Power cycling SE edition the minimum PC system requirements for 8 bikes
run through a USB hub(s) are below:
• Win XP / Win 7 / Win 8
• 2 GHz CPU
• 2 Gb RAM
• 50 Mb Hard Disk Space
• Display Resolution 1024 x 768 and upward
*Systems that are running inferior specifications to these we cannot guarantee the effectiveness
of the stability of the soware whilst running a session.
**More bikes can be connected through a USB hub. The quality and throughput speed of the
USB hub will affect the soware’s ability to deal with the incoming data from the bikes. Where at
all possible use the best available peripherals to avoid data bolenecks.
Set up requirements
The systems set up requirements are:
• Any number of Wabike’s (up to 16)
• The respective amount of USB ‘A’ to ‘B’ leads
• USB Hubs (1 Hub per 4 bikes, 4 port USB)
• PC/ Laptop computer with Power Cycling SE installed
• TV, Projector or similar to project the soware onto the larger screen
• Display connectivity (HDMI Cable, VGA Cable)
• Under floor cabling/ floor trunking (if running via USB)

6
Power Cycling SE User Manual | 09/2014-v1.0EN
4. Installation of Power Cycling
Studio Edition
To install the soware follow these steps:
• Double click the installation file (e.g. WabikePowerCyclingSESetup.exe) to begin the
installation process.
• The screen shown below fig. 4.0 will appear.
• Click Next to Continue.
fig 4.0
fig 4.2

wabike.com | 0115 945 5450 | info@wabike.com @wabike facebook.com/wabike
• Tick ‘I accept the terms in the license agreement’ then click Next.
• At this stage the user is able to specify and confirm the installation location of the soware
on the hard drive of the computer (fig 4.3).
• To install to the default location click Next to continue.
• Aer the installation has complete, click finish to complete the installation and launch the
soware. Uncheck the box before clicking finish to just complete the installation and close
the installation wizard without launching the soware (fig 4.4).
fig 4.3
fig 4.4

8
Power Cycling SE User Manual | 09/2014-v1.0EN
5. Connecting Bikes via USB
There are two ways of connecting the Wabike(s) to the Power Cycling SE, one of which being via
the USB ‘A’ to ‘B’ lead (shown below). The Wabikes are identified by the Wabike Monitor (WBM)
serial numbers, which can be found on the back of the WBM.
To connect the Wabike(s) to the PC/Laptop running the Power Cycling SE soware and follow
the steps below:
1. Insert the USB-B connector lead into the USB-B port on the back of the WBM
2. Insert the plug shown on the right (Type A) into your computer or USB hub
3. Turn on the WBM’s.
IMPORTANT! When connecting a WBM to a PC/Laptop for the first
time, a driver soware is installed by the operating system to allow
the bikes to communicate properly with the soware, this process is
automatic. It may take up to a minute to complete. The connection
becomes operational once the driver soware has installed.
Wiring sequences
• 1, 2, 3 & 4 Wabikes
For 1 and 2 bikes, they can be directly connected up to the PC/ Laptop via 2 USB A to B cables,
there is no need for a USB Hub (assuming that there is more than 1 USB port on the PC/ Laptop)
For 3 to 4 bikes a USB Hub is needed. 3-4 bikes into 1 USB hub, then 1 USB lead from the hub to
the PC.
• 5-8 bikes
For 5 to 8 bikes, 2 USB Hubs are needed for this. It is best to split the bikes as equally as possible
to share the data load per USB Hub and cables. 2 Hubs should share the number of bikes equally.
For 6 and 8 bikes the Hubs should be split with a 3:2 and 4:2 bike to Hub ratio. One Hub for 5 bikes
with 4 bikes in 1 Hub. One long USB cable can be used for the arrangement with one bike linked
directly to the Laptop/ PC.
• 12-16 bikes
For 12 to 16 bikes see the wiring diagram on page 5.

wabike.com | 0115 945 5450 | info@wabike.com @wabike facebook.com/wabike
6. Connecting Bikes via ANT
Only the Model B WBM’s can be connected to Power Cycling SE via ANT.
Update your WBM firmware to version 1.20 or greater to ensure ANT+ support. You can download
the latest firmware at wabike.com
To connect the bikes via ANT+, follow the steps:
• Plug the ANT+ USB stick into the Computer/ Laptop,
• Turn on the WBM(s) that will be used in the session,
• To ensure the WBM(s) transmit the correct data, select ANT Channel from the main menu on
each of the bikes (fig 6.0), and then select the wabike (WB) ANT channel from the list (fig 6.1).
• Alternatively, you can use any ANT channel that includes WB, e.g., WB + SPC if the riders
would like to connect their cycling computers to the bikes (See owners manual)
• Then follow the steps in sections 6. Activity or 7. Race to complete the connection.
fig 6.0
fig 6.1
Please note:
If the monitors are used
only with Power Cycling SE,
the ANT Channel should be
switched to Wabike protocol
10
Power Cycling SE User Manual | 09/2014-v1.0EN
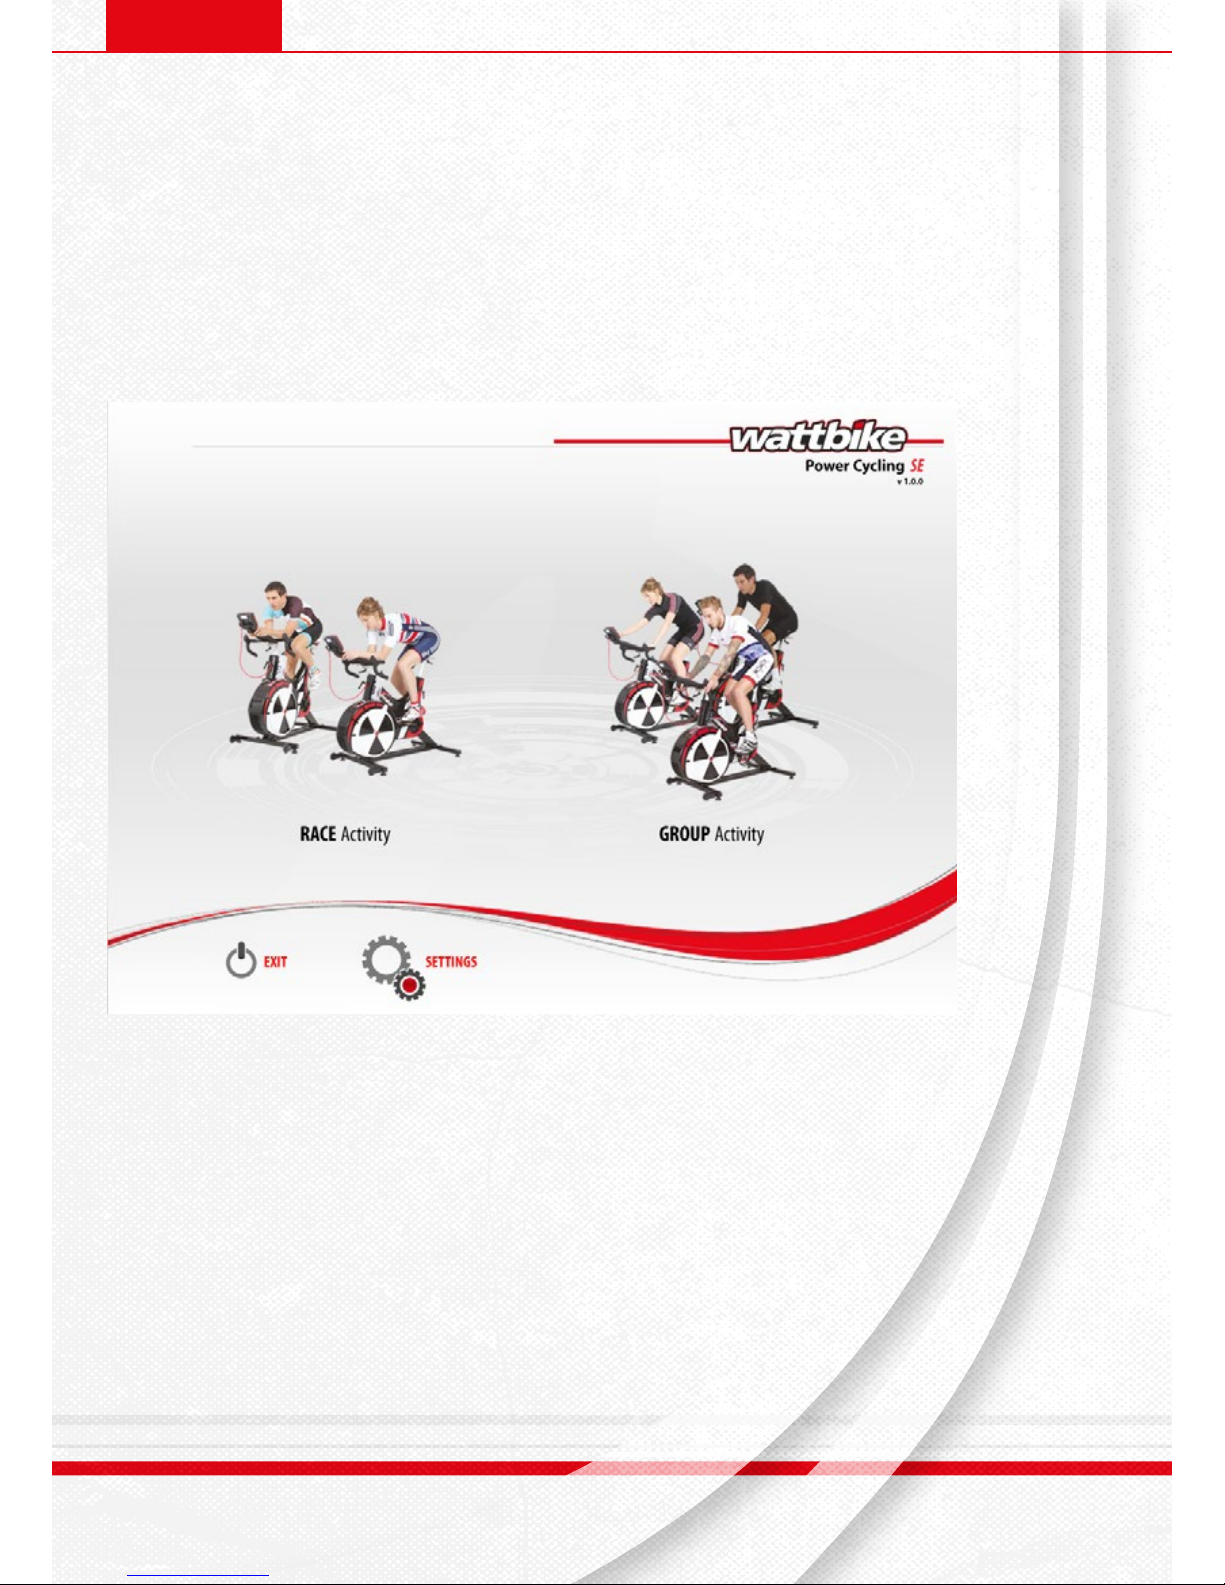
7. Power Cycling SE Launch Screen
Aer opening Power Cycling SE the Launch screen will show two activity types (fig 7.0);
1. Race and Group activities.
Clicking on either of these icons will bring up their respective screens for their respective activity
mode, which are both covered in the following sections.
There are also two options;
2. Exit and Seings
• Clicking the Exit buon will close the soware.
• Clicking the Seings buon will show the seings screen (covered in section 8).
fig 7.0

wabike.com | 0115 945 5450 | info@wabike.com @wabike facebook.com/wabike
8. Race Activity
The race activity allows up to 16 people to race at one time, running over distances from 100m to
10 Billion metres.
1. On the Launch Screen click RACE Activity, (fig 8.0).
2. There must be at least two Wabikes connected at this point, If there are no Wabikes
connected to the PC/laptop, or if none of them are enabled, a warning screen is displayed (fig 8.1)
3. Once the active Wabikes are connected with the soware they will appear in a list format
with a predefined bike number and tick box selected as default (fig 8.2)
fig 8.0
fig 8.1

12
Power Cycling SE User Manual | 09/2014-v1.0EN
4. Clicking the check box next to the WBM serial number will ‘Enable’ and enter those bikes into
the race. Alternatively, to rename a bike from the activity untick the box.
5. To order the bikes manually, click the Up and Down arrows near the boom le hand side
of the screen. This feature will enable the user to set the bikes numbering in order for their
arrangement in the studio to come up in their respective positions on screen.
6. Click okay to continue through to the bike allocation stage ‘Race Start Screen (fig 8.3). At this
point the soware will allocate the bikes a race number, such as ‘Bike 1’, ‘Bike 2’ etc… the race
numbers will flash on the boom section of the WBMs.
7. Enter the race distance required then click ‘Ok’ to progress to the race start page (fig 8.4).
fig 8.2
fig 8.3

wabike.com | 0115 945 5450 | info@wabike.com @wabike facebook.com/wabike
8. Once all the race details are correct a race can start.
9. To start a race click “START’, a count down to the Race start will begin on screen and also on
the WBM screens.
10. Aer the count down has completed the riders can then start pedalling, if the rider’s pedal
before the count down has finished their ‘bike’ will cause a false start.
11. All races should be conducted with a ‘Standing Start’ meaning there is no pedalling before the
timer has finished.
12. If for any reason the race needs to be abandoned click STOP in the boom right hand corner
to abort it.
During the Race
A screen similar shown in fig 8.5 will be displayed with the top ‘half’ of the screen dedicated to
the ‘Track’ and the boom ‘half’ dedicated to the details of the race.
The boom split portion of the display shows:
• The Info Tab - Basic race information: distance, time, and the number of participants (fig 8.5)
• The Ranking tab – What position the bikes are in at that point in the race (fig 8.6),
• The Split tab - the split times and differences between the participants at predetermined
points in the race (fig 8.7).
fig 8.4
fig 8.5

14
Power Cycling SE User Manual | 09/2014-v1.0EN
• At any point during a race any rider can be disqualified by right clicking on the on screen
cyclist or their lane (fig 8.8),
• At any point during the race a rider can be forfeited, again by right clicking on the on screen
cyclist or their lane (fig 8.9),
• Participants can also be disqualified or forfeited by the boom half of the screen by right-
clicking ranking table and terminating as required (fig 8.9)
fig 8.6
fig 8.7
fig 8.8

wabike.com | 0115 945 5450 | info@wabike.com @wabike facebook.com/wabike
Tip!
• Double-click a participant’s lane to have them cantered in the view (fig 8.10)
• Right-clicking also enables you to zoom in on the field, this can be useful for longer races
where the ‘Track’ that the riders are on is so large that they move slowly (fig 8.11)
fig 8.9
fig 8.10
fig 8.11

16
Power Cycling SE User Manual | 09/2014-v1.0EN
9. Group Activity
To start a group activity for running Power classes, click GROUP Activity on the main menu
screen.
1. On the Launch Screen click GROUP Activity (fig 9.0).
2. There must be at least two bikes connected at this point, If there are no Wabike’s connected
to the PC/laptop, or if none of them are enabled, a warning screen is displayed (fig 9.1)
3. Once the bikes are connected with the screen will display the connected bikes (fig 9.2)
4. Clicking the check box next to the WBM serial number will ‘Enable’ and enter those bikes into
the activity,
fig 9.0
fig 9.1

wabike.com | 0115 945 5450 | info@wabike.com @wabike facebook.com/wabike
5. To order the bikes manually, click the Up and Down arrows near the boom le hand side of
the screen,
6. Click ‘OK’ to continue through to the bike allocation stage ‘Activity Start Screen (fig 9.3). At
this point the soware will allocate all the bikes a number, such as ‘Bike 1’, ‘Bike 2’ etc.… the
bike number will flash on the boom of the WBMs.
7. IMPORTANT! Before the start of a group activity session, all the cyclists are required to input
their current weight, MMP (Maximum Minute Power) and MHR (Maximum Heart Rate).
Every rider will have to complete this step before the soware can continue. If the rider does
not input their data or enters them incorrectly the training zones and power per kilo metrics
will be affected (fig 9.4). If the riders data is not known enter through inpuing the standard
data in supplied by the session instructor.
fig 9.2
fig 9.3

18
Power Cycling SE User Manual | 09/2014-v1.0EN
(The MMP-MHR-Weight feature can be disabled in the Seings screen. When disabled, the user
data query will be skipped and the MMP-MHR displays omied and thus loose the power per
kilo and the Training Zones features.)
8. Once all the bikes are set and ready to go and all he rider have entered their data the
“Collecting user data” notification will disappear (fig 9.3). When the riders are ready to start
the session click ‘START” (fig 9.5).
TIP
• The display shows how many cyclists and their (from top parameter):
• Cadence (with average and max)
• Power (with average and max)
• Heart Rate (with average and max)
• MMP (Maximum Minute Power) and the current Power Zone with the active colour
formaing,
• MHR (Maximum Heart Rate) and the current Heart Rate Zone with the active colour
formaing,
9. As the riders begin to cycle the session data will appear on screen (fig 9.6).
fig 9.4
fig 9.5

wabike.com | 0115 945 5450 | info@wabike.com @wabike facebook.com/wabike
10. Once the Activity has finished click ‘Stop’, then ‘Exit’. The soware will then collate the data
from all the bikes into the summary screen fig 9.10.
Post Activity
IMPORTANT! Please note that the session’s activity are not stored, they are deleted as soon as
the Activity history has been displayed then exited.
Clicking the tab group zones will show display similar to fig 9.11
fig 9.6
fig 9.10
fig 9.11

20
Power Cycling SE User Manual | 09/2014-v1.0EN
Clicking the Group summary tab fig 9.12, displays the full parameters being measured as totals or
averages where appropriate.
Displayed (from top to boom):
• Time and date of the session start and end,
• The percentage times spent in the riders’ training zones with time on the graph table being
represented by ‘#”
• Power in Was (W) at the boom
• The summary table showing the full parameters being measured as totals or averages where
appropriate.
• Clicking the Personal data tab fig (9.13) will show the selected individual cyclists data with
as default the heart rate and Power displayed on the graph with a table below showing the
session data per revolution. The parameters, x-axis and theme (Revolutions or zones) can be
changed by right clicking on the graph (fig 9.14).
fig 9.12
fig 9.13
Table of contents
Other Wattbike Exercise Bike manuals

Wattbike
Wattbike AtomX User manual

Wattbike
Wattbike Wattbike User manual

Wattbike
Wattbike cycle trainer User manual

Wattbike
Wattbike PRO/TRAINER User manual

Wattbike
Wattbike ATOM User manual

Wattbike
Wattbike ATOM User manual

Wattbike
Wattbike ATOM User manual

Wattbike
Wattbike Exercise Bike User manual

Wattbike
Wattbike ATOM User manual

Wattbike
Wattbike Pro User manual


