wattstopper FS-PP v2 User manual

FS-PP v2
Fixture Mount Power Pack
Installation Instructions
FS-PP V2
Model:
Fixture Sensor Power Pack
120/277/347VAC, 60Hz
@120VAC 5A (N/O)
3A (N/C)
@277VAC 4.3A (N/O)
2.5A (N/C)
@347VAC 3.4A (N/O)
2A (N/C)
03392r2
Strip Gauge
AC INPUT
SPECIFICATIONS
Power .................................................120/277/347VAC, 60Hz
Relay Type ................. Form C with Zero Crossing on N.O. only
Output ........................ 70mA @ +24VDC with relay connected
Load Requirements
@120VAC.................................5.0A (N/O), 3.0A (N/C), 1/6hp
@277VAC.................................4.3A (N/O), 2.5A (N/C), 1/6hp
@347VAC............................................ 3.4A (N/O), 2.0A (N/C)
Low Voltage Connections ....... RJ45 connection to FS sensors
...................................... Control in, common, +24VDC
Line and Load Connections...........12-18AWG screw terminals
Terminal Torque Rating ....4.428 inch pound-force (0.5Nm)
Operating Temperature..................... 32° to 131°F (0° to 55°C)
Dimensions .................... 7.5” x 0.87” x 1.0” (190 x 22 x 25mm)

DESCRIPTION AND OPERATION
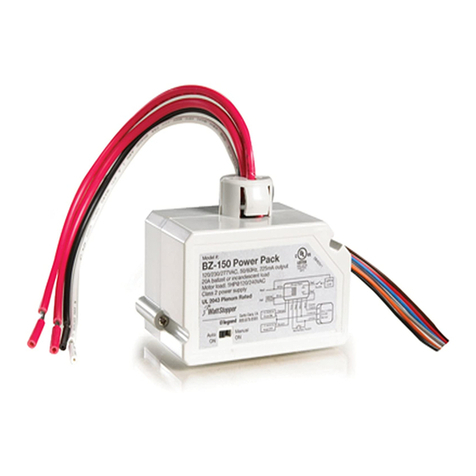
The FS-PP v2 power pack supplies low voltage power to FS series occupancy
sensors and switches line voltage in response to control signals from the
sensors. The FS-PP v2 is designed for installation inside the lighting xture
housing.
A 6’ long cable tted with a male RJ45 plug is supplied with each FS series
24VDC occupancy sensor. The FS-PP has a corresponding female RJ45
receptacle. This cable carries power to the sensor and lighting control signals
to the power pack.
Each Watt Stopper FS-PP v2 can supply power for up to seven FS series low
voltage sensors. FS-CK accessory kits are required to connect multiple sensor
or multiple power pack wiring congurations. Wiring
connected to the RJ45 is limited to an aggregate total
of 100’.
High voltage connections should use at least 16 gage
wire. Always check local building codes.
Call 800.879.8585 for Technical Support
INSTALLATION
1. Determine an appropriate mounting location inside the light xture.
2. Use the holes or mounting slots at both ends of the power pack to secure it
to the xture.
3. Connect wires to load as described in the wiring section.
4. Connect wires to electrical supply as described in the wiring section.
5. Connect the RJ45 from the sensor to the RJ45 on the power pack.
6. Restore power from the circuit breaker.
Fig 1: FS-PP v2 wire connections and operation monitor LED
High voltage AC
input wiring
Low voltage RJ45
connection to FS sensor
Relay Output
to load
Green LED - Operation monitor
COM
N/O
N/C
03500r1
ISOLATED RELAY
OUTPUTS
TO LOAD
RJ45
TO SENSOR
Santa Clara, CA•800.879.8585
FS-PP V2
Model:
Fixture Sensor Power Pack
120/277/347VAC, 60Hz
@120VAC 5A (N/O)
3A (N/C)
@277VAC 4.3A (N/O)
2.5A (N/C)
@347VAC 3.4A (N/O)
2A (N/C)
GROUND
NEUTRAL
LINE
03392r2
Strip Gauge
12-18AWG
CU wire only
88T9
Appliance
Control
LISTED
AC INPUT
CAUTION
TURN THE POWER OFF AT THE CIRCUIT BREAKER
BEFORE INSTALLING THE POWER PACK.
High voltage wiring:
12-18 AWG, Cu Only
Strip Gage
1/2"
12.7mm

Visit our website for FAQs: www.wattstopper.com
N/C
Grey
Com
Violet
0-10VDC
0-10VDC
Dimming Ballast
Line Voltage
Inputs to
Ballast
Outputs
to Lamps
Com
N/O
RJ45
Plug
from FS
sensor
Line
120/277/347 Volts AC
Neutral
Ground
Green Operation
LED
COM
N/O
N/C
03500r1
ISOLATED RELAY
OUTPUTS
TO LOAD
RJ45
TO SENSOR
Line
120/277/347 Volts AC
Neutral
Ground
Green Operation
LED
COM
N/O
N/C
03500r1
ISOLATED RELAY
OUTPUTS
TO LOAD
RJ45
TO SENSOR
Lighting
Load
RJ45
Plug
from FS
sensor
Neutral
Santa Clara, CA•800.879.8585
FS-PP V2
Model: Fixture Sensor Power Pack
120/277/347VAC, 60Hz
@120VAC 5A (N/O)
3A (N/C)
@277VAC 4.3A (N/O)
2.5A (N/C)
@347VAC 3.4A (N/O)
2A (N/C)
GROUND
NEUTRAL
LINE
03392r2
Strip Gauge
12-18AWG
CU wire only
88T9
Appliance
Control
LISTED
AC INPUT
Santa Clara, CA•800.879.8585
FS-PP V2
Model: Fixture Sensor Power Pack
120/277/347VAC, 60Hz
@120VAC 5A (N/O)
3A (N/C)
@277VAC 4.3A (N/O)
2.5A (N/C)
@347VAC 3.4A (N/O)
2A (N/C)
GROUND
NEUTRAL
LINE
03392r2
Strip Gauge
12-18AWG
CU wire only
88T9
Appliance
Control
LISTED
AC INPUT
WIRING A SINGLE SENSOR
Fig 2: FS-PP v2 direct wiring to lighting load
Fig 3: FS-PP v2 wiring to 0-10V dimming ballast

Call 800.879.8585 for Technical Support
Standard connection between FS sensor and FS-PP power pack
Tw o FS sensors connected to two FS-PP
Tw o FS sensors connected to one FS-PP
One FS sensor connected to two FS-PP
FS-C4
FS-C3 (3' shown)
or
FS-C1 (10')
FS-C4
FS-C3 (3')
or
FS-C1
(10' shown)
FS-C4FS-C4 FS-C3 (3')
or
FS-C1
(10' shown)
FS-PP
FS-PP
FS-PP
FS-PP
FS-PPFS-PP
Any 24VDC
FS-Sensor
Any 24VDC
FS-Sensor
Any 24VDC
FS-Sensor
Any 24VDC
FS-Sensor
Any 24VDC
FS-Sensor
Any 24VDC
FS-Sensor
Fig 6: One sensor controlling two Power Packs
CONTROL CONFIGURATIONS
Fig 7: Two sensors controlling one Power Pack
Fig 8: Two sensors controlling two Power Packs
Fig 5: One sensor controlling one Power Pack

TROUBLESHOOTING
Lights will not turn on:
• Sensor LED does not ash:
- Is green power pack LED on?
If yes, check RJ45 connections at sensor and power pack.
If no, check circuit breaker and wiring to power pack.
- Check all wire connections.
• LED does ash:
- Check all wire connections and verify the load wire is tightly secured.
• If lights still do not turn on, call 800.879.8585 for technical support.
Lights will not turn off:
The time delay can be set from 30 seconds to 30 minutes. Ensure that the
time delay is set to the desired delay and that there is no movement within the
sensor’s view for that time period.
• To quickly test the unit for proper operation, turn the time delay to
minimum and move out of the sensor’s view. Lights should turn off after 30
seconds.
• If lights still do not turn off, call 800.879.8585 for technical support.
Call 800.879.8585 for Technical Support

Catalog # Description
FS-PP v2 Fixture Mount Power Pack: 120/277/347VAC, 60Hz
with NO/NC Relay output
FS-105 Ceiling tile mount, low voltage PIR occupancy sensor
with adjustable time delay and light level
FS-205 Fixture mount, low voltage PIR occupancy sensor
with adjustable time delay and light level
FS-305 Fixture or Ceiling tile mount, low voltage PIR occupancy sen-
sor, adjustable time delay
FS-405 Fixture mount, low voltage PIR occupancy sensor w/20’
diameter coverage, adjustable time delay and light level
FS-505 Fixture mount, low voltage ultrasonic occupancy sensor
FS-505C Same as FS-505, with directional cones
FS-C1 One 10’ cable with a shielded RJ45 male connector at each
end
FS-C2 One 6” (152mm) cable with 3 flying leads at
one end and a shielded RJ45 male connector
at the other
FS-C3 One 3’ cable with a
shielded 90° RJ45
male connector at one end and a shielded straight male
RJ45 connector at the other end, for space-limited areas
FS-C4 Shielded RJ45 splitter with female to dual
female receptacles
FS-C5 Shielded RJ45 male-to-male coupler
ORDERING INFORMATION
Sensors and power packs are White.
WARRANTY INFORMATION
Watt Stopper warranties its products to be free of defects in materials
and workmanship for a period of five (5) years. There are no obligations or
liabilities on the part of Watt Stopper for consequential damages arising out
of, or in connection with, the use or performance of this product or other
indirect damages with respect to loss of property, revenue or profit, or cost of
removal, installation or reinstallation.
2800 De La Cruz Boulevard, Santa Clara, CA 95050
800.879.8585
www.wattstopper.com
03391r5 4/2012
10' (3m)
6" (152mm)
3' (914mm)
Table of contents
Other wattstopper Power Pack manuals
