WEATHER DIRECT WD-9535 User manual

Version 2 - 12/22/2011
Page 1 of 24
WD-9535
4 DAY INTERNET POWERED WEATHER ALERT
STATION
Owner’s Manual
WEATHER DIRECT®
Presented by La Crosse Technology®
La Crosse Technology, Ltd.
www.weatherdirect.com
2809 Losey Blvd. S.
La Crosse, WI 54601
Phone 608-785-7935

Version 2 - 12/22/2011
Page 2 of 24
Table of Contents
Table of Contents ............................................................................................................................ 2
Congratulations................................................................................................................................ 4
Quality Forecasts............................................................................................................................. 4
Weather Direct® is Green ............................................................................................................... 4
Included in the Box .......................................................................................................................... 4
915 MHz Wireless Sensor Technology ........................................................................................... 5
Features........................................................................................................................................... 5
What You Need to Get Started:....................................................................................................... 6
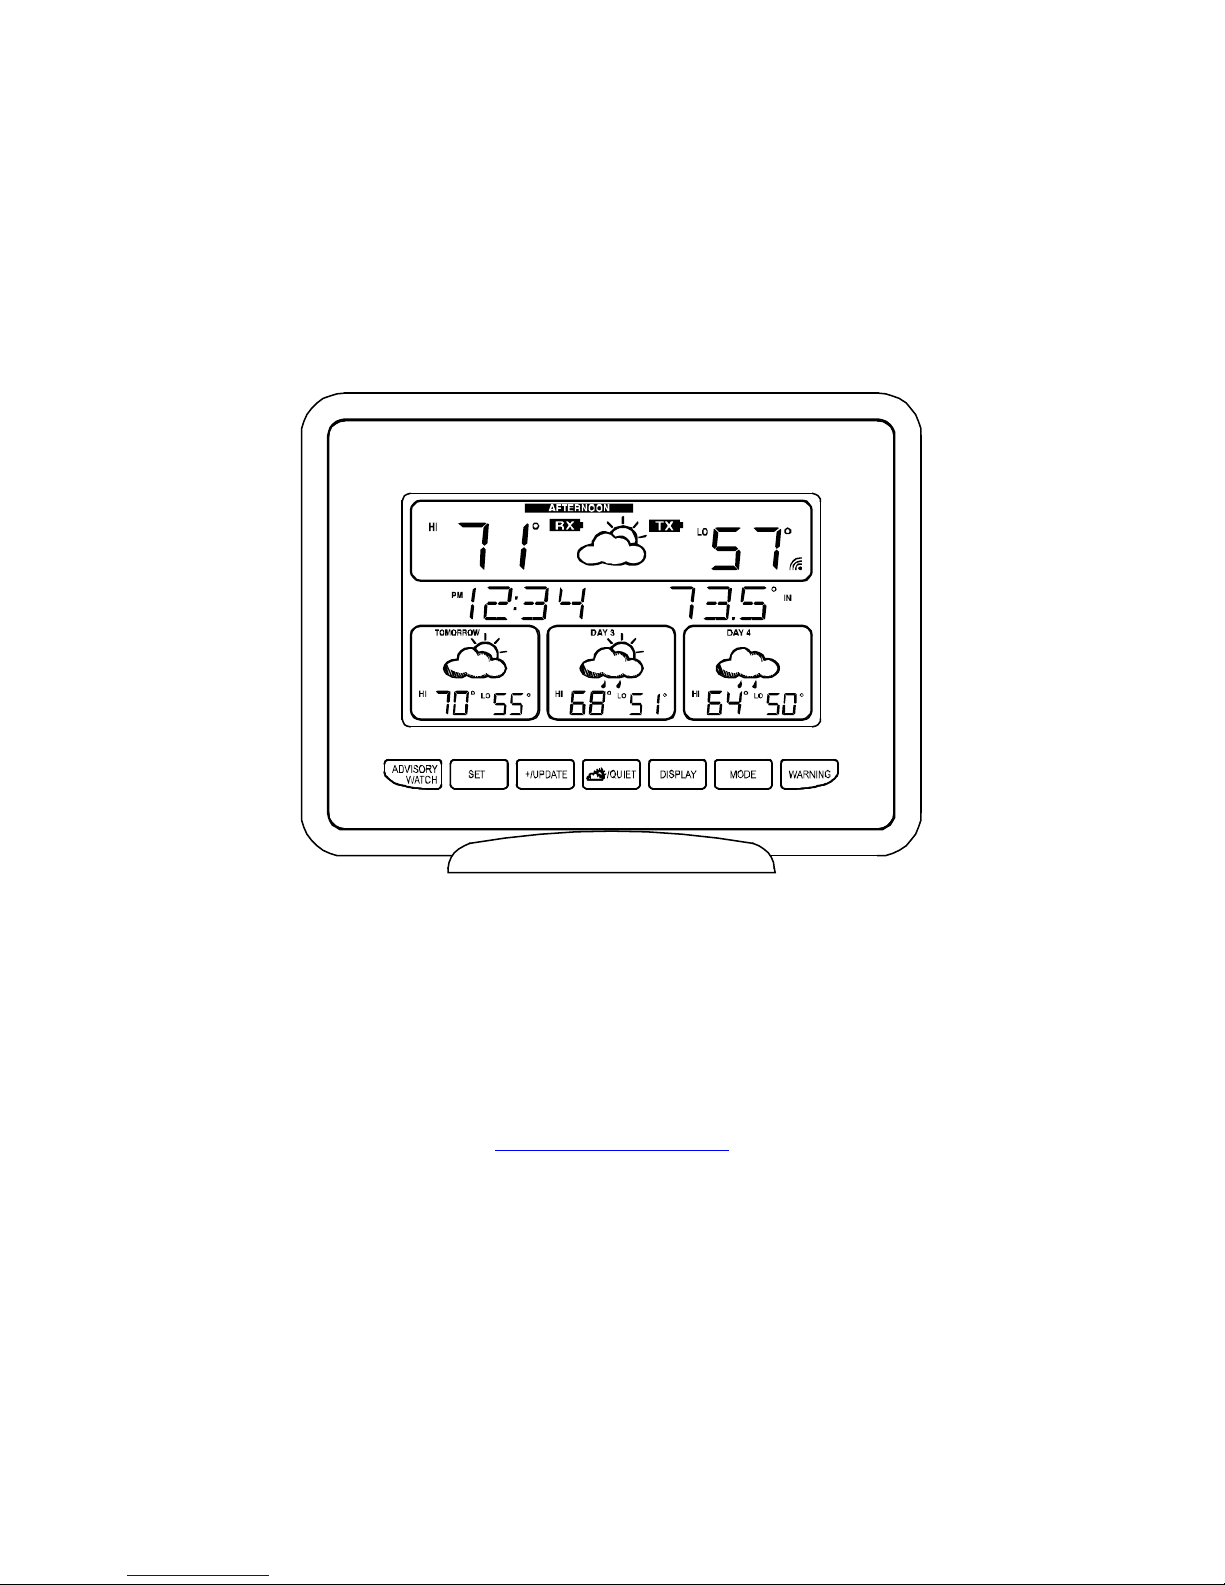
Quick Set Up Visual:........................................................................................................................ 7
Set Up your WD-9535 ..................................................................................................................... 7
Detailed Set Up:............................................................................................................................... 7
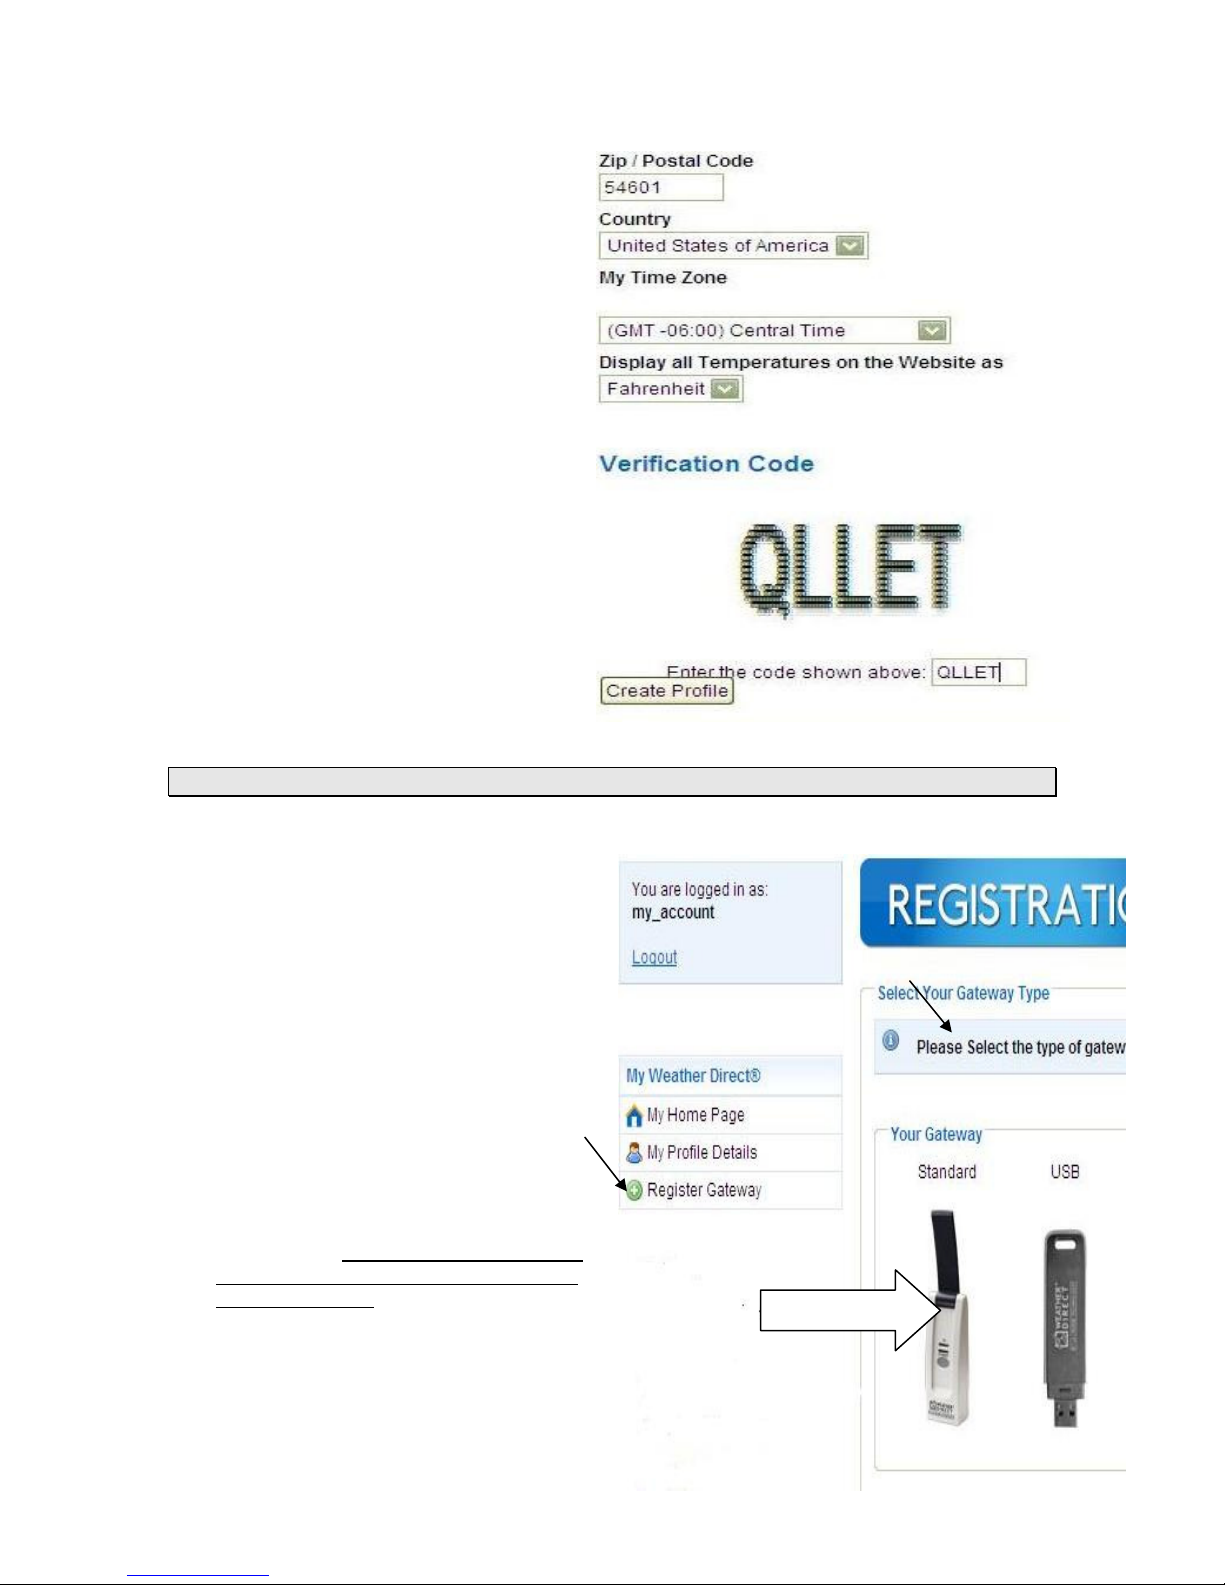
Create Your Weather Direct User Account ................................................................................. 7
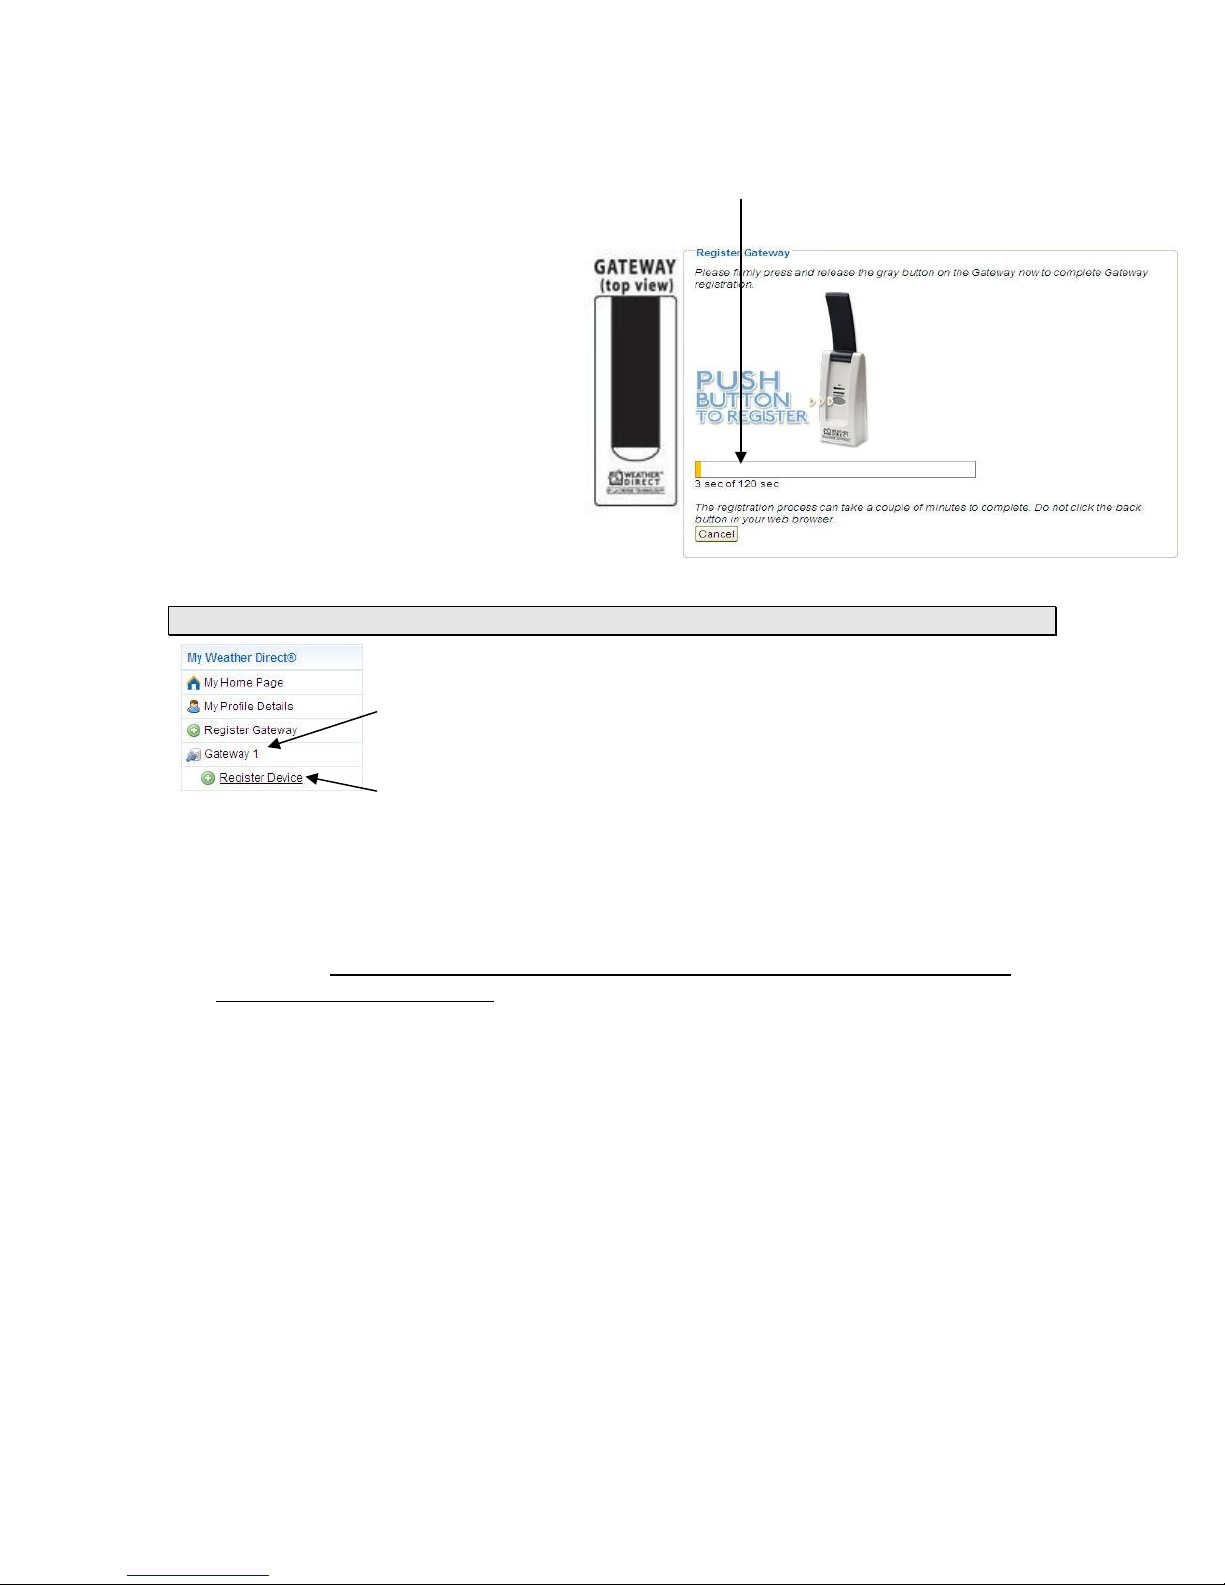
Register Standard Gateway ........................................................................................................ 9
Register a Device ...................................................................................................................... 10
TX50 Outdoor Temperature Sensor.......................................................................................... 11
Time Setting on Wireless Display.................................................................................................. 12
Wireless Display Operation ........................................................................................................... 13
“MODE” Key .............................................................................................................................. 14
“DISPLAY” Key.......................................................................................................................... 14
“ /QUIET” Key...................................................................................................................... 15
When ADD 4 LOCATIONS Expansion Option is Active ....................................................... 15
+/UPDATE” Key ........................................................................................................................ 15
Manually Request a Weather Direct® Data Update ............................................................. 15
“SET” Key.................................................................................................................................. 15
Changing Settings on Your Wireless Display ....................................................................... 15
Set Mode 1 – Set LCD Contrast (0-7) .............................................................................. 15
Set Mode 2 - Set Text Scrolling Speed (1-4).................................................................... 16
Set Mode 3 – Enable Automatic Weather Texts (ON/OFF) ............................................. 16
Set Mode 4 – Enable Warning Lights (ON/OFF).............................................................. 16
Set Mode 5 - View Device ID............................................................................................ 17
Factory Reset of Wireless Display................................................................................................. 17
FREE Trial of Expansion Options for 14 Days .............................................................................. 17
Severe Weather Alerts .................................................................................................................. 18
Types of Severe Weather Alerts:.......................................................................................... 18
Forecast Icons Explained .............................................................................................................. 19
Hardware Installation ..................................................................................................................... 20
Wireless Outdoor Sensor Installation Options .......................................................................... 20
To Surface Mount the Outdoor Sensor:................................................................................ 20

Version 2 - 12/22/2011
Page 3 of 24
To Wall Mount the Outdoor Sensor: ..................................................................................... 20
Gateway Installation ...................................................................................................................... 20
Online Resources .......................................................................................................................... 21
Care and Maintenance .................................................................................................................. 21
Battery Replacement ..................................................................................................................... 21
Troubleshooting ............................................................................................................................. 22
Specifications................................................................................................................................. 22
Temperature Range.............................................................................................................. 22
Battery Life ............................................................................................................................ 22
Dimensions ........................................................................................................................... 22
Weather Direct® Update Rate .............................................................................................. 22
Weather Direct® Wireless Range......................................................................................... 22
Power Requirements ..................................................................................................................... 22
Liability Disclaimer ......................................................................................................................... 22
FCC Statements ............................................................................................................................ 23
Warranty Information ..................................................................................................................... 23

Version 2 - 12/22/2011
Page 4 of 24
Congratulations
You have just purchased the world’s first Internet-Powered Weather Forecast Station.
Meteorological accuracy 24 hours-a-day, providing forecast information without turning on your
television or computer! Weather Direct® uses the power of the Internet to deliver weather
forecasts and other important information tailored to you, because you are in control of the
information it delivers.
We understand that no one likes having to read a manual, so we’ve tried to make this a fun and
rewarding read. After all, Weather Direct® is all about you. It’s like having your own personal
assistant to tell you the weather forecast when and where you want it. Knowing how the Weather
Direct® forecast station works will allow you to get the most out of this innovative new system.
Weather Direct® - Not Just Another Weather Forecast Station. Weather Direct® is the complete
weather forecast experience.
Quality Forecasts
Weather Direct® provides the most accurate forecast information available, customized to your
exact location! Our forecasts go beyond backyard measurements by using Internet-enabled
weather data provided by official National Weather Service instrumentation and local weather
reporting stations widely distributed throughout North America.
The same quality weather information used by meteorologists to deliver the local forecast plus
additional weather data unique to the Weather Direct® network is available to you 24 hours a
day! We provide the most detailed, customized, up-to-date weather forecasts available on any
medium. Weather Direct® allows you to pinpoint your exact location to ensure that you receive
precision weather forecasts customized for you!
Weather Direct® is Green
We are doing our part to keep our planet healthy by eliminating our paper manuals, saving trees
in the process. Not only are we reducing the amount of paper, but we are also trying to help you
save space in your desk drawer, file cabinet or box in the basement where all these pesky
manuals end up. Now you can print only the pages from this manual that you need… or not print
any at all if you find what you are looking for online.
The Gateway uses only 1 watt of power with a two-year battery life on the Wireless Display and
Temperature sensor. Since the Weather Direct® system works even when your computer is off,
you save money on electricity.
Included in the Box
The WD-9535 4 Day Wireless Weather Alert Station is a complete Weather Direct® system that
includes:
•
WD-9535 Wireless Display – Provides weather forecast information, time, date and
other custom data from the Internet. Also receives and displays wireless outdoor
temperature, from your backyard using the included Wireless Outdoor Sensor.
•
Wireless Gateway + Mounting Plate – Powers your Weather Direct® System with
weather data and other customizable feeds from the Internet. Sends data your
Wireless Display with a wireless range of up to 330 feet (open air).

Version 2 - 12/22/2011
Page 5 of 24
•
TX-50U Wireless Outdoor Temperature Sensor + Mounting Plate – Measures the
outdoor temperature where you are and sends temperature data to your Wireless
Display with a wireless range of up to 330 feet (open air).
•
(4) Screws and drywall anchors for mounting the Wireless Outdoor Temperature
Sensor and the Wireless Gateway
•
Quick Set Up Card
•
LAN cable to connect the Gateway to a network router
•
AC adapter for Gateway
915 MHz Wireless Sensor Technology
Features
•
Free Forecasts for Over 60,000 Locations in the United States and Canada, Including
Your Hometown, Golf Courses, Parks Sports Venues and More.
•
Automatically Updates Itself via the Gateway
•
4 Day Forecast with Daily Sky Condition Icons
•
Specific Forecast for Morning, Afternoon, Evening and Night and Full Day
•
Center LCD Line Scrolls City Name, Forecast, Outdoor Temperature, Sun Rise/Set
•
Center LCD Line Scrolling Speed Adjustment (1-4)
•
LCD Contrast Setting (1-7)
•
Daily HI / LOW Temperature Forecast
•
Indoor Temperature (°F)
•
Wireless Outdoor Temperature (°F)
•
Time and Date Set Automatically
•
Low Battery Indicator on the LCD and the web site for the Wireless Display and
Outdoor Sensors
•
Expansion Options (see website for details)
This product offers:
INSTANT TRANSMISSION
is the state
-
of
-
the
-
art new
wireless transmission technology, exclusively designed
and developed by LA CROSSE TECHNOLOGY®.
INSTANT TRANSMISSION offers you an immediate
update (every 4 seconds!) of all your outdoor data
measured from the sensors: follow your climatic
variations in real-time!

Version 2 - 12/22/2011
Page 6 of 24
What You Need to Get Started:
•
High-speed Internet connection – cable, DSL or other broadband Internet service will work.
•
Router or broadband modem with built-in router (contact your Internet service provider ISP
for information on compatibility with their service)
•
If you have any questions about routers, or you would like a recommendation on a great
router for use with Weather Direct®, see - www.weatherdirect.com/router
•
Valid e-mail address – required to make sure you can retrieve your password and receive
other information about your user profile.
•
2 “AA” Alkaline batteries for the Wireless Outdoor Sensor
NOTE: Rechargeable batteries are not recommended due to the wide variation in
performance between brands and types. Please use only fresh Alkaline batteries.
•
3 “D” Alkaline batteries for the Wireless Display
NOTE: Rechargeable batteries are not recommended due to the wide variation in
performance between brands and types. Please use only fresh Alkaline batteries.
•
Visit www.weatherdirect.com and click “Register” to Start. Note: The Gateway is registered
first, then the wireless display.
•
After you have registered and selected a forecast location and Time Zone for your Wireless
Display, the forecast data will show up on the display within 60 seconds.
•
A reasonably current Windows, Macintosh, or Linux PC with Internet browser installed is
required for initial set up and configuration changes
1
.
•
The browser must be configured with Java Script enabled. Most browsers allow JavaScript as
a standard feature. If you have turned off support for JavaScript in your browser, please
allow JavaScript to run again to register or configure your Device.
1
Any internet use involves computer security maintenance. It is your responsibility to maintain current
operating system and internet security patches to protect your PC resources. Contact your operating system
vendor or ISP for maintenance details. The following reference may also be helpful:
http://www.cert.org/tech_tips/home_networks.html

Version 2 - 12/22/2011
Page 7 of 24
Quick Set Up Visual:
Please DO NOT insert batteries into the Wireless Display or the Outdoor Sensor until instructed
to do so.
Connect the Gateway to an available LAN port on your network router with the LAN cable
(included) and then power up the Gateway with the AC Adapter (included).
Set Up your WD-9535
NOTE: The Quick Set-Up Card that is included in the box contains additional instructions
to help you get started quickly if you want to perform a basic setup of your Weather Direct®
system without reading this entire manual.
Open www.weatherdirect.com in a web browser and click “REGISTER” at the top of the page.
Our Online Registration Wizard will guide you through the complete registration process.
Note: To connect the WD-9535 to the external sensor, insert batteries into the sensor before
putting batteries in the WD-9535. When the WD-9535 starts up, it will connect to the external
sensor.
Detailed Set Up:
Create Your Weather Direct User Account
First, create an account at www.weatherdirect.com. You
only need one account to manage all your Weather Direct
components. (Note: We generally recommend limit of 3
gateways per user account.)
In the Login box, select the “Register New User” link.

Version 2 - 12/22/2011
Page 8 of 24
You are presented with a standard web site usage
agreement. You may use the print link, if desired.
You must consent to the License Agreement terms
where indicated before clicking on the “Create Profile”
button:
Weather Direct basic registration and usage is free.
Next you need to complete one screen of
basic personal information. Tips on doing
so:
User Name: Make this an easy to
remember name variation or descriptive
phrase. Use the underscore _ where any
spaces would be. If the name chosen has
already been taken, you will get a red error
message.
Password: Choose 6 or 8 characters you
can remember. For best security, combine
letters, numbers, and symbols.
Email Address: This must be valid, as it is
used to confirm specific events. (Note: Your
hi-speed internet service usually provides an
email address. Basic free accounts are also
available at resources like google.com,
msn.com, or yahoo.com if you do not have
e-mail or wish a separate address for
weather direct.)
First Name, Last Name and Zip Code: We
do not sell or rent lists; your name is used for
notification and support purposes only.

Version 2 - 12/22/2011
Page 9 of 24
My Time Zone: This entry tells the
computer which time zone you want to see
on the display.
Display all Temperatures on the Website
as: Your choices are Fahrenheit or Celsius.
Note: Displays can have their own setting
selected when you register a device.
Verification Code: Retype what you see on
the screen. This is a common web site
security registration request.
Note: If you see black instead of a
verification code, check what you need to
get started above. You can create your
account on a different PC (one-time task). A
configuration issue making the account
usually does not impede using it. We cannot
resolve browser configuration issues for you.
Note: After account set up you will only
need you user name and password to log in.
Register Standard Gateway
On the “Select Your Gateway Type” box select
the picture that matches the gateway in your
package. Most users purchase a standard
gateway.
Notice the “My Weather Direct” summary on
the left. This panel will gradually fill with
gateway(s) and display(s) as you build your
weather direct system.
If you do not see the Select Your Gateway
Type box, choose either the “Register
Gateway” entry on the left, or the “Register”
menu option at the top of the page.
Please follow the directions on the screen to
register the gateway. A few tips:
1. On the first gateway registration screen,
STOP and double-check ALL wiring before
you proceed. The most common mistake
we see is that user’s wire is in a router or
switch incorrectly.

Version 2 - 12/22/2011
Page 10 of 24
2. If you have some difficulty registering, it is OK to press the gray button on the gateway more
than once as the progress bar advances across the screen. Wait about 30 seconds between
attempts and make sure to press the button firmly.
If you succeed, a working gateway comes
to rest at a solid red light. Normal
operation is red light always on and green
light on when data transmits.
Register a Device
To register any device, your gateway must be successfully registered
Select the “Register Device” option under the gateway in the My Weather
Direct panel.
When you are presented with the Registration screen, look at your device (WD-9535), then
scroll up and down the pictures presented on the screen until you find the closest match (the
registration process will correct any errors as it reads the display chip).
WARNING: Match display models on the 4 numeric digits, as any other characters on the
picture label are less important. If in doubt, the model number is printed on the back of the
device just below the “ONLINE SUPPORT” entry (usually on the battery cover). You need
the last 4 digits from the www.weatherdirect.com/9535 entry as the web site does not use the
letter codes.

Version 2 - 12/22/2011
Page 11 of 24
Non-Audio Units
After batteries are inserted in a non-audio unit, it should scroll the words “Press Gateway
Button” in the window of the LCD. If it does not, press and hold both the SET+DISPLAY keys
until you hear two beeps, then it is reset and the “Press Gateway Button” message should
scroll.
Follow the directions on both the web site and LCD display screen. You only press the
Gateway button to register a non-audio unit.
Additional tips:
•It is OK to press the Gateway button more
than once while the progress screen
advances, provided that you wait 30
seconds between each press.
•When you get to the “Wireless Display Settings” page, do not
be overly concerned about making your initial data entry
perfect. You have about 120 seconds to save the registration.
You can always “perfect” it later.
TX50 Outdoor Temperature Sensor
Once the forecast is showing on the WD-9535U display, then remove the batteries again from the
display. Wait 10 minutes. Insert Batteries into the outdoor sensor before you replace batteries in
the display. Place the sensor 5-10 feet from the display for 15 minutes. Press the “DISPLAY” Key
repeatedly on your Wireless Display until the outdoor temperature is displayed in the center scroll
line.

Version 2 - 12/22/2011
Page 12 of 24
The Wireless Outdoor Sensor sends temperature data to your Wireless Display, accurate to
within a tenth of one degree.
The Outdoor Temperature Sensor uses 2 x “AA”, Alkaline
batteries. To install and replace the batteries, please follow
the steps below:
1. Remove the battery compartment cover on the back
of the sensor.
2. Insert the batteries, observing the correct polarity
(see marking).
3. Replace the battery compartment cover on the unit.
Press the “DISPLAY” Key repeatedly on your Wireless Display until the outdoor temperature is
displayed in the center scroll line (right side next to the word Out).
Time Setting on Wireless Display
The Time Zone you select on
www.weatherdirect.com for your
Wireless Display is intended to set
the time for your physical location
so the clock on your Wireless
Display is accurate. This time is
independent of your selected
forecast locations. The Wireless
Display will ONLY display the time
from the “Time Zone for Wireless
Display Clock” set on the web site,
NOT the time at the forecast
locations. There is only one Time
Zone available per Wireless
Display.
The Daylight Saving Time (DST)
checkbox on your Wireless Display
settings at www.weatherdirect.com
is selected by default because most
locations observe DST. If you are
in a location that does not observe DST, please make sure to uncheck this box.

Version 2 - 12/22/2011
Page 13 of 24
Wireless Display Operation
This section will teach you how to use your Wireless Display once you have completed online
registration. There are 5 control Keys located on the front of the Wireless Display: “SET”,
“+/UPDATE”, “ /QUIET”, “DISPLAY” and “MODE”. The following information is divided into
sections based on the function of each Key.
Note: If you have any difficulty displaying the outdoor temperature, remove batteries from both
the display and the temperature sensor. Let them sit for 10 minutes. Then, making sure the
display is in range of the gateway; reinsert batteries first into the temperature sensor, then the
display. As the display updates, the temperature sensor will be discovered and connect to the
display.

Version 2 - 12/22/2011
Page 14 of 24
“MODE” Key
Specific Forecasts help you prepare for different weather conditions during the day by providing
weather information for Morning, Afternoon, Evening and Night.
You'll know if the weather during the morning commute will be different from the weather during
the rest of the day.
You'll know to bring your umbrella to work on a deceptively beautiful sunny morning, because
Micro Forecasts will inform you that it will rain in the afternoon on your way home.
Going to the game today? The Afternoon and Evening forecasts are a lifesaver! Micro Forecasts
help to make sure that you pack a blanket or a rain coat if needed.
Work 2nd or 3rd shift? Receive detailed forecast information tailored to specific times of the day
when you are the most active.
You can change the Micro Forecast reading on your Wireless Display by pressing the “MODE”
Key to toggle between the available options.
Press the “MODE” Key to cycle through the Micro Forecast options:
1. MORNING
Forecast from 6:00 AM - 11:59 AM with Daily HI/LO Temperature
2. AFTERNOON
Forecast from 12:00 PM - 5:59 PM with Daily HI/LO Temperature
3. EVENING
Forecast from 6:00 PM - 11:59 PM with Daily HI/LO Temperature
4. NIGHT
Forecast from 12:00 AM – 5:59 AM with Daily HI/LO Temperature
5. ROTATE (displays briefly in center panel)
Rotates between the four Micro Forecasts and the Daily Forecast
6. NEXT SECTION (displays briefly in center panel)
Shows the forecast for the next six hour period so you can be prepared for the upcoming
weather. If it was morning now, it would show the afternoon forecast. If it was evening
now, it would show the night forecast, etc.
7. ONLY DAY (displays briefly in center panel)
Shows only the Daily forecast when you are only interested in the weather for the day
rather than forecasts for morning, afternoon, evening or night.
“DISPLAY” Key
The “DISPLAY” key allows you to change the data shown in the right-most section of the scrolling
text. By default, this area will display the seconds’ value of the current time. By pressing the
“DISPLAY” key, you can choose to change this value to show the Date, Day of Week, Indoor
Temperature, or Outdoor Temperature.

Version 2 - 12/22/2011
Page 15 of 24
Note: The outdoor temp is supplied from the external sensor that is included with your WD-9335.
To connect the WD-9535 to the external sensor, insert batteries into the sensor before putting
batteries in the WD-9535. When the WD-9535 starts up, it will connect to the external sensor.
“ /QUIET” Key
Press the “ /QUIET” key to start the weather scroll. When this button is pressed the location
name will appear in the center scrolling text window, followed by that location’s forecast
information. If you have multiple locations, you need to press “SET” to change the location
scrolled.
If an alert is currently beeping, this key will also silence the alert. This will not cancel the alert or
turn off any alert lights.
When ADD 4 LOCATIONS Expansion Option is Active
Press the QUIET Key to toggle between the forecast locations on the Wireless Display when the
ADD 4 LOCATIONS Expansion Option is active. The name of the location will appear briefly on
the bottom of the LCD when it is selected. Weather data for up to 5 locations can be viewed on
your Wireless Display.
+/UPDATE” Key
Manually Request a Weather Direct® Data Update
•
When you register your Wireless Display, the weather data is updated within a few minutes.
Every 6 hours after that, your Gateway will send weather data to update your Wireless
Display.
•
After changing the forecast location or other setting on the web site, it can be up to six hours
for your next scheduled automatic update.
•
After adding an Expansion Option to your Wireless Display, it can be up to six hours for your
next scheduled automatic update.
•
If you do not want to wait for your Wireless Display to update automatically, Press and Hold
the “+” Key for 3 seconds until your Wireless Display beeps once. A second beep within a
few seconds will signify that the Wireless Display has received the data.
“SET” Key
Changing Settings on Your Wireless Display
Press and hold the “SET” Key until the Wireless Display beeps to enter the SET mode. Press the
“SET” Key to toggle through the five SET modes. If you wait for 5 seconds without pressing a
key, the Wireless Display will exit the SET mode and return to normal operation.
The SET modes are:
Set Mode 1 – Set LCD Contrast (0-7)
1.
Press and Hold the “SET” Key until the Wireless Display beeps to enter
the SET mode.
2.
“SET LCD CONTRAST” will scroll across the center.
The number (0-7) will flash near the top.

Version 2 - 12/22/2011
Page 16 of 24
3.
Press the “+” Key to update the LCD Contrast settings.
Lightest Contrast = “0”, Darkest Contrast = “7”
4.
Press the “SET” Key to save the current settings and advance to the next
option
Set Mode 2 - Set Text Scrolling Speed (1-4)
1. Press the “SET” Key until “SET SCROLL SPEED” scrolls across the
center.
The number (1-4) will flash near the top.
The standard speed is set to “2”. There are four speeds available – “1” is
the slowest and “4” is the fastest.
2. Press the “+” Key to change the scroll speed.
3. Press the “SET” Key to save the current settings and advance to the next
option.
Set Mode 3 – Enable Automatic Weather Texts (ON/OFF)
When this mode is enabled, the center scrolling text area will automatically toggle
between displaying the forecast information and displaying the time and date/temp. (for
details on selecting date or temperature options, see the section on the DISPLAY key)
1. Press the “SET” Key until “On” flashes at the top and “AUTOMATIC
WEATHER TEXTS” scrolls across the center.
The default is set to “On”.
2. Press the “+” Key to enable/disable the auto texts. Disabled is displayed
as “Of”.
3. Press the “SET” Key to save the current settings and advance to the next
option.
Set Mode 4 – Enable Warning Lights (ON/OFF)
In addition to the scrolling text of the Severe Weather Alerts, a Warning light provides a
visual indication of an alert condition for the area.
The orange/yellow light in the lower left corner lights when an alert is issued that is in the
category of Advisory or Watch. This also includes NWS Statements and other
notifications that are less than an imminent threat level. These alerts typically indicate
that some condition is likely or possible to affect the area.
The red light to the lower right corner illuminates when a Warning level alert has been
issued. These alerts typically indicate that the alert information is of a higher level of
importance and that some condition is very likely to happen or is already happening in or
near the area.
You can turn this feature off so that the lights do not illuminate, and only the text of the
alert is displayed in the center scrolling area. To change the setting, follow the
instructions below:
1.
Press the “SET” Key until “ON” or “OF” flashes at the top and “ENABLE
WARNING LIGHTS” scrolls across the center.
2.
Press the “+” Key to enable/disable the auto texts. Disabled is displayed
as “Of”.
3.
Press the “SET” Key to save the current settings and advance to the next
option.

Version 2 - 12/22/2011
Page 17 of 24
Set Mode 5 - View Device ID
NOTE: Device ID is a reference item for customer service only. You may press
the “SET” Key again to exit SET mode if you are not asked to provide this
number by customer service.
1.
Press the “SET” Key until “CO 1” appears at the top left.
2.
The Device ID will appear in the center scroll area.
3.
Next press the “+” key. “CO 2” will appear in the upper left. You need to
write down both sets of numbers to get the complete Device Id.
4.
Press the “SET” Key to exit SET mode.
Factory Reset of Wireless Display
NOTE: It is not possible to re-register a previously registered Wireless Display under a new
account until the Wireless Display has been deleted from the user account on
www.weatherdirect.com and a Factory Reset has been performed.
NOTE: Expansion Options that are Lifetime Upgrades are still active on your Wireless
Display even if you delete it from your user account on www.weatherdirect.com or perform
a Factory Reset. The selection of locations and other custom settings will need to be
performed again if the Wireless Display is re-registered.
WARNING: The Factory Reset procedure will erase any registration and setup information
from your Wireless Display. You must register the Wireless Display again with
www.weatherdirect.com to use it after a Factory Reset.
WARNING: Deleting the Wireless Display from a user account on www.weatherdirect.com
will erase the weather and other setup information such as forecast locations from the
Wireless Display.
If you have trouble registering your Wireless Display after multiple attempts, you can try a Factory
Reset.
If you wish to give your Wireless Display to someone else or simply to register it under a different
user account, you must perform the Factory Reset to clear the registration information from the
memory of the Wireless Display and delete the device from the user account on
www.weatherdirect.com
Additional diagnostic and reset information, including how to reset the gateway (if necessary), is
contained at www.weatherdirect.com/help
TO PERFORM THE FACTORY RESET:
Hold both the “SET” and “DISPLAY” Keys down together for about 6 seconds; you will hear a
double beep. This resets the Wireless Display to the original factory state. Once this has been
done, you will need to re-register the device. Please refer to the section on device registration in
this guide for instructions.
FREE Trial of Expansion Options for 14 Days
When you register your Wireless Display and have the included forecast location selected, you
will be given the opportunity to try our most popular Expansion Options FREE for 14 Days! NO
CREDIT CARD OR PAYMENT REQUIRED! 14 Days of FREE Expansion Options, including:

Version 2 - 12/22/2011
Page 18 of 24
Severe Weather Alerts
Keep your family safe with Severe Weather Alerts issued by the National Weather Service. This
valuable information will help you prepare for upcoming weather events. Choose which types of
severe weather events you want to receive. Even be alerted via e-mail or SMS text message
when you are away from your Wireless Display!
Severe Weather Alerts are available for either 1 year or 3-year periods that cover one forecast
location. You can add up to 5 total alert locations if you also have the Add 4 Locations Expansion
Option active.
Severe Weather Alerts are available for any of our forecast locations.
Weather Direct® is not liable for any incidents that may occur as a result of any National Weather
Service alert. This alert service is provided as a convenience to make you aware of a potential
situation, not as a replacement for local severe weather warning systems.
Types of Severe Weather Alerts:
Warnings
Blizzard Heavy Rainfall Severe Thunderstorm
Coastal Flood Heavy Snow Severe Wind
Excessive Heat Heavy Snowfall Small Craft
Flash Flood High Wind Special Marine
Flood Hurricane Force Storm
Freeze Ice Storm Tornado
Frost Lake Effect Snow Weather
Gale Lake Snow Wind Chill
Heavy Rain River Flood Winter Storm
Watches
Coastal Flood Flood Lake Effect Snow
Excessive Heat Freeze Lake Snow
Flash Flood High Wind River Flood
Advisories and Statements
Blowing Dust Heat Tropical Storm Statement
Blowing Snow Heavy Snow Urban And Small Stream Flood
Dense Fog Hurricane Statement Urban Flood
Freezing Drizzle Lake Effect Snow Wind

Version 2 - 12/22/2011
Page 19 of 24
Freezing Fog Small Stream Flood Wind Chill
Freezing Rain Snow Winter Weather
Frost Snow And Blowing Snow
Forecast Icons Explained
There are two sets of icons presented on your Wireless Display, one for day and one for night. A
sun appears on many of the day icons while a moon appears on many of the night icons. Night
icons are only available with the Micro Forecast Expansion Option.
NOTE: Trace precipitation will not display droplets on the icon and “MEDIUM” conditions
generally use the “HEAVY” icons to communicate weather events that are likely to affect
your plans for the day.

Version 2 - 12/22/2011
Page 20 of 24
Hardware Installation
NOTE: Hardware installation is only intended to be performed after you have registered
your Gateway and Wireless Display, inserted batteries into the Wireless Outdoor
Temperature Sensor, and have confirmed successful reception of weather data.
Wireless Outdoor Sensor Installation Options
NOTE: Move the Wireless Outdoor Sensor into its intended location and wait for 10
minutes to make sure the outdoor temperature is still being received by the Wireless
Display. Press and release the “” “DISPLAY” Key on your Wireless Display to show the
outdoor temperature. NOTE: you will toggle from seconds, date, indoor temperature then
outdoor temperature showing in the right side of the scroll line. If the display shows - -,-F
for the outdoor temperature, the signal cannot reach the Wireless Display. Find a closer
location to mount the Wireless Outdoor Sensor and wait 10 minutes to check the Wireless
Display again for reception.
DO NOT mount the Wireless Outdoor Sensor in a permanent fashion until you are
sure the signal is being received by the Wireless Display.
To Surface Mount the Outdoor Sensor:
We have provided a mounting plate that you can attach to a surface with the
supplied screws. The Sensor can be positioned on a flat surface by securing the
stand to the bottom by gently pushing the bottom of the Sensor onto the holding
pegs of the stand until they click into place in the grooves on the Sensor.
To Wall Mount the Outdoor Sensor:
The Outdoor Sensor is weather resistant, but not water proof. To ensure maximum
Sensor life, mount it in a covered place out of the elements like under the eaves.
Placement on the North side of your home will provide the most accurate readings.
Mount it about 18” down from the eaves for optimum performance. This ensures that
the weather data collected by the Outdoor Sensor will not be affected by the
temperature of the air leaving the attic.
We have provided a mounting plate that you can attach to the wall with the supplied screws.
Gently snap the Sensor onto the holding pegs on the mounting plate after the plate is screwed to
the wall. When the holding pegs are securely locked into the slots on the Sensor, you will hear a
“Click”.
Gateway Installation
The Gateway should be installed indoors in an easy-to-reach location. Registration requires that
you press the gray button on the Gateway. It can be mounted securely to the wall with the
included mounting plate and drywall anchors.
If you require a longer LAN cable to mount the Gateway in a desired location, any standard
Category 5 network cable will work, but a crossover cable may not work. Crossover cables
designed to connect two computers without networking hardware may not work with your
Gateway.
Table of contents
Other WEATHER DIRECT Weather Station manuals

WEATHER DIRECT
WEATHER DIRECT Weather Direct Lite WD-3106UR-B User manual

WEATHER DIRECT
WEATHER DIRECT WD-3312 User manual

WEATHER DIRECT
WEATHER DIRECT Weather Direct Lite WD-2512UR-B User manual

WEATHER DIRECT
WEATHER DIRECT Weather Direct WD-3307 User manual

WEATHER DIRECT
WEATHER DIRECT WD3105UCA User manual

WEATHER DIRECT
WEATHER DIRECT Internet-Powered Weather Station WD-3209 User manual

WEATHER DIRECT
WEATHER DIRECT Weather Direct WD-3303 User manual

WEATHER DIRECT
WEATHER DIRECT Weather Direct Lite WD-2512UR-B User manual

WEATHER DIRECT
WEATHER DIRECT WD-2512U User manual

WEATHER DIRECT
WEATHER DIRECT Internet-Powered Weather Station WD-2511U User manual