Weka 617.3279.00.00 Operating instructions

Montage-, Bedienungs- und Wartungsanleitung
en ASSEMBLY, USER AND MAINTENANCE INSTRUCTIONS Flat roof carport
fr NOTICE DE MONTAGE, D'UTILISATION ET D'ENTRETIEN toiture de protection pour automobile plate
it ISTRUZIONI DI MONTAGGIO, USO E MANUTENZIONE carport con tetto piatto
Art.-Nr. 617.3279.00.00
Art.-Nr. 618.6079.00.00
Stand 1448

Techn. Änderungen vorbehalten! Alle Maßangaben sind ca. Maße. Copyright HRB3662
1
- de -
Sehr geehrte Kundin, sehr geehrter Kunde,
danke, dass Sie sich für ein weka – Produkt entschieden haben.
Lesen Sie diese Anleitung vor dem Aufbau bitte vollständig durch, um Montagefehler oder
Beschädigungen zu vermeiden.
WICHTIG !
Prüfen Sie bitte sofort anhand der Packliste, ob das weka-Produkt vollständig und
unbeschädigt bei Ihnen angekommen ist.
Bitte vernichten Sie die Packliste erst nach Ablauf der Garantiezeit. Diese Liste dient Ihnen zur
Kontrolle auf Vollständigkeit der Einzelteile und ist mit dem Kaufbeleg aufzubewahren. Eventuelle
Beanstandungen können mit Hilfe dieser Liste problemlos behoben werden.
Die Pos.-Nummern der Packliste stimmen nicht mit den Pos.-Nummern folgender
Montageanleitung überein.
Wir empfehlen Ihnen die Montage mit 2 Personen durchzuführen.
Weiterentwicklungen im Sinne des technischen Fortschritts behalten wir uns vor. So können
geringfügige Abweichungen in den Darstellungen entstehen.
Verpackungsmaterial nicht einfach wegwerfen! Papier-, Pappe- und Wellpappeverpackungen,
sowie Kunststoffverpackungsteile sollten in die entsprechenden Sammelbehälter gegeben
werden.
Empfehlungen
Bitte bohren Sie alle Schraubverbindungen vor, um Beschädigungen an den Holzteilen zu
vermeiden! Folgendes Zeichen macht Sie während der Anleitung nochmals darauf aufmerksam:
Voraussetzung für eine statikgerechte Montage ist die Verankerung der Pfosten mittels H-
Pfostenträgern in Betonfundamenten. Die Pfostenträger sind als weka-Zubehör gegen Aufpreis
erhältlich.
Den Fundamentplan erhalten Sie bei Ihrem Fachhändler!
Um das exakte Ausrichten der H-Anker zu erleichtern, kennzeichnen Sie die erforderlichen
Pfostenabstände auf einem Richtholz und befestigen dort die Anker mit Schraubzwingen
Danach hängen Sie die H-Anker in die zuvor ausgehobenen Fundamentlöcher, wobei ein
Mindestabstand von 2 cm zwischen Fundamentoberkante und oberer Strebe einzuhalten ist.
Die benötigte Dachneigung von 1% (Gefälle in Richtung Rückseite) erreichen Sie, indem Sie die
Höhe der Pfostenträger variieren. Das erforderliche Gefälle erreichen Sie auch alternativ durch die
Kürzung der Pfosten.
Nachdem Sie die Löcher mit Beton C25/30 aufgefüllt haben, müssen die Fundamente mindestens
3 Tage lang aushärten.
Sicherheits- und Warnhinweise
Zur Verhütung von Unfällen ist zu vermeiden, dass sich Kinder während der Montage in unmittelbarer
Nähe aufhalten.
Es sind die gültigen Arbeitsschutz- und – Unfallverhütungsvorschriften zu beachten. Informieren Sie
sich bitte bei einem Baufachmann.
Das Dach ist nur auf lastverteilenden Bohlen zu betreten.
Wenn Sie am Dach arbeiten, vermeiden Sie Absturzgefahr durch Einhaltung der zur Zeit gültigen
Unfallverhütungsvorschriften (z.B. Gerüstanordnung, Absturzsicherung).
Die erforderlichen Maßnahmen und Einsatzbedingungen stimmen Sie mit einem örtlichen
Baufachmann oder zuständigen Arbeitsschutzbehörde ab. Arbeiten Sie immer mit Helfern!

Techn. Änderungen vorbehalten! Alle Maßangaben sind ca. Maße. Copyright HRB3662
2
Wir empfehlen Ihnen, beim Abpacken der losen Holzteile und bei der Montage des Hauses
Sicherheitsschuhe, Arbeitshandschuhe und beim Bohren und Sägen eine Schutzbrille zu tragen.
Bei hohen Schneelasten (größer als 1,25kN/m² oder ca. 30cm Schneehöhe) ist das Dach zu
beräumen.
Transport und Lagerung
Sie erhalten das Produkt auf Paletten gestapelt.
Nach dem Auspacken und der Kontrolle behandeln Sie die Teile wie folgt:
Schützen Sie das unbehandelte Holz vor
stundenlanger,
direkter Sonneneinwirkung Feuchtigkeit Bodenkontakt
Folgen falscher Lagerung sind: - Risse
- Verdrehen und Wölben
- Fäulnis (Befall durch Schädlinge usw.)
Lagern Sie das Holz vor Witterungseinflüssen
geschützt und gewährleisten Sie eine
ausreichende Umlüftung!
Garantiebestimmungen der weka Holzbau GmbH
Wir gewähren Ihnen zu nachfolgenden Konditionen – jedoch nur auf die Holzteile unserer Produkte
(weka-Produkt genannt), nicht auf damit verbundene Bauteile oder Bestandteile des weka-Produkts
aus anderem Material als Holz – ab Lieferdatum 5 Jahre Garantie auf Funktion. Innerhalb der
Garantiezeit werden fehlerhafte Teile oder fehlende Teile der Ware oder die Ware selbst nach unserer
Wahl ersetzt. Vom Garantieumfang erfasst ist lediglich der kostenlose Ersatz des jeweils
mangelhaften oder defekten Holzteils. Nicht im Garantieumfang enthalten sind Folge- oder
Zusatzkosten, insbesondere keine Liefer- und Auf- oder Umbaukosten.
Die Garantie ist ausgeschlossen, wenn:
- von der jeweiligen Montageanleitung abgewichen wurde,
- Veränderungen (zusätzliche An- oder Umbauten) an dem Produkt im Vergleich zur
Montageanleitung vorgenommen wurden,
- die jeweils angegebenen Belastungsgrenzen (z.B. Schneelast usw.) überschritten wurden,
- das weka-Produkt falsch gegründet (Fundament / Bodenplatte o.ä.) wurde, insbesondere bei
Verstößen gegen die Regeln der Baukunst,

Techn. Änderungen vorbehalten! Alle Maßangaben sind ca. Maße. Copyright HRB3662
3
- unterlassene oder nicht ausreichende Pflege (Wartung: Holzschutz, Holzanstrich usw.) des
Holzes vorgenommen wurde.
- Windgeschwindigkeiten über Stärke 7, Naturkatastrophen oder gewaltsame Einwirkungen den
Schaden am weka-Produkt verursacht haben.
- der Mangel in holztypischen Farbveränderungen, Rissbildungen, Verwerfungen, Schwinden,
Quellen oder ähnlichen normalen, in der Natur des Werkstoffes „Holz“ begründeten
Veränderungen besteht.
Garantieansprüche können nur in Verbindung mit Originalpackzettel und Originalkaufbeleg in
Anspruch genommen werden und müssen innerhalb der Garantiezeit schriftlich, per Telefax oder per
e-Mail geltend gemacht werden. Anspruchsvoraussetzung ist eine unverzügliche Anzeige des
Mangels bzw. des Schadens in Form einer geordneten Darstellung des Schadens in Bild und Text.
Garantieansprüche sind zu richten an:
weka Holzbau GmbH, Johannesstraße 16, 17034 Neubrandenburg
Fax: 0395/42908-83; e-Mail: info@weka-holzbau.com
ACHTUNG! Bei Nachrüstung von Wandelementen, Geräte-, Lagerräumen oder sonstigen
Wandverkleidungen ist eine ständige und vollflächige Unterlüftung der Dachplatten zwingend
erforderlich, da es sonst zu Hitzestau und Beschädigung der Dachplatten kommen kann.
Dazu ist oberhalb der Wände bis zu den Dachplatten ein Mindestabstand von ca. 20 cm zu
gewährleisten.
Montagebedingungen für weka – Montageteam
Wenn Sie Montagehilfe in Anspruch nehmen und dazu ein weka - Montageteam rufen, wird die weka
Holzbau GmbH für Sie wie folgt tätig:
Montage bedeutet das anleitungsgemäße Zusammenfügen (Aufbau) der gelieferten Einzelteile der
Ware ohne Anstrich, Lieferung und Montage von Zubehör und Zubehörteilen. Elektrische Anschlüsse
sind in den Montageleistungen nicht enthalten
Die aufzubauende Ware muss sich am Aufbauort/Standort/Standfläche befinden. Transport des
Artikels oder der Einzelteile über eine Entfernung von 10 - 15m hinaus oder in ein anderes Geschoss
sind im angebotenen Montagepreis nicht enthalten. Der Untergrund muss tragfähig, horizontal und
eben sein.
Im Zweifel gilt für die Ebenheit: DIN 18202 „Ebenheitstoleranzen im Hochbau“, Tab.3, Zeile 3, mit
einer maximalen Höhendifferenz der am weitesten von einander entfernten Punkten von ca. 10 bis
11mm.
Alle vorbereitenden Arbeiten müssen gemäß den technischen Regeln vor Beginn der Montage
ausgeführt sein. Die von Ihnen gefertigten oder gewählten Untergründe/Fußböden/ Fundamente
müssen für die Montage geeignet sein.
Hinweise – Dachplatten
Die Dachplatten sind vor der Montage überdacht zu lagern oder gegen direkte Sonnenbestrahlung
zu schützen! Hierzu eignet sich besonders weiße Folie. Bei mehreren übereinander gestapelten
Platten kann sich ein Wärmestau bilden, der durch einen Brennglaseffekt zu Verformungen und
Verfärbungen der Platten führt.
Die Montage der Platten darf nicht bei einer Temperatur von unter +5°C bzw. über 30°C erfolgen.
Um die Dichtheit Ihres Carports zu garantieren, ist beim Verlegen der Dachplatten mit Silikon
(nicht im Lieferumfang enthalten) zu arbeiten.
Die Bohrung der Dachplatten ist in einer Größe von d = 10 mm vorzubohren!
Bitte beachten Sie, dass bei zweifarbigen Dachplatten die dunkle Seite als Unterseite
verwendet wird.
Verwenden Sie die Abstandhalter!
Beachten Sie, dass die Schrauben nicht zu fest angezogen werden, um das Arbeiten der Platten
zu gewährleisten.

Techn. Änderungen vorbehalten! Alle Maßangaben sind ca. Maße. Copyright HRB3662
4
Werkzeug
Folgendes Werkzeug sollten Sie vor Beginn der Montage zurecht gelegt haben.
Bandmaß Wasserwaage Bleistift Säge Bohrmaschine
Elektroschrauber Kegelbohrer Schraubzwingen Schraubenschlüssel Silicon
= EINFAHRT
Hinweis
In regelmäßigen Abständen sollten die Verschraubungen überprüft und nachgezogen werden. Dieses
Produkt ist überwiegend aus Massivholz gefertigt und da es sich bei dem Werkstoff Holz um ein
Naturprodukt handelt, kann es vorkommen das durch extreme Witterungseinflüsse, insbesondere
nach langen Wärmeperioden, sich Trockenrisse bilden. Diese Trockenrisse sind keinesfalls ein
Qualitätsmängel, sondern eine natürliche Erscheinung und je nach Wetterlage können sich diese
Risse bis auf ein Minimum wieder verschließen.
Darüber hinaus haben diese Trockenrisse, welche in Längsrichtung des Holzes auftreten, keinen
Einfluss auf die Festigkeit und Belastbarkeit des Materials. Das heißt, die statischen Eigenschaften
werden nicht beeinträchtigt.
Holzschutz
Das Produkt besteht aus dem natürlichen Rohstoff Holz. Dies macht regelmäßig ausreichende
Holzschutzmaßnahmen zwingend erforderlich. Für die fachgerechte Holzschutzbehandlung wenden
Sie sich bitte an einen Holzschutzfachmann.
Holzschutzmaßnahmen sind vom Kunden in eigener Verantwortlichkeit durchzuführen. Ohne
vorschriftsmäßigen Holzschutz kann keine Gewährleistung übernommen werden. Bitte beachten Sie
auch die diesbezüglichen Bestimmungen in unseren Garantieerklärungen.
Wir wünschen Ihnen gutes Gelingen und viel Freude an Ihrem weka-Produkt.

Techn. Änderungen vorbehalten! Alle Maßangaben sind ca. Maße. Copyright HRB3662
5
- en -
Dear customer
Thank you very much for choosing a weka product.
Read these instructions through completely before assembling your product in order to
avoid errors in assembly or damage.
IMPORTANT
Please use the enclosed packing list to check immediately that your weka product has
been delivered complete and intact.
Please do not dispose of the packing list before the guarantee period has expired. This list
enables you to check that all the individual parts are present. It should be retained along with the
proof of purchase. Any complaints which may arise can probably be easily rectified with this list.
The item numbers on the packing list do not correspond to the item numbers in the following
assembly instructions.
We recommend that 2 people carry out the assembly.
We reserve the right to make further technological developments. This means that there many be
minor deviations in the illustrations.
Please do not simply throw away the packaging material. Paper, card and corrugated board as
well as plastic packaging materials should be placed in the correct collection containers.
RECOMMENDATIONS
Please drill pilot holes for all screw connections to avoid damaging the wood. The following
symbol in the instructions will indicate when this is necessary:
A prerequisite for successful assembly, is the anchoring of the studs in the concrete foundation
using H stud supports. The stud supports are available as weka accessories for an additional cost.
A foundation plan can be obtained from your specialist dealer!
In order to facilitate the precise alignment of the H anchors, mark the necessary post clearances
on a piece of guide wood and fix the anchors in place with screw clamps
Then suspend the H anchors in the base holes already prepared. A minimum clearance of 2 cm is
to be maintained between the upper edge of the foundation and the upper strut.
The required roof pitch of 1% (gradient towards the rear) can be achieved by varying the height of
the stud supports.
The required gradient can also be achieved by shortening the studs.
After the holes have been filled with C25/30 concrete, the foundation must be allowed to set for at
least 3 days.
Safety information and warnings
In order to prevent accidents, we recommend that children be kept out of the direct vicinity during
assembly.
During assembly, children under the age of 14 should be kept at least 3 m from the assembly site.
The current occupational safety and accident prevention regulations are to be observed. Information
can be obtained from a builder.
The roof is only to be accessed on load-distributing boards.
When you are working on a roof, avoid the risk of falling by complying with the current accident
prevention regulations (e.g. scaffolding requirements, safety rails).
Agree the required measures and operating conditions with a local builder or competent work safety
authority. Always work with helpers!

Techn. Änderungen vorbehalten! Alle Maßangaben sind ca. Maße. Copyright HRB3662
6
When unpacking the loose wooden parts and when assembling the cabin, we recommend that you
wear safety boots and work gloves. When using a drill or saw, you should also wear protective
goggles.
The roof is to be cleared of high snow loads (in excess of 1,25 kN/m² or approx. 30 cm in height).
Transport and storage
The product is delivered stacked on pallets.
After unpacking and checking, handle the parts as follows:
Protect the wood against
long-term, direct sunlight moisture contact with the ground
Incorrect storage may result in: - Cracks
- Distortion and warping
- Rotting (infestation by pests etc.)
Store the wood such that it is protected against
weathering and has sufficient ventilation.
Warranty terms of weka Holzbau GmbH
We guarantee the function of our products for 5 years from the date of delivery based on the following
conditions – however only on the wooden parts of our products (hereinafter weka product) and not on
connected components or parts of the weka product made of another material besides wood. Within
the warranty period defective parts or missing parts of the product or the product itself will be replaced
at our discretion. The warranty extends only to the free-of-charge replacement of the respective faulty
or defective wooden part. The warranty does not cover any consequential or additional costs, in
particular no delivery and installation or modification costs.
The warranty is void in case of:
- failure to follow the assembly instructions,
- changes (additions or modifications) made to the product diverging from the assembly
instructions,
- load limits (e.g. snow load, etc.) having been exceeded,
- the weka product having been installed on an incorrect foundation or floor plate, etc., in
particular in case of violation of the rules of architecture,

Techn. Änderungen vorbehalten! Alle Maßangaben sind ca. Maße. Copyright HRB3662
7
- lack of or insufficient care of the wood (maintenance measures such as preservation or
painting of the wood),
- wind speeds stronger than force 7 (moderate gales), natural catastrophes or brute force
having caused the damage to the weka product,
- the deficiency consisting in changes which are typical for wood, such as discoloration,
formation of cracks, warping, shrinking, swelling or similar normal effects on the material
"wood".
Warranty claims must be accompanied by the original packing slip and the original sales receipt and
must be submitted within the warranty period in writing or by fax or e-mail. A further prerequisite for a
claim is the immediate notification of the defect or damage in the form of pictures and a written
description of the defect.
Address all warranty claims to:
weka Holzbau GmbH, Johannesstraße 16, 17034 Neubrandenburg
Fax: 0395/42908-83; E-mail: info@weka-holzbau.com
NOTE! For retrofitting of wall elements, equipment and storage rooms, or other wall coverings,
constant and full-surface ventilation underneath the roof panels is required, as otherwise heat
may be built up and the roof panels damaged.
For this, a minimum distance of 20 cm up to the roof panels must be ensured.
Assembly conditions for a weka assembly team
If you wish for help assembling your cabin and choose to employ a weka assembly team, weka
Holzbau GmbH will carry out the following services for you:
Assembly means putting together (installation) of the individual parts supplied. It does not include
treating them with a wood protection agent, the delivery and assembly of accessories and accessory
parts. Electrical connections are not included in the assembly service.
The items to be assembled must be located at the installation site/location/base area. Transport of the
article or the individual parts over a distance greater than 10 - 15 m or to another level is not included
in the assembly price quoted. The substrate must be stable, horizontal and level.
In the event of doubt, reference should be made to DIN 18202 ‘Level tolerances in building
construction’, tab. 3, row 3, with a maximum height difference at the furthest points of approx. 10 to 11
mm.
All preparatory work must have been carried out in accordance with the technical regulations before
assembly begins. The substrates/floors/foundations constructed or selected by you must be suitable
for the assembly.
NOTES – ROOF TILES
Prior to mounting, the roof tiles are to be stored undercover and out of direct sunlight. This applies
in particular to white foils. Heat may build up under a stack of tiles leading to distortion and
discoloration of the tiles due to the burning glass effect.
Roof tiles must not be mounted in temperatures below +5°C or above 30°C.
In order to guarantee the impermeability of your car port, silicon is to be used when laying the roof
tiles (not included in the delivery), see page 30.
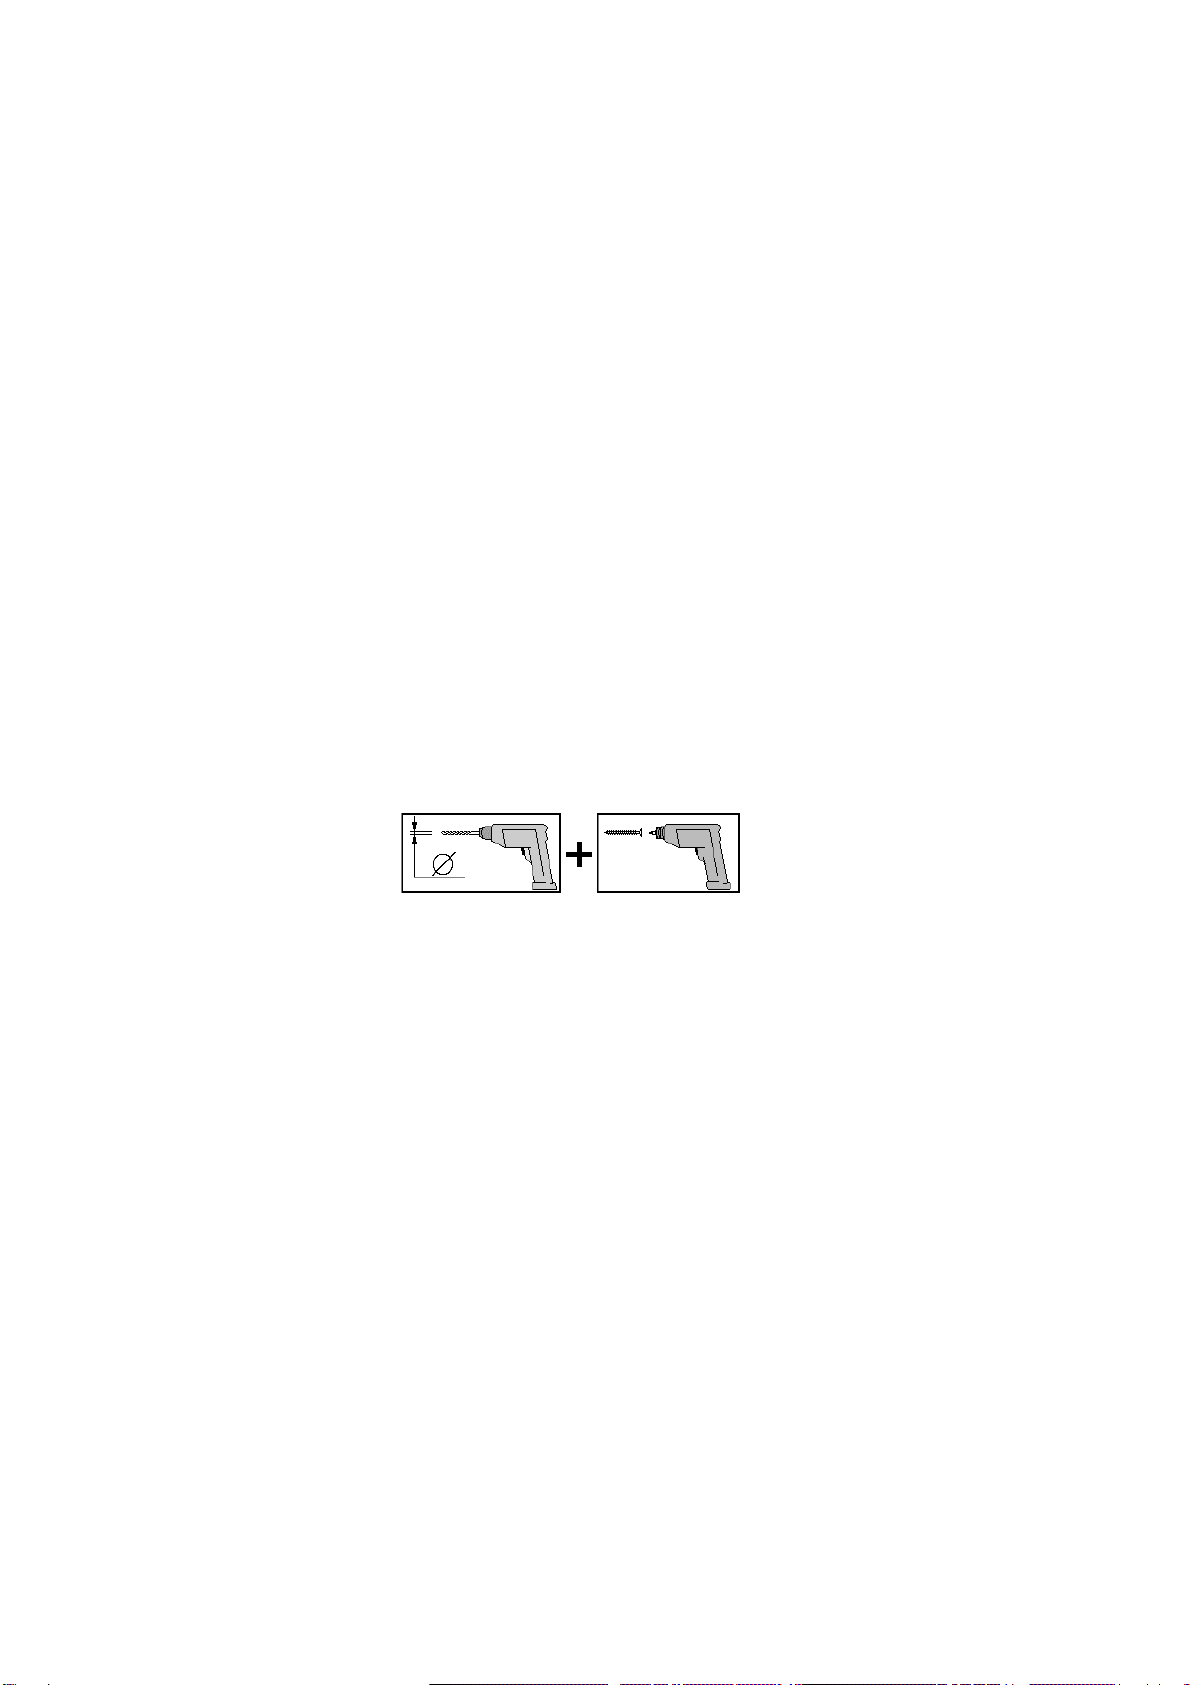
The roof tiles are to be pre-drilled with holes with a diameter = 10 mm.
Please note that the tiles are to be screwed into place on the front and back purlin (item 3) on
every 2nd wave, on the centre purlins (item 3) on every 4rd wave. Figure page 31
Use the spacers (item 19) according to the figure on page 31.
Please note that the screws are not to be screwed down too tightly in order to guarantee the
function of the tiles.
Note: No false floor may be installed or thermal insulation provided below the roof tiles. There
must be adequate ventilation beneath the roof tiles.

TOOL
You should have the following tools to hand before beginning assembly. (Not supplied.)
Spring tape measure Spirit level Pencil Mitre saw/hand disk saw Drill
Electric screwdriver Taper drill Screw clamp Spanner Silicone
= Entrance
The screw connections should be checked and retightened at regular intervals. This product is
manufactured primarily from solid wood and as wood is a natural product, prolonged weathering, in
particular after long hot periods, may lead to the formation of dry cracks. These dry cracks are in no
way a quality defect but a natural occurrence and, depending on the weather conditions, these cracks
may close up again to a minimum.
In addition, these dry cracks which appear along the grain of the wood have no effect on the stability
and durability of the material. In other words, the static properties are unaffected.
Wood protection
The product is made from natural timber, for which regular and adequate wood preservation measures
are obligatory. Please contact a wood preservation expert for information on professional preservation
measures.
Wood preservation is to be carried out by the customer at his own risk. No guarantee can be given in
the event of wood preservation not carried out in accordance with the instructions. Please also note
the provisions relating to this in our guarantee.
We hope you have a successful installation and wish you many happy hours enjoying
your weka product.

Techn. Änderungen vorbehalten! Alle Maßangaben sind ca. Maße. Copyright HRB3662
1
- fr -
Chère Cliente, cher Client
Nous vous remercions d'avoir choisi un produit weka.
Lisez entièrement la présente notice avant de procéder à l'assemblage afin d'éviter les erreurs et
les dommages.
IMPORTANT !
Veuillez vérifier immédiatement, à l'aide de la liste des pièces, si le produit weka est
arrivé complet et en bon état.
Ne détruisez la liste des pièces qu'une fois la garantie écoulée. Cette liste vous permet de vérifier
si les pièces détachées sont complètes et doit être conservée avec le justificatif d'achat. Elle vous
permettra de faire valoir aisément d'éventuelles réclamations. Les numéros de pos. de la liste des
pièces ne sont pas identiques aux numéros de pos. de la présente notice de montage.
Nous vous recommandons d'effectuer le montage à 2 personnes.
Nous nous réservons le droit d'apporter aux produits des modifications dans le cadre de
l'évolution technique. De légères différences sont par conséquent possibles par rapport aux
illustrations.
Ne pas jeter simplement le matériel d'emballage! Les emballages en papier, carton et carton
ondulé doivent être déposés dans le container de tri correspondant.
RECOMMANDATIONS
Pré-percez tous les assemblages vissés afin d'éviter d'endommager les éléments en bois! Ceci
vous est rappelé par le symbole suivant dans la notice:
Le montage en respect des règles de la statique exige d'ancrer les poteaux à l'aide de supports
en H dans des fondations en béton. Les supports de poteaux sont disponibles à titre
d'accessoires weka contre supplément.
Le plan de fondation vous sera remis par votre revendeur!
Pour faciliter l'alignement précis des éléments d'ancrage en H, repérez les distances nécessaires
entre les poteaux sur une latte repère et fixez-y les éléments d'ancrage à l'aide de serre-joints.
Suspendez ensuite les éléments d'ancrage en H dans les trous préalablement aménagés de la
fondation en laissant au moins 2 cm entre le bord supérieur de la fondation et l'entretoise
supérieure.
Pour obtenir la pente requise du toit de 1% (inclinaison vers l'arrière), variez la hauteur des
supports de poteaux. La pente requise peut également être obtenue en raccourcissant les
poteaux.
Après avoir rempli les trous de béton C25/30, laissez durcir les fondations pendant au moins 3
jours.
Informations sur la sécurité et avertissements
Pour prévenir les accidents, faites en sorte que les enfants ne se tiennent pas à proximité durant le
montage.
Les enfants de moins de 14 ans ne sont pas autorisés à se tenir à moins de 3 m du chantier pendant
le montage.
Les prescriptions en vigueur dans le code du travail et sur la prévention des accidents doivent être
respectées. Informez-vous auprès d'un professionnel de la construction.

Techn. Änderungen vorbehalten! Alle Maßangaben sind ca. Maße. Copyright HRB3662
2
Utilisez uniquement les madriers porteurs pour poser les pieds sur le toit.
Si vous travaillez sur le toit, évitez tout risque de chute en respectant les règlements de protection
contre les accidents en vigueur actuellement (par ex. règlement sur les équipements de protection,
protection contre les chutes).
Les mesures et conditions de mise en œuvre requises vous seront communiquées par un spécialiste
local ou les autorités chargées de la protection du travail. Travaillez toujours avec l'assistance de
tiers !
Nous vous recommandons de porter des chaussures de sécurité et des gants de travail lorsque vous
sortez les pièces de bois de l'emballage et lors du montage de l'abri et de porter des lunettes de
protection lorsque vous effectuez des travaux de perçage.
En cas de fortes charges de neige (supérieures à 1,25 kN/m² soit environ 30 cm de neige), le toit doit
être dégagé.
Transport et stockage
Le produit vous est livré gerbé sur palettes.
Après le déballage et le contrôle, veuillez traiter les pièces comme suit :
Protégez le bois contre
un ensoleillement
direct et prolongé l'humidité le contact avec le sol
Un mauvais stockage engendre : - des fissures
- un gauchissement et des cambrures
- la putréfaction (attaque de parasites, etc.)
Stockez le bois à l'abri des intempéries et assurez-
vous qu'il est suffisamment aéré !
Conditions de garantie de la weka Holzbau GmbH
Nous vous accordons, aux conditions qui suivent, 5 ans de garantie à compter de la date de livraison
sur le bon fonctionnement des pièces en bois de nos produits exclusivement (désignés produits
weka), à l’exclusion des pièces qui leur sont associées et à l’exclusion des composants du produit
weka fabriqués en un matériau autre que le bois. Pendant la durée de la garantie, les pièces
défectueuses, ou les pièces de la marchandise manquantes ou la marchandise elle-même seront
remplacées suivant notre choix. L’étendue de la garantie se limite au remplacement gratuit de la pièce
en bois défectueuse ou comportant un vice. Sont exclus de l’étendue de la garantie les coûts
consécutifs ou supplémentaires et singulièrement les coûts de livraison, de montage ou de
transformation.

La garantie est exclue dans les cas suivants :
- La notice de montage n’a pas été respectée,
- Le produit a été modifié (par des pièces rapportées ou des transformations) par rapport à ce
qui est dit dans la notice de montage,
- Les limites de charge indiquées (par exemple le poids de la neige etc) ont été dépassées,
- Le produit weka a été monté sur des mauvaises fondations (dalle, plancher ou autre) et
notamment en cas de non respect des règles de construction,
- L’entretien du bois a été négligé ou est insuffisant (entretien : protection du bois, peinture,
etc.).
- Le vent de force supérieure à 7, les catastrophes naturelles ou des manifestations de violence
ont endommagé le produit weka.
- Le défaut consiste en des modifications inhérentes à la nature du matériau « bois », comme
par exemple les changements de couleur caractéristiques pour le bois, les fissures, le
gauchissement, le rétrécissement, ou le gonflement ou autres.
Le recours à la garantie ne peut se faire qu’avec le bordereau de colisage d’origine et le document
d’achat d’origine pendant la période de garantie par écrit, par fax ou par courriel. Il est subordonné à
la dénonciation immédiate du vice ou du défaut sous forme d’une description explicite du dommage
par le texte et l’image.
Le recours à la garantie sera adressé à :
weka Holzbau GmbH, Johannesstrasse 16, 17034 Neubrandenburg
Télécopie : 0395/42908-83; e-Mail : info@weka-holzbau.com
ATTENTION ! En cas de rajout d'éléments de parois, d'espaces de stockage, de locaux à outils
ou autres revêtements de parois, il est absolument nécessaire d'assurer une circulation de l'air
permanente sous toute la surface des panneaux de toit afin d'éviter tout endommagement de
ces derniers dû à une accumulation de chaleur.
Veiller par ailleurs à respecter un espace minimum d'env. 20 cm entre le haut des parois et les
panneaux de toit.
Conditions de montage pour l'équipe de montage weka
Si vous décidez de vous faire aider pour le montage et que vous faites appel à l'équipe de montage
weka, weka Holzbau GmbH prendra en charge les éléments suivants à votre place :
Le montage, ce qui signifie l'assemblage conforme aux instructions (montage) des pièces détachées
livrées pour la marchandise sans application de produit, la livraison et le montage des accessoires.
Les raccordements électriques ne sont pas compris dans les prestations de montage.
La marchandise à installer doit se trouver sur le lieu de montage/d'implantation/de pose. Le transport
de l'article ou des pièces détachées à une distance de plus de 10 - 15 m ou à un autre étage n'est pas
compris dans le prix du montage. Le sous-sol doit être solide, horizontal et plan.
En cas de doute sur la planéité, voir : DIN 18202 "Toleranzen im Hochbau" (Tolérances pour les
constructions), tableau 3, ligne 3, avec une différence de hauteur maximale entre les points les plus
éloignés de 10 à 11 mm.
Tous les travaux préparatoires doivent avoir été faits avant le montage conformément aux règles de
l'art. Les sous-sols/planchers/fondations réalisés par vous-même doivent être appropriés pour le
montage.
Remarques – Panneaux de toit
Les panneaux de toit doivent être entreposés sous abri avant le montage ou protégés du soleil !
L'utilisation de film blanc est particulièrement adaptée. L'empilement de panneaux peut
conduire à une accumulation de chaleur qui, par effet de loupe, entraîne une déformation et une
décoloration des panneaux.

Techn. Änderungen vorbehalten! Alle Maßangaben sind ca. Maße. Copyright HRB3662
1
Les panneaux ne doivent pas être montés par une température inférieure à +5°C ou supérieure
à 30°C.
Pour garantir l'étanchéité de votre abri-garage, utiliser de la silicone (non fournie) pour la pose
des panneaux, cf. p. 30.
Pré-percer les panneaux de toit à d = 10 mm !
Attention, les panneaux sont vissés sur les pannes avant et arrière (pos.3) tous les deux
sommets et sur les pannes centrales (pos.3) tous les trois sommets. Fig. p. 31
Utiliser les écarteurs (pos. 19) suivant la fig. p. 31 !
Les vis ne doivent pas être trop serrées pour permettre aux panneaux de travailler.
Attention : Ne pas installer de faux plafond ou d'isolation thermique sous les panneaux de toit.
Une aération suffisante est absolument indispensable sous les panneaux de toit !
Outil
Pour le montage, nous vous recommandons de préparer les outils suivants.
(N'est pas compris dans la fourniture!)
Décamètre à ruban Niveau à bulle Crayon Scie à denture fine Perceuse
visseuse alésoir conique serre-joint Clé silicone
élecktrique
= Entreé
Il est conseillé de vérifier et de resserrer les assemblages vissés à intervalles réguliers. Ce produit est
essentiellement fabriqué en bois massif. Le bois étant un matériau naturel, il se peut que des
conditions climatiques extrêmes, notamment après de longues périodes de chaleur, entraînent la
formation de fentes de sécheresse. Ces fentes de sécheresse ne constituent en aucun cas un défaut
de qualité, mais un phénomène naturel. Selon la situation météorologique, ces fentes peuvent se
refermer quasi-intégralement.
De plus, ces fentes de sécheresse, qui apparaissent dans le bois dans le sens de la longueur,
n'exercent aucune influence sur la solidité et la résistance du matériau. Autrement dit, les propriétés
statiques ne sont pas affectées.
Protection du bois
Cet article est en bois brut naturel. Il est impératif d’entretenir et de protéger le bois régulièrement.
Veuillez vous renseigner auprès d'un spécialiste du bois pour connaître les traitements appropriés.
Les mesures de protection du bois sont à effectuer par le client, sous sa propre responsabilité.
Aucune garantie ne peut être accordée si le bois n’a pas été protégé selon les règles. Veuillez
également vous reporter aux dispositions correspondantes de nos déclarations de garantie.
Nous vous souhaitons beaucoup de plaisir avec votre produit weka !

- it -
Egregi clienti,
ci congratuliamo con voi per avere scelto un prodotto weka.
Prima del montaggio leggete con cura le presenti istruzioni al fine di evitare errori di montaggio o
danni.
IMPORTANTE !
Controllate subito con l'ausilio della lista di imballaggio che il prodotto weka sia stato
fornito completo e senza danni.
Vi preghiamo di conservare la lista di imballaggio solo alla scadenza del periodo di garanzia.
Questa lista serve per controllare la completezza della fornitura e deve essere conservata insieme
allo scontrino. Con l'ausilio della lista è possibile risolvere eventuali reclami. I numeri di posizione
della lista di imballaggio non corrispondono con i numeri di posizione delle seguenti istruzioni di
montaggio.
Raccomandiamo di eseguire il montaggio in 2 persone.
Ci riserviamo di apportare modifiche ai fini del progresso tecnologico. Per tale motivo è possibile
che nelle rappresentazioni vengano a crearsi lievi differenze.
Non gettare via il materiale di imballaggio! La carta, il cartone normale e ondulato cosìccome gli
imballaggi in plastica devono essere smaltiti negli appositi contenitori di raccolta.
RACCOMANDAZIONI
Per evitare danni agli elementi in legno si raccomanda di preforare tutti i punti di avvitaggio a vite!
Il presente simbolo richiama la vostra attenzione su tale particolare nel corso delle istruzioni:
Per un corretto montaggio statico è necessario ancorare i montanti nelle fondamenta in
calcestruzzo con supporti ad H. I supporti dei montanti sono disponibili come accessorio weka su
sovraprezzo.
Per uno schema delle fondamenta rivolgetevi al vostro rivenditore specializzato!
Per facilitare l'allineamento dell'elemento di ancoraggio ad H contrassegnate le necessarie
distanze fra i montanti con un regolo e fissate in tali punti gli elementi di ancoraggio per mezzo di
morsetti.
Successivamente inserite gli elementi di ancoraggio ad H nei pozzetti di fondamenta creati in
precedenza, rispettando una distanza di 2 cm fra il bordo superiore delle fondamenta e la traversa
superiore.
L'inclinazione del tetto necessaria (1% verso il retro) può essere raggiunta variando l'altezza del
supporto del montante. L'inclinazione necessaria può essere raggiunta anche alternativamente
accorciando i montanti.
Dopo aver riempito i pozzetti con calcestruzzo C25/30, le fondamenta devono asciugare per
almeno 3 giorni.
Avvertenze di sicurezza
Per la prevenzione di infortuni è necessario evitare la presenza di bambini nelle immediate vicinanze
dei lavori di montaggio.
Evitare la presenza di bambini sotto i 14 anni entro un raggio di 3 m dal cantiere di montaggio.
Rispettate i regolamenti antifortunistici e per la sicurezza sul luogo di lavoro. Informatevi presso un
tecnico.
Calpestate solo i listoni del tetto che distribuiscono il carico.

Techn. Änderungen vorbehalten! Alle Maßangaben sind ca. Maße. Copyright HRB3662
1
Durante i lavori al tetto prevenire il pericolo di cadute rispettando la normativa antinfortunistica vigente
(ad es. installazione di armature, protezioni contro le cadute).
Concordare le necessarie misure e condizioni di lavoro con un tecnico locale o con l’ente pubblico
responsabile della sicurezza sul lavoro. Lavorare sempre con aiutanti!
Consigliamo di indossare scarpe e guanti antinfortunistici quando disimballate i singoli componenti di
legno e durante il montaggio della casetta e occhiali di protezione quando trapanate e segate.
In caso di carichi di neve elevati (maggiori a 1,25kN/m² o con neve alta ca. 30cm) il tetto deve essere
liberato.
Trasporto e stoccaggio
Il prodotto vi verrà consegnato impilato su pallet.
Dopo il disimballaggio e i controlli trattate i componenti come segue:
Proteggete il legno da
esposizione prolungata
ai raggi solari diretti umidità contatto con il terreno
Le conseguenze di uno stoccaggio errato sono: - screpolature
- torsione e incurvamento
- putrefazione (infestazione di parassiti etc.)
Conservate il legno al riparo dalle intemperie e
garantite sempre un'aerazione costante!
Condizioni di garanzia di weka Holzbau GmbH
Concediamo alle seguenti condizioni – tuttavia soltanto sulle parti in legno dei nostri prodotti (qui di
seguito designate prodotto weka), non sui componenti o gli elementi del prodotto weka a queste
collegati – una garanzia di funzionalità di 5 anni dalla data di consegna. Per tutta la durata della
garanzia sostituiamo, a nostra discrezione, le parti difettose o mancanti della merce o la merce stessa.
La portata della garanzia comprende esclusivamente la sostituzione gratuita della parte in legno
guasta o difettosa. La garanzia non copre invece i costi conseguenti o aggiuntivi, in particolare le
spese di consegna, installazione e modifica.
La garanzia è esclusa se:
- non ci si è attenuti alle istruzioni per il montaggio,
- sono state apportate modifiche (aggiunte o cambiamenti) al prodotto rispetto alle istruzioni per
il montaggio,

Techn. Änderungen vorbehalten! Alle Maßangaben sind ca. Maße. Copyright HRB3662
2
- sono stati superati i limiti di sollecitazione indicati (ad es. carico da neve ecc.),
- le fondazioni del prodotto weka sono state realizzate in maniera non corretta (fondamenta /
piastra base o similare), in particolare se sono state violate le regole dell'architettura,
- il legno non è stato curato o è stato curato in misura insufficiente (manutenzione: protettivo o
vernice per legno ecc.),
- velocità del vento superiori a forza 7, catastrofi naturali o azioni violente che hanno causato il
danno al prodotto weka,
- il difetto consiste in alterazioni cromatiche, crepe, imbarcamenti, ritiri, rigonfiamenti o simili
modificazioni che sono normali, in quanto legate alla natura del materiale „legno“.
I diritti di garanzia possono essere fatti valere soltanto unitamente alla distinta di imballo originale e al
giustificativo d'acquisto originale e devono essere rivendicati per iscritto oppure mediante fax o e-mail
entro la durata della garanzia. Premessa per la rivendicazione è la tempestiva segnalazione del difetto
o del danno sotto forma di rappresentazione ordinata dello stesso tramite testo e figure.
Le richieste di garanzia devono essere rivolte a:
weka Holzbau GmbH, Johannesstraße 16, 17034 Neubrandenburg
Fax: 0395/42908-83; e-mail: info@weka-holzbau.com
ATTENZIONE! Nel montaggio degli elementi da parete, dei portattrezzi, dei ripostigli o di altri
rivestimenti delle pareti è assolutamente necessaria una ventilazione costante e su tutti i
pannelli del tetto, poiché altrimenti si potrebbe verificare dell’accumulo di calore e un
danneggiamento dei pannelli.
Inoltre, sopra le pareti deve essere consentita una distanza minima di ca. 20 cm fino ai pannelli
del tetto.
Condizioni di montaggio per weka – squadra di montaggio
Se avete bisogno di aiuto per il montaggio e chiamate perciò una squadra di montaggio weka, weka
Holzbau GmbH interverrà alle seguenti condizioni:
Per montaggio si intende l’assemblaggio conforme alle istruzioni (installazione) dei singoli componenti
forniti senza verniciatura, consegna e montaggio di accessori o parti di accessori. L’allacciamento
elettrico non è compreso nel montaggio.
I pezzi da montare devono trovarsi sul luogo/superficie/terreno di montaggio. Il trasporto dell’articolo o
del componente singolo per oltre 10 - 15m all’aperto o su un altro piano non è incluso nel prezzo di
montaggio. La base di appoggio deve essere stabile, orizzontale e piana.
In caso di dubbio spianare il terreno in case a: DIN 18202 "Tolleranze di planarità nell'edilizia", tab.3,
riga 3, con una differenza massima di livello tra i due punti più lontani da ca. 10 a 11mm.
Tutti i lavori preparatori devono essere eseguiti allo stato dell’arte prima dell’inizio del montaggio. I
sottofondi/pavimenti/le fondamenta che avete preparato o scelto devono essere idonei per il
montaggio.
Istruzioni – Piastre del tetto
Prima dell’assemblaggio, le piastre vanno conservate in un luogo riparato o lontano dalla luce
solare diretta! A tale scopo, si presta particolarmente bene un telone bianco. In caso di
sovrapposizione di più piastre, può verificarsi un ritardo nella trasmissione del calore, che può a
sua volta causare un effetto di focalizzazione, con conseguenti deformazioni o alterazioni del
colore!
L’assemblaggio delle piastre non va eseguito in presenza di temperature inferiori ai +5°C o
superiori ai 30°C.
Per garantire la tenuta stagna del vostro Carport, va impiegato del silicone (non incluso nella
partita) per l’installazione delle piastre - si veda pag.30.
I fori per l’installazione delle piastre del tetto devono avere un diametro di = 10 mm!

Techn. Änderungen vorbehalten! Alle Maßangaben sind ca. Maße. Copyright HRB3662
3
Vi preghiamo di considerare, che il collegamento a vite delle piastre sull’arcareccio anteriore e
posteriore (Pos.3) si trova ogni due creste, e quello sull’arcareccio centrale (Pos.3) ogni tre
creste. Figura a pag. 31.
Impiegate i distanziatori (Pos. 19) in conformità alla figura a pag.S.31!
Vi preghiamo di considerare che le viti non vanno strette troppo, per consentire il funzionamento
delle piastre.
Attenzione: Sotto le piastre del tetto non è consentito inserire tramezzi o materiali isolanti. È
assolutamente necessario garantire un’adeguata ventilazione al di sotto delle piastre del tetto!
Utensile
Prima di iniziare con il montaggio tenere a portata di mano i seguenti utensili.
(Non compreso nella fornitura!)
metro a nastro livella ad acqua Matita sega fine trapano
avvitatore trapano conico morsetto chiave silicone
elettrico
= Ingresso
Si raccomanda di controllare periodicamente tutti i collegamenti a vite e di riserrarli all'occorrenza.
Questo prodotto è prevalentemente realizzato con legno massiccio e poiché nel materiale legno si
tratta di un prodotto naturale, in seguito a condizioni atmosferiche estreme, in particolare durante i
lunghi periodi estivi, non è da escludere una formazione di fessure di essiccamento. Queste fessure di
essiccamento non sono in nessun caso un difetto di qualità, bensì un fenomeno naturale. A seconda
delle condizioni atmosferiche queste fessure possono di nuovo chiudersi, lasciando soltanto uno
spiraglio minimo.Inoltre, queste fessure di essiccamento, che si formano in senso longitudinale sul
legno, non hanno alcun influsso sulla stabilità e sul carico del materiale. Ciò significa che non vengono
in alcun modo pregiudicate le caratteristiche statiche.
Protezione del legno
Il prodotto è composto dalla materia prima naturale del legno che rende le misure di protezione del
legno assolutamente necessarie. Per il trattamento di protezione del legno a regola d’arte rivolgersi ad
un esperto di protezione del legno.
Le misure di protezione del legno devono essere eseguite dal cliente sotto la sua responsabilità.
Senza protezione del legno prescritta non può essere assunta nessuna garanzia. Osservare anche le
disposizioni al riguardo nelle nostre dichiarazioni di garanzia.
In bocca al lupo con il montaggio e buon divertimento con il vostro prodotto weka!


Techn. Änderungen vorbehalten! Alle Maßangaben sind ca. Maße. Copyright HRB 3662
5
de
STÜCKLISTE
en Parts list
fr liste des pièces
it lista pezzi
Stück
Pos Bild Abmessung 617.3279 618.6079
120 / 120 / 2150 10 15
60 / 120 / 2550 4 6
60 / 120 / 3000 2 3
40 / 120 / 3140 12 24

Techn. Änderungen vorbehalten! Alle Maßangaben sind ca. Maße. Copyright HRB 3662
6
Stück
Pos Bild Abmessung 617.3279 618.6079
40 / 120 / 500 4 6
20 / 120 / 3000 8 8
20 / 120 / 3220 1 2
20 / 120 / 2140 4 4
1090 x 2400 x 1,4 3 6
This manual suits for next models
1
Table of contents
Languages:
Other Weka Tent manuals
Popular Tent manuals by other brands

kmda
kmda ICE RUNNER FISH HOUSE Assembly instructions

GigaTent
GigaTent Princess Tower owner's manual

Sun Hut
Sun Hut Fortress 45 instructions

Bell Tent
Bell Tent Pro Porch and Connector Setting up

Freespirit Recreation
Freespirit Recreation High Country Premium Series instruction manual

Big Sky
Big Sky Revolution 1.5P quick start guide

skandika outdoor
skandika outdoor SHOWER Assembly instructions

Reimo
Reimo HOOGE AIR 480 quick start guide

Crivit Beach
Crivit Beach 86428 Operation and safety notes

Kiwi Camping
Kiwi Camping Takahe 15 Pitching instructions

toolport
toolport XXL Wikinger VARIO PREMIUM Assembly instruction

UK Tents
UK Tents PROFESSIONAL Series quick start guide