EQUIPMENT
CAMPING
1. Clear your site making sure there are
no sharp objects. Try to choose a site
that is flat and clear.
2. Sort the poles into their matching
colour. Once sorted, connect each
colour pole length together as per the
pole chart.
3. Spread your tent out with floor facing
down. The front is the end with the
large awning roof attached.
4. Peg out the four corners of the tent.
Pull the floor as tight as possible. To
ensure the floor sits flat it may be easier
to peg in the following sequence. Pegs
should be at a 45o angle away from the
tent for greatest hold.
5. Peg out the remaining peg points
ensuring the floor sits flat.
6. Open all doors and windows. This
allows air to enter the tent and makes
pitching easier.
7. Thread the BLUE E1 pole through the
sleeve that runs along the RHS of the
tent. Thread the poles from the rear of
the tent inserting the pole through the
black webbing loop before threading
through the pole sleeve and place
behind the button pin on the pole.
8. At the front of the tent thread the
BLUE E2 pole up through the pole
sock on the side of the front awning
from the inside to the outside. Thread
through the black webbing loop
before inserting into the pole sleeve
and connecting to the E1 pole. Loop
webbing over button pin.
9. Cover the pole by wrapping the end of
the pole sleeve over the pole sock and
attach the Velcro.
10. Repeat with the GREEN pole
11. Insert the remaining BLUE EA and EB
poles into the end of each section and
raise the pole so that the outside wall
sits taught. You will need two people
to do this.
15) Repeat with the second BLACK
RA/RB pole at the front of the tent.
Thread the RB pole through the
outermost of the 3 holes on the
BLACK R3 pole. If the roof is too tight
move back one hole before threading
through the eyelet in the roof. Ensure
the end of the BLACK R3 pole
extends out the pocket on the front
wall. Attached the Velcro strips on the
front wall around the pole
17) Insert BLACK R4 / R5 pole
into the end of the R3 pole that
extends through the pole sock at
the front of the tent.
1) Clear your site making sure there
are no sharp objects. Try to choose
a site that is flat and clear.
2) Sort the poles into their matching
colour. Once sorted, connect each
colour pole length together as per
the pole chart.
3) Spread your tent out with floor
facing down. The front is the end
with the large awning roof
attached.
4) Peg out the four corners of the
tent. Pull the floor as tight as
possible. To ensure the floor sits flat
it may be easier to peg in the
following Sequence. Pegs should
be at a 45oangle away from the
tent for greatest hold.
7) Thread the BLUE E1 pole
through sleeve that runs along the
RHS of the tent. Thread the poles
from the rear of the tent inserting
the pole through the Black
webbing loop before threading
through the pole sleeve and place
behind the button pin on the pole.
EB
EA
EB
EA
9) Cover the pole by wrapping the
end of the pole sleeve over the
pole sock and attach the Velcro.
11) Insert the remaining BLUE EA
and EB poles into the end of each
section and raise the pole so that
the outside wall sits taught. You will
need two people to do this.
5) Peg out the remaining peg
points ensuring the floor sits flat.
#1
#2
#3 #4
8) At the front of the tent thread
the BLUE E2 pole up through the
pole sock on the side of the front
awning from the inside to the
outside. Thread through the Black
webbing loop before inserting into
the pole sleeve and connecting to
the E1 pole. Loop webbing over
Button Pin.
6) Open all doors and windows.
This allows air to enter the tent and
makes pitching easier
10) Repeat with the GREEN pole
RA
RB
13) Thread the BLACK R1 to R3
poles inside the tent by threading
through the pole sock at the top of
the Front wall.
14) Insert the BLACK RB/RA
pole into the hole at the end of the
R1 pole and then through the
eyelet at the rear of the roof and
extend until the wall sits tight.
Attach the Velcro strips on the rear
wall.
12) Repeat with the GREEN EA
and EB poles.
RA
RB
16) Place white “Witch Hat”
washers onto pole spikes of bothe
RB poles to prevent water running
down during heavy rain.
R3
R1
E1
E1
E2
E1 E2
EB
EA
EB
EA
R2
R3 R1
R5 R4
ATLAS
///////// CANVASSERIES
FREEDOM CAMPING
BY
12. Repeat with the GREEN EA and EB
poles.
13. Thread the BLACK R1 to R3 poles inside
the tent by threading through the pole
sock at the top of the front wall.
14. Insert the BLACK RB/RA pole into the
hole at the end of the R1 pole and then
through the eyelet at the rear of the
roof and extend until the wall sits tight.
Attach the Velcro strips on the rear wall.
15) Repeat with the second BLACK
RA/RB pole at the front of the tent.
Thread the RB pole through the
outermost of the 3 holes on the
BLACK R3 pole. If the roof is too tight
move back one hole before threading
through the eyelet in the roof. Ensure
the end of the BLACK R3 pole
extends out the pocket on the front
wall. Attached the Velcro strips on the
front wall around the pole
17) Insert BLACK R4 / R5 pole
into the end of the R3 pole that
extends through the pole sock at
the front of the tent.
1) Clear your site making sure there
are no sharp objects. Try to choose
a site that is flat and clear.
2) Sort the poles into their matching
colour. Once sorted, connect each
colour pole length together as per
the pole chart.
3) Spread your tent out with floor
facing down. The front is the end
with the large awning roof
attached.
4) Peg out the four corners of the
tent. Pull the floor as tight as
possible. To ensure the floor sits flat
it may be easier to peg in the
following Sequence. Pegs should
be at a 45oangle away from the
tent for greatest hold.
7) Thread the BLUE E1 pole
through sleeve that runs along the
RHS of the tent. Thread the poles
from the rear of the tent inserting
the pole through the Black
webbing loop before threading
through the pole sleeve and place
behind the button pin on the pole.
EB
EA
EB
EA
9) Cover the pole by wrapping the
end of the pole sleeve over the
pole sock and attach the Velcro.
11) Insert the remaining BLUE EA
and EB poles into the end of each
section and raise the pole so that
the outside wall sits taught. You will
need two people to do this.
5) Peg out the remaining peg
points ensuring the floor sits flat.
#1
#2
#3 #4
8) At the front of the tent thread
the BLUE E2 pole up through the
pole sock on the side of the front
awning from the inside to the
outside. Thread through the Black
webbing loop before inserting into
the pole sleeve and connecting to
the E1 pole. Loop webbing over
Button Pin.
6) Open all doors and windows.
This allows air to enter the tent and
makes pitching easier
10) Repeat with the GREEN pole
RA
RB
13) Thread the BLACK R1 to R3
poles inside the tent by threading
through the pole sock at the top of
the Front wall.
14) Insert the BLACK RB/RA
pole into the hole at the end of the
R1 pole and then through the
eyelet at the rear of the roof and
extend until the wall sits tight.
Attach the Velcro strips on the rear
wall.
12) Repeat with the GREEN EA
and EB poles.
RA
RB
16) Place white “Witch Hat”
washers onto pole spikes of bothe
RB poles to prevent water running
down during heavy rain.
R3
R1
E1
E1
E2
E1 E2
EB
EA
EB
EA
R2
R3 R1
R5 R4
ATLAS
///////// CANVASSERIES
FREEDOM CAMPING
BY
15. Repeat with the second BLACK RA/RB
pole at the front of the tent. Thread the
RB pole through the outermost of the 3
holes on the BLACK R3 pole. If the roof
is too tight move back one hole before
threading through the eyelet in the
roof. Ensure the end of the BLACK R3
pole extends out through the pocket
on the front wall. Attached the Velcro
strips on the front wall around the pole.
16. Place white “Witch Hat” spike washers
onto pole spikes of both RB poles to
prevent water running down during
heavy rain.
17. Insert the BLACK R4/R5 pole into
the end of the R3 pole that extends
through the pole sock at the front of
the tent.
15) Repeat with the second BLACK
RA/RB pole at the front of the tent.
Thread the RB pole through the
outermost of the 3 holes on the
BLACK R3 pole. If the roof is too tight
move back one hole before threading
through the eyelet in the roof. Ensure
the end of the BLACK R3 pole
extends out the pocket on the front
wall. Attached the Velcro strips on the
front wall around the pole
17) Insert BLACK R4 / R5 pole
into the end of the R3 pole that
extends through the pole sock at
the front of the tent.
1) Clear your site making sure there
are no sharp objects. Try to choose
a site that is flat and clear.
2) Sort the poles into their matching
colour. Once sorted, connect each
colour pole length together as per
the pole chart.
3) Spread your tent out with floor
facing down. The front is the end
with the large awning roof
attached.
4) Peg out the four corners of the
tent. Pull the floor as tight as
possible. To ensure the floor sits flat
it may be easier to peg in the
following Sequence. Pegs should
be at a 45oangle away from the
tent for greatest hold.
7) Thread the BLUE E1 pole
through sleeve that runs along the
RHS of the tent. Thread the poles
from the rear of the tent inserting
the pole through the Black
webbing loop before threading
through the pole sleeve and place
behind the button pin on the pole.
EB
EA
EB
EA
9) Cover the pole by wrapping the
end of the pole sleeve over the
pole sock and attach the Velcro.
11) Insert the remaining BLUE EA
and EB poles into the end of each
section and raise the pole so that
the outside wall sits taught. You will
need two people to do this.
5) Peg out the remaining peg
points ensuring the floor sits flat.
#1
#2
#3 #4
8) At the front of the tent thread
the BLUE E2 pole up through the
pole sock on the side of the front
awning from the inside to the
outside. Thread through the Black
webbing loop before inserting into
the pole sleeve and connecting to
the E1 pole. Loop webbing over
Button Pin.
6) Open all doors and windows.
This allows air to enter the tent and
makes pitching easier
10) Repeat with the GREEN pole
RA
RB
13) Thread the BLACK R1 to R3
poles inside the tent by threading
through the pole sock at the top of
the Front wall.
14) Insert the BLACK RB/RA
pole into the hole at the end of the
R1 pole and then through the
eyelet at the rear of the roof and
extend until the wall sits tight.
Attach the Velcro strips on the rear
wall.
12) Repeat with the GREEN EA
and EB poles.
RA
RB
16) Place white “Witch Hat”
washers onto pole spikes of bothe
RB poles to prevent water running
down during heavy rain.
R3
R1
E1
E1
E2
E1 E2
EB
EA
EB
EA
R2
R3 R1
R5 R4
ATLAS
///////// CANVASSERIES
FREEDOM CAMPING
BY
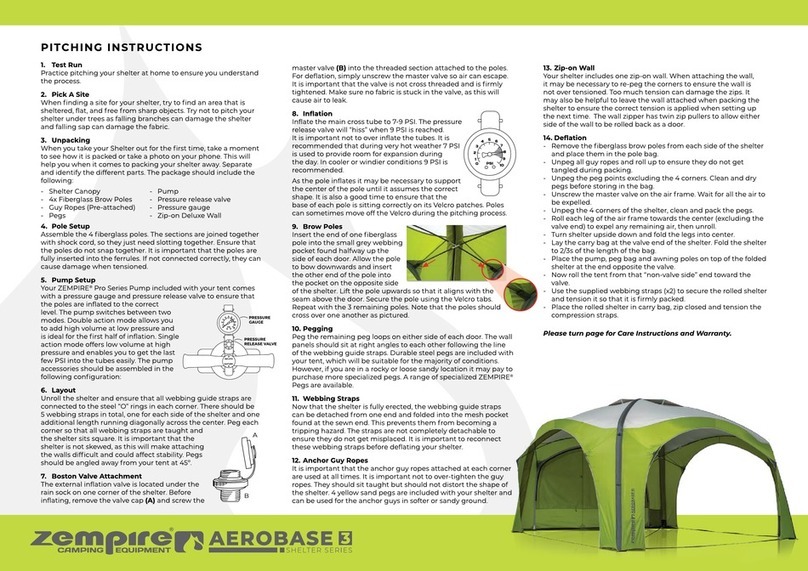
PITCHING INSTRUCTIONS
